# Dark Lab
# About the Dark Lab
[](https://wiki.cci.arts.ac.uk/uploads/images/gallery/2024-01/RHJj45UxgiI8Pmj7-darklab.webp)
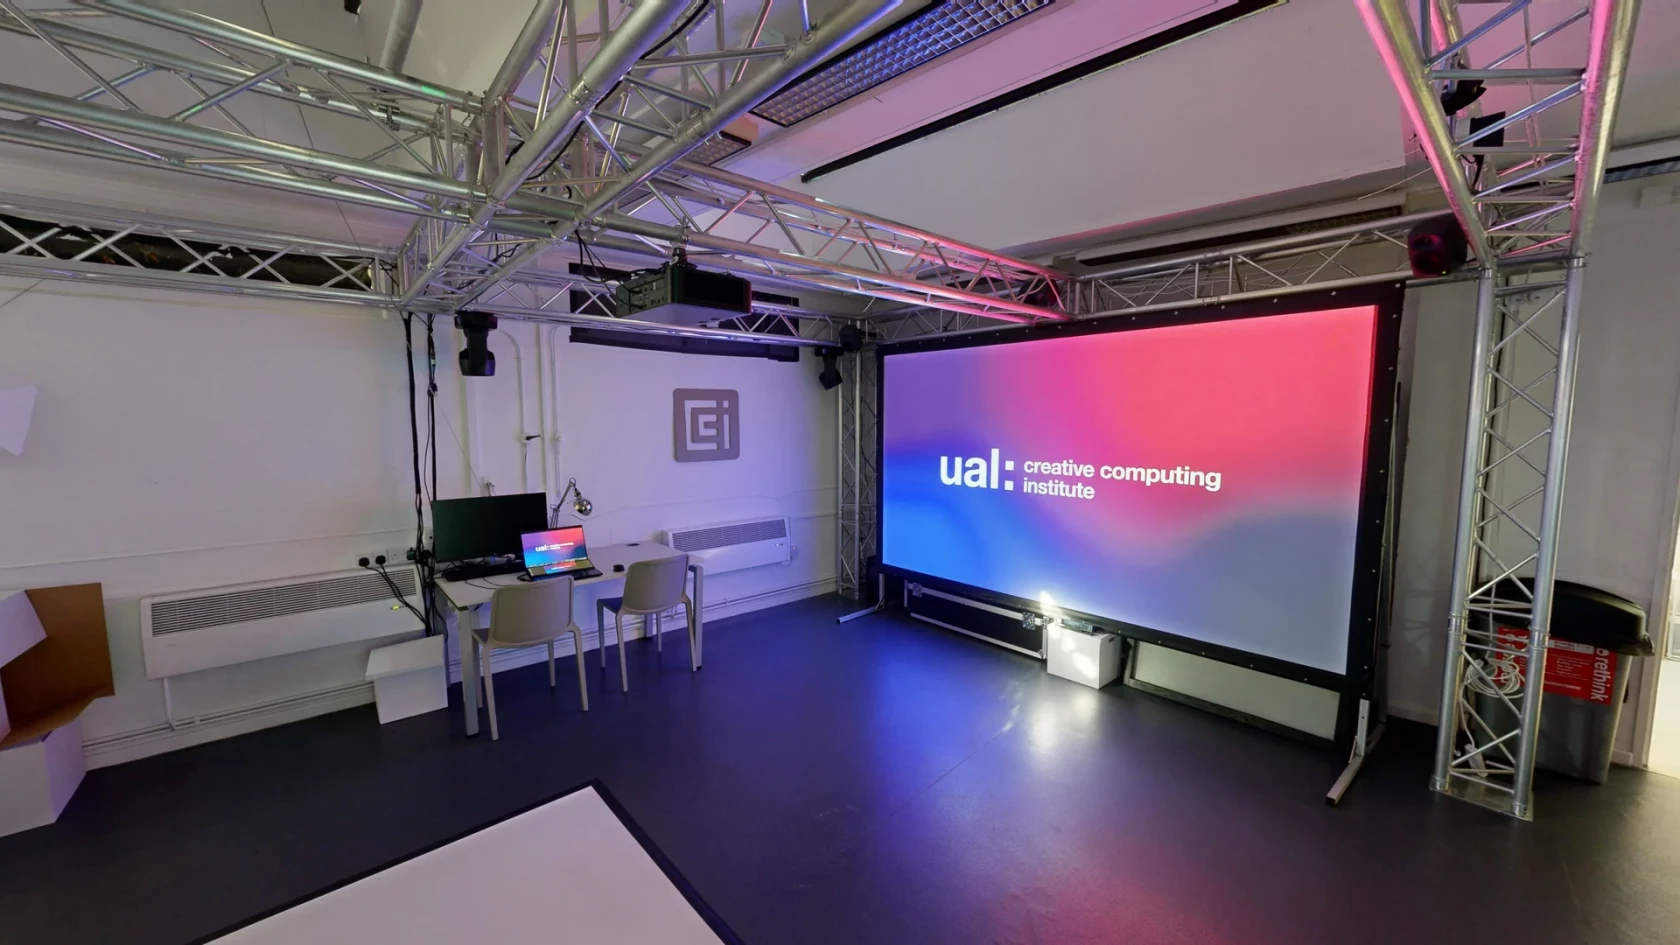
The **Dark Lab** is located on the Ground floor of Greencoat Building, in GB_G05.
This space can be made completely dark and features projectors, a multi-channel sound system, VR headsets, motion tracking, programmable lights, fast computers and much more!
It is a great space for working on interactive installations, performances, games, etc.
We aim to keep the Dark Lab open to all students, as a space to freely walk in and use.
However - we can only do this if everyone respects the equipment, the house rules below, and each other!
## House Rules
See the [House Rules](https://wiki.cci.arts.ac.uk/books/dark-lab/page/house-rules) that apply to using the lab, and never forget them ;p
## How to plug in to the equipment
See [here](https://wiki.cci.arts.ac.uk/books/dark-lab/chapter/equipment) on how to plug into the projectors, sound system, TV's, lights, etc.
## Booking the Lab
The Dark Lab is open to every student, every day within term time throughout the building opening hours.
Mind the [Lone Working Policy](https://wiki.cci.arts.ac.uk/books/about/page/lone-working-policy), as usual.
It ***can*** be booked through [ORB](orb.arts.ac.uk) - but please only do this in case you *really* need (part of) the lab to available at a specific time moment.
## The different areas of the lab
There are six computing stations, each with slightly different equipment hooked up.
**Area 1**:
‒ projector
‒ kinect
‒ 4-channel sound
‒ DMX lights
‒ PC (RTX 4090)
‒ 27" 3D display with head-tracking
**Area 2:**
‒ projector
‒ kinect
‒ 4-channel sound
‒ DMX lights
‒ PC (**RTX 5090**)
‒ 32" OLED display
**VR 1:**
‒ Meta Quest 3 VR/MR headset
‒ 65" TV
‒ PC (RTX 4090)
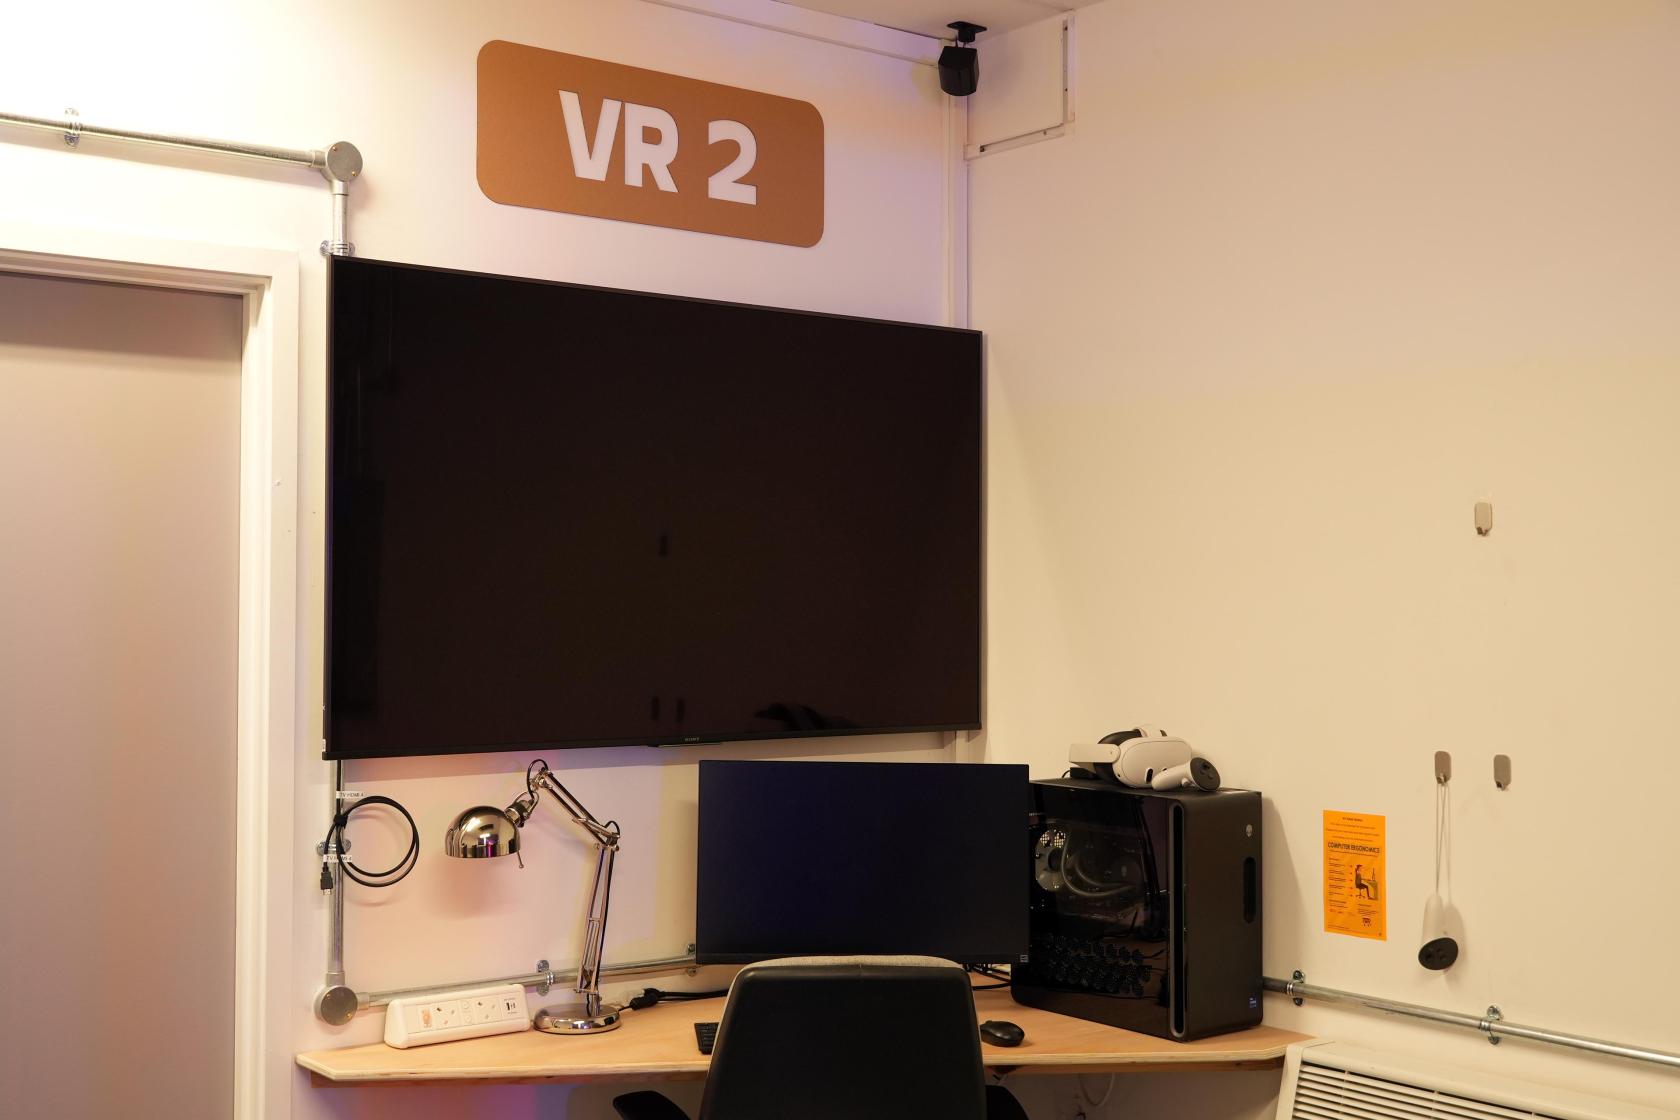
**VR 2:**
‒ Vive Pro 2 VR headset
‒ 65" TV
‒ PC (RTX **5090**)
‒ 32" OLED display
**Multi-Touch**
‒ 86" 4K multi-touch screen / electronic whiteboard
‒ PC (RTX 4090)
**PC Trolley**
‒ height adjustable trolley
‒ PC (RTX 4090)
‒ 27" 4K display
## Opening Hours
| | Open | Staffed |
| - | - | - |
| Weekdays | 09:00–21:00 | 11:00–19:00 |
| Saturday | 10:00–17:00 | Unstaffed |
| Sunday | Closed | Closed |
## Staff
 |
| Lieven van Velthoven |
| Creative Code Specialist Technician |
| he/him |
[](https://wiki.cci.arts.ac.uk/uploads/images/gallery/2025-09/Zl3Tr6sM1z5ZgjRo-cci-darklab-mapping-cubes-01.jpg)
# HOUSE RULES
### We welcome everyone to the Dark Lab!
The Lab is currently open to anyone (within term time).
**All we need to keep it that way** are some simple, yet important rules:
##### (0) Feel free to come in, and plug in!
we welcome everyone during building opening hours, within term time, to freely work in the lab. You might need to share it though! And as always, please keep the Lone Working Policy in mind.
##### (1) DO NOT MOVE or adjust the permanently installed equipment (just ask us!)
do not move or adjust the projectors and other equipment - a technician will be happy to do it for you!!
##### (2) DO NOT STAND on chairs, tables, or anything except the floor
if you want something attached to the truss grid, just ask a technician!
##### (3) DO NOT UNPLUG any cabling (unless clearly labeled and meant to be unplugged)
everything is fully set up and ready to go. If you are having any issues, please ask a technician!
##### (4) MIND YOUR STEP (and mind your head)
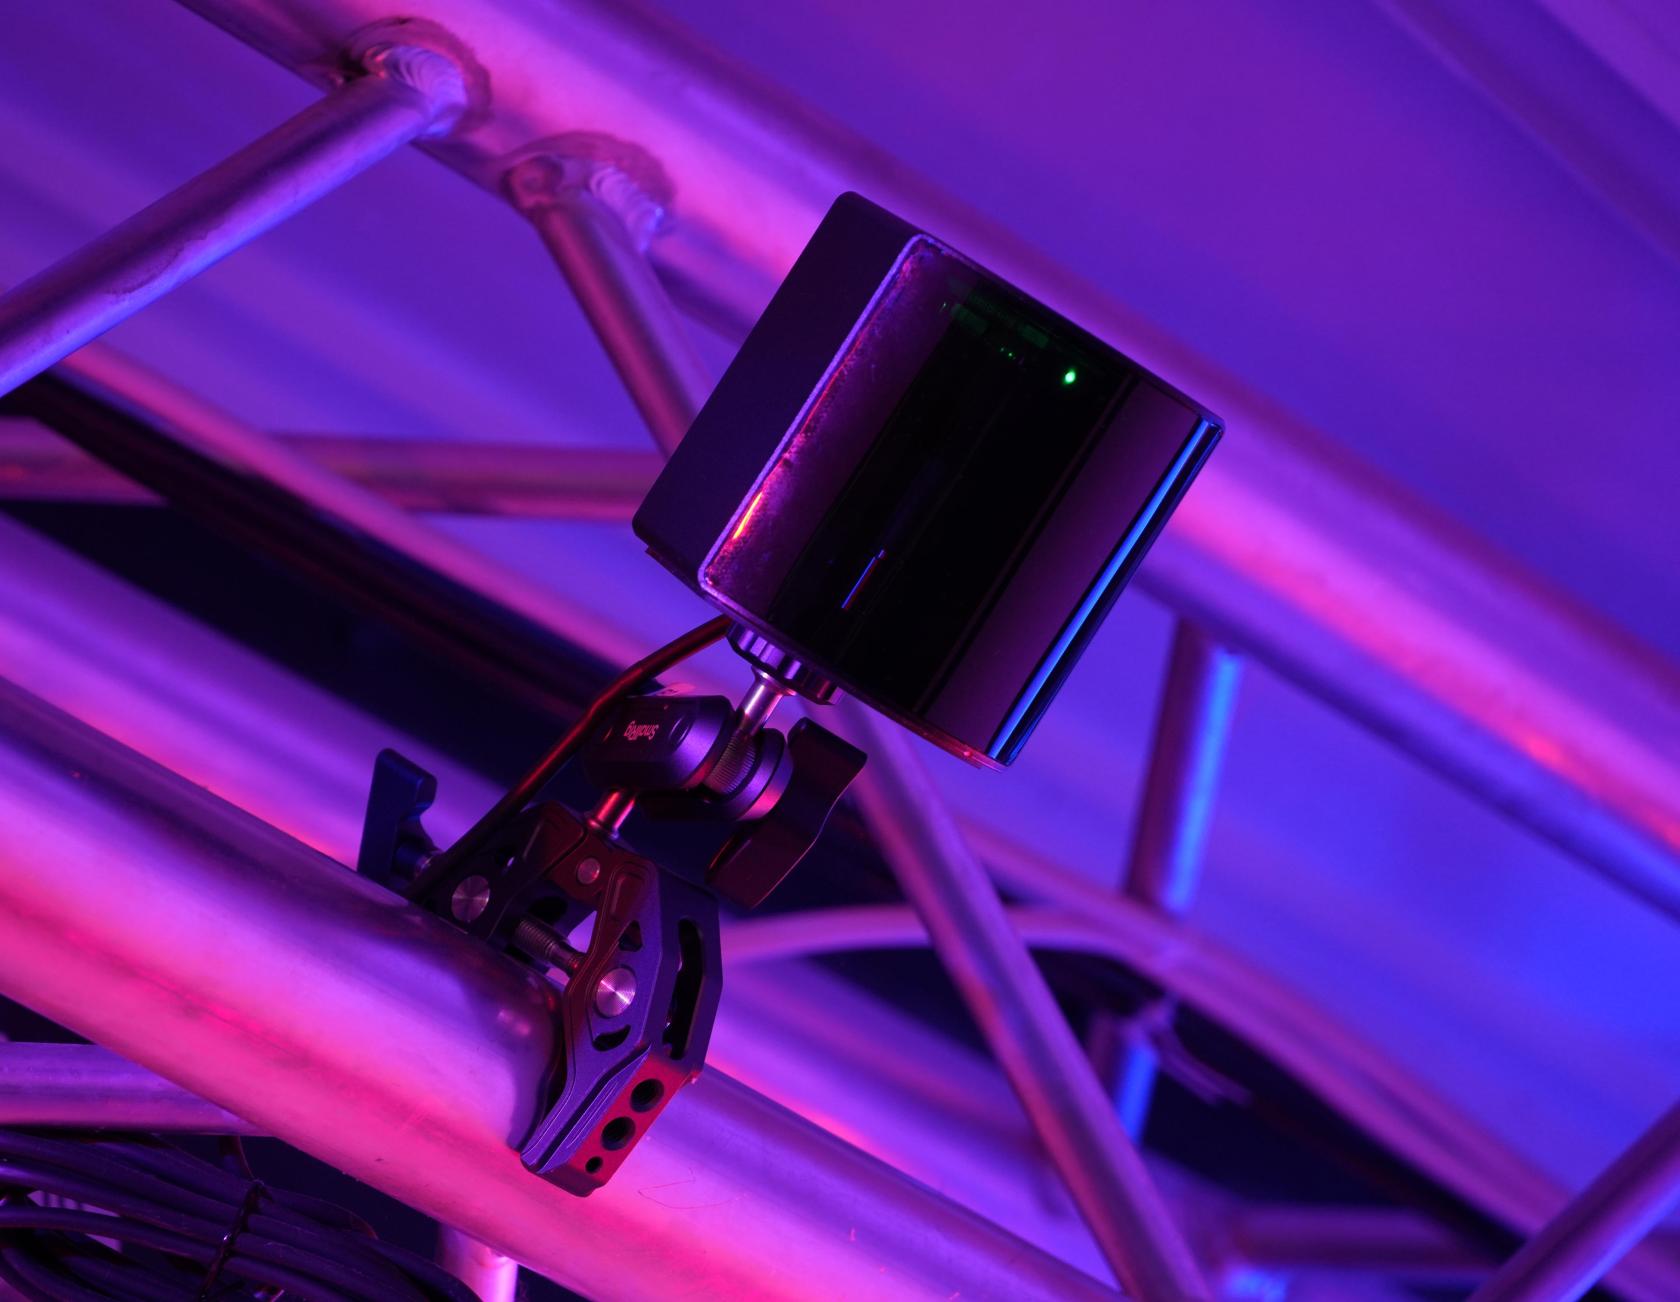
be careful not to bump into anything in the dark, like e.g. backing into a camera tripod (like I did!).
##### (5) BE MINDFUL OF OTHERS
please be accomodating to others wanting to use the Lab, and mindful of any ongoing classes nearby.
keep the volume down while others around - turn it up when they are gone!
if you have been spending a lot of time working there, please make way for anyeone new wanting to come in.
##### (6) NO GLUE, PAINT, OR OTHER CHEMICALS. No liquids, dust, or dirt (unless agreed with a technician)
sadly, this also includes smoke machines.
we generally try to minimize spills, dust, etc, but do feel free to come to us if you have ideas though!
for glues, paints, etc, you could see e.g. the Prototyping Lab in Greencoat.
##### (7) NO LASERS
sorry - massive health and safety issue in the general case. but do talk to us if you want to use lasers, we can look at the risks!
##### (8) LEAVE IT HOW YOU FOUND IT
please tidy up and return things to their place when you are done working in the lab. again, we need everyone's help in order to keep the Dark Lab freely accessible!
##### (9) DO NOT STORE THINGS IN THE LAB (unless agreed with a technician)
unfortunately, our space is limited... we also want the lab to be nice and clear for whoever comes in next.
do talk to us if you need to temporarily store your physical project!
##### (10) Book it for important occasions only
we try to keep it open to everyone, and do not want people to abuse the booking system.
then again, we do not want anyone to abuse the 'free to use' rule either...
so please make a booking if you really need to make sure it will be available, and honour other people's bookings.
# Equipment
# New Page
[](https://wiki.cci.arts.ac.uk/uploads/images/gallery/2025-02/MnMj9OIuCeYkZHFX-image-1739874864498-34-18.png)
We got the [VIVE Pro 2 headset](https://www.vive.com/uk/product/vive-pro2/overview/) and base stations, controllers (HTC Vive Controllers and VALVE INDEX Controllers), and trackers in the lab.
## Setup
*For the full official tutorial, please refer to: [VIVE Pro 2 Setup Video](https://www.youtube.com/watch?v=VAcPyq6UTws)*
For the UE4, please refer to: https://www.youtube.com/watch?v=mee_6vlWZ8c
---
## 1. Hardware Connections & Power Check
**Before powering on your PC: Ensure all devices are powered and connected**
- Headset, controllers, Lighthouse base stations, and the Vive link box should all be connected and displaying a solid green light.
- *Link box connections:*
- **DisplayPort cable** → Graphics card port
- **USB 3.0 cable** → PC USB port
- **Power adapter** → Mains socket (requires 9V/1.5A or above)
---
## 2. Software Setup
### Essential Installations
1. **Steam & SteamVR**
- Download and install the Steam client.
- Search for and install **SteamVR** from your Steam library.
2. **Room Tracking Configuration**
- Open SteamVR > **Room Setup**
- Base stations should be mounted at a height of at least 2m, positioned diagonally across the play area.
- *Controller pairing:* Press and hold the system button until the LED flashes blue → complete pairing via the SteamVR interface.
---
## 3. Unreal Engine 5 Integration
### Initial Project Setup
1. **Create a New VR Project**
- Template: `Games > Virtual Reality`
- Select `Blueprint` and `Starter Content` (for quick testing)
- **Tip:** Begin with a simple scene (e.g., an empty template) and gradually increase complexity.
2. **Enable Key Plugins**
- Go to `Edit > Plugins` and enable the following:
- **OpenXR** (recommended for SteamVR compatibility and future-proofing)
- **OpenXR Hand Tracking**
- **OpenXR Vive Tracker** (if using external trackers)
- **SteamVR** (required for the Vive Pro 2)
- **Oculus VR** (if Oculus headset compatibility is needed)
- **VR Expansion Plugin** (for advanced interaction features)
- *Restart UE5 to apply changes.*
3. **Optimise Project Settings**
- Open `Edit > Project Settings` and adjust the following:
- **Rendering**: Enable Forward Rendering and disable Mobile HDR.
- **XR Settings**: Tick `Start in VR` and enable `Motion Controller Support`.
These settings improve performance and ensure VR input responsiveness.
---
## 4. Testing & Troubleshooting
### Launching VR Preview
1. Click the dropdown next to the **Play** button (not the default **Play** mode) and select **VR Preview**.
2. Put on the headset to test real-time scene rendering.
---
### Common Issues & Checks
- **Device Not Detected:**
- Confirm cables are securely connected and devices are powered.
- Restart SteamVR or the PC if necessary.
- **Tracking Issues:**
- Ensure base stations are unobstructed and correctly positioned.
- Check for reflective surfaces or direct sunlight interfering with the sensors.
- **Performance Lag:**
- Lower rendering resolution or disable unnecessary plugins.
- Update graphics drivers and Unreal Engine to the latest stable version.
With these steps completed, your HTC Vive Pro 2 should be ready for Unreal Engine 5.2+
# Cameras and tripods
# Myo neural trackers
# Meta Quest 3 VR/MR headset
[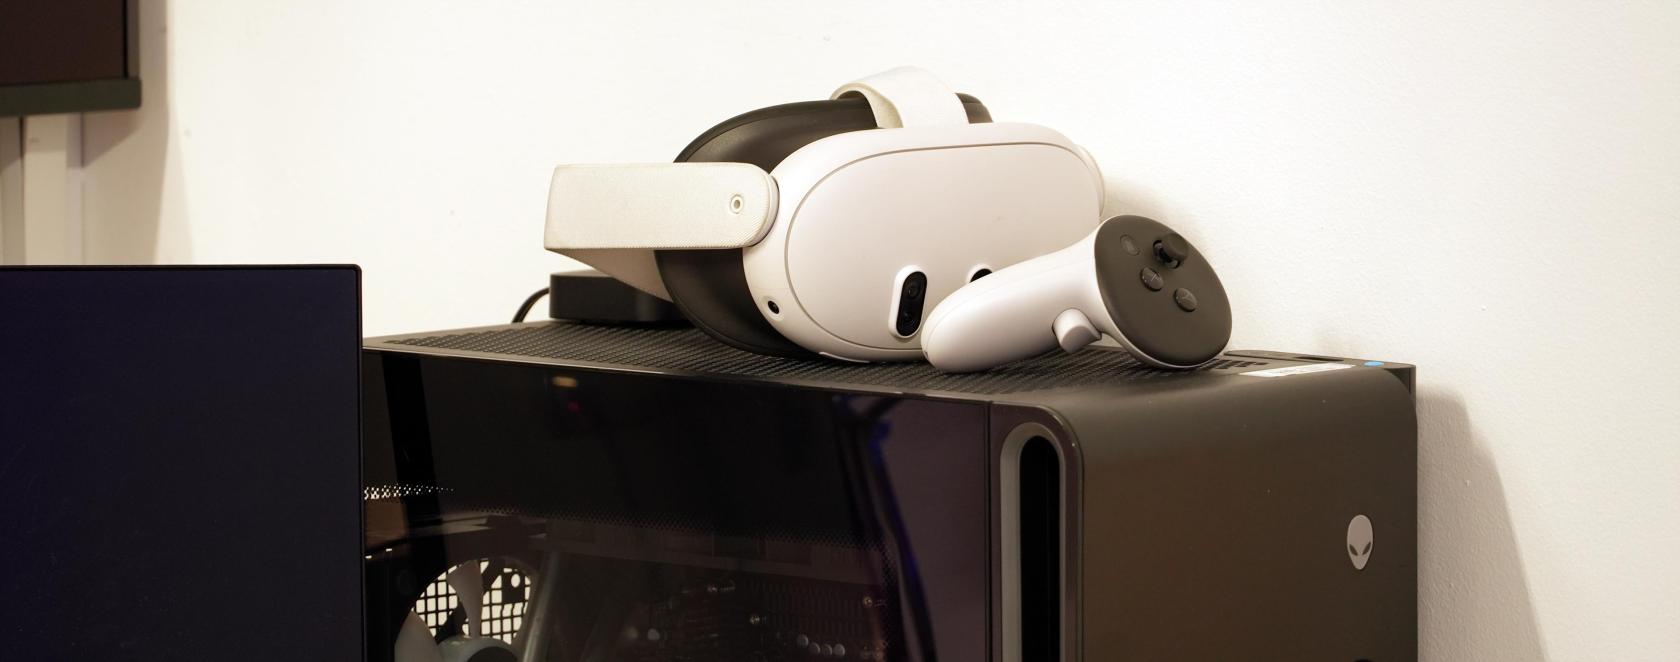](https://wiki.cci.arts.ac.uk/uploads/images/gallery/2025-09/HR4Z574WcRUklGMm-cci-darklab-quest3.jpg)
Meta's Quest 3 is an all-in-one standalone VR / MR headset, running on Android.
It can do untethered wireless Virtual Reality (or PCVR through a USB-C cable), but also Mixed Reality using its 'passthrough cameras' that let you see the real world while wearing the headset.
The Quest comes with two controllers - but also features full hand/finger tracking and gesture-based operation.
It has a built-in battery and relies on camera-based 'inside-out' tracking; i.e. you can use it just about anywhere!
It also has a built-in LiDAR sensor to aid in scanning the room, which makes setting up the safety boundary or Mixed Reality environments relatively easy.
Meta has an ecosystem of apps for you to explore, or contribute to.
There are great development tools and plugins available for the main game engines, 3D platforms and languages to do just that :)
We have one Quest 3 permanently available in the Dark Lab, a few more in High Holborn, and hopefully more will be coming to ORB in the near future.
#### Getting started
The Dark Lab Quest should be fully set up, and has a CCI account ready for you to use.
For other headsets, you will need to set them up first (i.e. get the Meta Horizon app on your phone, pair it to the headset, enable developer mode, etc.
See: [How to set up your Meta Quest 3](https://www.meta.com/en-gb/help/quest/10004693912934783/)
More [basic info here!](https://www.meta.com/en-gb/help/quest/1994971530885728/)
If this is your first time experiencing a headset like this, we recommend checking out:
~ 'First Encounters' - Meta's flagship Mixed Reality demo.
~ 'Theatre Elsewhere' - An open gallery of amazing 3D art, animations and short films all hand-drawn in VR.
~ 'VR Chat' - The *real* Metaverse! You don't need to chat if you just feel like exploring an infinite collection of crowd-sourced worlds.
Just to get a good sense of what this headset can do.
## Development
Loads of confusing (old) protocols, tools and terms - best to not Google too much but follow the how-to's & examples from Meta
Get the Developer Hub and start from there.
A good start in Unity is this one: [Unity Hello World for Meta Quest VR Headsets](https://developers.meta.com/horizon/documentation/unity/unity-tutorial-hello-vr/)
##### Meta Horizon App
##### Quest Link App
##### Meta Quest Developer Hub
##### Samples and demos
##### Building Android packages
##### Unity Play Mode with Quest Link
##### Unreal &
# MIDI controllers
# 3D scanning
[](https://wiki.cci.arts.ac.uk/uploads/images/gallery/2025-09/GKhXp4FXM3fcTFoa-cci-darklab-lidar-lieven.jpg)[](https://wiki.cci.arts.ac.uk/uploads/images/gallery/2025-09/VhXAo0CTk7IoMeT2-cci-darklab-shaba-splat.jpg)
splatting grammetry lidar structured light
See 3D scanning workshop PPT folder
For Photogrammetry, install:� - iOS: ‘RealityScan’ ‘polycam’ ‘PhotoCatch’� - Android: ‘RealityScan’or ‘polycam’� - Windows: ‘RealityCapture’, ‘MeshRoom’ or Postshot for splatting� - Mac: ‘PhotoCatch’
��CCI Scanners:� - handhelD� - turntable� - Leica LiDAR[](https://wiki.cci.arts.ac.uk/uploads/images/gallery/2025-09/gD4e2qeOWAFCaO3v-image-1757482637437.png)
# Projectors
[](https://wiki.cci.arts.ac.uk/uploads/images/gallery/2025-09/bdg6d1MWxY2MrFMr-cci-darklab-epson-l635su.jpg)
### In the Lab ###
We have a selection of video projectors available for use in the Dark Lab.
Some of them are permanently mounted in the truss grid - those are ready for you to use!
If you would like to project anywhere else in the Lab, please ask a Dark Lab technician and they will see if it is possible to mount one for you (no guarantees - but do ask!).
### To take home ###
We also have a few projectors that you can take home - namely the BenQ ones listed below. These are bookable through [ORB](https://orb-arts.siso.co), our online loan store and equipment booking system.
### How to use the Dark Lab projectors ###
Feel free to use the projectors whenever no one else is using them!
The permanently mounted projectors all have an HDMI cable (with USB-C adapter) that you can plug into.
[](https://wiki.cci.arts.ac.uk/uploads/images/gallery/2025-09/IlhTFXG2jDfkBw5w-cci-area2-plugin-full.jpg)
The two main screens (Area 1 and Area 2) are also hooked up to the two corresponding PC's.
Those have a little switch on the desk to choose between input from the PC or your own laptop.
[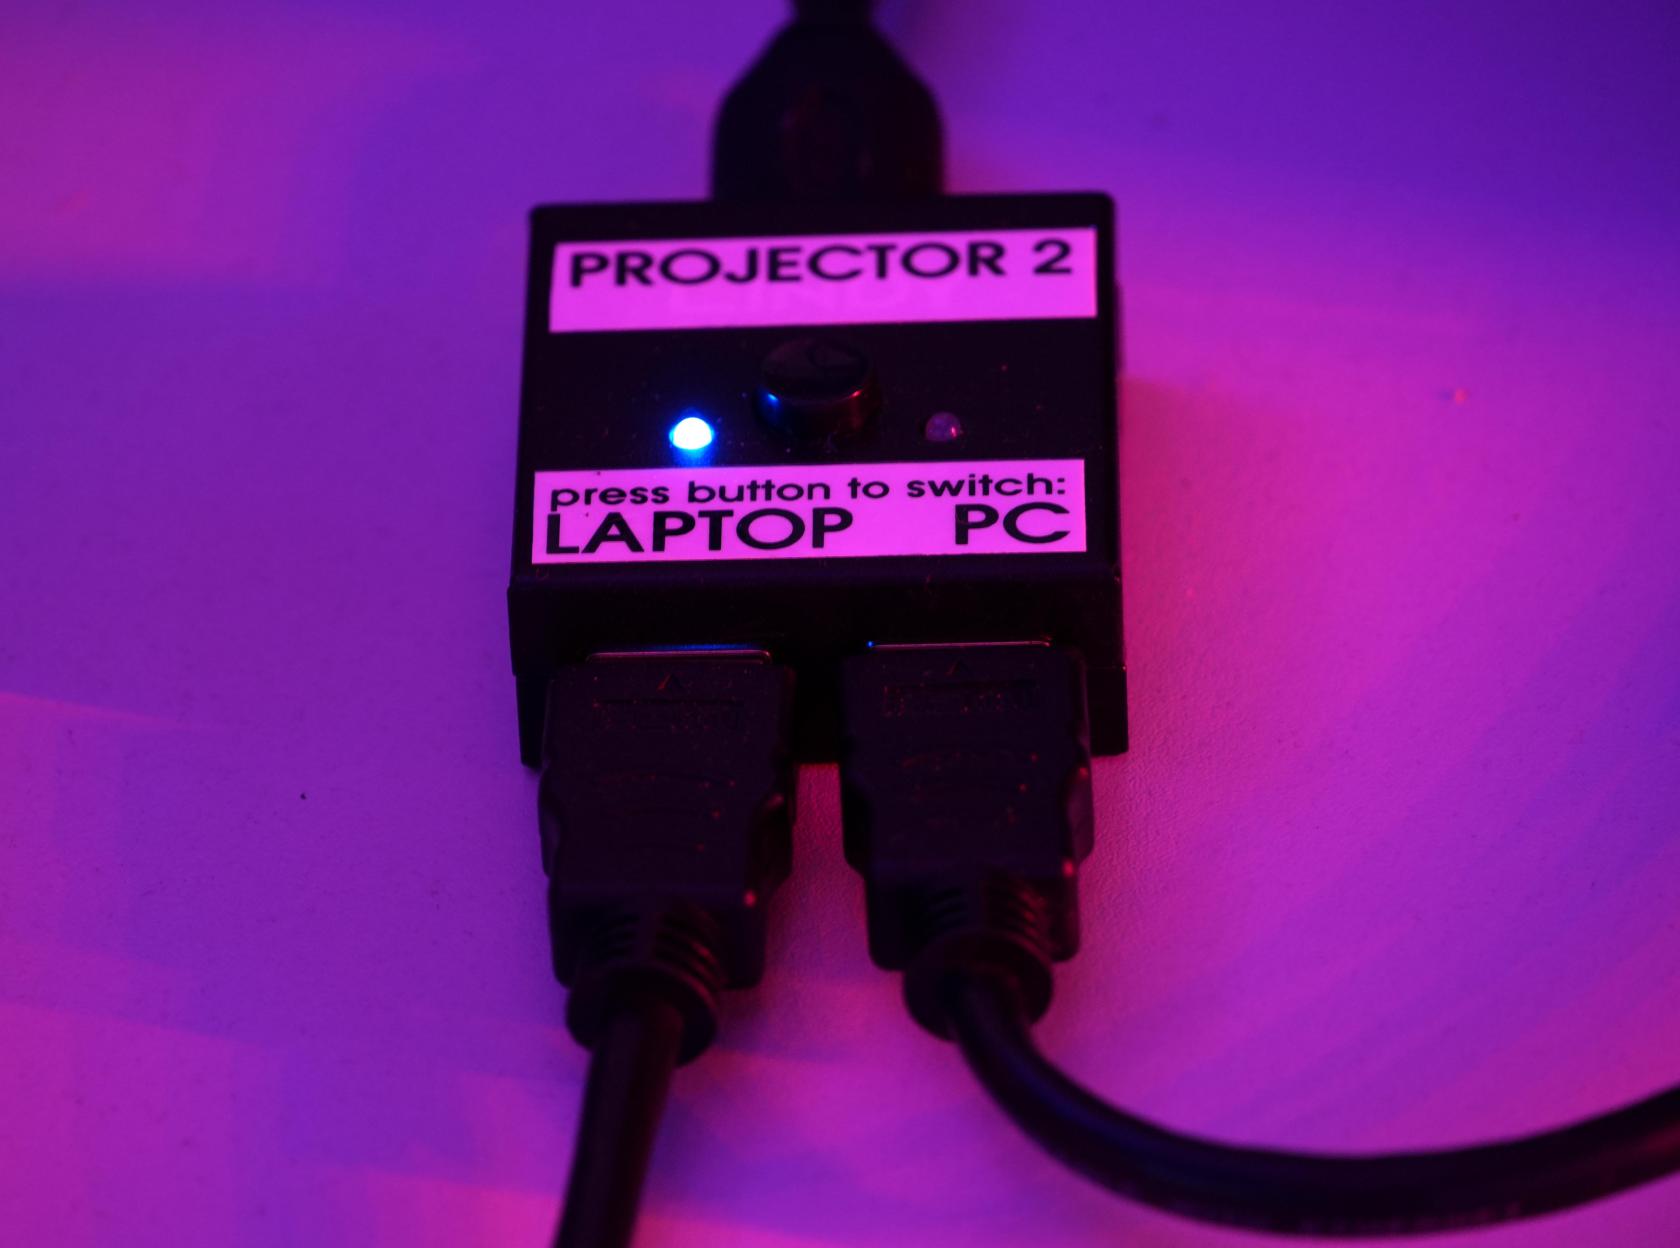](https://wiki.cci.arts.ac.uk/uploads/images/gallery/2025-09/tKqwHai6QhgYcS0V-cci-darklab-projector-switch.jpg)
##### Remotes #####
On, or next to, the screens you will find remotes to turn the projectors on and select the correct HDMI input.
The HDMI cables are labeled as 'Projector 1 (HDMI 1)', etc.; telling you which projector it is connected to, and which input to select on the projector itself (HDMI 1, HDMI 2, etc).
(Please make sure to turn them off when you're done, and stick the remote back where to where it was!)
[](https://wiki.cci.arts.ac.uk/uploads/images/gallery/2025-09/0NVjs77w08GRxfvs-cci-darklab-epson-remote.jpg)
### What do we have? ###
Our projectors vary in brightness, throw ratio, zoom, lens shift, imaging technology, etc. Some of those terms are explained below.
We can have a chat about which one might best suit your project!
Here are the models we currently have; click on the links to find out more.
2x [Epson EB-L635SU](https://www.epson.co.uk/en_GB/products/projectors/installation/eb-l635su/p/31708#tech-specs) (6000 lumen, LCD, 0.8:1 medium short throw) (these are the two main projection screens)
1x [Panasonic PT-VMZ60](https://www.projectorcentral.com/Panasonic-PT-VMZ60U.htm#specs) (6000 lumen, LCD, 1.09-1.77 throw ratio)
1x [Panasonic PT-VMZ71](https://www.projectorcentral.com/Panasonic-PT-VMZ71WU.htm#specs) (7000 lumen, LCD, 1.09-1.77 throw ratio)
2x [NEC P525UL](https://www.sharpnecdisplays.eu/p/datasheet/en/datasheet/rp/p525ul.xhtml) (5000 lumen, LCD, 1.23-2.0 throw ratio)
1x [Optoma EH460ST](https://www.optoma.co.uk/ContentStorage/Documents/5ddee23d-0294-49eb-90fd-5a116be7417c.pdf) (4200 lumen, DLP, 0.5:1 short throw)
8x [BenQ TH671ST](https://www.benq.eu/en-uk/projector/cinema/th671st.html) (3000 lumen, DLP, 0.69-0.83 short throw)
1x Portable pico projector
[](https://wiki.cci.arts.ac.uk/uploads/images/gallery/2025-09/I7nkk312tHjnYffg-cci-darklab-nec.jpg)
[](https://wiki.cci.arts.ac.uk/uploads/images/gallery/2025-09/y4GlRnEmwJHcgRnL-cci-darklab-panasonic-vmz71.jpg)
[](https://wiki.cci.arts.ac.uk/uploads/images/gallery/2025-09/3pPWnWmN1pzIbJqf-cci-darklab-panasonic-vmz60.jpg)
[](https://wiki.cci.arts.ac.uk/uploads/images/gallery/2025-09/fQFTi8agRto4qVam-cci-darklab-epson-ust.jpg)
### Projector tips & terminology ###
#### Throw ratio ####
The so-called 'throw ratio' of a projector specifies how narrow or wide the projection angle of the lens is. In other words, it tells you how big the image will be, depending on the distance from the screen or wall.
Throw ratio is the projector distance divided by the image width. So for example, a throw ratio of 0.5 means that from one meter away it will 'throw' an image of 2 meters wide onto the wall (or 1 meter wide from 0.5 meter distance, etc.).
#### LCD vs. DLP ####
There are a few different types of projectors, in the sense of how they actually create the pixels on screen. Each technology has its own strengths and weaknesses:
1. LCD projectors
Pros: Amazing colours. No artifacts when taking photos or videos.
Cons: Black levels aren't the best (dark grey instead of black).
3. DLP projectors
Pros: Black levels are usually better than LCD. Native support for 3D through DLP-Sync 3D glasses.
Cons: Depending on the shutter speed, problems might arise when trying to take photos or videos (rainbow effect). Some people's eyes are sensitive to this, too. Colour reproduction is often not as good as with LCD.
#### Brightness ####
When it comes to brightness; more is usually better! Thankfully, we have some really bright ones at CCI (up to 7000 lumen).
The light output of the projector will get spread over the whole image; so if you make the image bigger (by placing the projector further away from the screen), that means it will become less bright.
When using cameras, it sometimes helps to dial the brightness down a little, in order not to overexpose or blind the camera.
#### Lens shift and mounting ####
Our more fancy projectors like the Epsons, Panasonics and NECs have a feature called 'lens shift' (both horizontal and vertical).
This allows them to shift the image up/down or left/right without physically moving the projector or distorting the image. Very handy!
Most 'simpler' projectors that do not have lens shift tend to project slightly upward - in the sense that if you put them flat (horizontally; level) onto a floor or table, they will project a rectangular image slightly upward onto the wall.
This means that if you want to mount one of those projectors from the ceiling, you can place them upside down so that they project slightly downward onto the wall or screen.
#### Prevent keystoning whenever you can! ####
Your image will be much sharper (both resolution and focus!) if you place the projector such that it throws an (almost) rectangular image.
You can always adjust keystone / corner points, but this will affect the clarity of the image!
# VR trackers
[](https://wiki.cci.arts.ac.uk/uploads/images/gallery/2025-09/JrT25hEJZp4PS7bd-cci-darklab-base-station.jpg)
The Dark Lab has Virtual Reality motion tracking set up in both main truss grid area and the VR corner, making pretty much the entire lab trackable using our 'Vive VR trackers'. These are little plastic things that you can attach to whatever you want to track. They can send both their position and orientation wirelessly, with super high accuracy, in real-time to your computer.
And you do not need a VR headset to use them :)
### How to use Vive trackers ###
The Vive tracking system is compatible with some of the main PC-based VR protocols like SteamVR and OpenVR/OpenXR. They can basically work with any software that supports (one of) these protocols, like Unity, Unreal, TouchDesigner, WebXR, etc., and most programming languages.
You'll need to have SteamVR running and logged in.
### Using trackers without a VR headset ###
Thankfully, all our Vive VR trackers can be used even when you do not have a VR headset attached to your computer. For this you will need to edit two text files in your SteamVR folder, as described here:
https://github.com/username223/SteamVRNoHeadset or here: https://github.com/n1ckfg/ViveTrackerExample (step 3-9)
### To take home ###
We also have a few VR trackers that you can take home - these do not need any 'base stations' to work! This means you can use them anywhere, including outdoors. They rely on two little built-in cameras to function properly, so they do need some light. Also, just like the 'normal' VR trackers, you cannot block their view of the environment.
### What do we have? ###
10x Vive Tracker 3.0 https://www.vive.com/uk/accessory/tracker3/
2x 3-Pack HTC VIVE Ultimate VR Tracker and Wireless Dongle
# Sound System
# Dark Lab Sound System #
[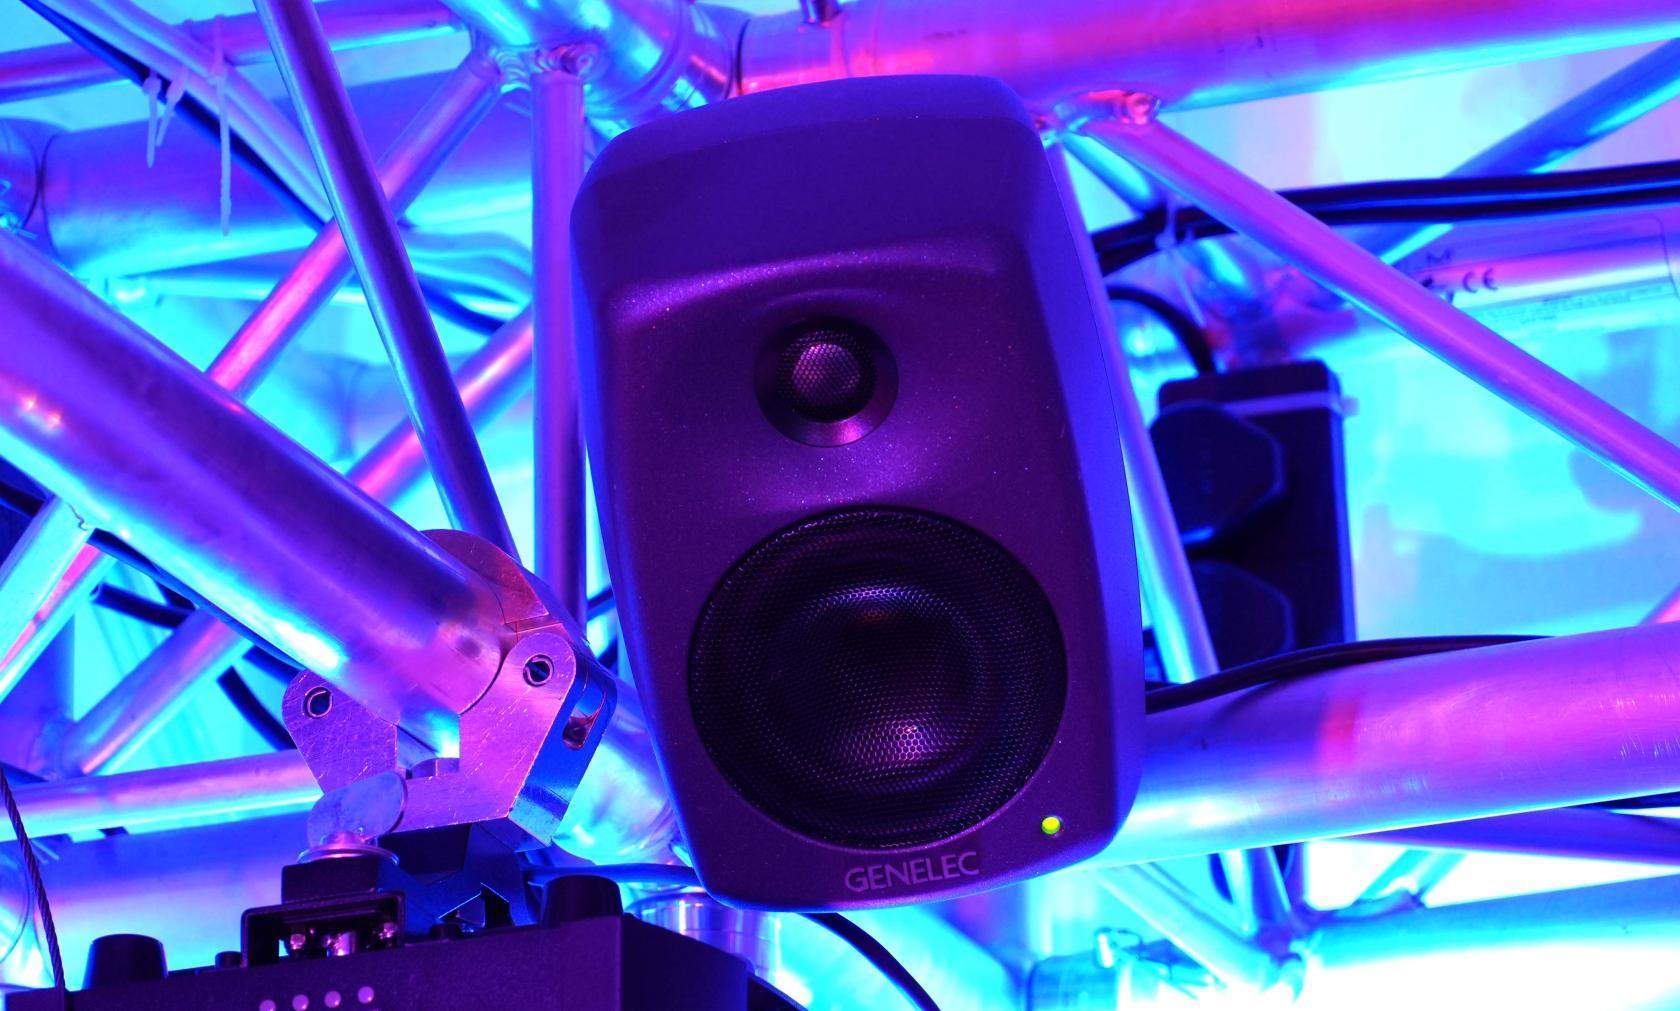](https://wiki.cci.arts.ac.uk/uploads/images/gallery/2025-09/Nkp6aU3cAjX7Egxv-cci-darklab-genelec-8020d.jpg)
Feel welcome to come in and enjoy - but please DO NOT bother other people!
Be respectful of others in the Lab and of any classes next door. Feel free to use the sound system whenever the lab is empty, or perhaps come in on a weekend or evening to give it a proper spin.
## How to plug in? ##
We currently have four speakers and two subwoofers set up and ready to go.
Using the switches pictured below, audio can be routed to the speakers in the following ways:
Four channel surround sound from:
— The computer in Area 1 (left; PC1)
— The computer in Area 2 (right; PC2), or use the USB-C cable to the sound interface (labeled as 'speakers')
Stereo (copied into 4 channel):
~~— The DJ controller~~ (sadly, we currently do not have this available)
— The Bluetooth receiver
— Two XLR audio cables (with provided adapter cables for 3.5mm headphone jack, RCA or 6.5mm Jack connectors)
Use these switches to choose which sound source(s) you want to send to which set of speakers:
You can find them in 'The Rack'.
[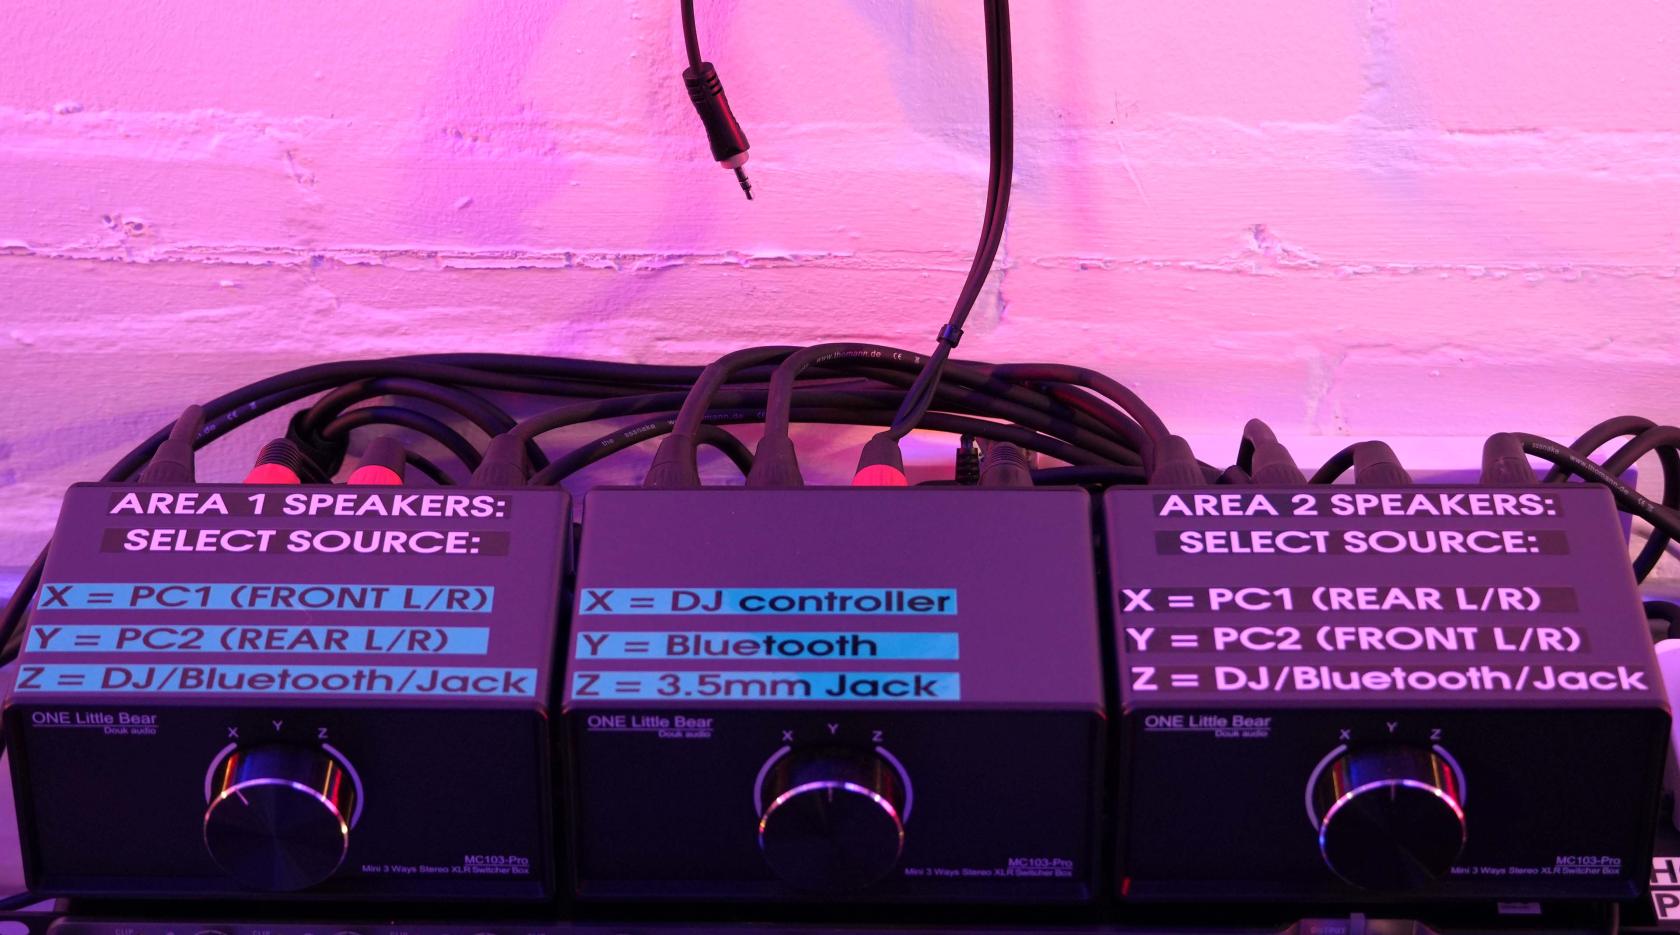](https://wiki.cci.arts.ac.uk/uploads/images/gallery/2025-09/j4jN94uiU1EkvQ8V-cci-darklab-audio-source-selectors-2.jpg)
#### Connecting your laptop (or anything else) ####
There are three ways to get sound from your own laptop (or other device) to play over the Dark Lab's speakers:
1) USB-C sound interface (four channel)
2) Bluetooth (stereo)
3) 3.5mm mini-jack (headphone jack) cable (stereo). Plug the provided adapter cable into the two XLR cables sticking out of the rack cabinet to connect.
If you need anything else, don't hesitate to ask a technician!
##### (1) USB-C #####
The sound card on the Area 2 wall should work on any laptop without requiring any drivers. Feel free to plug in the USB-C cable!
It is connected to all four speaker channels, and labeled as 'PC2' on the speaker source selector boxes.
By default, normal stereo sound will come out of the speakers in Area 2 if you choose 'PC2 (Front L/R)'.
In order to get four-channel sound working, you might need to configure your computer for surround sound.
In Windows, you can open 'Sound Settings', then click 'More Sound Settings'. A little window will pop up, showing all your audio devices. Right-click on 'Speakers (Sound Blaster X4)' and choose 'Configure Speakers'. Then choose 5.1 surround -> rear pair only -> all speakers full range.
You're then ready to play 4-channel surround sound from videos, games or whatever!
[](https://wiki.cci.arts.ac.uk/uploads/images/gallery/2025-09/jv0y0yr9CE793zaG-cci-darklab-x4-sound-card.jpg)
[](https://wiki.cci.arts.ac.uk/uploads/images/gallery/2025-09/zU2O1epQinGEGYgC-cc-darklab-usb-c-sound.jpg)
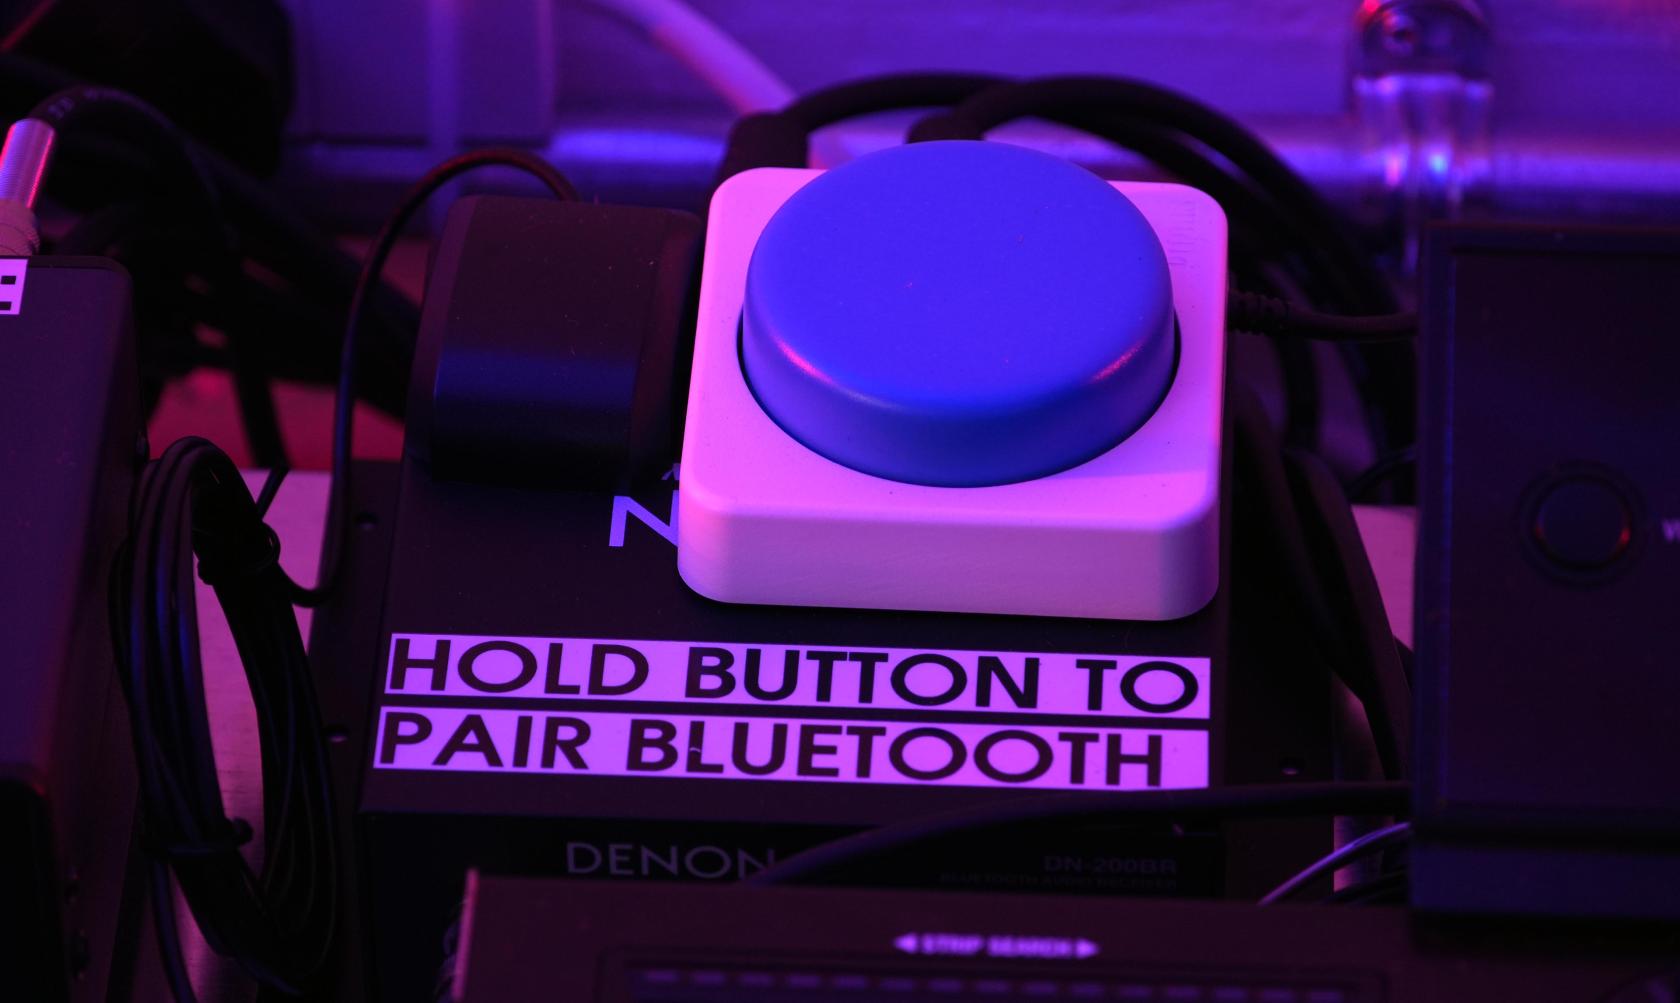
##### (2) Bluetooth #####
— Set the speaker source selector boxes to **Bluetooth** (on the middle one), and set the other two switches to **'Z = DJ / BT / Cable'**.
— Press and hold the Big Blue Button to put our Bluetooth receiver into pairing mode, then pair your phone or laptop to it. The receiver should appear as '***DN-200BR***'.
Now you should be good to go!
##### (3) Audio cable #####
— **First TURN OFF the speakers, and turn down your device's volume (!)**
— Plug into the two cables hanging out of the front of the Rack. Below are adapter cables on little hooks.
— Select the right input and speakers on the speaker source selector boxes.
We can provide different cables or adapters if needed.
[](https://wiki.cci.arts.ac.uk/uploads/images/gallery/2025-09/uor6bH5k4A9PREv7-cc-darklab-bluetooth-pairing.jpg)
## What speakers and equipment do we have? ##
Currently, we have:
— 2x [Genelec 8040B](https://www.genelec.com/8040b) studio monitors
— 2x [Genelec 8020D](https://www.genelec.com/8020d) near-field monitors
— 2x [Genelec 7040A](https://www.genelec.com/7040a) subwoofers.
This gives each projection area a stereo pair + one sub, or four channels with two subs.
More channels will likely be added in the near future.
[](https://wiki.cci.arts.ac.uk/uploads/images/gallery/2025-09/6Dn7we6KlXJCiiDI-cci-darklab-genelec-sub.jpg)
# 86" Touchscreen Display
[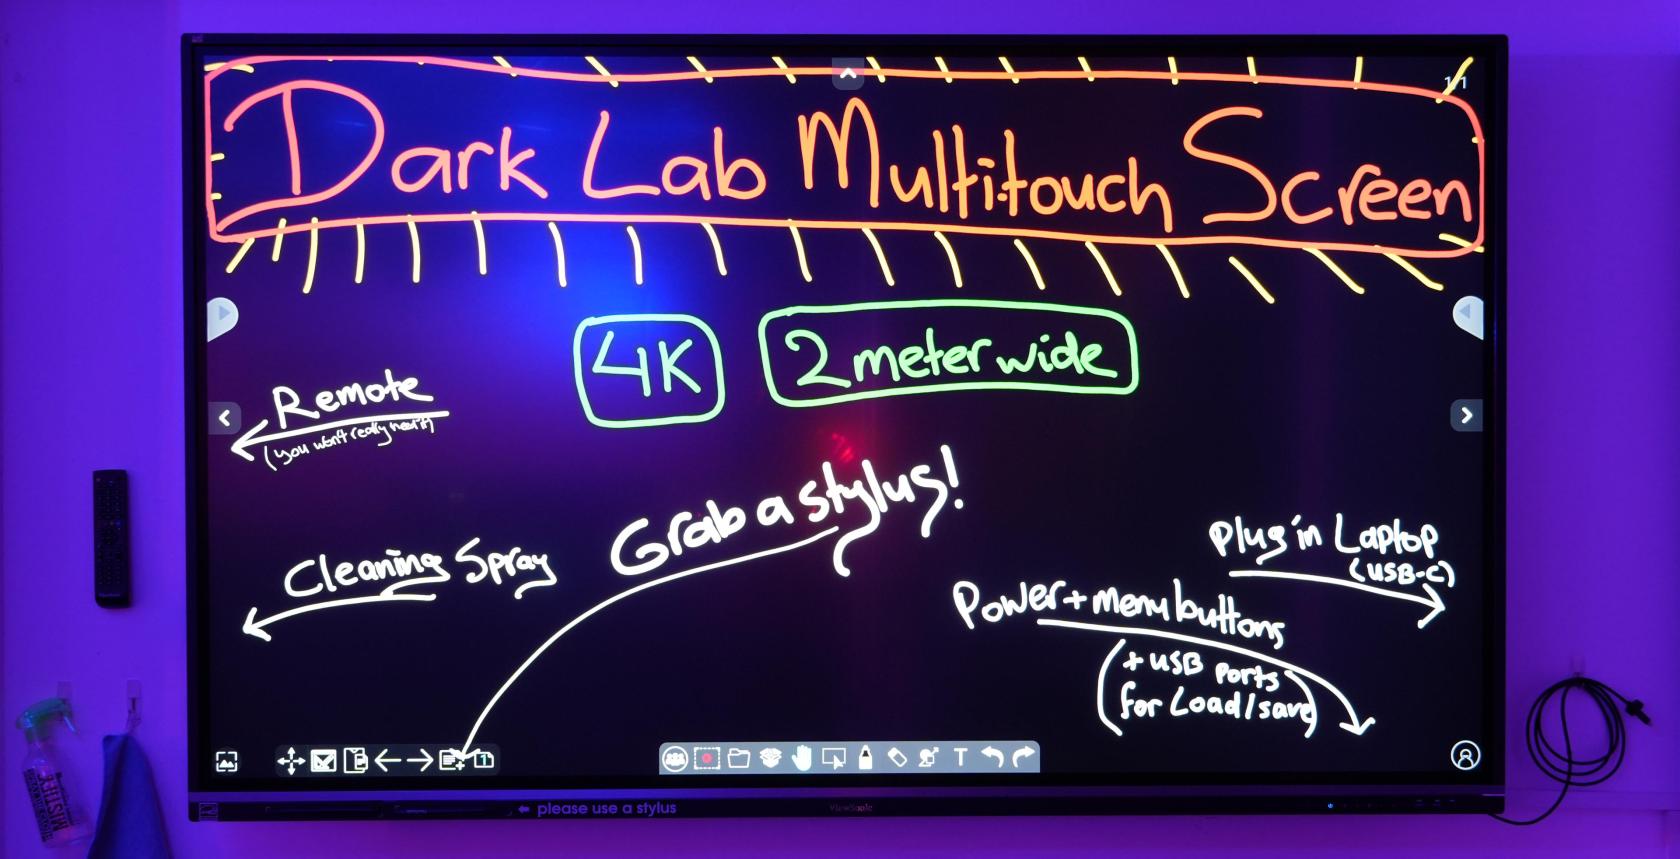](https://wiki.cci.arts.ac.uk/uploads/images/gallery/2025-09/PM2MFH2RjF7jwLrI-cc-darklab-viewboard.jpg)
# **Viewsonic 86" 4K multi-touch display**
The Dark Lab has been outfitted with a large, two meter wide multi-touch screen.
It has a built-in drawing app for sketching and (groupwise) ideation, but you can also plug in your computer and use it for touch-based interaction - or just as a big 4K monitor!
## **How to use it?**
Use the button panel on the front to power up the screen. It will automatically load up the whiteboard drawing app.
To use your own computer instead: just plug in the USB-C cable provided! This should work for both the video and touch data.
There is also a powerful Windows PC hooked up and ready to use.
You can develop touch-based visuals, games and art in e.g. Unity, TouchDesigner, Unreal Engine, P5.JS, etc..
All of these, and many other tools/languages, have built-in (multi)touch support.
Please use the stylus pens whenever you can, as it is a giant fingerprint magnet!
Feel free to use finger-based interaction - just use the micro-fiber cloth and screen cleaner spray when you are done (be gentle ;))
[](https://wiki.cci.arts.ac.uk/uploads/images/gallery/2025-06/n5XXB5dbfNDvyV7i-viewboard.jpg)
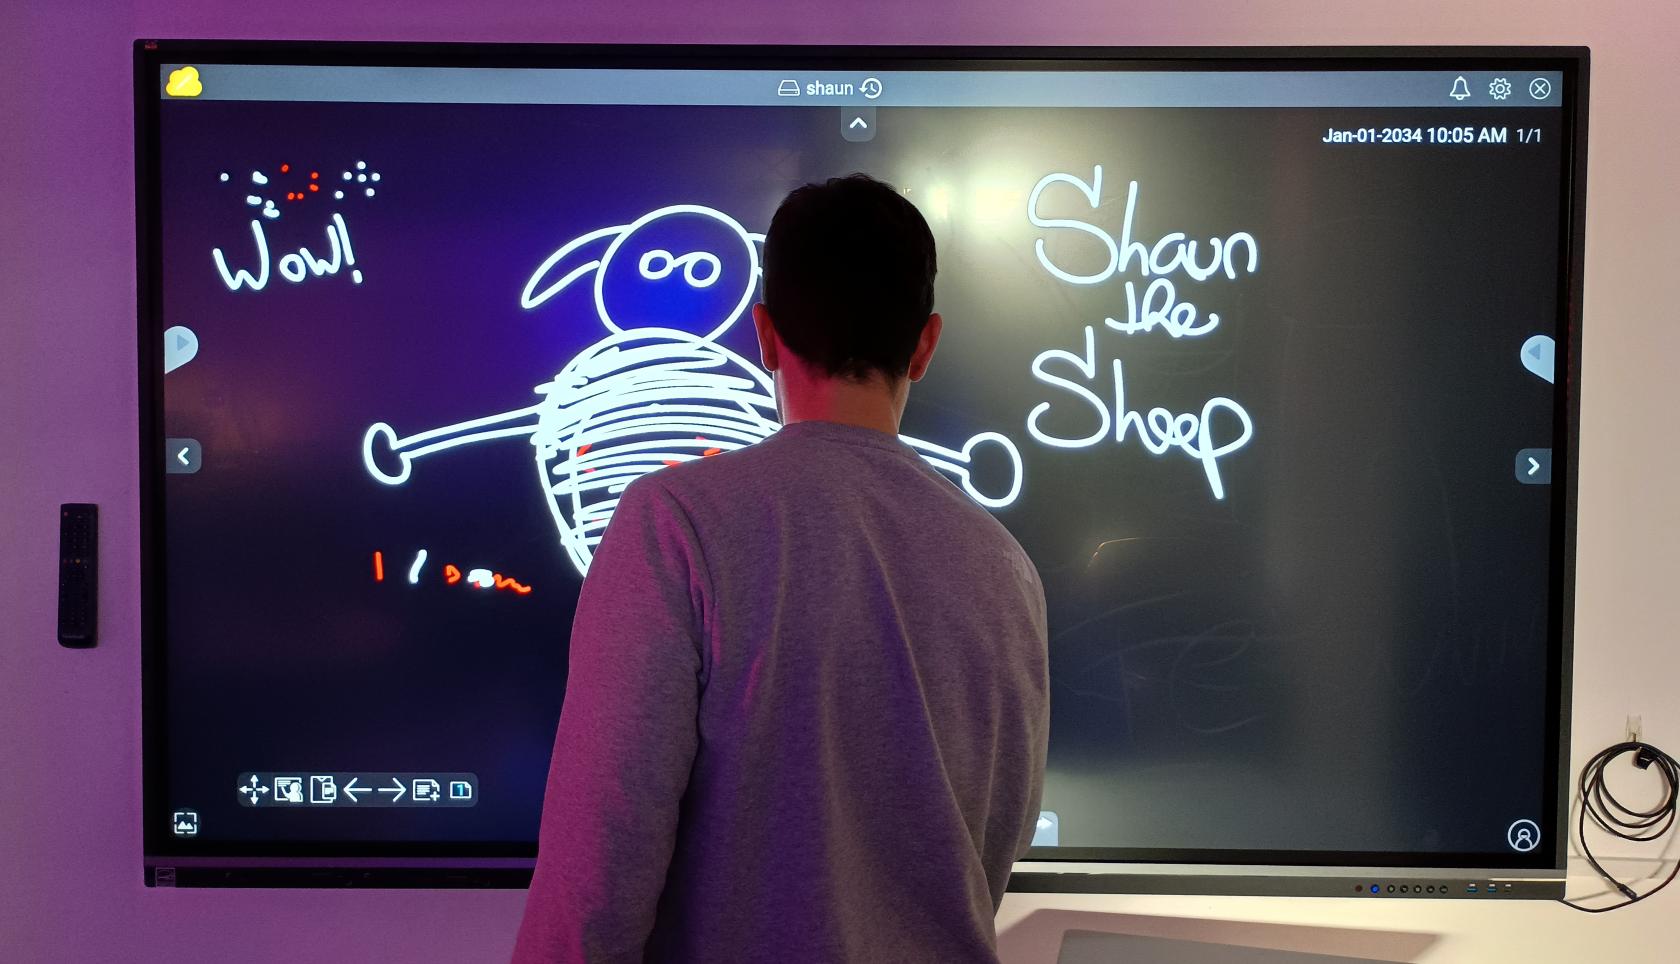
### **Using the built-in whiteboard**
The Viewboard has very capable built-in whiteboard functionality. It's vector-based, 'non-destructive' (i.e. you can change edits later on), with infinite canvas plus a bunch of neat functions.
The styluses have a sharp pointed side and a blunt side. The touch board can tell the difference, and will let you assign different colors depending on which side you used to touch the color pallette.
For some nice videos about its other whiteboard functions see here:
[Viewsonic 'Basic Whiteboarding' how-to videos](https://youtube.com/playlist?list=PLDfhD4-dQNN7FEvmgDy7gByk9TJ1ainQF&si=qkBvTu5mjEmb5ZYQ)
You can load / save your sketches onto a memory stick or hard drive by plugging it into the USB ports on the front of the device.
In the whiteboard app or home screen, tap the folder-shaped icon to bring up the options for saving and loading files.
Although you can store files on the device itself, DO NOT store anything personal/sensitive that you do not want others to see!!
##### **For more information:**
The ['Viewsonic Education North America' YouTube channel](https://youtube.com/@ViewSonicEducation) has loads of other how-to videos, in case you ever get stuck on anything - including how to use it with Windows and MacOS.
### **Developing your own touch-based apps**
The screen will work with any software that supports touch-interaction.
If you want to make you own software/games/art, you can!
**Unity:
**
Open up the package manager, search for the Input System, click it, then check the area under the description.
There should be some code samples there, including the ‘Touch Samples’. You can import them straight from that menu.
You can use the Input Debugger in Unity to make sure that touch input is working at all, before doing any coding!
Open the Input Debugger by selecting from the top menu dropdown:
**Window > Analysis > Input Debugger.**
See here for more information: [https://learn.unity.com/tutorial/touch-input-for-mobile-scripting](https://learn.unity.com/tutorial/touch-input-for-mobile-scripting)
**TouchDesigner**
Double-click the empty background, or hit 'TAB' to bring up TouchDesigner's collection of operators.
Select 'Multi Touch In' in the DAT operators (pink) tab.
You should now see a table where all of your touch inputs will appear.
[https://derivative.ca/UserGuide/Multi_Touch_In_DAT](https://derivative.ca/UserGuide/Multi_Touch_In_DAT) <- explains what the various values mean (id, sn, x, y, u, v, etc.)
[https://derivative.ca/UserGuide/MultiTouch](https://derivative.ca/UserGuide/MultiTouch)
You will also see a ***'callbacks'*** code block, where you can (optionally!) script your own Python actions.
Here is a tutorial on using TouchDesigner callbacks:
[https://learn.derivative.ca/courses/100-fundamentals/lessons/107-dats-scripting-python/topic/scripting-events-with-callbacks/](https://learn.derivative.ca/courses/100-fundamentals/lessons/107-dats-scripting-python/topic/scripting-events-with-callbacks/)
[](https://wiki.cci.arts.ac.uk/uploads/images/gallery/2026-03/BBndcRX1byZVjII2-cci-darklab-touchdesigner-multitouchin.jpg)
**P5.JS**
P5 also has built-in support for touch devices. See here for more info!
[https://p5js.org/reference/p5/touches/](https://p5js.org/reference/p5/touches/)
[https://github.com/L05/p5.touchgui](https://github.com/L05/p5.touchgui)
### **Enjoy!**
# Spatial Reality Displays (3D with head-tracking)
[](https://wiki.cci.arts.ac.uk/uploads/images/gallery/2025-09/5mZmwLSE7kQ5tkcz-cci-darklab-spatiallabs-27inch.jpg)
Our Acer Spatial Labs displays are one type of **'holographic' or spatial reality displays** that we have at CCI.
(see 'Looking Glass' for the other kind)
These are glasses-free 3D displays with built-in head tracking, allowing you to view things in full 3D from different perspectives.
It is bit like Virtual Reality, but on a computer screen.
They are great for productivity in 3D applications like Blender, Fusion or game engines - but even more exciting for interactive experiences.
We have one 27" desktop version hooked up permanently to the Dark Lab Area 1 computer.
(It doubles as a 4K 165hz display for you to simply use)
We also have two portable, 16" Spatial Labs displays available through [the Kit Room](orb.arts.ac.uk)!
Seee the product info page here:
[https://www.acer.com/gb-en/spatiallabs](https://www.acer.com/gb-en/spatiallabs)
#### How to get it running
**in the Dark Lab**
The 27" SpatialLabs in Dark Lab Area 1 is hooked up to the PC, and the software should be good to go.
Make sure the USB-C labeled 'Acer' is plugged into the USB-C port at the front of the computer.
**On your own computer**
The 27" Acer SpatialLabs in Dark Lab Area 1 has labeled HDMI and USB-C cables for you to plug into.
Both the video and head tracking should work over USB-C, though.
You can also take a portable version home through [ORB](orb.arts.ac.uk).
First - you'll need to get Acer's main software & drivers installed.
Get the 'Acer Spatial Labs Experience Center' from the following links:
[SpatialLabs 27" ASV27-2P download page](https://www.acer.com/gb-en/support/product-support/ASV27-2P/downloads)
[SpatialLabs 16" ASV15-1BP download page](https://www.acer.com/gb-en/support/product-support/ASV15-1BP/downloads)
If you often use other VR devices on the same PC, see the [OpenXR Runtime Switcher](https://github.com/WaGi-Coding/OpenXR-Runtime-Switcher).
If needed, add the Acer runtime; the default location is: "c:\Program Files\Acer\Acer XR Service\AcerRuntime".
#### How to use it
~ Head to the [SpatialLabs Developer Portal](https://spatiallabs.acer.com/developer) to find tutorials and plugins for Unreal, Unity and OpenXR.
~ The 'Experience Center' sofware has a tab where you can find plugins for Blender, Fusion360, Rhino, etc.
~ It also comes with 3D media viewing apps if you just want to see some 3D models, images or video.
Software development info can be found here:
[https://spatiallabs.acer.com/developer](https://spatiallabs.acer.com/developer)
Basically, it will work like any other VR project - except that the OpenXR runtime is now Acer's one.
OpenXR, and the runtime, will take care of the stereoscopic 3D output and the head-tracking, as long as your project is set up to use OpenXR.
Obviously, your content will need to be suited for a screen like this.
(The SpatialLabs displays only support full-screen applications.)
**A note on 3D convergence**
In headtracked 3D graphics, the left and right eye views match or 'converge' at the screen plane. In this case, that is our flat screen panel.
In your 3D software, anything that is closer to the camera than the convergence plane will appear to come out of the screen, and anything further away will appear behind the screen.
[](https://wiki.cci.arts.ac.uk/uploads/images/gallery/2025-09/3scVJkqhHY6z2AnK-cci-darklab-stereoscopic-convergence.jpg)
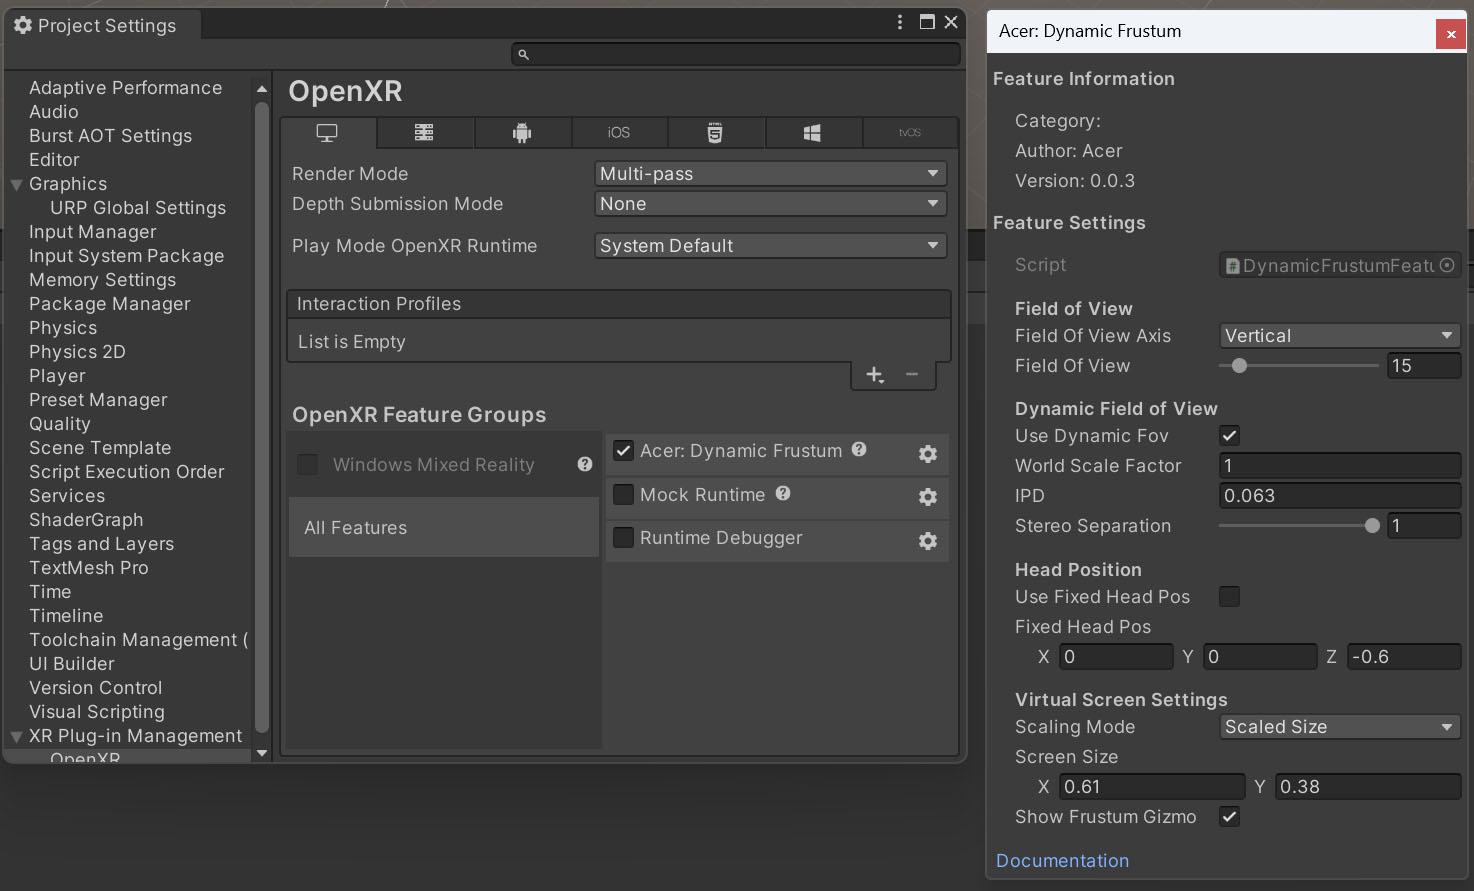
**A note on screen size**
For screen-based spatial 3D, it is very important that the software knows what the **physical size of the screen is, versus the distance between your eyes**.
When done correctly, the screen can almost appear like a physical portal or glass box, and it should be very comfortable to view. Get them wrong, and you will get an instant headache!
Acer has a shortcut key 'Alt-C' to bring up its menu where you can adjust these types of settings, and the Unity / Unreal / etc plugins expose these settings too. Make sure to set them to 'Screen Mode' and enter the correct dimensions.
(0.344 x 0.192 meters for the 16" portable version)
See Acer's docs for more info.
[](https://wiki.cci.arts.ac.uk/uploads/images/gallery/2025-09/XKrwUlmcKg4v6f0l-cci-darklab-acer-spatiallabs-unity-settings.jpg)
*Head tracking + hand tracking + 3D = magic!*
*Ultraleap's Physical Hands demo on the SpatialLabs display*
[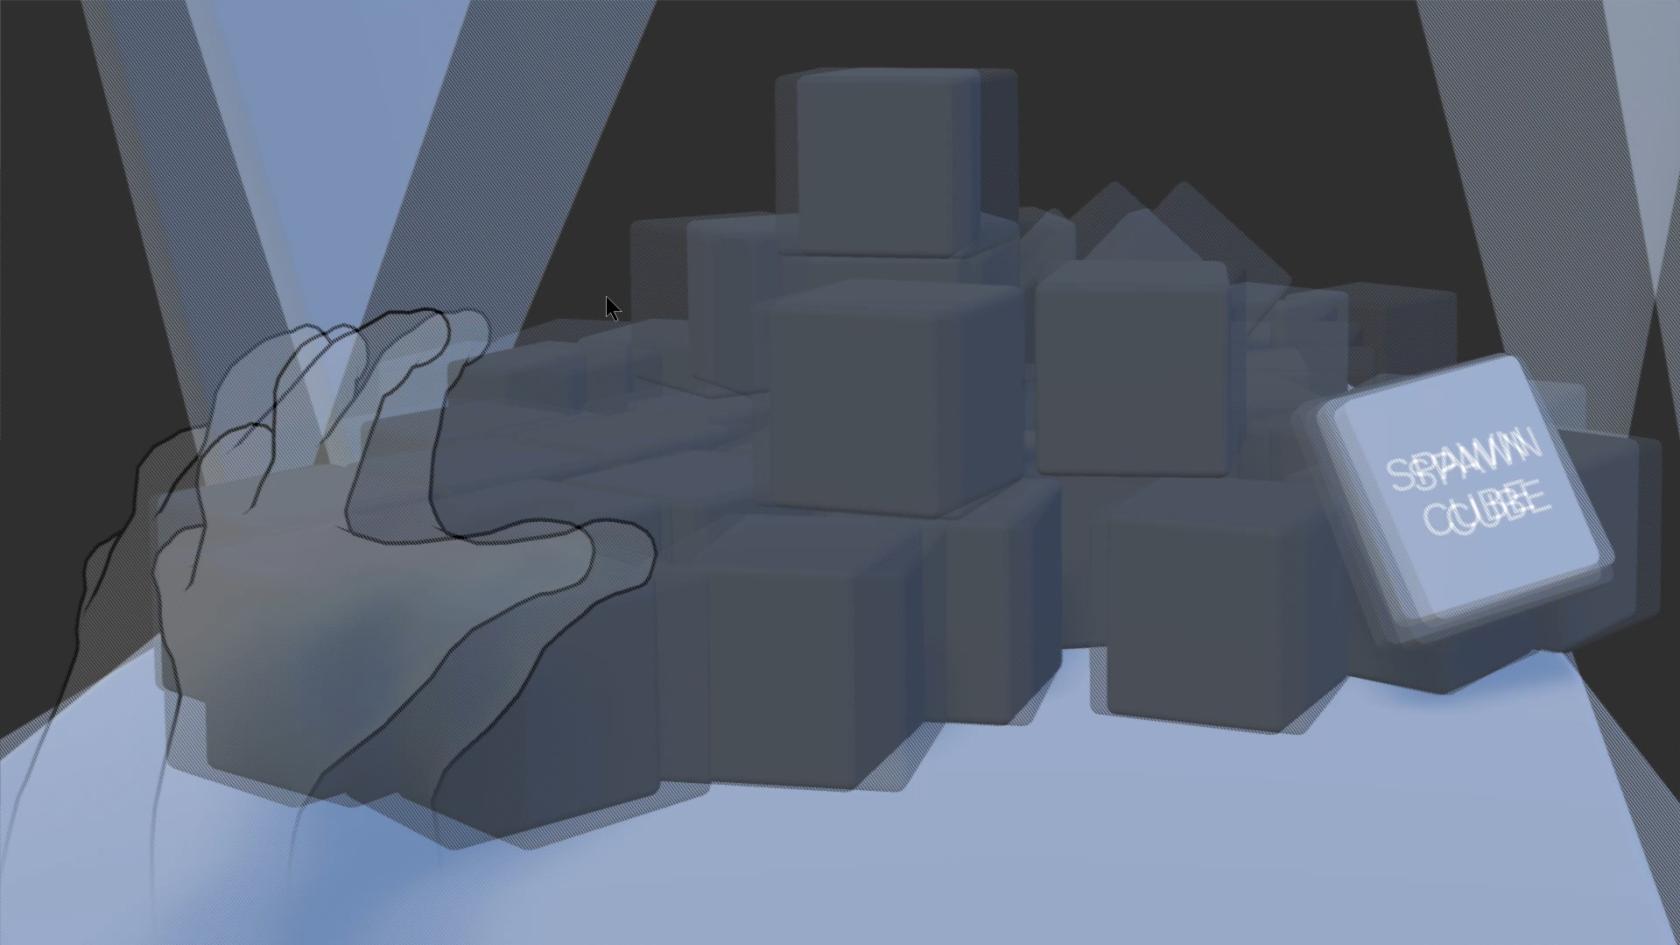](https://wiki.cci.arts.ac.uk/uploads/images/gallery/2025-09/xrn6KZBnJ8W4c2KX-unity-leap-spatial-3d.jpg)
# DMX Stage Lights
[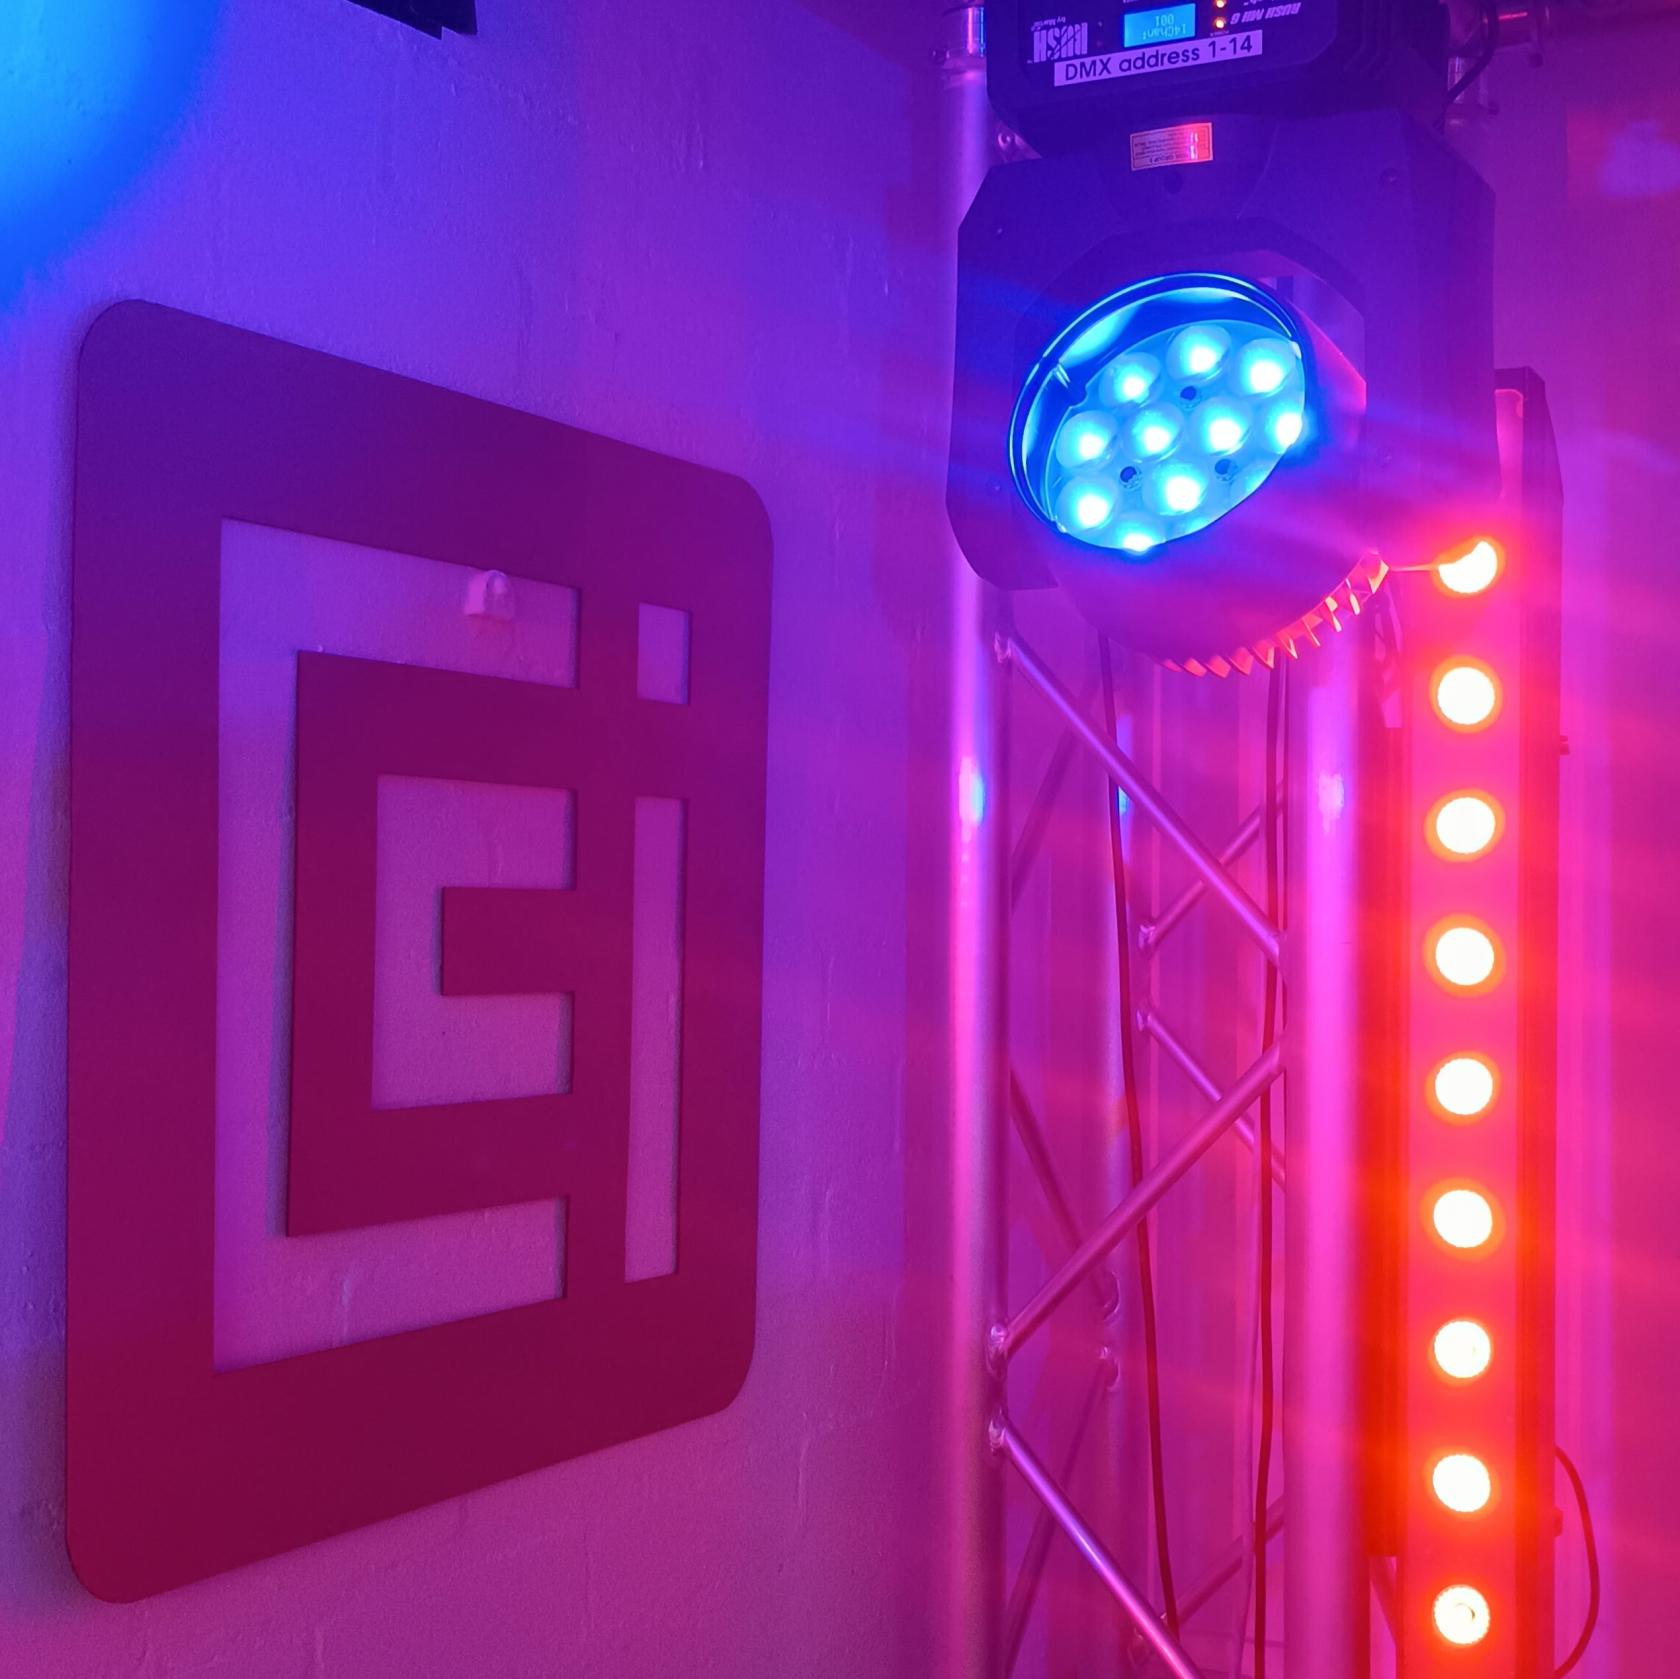](https://wiki.cci.arts.ac.uk/uploads/images/gallery/2025-06/xvREBwUiJbtPuFj9-dmx-lights-01-hdr-cropped.jpg)
## What is DMX? ##
DMX (Digital Multiplex), aka DMX512, is the industry standard protocol for controlling lighting and effects in clubs, theatres and tons of other places.
At its core, DMX data consists of a list of 512 numbers, each between 0 and 255, usually referred to as 'channels'. This data gets sent through an XLR-style cable from the lighting controller to the lights.
Most light fixtures (and other DMX-enabled devices) usually have both a DMX-in and DMX-out port. This allows them to be daisy-chained together, meaning you can control multiple lights through just one cable.
Some lights might have one function (e.g. dimmer), while others might have a whole range of controllable functions like Red, Green, Blue, White, Dimmer, Strobe, Pan, Tilt, etc.. This means that each light takes a specific number of channels to control it, and that number will differ between lights.
All lights have a function to set their 'DMX address', indicating which of the 512 channels are meant for that light.
For example: if one light takes **eight** channels to control it, and the next one takes **fourteen** channels;
- The first light would be set to DMX **address 1**, and takes DMX **channels 1-8**.
- The second light would then be set to **address 9**, and take **channels 9-23**.
- The third light would be **address 24**, etc.
In general, for controlling *any* light, you will want to look up the User Manual for that model to find out which channels control which function of the light.
Just scroll down to find a table like this:
[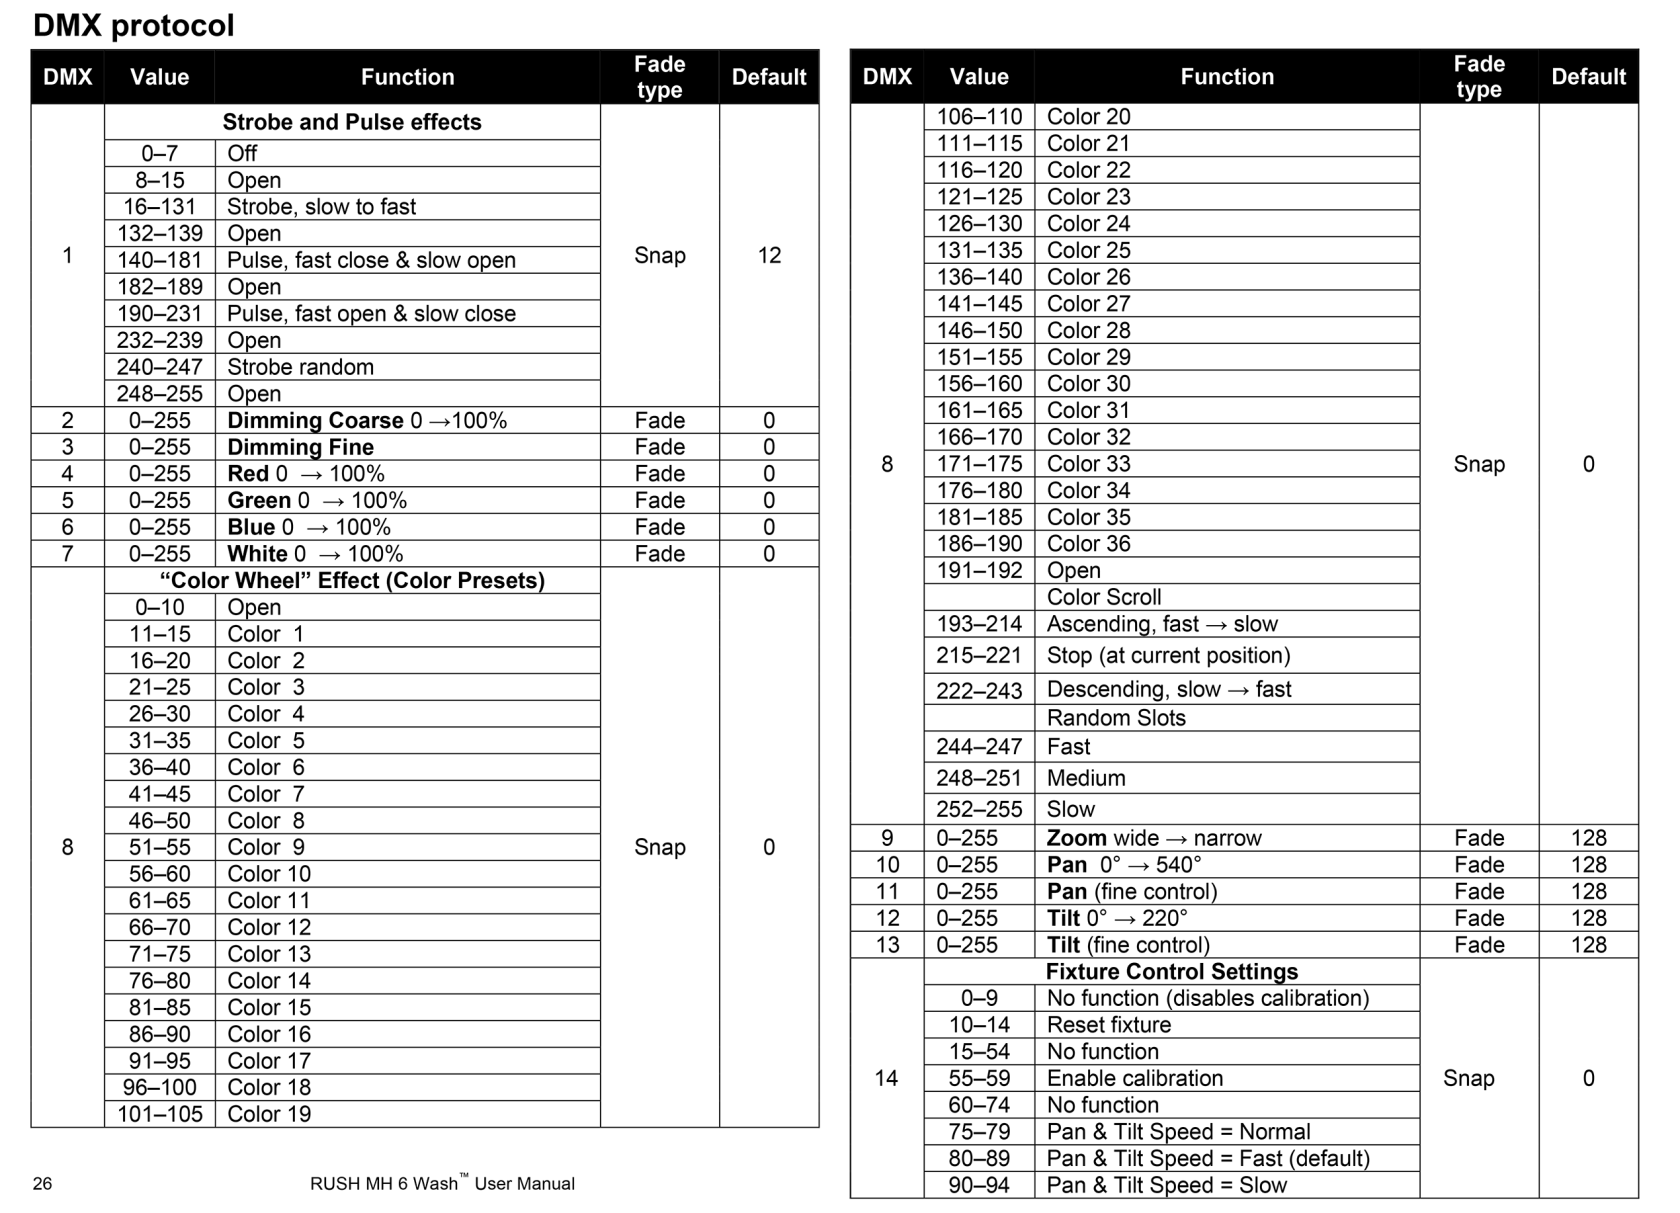](https://wiki.cci.arts.ac.uk/uploads/images/gallery/2025-06/qIVfExE041HjFiXv-dmx-channel-list-example.png)
## How to use the Dark Lab lights ##
Do you just want to simply adjust the lighting, or control/program the lights from code?
Our Eurolite lighting desk has already been set up to work with our specific lights, so you won't need to worry about addresses and channels if you just want to change the colours! See [here](https://wiki.cci.arts.ac.uk/books/dark-lab/page/dmx-lighting-controller-or-how-to-easily-adjust-the-lights) how to use it.
The permanently mounted stage lights in the lab are all daisy-chained together. There is a little switch box where you can select what controls the lights: i.e. the lighting desk, a USB DMX interface, or the wireless DMX receiver (ask the Kit Room or a Dark Lab technician for the wireless DMX transmitter).
We also have DMX shields that can plug into your Arduino.
All lights in the Lab are labeled with their DMX (starting) addresses. Please refer to the User Manuals of the lights to know which consecutive channels correspond to which functions:
[Martin Rush Batten 1 Hex User Manual](https://wiki.cci.arts.ac.uk/attachments/13)
[Martin Rush MH6 Wash User Manual](https://wiki.cci.arts.ac.uk/attachments/15)
If you want to incorporate DMX into your projects and make it interactive through code (using e.g. a USB or Arduino DMX interface to connect to the lights), you will need to keep the above in mind though!
## What DMX equipment is available to take home? ##
We also have a few lights and DMX interfaces that you can take home. These are bookable through [ORB](https://orb-arts.siso.co), our online loan store and equipment booking system. Feel free to have a look, or have a go!
The technicians will be happy to help with any questions you might have.
# DMX Lighting Controller (or how to easily adjust the lights!)
## Turning on the lights, and the DMX controller ##
Use the big colourful buttons on the AV Rack to turn on the DMX stage lights ***and*** the rack itself (which powers up the lighting controller).
Some fans should come on, and the 'moving heads' will move for a second while they calibrate.
**Make sure that the "DMX Lights - Select Input:" switch on top of the AV Rack is set to input 'X = Eurolite'.**
### Using the Eurolite DMX lighting controller to operate the lights ###
[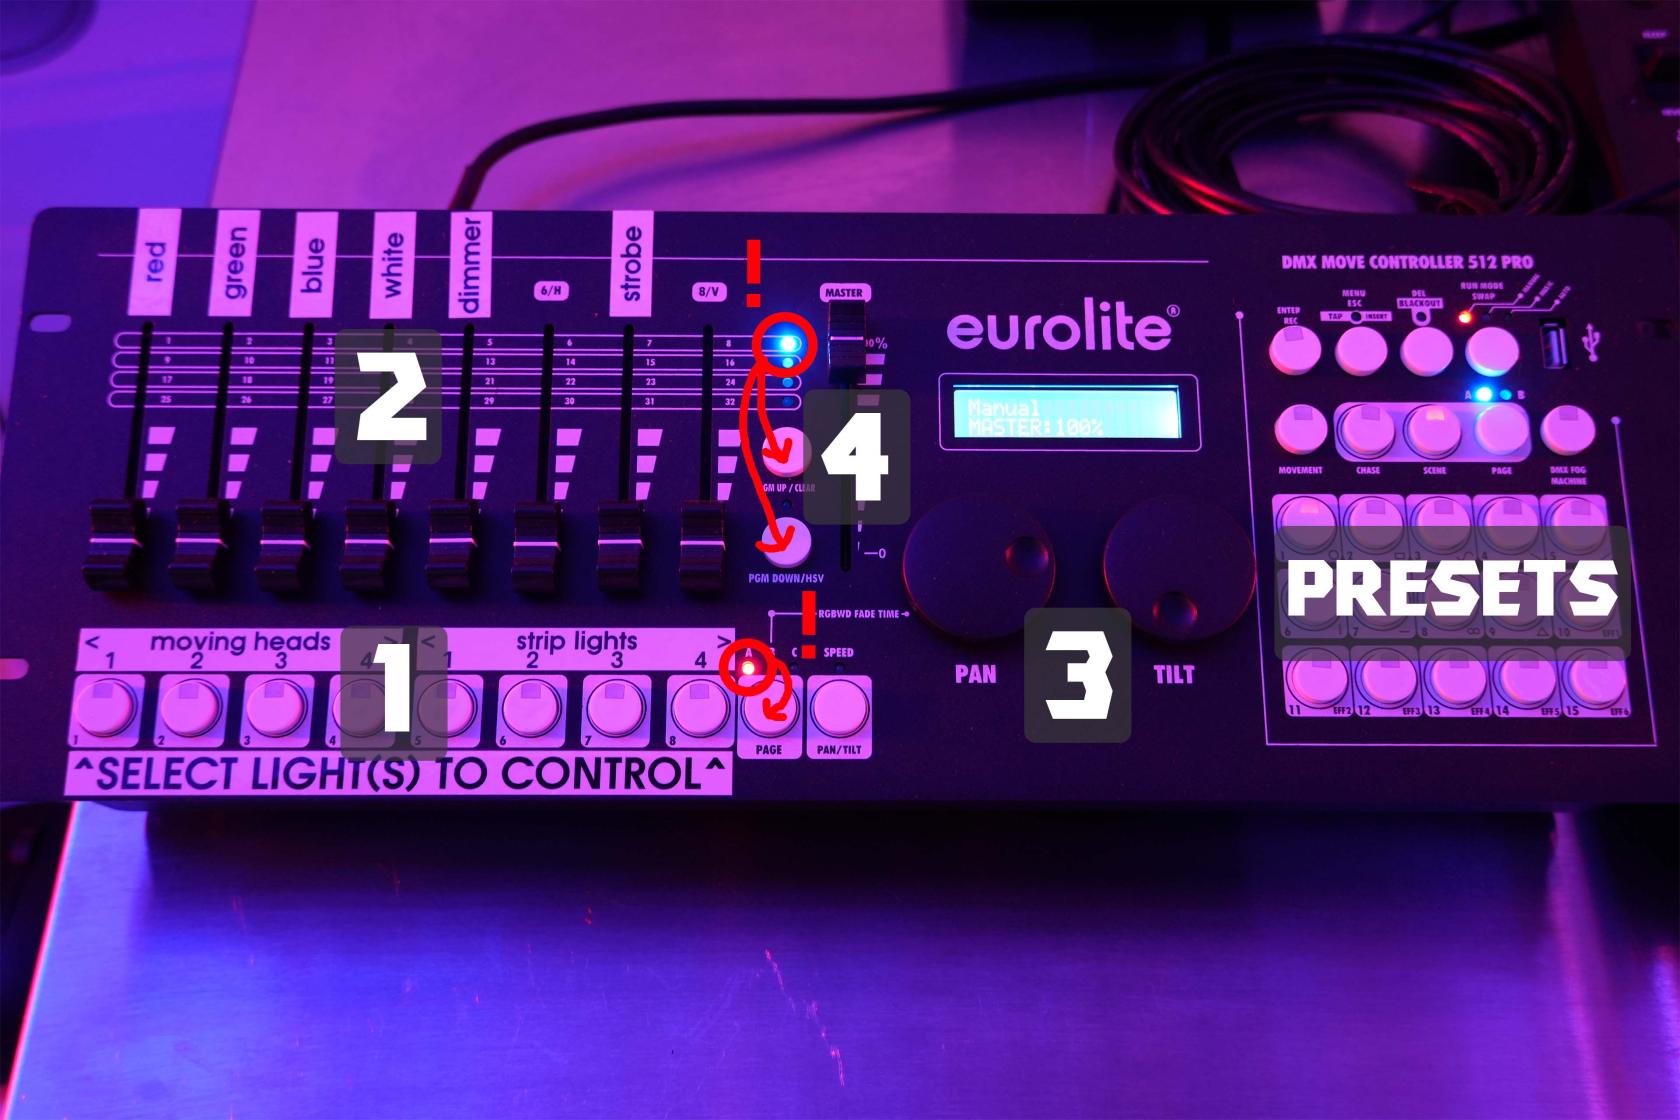](https://wiki.cci.arts.ac.uk/uploads/images/gallery/2025-09/J50gga3ZLLtMVrxs-cci-darklab-eurolite-desk-annotated.jpg)
This simple little lighting desk gives full control over all the (permanently mounted) stage lights in the lab.
Feel free to turn off the main room lighting and adjust the stage lights using this DMX lighting controller.
#### To change colours:
**(1)** Toggle the light(s) fixtures that you want to control using the bottom row of buttons.
**(2)** Adjust the faders above to change Red, Green, Blue, White, Strobe, etc.
Don't forget to 'open' the dimmer, otherwise you will not see anything!
**(3)** Turn the pan and tilt dials to move any selected moving heads
**(4)** The main dimmer controls everything, so make sure it is open if you do not see anything!
The strobe and dimmer faders should be open, too.
**(5)** ... repeat for any of the other lights you want to adjust.
**That's it!**
There are a few built-in colour presets, too: see the 15-button section located on the right.
Not all of those presets are assigned at the moment.
#### If the lights are turned on, but nothing happens:
~ make sure that 'PAGE' (the red LED) is set to 'A'
~ make sure the 'PGM' (blue LED next to the faders) is set to 1-8, the top row.
~ make sure the dimmers and strobe are all open
#### If weird things happen:
~ make sure none of the presets are toggled on by mistake.
~ talk to a technician!
### PLEASE TURN THE LIGHTS AND RACK OFF AGAIN WHEN YOU ARE DONE!
**Thanks! :)**
# DJ Controller
SADLY, THIS DEVICE IS NO LONGER AVAILABLE AT CCI!
[](https://wiki.cci.arts.ac.uk/uploads/images/gallery/2025-09/hHQEhF6FSmjgnXMJ-cci-darklab-dj-controller.jpg)
### How to use the Numark NS7-III ###
The NS7 is a DJ controller with a built-in mixer. It relies on a laptop running DJ software, connected over USB.
It is a quite capable device though! - and permanently hooked up to the Dark Lab sound system.
To use it, simply:
~ Plug its USB cable (labeled 'Numark') into your computer.
~ Turn on the unit (see picture below for the power button location).
~ Download and install ['Serato DJ Pro' software](https://serato.com/dj/pro/downloads).
The DJ controller will unlock the Pro license automatically.
~ Import and analyze some of your music.
~ Switch the Dark Lab speakers' source to the DJ controller using the switch boxes. See the [Sound System](https://wiki.cci.arts.ac.uk/books/dark-lab/page/sound-system) page about using the Dark Lab sound.
Please enjoy - but DO NOT bother other people!
Be mindful of any classes next door. Use it whenever the lab is empty, or perhaps come in on a weekend or evening.
We have a lot of other MIDI / music equipment at CCI, too!
*The on / off switch is located there:*
[](https://wiki.cci.arts.ac.uk/uploads/images/gallery/2025-09/XoTCNbFMmEdjoTOa-cci-darklab-dj-controller-on-off.jpg)
# Leap Motion Controller (hand & finger tracking)
[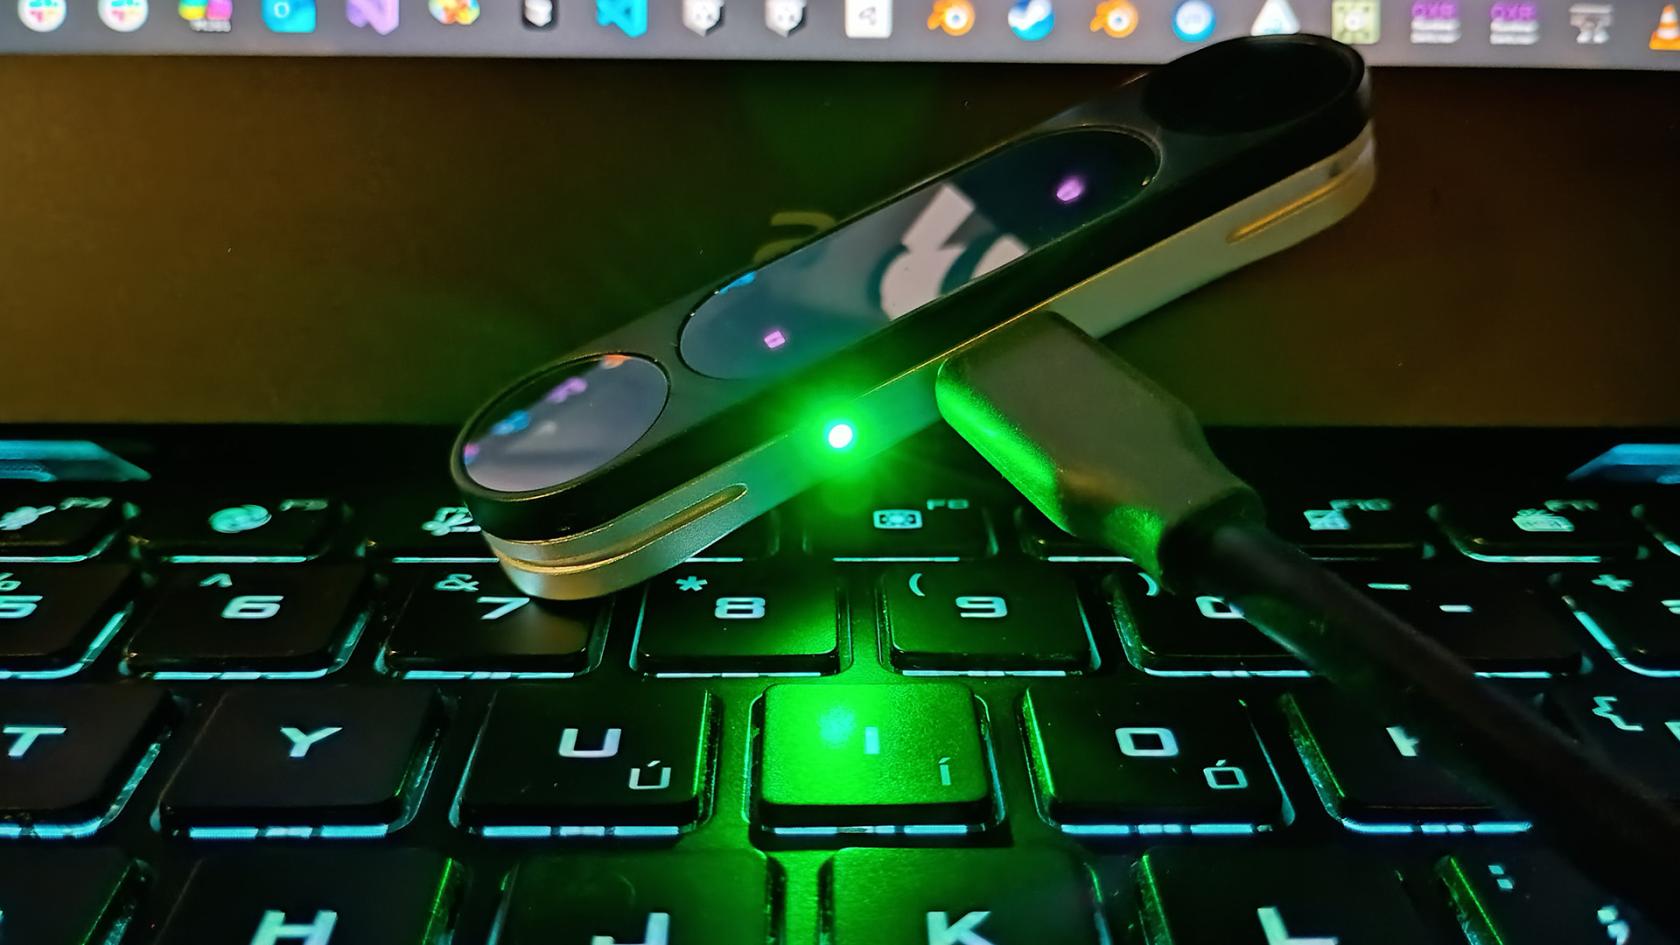](https://wiki.cci.arts.ac.uk/uploads/images/gallery/2025-09/HdoXRC2sISvhEZt5-cci-darklab-leap-on-keyboard-close-copy.jpg)
The **'Leap Motion Controller 2'** is a little usb-connected hand & finger tracking device made by [Ultraleap](www.ultraleap.com).
The original version was (partly) intended to add hand tracking to VR headsets, but quickly became very popular for hand / gesture interaction in general.
The Leap can recognize two-handed gestures and perform very smooth and accurate, real-time motion tracking of your hands and fingers.
It connects over USB and works on Windows, Mac, Linux, Android, Quest VR, etc.
There are plugins and API's available for most common languages and platforms; e.g. Unity / Unreal / TouchDesigner / Processing / etc.
It works by having stereo 3D 'active infrared' (nightvision) cameras look out from the the device.
Just hold your hands in its view / interaction zone - and it will start tracking them at 120 frames per second :)
[](https://wiki.cci.arts.ac.uk/uploads/images/gallery/2025-09/dD7WRQFF8BYW0qqg-cci-darklab-leap-right-side-up.jpg)
##### What do we have at CCI? #####
We have a bunch of the 'Leap Motion Controller 2' and the original 'Leap 1' available through the [Kit Room](orb.arts.ac.uk).
In most cases you will be able to loan a Leap 2 - but do not worry if only the V1 is left in stock! The difference between the two is somewhat minor, and the original is highly capable too :)
//////// TODO INSERT PICTURE OF BOTH V1 and V2 ////////
*The 'Physical Hands' sample project working on one of our 'spatial 3D' displays:*
[](https://wiki.cci.arts.ac.uk/uploads/images/gallery/2025-09/xrn6KZBnJ8W4c2KX-unity-leap-spatial-3d.jpg)
##### How to get it running: #####
~ Get a device through [ORB, our loan store](orb.arts.ac.uk)
~ Install a version of the Ultraleap software. Depending on what software you want to use it with, you might need an older version:
~ Go to [Ultraleap's website](https://www.ultraleap.com/downloads/)
~ Or install it through [Steam](https://store.steampowered.com/search/?term=ultraleap&tags=603297&supportedlang=english&ndl=1)
#### How to develop for it ####
There are many different ways to work with the Leap. You can use their plugins to go straight into Unity/Unreal/etc., or you can use the SDK with its programming API's for many common languages. TouchDesigner has a component built-in.
Choosing how to approach things will depend on what type of interaction you are aiming for.
For example, are trying to recognize just the hand / finger positions, or entire gestures, or do you want to achieve a more physical style interaction with grabbing, pushing, pulling, etc.?
Ultraleap provides amazing samples and demo projects for any of the above, that you can literally drag and drop into your own.
Their resources are probably the best place to start any new Leap Motion project:
Getting started: [docs.ultraleap.com/hand-tracking/getting-started.html](https://docs.ultraleap.com/hand-tracking/getting-started.html)
Installing the software on Windows or Mac: [docs.ultraleap.com/hand-tracking/desktop-setup.html](https://docs.ultraleap.com/hand-tracking/desktop-setup.html)
Tips for where to best place the sensor: [docs.ultraleap.com/TouchFree/touchfree-user-manual/camera-placement.html](https://docs.ultraleap.com/TouchFree/touchfree-user-manual/camera-placement.html)
Basic guidelines for effective interaction: [docs.ultraleap.com/xr-guidelines/Getting%20started/design-principles.html](https://docs.ultraleap.com/xr-guidelines/Getting%20started/design-principles.html)
Basic (programming) info and concepts about the coordinate system, hand bones, etc: [docs.ultraleap.com/api-reference/tracking-api/leapc-guide/leap-concepts.html](https://docs.ultraleap.com/api-reference/tracking-api/leapc-guide/leap-concepts.html)
Sensor specs: [www.ultraleap.com/products](https://www.ultraleap.com/products/)
Code samples, resources and demo projects: [github.com/ultraleap](https://github.com/ultraleap)
Because of the Leap's popularity among creative coders over the last decade, there are tons of additional tutorials and code samples for you to find besides Ultraleap's own resources.
##### TROUBLESHOOTING #####
~ **If the device is connected, and tracking your hands, but it does not work in TD/UE/Unity/etc:**
You might need a different version of the Ultraleap software. Some plugins/libraries only work with a certain one (e.g. Hyperion (v6), Gemini (v5), Orion (v4). If you are sure you are using the correct one, perhaps do a clean reinstall/reboot and try again, try the Steam versions, or something else might be wrong...
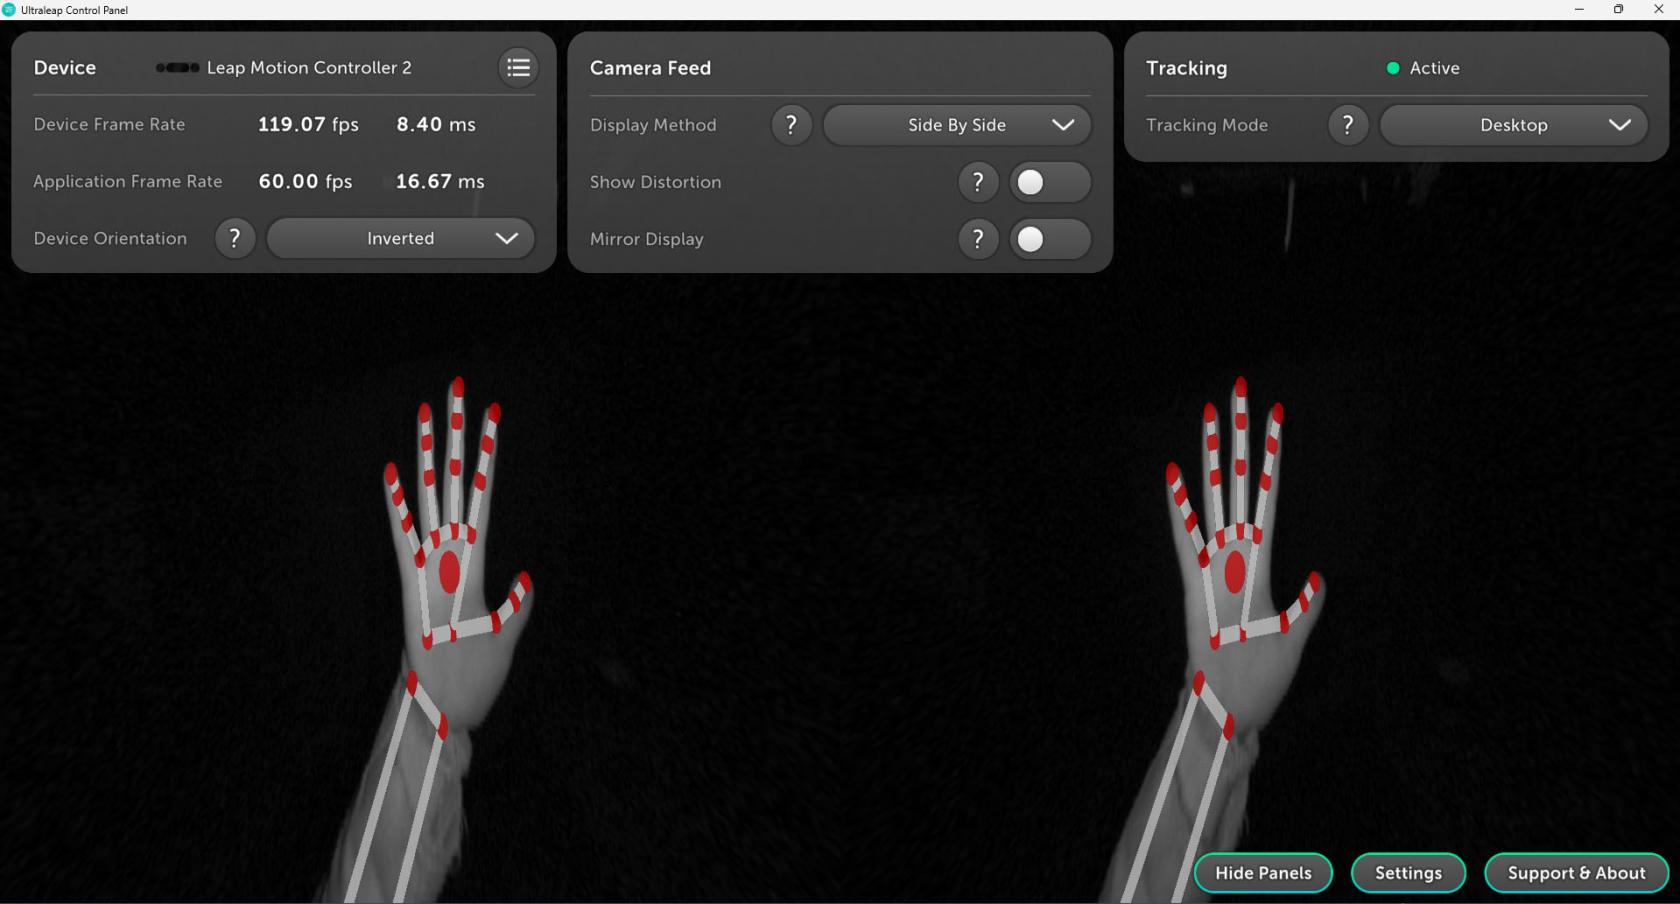
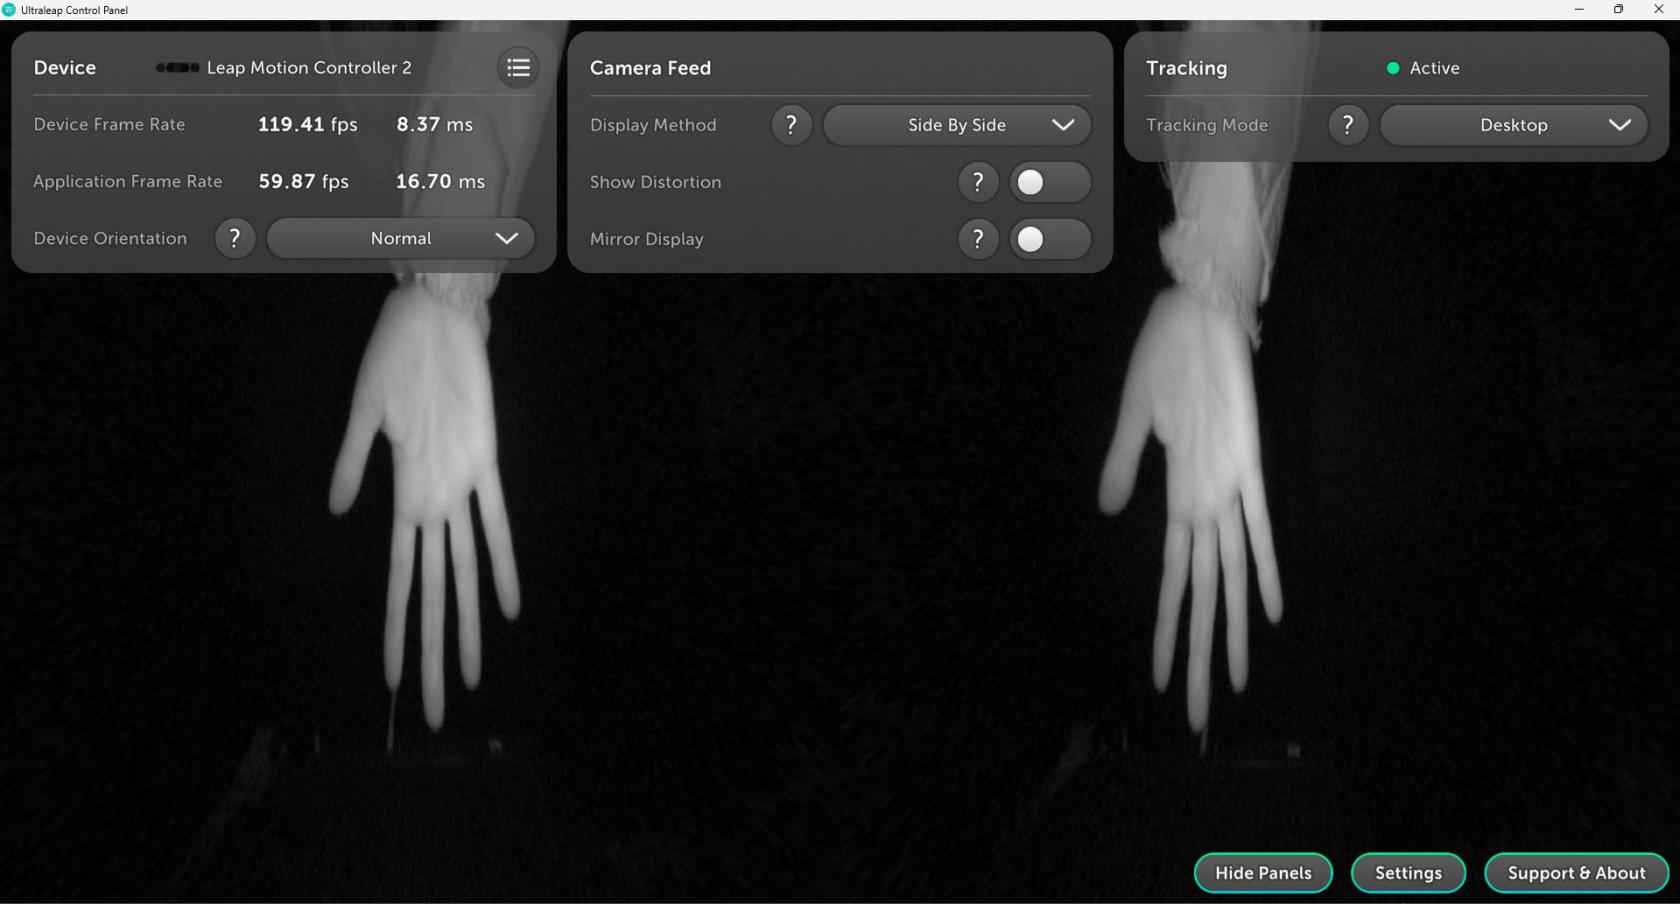
~ **If the device is connected, and you can see the cameras working, but it is not tracking your hands**
Do you have it upside down perhaps? Which side is the cable coming out?
Try flipping the orientation in the Control Panel, or changing the 'Tracking Mode'.
[](https://wiki.cci.arts.ac.uk/uploads/images/gallery/2025-09/MFXurDg3feB8wQju-cci-darklab-leap-control-panel-options.jpg)
*upside down, not tracking...*
[](https://wiki.cci.arts.ac.uk/uploads/images/gallery/2025-09/AC9oNBJ0F4OwnVpw-cci-darklab-leap-upside-down.jpg)
~ **If the device is connected, but you cannot see anything happening in the software**
~ **If the software cannot connect to the device:**
~ **If you cannot install the sofware at all**
**[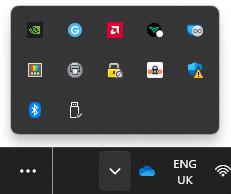](https://wiki.cci.arts.ac.uk/uploads/images/gallery/2025-09/y2Eg9Qnr0rf9vkJC-cci-darklab-leap-tray-icon.jpg)
[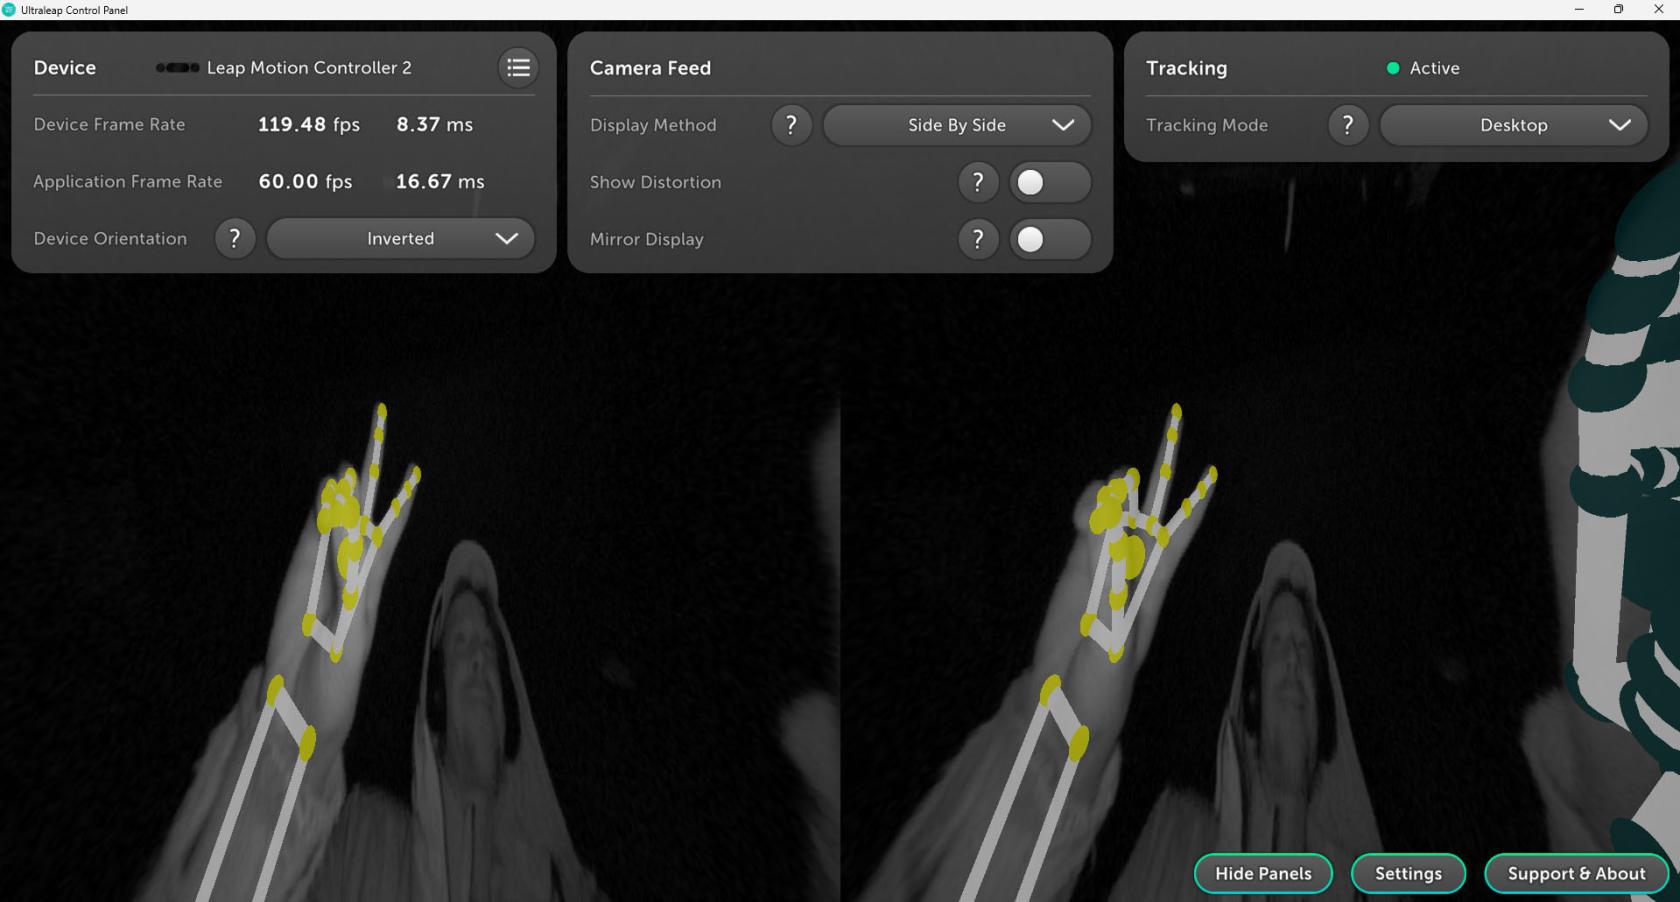](https://wiki.cci.arts.ac.uk/uploads/images/gallery/2025-09/T9OgFilZO7ZomRcX-cci-darklab-leap-peace-sign.jpg)
# Microsoft Kinect (body motion sensor / depth camera)
[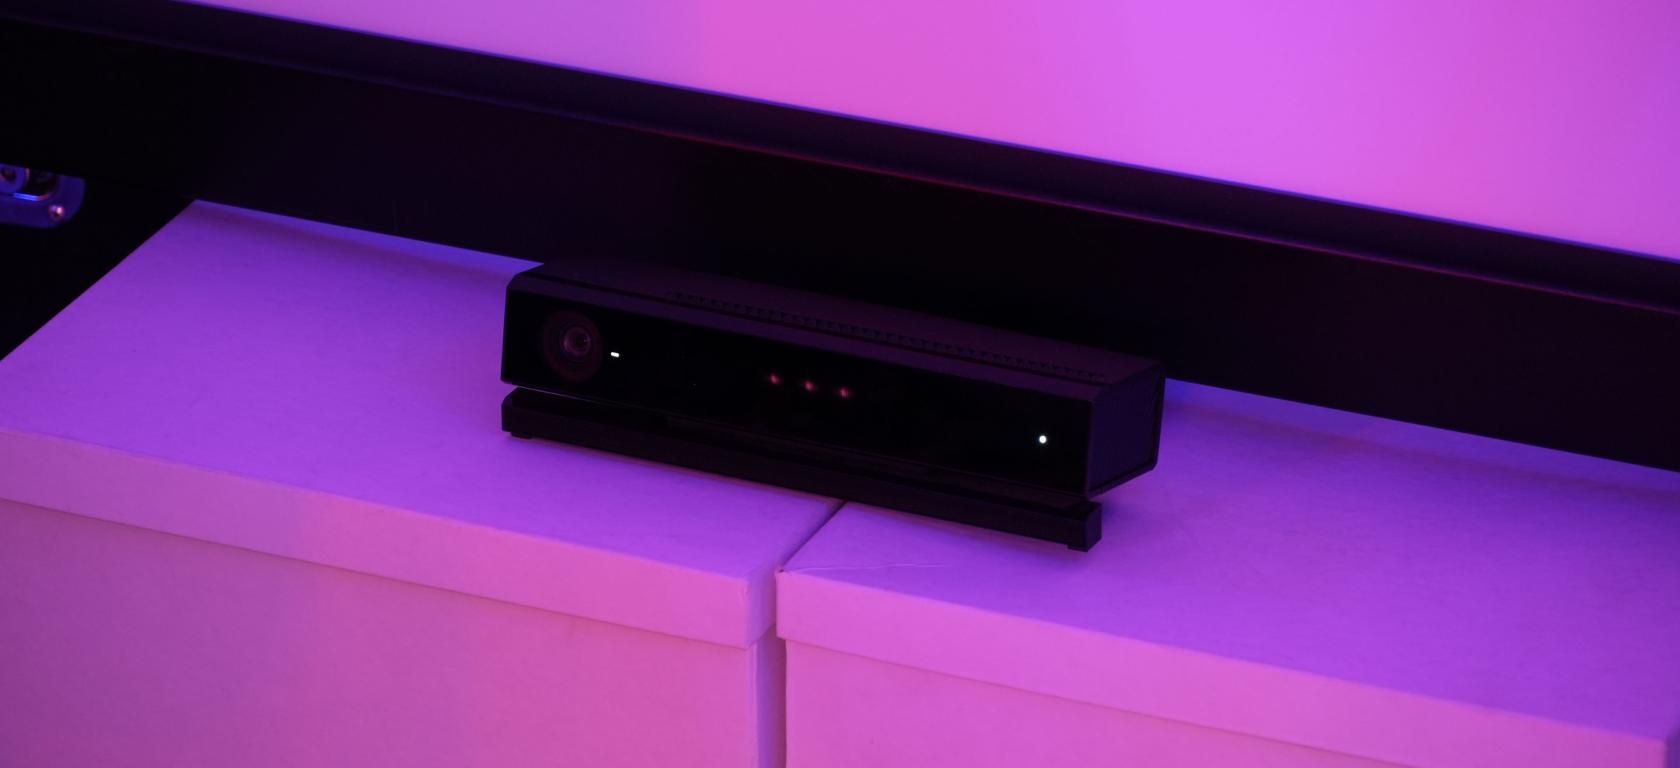](https://wiki.cci.arts.ac.uk/uploads/images/gallery/2025-09/tzSE9Tvgint1FLNI-cci-darklab-kinect.jpg)
## **What is it?**
Microsoft Kinect V2 is a full-body motion sensor originally released for XBox One game consoles and PCs.
It has an RGB colour camera, an infrared night-vision camera, a microphone array that can detect which direction sounds are coming from - and its main feature: the 3D depth-sensing camera.
The Kinect can track up to 4 people's bodies simultaneously in real-time.
Just walk up to it and it will start tracking your movements!
It provides 3D skeletal data (the positions of 24 of your body's joints in 3D space), at a rate of 30 times per second.
### **What you will need**
The Kinect works great on Windows, where you can get Microsoft's drivers and the full SDK (software development kit).
Sadly, there is no proper support for MacOS...
(On Mac, you could consider using a webcam and so-called 'pose estimation' software libraries like Google's 'MediaPipe Pose Landmarker' to achieve a similar type of body tracking).
The SDK comes with a collection of demos and example code in various languages. These allow you to access the skeletal tracking data, and all of the 'raw' sensor streams from the color/infrared/depth cameras and microphone array, in your own code.
There are also plugins and libraries for many apps, languages and platforms; e.g. Processing, TouchDesigner, Unity, etc. etc.!
### **The setup**
***for Windows PCs:***
1) First you'll want to download and install ["Kinect for Windows SDK 2.0"](https://www.microsoft.com/en-gb/download/details.aspx?id=44561).
2) Plug in the power adapter and USB cable. The power adapter might feel like it does not fit, but it does! Don't feel afraid to apply some force ;)
3) Run 'Kinect Studio' and click 'connect' in the top left corner to test if all is working well!
The lights should come on and it will start tracking any people that stand in front of the sensor.
FIELD OF VIEW / distance
VueFsaPMGK5XEY
https://youtu.be/GPjS0SBtHwY?si=Np0OPAfzBRv4aRw6
https://youtu.be/Hi5kMNfgDS4?si=qtxaiYW1ax-mNV-h
#### **Troubleshooting**
MORE INFO:
[learn.microsoft.com](https://learn.microsoft.com/en-us/windows/apps/design/devices/kinect-for-windows)
https://youtu.be/GPjS0SBtHwY?si=e4
# Know the Kinect
Here is an old, but great [Tech Demo](https://www.youtube.com/watch?v=OWzjn656kb4) from Microsoft, showing off what Kinect can do.
#### Kinect can provide real-time
- skeletal tracking in 3D space with human body joints,
- Infrared camera image,
- depth camera image,
- microphone direction data
## Kinect can’t do:
- High precision motion capture
- Hand(gesture)/face(landmark) tracking (with only native Kinect SDK)
** Kinect offers native support on Windows only
** For macOS users, the alternative option is to use webcam with OpenCV, MediaPipe for tracking. LeapMotion is also an option, but limited to hand and gesture on a smaller scale.
There are two versions of Kinect available from the Kit Room, Kinect for Windows V2 and Azure Kinect. The functionality is mostly the same, with some difference in specs and formfactor. The Azure does have slightly improved tracking.
Kinect for Windows V2 is set up and installed in the Darklab.
[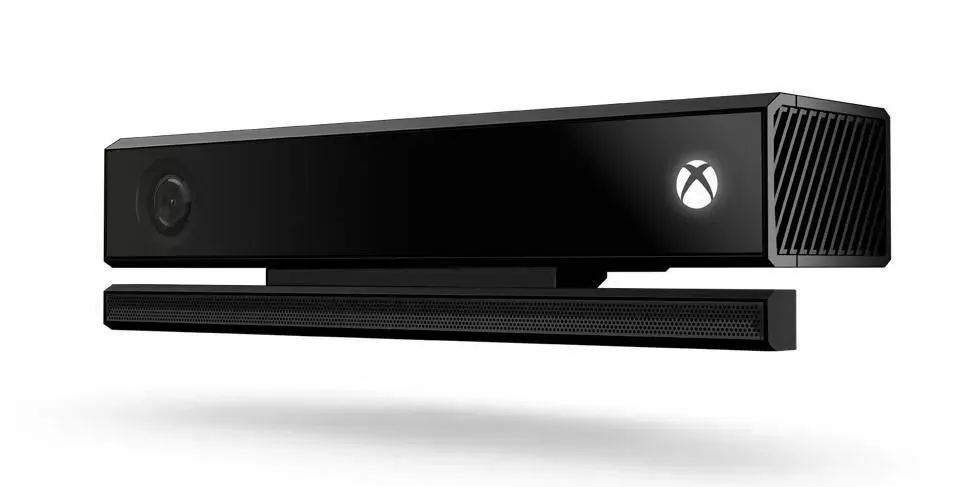](https://wiki.cci.arts.ac.uk/uploads/images/gallery/2025-06/bhJ5vqlksEBGD2wF-kinect-for-windows-v2.png)
Kinect for Windows V2
[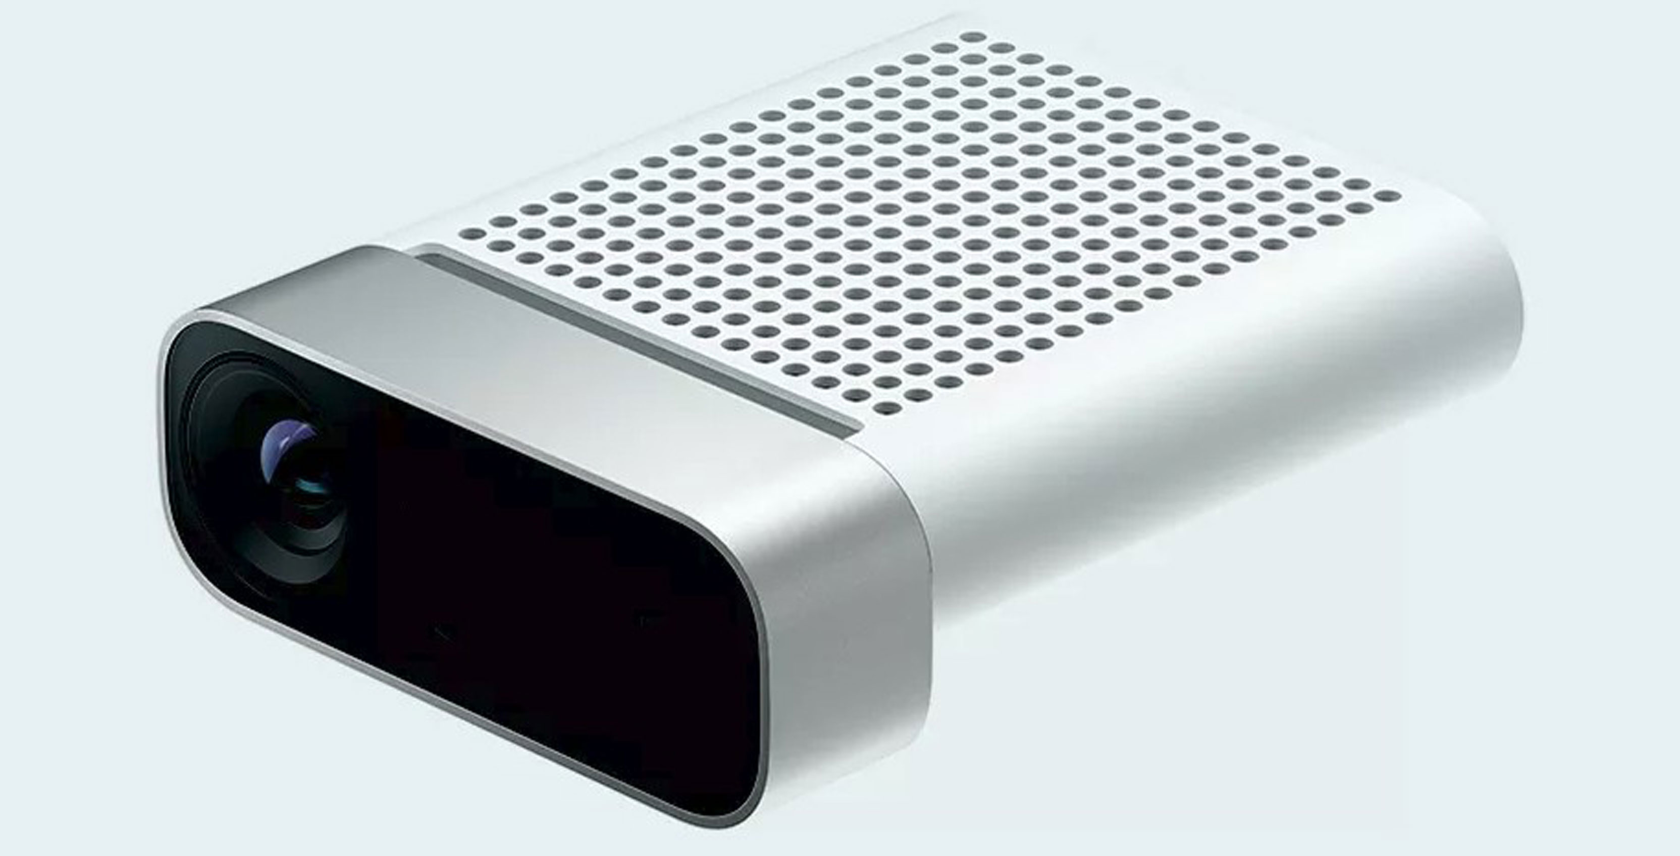](https://wiki.cci.arts.ac.uk/uploads/images/gallery/2025-06/2uPFUInLfR5fd0vy-azure-kinect.png)
Azure Kinect
# Installing the drivers
Kinect for Windows and Azure require different drivers and SDK. Identify your Kinect and install the corresponding SDK from below.
## Kinect for Windows V2
Download and install the Kinect for Windows SDK 2.0
[Download Kinect for Windows SDK 2.0 from Official Microsoft Download Center](https://www.microsoft.com/en-gb/download/details.aspx?id=44561)
After you install the SDK, connect your Kinect to your computer, make sure the power supply is connected, the usb cable only transfer data.
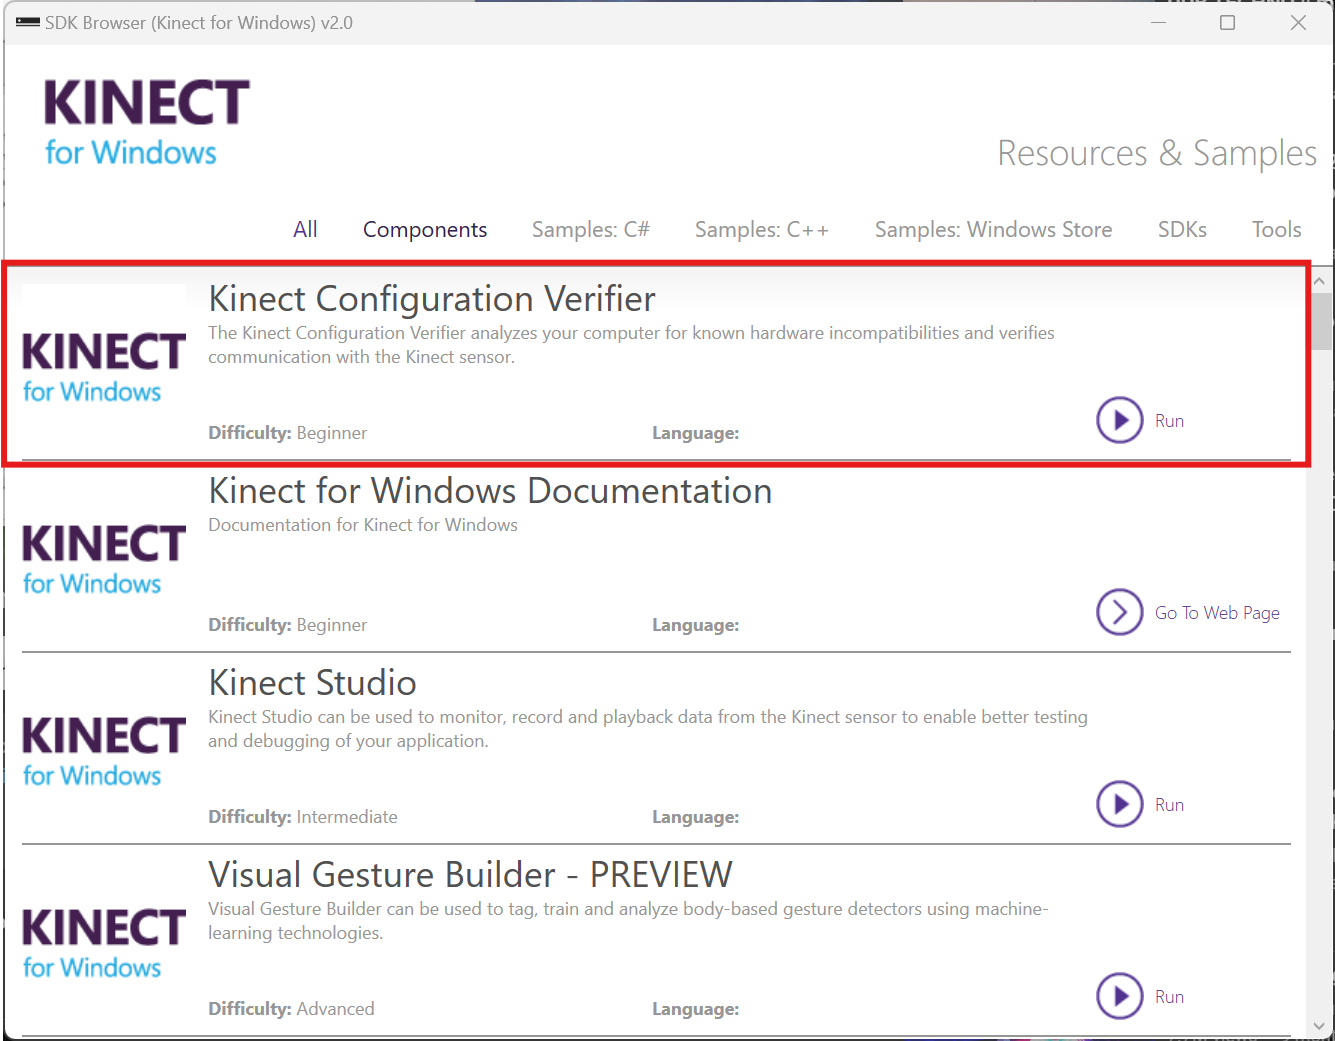
Head to SDK Browser v2.0 to find the SDKs and Documentation. You don’t need to touch the SDKs to use Kinect, but the installation is required for other application to run on it.
[](https://wiki.cci.arts.ac.uk/uploads/images/gallery/2025-06/Ds4e3P56AOE7sgYt-kinect-sdk-browser.png)
Use the Kinect Configuration Verifier to check if Kinect is working properly. It may take some time to run, if you can see the color and depth image in the last section, then everything is all set now.
[](https://wiki.cci.arts.ac.uk/uploads/images/gallery/2025-06/Dl6UK1DZmlmNvqy5-verify-kinect-configuration.png)
[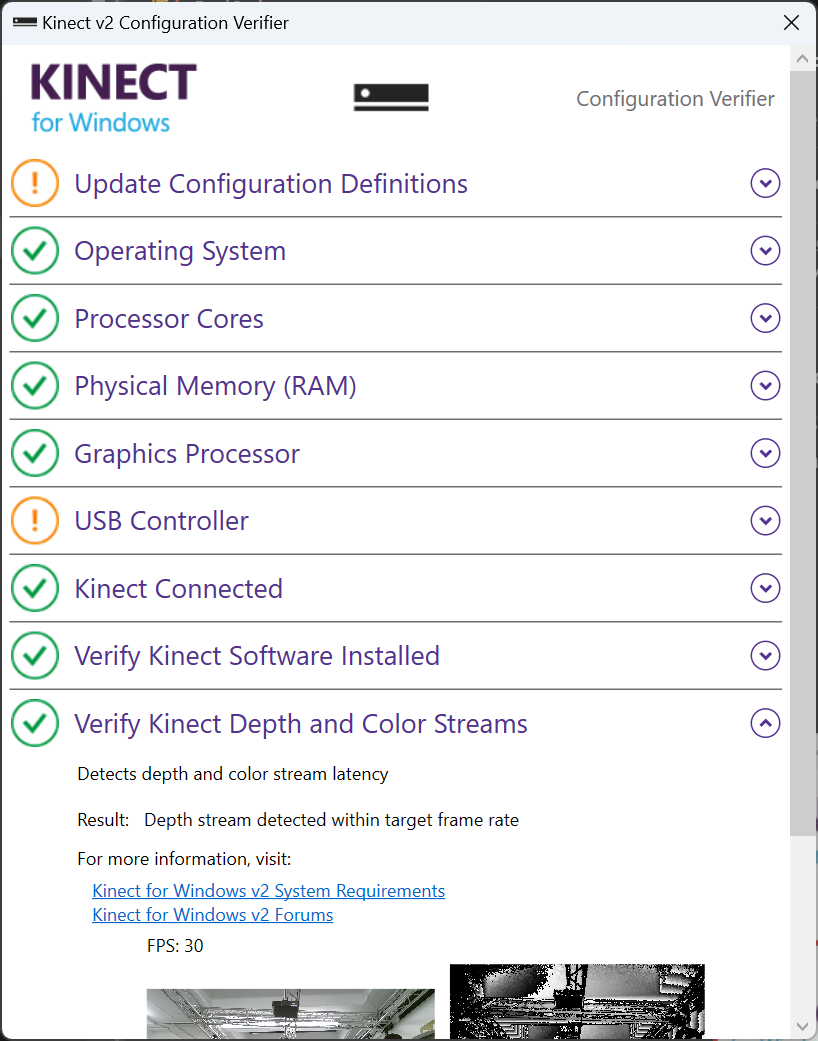](https://wiki.cci.arts.ac.uk/uploads/images/gallery/2025-06/7USNKabA56jAD5sc-verify-kinect-configuration-good.png)
You can view your live Kinect feed with Kinect Studio 2.0
[](https://wiki.cci.arts.ac.uk/uploads/images/gallery/2025-06/6T4dLGTm0wWn8mkU-kinect-studio.png)
## Azure Kinect
Azure Kinect SDK can be found on GitHub, follow the instruction to download and install the latest version.
[**GitHub - microsoft/Azure-Kinect-Sensor-SDK: A cross platform (Linux and Windows) user mode SDK to read data from your Azure Kinect device.**](https://github.com/microsoft/Azure-Kinect-Sensor-SDK/blob/develop/docs/usage.md)
Connect Azure Kinect to your computer. Azure Kinect could be powered with a standalone power supply or directly from usb-c. Make sure you use the bundled usb-c cable or a quality cable that meets the power delivery and data speed requirement.
Verify the connection and view the live feed from Azure Kinect Viewer.
[](https://wiki.cci.arts.ac.uk/uploads/images/gallery/2025-06/eYnAATiDC8Dddiux-azure-kinect-viewer.png)
## Troubleshooting
### Kinect don’t show up as a device/ Couldn’t connect to the Kinect
- Check your usb connection
- Check if Kinect is connected to power
- Try a different usb cable that is known good for data and power
** The light on Kinect only turns on when there’s application actively using the device
### Kinect for Windows connects, but looses connection/reboot every couple minutes
Go to your system sound settings and find Microphone Array Xbox NUI Sensor. Make sure this device is allowed for audio. If not allowed, Kinect won’t initialize properly and try to reboot every minute.
[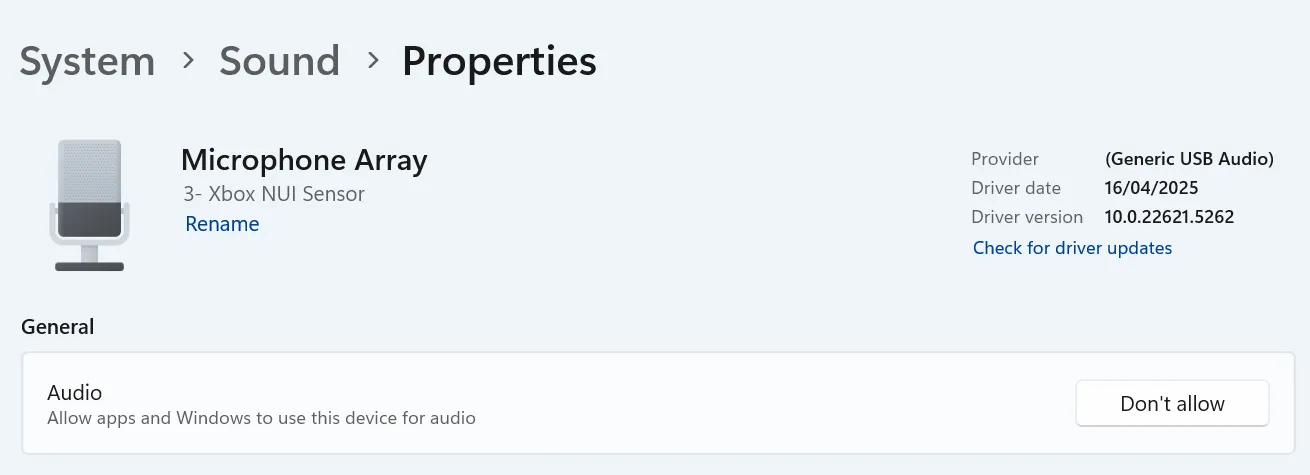](https://wiki.cci.arts.ac.uk/uploads/images/gallery/2025-06/v76uZusN0xOHNGR2-troubleshoot-microphone-permission.png)
# Kinect in TouchDesigner
# TOP and Chop
There are generally two different ways of utilizing Kinect in TouchDesigner, with Kinect TOP and Kinect Chop. `Kinect TOP` offers all image sensor data in a TOP. `Kinect CHOP` provides skeletal tracking data through different channels in a CHOP.
# TOP
The image data can be accessed through `Kinect TOP` or `Kinect Azure TOP` respectively.
Below is an example of using creating a colored point cloud from the depth and color sensing image from Kinect. The project file for this example could be found [here](https://artslondon-my.sharepoint.com/:f:/g/personal/r_wang_arts_ac_uk/EvjnQDbNE25Gmmnno8spEHwBjtGwH8weM9ACEGr_8q4qVQ?e=ul74Ke).
[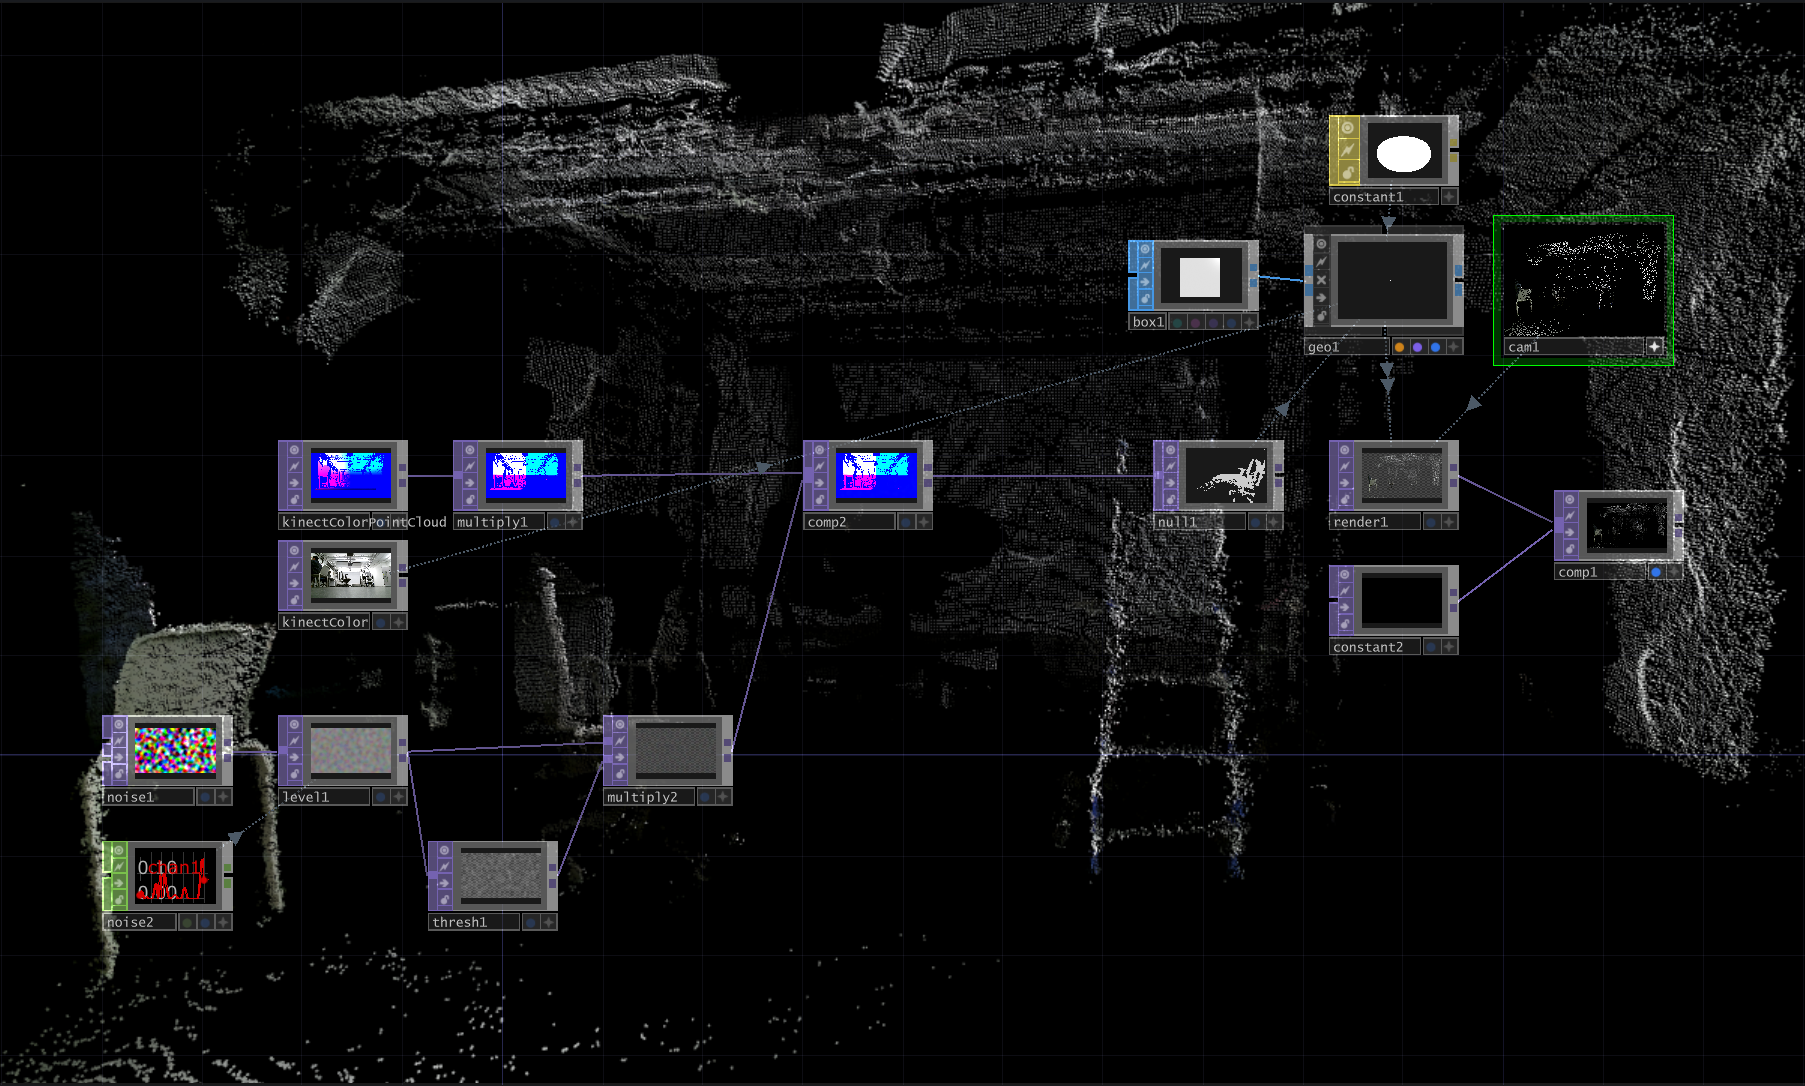](https://wiki.cci.arts.ac.uk/uploads/images/gallery/2025-06/rJimaPc42ekOZAim-kinect-point-cloud.png)
# CHOP
`Kinect CHOP` offers the skeletal tracking data for each joint and its x/y/z position in different coordinate space through different channels. Use `Select CHOP` to select the channel you need, [Pattern Matching](https://docs.derivative.ca/Pattern_Matching) is helpful in filtering and selecting multiple channels with conditions.
[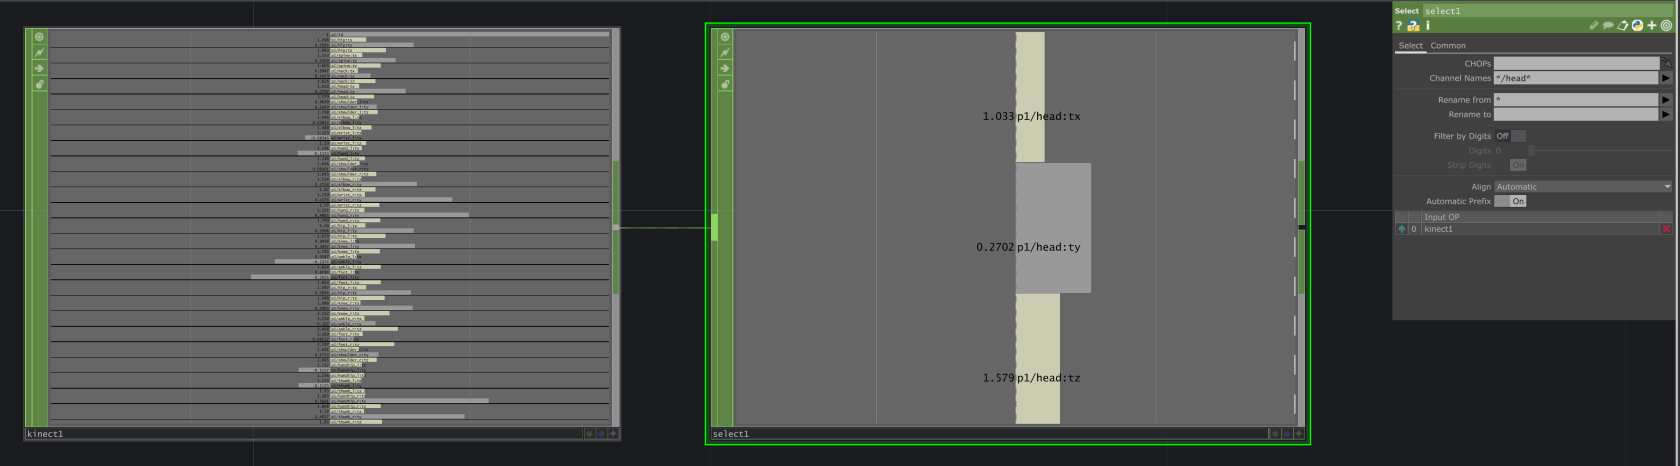](https://wiki.cci.arts.ac.uk/uploads/images/gallery/2025-06/l4t6UZA9vBXwi9Za-kinect-chop-and-select.png)
## Multi-player Tracking
A common problem of using Kinect skeletal tracking in an installation is about finding the right person to track. When you need to track only one person, setting `Max Player` to 1 will pass the handling of player selection to Kinect, and most of the time it will lock on to the closest person and there is no way to manually switch player. When there are more people in the Kinect tracking space in an installation, this could be an problem.
A good approach is to keep the `Max Player` at Max, and create cuntom logic to filter and select the player you wanna track. Every time Kinect detects a new player in the frame, they will be assigned a `p*/id`. You can use id to keep tracking locked on the same person, no matter the position and how many players are in frame.
For each player, you can use the x/y/z positions from the head joint (or any other joint) `p*/head:*` to caculate its reletive distance to any point in space. And use math to draw a boundary or create sorting logic, you can map a physical point in real-world to a point in Kinect coordinate space, so Kinect only use the tracking from the person standing right on the point.
Below is an example of selecting a player based on the realtive position to the vertical center of the frame `x = 0` and a point `x = 0, z = 3`. The project file could be found [here](https://artslondon-my.sharepoint.com/:f:/g/personal/r_wang_arts_ac_uk/EvjnQDbNE25Gmmnno8spEHwBjtGwH8weM9ACEGr_8q4qVQ?e=ul74Ke)
[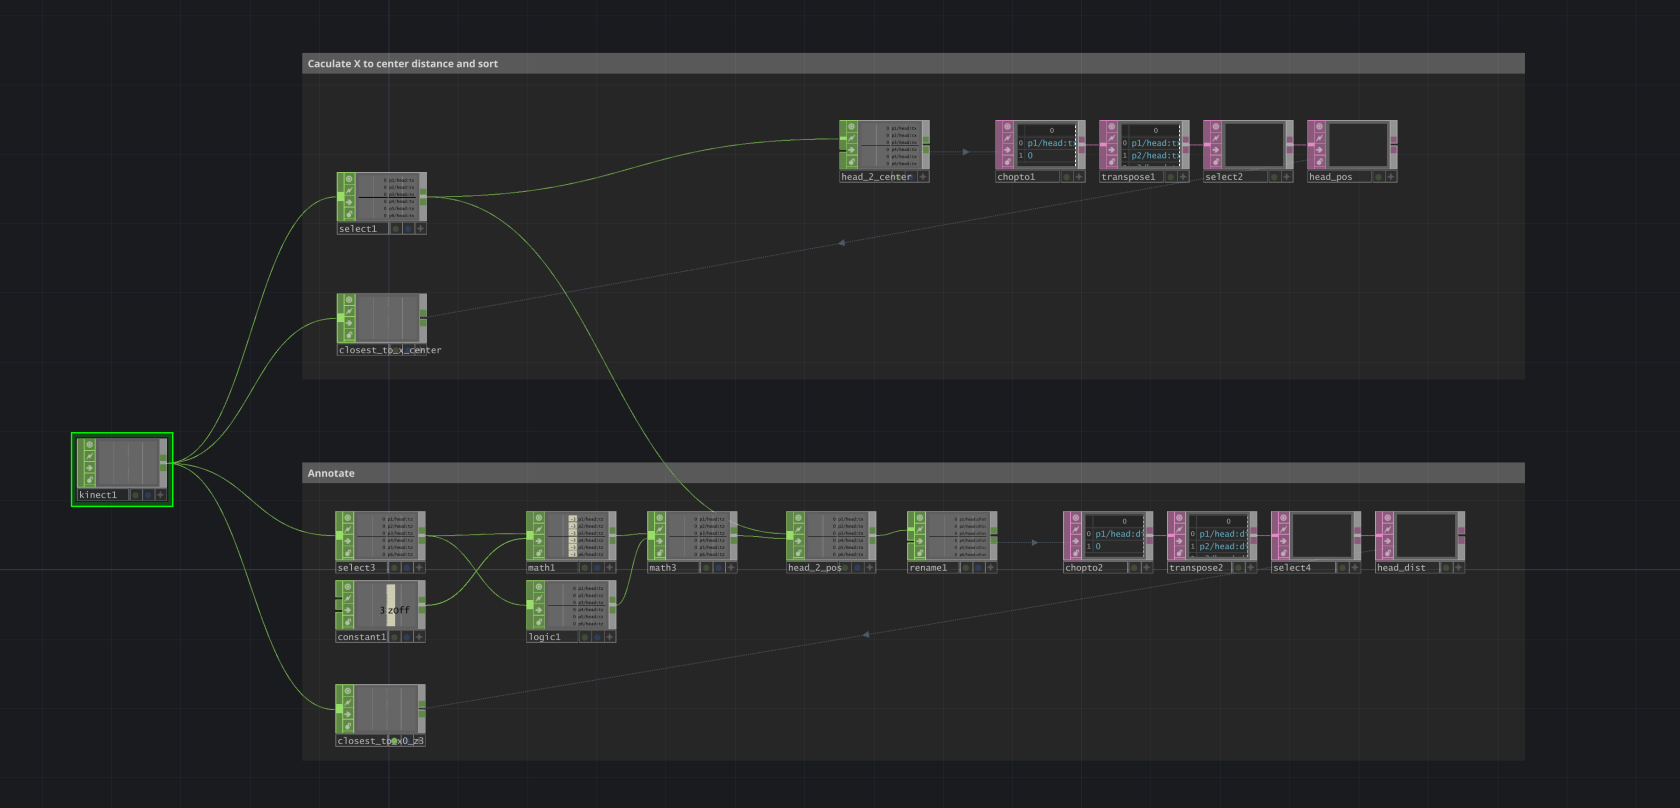](https://wiki.cci.arts.ac.uk/uploads/images/gallery/2025-06/N8Oow5YuF0scsUA4-kinect-distance-based-select-player.png)
# Use Kinect anywhere
# Stream Data
Althrough only a limited set of software, for example TouchDesigner, offers native support for Kinect over the Kinect SDK, you can stream Kinect data from one of these applications to almost anywhere, including in different environment like Python, Node.js or even Web Apps including p5.js.
Within a local network, you can effectively setup one Windows computer as the Kinect Host and stream data to the same machine or different machines, utilizing Kienct on Raspberry Pi, MacOS or even Arduino.
Depending on the use case, you can stream the raw camera data as a video feed, or stream the skeletal tracking data as a live data feed. TouchDesigner is good as the host to do both.
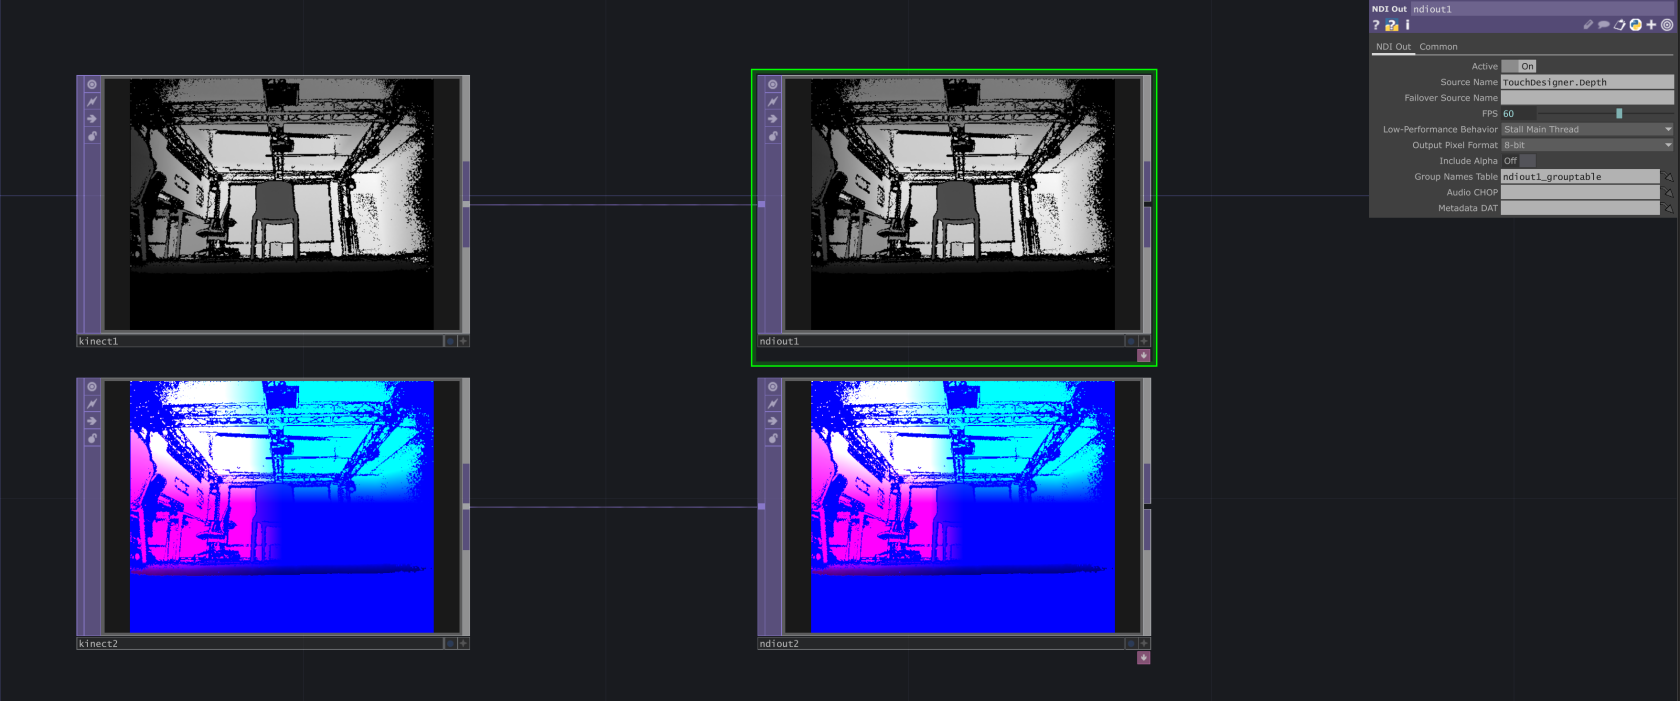
## Stream Image Feed via NDI
NDI (Network Device Interface) is a real-time video-over-IP protocol developed by NewTek. It's designed for sending high-quality, low-latency video and audio over a local network (LAN), with minimal setup and high performance. Read [NDI Documentation](https://docs.ndi.video/all/getting-started/what-is-ndi) for more infomation.
You can use NDI to stream Kinect video feeds (color, depth, IR) from TouchDesigner to:
- Another TouchDesigner instance (on same or different machine)
- OBS Studio for recording or streaming
- Unreal Engine, Unity, Max/MSP, etc.
- Custom apps using NDI SDK or NDI-compatible plugins
Setup NDI stream in TouchDesigner with `NDI OUT CHOP`, you can create different streams for different image source (TOP) with different names.
[](https://wiki.cci.arts.ac.uk/uploads/images/gallery/2025-06/10FJaEBLFAcvmyUV-ndi-in-touchdesigner.png)
## Stream Body Tracking Data via OSC
OpenSoundControl (OSC) is a data transport specification (an encoding) for realtime message communication among applications and hardware over network, typically TCP or UDP. OSC is originally created for highly accurate, low latency, lightweight, and flexible method of communication for use in realtime musical performance and is widely used in music, art, motion tracking, lighting, robotics, and more.
You can use OSC to stream body tracking data from Kinect in TouchDesigner to other software (or vice versa), such as:
- Unity, Unreal Engine
- Processing, openFrameworks
- Max/MSP, Pure Data, Isadora
- Web apps (via websocket bridge)
- Python, Node.js apps
- Other TouchDesigner instance
Send OSC data from TouchDesigner with `OSC Out CHOP` or `OSC Out DAT`. Use `CHOP` when sending multiple channels straight from a chop; Use `DAT` with custom python script to further manipulate and format the data before sending.
[](https://wiki.cci.arts.ac.uk/uploads/images/gallery/2025-07/0L3MKBQ9QSlbmflB-osc-out-chop.png)
## Stream with Kinectron for Web
OSC communication is typically implemented with UDP, which is fast and easy for native application to send and receive over the same local network. However web application in the browser runs in an isolated sandbox and does not have the access to local UDP port. To get data into your web application, you need a bridge for communicating with your web app through WebSocket or WebRTC.
[Kinectron](https://github.com/kinectron/kinectron) enables real-time stream of Azure Kinect Data to web browser. Visit [Kinctron Release](https://github.com/kinectron/kinectron/releases) page to download the latest version of the server side application and client side library for using the data.
** Notice that Kinectron V1.0.0 only support Azure Kinect. Support for Kinect Windows V2 could be found on the older version 0. Find more about [Kinectron V0](https://kinectron.github.io/#/) and usage examples.
# Receiving data
OSC is widely supported in a range of applications and programming languages. Find the package or library to receive OSC data or you can bind a socket to the UDP port then listen and parse any OSC message.
### Unity
Script and examples for receiving OSC message
[https://t-o-f.info/UnityOSC/](https://t-o-f.info/UnityOSC/)
### Unreal
Unreal has built-in OSC Plugin, include the plugin from plug-in manager and start with a blutprint. Find the documentation
[OSC Plug-in Overview](https://dev.epicgames.com/documentation/en-us/unreal-engine/osc-plugin-overview-for-unreal-engine)
### Processing
Use oscP5 library for processsing
[oscP5](https://sojamo.de/libraries/oscp5/)
### openFrameworks
openFrameworks has add-on to support OSC natively, find the documentation
[ofxOsc Documentation](https://openframeworks.cc/documentation/ofxOsc/)
### MaxMSP and Pure Data
Use `udpsend` and `udpreceive` objects to send and receive osc message
### Ableton
Use Connection Kit in Max4Live to send and receive OSC data in Ableton. More info in
[Connection Kit](https://www.ableton.com/en/packs/connection-kit/)
### Python
There are multiple packages available for osc in python.
One example is `python-osc`. Install with `pip install python-osc` and find the documentation [python-osc](https://python-osc.readthedocs.io/en/latest/)
### Node.js
There are multiple osc packages in node as well.
One example is `osc`, install with
`npm intall osc`
and find the documentation [osc.js](https://github.com/colinbdclark/osc.js)
With `osc.js`, you can also create a WebSocket bridge that forward osc messages to browser application.
### Browser /Web Application
To use Kinect data in the browser, there are two options
- Use Kinectron to stream data and receive with Kinectron client-side script, full support for video stream and body tracking data
- Use `osc.js` in Node.js to create WebSocket bridge and forward selective tracking data through websocket. Use JavaScript native WebSocket Client API to receive the data
# Use Kinect Directly in Unreal and Unity
In game engines, you should be able to use the Kinect SDK directly, which still envolves some lower level programing and a lot of experience. There are some plugins developed for Kinect, but some of them are paid and some haven't been updated for years. Look for the right plugin for your need, depending on whether you want to get Skeletal Tracking or Depth Image.
### Unreal
[Neo Kinect](https://www.fab.com/listings/2b2c6d45-c984-4216-a5d0-35ca97fbd526) (paid)
[Azure Kinect for Unreal Engine](https://github.com/nama-gatsuo/AzureKinectForUE)
### Unity
[Azure Kinect and Femto Bolt Examples for Unity](https://assetstore.unity.com/packages/tools/integration/azure-kinect-and-femto-bolt-examples-for-unity-149700) (paid)
[Unity_Kinect](https://github.com/nuwud/Unity_Kinect) (free)
# Vive VR Trackers (body / object tracking)
Vive Trackers are little devices that can track their position and orientation in the room, in real-time.
They rely on HTC's base station VR tracking system, which gives them extremely high precision at essentially zero delay.
You can attach them to anything you want to have tracked, e.g. your body, a camera, object, etc.
Just make sure they are visible to the 'base stations' mounted all around the lab!
These trackers connect to either a PCVR headset, or a USB receiver dongle connected to your computer.
You don't need a VR headset to use them, and they are compatible with any software that supports OpenXR/SteamVR/WebVR (including Unity, Unreal, TouchDesigner, most programming languages).
Like most VR-related development, your experience will be best on Windows.
This tracking system is set up all around the Dark Lab - but we also have a version of these trackers that can work anywhere, including outdoors! (see Vive Ultimate Tracker)
*One of eight 'HTC Vive Base Station 2.0' in the Dark Lab*
[](https://wiki.cci.arts.ac.uk/uploads/images/gallery/2025-09/Se57a54WCeTf7Yeu-cci-darklab-base-station.jpg)
# How to use
### 1) Getting Ready
First things first — make sure:
~ your Vive Trackers are charged and turn on.
~ you have Steam running, and SteamVR installed.
~ you have either a compatible (Vive/SteamVR) headset plugged in, or the USB receiver dongle (one for each tracker).
### 2) **Pairing your VR trackers**
Wireless VR trackers (and controllers) need pairing just like any Bluetooth device. This is done through SteamVR.
TL;DR: **SteamVR Settings > Devices > Pair Controllers > I want to pair a different type of controller.. > HTC Vive Tracker** and follow the steps. You’ll know it’s good to go when the LED light is solid green, and your tracker shows up as 'currently tracking' in your SteamVR app.
- Click the 3 little lines on the top left of the SteamVR desktop dashboard window to open the **SETTINGS**.
[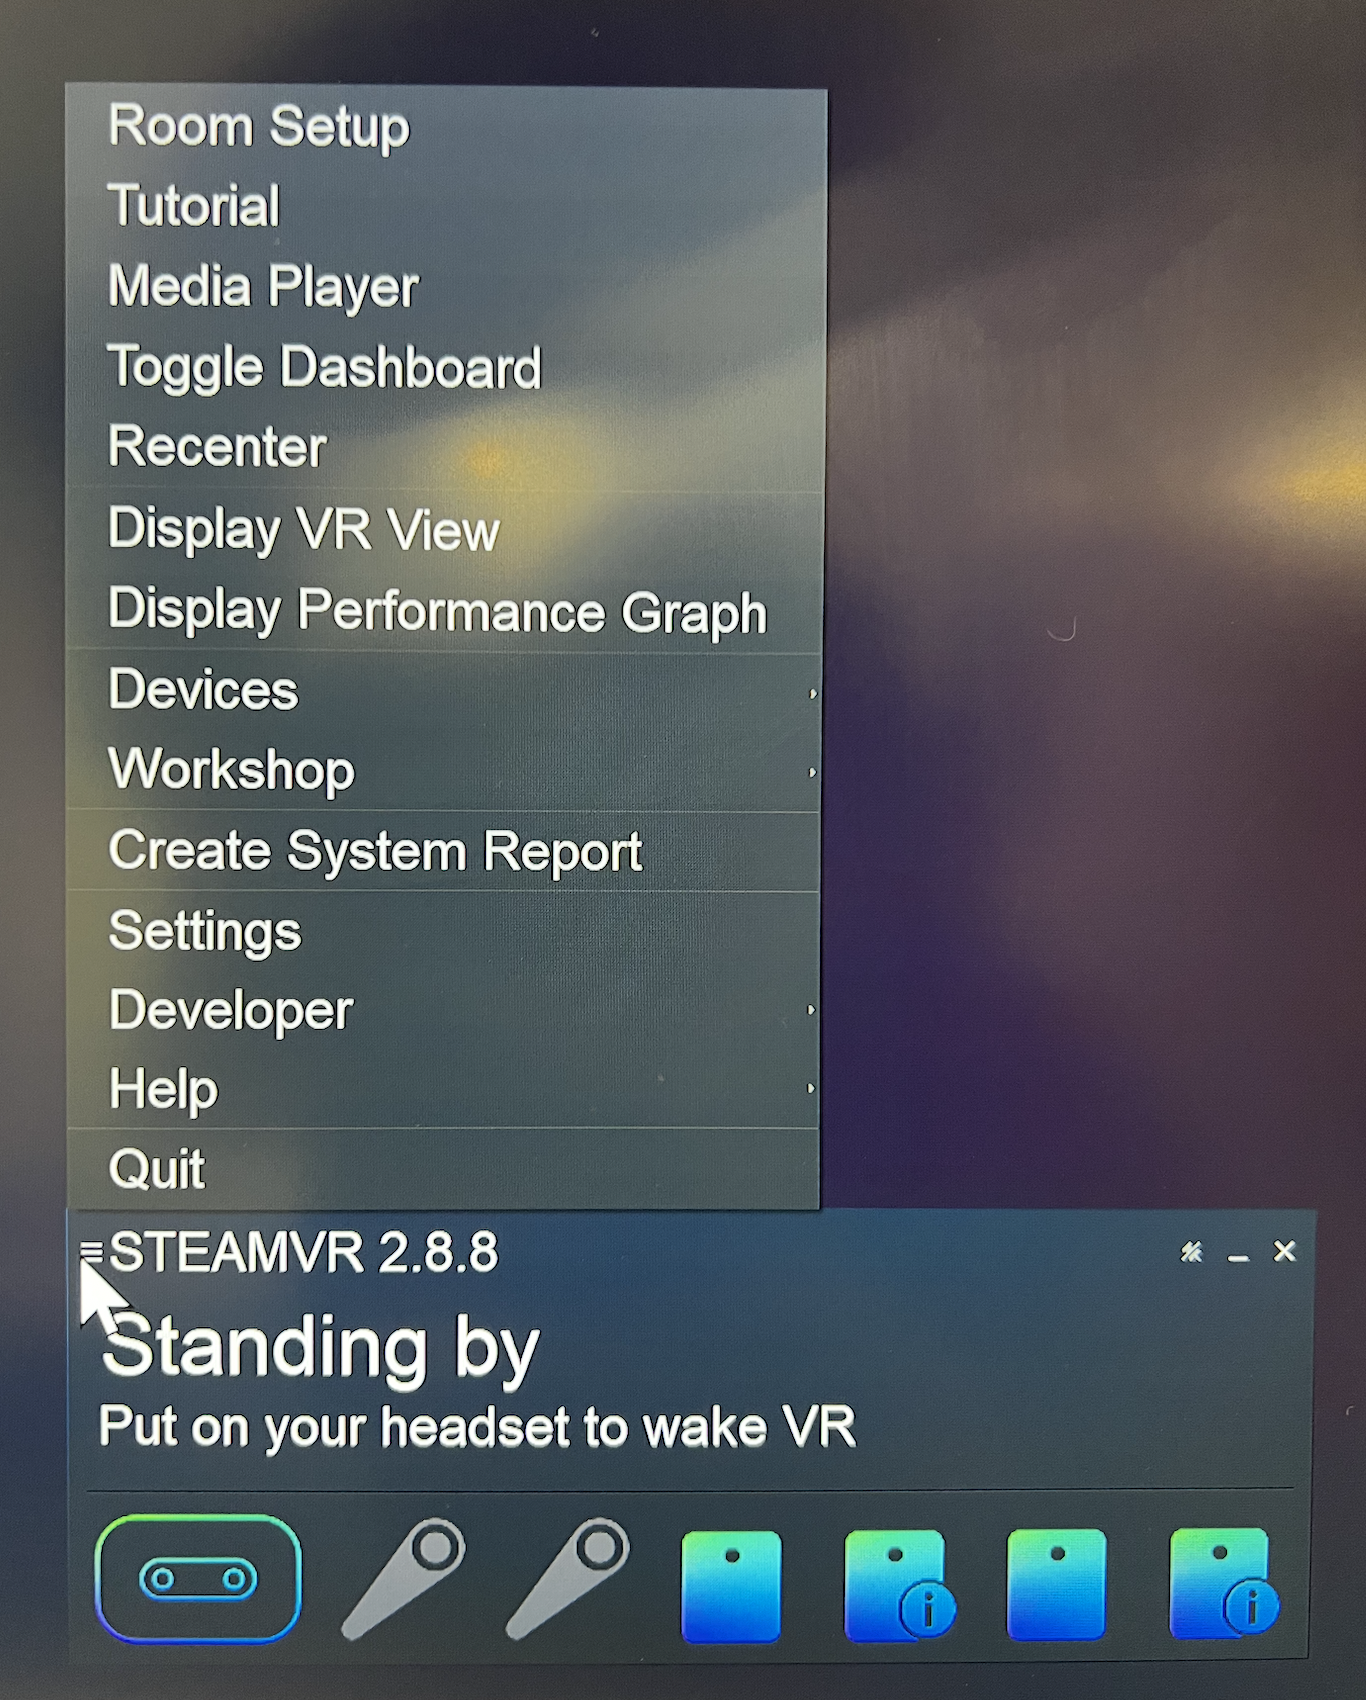](https://wiki.cci.arts.ac.uk/uploads/images/gallery/2025-02/50L9XXJ2ig0Kd3z3-image-1739880267531.png)
- Then go to Devices, chose pair your contrllers, click on I want to pair a different type of controller, then select HTC Vive Tracker.
[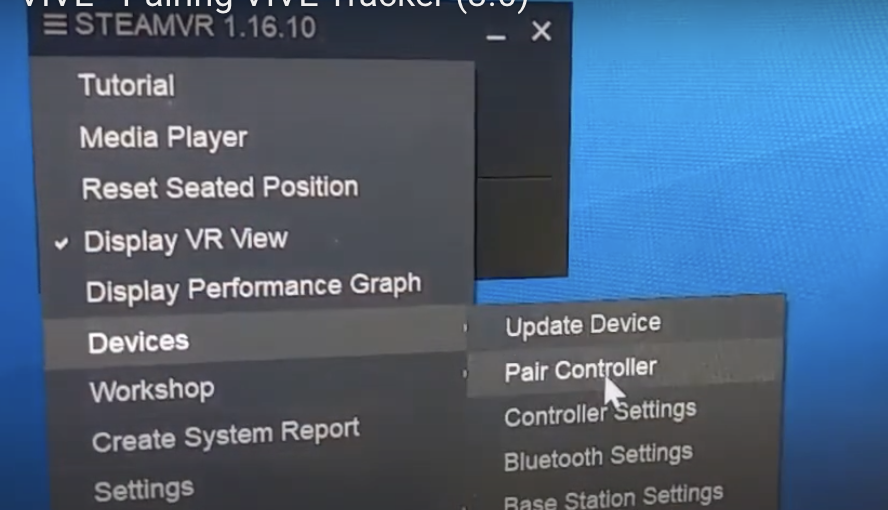](https://wiki.cci.arts.ac.uk/uploads/images/gallery/2025-02/T0EQKDHBkbdhzwwH-image-1739879352796-49-04.png)
- Turn on the Tracker.
[](https://wiki.cci.arts.ac.uk/uploads/images/gallery/2025-02/M1quu2QzCA6pzmD8-image-1739879396953-49-48.png)
---
### 3. Assign Tracker Roles
Your tracker should now be tracking, and a little icon for it should have appeared on the SteamVR GUI.
Now let’s tell SteamVR which tracker does what:
- **SteamVR Settings > Controllers > Manage Trackers**
- Assign the roles like this:
- **Waist** → `waist`
- **Left Foot** → `left_foot`
- **Right Foot** → `right_foot`
This will tell other software what the tracker is attached to, so it can **assign them to the correct body parts or game objects**.
---
## VR tracking in Unreal Engine
### 1) Set Up the Plugin
- Double-check that SteamVR is running.
- Open Unreal Engine and go to **Edit > Plugins**.
- Find and enable **OpenXR Vive Tracker**.
### 2) Integrate with Unreal Engine
- Open your project’s blueprint.
- Locate the **Motion Controller** component.
- Add a **Live Link** component to stream tracker data.
- Make sure the **Role** matches the SteamVR assignments.
### 3) Find and Link the Prawn Asset
- Connect the prawn’s motion controllers to the corresponding trackers. You could check here for more details [Fixing Live Link XR in Unreal Engine 5.2 and 5.3](https://www.youtube.com/watch?v=GKsPjufVPwg)
- Open the **Content Browser**.
- Search for **prawn**, and follow the tutorial video.
### 4) Test and Calibrate
- Run your project in **VR Preview**.
- Do some basic movements to check if everything tracks correctly.
---
## VR tracking in Unity
Vive has a great page explaining how to get things fully up and running in Unity [right here!](https://developer.vive.com/resources/openxr/unity/tutorials/tracker-overview/getting-data-from-vive-tracker/)
We also have been using [EasyOpenVR](https://github.com/BOLL7708/EasyOpenVR) as a simple means to get tracking data into C#.
We will be posting some CCI code samples shortly.
---
## VR tracking in TouchDesigner
TouchDesigner has built-in VR support. Some of it might seem a bit dated, but it should work for our trackers.
See the following pages on Derivative's website for more:
[TouchDesigner VR Support](https://derivative.ca/feature/vr-support/12)
[TouchDesigner OpenVR](https://derivative.ca/UserGuide/OpenVR)
---
#### Useful links:
~ [OpenXR Runtime Switcher](https://github.com/WaGi-Coding/OpenXR-Runtime-Switcher) if you work with different VR backends, like Meta Quest and SteamVR
For the full official tutorial, please refer to:
- [Pairing Vive Trackers (3.0)](https://www.vive.com/us/support/tracker3/category_howto/pairing-vive-tracker.html)
- [Fixing Live Link XR in Unreal Engine 5.2 and 5.3](https://www.youtube.com/watch?v=GKsPjufVPwg)
# Virtual Reality
[](https://wiki.cci.arts.ac.uk/uploads/images/gallery/2025-09/HR4Z574WcRUklGMm-cci-darklab-quest3.jpg)
[](https://wiki.cci.arts.ac.uk/uploads/images/gallery/2025-09/xYcU1NA4NtRfW41M-cci-darklab-vr2.jpg)
### What do we have?
We currently have the following headsets and other Virtual Reality (VR) equipment available at CCI:
Headsets:
- [Meta Quest 3](https://www.meta.com/gb/quest/quest-3/)
- [Valve Index VR headset](https://store.steampowered.com/valveindex)
- [Vive Pro 2 Wireless](https://www.vive.com/uk/product/vive-pro2/overview/)
- [Vive Focus 3](https://www.vive.com/uk/product/vive-focus3/overview/)
VR controllers:
- 4x Vive Pro 2 controllers
- 2x Vive Index ('Knuckles') controllers
VR trackers + straps:
- 10x Vive Tracker 3.0
- 2x '3-pack Vive Ultimate Tracker with USB receiver dongle'
- hand, foot and waist tracker straps
Trackable areas in Dark Lab:
- 4x base stations in VR area
- 4x base stations in projection area
(covering most of the Lab)
[](https://wiki.cci.arts.ac.uk/uploads/images/gallery/2025-09/JrT25hEJZp4PS7bd-cci-darklab-base-station.jpg)
### How to use our headsets
The VR area in the Dark Lab is set up with two stations. One features a PC-based VR headset, and the other a battery-powered standalone headset that can also do MR or 'mixed reality' - where you see the real world with virtual things in it.
The Quest can also be used for tethered PCVR through the provided USB-C cable.
Both stations feature a top spec gaming PC and a big TV for spectators.
The computers *should* be fully set up and good to go for VR development - or if you just want to have a go in VR!
Feel free to pop in anytime.
##### Getting started
For PC-based VR:
~ open and log into Steam
~ open SteamVR
~ make sure everything seems to be up and running in SteamVR:
~ install and/or fire up some VR applications!
For Meta Quest (as standalone device):
~ Just turn it on, using the button on the side of the unit
~ There should be a Dark Lab user account waiting to be used
~ Use either controllers, or your hands/fingers, to control the cursor
~ open the library button marked as below to view all installed apps
~ Download the 'Meta Quest Developer Hub' on your computer to more easily upload code samples, etc, to the headset.
For Meta Quest (connected to the PC):
~ Make sure the provided USB-C cable is plugged into the Quest
~ Run the Quest Link app and sign in. This might need to be the same account on both the headset and the computer.
~ Double-check that Meta Quest is the current VR runtime
~ Run Steam and sign in
~ Run SteamVR
~ install and/or fire up some VR applications!
#### PCVR vs. Standalone
Virtual Reality typically comes in two main forms:
~ PC-based; where a headset is connected to a gaming-style computer (usually over a cable, or sometimes WiFi).
The computer runs the applications, sending the video feed to the headset, which gives you the highest graphics power and performance at the cost of being bound to a PC.
~ Standalone headsets can run completely independently; wireless and off battery power. The tend to use camera-based 'inside-out' tracking, allowing them to be used without needing tracking base stations in the room.
The downside is that everything runs off what is essentially a mobile phone processor, so the graphics and processing power will be less compared to PCVR.
### Getting started in VR Development
This section is a work in progress!
Both Unity and Unreal Editor have empty VR project templates that you can choose when starting a new VR project.
You can also convert an existing project to VR; usually this involves swapping or converting your main camera to an 'XR camera rig'.
Both Steam and Meta have some great developer resources and guidelines.
### SteamVr / OpenXR / Meta (Oculus)
Getting into VR development can be confusing with all the various protocols and APIs.
The way it works is: you develop your project or code to use 'OpenXR', which is becoming the main platform for Virtual and Mixed Reality applications.
Each headset comes with 'VR runtime' software that can interpret OpenXR apps and run them on the actual hardware (similar to driver software for your webcam or printer).
On Valve / HTC Vive headsets, the runtime is SteamVR. For the Quest, it is the Meta Quest runtime.
(OpenVR, Steam's original SDK / API has now pretty much been superceded by OpenXR. Both are implemented in the SteamVR runtime though)
[OpenXR Runtime Switcher](https://github.com/WaGi-Coding/OpenXR-Runtime-Switcher)
- Unreal / Unity standard project templates
- Convert existing project to VR
- setting backends etc
-
[](https://wiki.cci.arts.ac.uk/uploads/images/gallery/2025-09/3ubfsV8tysdgsBss-cci-darklab-tv-hdmi.jpg)
# AV Rack
The 'AV Rack' houses some of our audiovisual equipment.
Feel free to use the big buttons to turn on the sound system, the DMX stage lights, and the equipment in the rack itself.
It is a standard 19"-wide enclosure that can hold things like audio interfaces, amplifiers, lighting controllers and any other 'rack-mountable' equipment.
Currently, our rack houses a DMX lighting controller, the selector switches to route sound from different inputs to the speakers, and the big colourful buttons to turn on the lights, speakers and the Rack itself.
It also houses the Bluetooth audio receiver inside.
We will be definitely be adding more equipment in the near future though!