The laser cutter was purchased in 2021 by UAL Creative Computing Institute and partly funded by the UKRI World Class Labratories fund 2020/21.
The laser cutter is a Trotec Speedy 400 with an 80 watt CO2 metal tube and Run on Ruby (integrated touch screen). It can take a maximum upto 1000 x 600 mm sheet of material. The machine also additional features a computer vision camera that allows cutting outlines to be aligned precisely with a printed document.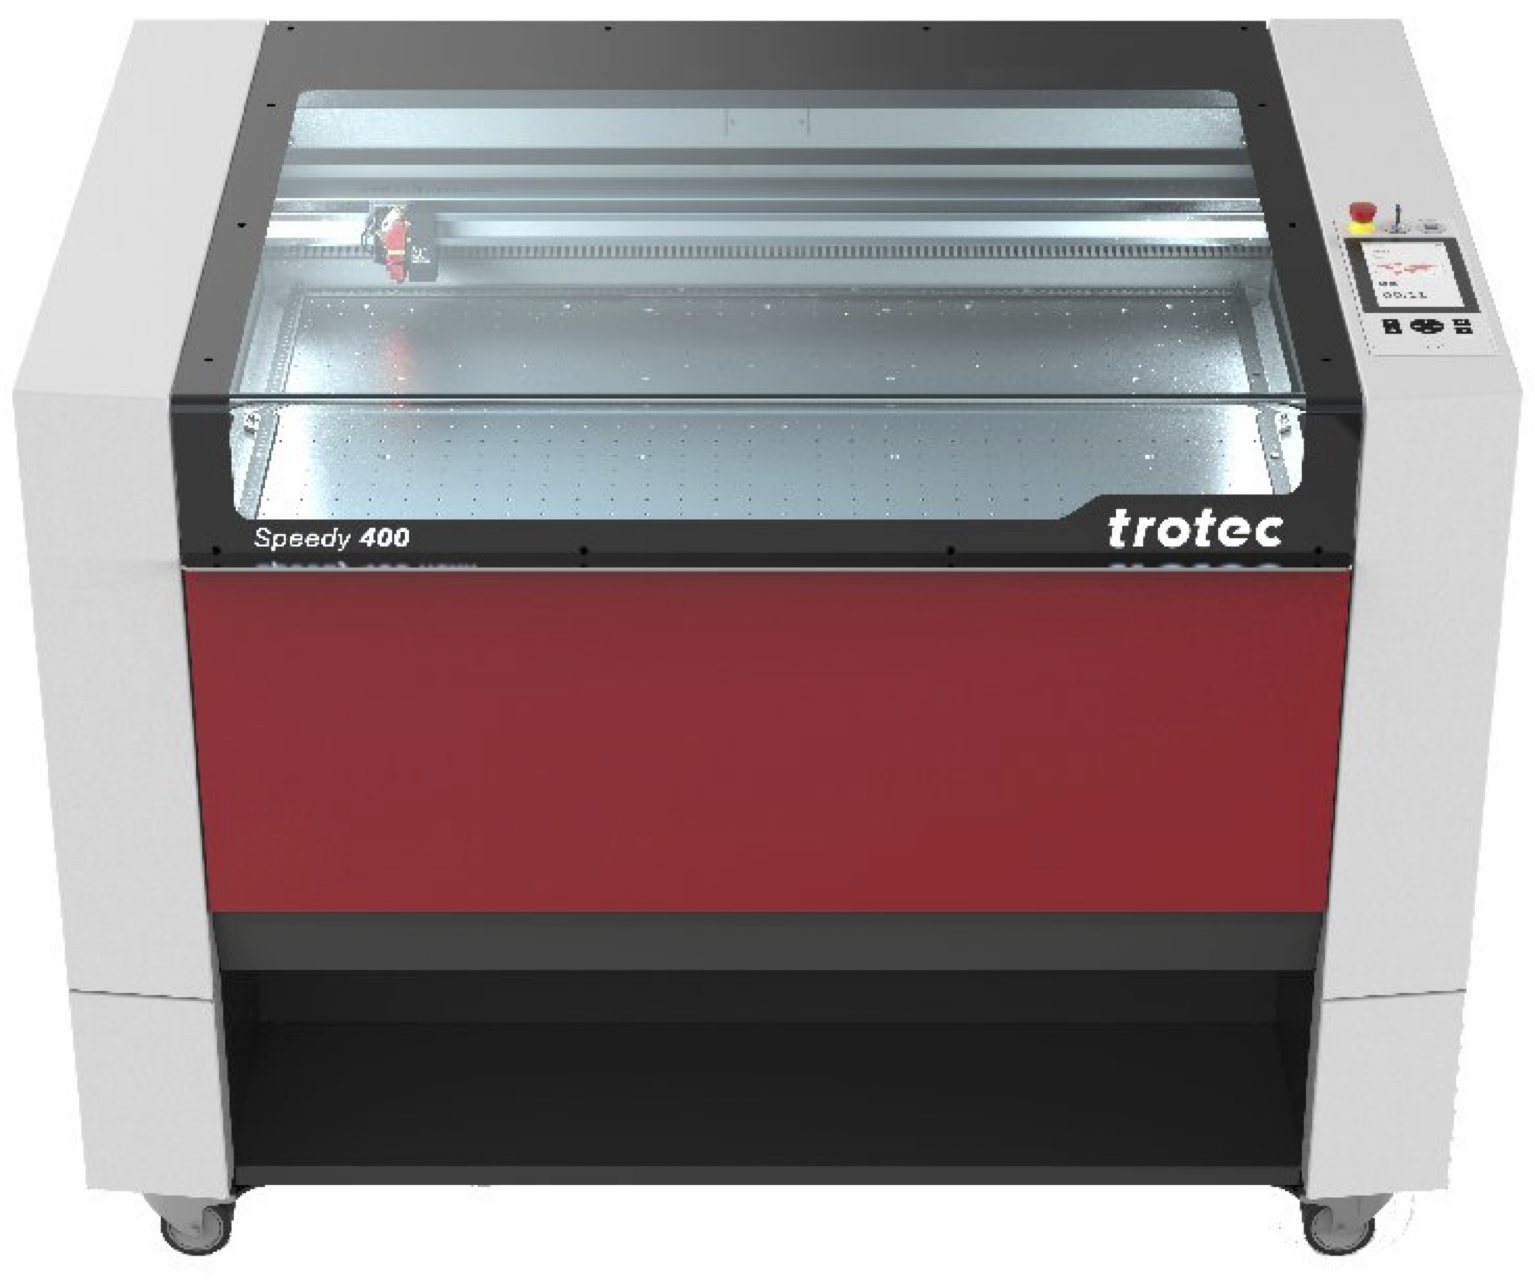 The use of the laser cutter is free to use for [all authorised users](https://wiki.cci.arts.ac.uk/books/about/page/who-can-access-cci-technical-resources), however it should only be used for projects directly related to your study and/or research at UAL.
This machine is not for personal use, such as making business cards, wedding invites or items for sale.
# How to access the laser cutter 1. Check you are an [authorised users](https://wiki.cci.arts.ac.uk/books/about/page/who-can-access-cci-technical-resources). 1. [Book](https://wiki.cci.arts.ac.uk/books/facilities/page/inductions) and complete a safety induction with a member of technical staff. 1. Design your project. 1. Purchase suitable materials. 1. Book a slot. # Safety The laser cutter while generally quite safe to use when operated correctly, however it can be a dangerous machine as it works by vapourising and burning material using a high power laser focused onto a combustable material. ## Risks include: 1. **Unattended operation** - This could result in a fire that destroys the laser cutter, causes serious damage to the building, or could kill people. 1. **Using unsuitable materials** - Materials like PVC can cause corrosive and carcinogentic fumes that will destroy the machine and cause severe breathing problems. [Check which materials are approved for use.](https://wiki.cci.arts.ac.uk/books/facilities/page/materials) 1. **Defeating the safety interlocks** - This will enable the invisible infrared (IR) laser to bounce around the room in an uncontrolled manor burning people and materials it contacts, this could result in fires, skin burns, or instant blindness. 1. **Inhalation of fumes** - Opening the lid during operation, or defeating the safety interlocks will enable the fumes inside the machine to escape which are carcinogenic, and toxic, causing short term breathing problems, and longer term issues such as occupational asthma. ## Rules By following these simple rules you can ensure that you and others are kept safe, anyone breaking these rules will be permenantly banned from using the laser cutter. 1. Never leave the laser cutter running unsupervised under any circumstances for any period of time. 1. [Only use approved materials](https://wiki.cci.arts.ac.uk/books/facilities/page/materials). 1. Never bypass any safety systems, open panels, or ignore safety alerts from the machine. 1. Never permit someone else to use your access to the laser cutter. # Fire safety Because of how the laser cutter operates there will always be a risk of fire, being near the laser cutter to react quickly is what stops this happening: 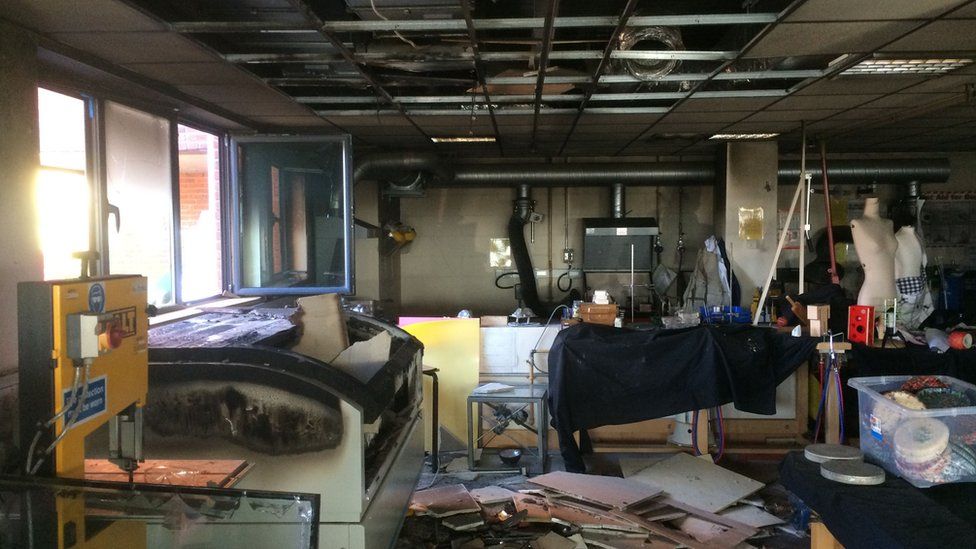 [This UK school workshop was destroyed in 2015](https://www.bbc.co.uk/news/uk-england-hampshire-34814476) after a laser cutter fire. ## Flaming up Some materials will "flame up" when you are cutting, this is caused by the vapourised material gases burning, this isn't necessarily a problem, but it can be hard for in-experienced users to tell the difference and it can be scary. Over prolonged periods of time this flame can deposit soot on the lens and will need reglar cleaning - please seek advice from a technician. If you are unsure whether the material is on fire, of the gases are burning press the run/pause button on the laser cutter, the flames should stop as soon as the laser does: 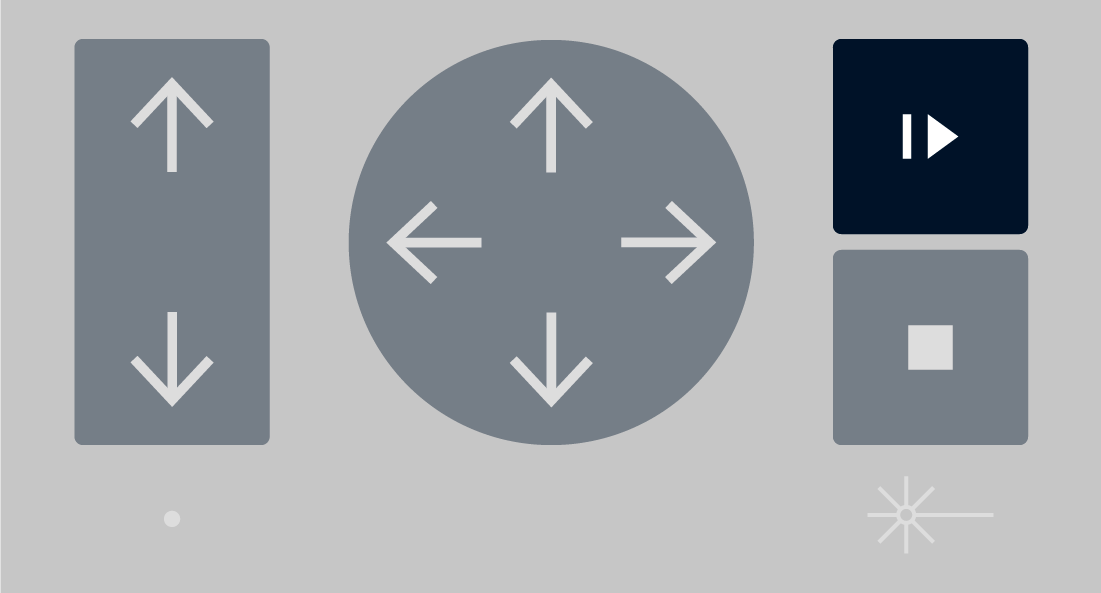 ## What to do If the material is on fire **press the emergency stop button** this will cut all power to the laser cutter, the fire should go out immediately. ### Small fires If the fire is small (<5 cm): 1. Lift the lid of the laser cutter. 1. Use the CO2 (black and red) fire extinguisher: - Point the horn outwards - Pull the pin - Squeeze the handle while pointing the horn at the base of the flames.Do not touch the horn it will get very cold and could injure your hands.
If the fire continues after the extinguisher has run out proceed to large fires: ### Large fires or not extingushed If the fire is large, or the extinguisher has run out: 1. Press the emergency stop button if it's safe to do so. 1. Leave the room closing the door behind you. 1. Press the fire alarm call point outside the classroom by the lift lobby doors. 1. Leave the building and encourage others to go with you. 1. Call 999 or 112 from your phone or 5999 or 5112 from a UAL desk phone, tell a member of estates staff or the emergency services: > Laser Cutter on fire in B block, 4th floor, room B401A # Laser Safe Materials Only approved materials can be used in the laser cutter. If you are unsure please visit the CCI technical office on the 5th floor of B block, Peckham Road, post in [`#technical`](https://slack.com/app_redirect?channel=CKSUQRZC2) on Slack. --- # Available in the Art Shop The following materials form this list are in the Camberwell Art Shop in the D Block at Peckham Road: - Cast Acrylic - Plywood - Polypropylene - thin single walled cardboard e.g. 2mm cardboard - paper --- # Approved materials The following materials are approved for use in the laser cutter:Be sure that the material is what you think it is before using it in the laser cutter.
## Acrylic Acrylic is probably one of the most commonly used materials in a laser cutter, there are two types: ### Cast Acrylic Cast acrylic, also known as PolyMethyl MethAcrylate (PMMA) is available in a vast number of colours and finishes under numerous brands including Perspex, Plexiglass and many others. This material is a popular choice for laser cutting because it produces a smooth glass-like edge finish. When engraved it also produces a very clean effect, and can also be etched to produce a matt whitened finish. ### Extruded Acrylic Acrylic plastic is also available in an extruded version, the difference is how the product if fabricated. Cast acrylic is cast in a mould, where extruded acrylic is extruded through a form to create a sheet. Extruded acrylic tends to be dimensionally more accurate than cast because of how it is produced. This means in specific engineering situations extruded acrylic might be preferable because it's thickness varies less across the sheet, however extruded acrlyic does not produce the same matt whitened finish when it's etched. Cast acrylic is usually better for the type of work we undertake at UAL because the variation in thickness usually isn't substancial enough to cause problems. Laser-cutted Extruded acrylic would have blurry edges as shown below. [](https://wiki.cci.arts.ac.uk/uploads/images/gallery/2025-05/J5131Dpfx5mLGuqG-image-1746628820914-40-18.png) ## Plywood Plywood is a commonly used material in laser cutting, however it has a very specific aesthetic, leaving a dark burned edge unless sanded. Additionally plywood is relatively absorbant and has no protective covering so it will stain with the vapourised fumes. To prevent vapour staining you can cover the surfaces with masking tape that can be removed after. Laser cut woods of all types can smell of burning for a long time after they've been processed in the laser cutter. ## Paper and Cardboard Paper and Cardboard are very quick to laser cut which makes them ideal for testing before cutting more expensive materials. ### Paper When laser cutting paper you must not cut more than 1 sheet at a time due to the risk of fire caused by heated gases being caught between the layers of paper. Additionally you may need to reduce the air assist to prevent it from blowing smaller pieces of paper around. ### Solid Cardboard There are various types of solid cardboard such as grey board and thick paper stock. ### Single wall corrugated cardboardOnly single wall corrugated cardboard should be used, the more layers the more risk of fire.
Corrugated cardboard can easily be cut but care should be taken as the flutes of the sheet can hold the hot gases and cause fire. --- # Materials with Limitations The following materials can be used, subject to limitations detailed:Ask a technician before using these materials in the laser cutter.
## Polypropylene sheet Polypropylene (PP) sheets are available in a number of thin sheets, it can be cut easily but the material it's not possible to etch into the surface as the plastic will only melt. PP comes in a small number of colours including white and black, and usually has two different grains on the surface, one is fine the other more coarse. Because PP cuts at a relatively low power you will need to adjust the power levels for different colours that absorb more or less of the laser power. ## Metal Although metal can be cut by laser cutters, our laser cutter is not designed for this. Our laser cutter has an 80 watt CO2 laser tube which is fairly powerful, it's the wrong type of laser and its not powerful enough. A typical metal laser cutter would be a 12,000 watts fiber laser. Our machine can however etch the surface of some metals such as annodised aluminium. ## Glass, ceramic and stone It is impossible to laser cut these materials, however they can be etched, but materials like glass can cause injury, please consult with a technician first. --- # Materials to Avoid The following materials should be avoided:Do not use these materials in the laser cutter.
## MDF MDF and Laser (Safe) MDF are not permitted to be used in the laser cutter as they leave a lot of residue inside the machine, block the filters and smell after being cut. --- # Forbidden Materials These materials must not be used under any circumstances:Never use these materials in the laser cutter.
## PVC Under no circumstances can PVC be cut, it produces toxic and corrosive gas which will cause serious damage to the laser cutter, potentially destroying it and the cases are very harmful to life. ## Polycarbonate PolyCarbonate (PC) is often confused with clear acrylic as they're visibly indistinguishable from one another, however PC does not behave the same when laser cut, the edges yellow and become brittle and/or cracked and produces a lot of flames when cutting. ## Faux leather, pleather These materials contain PVC, see above. # Creating a file in Illustrator Although it's outside the scope of this guide to tell you how to use Adobe Illustrator, we'll cover preparing a simple file. We're going to etch the UAL Creative Computing Institute logo, outline it with an engraved line, and then cut out a bounding box. # Step 1 The laser cutter can etch raster images, however to be able to cut out or engrave we need to provide vector lines which is why you will need to use software such as: - Adobe Illustrator - Corel Draw - Affinity Designer - Inkscape - ❗️ Please don't export SVG from Fusion 360 for laser cutting Here you can see we've created an Illustrator document in RGB colour mode (not CMYK) and added a vector of the CCI logo to the artboard: 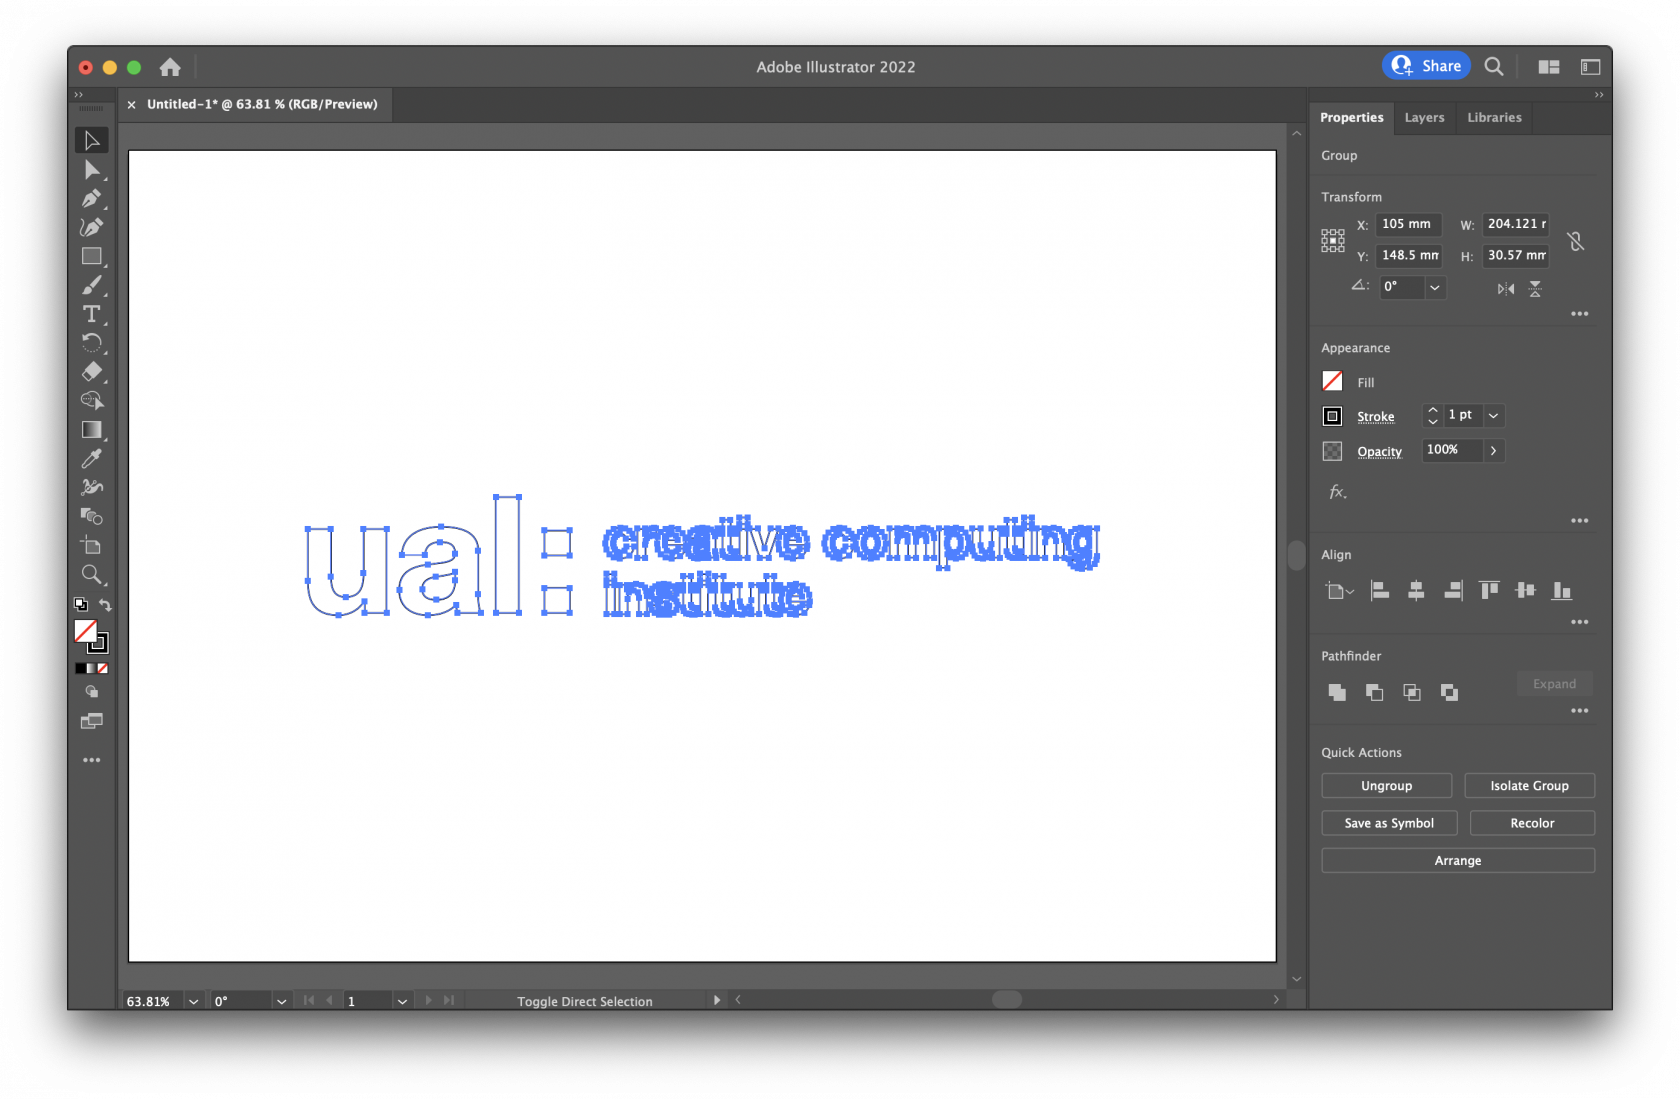 # Step 2 When preparing files for laser cutting with most machines you usually have to use specific colour and line thicknesses, and it's good practice to retain this with Trotec Ruby, however it is far more forgiving than older software. As a general rule there are 3 types of action, and these are the colour fill and stroke settings for those actions: - **Cut** - This is a vector line all the way through a piece of material. **[Design](https://wiki.cci.arts.ac.uk/books/facilities/page/ruby-design-screen)** – The design screen is where you can make or edit designs, the typical workflow is to create the file in another program such as Adobe Illustrator and then send the design to the prepare screen.
 **[Prepare](https://wiki.cci.arts.ac.uk/books/facilities/page/ruby-prepare-screen)** – The prepare screen is where multiple designs can be combined into a single job on the laser bed.
 **[Produce](https://wiki.cci.arts.ac.uk/books/facilities/page/ruby-produce-screen)** – The produce screen is where you can queue, reorder and view running jobs.
## Sidebar
Like man web applications Ruby has a side bar which is opened by clicking the hamburger menu to the left of the Trotec logo.
- **[Manage](https://wiki.cci.arts.ac.uk/books/facilities/page/ruby-manage-screen), [Design](https://wiki.cci.arts.ac.uk/books/facilities/page/ruby-design-screen), [Prepare](https://wiki.cci.arts.ac.uk/books/facilities/page/ruby-prepare-screen) and [Produce](https://wiki.cci.arts.ac.uk/books/facilities/page/ruby-produce-screen)** - These are repeated from the top bar.
- **[Materials](https://wiki.cci.arts.ac.uk/books/facilities/page/ruby-materials-screen)** - This is where you can view, create, edit and delete material and settings.
- **User management** - This is for administrators only, do not enter this area.
- **Settings** - This is for administrators only, do not enter this area.
- **Ideas** - This is where you can send suggestions to Trotec for improvements to Ruby.
- **Knowledge base** - This is where you can find help around using Ruby direct from Trotec.
- **Service File** - This is for administrators only, do not click this option.
- **Manuals** – This is where you can find the manual for all Trotec laser cutters.
# How to trust Trotec Ruby certificate on Windows 10
This guide will show you how to trust the Trotec Ruby certificate on Windows 10 to avoid security warnings.
1. [Download the certificate](http://10.96.134.33:5000/certificate) (Right click, Save As)
2. Locate the `TrotecRubyCA.crt` file in your downloads and open it.
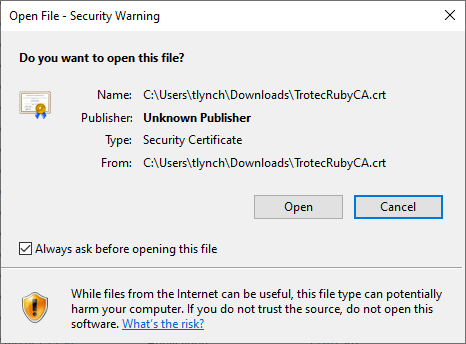
3. Windows will ask you to confirm if you want to open the file, press open.
[](https://wiki.cci.arts.ac.uk/uploads/images/gallery/2022-01/Hb8KzSZAGzMilYMK-image-1642629822034.png)
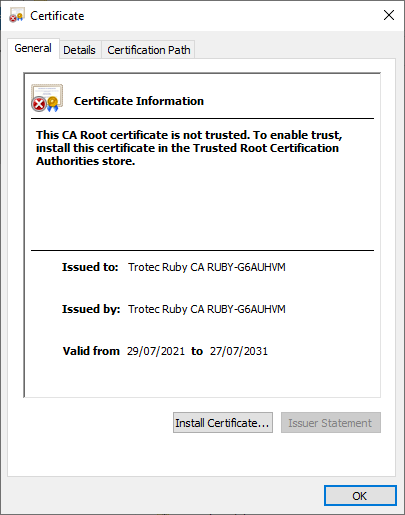
4. Windows will show you the details of this security certificate and say it is not trusted. This is because the certificate is issued by Trotec, rather than a global certificate authority. This normal and the certificate should still be installed.
[](https://wiki.cci.arts.ac.uk/uploads/images/gallery/2022-01/Yb6g8qrCugGeafHI-image-1642629878567.png)
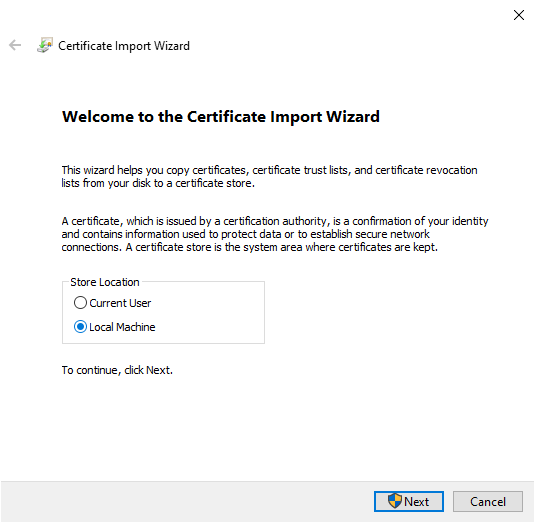
5. Install the certificate on the "Local Machine" and press Next.
[](https://wiki.cci.arts.ac.uk/uploads/images/gallery/2022-01/Z20MFNbt4xDA377r-image-1642631116315.png)
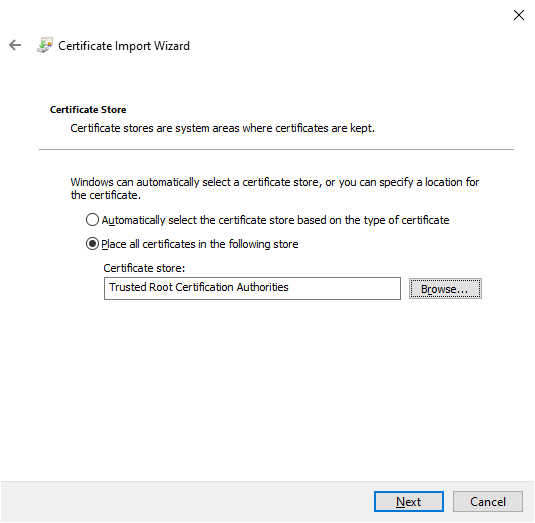
6. Click "Place all certificates in the following store" and select browse.
[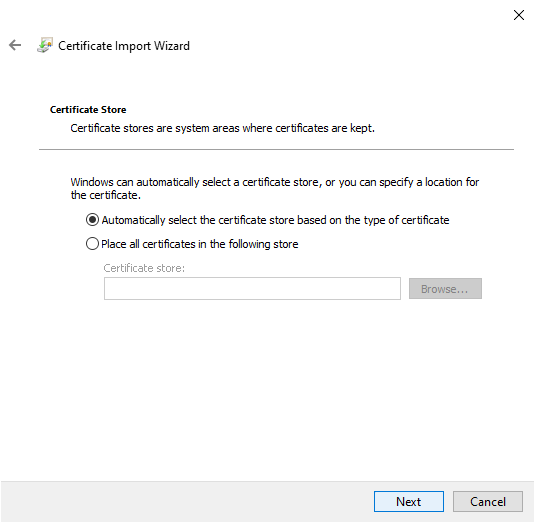](https://wiki.cci.arts.ac.uk/uploads/images/gallery/2022-01/NuBB7ot5xGj8VQWY-image-1642630085680.png)
7. Select "Trusted Root Certification Authorities" and press OK.
[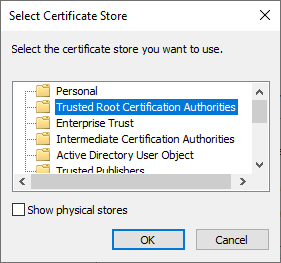](https://wiki.cci.arts.ac.uk/uploads/images/gallery/2022-01/La6KqhogM0DuOOKr-image-1642630759903.png)
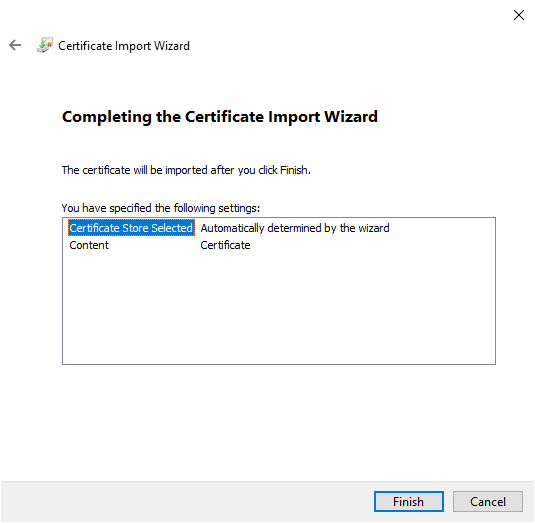
8. Press next.
[](https://wiki.cci.arts.ac.uk/uploads/images/gallery/2022-01/CW84Xp4pdbYKNyvy-image-1642630711613.png)
9. Press finish to complete the installation of the certificate.
[](https://wiki.cci.arts.ac.uk/uploads/images/gallery/2022-01/SHcEJwoXVJQgxQde-image-1642630151775.png)
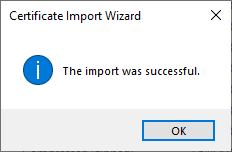
10. Windows will take a few moments and then confirm the outcome. You can now press okay to this prompt and close the certificate information window.
[](https://wiki.cci.arts.ac.uk/uploads/images/gallery/2022-01/VNYmdgm2TpNUIJR8-image-1642630179939.png)
11. Reboot your computer.
# How to trust Trotec Ruby certificate on macOS
This guide will show you how to trust the Trotec Ruby certificate on macOS to avoid security warnings.
1. [Download the certificate](http://10.96.134.33:5000/certificate) (Right click, Save As)
2. Locate the `TrotecRubyCA.crt` file in your downloads and open it.
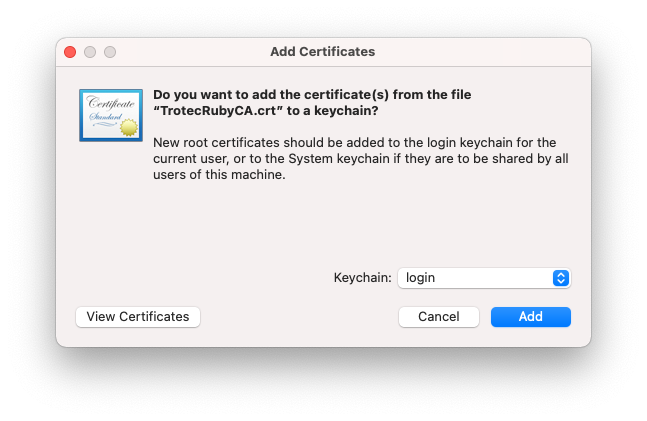
3. macOS will ask if you want to add the certificate to the Keychain. Ensure "login" is selected and press "Add".
[](https://wiki.cci.arts.ac.uk/uploads/images/gallery/2022-01/u7bXNjJsmWjJePzn-screenshot-2022-01-19-at-22-37-07.png)
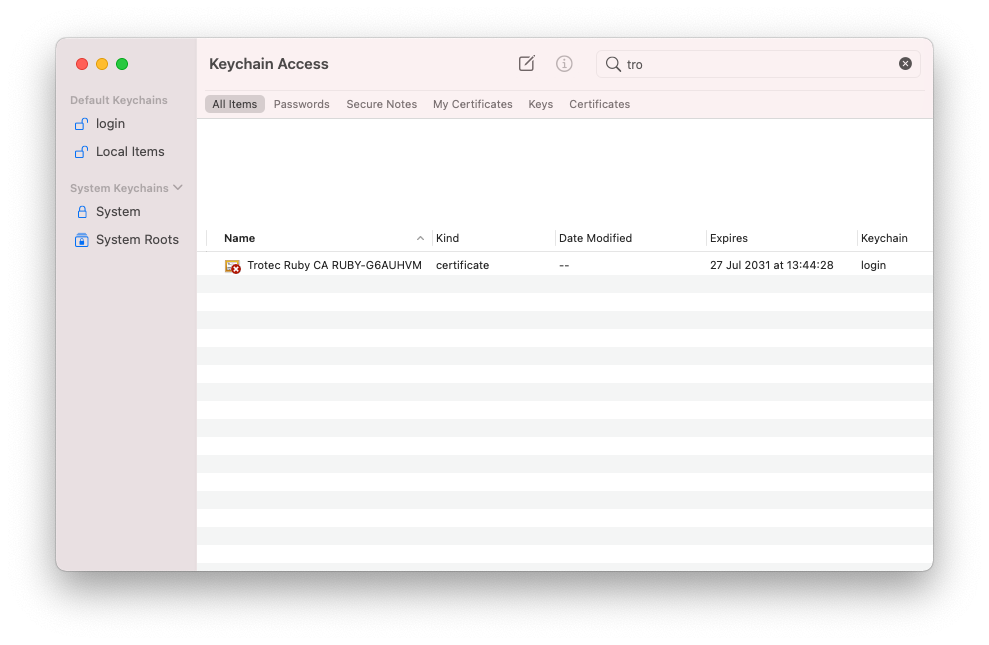
4. In the main Keychain app window select "login" on the left, then search for "Trotec" in the top right corner.
[](https://wiki.cci.arts.ac.uk/uploads/images/gallery/2022-01/ZbAbtrkHGiIqC80O-screenshot-2022-01-19-at-22-37-47.png)
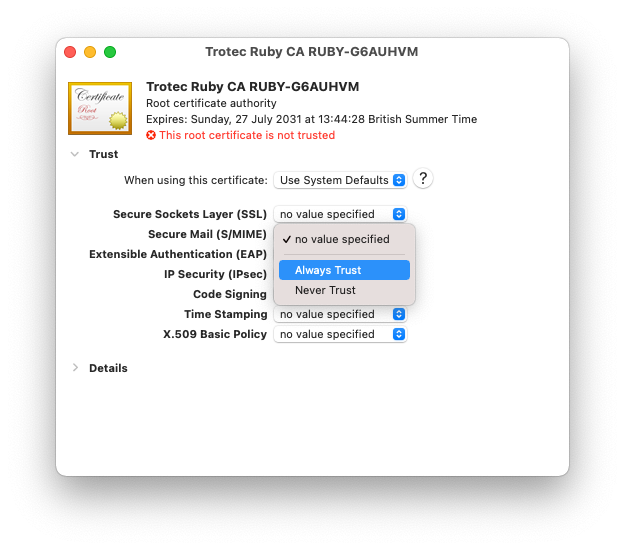
5. Double click on the "Trotec Ruby CA RUBY-G6AUHVM" certificate and expand the "Trust" section. Set "Secure Sockets Layer (SSL)" to "Always Trust"
[](https://wiki.cci.arts.ac.uk/uploads/images/gallery/2022-01/8PaQNbtuH9jFnI2k-screenshot-2022-01-19-at-22-38-00.png)
6. Close the window to save, and confirm with your admin password or Touch ID.
7. Reboot your computer.
# Ruby: Manage Screen
The manage view allows you to open, delete or upload files as well as organise them, we'll start by uploading a file.
# Uploading a file
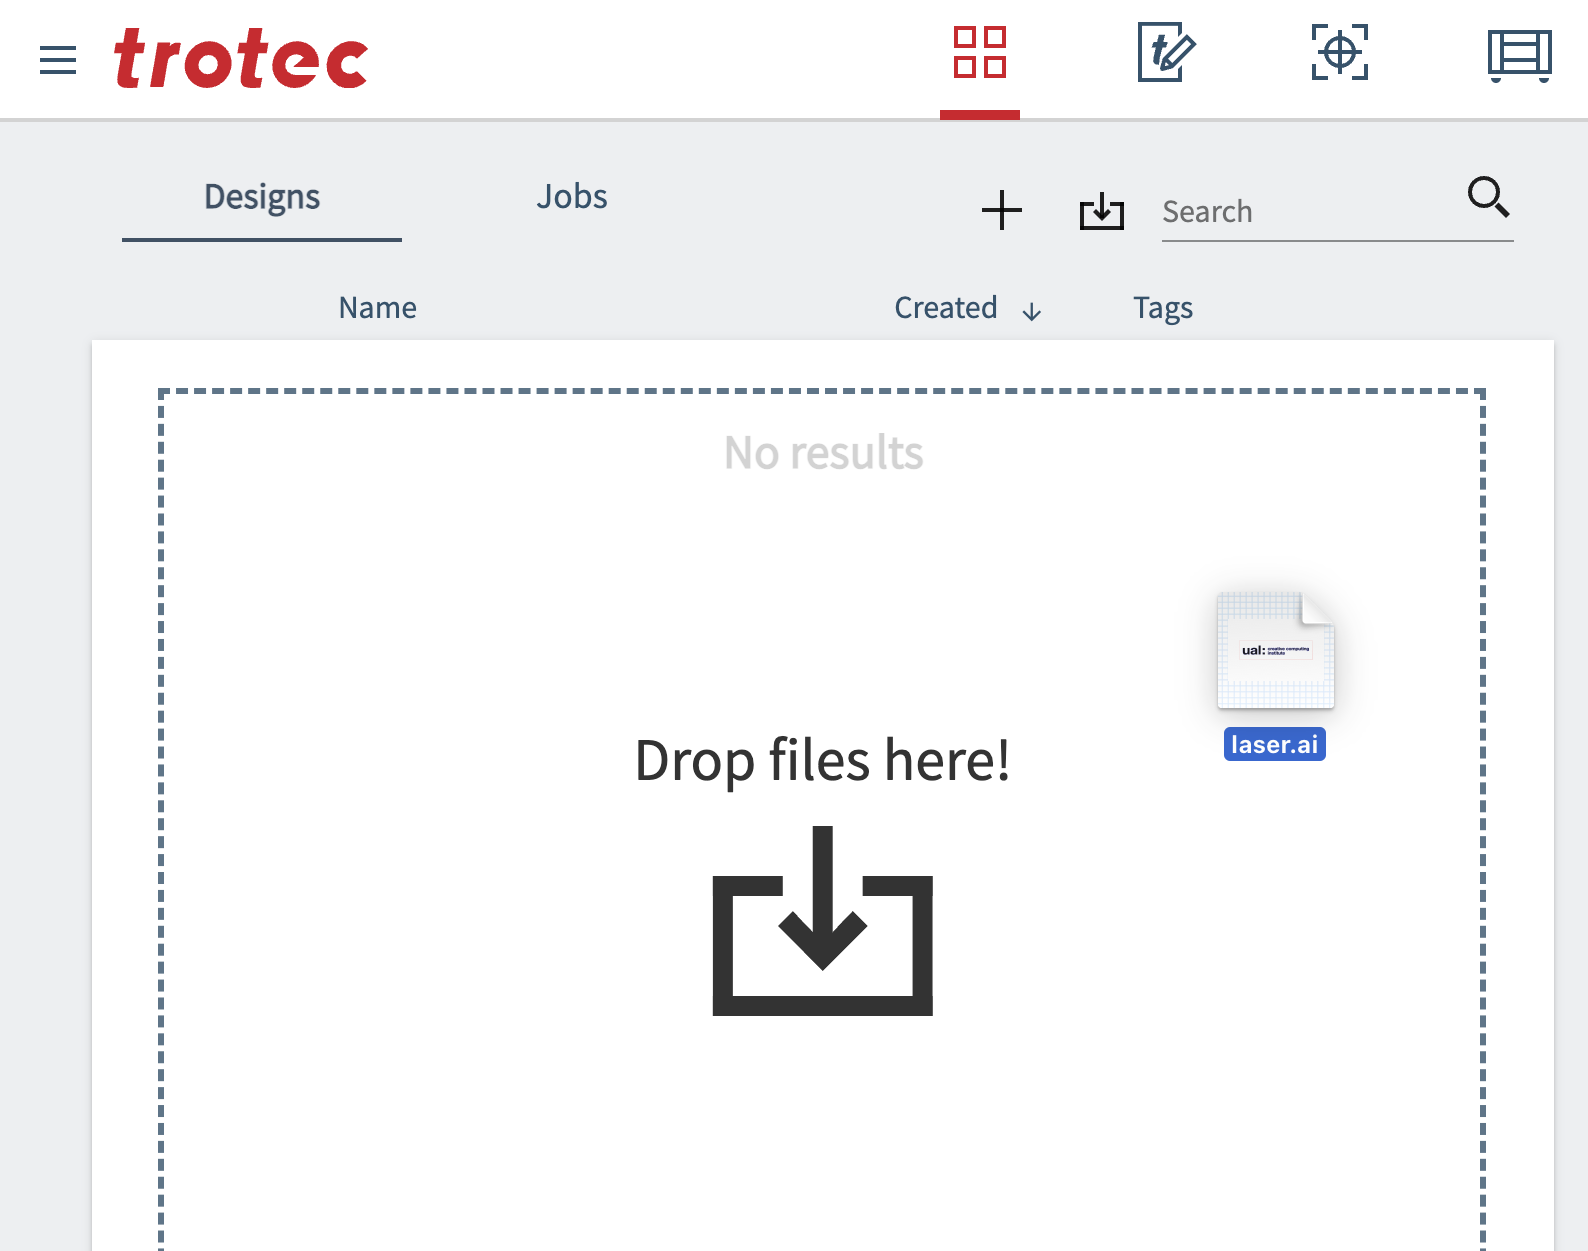
In Ruby switch to the manage screen and drag and drop the file(s) onto the dropzone:
Alternatively click the "Import File" icon and find the file(s) in the pop up dialog:

# Open a design
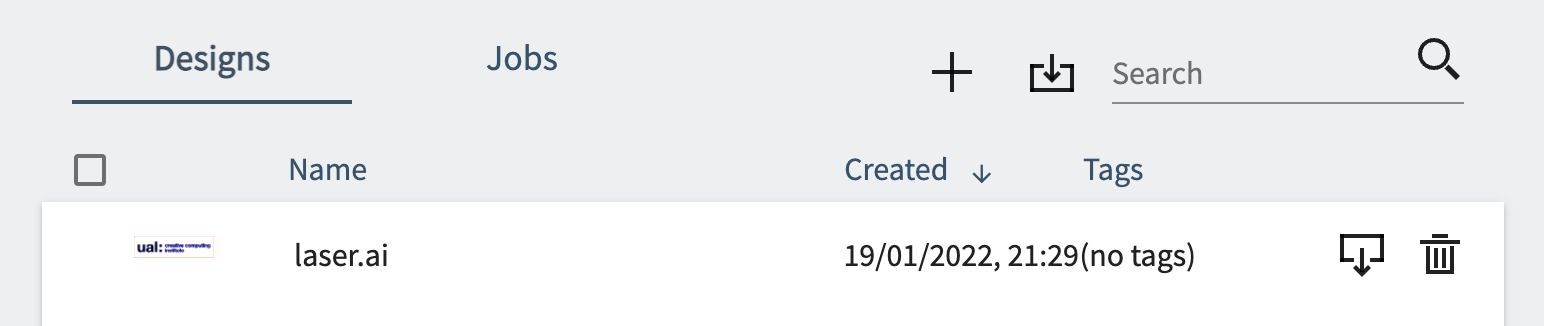
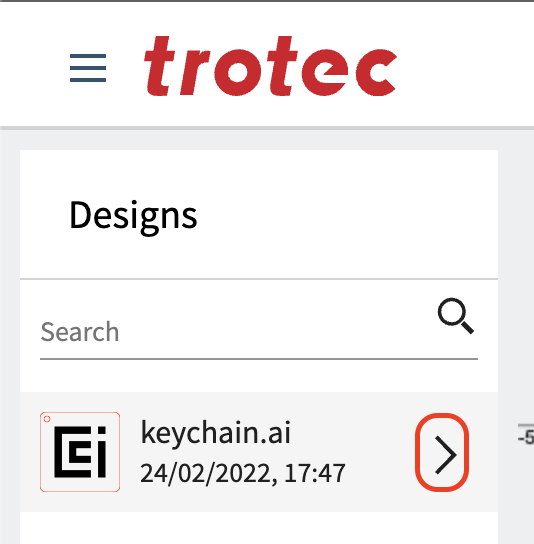
After your file is uploaded to Ruby it becomes part of a new design. You can see a small preview in your list of designs that you can open in the [Design Screen](https://wiki.cci.arts.ac.uk/books/facilities/page/ruby-design-screen) by double clicking, delete or download by clicking the relivent icons next to the design.
# Ruby: Design Screen
Once you open the design in Design Screen you should see the artwork you've created. You will be able to see artboard size, as well as all the colours and lines were all retained.
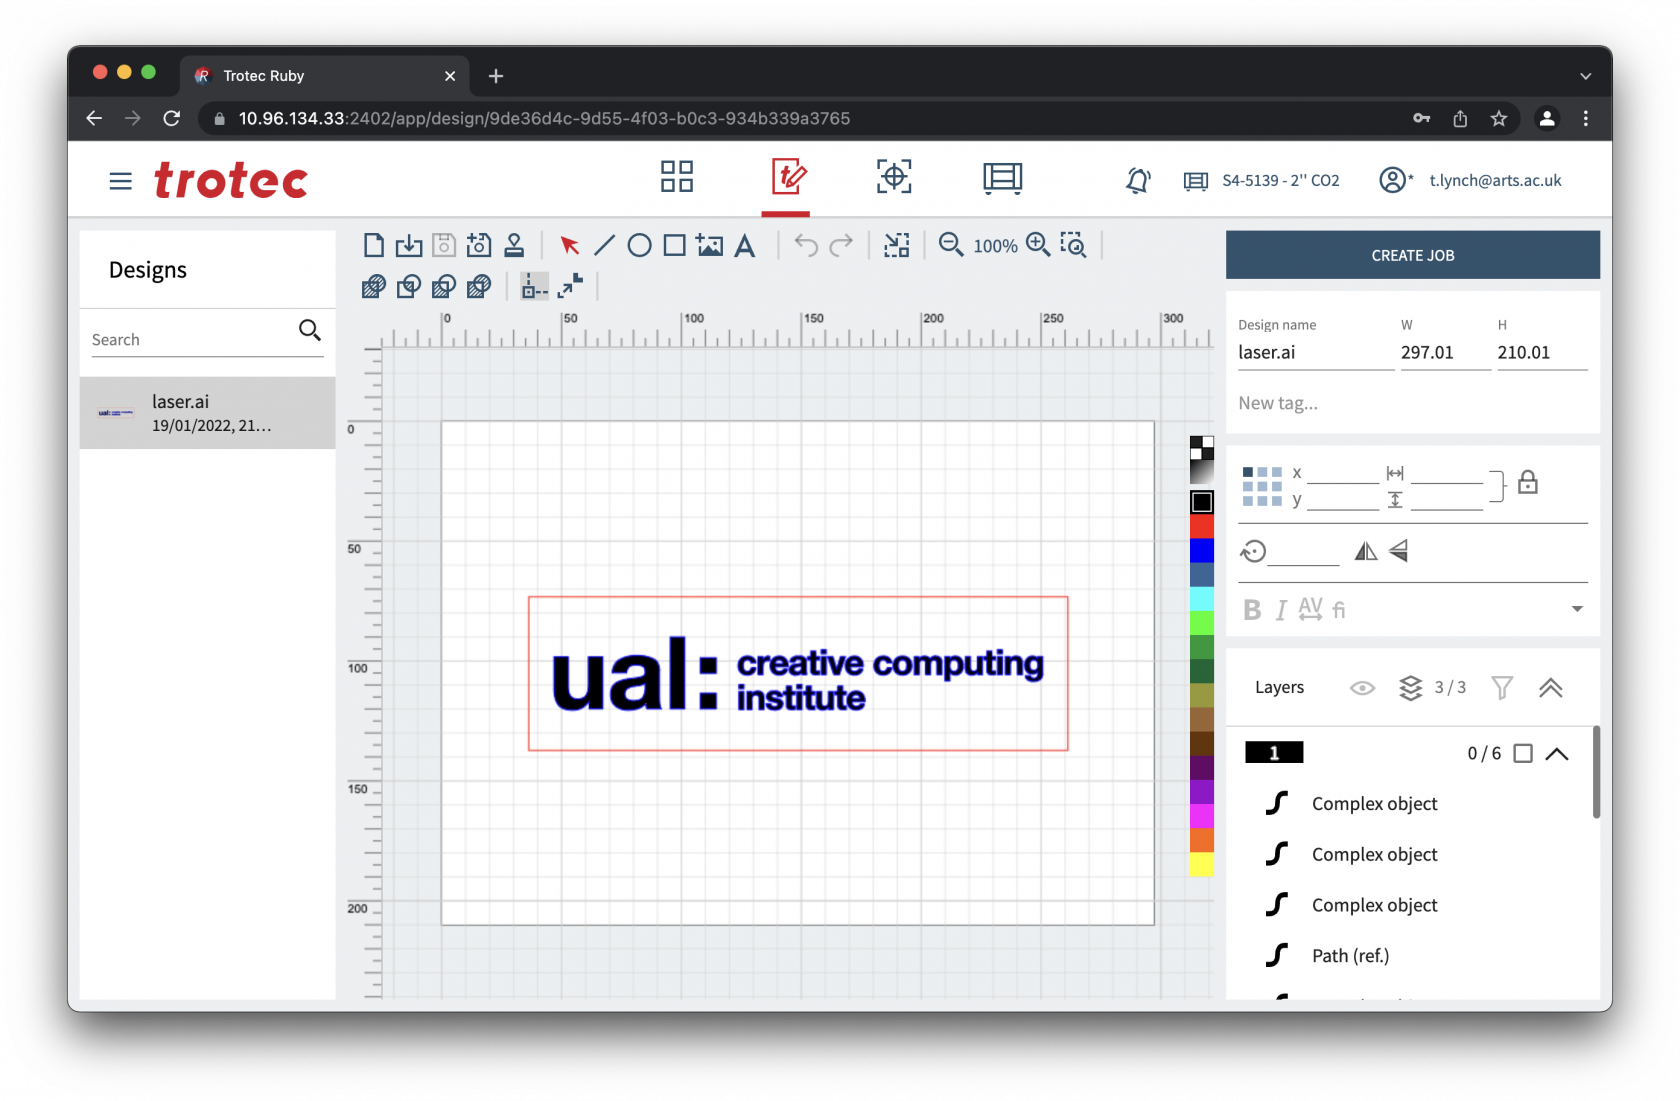
The design screen is split into 3 columns:
- Left: Design browser
- Middle: Work area
- Top: Toolbar
- Bottom: Work area
- Right
- Top: Design name and tags
- Middle: Object parameters
- Bottom: Layers
# Toolbar
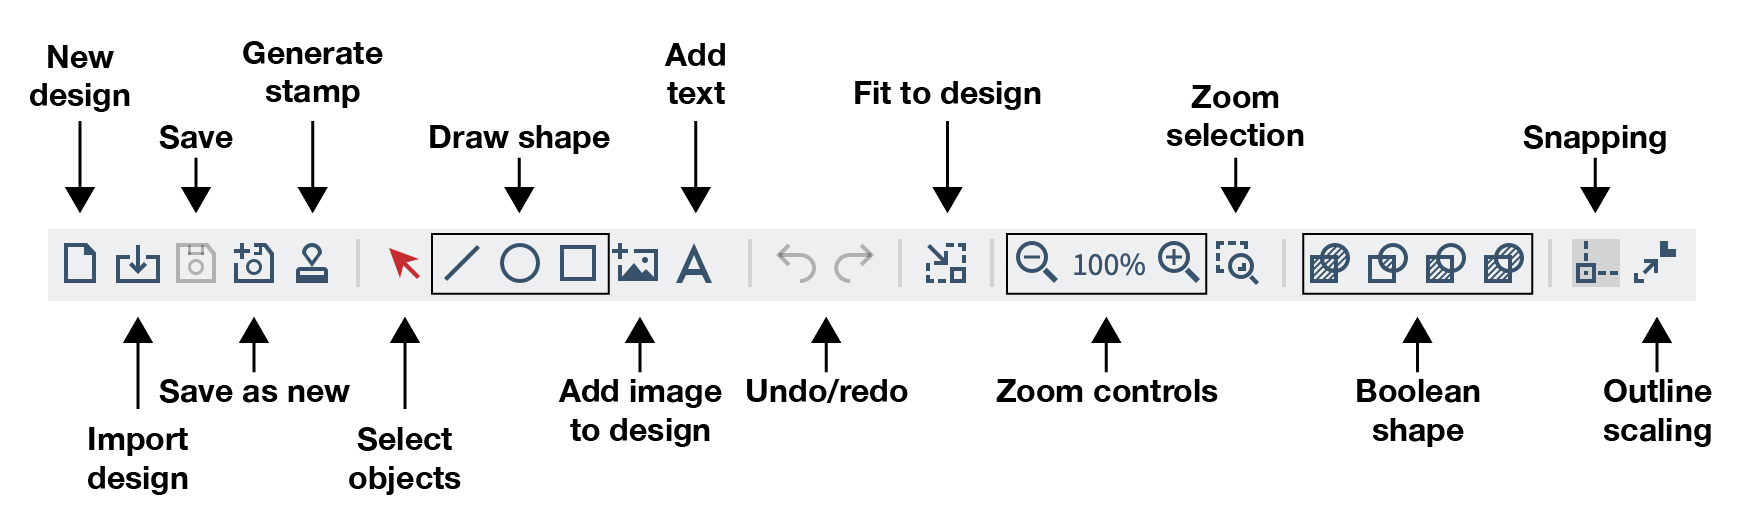
- **New design** - Create a new design.
- **Import design** - Upload a file from your computer.
- **Save** - Save the open design. *Greyed out means there are no changes to save.*
- **Save as new** - Save the open design as a new design.
- **Generate stamp** - Convert the open design into a stamp as a new design.
- **Select objects** - Switches the active tool select objects.
- **Draw shape** - Switches the active tool to draw the selected shape.
- **Add image to design** - Allows you to insert an image into your design from your computer.
- **Undo/redo** - Undo the previous action or redo it. *Greyed out means there are no further undo/redo steps available.*
- **Fit to design** - Shrinks the artboard to the smallest size that encompases all design elements.
- **Zoom controls** - Zooms the viewport in and out on the design.
- **Zoom selection** - Lets you draw a selection box to zoom into.
- **Boolean shape** - Allows you to Union, Intersect, Difference, or Exclusion vector shapes.
- **Snapping** - Toggle object snapping.
- **Outline scaling** - *We're not sure what this does yet!*
# Fit to Design
As we created the whole design in Illustrator already the only thing we would probably want to do is reduce the size of the artboard to the design.
We could do this in Illustrator but Ruby offers a tool to do it automatically by selecting "Fit to design" in the toolbar which will prompt you for a margin size, we'll leave this as 0.00mm and click "Fit to design":
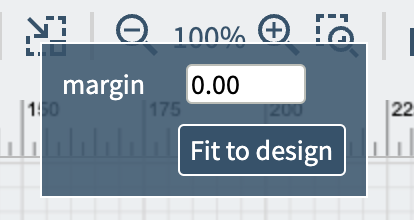
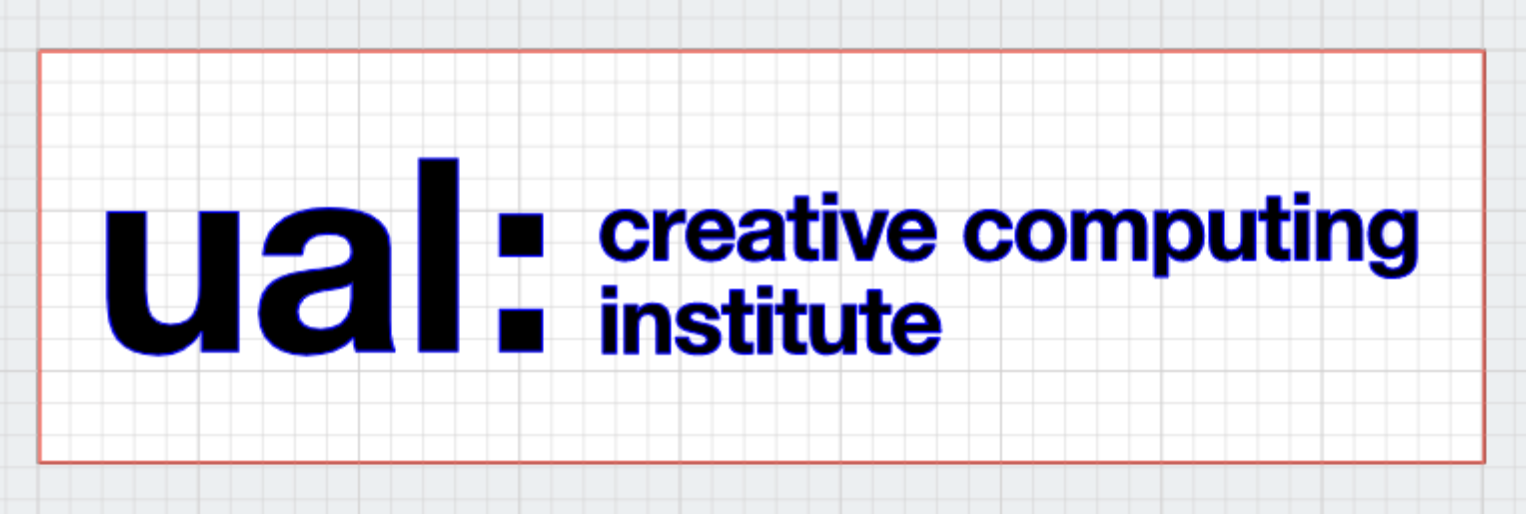
After you'll see the white area of your artboard has been made to perfectly fit the design we created, this might seem like a simple task, but it makes it easy to tightly pack multiple designs onto a piece of material.
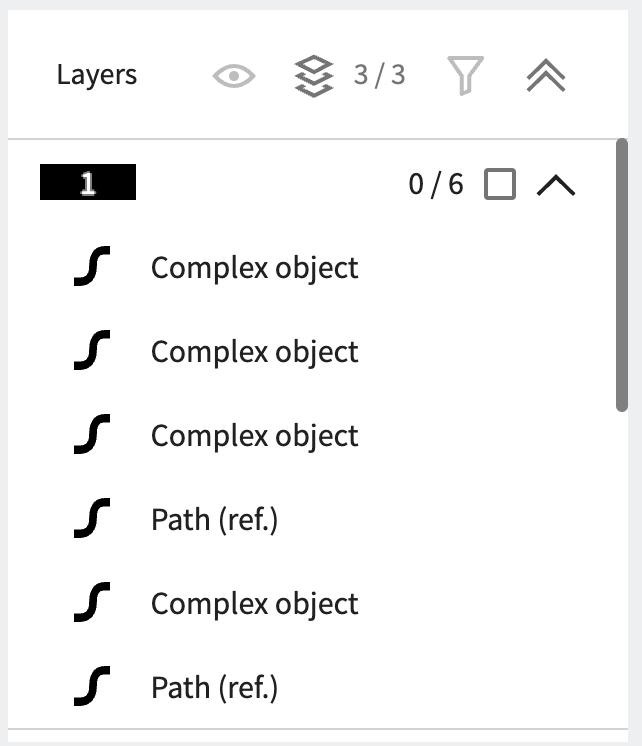
# Check your layers
As we've already setup the original file with 3 primary RGB colours and it's a simple design there should be 3 layers.
Layers are different in Ruby to most drawing packages, they're basically a way of defining multiple tasks for the laser cutter, for example:
1. Etch the black area
2. Engrave the blue line
3. Cut the red line
## Changing colours / Merging layers
If any object is the wrong colour you can select it by clicking the object on screen or in the layers, you can select multiple by pressing Command or Control and clicking each object. Or you can select all objects in a layer by pressing the tickbox next to that layer in the layers area.
Once you've selected the object(s) you can change the colour by selecting from those listed:

# Create Job
Once the design(s) are complete you can click "Create Job" to move to the [Prepare Screen](https://wiki.cci.arts.ac.uk/books/facilities/page/ruby-prepare-screen).

# Powering on the laser cutter
**[Produce](https://wiki.cci.arts.ac.uk/books/facilities/page/ruby-produce-screen)** – The produce screen is where you can queue, reorder and view running jobs.
## Sidebar
Like man web applications Ruby has a side bar which is opened by clicking the hamburger menu to the left of the Trotec logo.
- **[Manage](https://wiki.cci.arts.ac.uk/books/facilities/page/ruby-manage-screen), [Design](https://wiki.cci.arts.ac.uk/books/facilities/page/ruby-design-screen), [Prepare](https://wiki.cci.arts.ac.uk/books/facilities/page/ruby-prepare-screen) and [Produce](https://wiki.cci.arts.ac.uk/books/facilities/page/ruby-produce-screen)** - These are repeated from the top bar.
- **[Materials](https://wiki.cci.arts.ac.uk/books/facilities/page/ruby-materials-screen)** - This is where you can view, create, edit and delete material and settings.
- **User management** - This is for administrators only, do not enter this area.
- **Settings** - This is for administrators only, do not enter this area.
- **Ideas** - This is where you can send suggestions to Trotec for improvements to Ruby.
- **Knowledge base** - This is where you can find help around using Ruby direct from Trotec.
- **Service File** - This is for administrators only, do not click this option.
- **Manuals** – This is where you can find the manual for all Trotec laser cutters.
# How to trust Trotec Ruby certificate on Windows 10
This guide will show you how to trust the Trotec Ruby certificate on Windows 10 to avoid security warnings.
1. [Download the certificate](http://10.96.134.33:5000/certificate) (Right click, Save As)
2. Locate the `TrotecRubyCA.crt` file in your downloads and open it.
3. Windows will ask you to confirm if you want to open the file, press open.
[](https://wiki.cci.arts.ac.uk/uploads/images/gallery/2022-01/Hb8KzSZAGzMilYMK-image-1642629822034.png)
4. Windows will show you the details of this security certificate and say it is not trusted. This is because the certificate is issued by Trotec, rather than a global certificate authority. This normal and the certificate should still be installed.
[](https://wiki.cci.arts.ac.uk/uploads/images/gallery/2022-01/Yb6g8qrCugGeafHI-image-1642629878567.png)
5. Install the certificate on the "Local Machine" and press Next.
[](https://wiki.cci.arts.ac.uk/uploads/images/gallery/2022-01/Z20MFNbt4xDA377r-image-1642631116315.png)
6. Click "Place all certificates in the following store" and select browse.
[](https://wiki.cci.arts.ac.uk/uploads/images/gallery/2022-01/NuBB7ot5xGj8VQWY-image-1642630085680.png)
7. Select "Trusted Root Certification Authorities" and press OK.
[](https://wiki.cci.arts.ac.uk/uploads/images/gallery/2022-01/La6KqhogM0DuOOKr-image-1642630759903.png)
8. Press next.
[](https://wiki.cci.arts.ac.uk/uploads/images/gallery/2022-01/CW84Xp4pdbYKNyvy-image-1642630711613.png)
9. Press finish to complete the installation of the certificate.
[](https://wiki.cci.arts.ac.uk/uploads/images/gallery/2022-01/SHcEJwoXVJQgxQde-image-1642630151775.png)
10. Windows will take a few moments and then confirm the outcome. You can now press okay to this prompt and close the certificate information window.
[](https://wiki.cci.arts.ac.uk/uploads/images/gallery/2022-01/VNYmdgm2TpNUIJR8-image-1642630179939.png)
11. Reboot your computer.
# How to trust Trotec Ruby certificate on macOS
This guide will show you how to trust the Trotec Ruby certificate on macOS to avoid security warnings.
1. [Download the certificate](http://10.96.134.33:5000/certificate) (Right click, Save As)
2. Locate the `TrotecRubyCA.crt` file in your downloads and open it.
3. macOS will ask if you want to add the certificate to the Keychain. Ensure "login" is selected and press "Add".
[](https://wiki.cci.arts.ac.uk/uploads/images/gallery/2022-01/u7bXNjJsmWjJePzn-screenshot-2022-01-19-at-22-37-07.png)
4. In the main Keychain app window select "login" on the left, then search for "Trotec" in the top right corner.
[](https://wiki.cci.arts.ac.uk/uploads/images/gallery/2022-01/ZbAbtrkHGiIqC80O-screenshot-2022-01-19-at-22-37-47.png)
5. Double click on the "Trotec Ruby CA RUBY-G6AUHVM" certificate and expand the "Trust" section. Set "Secure Sockets Layer (SSL)" to "Always Trust"
[](https://wiki.cci.arts.ac.uk/uploads/images/gallery/2022-01/8PaQNbtuH9jFnI2k-screenshot-2022-01-19-at-22-38-00.png)
6. Close the window to save, and confirm with your admin password or Touch ID.
7. Reboot your computer.
# Ruby: Manage Screen
The manage view allows you to open, delete or upload files as well as organise them, we'll start by uploading a file.
# Uploading a file
In Ruby switch to the manage screen and drag and drop the file(s) onto the dropzone:

Alternatively click the "Import File" icon and find the file(s) in the pop up dialog:

# Open a design
After your file is uploaded to Ruby it becomes part of a new design. You can see a small preview in your list of designs that you can open in the [Design Screen](https://wiki.cci.arts.ac.uk/books/facilities/page/ruby-design-screen) by double clicking, delete or download by clicking the relivent icons next to the design.

# Ruby: Design Screen
Once you open the design in Design Screen you should see the artwork you've created. You will be able to see artboard size, as well as all the colours and lines were all retained.

The design screen is split into 3 columns:
- Left: Design browser
- Middle: Work area
- Top: Toolbar
- Bottom: Work area
- Right
- Top: Design name and tags
- Middle: Object parameters
- Bottom: Layers
# Toolbar

- **New design** - Create a new design.
- **Import design** - Upload a file from your computer.
- **Save** - Save the open design. *Greyed out means there are no changes to save.*
- **Save as new** - Save the open design as a new design.
- **Generate stamp** - Convert the open design into a stamp as a new design.
- **Select objects** - Switches the active tool select objects.
- **Draw shape** - Switches the active tool to draw the selected shape.
- **Add image to design** - Allows you to insert an image into your design from your computer.
- **Undo/redo** - Undo the previous action or redo it. *Greyed out means there are no further undo/redo steps available.*
- **Fit to design** - Shrinks the artboard to the smallest size that encompases all design elements.
- **Zoom controls** - Zooms the viewport in and out on the design.
- **Zoom selection** - Lets you draw a selection box to zoom into.
- **Boolean shape** - Allows you to Union, Intersect, Difference, or Exclusion vector shapes.
- **Snapping** - Toggle object snapping.
- **Outline scaling** - *We're not sure what this does yet!*
# Fit to Design
As we created the whole design in Illustrator already the only thing we would probably want to do is reduce the size of the artboard to the design.
We could do this in Illustrator but Ruby offers a tool to do it automatically by selecting "Fit to design" in the toolbar which will prompt you for a margin size, we'll leave this as 0.00mm and click "Fit to design":

After you'll see the white area of your artboard has been made to perfectly fit the design we created, this might seem like a simple task, but it makes it easy to tightly pack multiple designs onto a piece of material.

# Check your layers
As we've already setup the original file with 3 primary RGB colours and it's a simple design there should be 3 layers.
Layers are different in Ruby to most drawing packages, they're basically a way of defining multiple tasks for the laser cutter, for example:
1. Etch the black area
2. Engrave the blue line
3. Cut the red line

## Changing colours / Merging layers
If any object is the wrong colour you can select it by clicking the object on screen or in the layers, you can select multiple by pressing Command or Control and clicking each object. Or you can select all objects in a layer by pressing the tickbox next to that layer in the layers area.
Once you've selected the object(s) you can change the colour by selecting from those listed:

# Create Job
Once the design(s) are complete you can click "Create Job" to move to the [Prepare Screen](https://wiki.cci.arts.ac.uk/books/facilities/page/ruby-prepare-screen).

# Powering on the laser cutter
The laser cutter key is currently stored in the CCI staff office PR_B503.
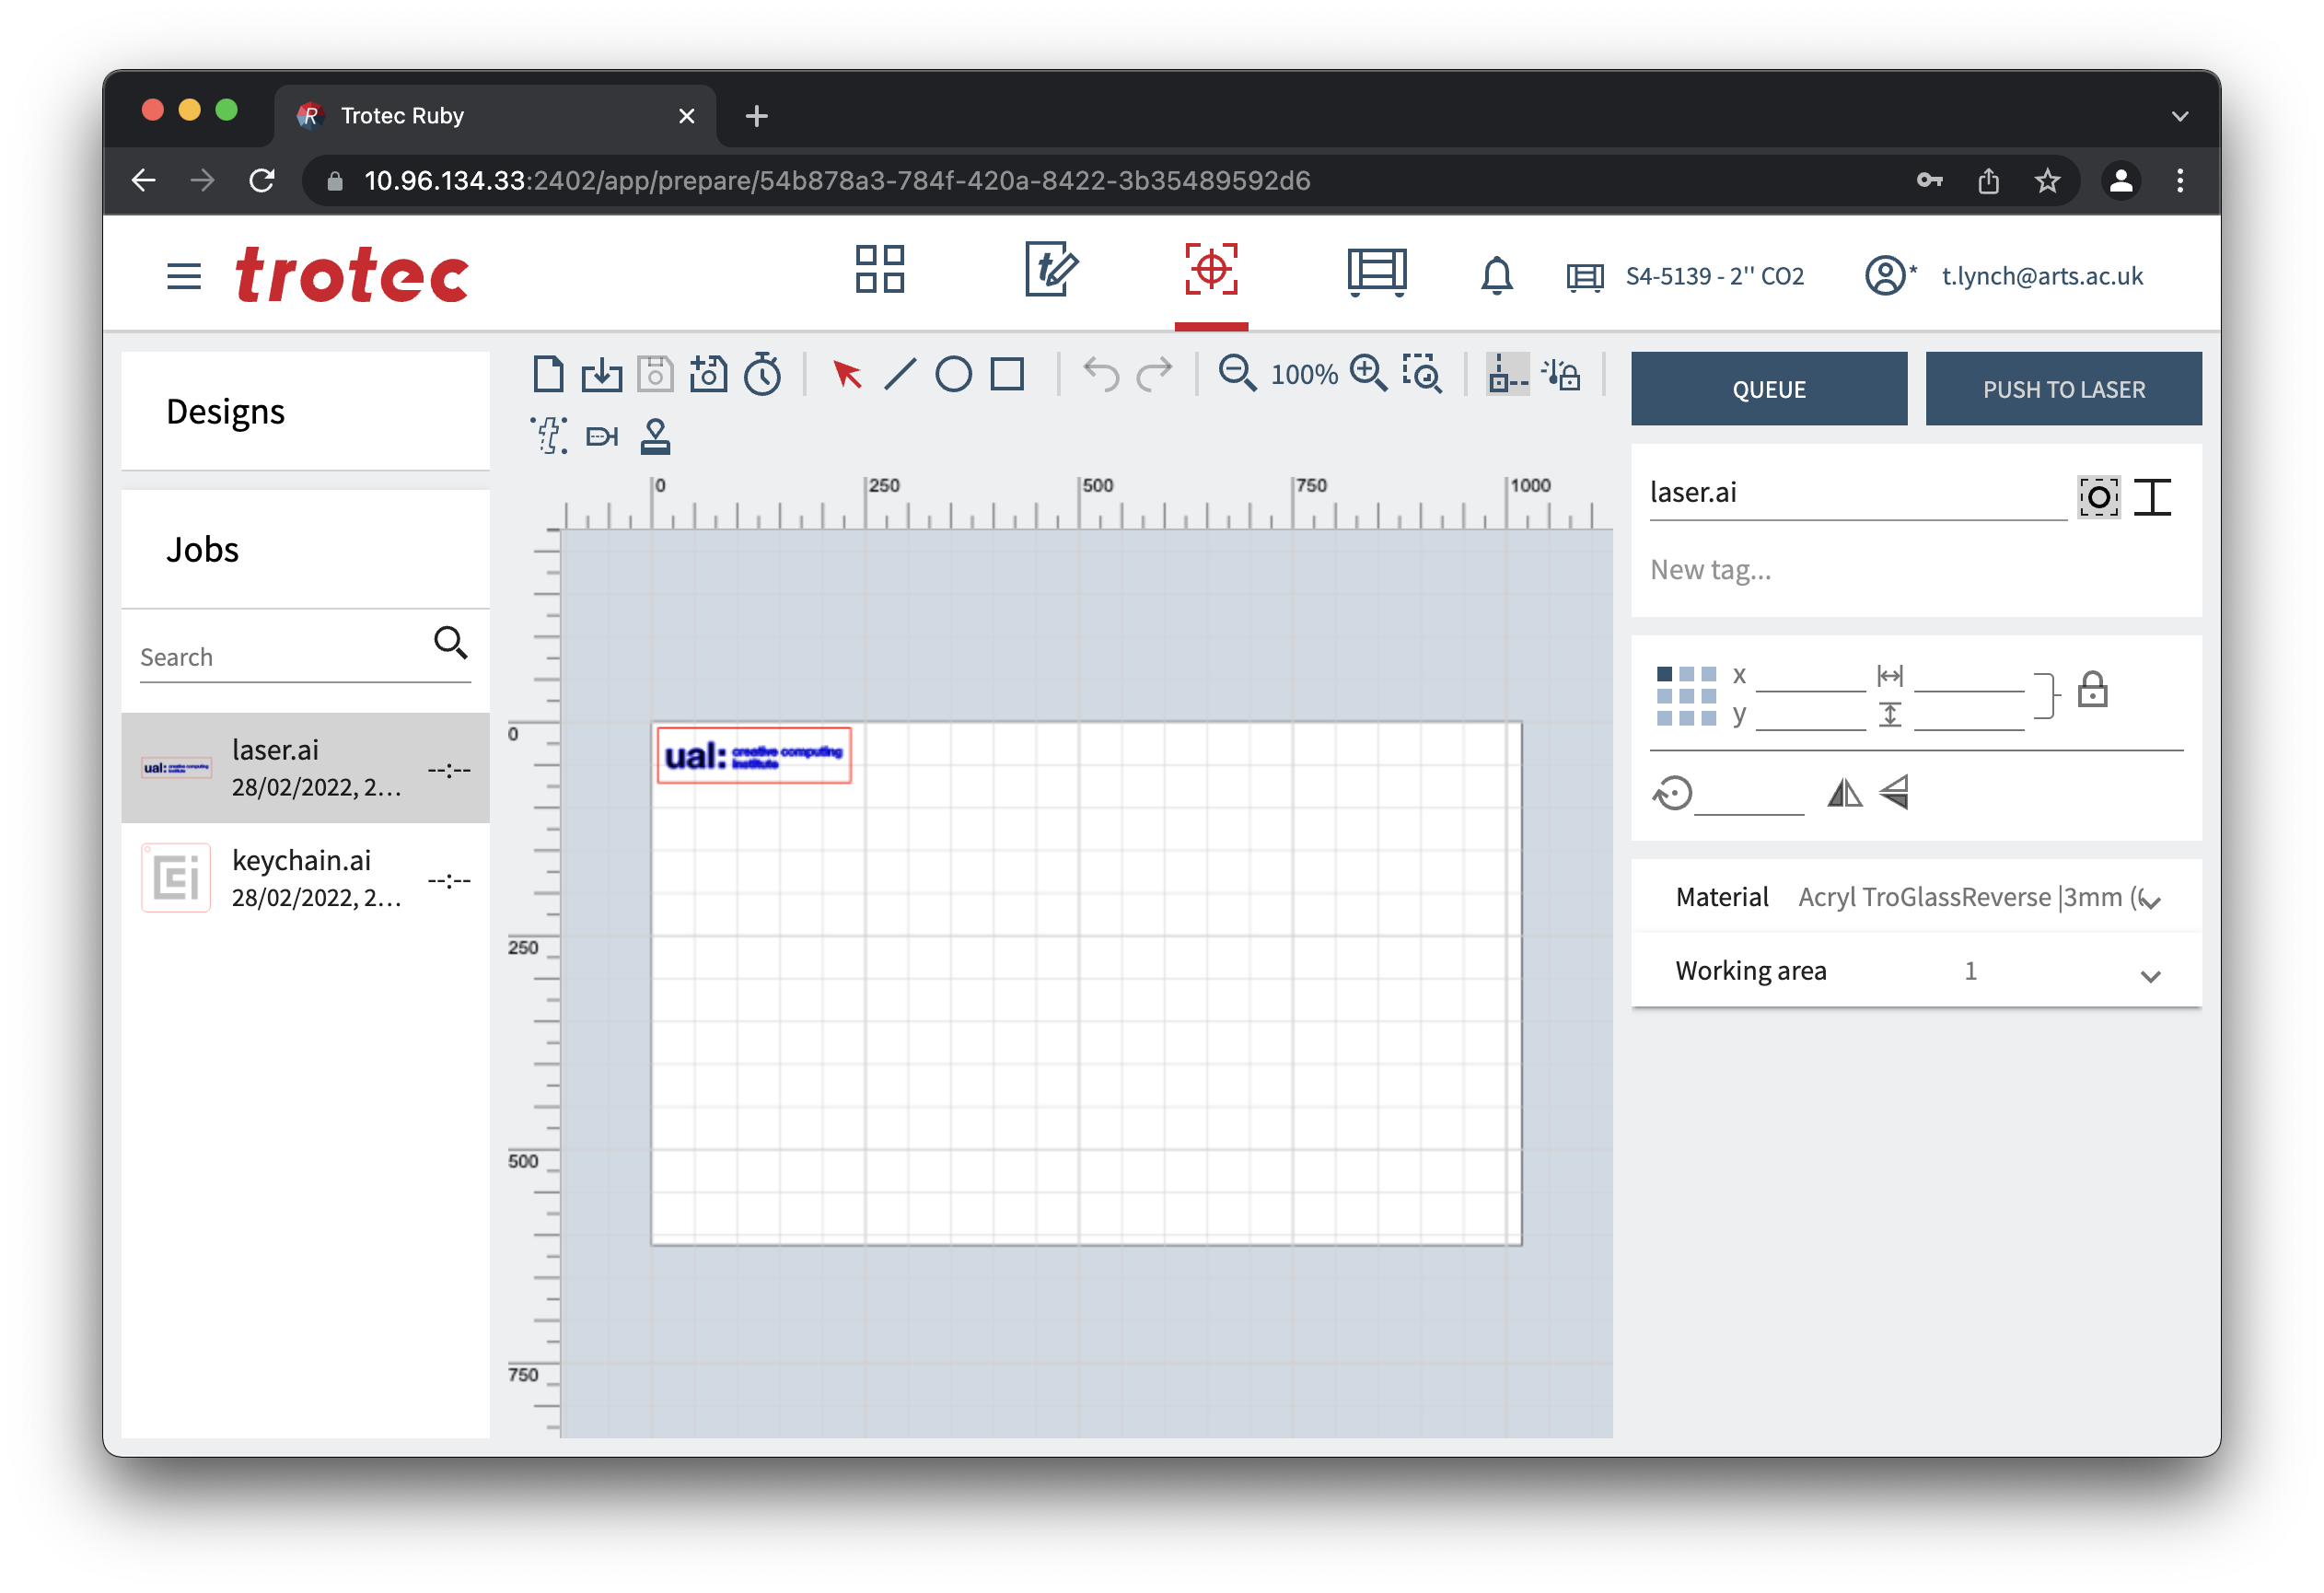
To turn on the laser cutter you will need the key. 1. Insert the key into the key switch. 2. Rotate all the way past the `I` mark to the power symbol, the machine will click and power up. 3. Allow the spring to return the key to the `I` mark. 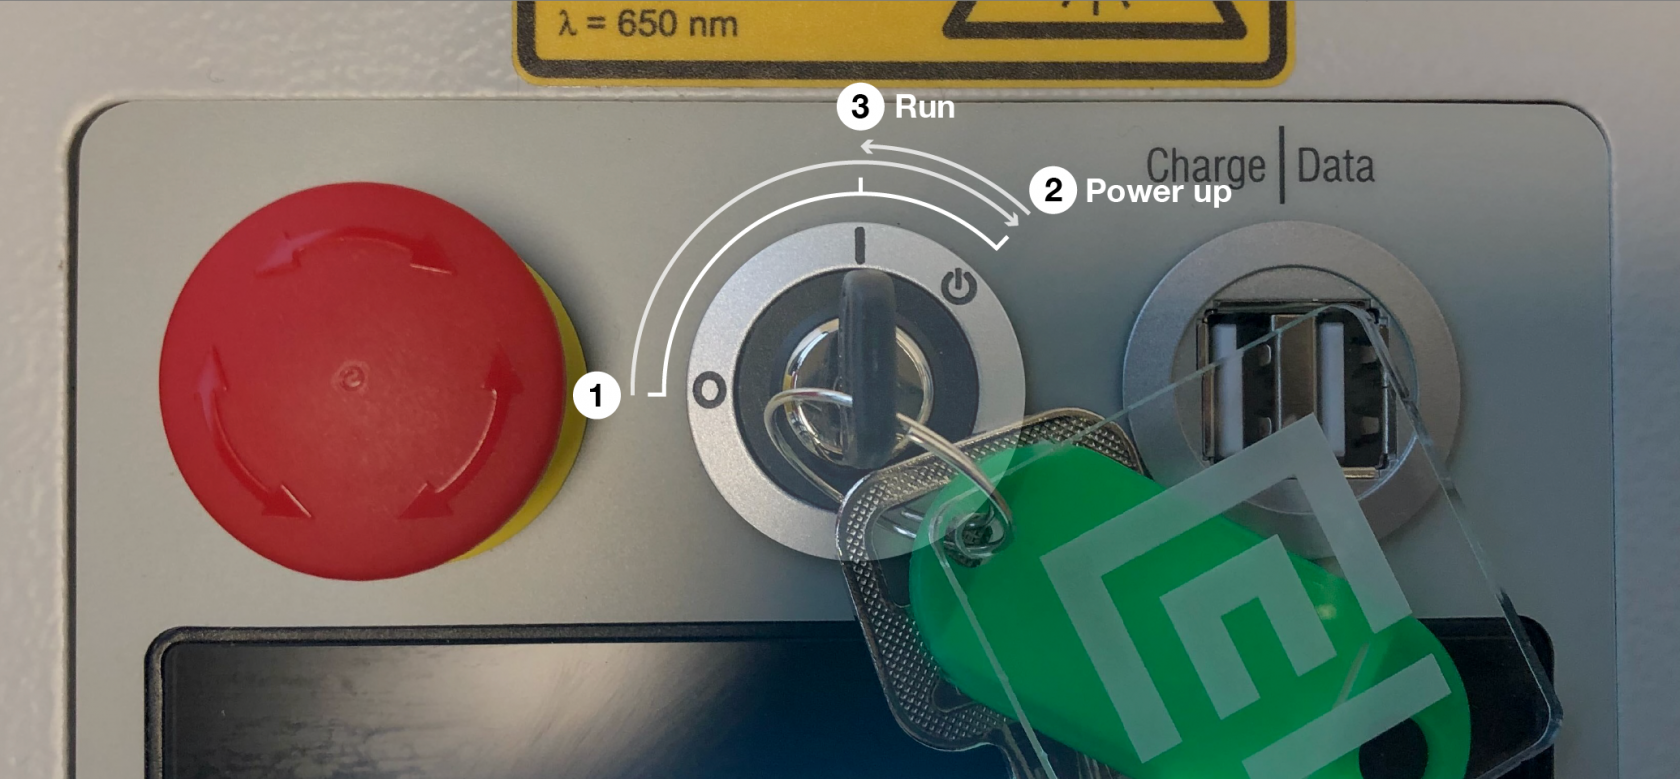 ## What to check if the laser won't turn on If the laser won't turn on normally there are 4 places to check, after each check try powering with the key switch: ### Step 1 - E-stop reset Check the red e-stop mushroom next to the key switch, it will turn the machine off if it is pressed in. You can reset it by turning it a fraction until it pops up from the down position. [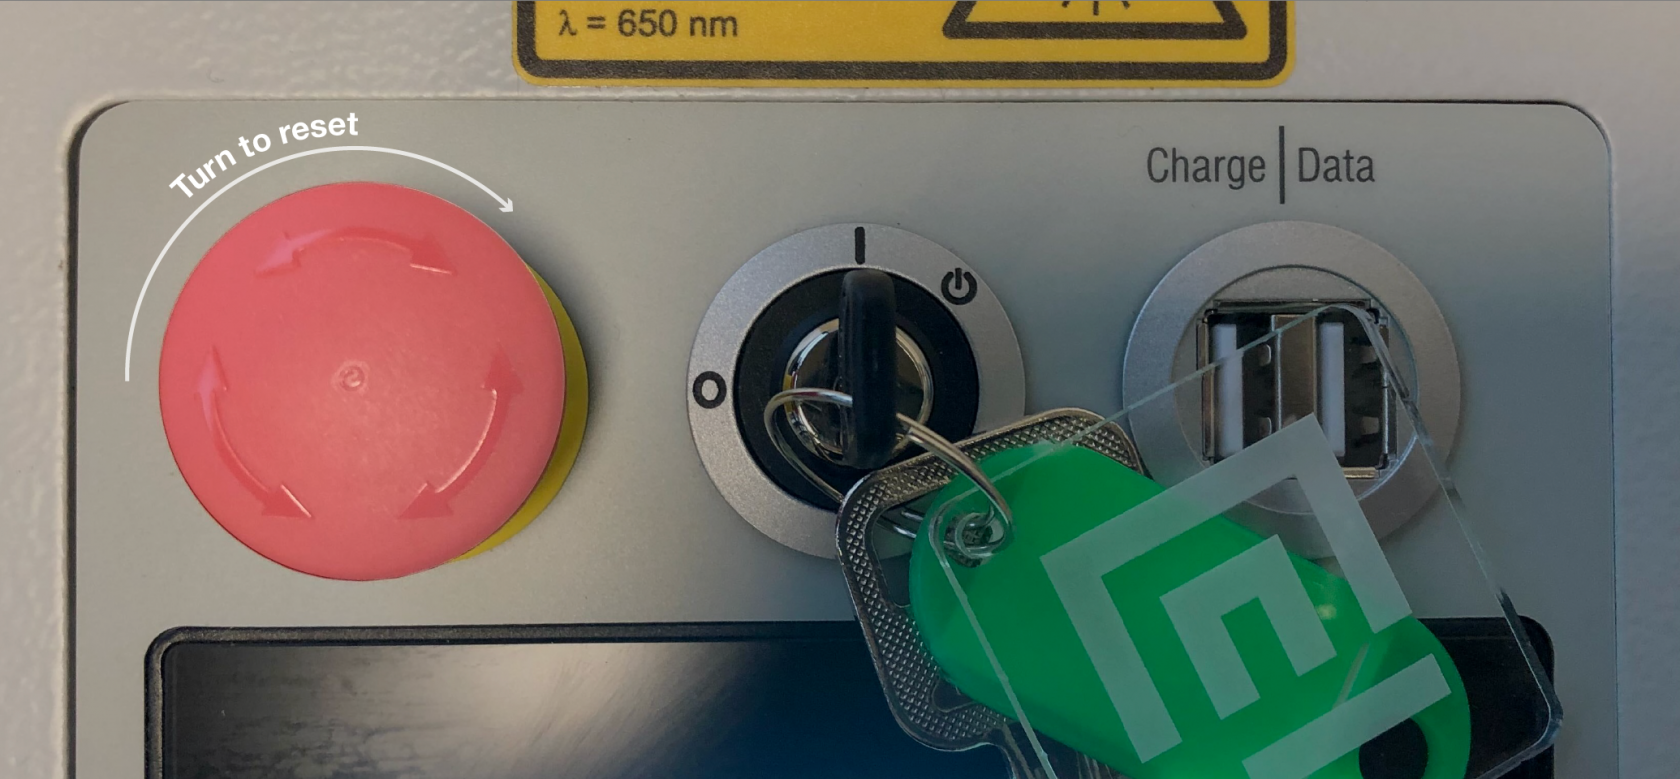](https://wiki.cci.arts.ac.uk/uploads/images/gallery/2022-03/u3qZzgxRCTfF6YQR-estop.png) ### Step 2 - Wall isolator switch On the wall box there is a red rotary switch, if this is off you will also find that the Ruby software isn't accessible from your computer. 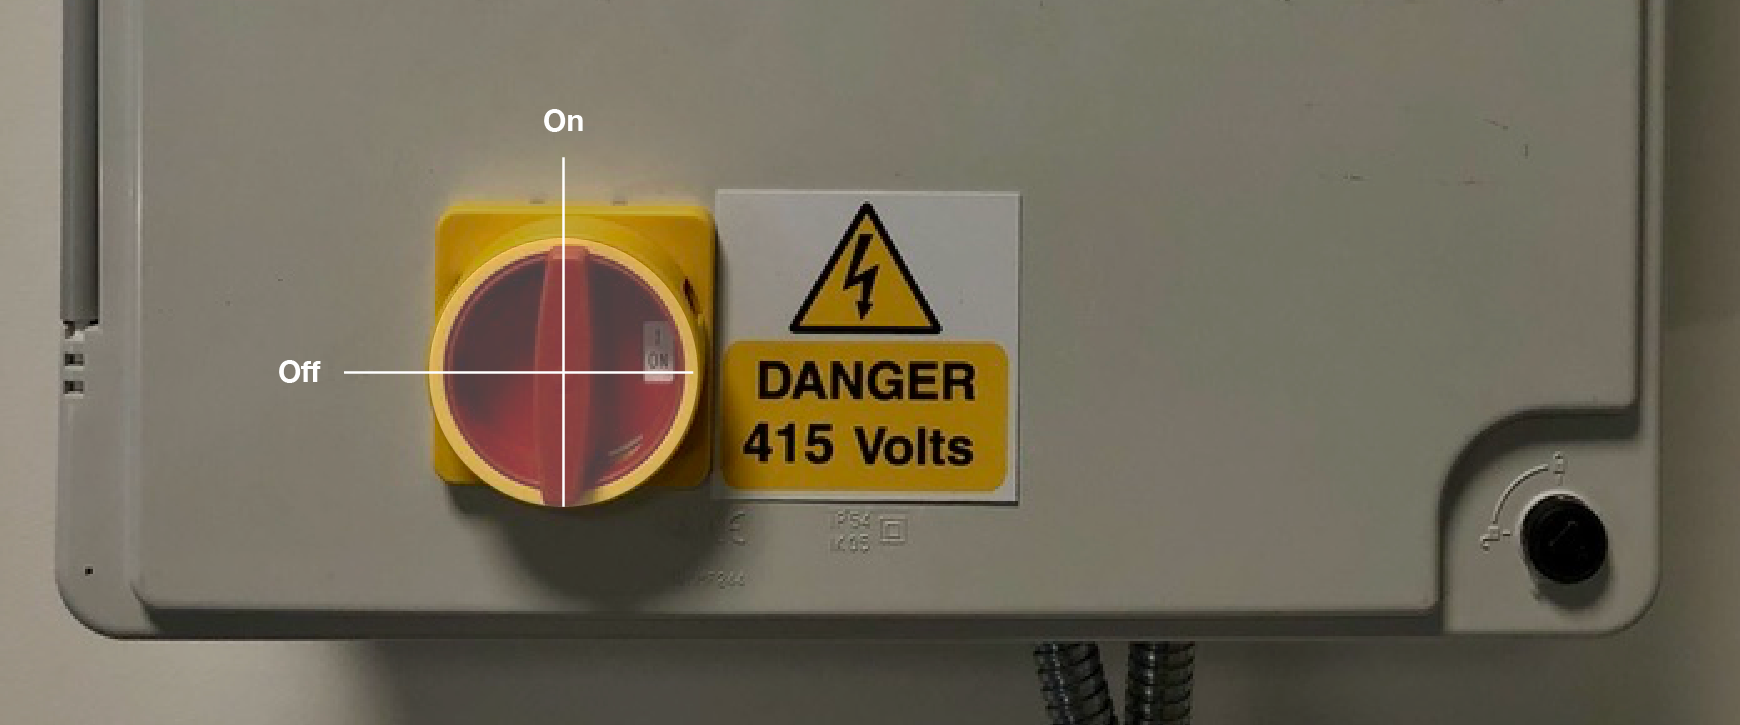 ### Step 3 - Laser power switch On the back of the machine there is a small rocker switch this should be on. If it is off you will find the Ruby software isn't accessible from your computer. ### Step 4 - Power cable Check the power cable running from the wall box to the back of the laser is properly inserted. If it isn't the Ruby software won't be accessible from your computer. # Ruby: Prepare Screen Once you've pushed your design over to the Prepare Screen you'll see it sitting in the working area. This area shows the entire working area of the laser bed, with the top left corner reprisenting the back left of the laser cutter bed. When the machine is running you'll find the red dot laser position matches an icon on the work area in this screen. This screen will allow you to take one or more designs and position them onto a material in the working area ready to be lasered.Typically you would come to this screen by pressing "Create Job" on the Design Screen, but you can also create a new job and then add designs from your library directly into a job.
 The Prepare Screen is split into 3 columns: - Left: Browsers - Top: Design browser - Bottom: Job browser - Middle: Work area - Top: Toolbar - Bottom: Working area - Right - Top: Job name and tags - Middle: Design parameters - Bottom: Materials and list of designs included in the job # Toolbar 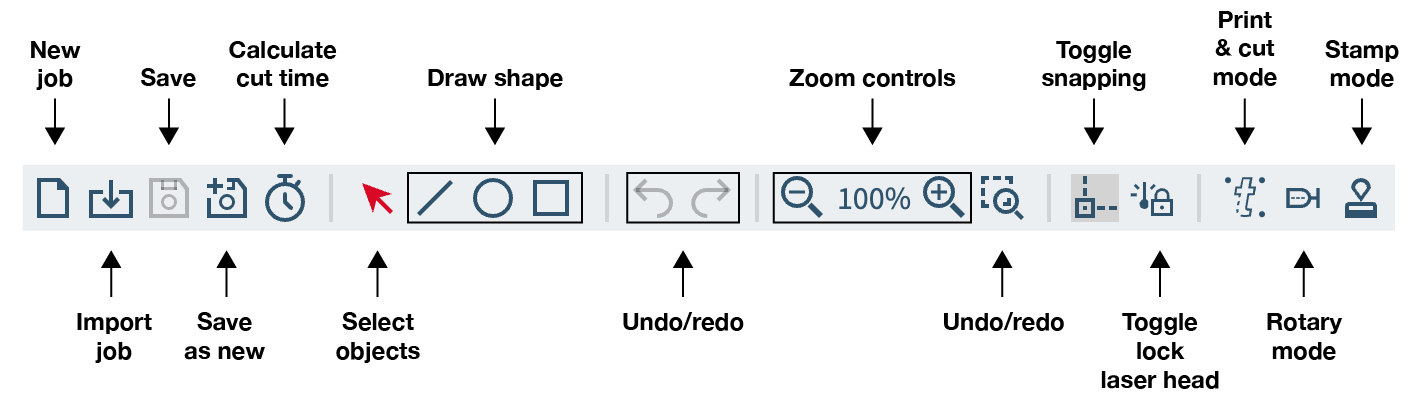 - **New job** - Create a new job. - **Import job** - Upload a file from your computer. - **Save** - Save the open job. *Greyed out means there are no changes to save.* - **Save as new** - Save the open design as a new job. - **Calculate cut time** - Calculated how long the job will take. - **Select objects** - Switches the active tool select objects. - **Draw shape** - Switches the active tool to draw the selected shape. - **Undo/redo** - Undo the previous action or redo it. *Greyed out means there are no further undo/redo steps available.* - **Zoom controls** - Zooms the viewport in and out on the job. - **Zoom selection** - Lets you draw a selection box to zoom into. - **Toggle Snapping** - Toggle object snapping. - **Toggle lock laser head** - We're not sure what this does. - **Print & cut mode** - Used with the computer vision camera attachement. - **Rotary mode** - Used with the rotary engraver attachement. - **Stamp mode** - Used when creating a stamp. # Adding a design If your design isn't on the working area open the designs browser on the top left, and drag the design(s) out into the working area where you want them. # Positioning a design At this point in the process you'll want to put your material into the laser cutter and position the red dot laser on the material where you want it to cut.Moving the laser X, Y and Z axis can cause damage to the machine if you crash the laser head, gantry or bed into your materials.
When the machine is on you can move the laser head around using the X and Y axis control buttons: 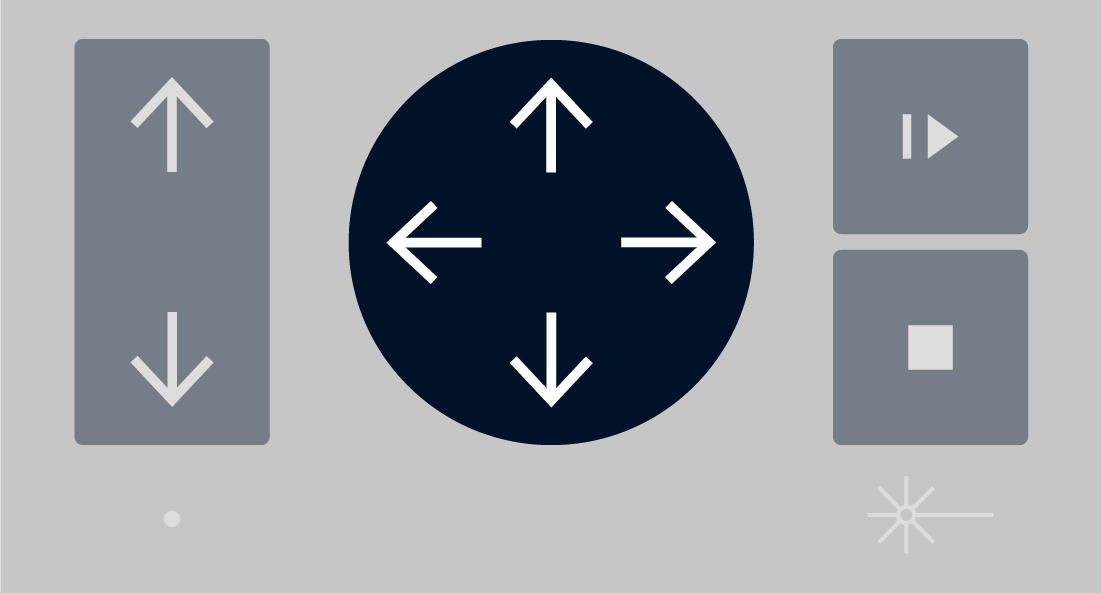 The red dot will be mirrored in the Prepare Screen by an icon, and you can position the design in relation to this icon, around any one of the 9 snappable positions around the bounding box of your design, most commonly people use the top left corner. 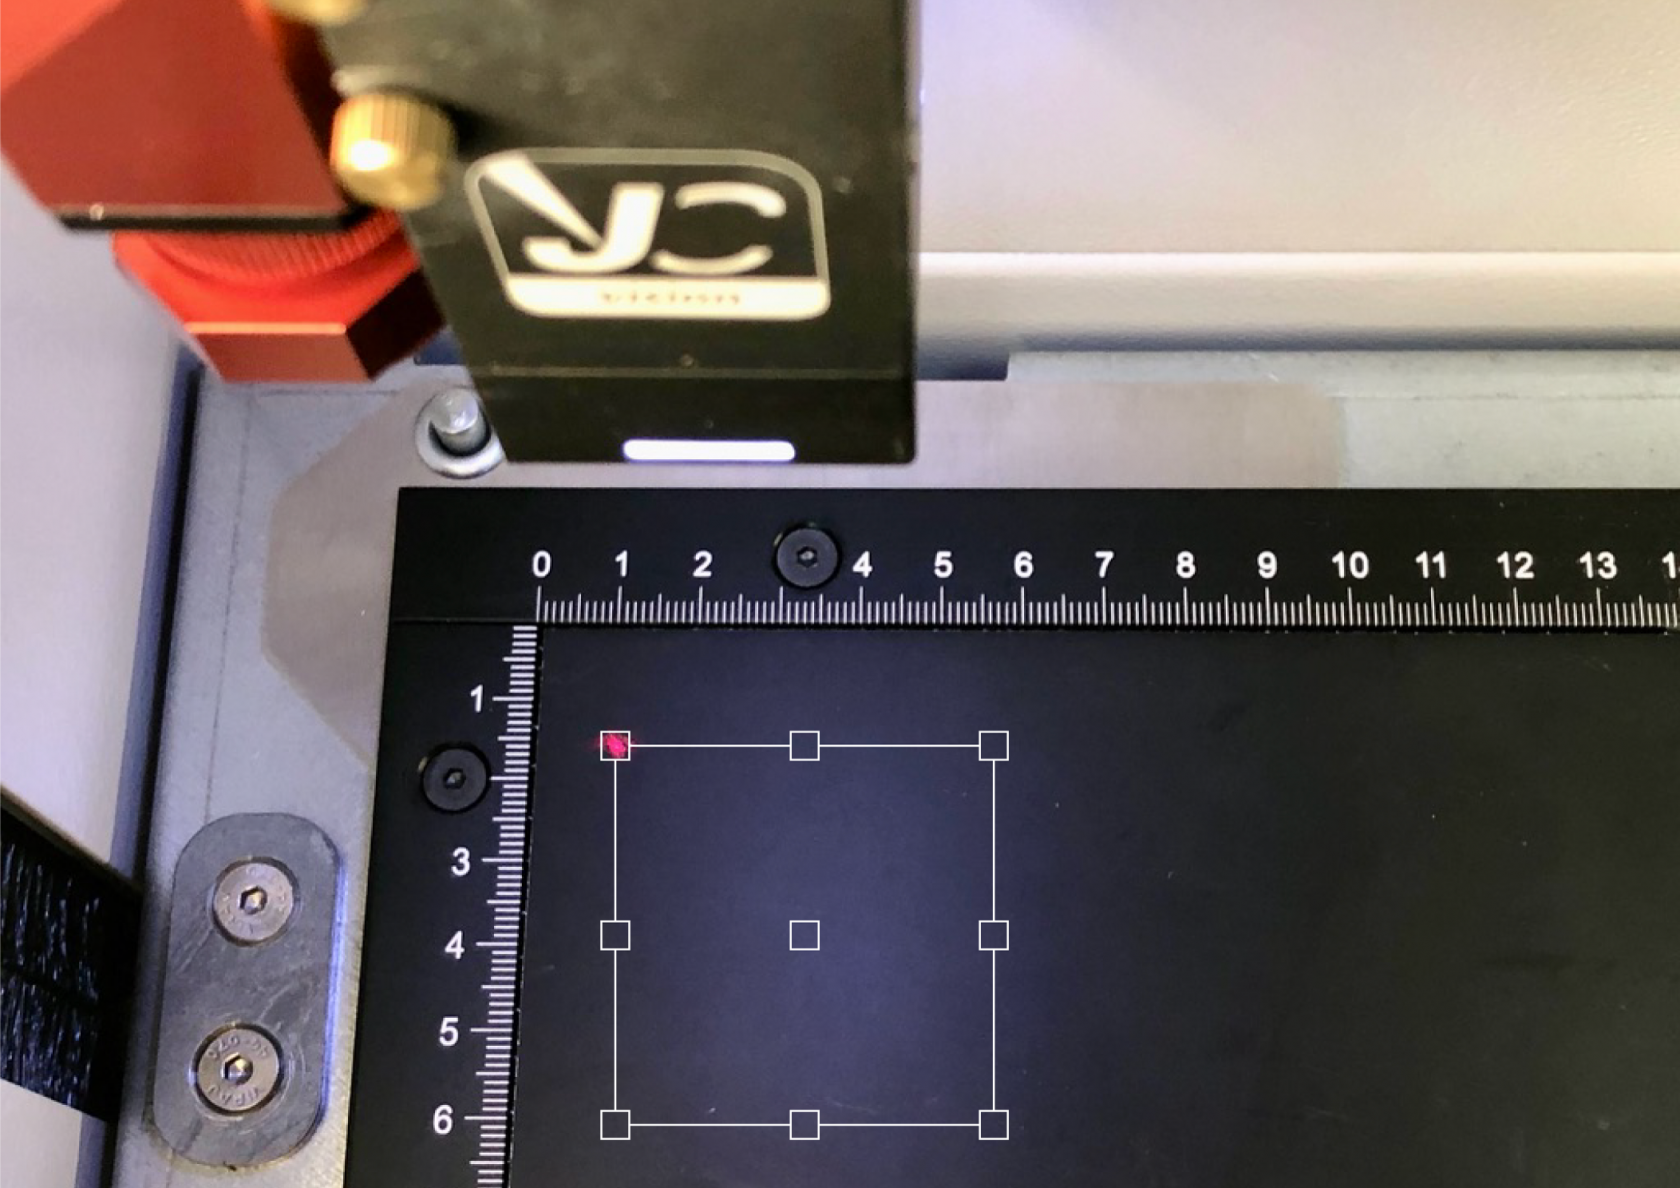 ## What are X, Y & Z axis? - X axis is the left to right movement of the laser head. - Y axis is the backward and forward movement of the laser gantry. - Z axis is the up and down movement of the laser bed. # Selecting a material Once you've got your design(s) laid out in the correct places you will need to set the material for the job.You cannot have different materials for each design.
Select the material from the lower right corner, make sure you pick the exact material you have. The thickeness and the type are important. 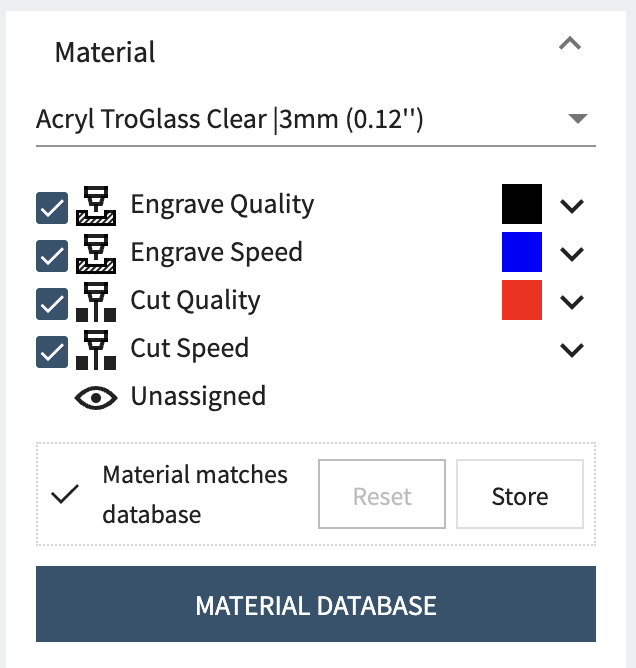 In this screenshot you can see we are using the black, blue and red colours but that the 4th "effect" is unassigned, this colour is RGB green `#00ff00` but was not included in our example design so it is shown as unassigned. From this area you can also disable certain effects if you want to skip them by unchecking the boxes next to them. ## Tweaking effects By clicking the dropdown icon to the right of an effect you can open the effect settings, this lets you get full control over the machines power, speed and other settings. These settings are very granular, but we ask that you avoid adjusting without the support of a technician as there is a greater risk of fire or damage to the machine if you use these incorrectly.
# Queue the job
Once you are ready to send the job to the laser cutter press Queue, the machine won't start until you press the start button on the laser cutter.

# Ruby: Design Array
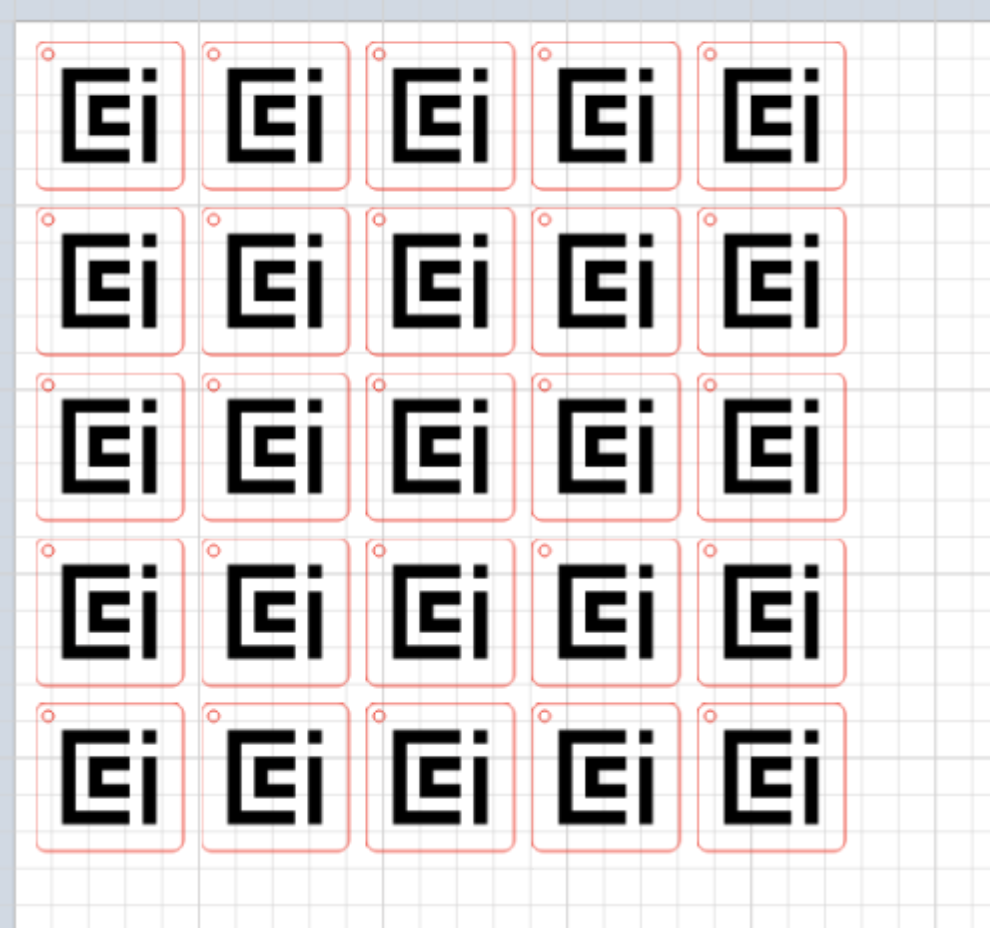
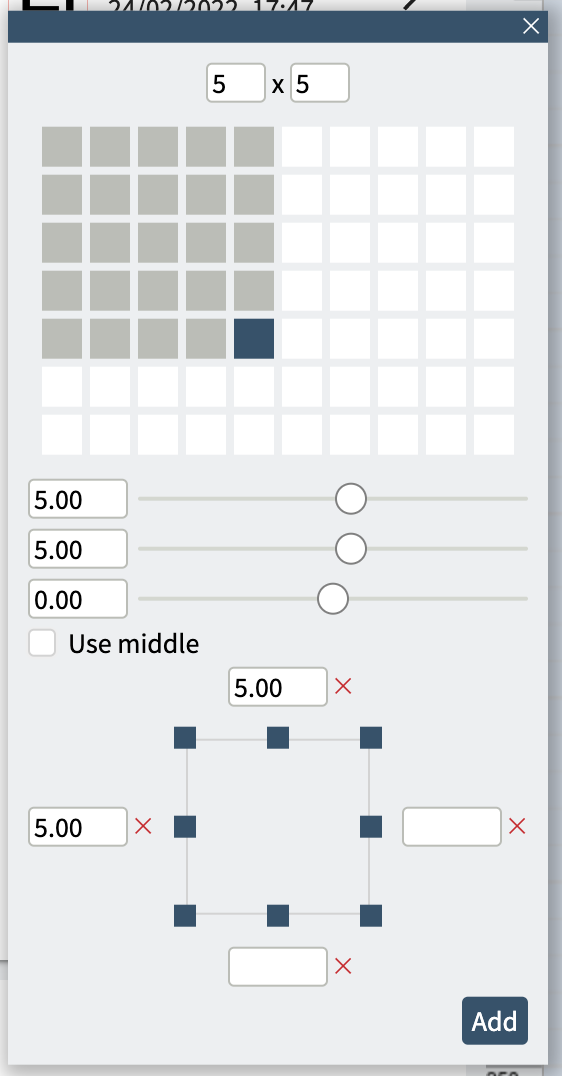
One of the most useful features in Ruby is the ability to automatically create a repeating grid from your design as a job. Trotec call this a Design Array, but you might also call it a grid, matrix or repeat.
When making a simple design like our key chain one of the most common things to do is to make lots of the, and it's also a really easy way to make a mistake as you copy and paste multiple files and have to update the duplicates too when any changes are made.
The Design Array feature in Ruby does this for you, allowing you to specify the number of repeats in an X and Y axis, as well as the spacing between them, the offset from any corner of the laser bed, and also an alternating offset which allows round objects to be interlaced to save space.
In this example you can see a 5x5 grid of our key chain design with a 5mm wide and tall margin from the bed, and from one design to the next:
These settings are very granular, but we ask that you avoid adjusting without the support of a technician as there is a greater risk of fire or damage to the machine if you use these incorrectly.
# Queue the job
Once you are ready to send the job to the laser cutter press Queue, the machine won't start until you press the start button on the laser cutter.

# Ruby: Design Array
One of the most useful features in Ruby is the ability to automatically create a repeating grid from your design as a job. Trotec call this a Design Array, but you might also call it a grid, matrix or repeat.
When making a simple design like our key chain one of the most common things to do is to make lots of the, and it's also a really easy way to make a mistake as you copy and paste multiple files and have to update the duplicates too when any changes are made.
The Design Array feature in Ruby does this for you, allowing you to specify the number of repeats in an X and Y axis, as well as the spacing between them, the offset from any corner of the laser bed, and also an alternating offset which allows round objects to be interlaced to save space.
In this example you can see a 5x5 grid of our key chain design with a 5mm wide and tall margin from the bed, and from one design to the next:
 # How to create a Design Array
1. Create a new job / open an existing job
2. Find the design in the left side bar.
3. Double click the arrow:
# How to create a Design Array
1. Create a new job / open an existing job
2. Find the design in the left side bar.
3. Double click the arrow:
 4. Choose your options:
 5. Press Add
Now your Design Array is created. This is a one time process which means if you change the design or want to change the array parameters you'll need to start again.
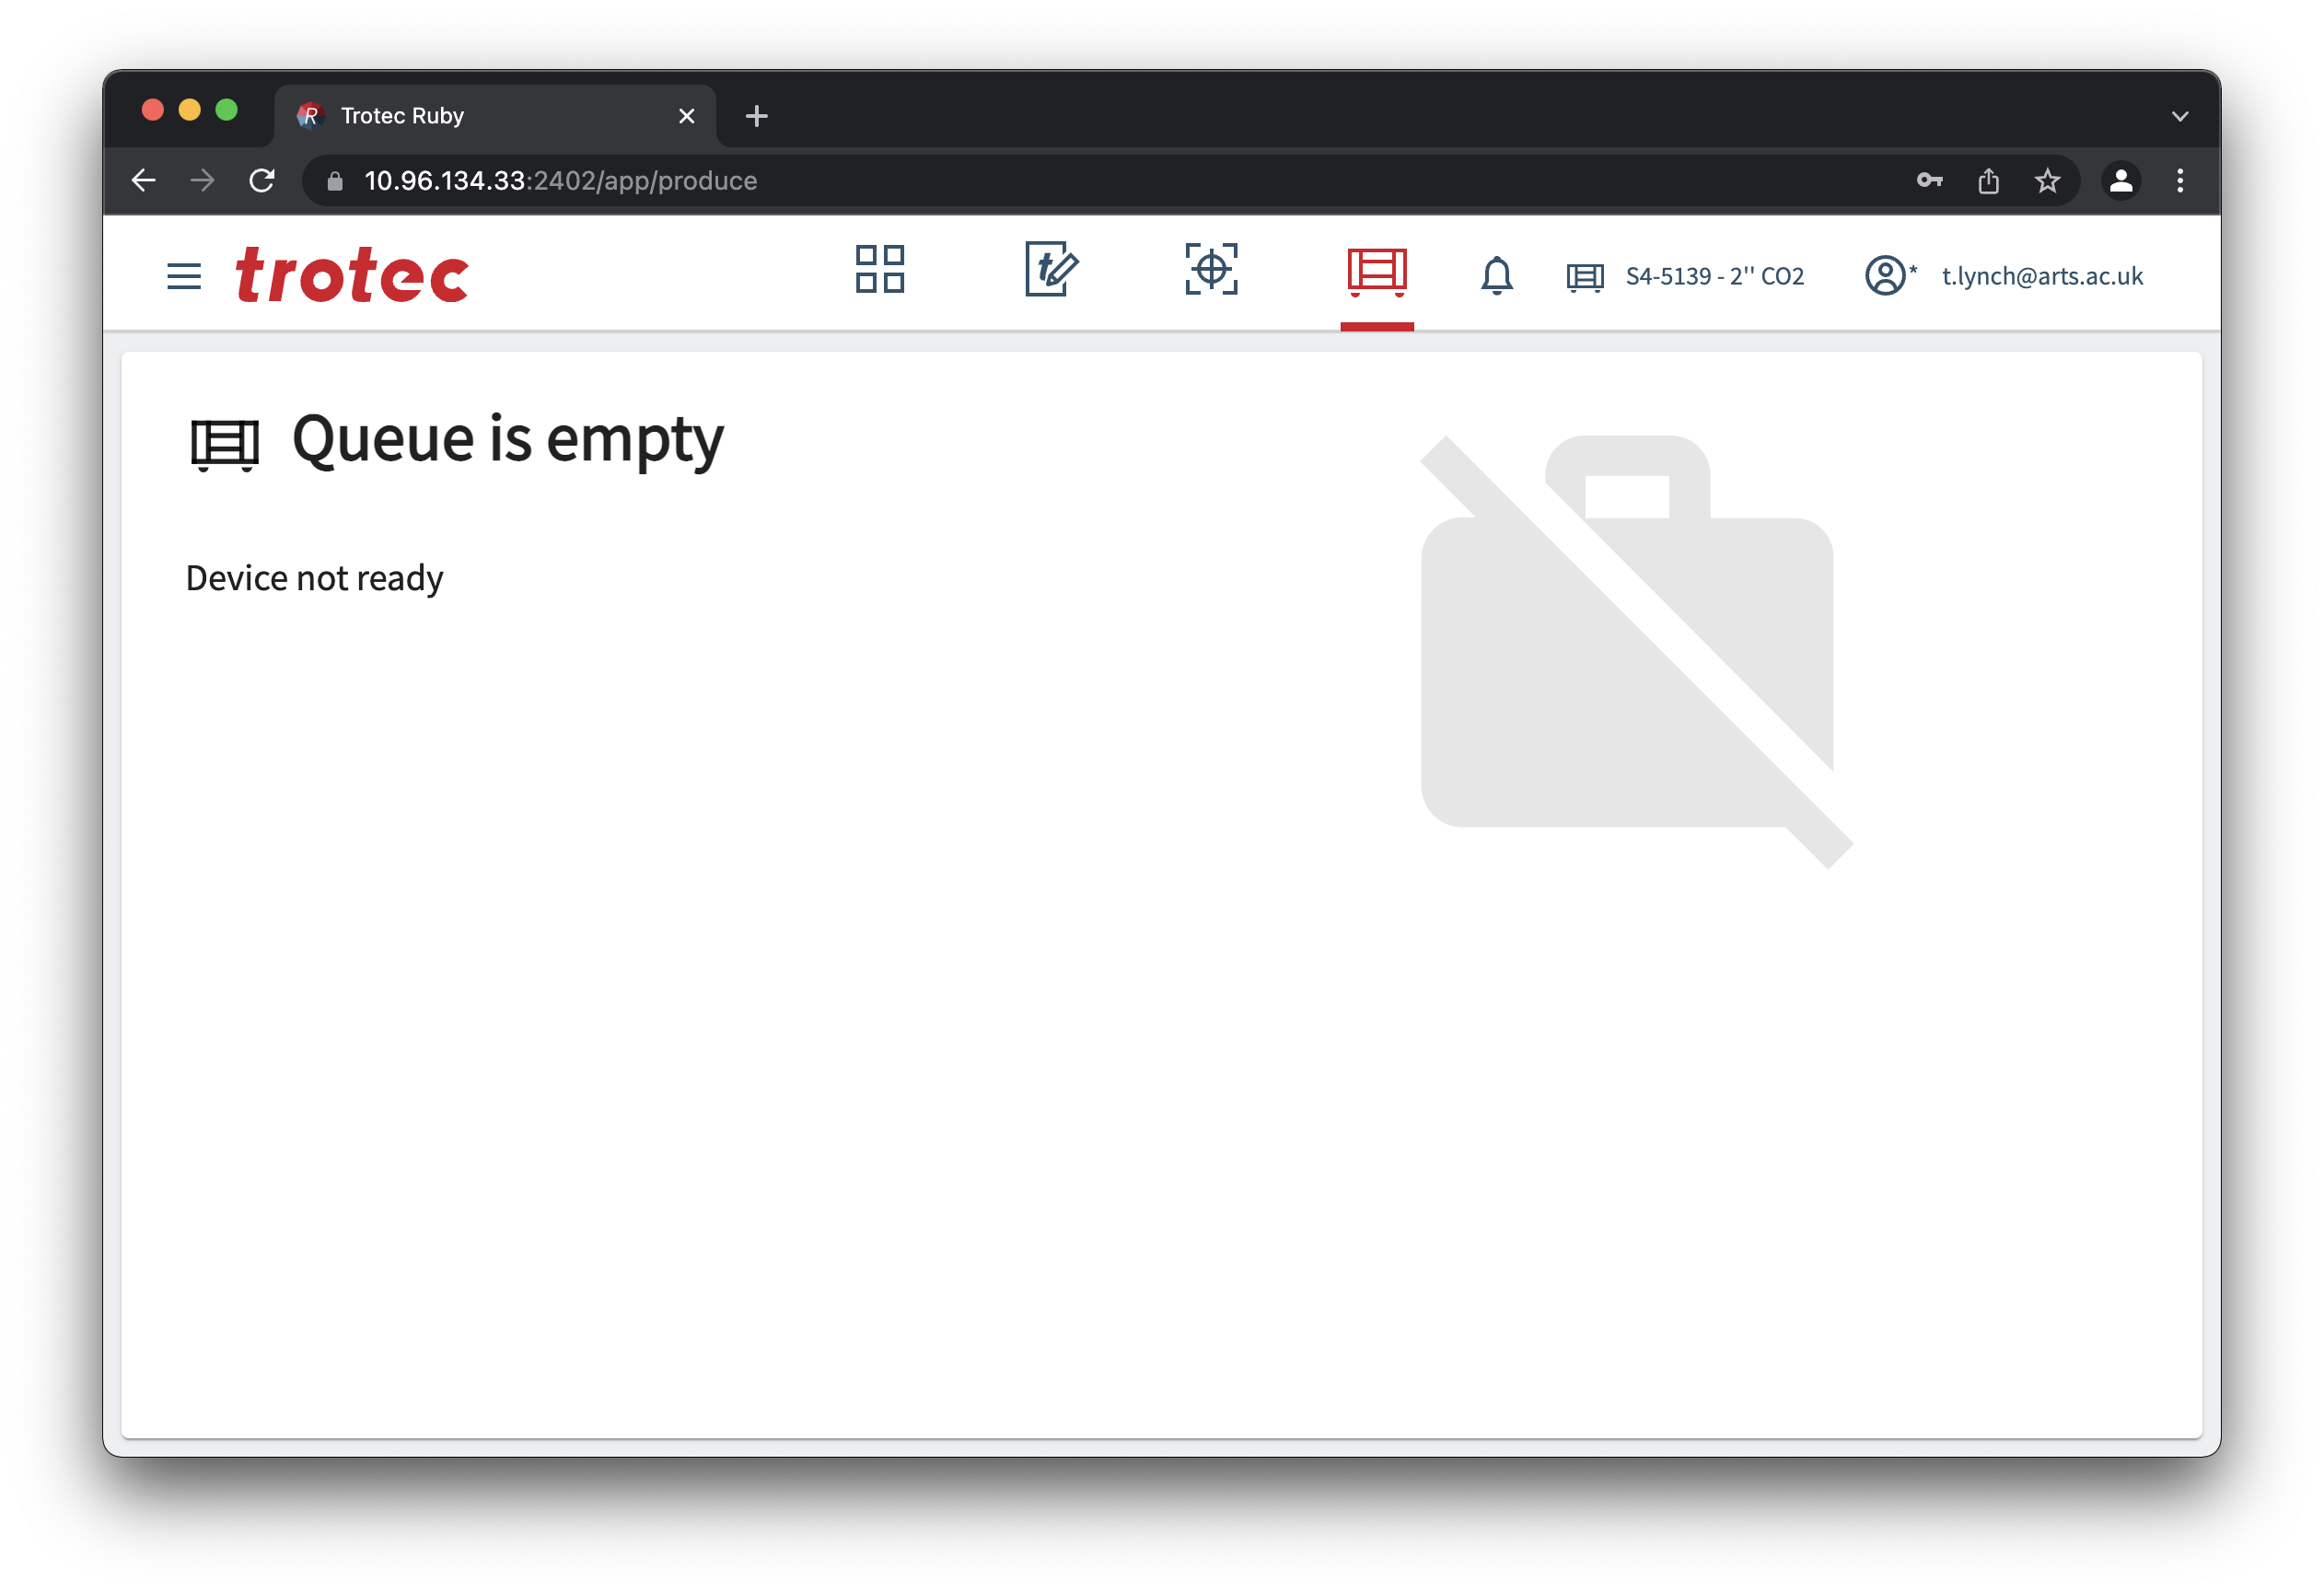
# Ruby: Produce Screen
On this screen you can see the queued jobs and monitor their progress remotely. This is useful if you are waiting for someone else to finish working.
5. Press Add
Now your Design Array is created. This is a one time process which means if you change the design or want to change the array parameters you'll need to start again.
# Ruby: Produce Screen
On this screen you can see the queued jobs and monitor their progress remotely. This is useful if you are waiting for someone else to finish working.
This screen must not be used as a substitute for direct supervision of the laser cutter.
At the time of writing Ruby v2.1 shows play and stop icons which don't function on our type of machine, these should be ignored.
 # Focusing the laser Once your material has been put in, you need to focus the laser beam onto the surface of the material.When focusing the laser cutter it's possible to damage the machine by running the laser head or X-axis arm into the material.
Operating the laser cutter out of focus increases the likelihood of fire and will result in poor cut quality.
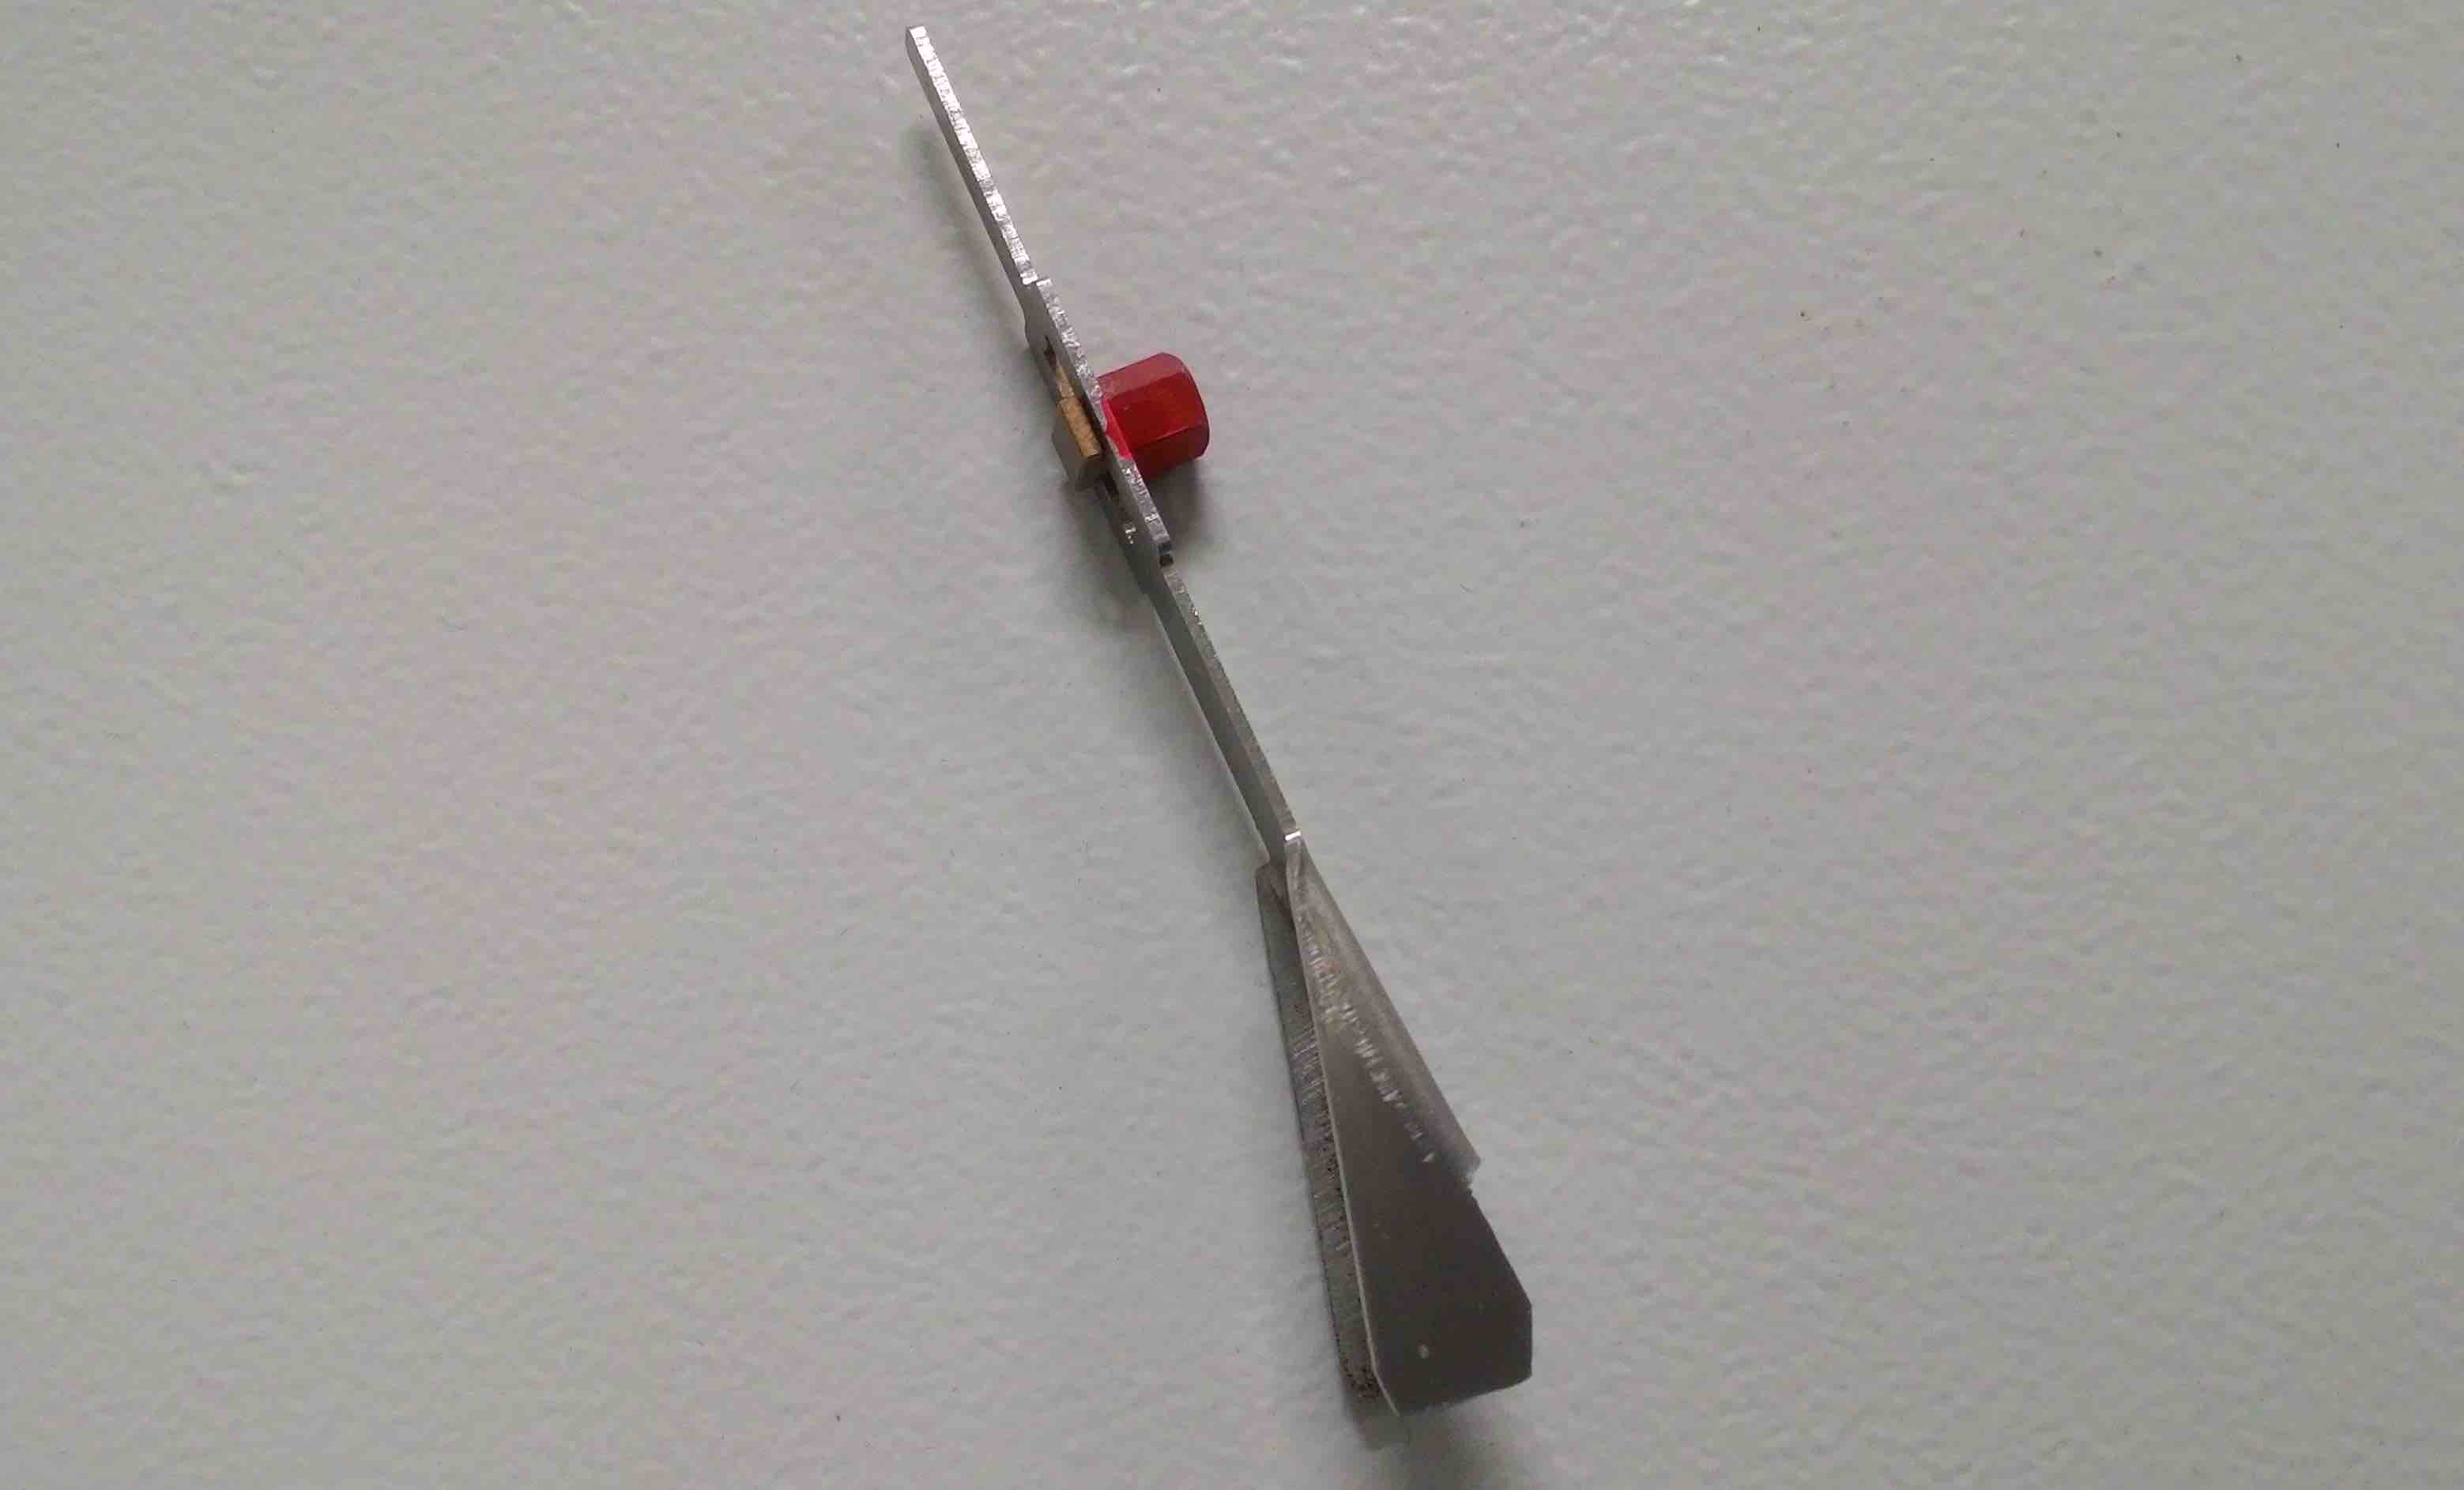
There are 2 ways of doing this: # Auto Focus When using sheet materials like acrylic, wood, paper and fabric you can use auto focus, position the red dot over the material and press the up and down Z axis buttons on the keypad: 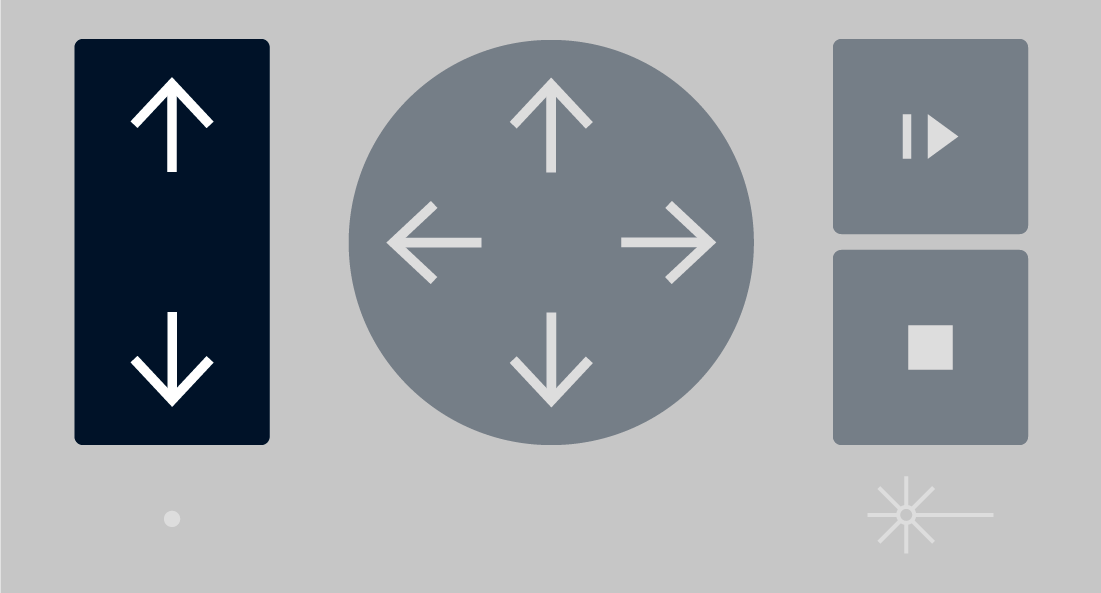 # Manual Focus Manual focusing should be done when the material isn't flat. To do this hang the focus tool off the left or right side of the laser head, and slowly nudge the Z axis upward until the tool is slightly displaced.The laser focus tool should be stored in the maintenance box under the laser cutter.
 # Running a job Once you've designed, prepared and queued up your job it will appear on the touch screen ready to cut. Before you press the run/start button check: 1. [Is the correct material selected in Ruby?](https://wiki.cci.arts.ac.uk/books/facilities/page/ruby-prepare-screen) 1. [Is this material approved for use?](https://wiki.cci.arts.ac.uk/books/facilities/page/laser-safe-materials) 1. [Is the laser focused?](https://wiki.cci.arts.ac.uk/books/facilities/page/focusing-the-laser) Once you are certain, close the lid, and press the run/start button.  If there is an issue during the operation of the laser cutter you can stop the machine: # Emergency stop To stop the laser cutter in an emergency such as fire or other risk to yourself, others or the machine, any of these will work: 1. Press the red emergency stop button 1. Power off using the key 1. Power off with the red rotary isolator. # Pause job If you need to pause the job to move a piece of material press the run/pause button again, the machine will carry on for a few seconds until it can safely pause. If you move the material the laser cutter will not track this, and you could ruin the job. # Box maker software/apps Any material box makers: