# Digital Fabrication Lab
# About the Digital Fabrication Lab (ReadMe)
👋 Hey there! Welcome to the Digital Fabrication Lab — our little playground of ideas and machines. You’ll find us in PR_B401A, high up on the 4th floor of Peckham Road. Before you get started, you will need to go through the induction process:
📘 Read Wiki → 🛠️ Book Induction → 🎒 Learner Access → 🛠️ Project Work → 👑 Experienced Access → 🚪 Lab Door Access
---
# Digital Fabrication Induction
**Inductions can be booked via Orb only within the days shown below**. **Where to find it: [Orb](https://orb-arts.siso.co/ui/find-workshops.php) -> Left sidebar 'Menu' icon-> Simple Booking -> Training and Workshops -> Select your preferred session** If you have any questions, please feel free to message **Yuwei Chen** via **Slack**.
| | Induction Windows |
| - | - |
| 2025 | Sep 22 – Nov 27 |
| 2026 | Jan 12 – Mar 19 Apr 13 – May 1 |
🚩 Before you come to the induction, please
- Read the Wiki in advance
- Bring your laptop (own or UAL loan)
- Download [Ultimaker Cura](https://ultimaker.com/software/ultimaker-cura/) for 3d printing. And if you are using the UAL laptop, please open UAL Self Service, search "Cura", then press on install.
# Opening Hours
| | Learner Access (Supervised) | Experienced Access (With Door Access) | Students without induction |
| - | - | - | - |
| Weekdays | **Monday** 14:00 – 16:30
**Tuesday - Friday** 09:00–16:30 | No access permitted |
| Weekends | Closed | Closed | Closed |
# Additional Notes
- The lab begins wrapping up at **16:00**. Cleaning starts then, and the lab closes at **16:50**. Everyone must leave by that time.
- Each person may use **only one 3D printer at a time**. You must stay by the printer for at least **30 minutes** to ensure it is running smoothly before leaving.
- When using the **laser cutter**, you must not leave the machine unattended. A fire can start within seconds.
- More detailed safety guidelines are posted inside the lab. Please make sure to read them.
## Safety & Code of Conduct 🔒
We are strict about safety because it protects everyone. At the same time, our team is here to support you.
- **Please do not share your access card.** The Lab use is limited to inducted CCI students only. If you are helping uninducted CCI students, make sure you are running the machines at all times; they can't operate the machines themselves or access the lab alone.
- Keep tools in PR_401A, they need to stay in the lab for lab maintenance, **and please don’t take any tiny tools/equipment/furniture/materials from any other room on the 4th floor, they belong to CCW**
- Borrow additional equipment from the GC Kit Room
- Bin the waste, clean your space after use
## Staff
Yuwei Chen
she/her
Digital Fabrication Specialist Technician
# Bambu - Advanced 3D Printers
We have **5 Bambu H2D Pro 3D printers** available for inducted and experienced students.
To use the Bambu printers, you must have:
- completed the **3D printing induction on ORB**
- completed several successful **technician-supervised prints on the Ultimakers**
- enough experience to check and prepare your models properly before printing
- **lab door access** and advanced user status
**Important:** 3D printing inductions only take place at the **start of the academic year**, not mid- or end-of-year. If you have not completed the induction between **September and March**, you cannot operate the printers yourself. You may ask another inducted student to print for you.
Please book your printer through the **Book Your Slots** page before use.Please **do not**:
- log out of the **Bambu admin account**
- add or change filament yourself unless you have been specifically inducted to do so
Print jobs may be cancelled if:
- the user cannot be identified
- the job does not include the correct name or notes
- the printer is used without a valid booking
Repeated failure to follow these rules may result in access to the labs being withdrawn.
# H2D Pro
# Ultimaker S7 - 3D Printers
In the Digital Fabrication Lab, we have 6 Ultimaker 3D printing equipment for CCI students to use, once they have done an induction.
# ReadMe🚩🌟🌟UltiMaker 3D Printer Guide
## Important Reminders (Read First)
- **Monitor the first few layers**. Stay with the machine and watch the first 5 layers carefully (roughly **15~30 mins**, depending on the size of your work). If you notice any issues, pause or abort the print on the machine.
- **Please name your file using your Slack name**. Students are responsible for the machine they are using, improper setup can cause damage or fire, so if we can’t identify you, your print will be paused or canceled.
- Always **wear gloves** when touching the build platform or removing prints, please.
- **Double-check** that the build platform is correctly reinstalled — all four alignment holes must **match precisely**. Misalignment can **damage the printer**.
- Not confident or unsure? **Please ask a Technician before printing**.
---
# 3D Printing Workflow Manual
From Modelling to USB Printing with UltiMaker Cura. Applies to: UltiMaker Cura users and USB-compatible 3D printers (e.g., UltiMaker series).
### 📌 Workflow Overview
Get a Laptop and a USB drive ready
1. **Design your model**
2. **CAD Export** – Export your model as .STL or .OBJ
3. **Install Cura** – Download and install [Ultimaker Cura](https://ultimaker.com/software/ultimaker-cura/)
5. **Slice in Cura** – Import, adjust slicing settings
6. **Printing Profile**Save your frequently used print setting as a new customer profile for quick setting up
7. **Backup** – Save the file separately as .3mf further editing
8. **Export as yourSlackName.ufp** – Save the file named after your **SlackName.ufp** before saving it to your USB drive, and the USB drive shouldn’t be bigger than 16GB, or the Ultimaker printers won’t recognise it.
9. **Pre-Print Self Check** – Follow [wiki](https://wiki.cci.arts.ac.uk/books/digital-fabrication-lab/page/step-4-check-the-machine-before-you-started) to inspect setup and hardware
10. **Monitor the first few layers** – Monitor the first few layers, stay with the machine and watch the first 5 layers carefully. If you notice any issues, pause or abort the print on the machine.
11. **Post-Print** – Cooldown, safe removal with Gloves, cleanup
---
## 📝 Step-by-Step Instructions
### 1. CAD Software Recommendation
Use CAD tools **optimized for 3D printing**:
- **Fusion 360** – Great for parametric design and functional parts. We have [Student Fusion Access](https://www.autodesk.com/uk/education/edu-software/overview#FSN), you could acces via [https://www.autodesk.com/uk/education/edu-software/overview#FSN](https://www.autodesk.com/uk/education/edu-software/overview#FSN)
- **Rhino** – Ideal for complex, freeform modeling with great STL control
- **Tinkercad** – Browser-based and beginner-friendly
❌ Avoid **Maya** and **Blender**:
- They’re built for animation/VFX, not solid modeling, so objects might not be closed properly, or may not be watertight.
- Blender lacks parametric accuracy and often produces **non-manifold** meshes.
> Tip: Choose tools built for precision modeling to reduce printing errors.
---
### 2. CAD Export
- Export as `.STL`, or `.OBJ`
- Recommended format: `.STL`
- Ensure **correct unit scale** (preferably millimeters)
---
### 3. Install Ultimaker Cura
- Download from: [ultimaker.com/software/ultimaker-cura](https://ultimaker.com/software/ultimaker-cura)
- Add your printer model (e.g., **Ultimaker S7**)
- Set **Material 1** to: `White PLA AA0.8` (for a fast prototyping) or `White PLA AA0.4` (for the final projects), check the available machines' nozzle sizes before exporting your print.
- Need different materials? Please speak with a Technician
---
### 4. Slice in Cura
- Import your model into Cura.
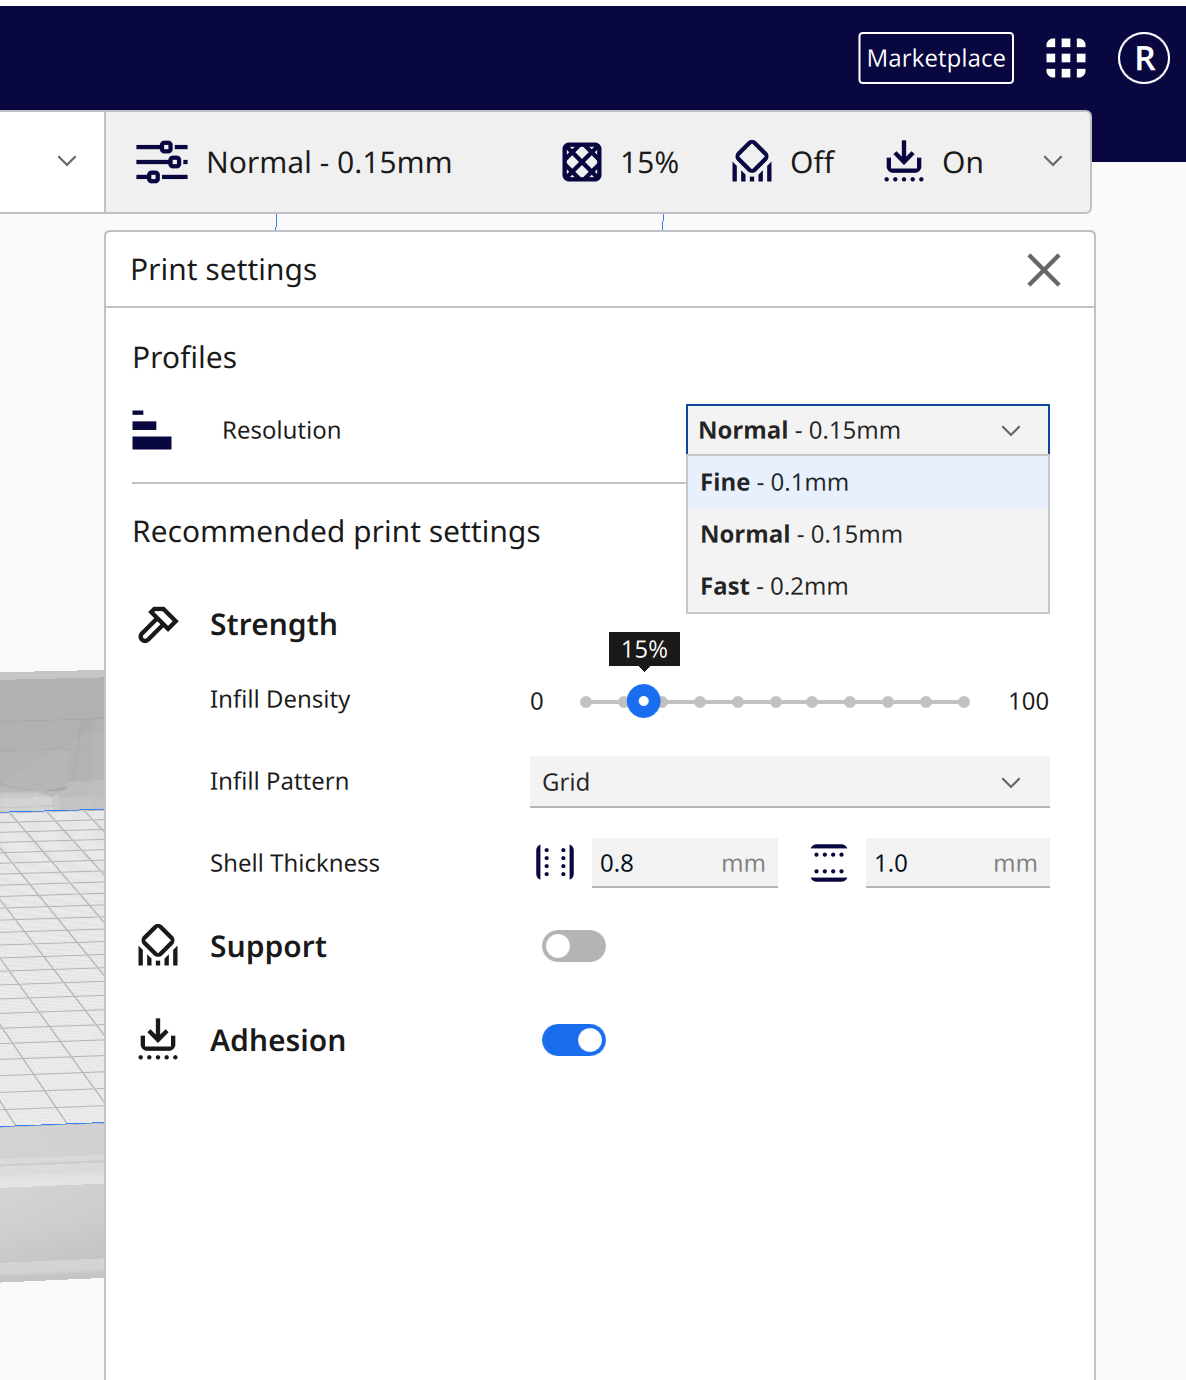
- Default settings may not work for most models. Adjust them by clicking on the settings bar in the top-right corner.
[](https://wiki.cci.arts.ac.uk/uploads/images/gallery/2025-05/bCJ03YrWTszWRFDT-image-1747829094260-04-46.png)
- Choose **`Fast`** for PLA prototyping and **`Normal`** for finer printing.
- Consider whether your model needs support. If it does, enable it using the support toggle.
[](https://wiki.cci.arts.ac.uk/uploads/images/gallery/2025-05/Dvid6etff3xwzqea-image-1747830047605-20-43.png)
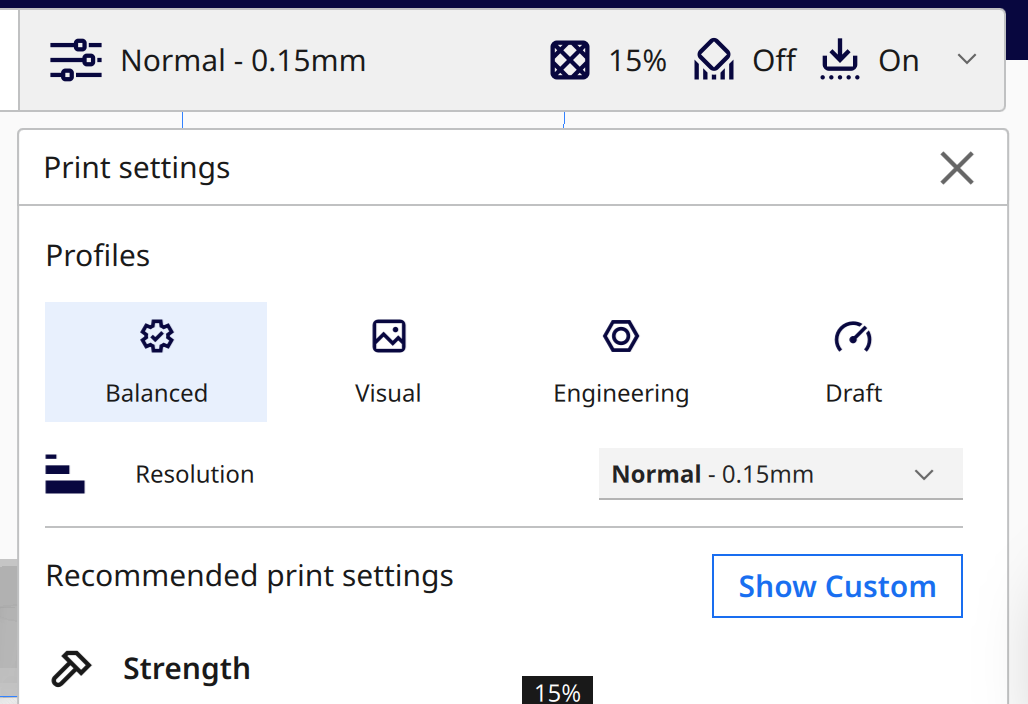
- Click on **`Show Custom`** to access and adjust advanced settings such as layer height, supports, and speed.
- The build plate temperature should be set to **75°C**;
- **If using PLA**, set the printing temperature to **215 °C** and speed to **80–110 mm/s**.
- **If using PVA**, set the printing temperature to **225 °C** and speed to **35–50 mm/s**.
- For more guidance, use the **“Settings Guide” plugin** (`Main page` > `Top right corner` > `Marketplace` > `Search`) or speak to a technician.
- Preview the slice before exporting (`PREVIEW` page – top center).
- **Check in X-ray view** (`PREVIEW` page – top center > `View type` – top left corner > `X-Ray view`):
- If everything is blue, it's likely safe to print.
- If there are red areas, return to your 3D modeling software to fix any issues.
---
### 5. Export as **yourslackname.ufp**
- Save your file as `.3mf` for further editing, `.ufp` for printing
- 🔔 **Filename format**: `yourSlackSame_modelMame.gcode`
- Unnamed or unclear files will be **paused or cancelled**
---
### 6. Prepare USB
- Save `.ufp` file to the **root directory**
- Bring it to the Lab
---
### 7. Pre-Print Self-Check
- Confirm **bed leveling** — all **4 holes must be in their positions**
- Ensure **the nozzles are clean** and not clogged. If there is something wrong, please let the technician know and choose another machine to use
- Load the filament; verify material matches
- Carefully install the build platform — all **4 holes must be in their positions**
>⚠️ If unsure, **ask a Technician** – improper setup can cause damage or fire, and the user would be responsible for that.
---
### 8. Monitor the First 5 Layers
- Insert the USB stick into the printer, choose your model, and start to print.
- Watch the print until a few layers are complete, users are responsible for not damaging the machine
- Check:
- Adhesion to bed
- No warping or dragging
- If issues occur, **pause immediately** and contact a Technician
---
### 9. Post-Print Safety & Cleanup
- Wait for the bed to **cool down** for few minutes
- Always **wear gloves** if you need to touch the platform
- Gently remove the model and/or build plate
- **Return tools and platform** exactly as found
---
# Step 1 - UltiMaker Cura Set-Up
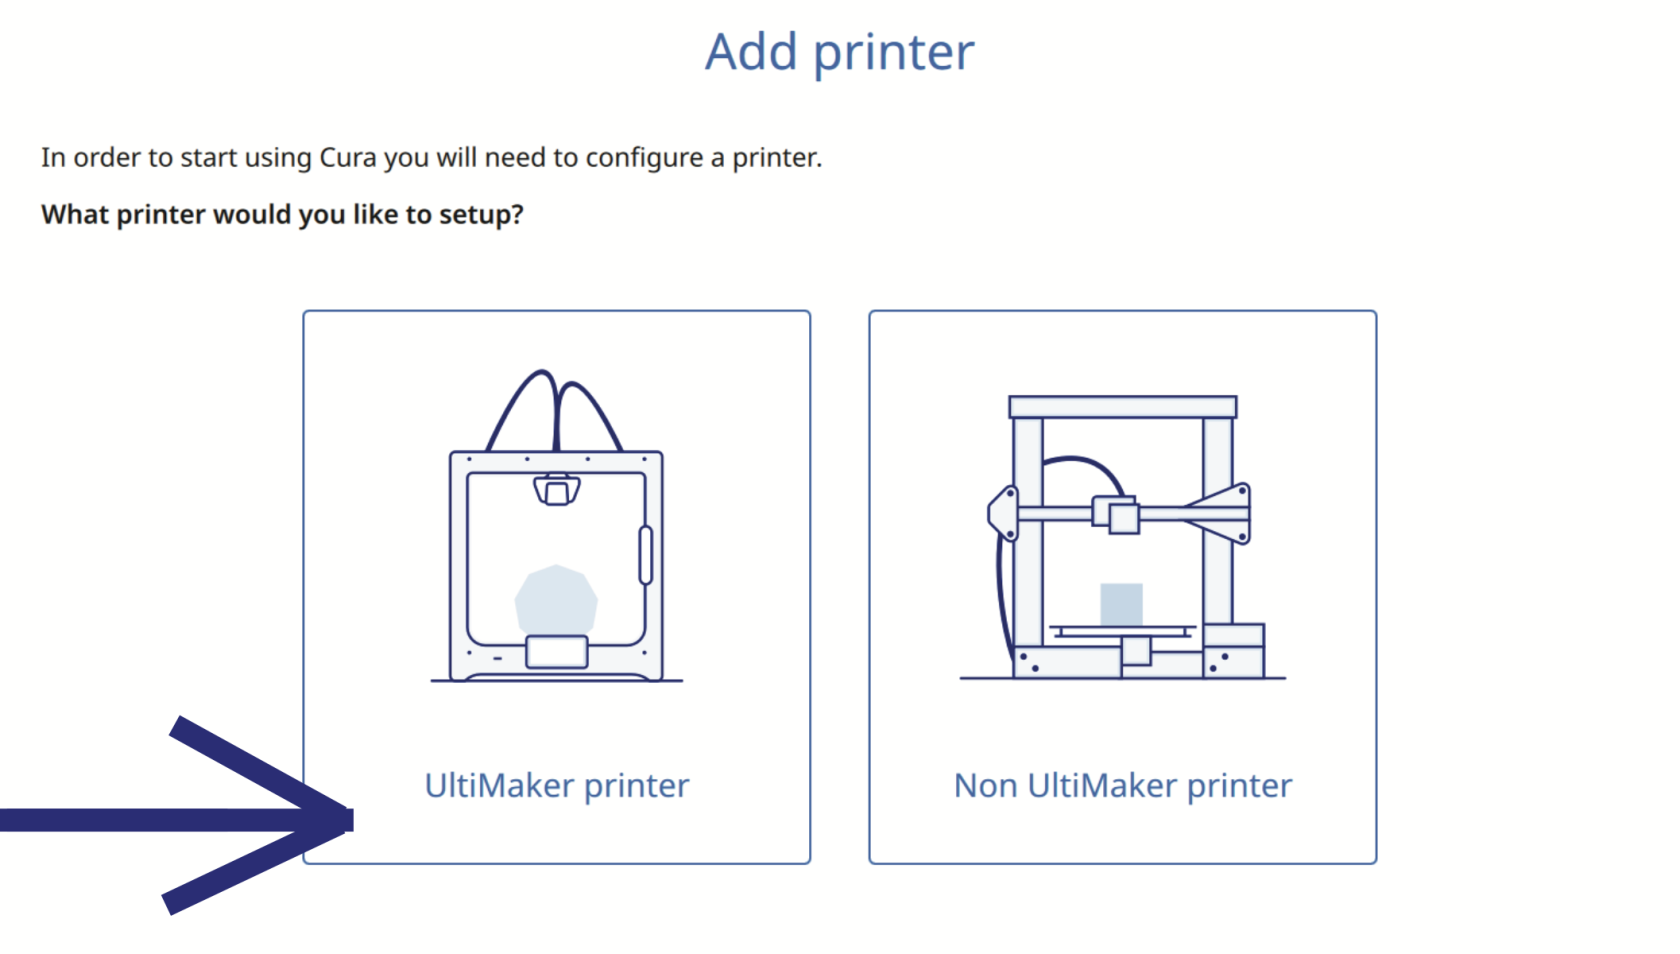
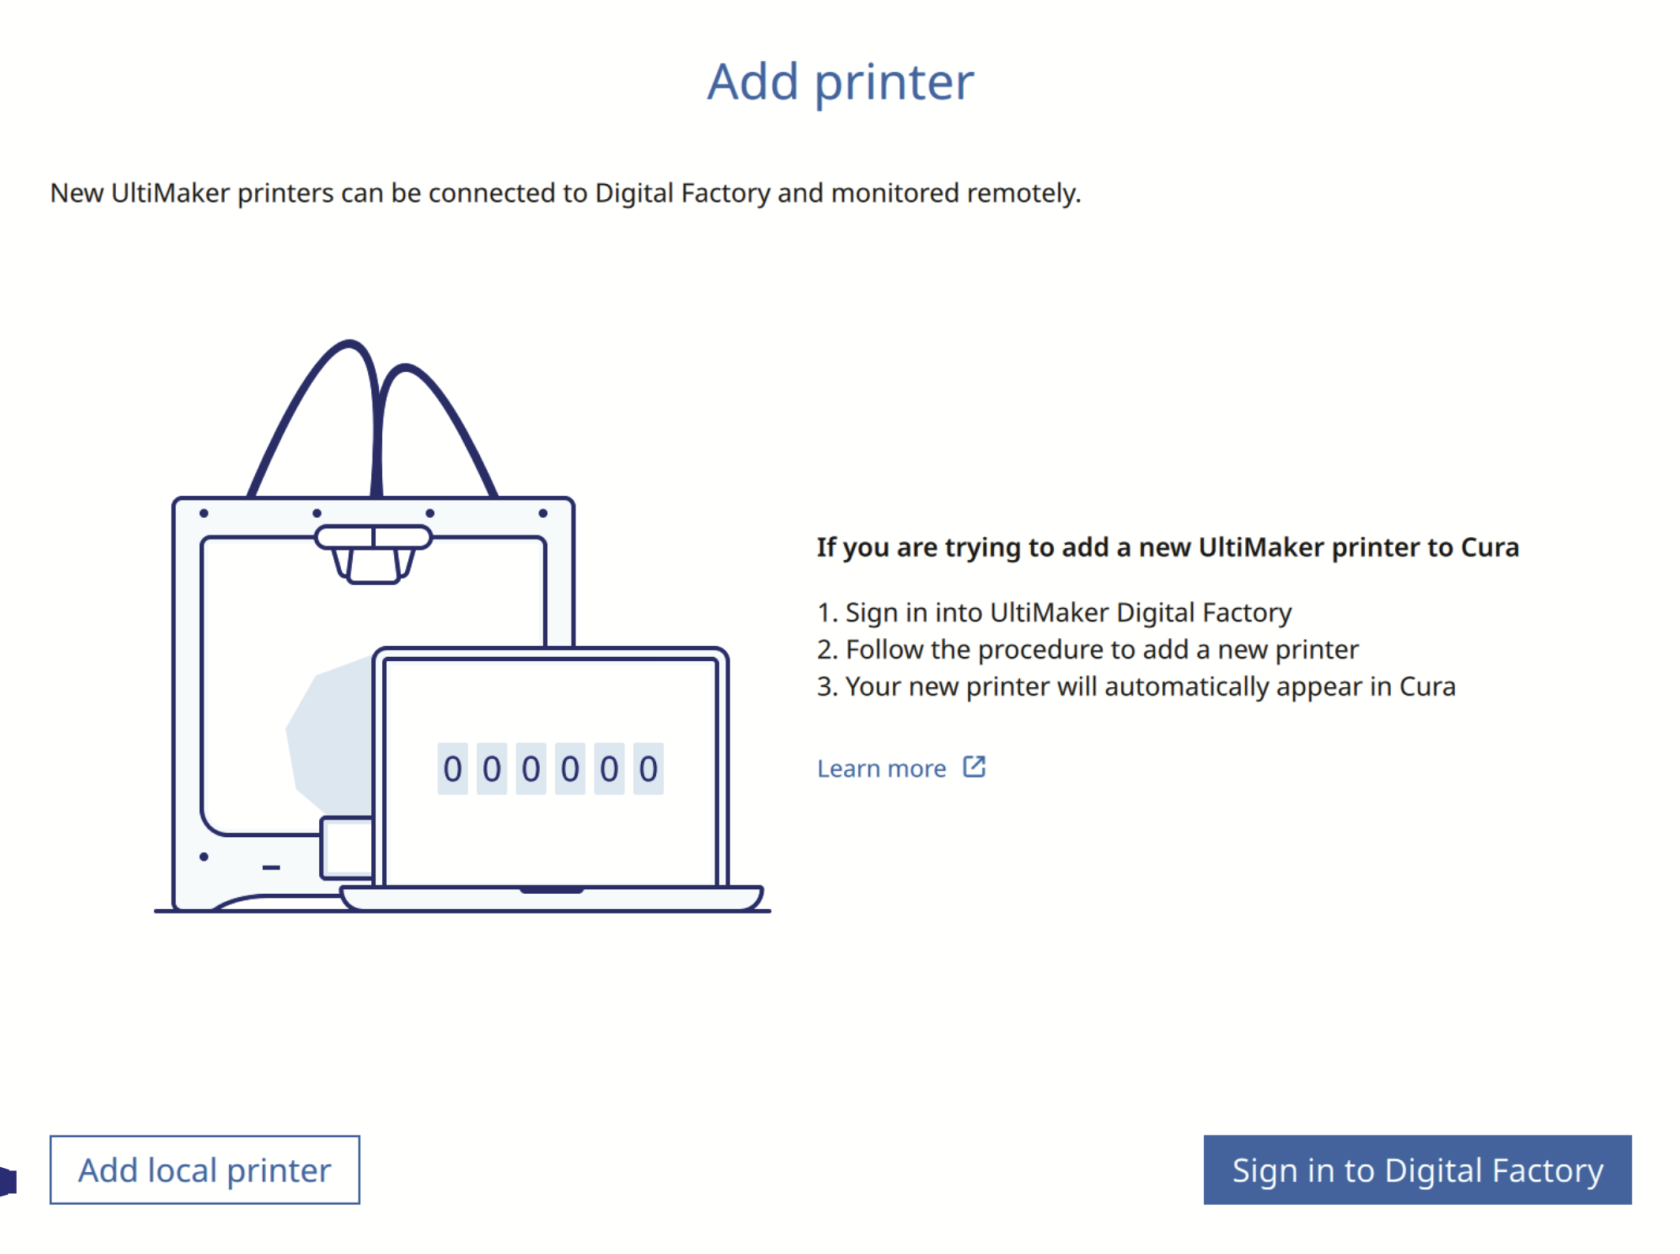
### You don't have to sign up or create a workspace for now. So please skip "Sign in to Ultimaker platform", then click on "Ultimaker printer", "Add local printer", then add an "Ultimaker S7 Machine". Set the basic settings up.
[](https://wiki.cci.arts.ac.uk/uploads/images/gallery/2026-02/3GfXfNw3psGWnwj1-image-1772204039704-53-50.png)
### 1. Add an UltiMaker printer from the start menu.
[](https://wiki.cci.arts.ac.uk/uploads/images/gallery/2025-10/51nsJruC9J2u7SDC-image-1759850967558-29-24.png)
### 2. "Add a local printer"
[](https://wiki.cci.arts.ac.uk/uploads/images/gallery/2025-10/beD0Mys1pqc1tfNT-image-1759851037318-30-31.png)
### 3. "Add a non-networked printer"
[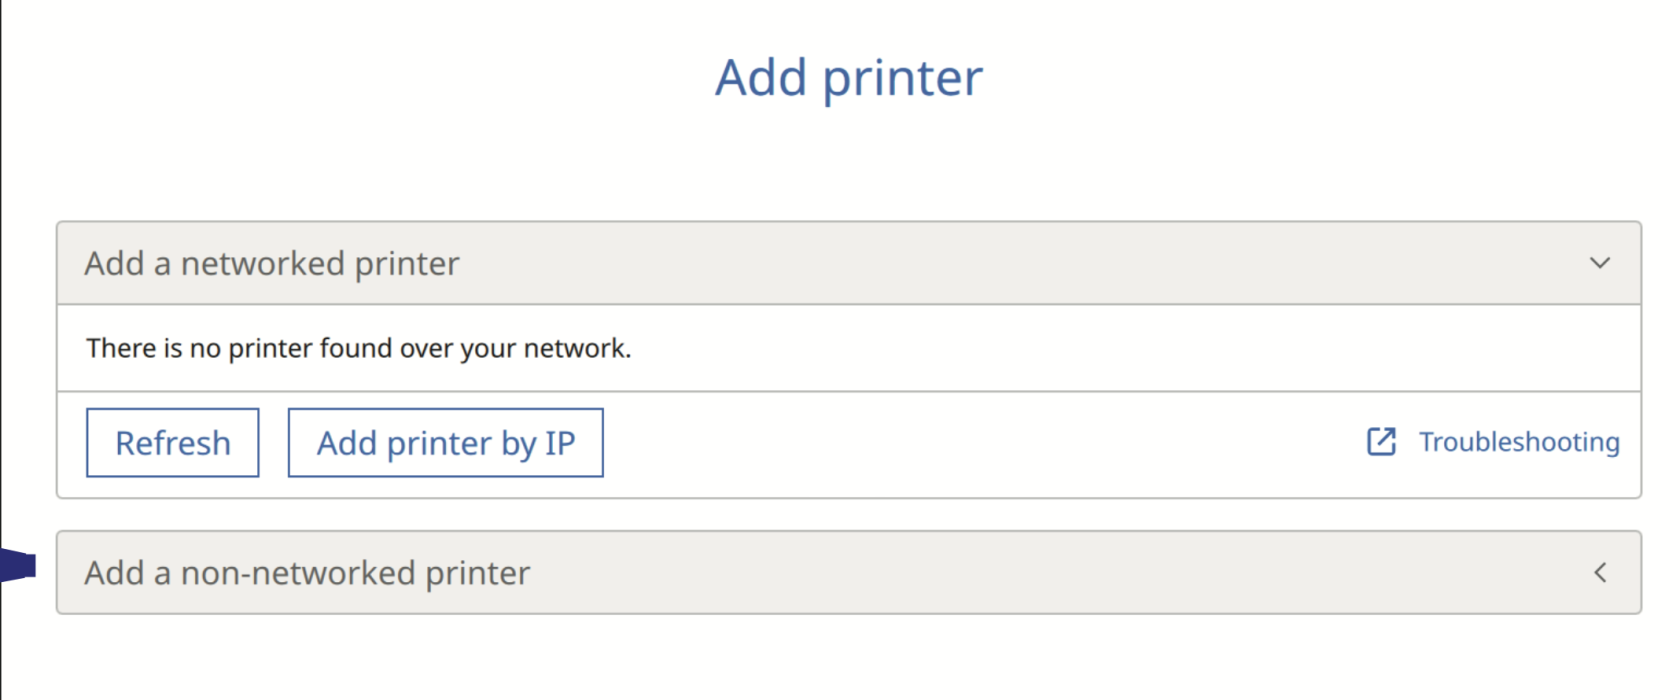](https://wiki.cci.arts.ac.uk/uploads/images/gallery/2025-10/FfZP59x2prAI2ekj-image-1759851077535-31-14.png)
### 4. Add Ultimaker S7
[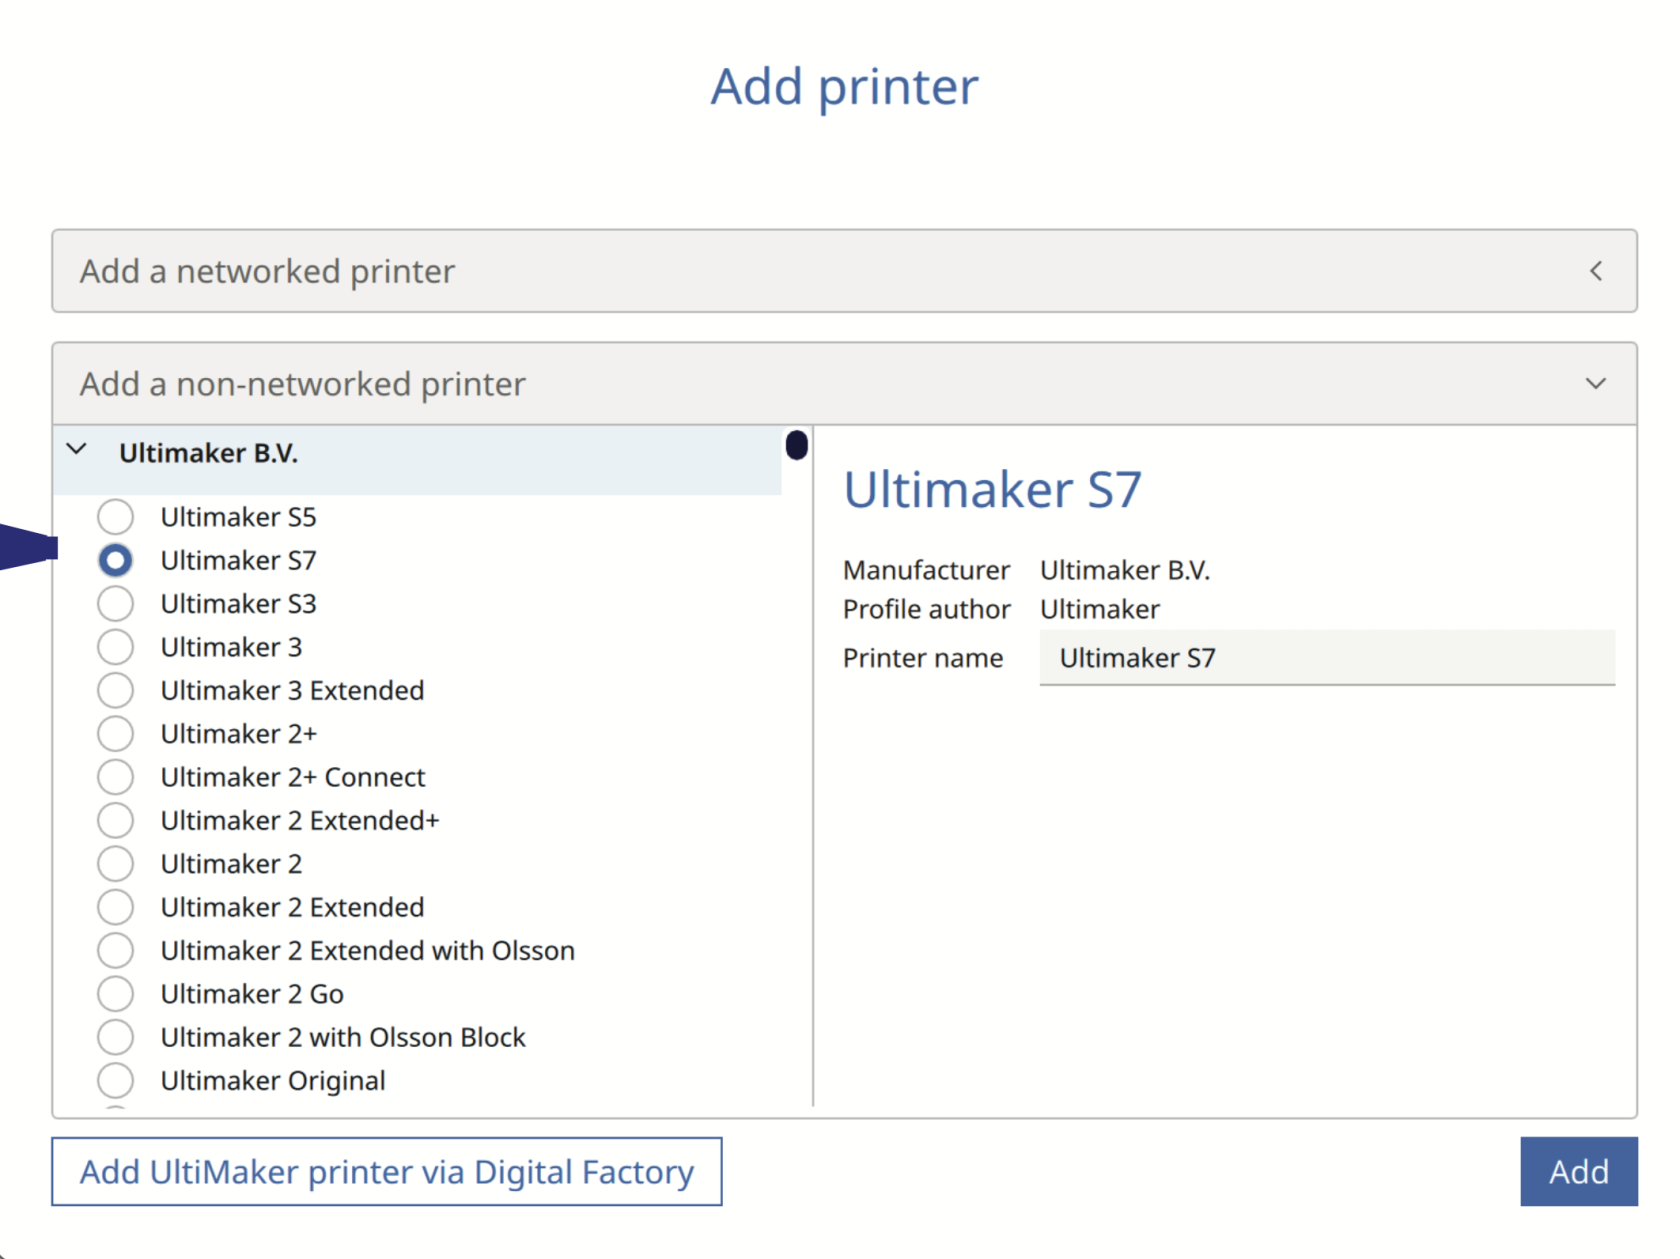](https://wiki.cci.arts.ac.uk/uploads/images/gallery/2025-10/7fycth1PdqEI42n4-image-1759851101734-31-39.png)
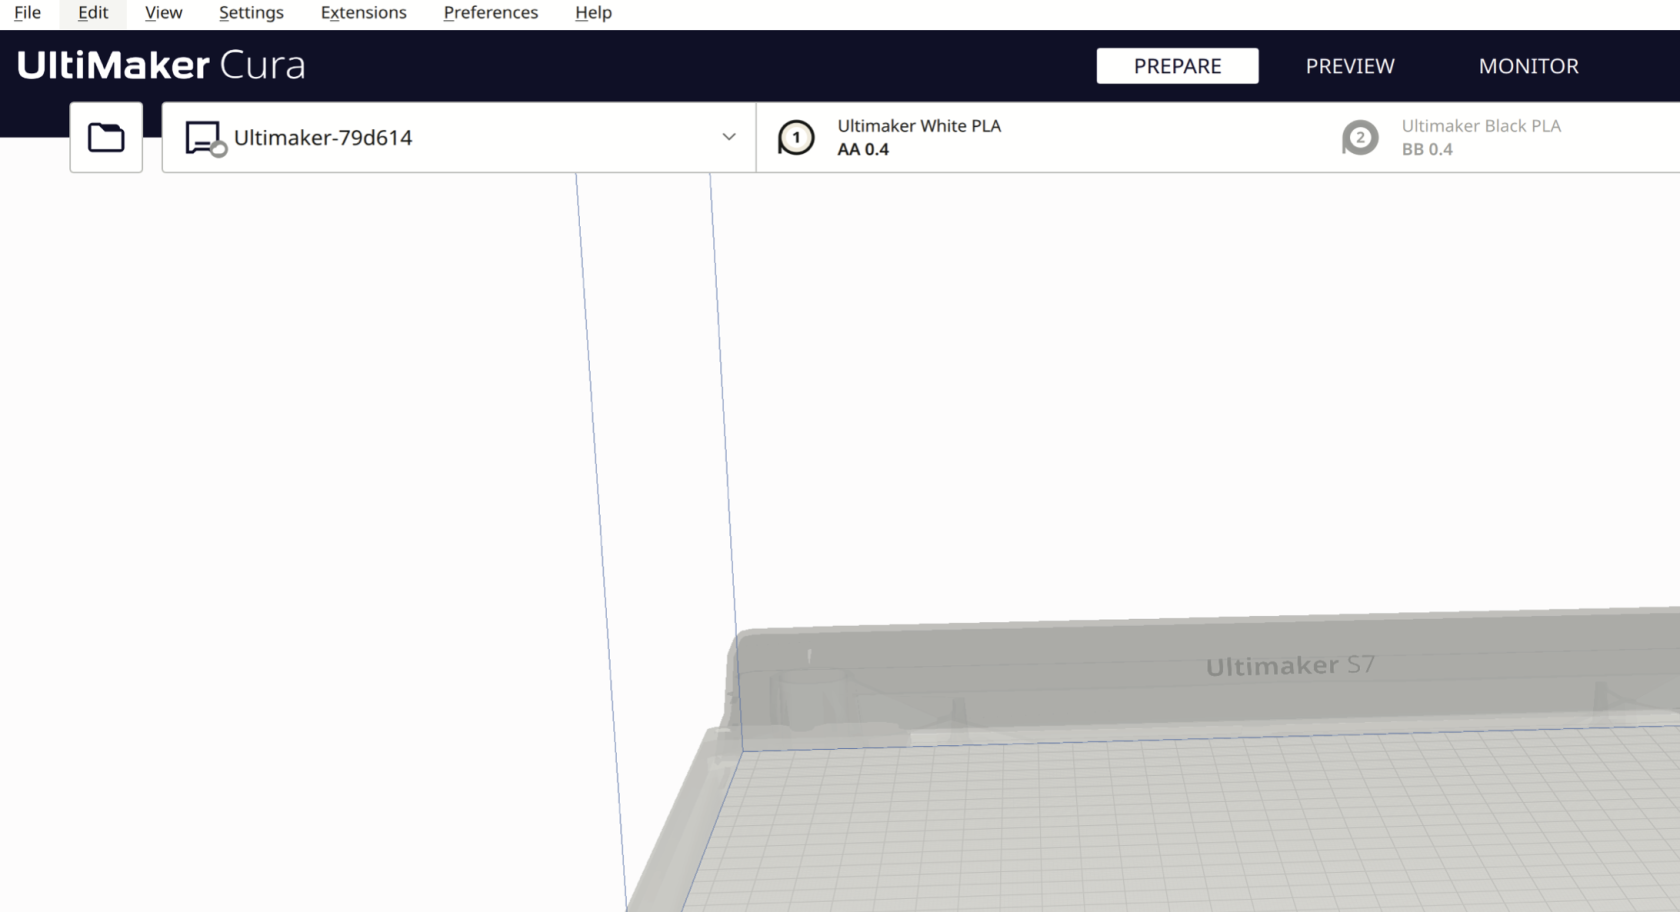
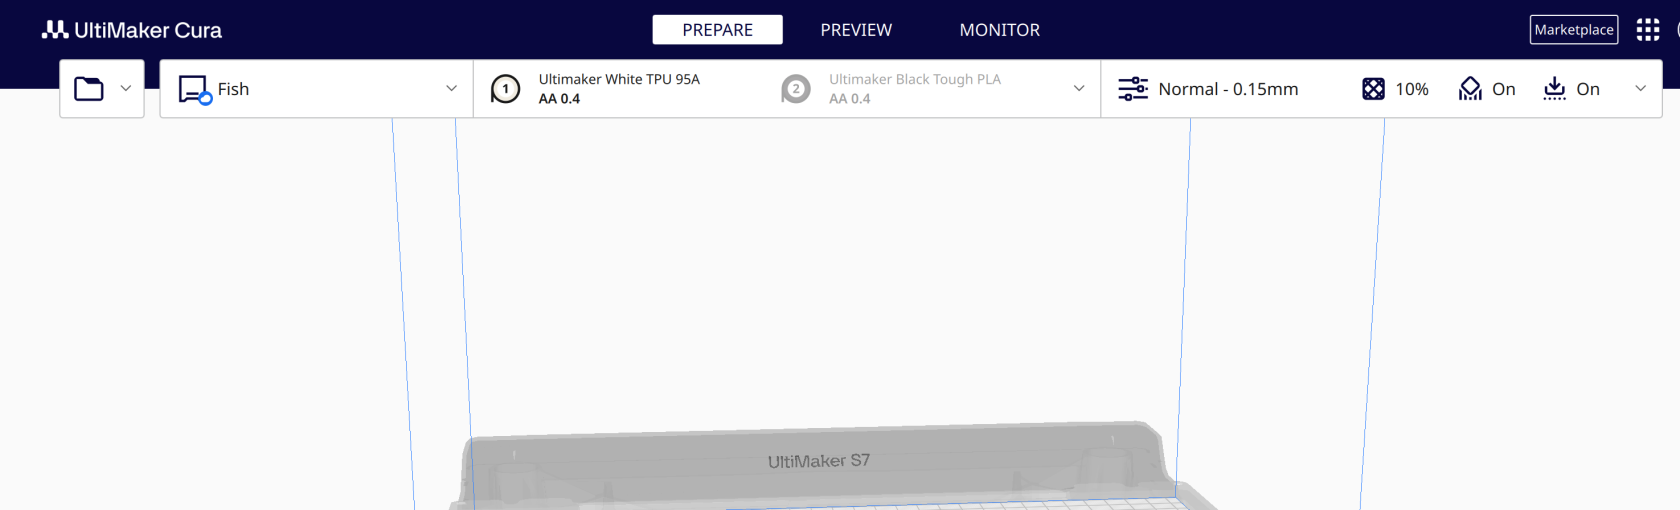
## Prepare Window
**This is the preparation window, which shows the bed size of the Ultimaker S7 (330 x 240 x 300 mm), select the filament type and color, as well as set up the values such as print resolution, which affects the length of time it takes to print, as well as the material infill density.**
1. Press the Folder button to import your STL/OBJ/3MF file into Ultimaker Cura, or drag and drop files into Ultimaker Cura.
[](https://wiki.cci.arts.ac.uk/uploads/images/gallery/2025-10/88AlusHQmmuWN8pF-image-1759851370204-36-06.png)
2. In the drop-down menu, select the type of filament, e.g. PLA, Tough PLA, PVA, TPU, Breakaway and the filament colour.
In this example, we are using UltiMaker White PLA from extruder AA 0.4
[](https://wiki.cci.arts.ac.uk/uploads/images/gallery/2025-10/AhY1D3MdQ6Kznsrc-image-1759851398358-36-33.png)
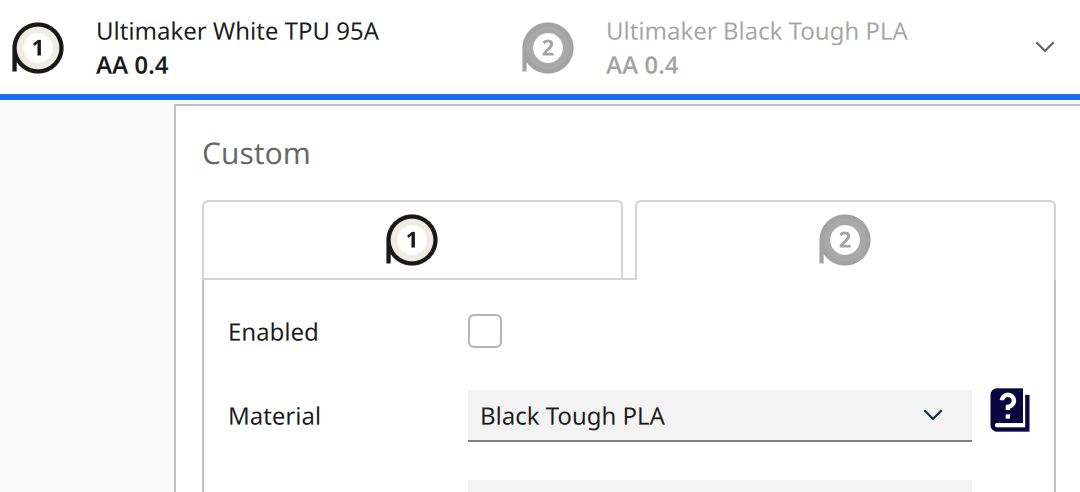
3. Enable and disable the filament extruder heads by ticking the “Enabled” box. (Please uncheck the second extruder option; we will cover the dual-extrusion option in our advanced 3D printing workshop)
[](https://wiki.cci.arts.ac.uk/uploads/images/gallery/2025-10/wLBi2opzLpRp0TAB-image-1759851518770-38-34.png)
## Material Setting
[](https://wiki.cci.arts.ac.uk/uploads/images/gallery/2025-10/2oueSlp6I7riylS4-image-1759851562704-39-18.png)
- The build plate temperature should be set to 75°C;
- The material temperature setting depends on different materials, and the support overhang angle should be 45°.
- Go to the **Show Custom** page to change them.
[](https://wiki.cci.arts.ac.uk/uploads/images/gallery/2025-10/UiX0VXfVwvcfKb5R-image-1761216195346-43-03.png)
[](https://wiki.cci.arts.ac.uk/uploads/images/gallery/2025-10/qJczKZhI3RqiMumH-image-1761216273319-43-03.png)
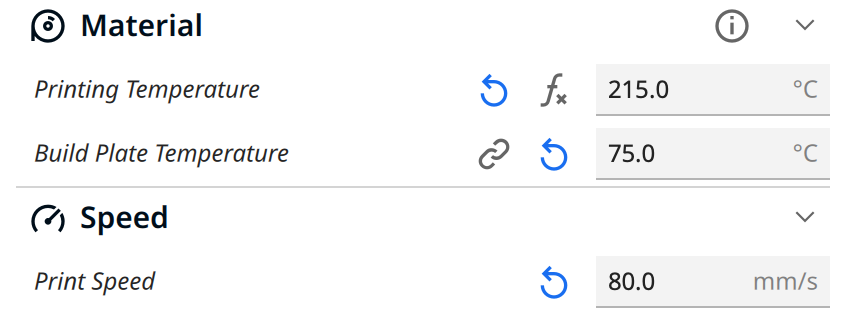
### If you are using **PLA**, please follow the basic settings below; with them correct, your prints won't go too wrong.
**Material**
Printing Temperature: 215 °C
Build Plate Temperature: 75 °C
(This printing temperature setting is for PLA; different filaments need different settings; **default settings won’t work**, make sure you set them correctly in UltiMaker Cura. For more info about different materials, please refer to the [Filaments page](https://wiki.cci.arts.ac.uk/books/digital-fabrication-lab/page/filaments-settings). We'd strongly recommend starting with PLA)
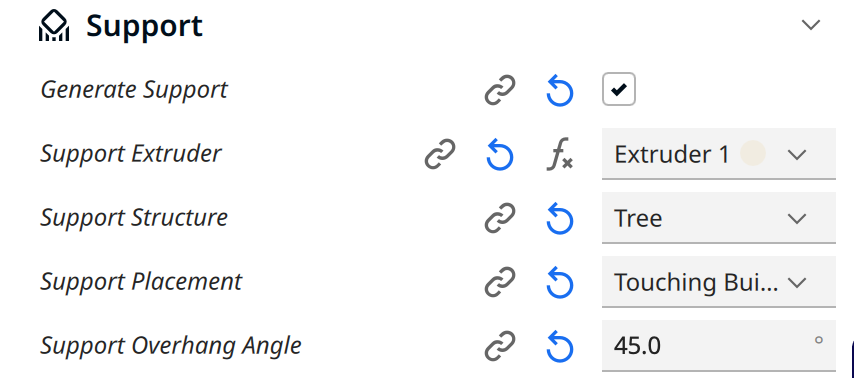
**Support (if the object needs support)**
Enable Generate Support
Set Support Overhang Angle to 45°
**Build Plate Adhesion**
Enable Prime Blob
Set Build Plate Adhesion Type to Brim
**Make sure you've chosen the first material bar**
[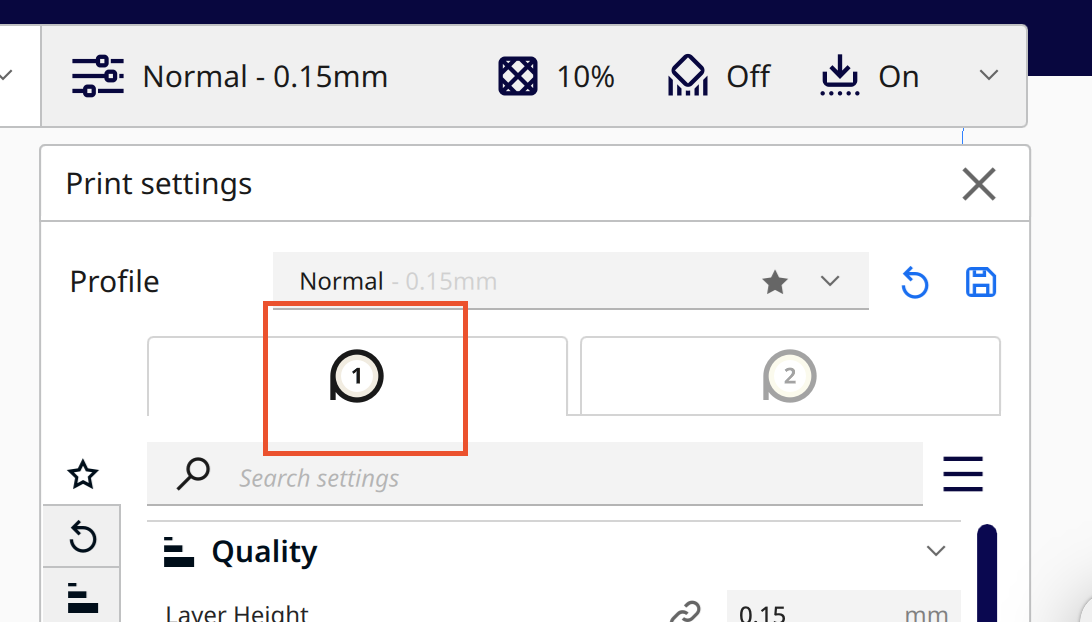](https://wiki.cci.arts.ac.uk/uploads/images/gallery/2026-02/HPn4bpFCbHQ0h8l7-image-1770201062750-30-20.png)
--
[](https://wiki.cci.arts.ac.uk/uploads/images/gallery/2025-10/7h9Zp9S5I6ZE8MCy-image-1761215869085-37-38.png)
[](https://wiki.cci.arts.ac.uk/uploads/images/gallery/2025-10/0tyCs5jo90yjY3vz-image-1761215830579-36-33.png)
## Import and Check Your Model
Import your model, then adjust the settings accordingly when needed. If there is anything shown
Here is a breakdown of the model colors in the Solid View (Prepare) mode:
- Material Color (e.g., Light Grey/Yellow): The default color of the model, representing that it is properly positioned and sliced with the currently selected material.
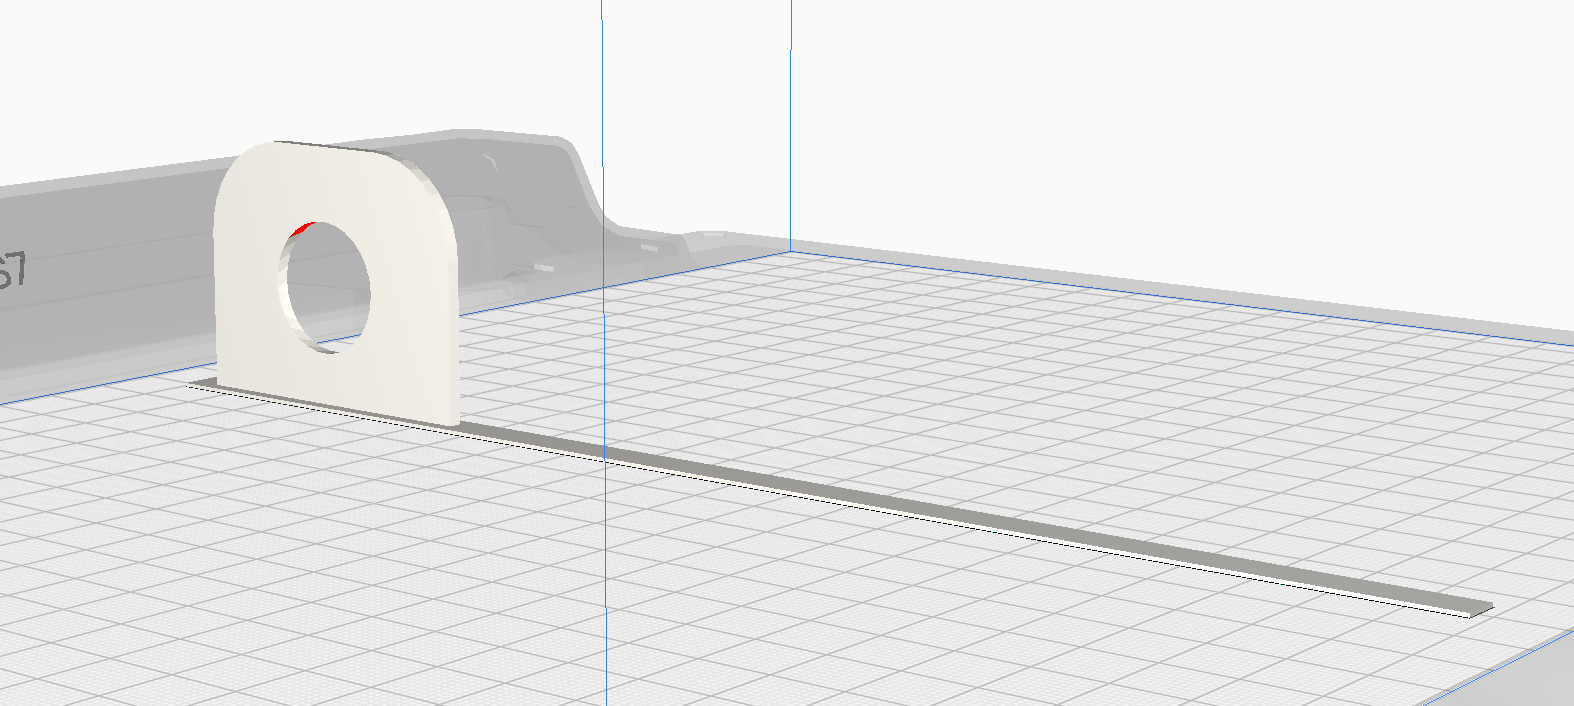
- Red (on bottom surfaces): Indicates areas that are steep overhangs (usually \(>50\) degrees) that may need support to print successfully.Red (on top surfaces): Usually means the mesh normals are reversed (flipped) in your 3D modeling software.
- Light Blue (on bottom): Indicates the area of the model that is in contact with the build plate.Striped Grey/Darker Overlay: Indicates that the model is outside the printable area or partially below the build plate. **Indicates the areas of the model that are in contact with the build plate.
Always check that the bottom of the model is correctly touching the build plate—especially when printing multiple models at once. Although they may appear to be on the same plane, some models might have been exported with their Z-axis not set to 0.
Ensure the light blue areas are properly grounded on the build plate, or use supports / build plate adhesion if necessary.**
- Yellow/Orange Settings: If numbers in the settings panel turn yellow or orange, it signifies a warning that the setting might cause issues, though it is not a fatal error
[](https://wiki.cci.arts.ac.uk/uploads/images/gallery/2026-02/NPnzLAdOSd7KYdqs-image-1770200698023-24-51.png)
# Step 2 - Print Setting
### Model Setup
* **Scale & Size** – Too small → loss of detail; too large → longer print time
* **Orientation** – Poor angles can cause rough surfaces or weak layer bonding
* **Supports** – Missing or excessive supports can lead to surface marks or print failure
* **Support Overhang Angle:** 45°
---
### Layer Settings
* **Layer Height** (recommended: 0.12 – 0.3 mm) – Smaller height → smoother surface, longer print time
* **Wall Line Count** (recommended: 2 – 8) – More walls → stronger print, longer print time
* **Infill Density** (recommended: 5% – 30%) – Lower infill → faster print, but weaker structure
---
### Temperature & Speed
* **Nozzle Temperature** (Recommended temperature for PLA: 215. [Temperature varies by filament type](https://wiki.cci.arts.ac.uk/books/digital-fabrication-lab/page/filaments-settings)) – Too low → poor adhesion and print failure; too high → stringing, blobs, or print failure
* **Build Plate Temperature** (set to 75 °C) – Too low → warping and print failure; too high → overly sticky bottom layers
* **Print Speed** – Higher speed generally results in lower print quality
---
### Adhesion & Environment
* **Bed Adhesion Type** (recommended: Brim) – Skirt / Brim / Raft affects print stability
* **Levelling** – Uneven or dirty print beds cause poor first-layer adhesion
* **Ambient Conditions** – Drafts or vibrations can distort printed layers
# Step 3 - Model Checking
Ultimaker Cura has a workflow based on three stages; the prepare, preview and monitor stage. Each stage has a unique stage menu to efficiently go through the 3D printing process.
## Prepare Page
The prepare stage is the first stage. The goal of this stage is to load and configure your 3D models for printing.
3D models loaded on the build plate are displayed solid, in the color corresponding to the material selected to print with. Models not fully within the printable area have a striped grey overlay. Non-printable areas on the build plate are displayed with a grey border, this space is necessary for build plate adhesion and support structures.
1. **Stage menu.**
Contains the printer selection, configuration and print settings panel.
2. **Stage.** The current stage is highlighted
3. **Non-printable area.** The area is represented by a grey shadow on the build plate and is caused by build plate adhesion and support settings
4. **Non-printable model.** Due to parts being in non-printable areas
5. **Printable model.** Displayed in the colour corresponding to the material selected to print with
[](https://wiki.cci.arts.ac.uk/uploads/images/gallery/2026-02/QQcZ1kG49mnPRUdg-image-1770202944362-02-13.png)
## Import and Check Your Model
Import your model, then adjust the settings accordingly when needed. If there is anything shown
Here is a breakdown of the model colors in the Solid View (Prepare) mode:
- Material Color (e.g., Light Grey/Yellow): The default color of the model, representing that it is properly positioned and sliced with the currently selected material.
- Red (on bottom surfaces): Indicates areas that are steep overhangs (usually \(>50\) degrees) that may need support to print successfully.Red (on top surfaces): Usually means the mesh normals are reversed (flipped) in your 3D modeling software.
- Light Blue (on bottom): Indicates the area of the model that is in contact with the build plate.Striped Grey/Darker Overlay: Indicates that the model is outside the printable area or partially below the build plate. **Indicates the areas of the model that are in contact with the build plate.
Always check that the bottom of the model is correctly touching the build plate—especially when printing multiple models at once. Although they may appear to be on the same plane, some models might have been exported with their Z-axis not set to 0.
Ensure the light blue areas are properly grounded on the build plate, or use supports / build plate adhesion if necessary.**
- Yellow/Orange Settings: If numbers in the settings panel turn yellow or orange, it signifies a warning that the setting might cause issues, though it is not a fatal error
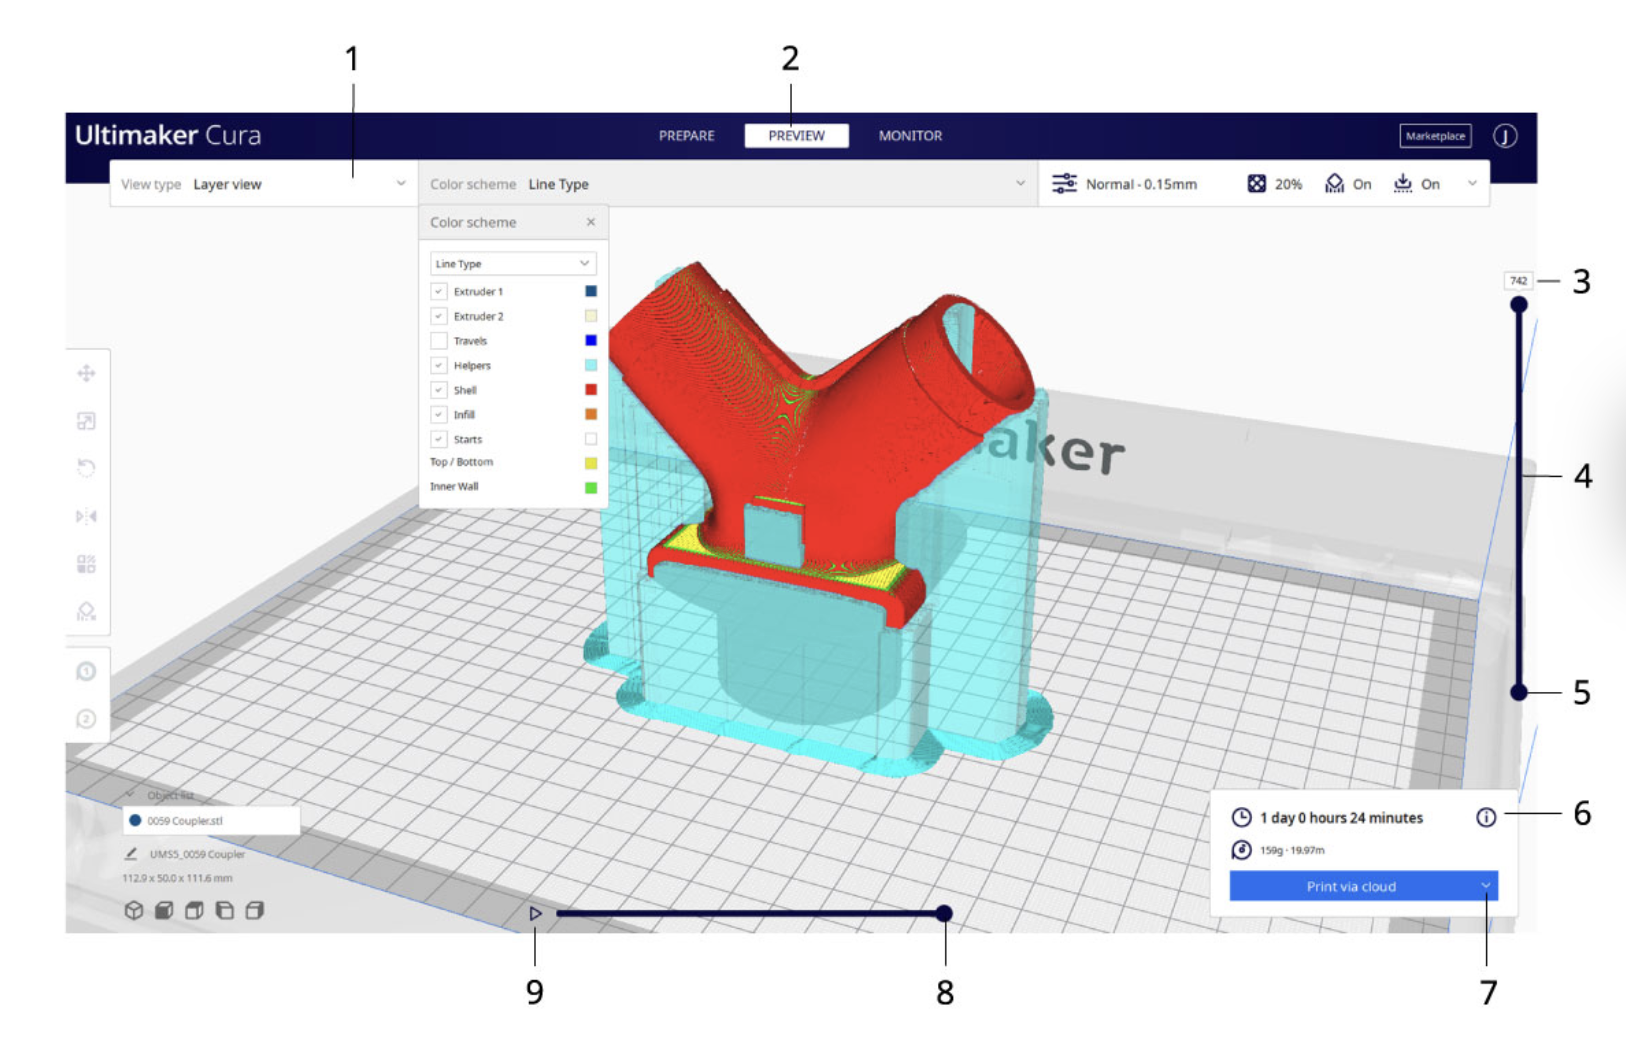
## Preview Page
The preview stage is the second stage. The goal of this stage is to preview and evaluate the 3D printing process. This stage can only preview the printed model when the model has been sliced with the action button in the bottom right corner. When going into this stage, the layer view opens automatically.
##### Layer view
When the layer view opens, your sliced 3D model is visible, represented by every print and travel path Ultimaker Cura generated. These are the actual print paths executed by the printer when the print job gets sent.
The stage menu now has options to change the current view, the color scheme panel, and the print settings panel. The right side shows the layer slider and the bottom slider control the simulation view. The action panel in the bottom left now contains the 'print over network’ action.
- **Stage menu.** This contains the view types, color scheme panel, and print settings panel
- Stage. The current stage is highlighted
- **Layer slider input.** This uses the numeric input to jump to the desired layer
- **The layer slider.** This can be dragged to drag a layer range up and down
- **Layer slider handle.** Both the top and bottom handle can be dragged to specify the visible layer range
- **Print information.** Hover the mouse over the icon to view detailed print time information per printed feature
- **Print over network.** This will send the print job directly to the printer over the network. Non-networked printers have options to save to removable disk or save to file instead
- **Path slider.** This indicates the current position of the simulation view. This handle can be dragged or moved with the ‘arrow keys’ or ‘shift + arrow keys’
- **Start simulation.** This starts the simulation of the currently active layer to provide visual feedback on the printing process
[](https://wiki.cci.arts.ac.uk/uploads/images/gallery/2026-02/YHjj0YRmTKJ8J7bs-image-1770204030740-20-19.png)
# Step 4 - 🌟🌟🌟Check the machine before you started
# 3D Printing Workflow Manual
From slicing to post-print care — applies to UltiMaker Cura 3D printers.
---
## Before You Print
1. **Unnamed files will be aborted.** Bring your **laptop and a USB drive** and name your print as `yourSlackUserName.ufp` before saving to a **USB drive**.
3. Talk to the Digital Fabrication Technician (Yuwei) about your project before printing.
4. Always do a **small test print** before the final, larger one — or this might happen 👇
**If the filament continues to be wasted, we have to either suspend your access or charge for the material.** Please use our free resources responsibly, so everyone can benefit.
4. **Slice in UltiMaker Cura** (set material, temperature, nozzle, supports, infill, etc.).
5. **Export the print file** as **.ufp** and **name it exactly**:
`yourSlackUserName.ufp`
6. **Save a project copy** as **.3mf** to keep your Cura settings for future edits.
7. Copy `yourSlackUserName.ufp` to a **USB drive**. **Unnamed files will be aborted.** ()
---
## At the Printer: Pre-flight Checks
1. **Build plate seated** — all four alignment pins must drop into the holes.
3. **Gloves on** if touching the plate; grease prevents adhesion.
4. **Clear stray filament** around the plate before and after printing.
5. **Never scrape** the plate with tools. If residue remains, please talk to Yuwei.
7. **Inspect the print head rubber (silicone shroud/wiper)** — if broken, report to Yuwei before printing.
8. **If the screen shows “Conflict”**:
- The filament or nozzle/core (AA/BB) does not match the profile.
- Check the screen for allowed material/nozzle.
- Speak to Yuwei if changes are needed.
---
## During Printing
- **Stay nearby for the first few layers to confirm proper adhesion.**
- If anything looks wrong, **pause or cancel immediately** and ask the Technician.
---
## ✅ After Printing
1. **Wait for the build plate to cool** — most models will be easier to release once cold.
2. **Do not use sharp or hard tools** on the build plate to pry models off.
3. If stuck, wear **gloves**, remove the **build plate**, and place it on a table to cool faster.
- Remove the model gently once cooled.
- Always **return the build plate** to the machine. A damaged plate cannot be reused.
4. **Clean the printer**: remove stray filament and check taht the build area is clear.
5. **Inspect the print head rubber** again. Report damage to Yuwei immediately.
6. Press the **confirm removal** button after you have finished those steps
---
# Filaments Settings
# PLA Basic but Important Printing Guide
**Default settings won’t work**, make sure you set them correctly in UltiMaker Cura.
**Material**
Printing Temperature: 215 °C
Build Plate Temperature: 75 °C
**Support (if the object needs support)**
Enable Generate Support
Set Support Overhang Angle to 45°
**Build Plate Adhesion**
Enable Prime Blob
Set Build Plate Adhesion Type to Brim
# Where to find the print setting?
Open your Ultimaker Cura software
Follow the > [important info page](https://wiki.cci.arts.ac.uk/books/digital-fabrication-lab/page/step-4-check-the-machine-before-you-started) before you start.
Follow the set-up page, if it's the first time you use Cura > [Set-up Page](https://wiki.cci.arts.ac.uk/books/digital-fabrication-lab/page/step-1-ultimaker-cura-set-up).
You will see the details above after you find the **Show Custom** in **Print Setting**
[](https://wiki.cci.arts.ac.uk/uploads/images/gallery/2026-02/l9eef2jH1IstMIIl-image-1770200545107-22-20.png)
- For example, if you are using **PLA**, set the printing temperature to 215°C and printing speed to 80–110 mm/s. (never forget to set the Support overhanging Angle to 45, unless for tailored solutions or your model doesn't need supports.)
[](https://wiki.cci.arts.ac.uk/uploads/images/gallery/2025-10/Itv7gwmDUfNajy8w-image-1759922474271-21-11.png)
[](https://wiki.cci.arts.ac.uk/uploads/images/gallery/2025-10/02cvbmxmU0LTPc2C-image-1759922525944-22-01.png)
- If using PVA as the second nozzle for supports, set the printing temperature to 225°C and speed to 35–50 mm/s. Use Normal Supports, and Build Plate Adhesion (Enable Prime Blob ☑️, type: Brim).
[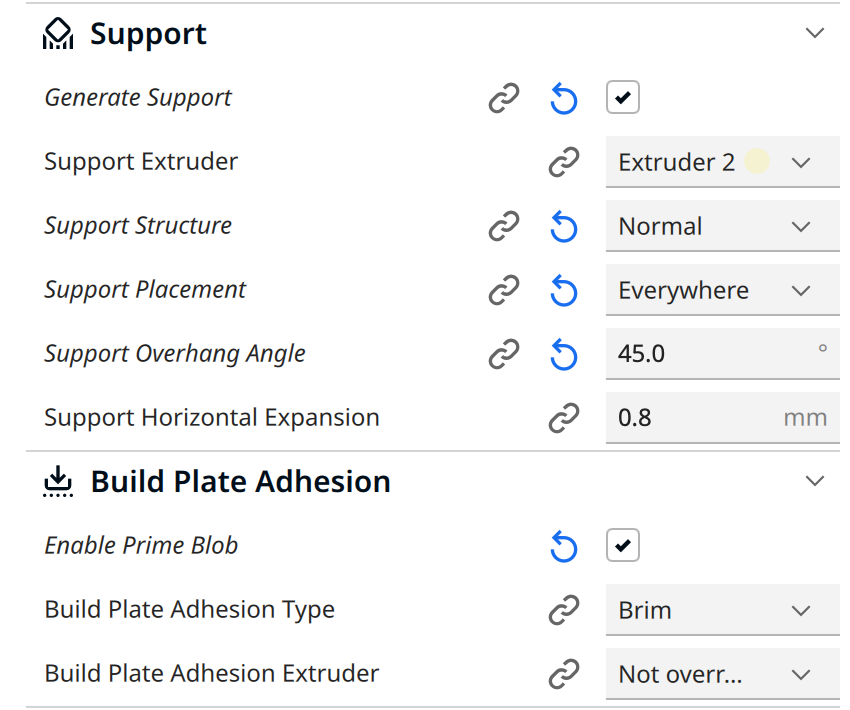](https://wiki.cci.arts.ac.uk/uploads/images/gallery/2025-10/QAbhNbbQHAtule6e-image-1759922789638-26-23.png)
# Other types of filament
- **Build plate temperature** should always be **75**
- **PLA** printing temperature: 215, printing speed 80 - 120
- **White Breakaway** printing temperature: 225, printing speed 80 - 100
- **TPU** temperature: 225, printing speed 40 - 80
- **PVA** temperature: 225~245(Depends on the weather and filament condition) , printing speed 30 - 60, **Normal Support**
- **PETG** temperature: 245, printing speed 80 - 120
# Plugins
Go to the **Marketplace** in Ultimaker Cura (at the right side of the top navi bar). **Install** the recommended and your preferred plugins, then **restart** UltiMaker Cura.
[](https://wiki.cci.arts.ac.uk/uploads/images/gallery/2025-10/vfFnyLg78Q6nqhOR-image-1759920139259-42-16.png)
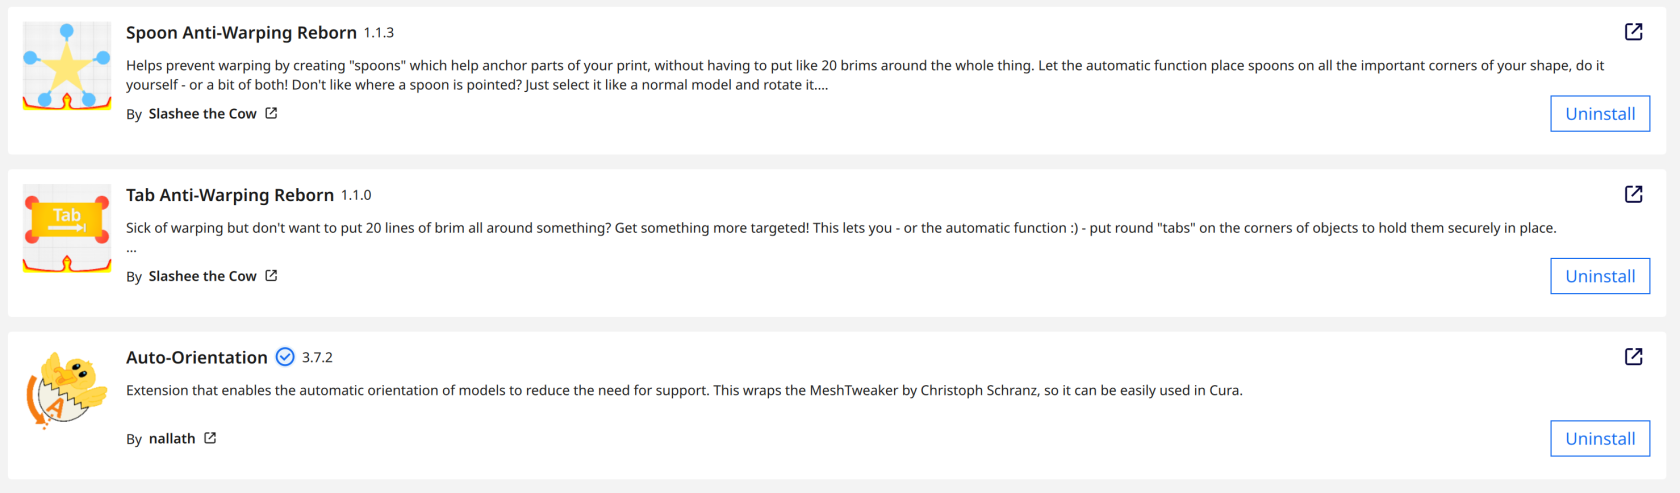
# Recommended Plugins
[](https://wiki.cci.arts.ac.uk/uploads/images/gallery/2025-10/ggpvU6zyNI3h2Qjy-image-1759920479969-47-57.png)
[](https://wiki.cci.arts.ac.uk/uploads/images/gallery/2025-10/U8KRNiBE5jtFuuPy-image-1759920761453-52-39.png)
[](https://wiki.cci.arts.ac.uk/uploads/images/gallery/2025-10/sRyP5mfrTADKjbW2-image-1759920694627-51-32.png)
Other
[](https://wiki.cci.arts.ac.uk/uploads/images/gallery/2025-10/ALwJmz9iC5PWc2e4-image-1759920642802-50-40.png)
[](https://wiki.cci.arts.ac.uk/uploads/images/gallery/2025-10/NTWYWJpP6ViWUSoq-image-1759920674679-51-12.png)
[](https://wiki.cci.arts.ac.uk/uploads/images/gallery/2025-10/b9US0iaIuShxQeTH-image-1759920743464-52-21.png)
# Tolerances
# Dimensional Accuracy and Tolerances
Typical accuracy for FDM printers is around **±0.1 mm**, but for our Ultimaker machines **±0.15 ~ 0.2 mm** is more realistic.
For **mating parts** to print on our machine, leave **0.15–0.2 mm clearance** to ensure proper fit.
> **Hole** = the opening or cavity
>**Pin** = the protruding post designed to fit into the hole
>Example: Pin = 10.00 mm, Hole = 10.20 mm → gives 0.20 mm clearance for smooth assembly.
# Design the Holes in Fusion
Take M2 as an example:
For M2 screws (nominal diameter 2.0 mm) in 3D-printed parts, the hole size can be adjusted depending on how tight you want the fit and how fragile the part is.
Base diameter: 2.0 mm
Recommended tolerance range: +0.2 mm ~ –0.1 mm
**Through Hole Design Guideline:**
> Option 1: +0.2 mm (≈ 2.2 mm) (frequently used) → Just fit: the screw slides in easily, ideal for normal assemblies.
> Option 2: 0 mm (2.0 mm) → Snug fit: requires slight twisting or pushing to insert; provides mild positional accuracy.
> Option 3: –0.1 mm (≈ 1.9 mm) → Tight fit: may need to be drilled or forced in; creates a very secure hold but not recommended for thin or brittle parts (e.g. PLA) as it may cause cracking.
**Tapping Hole Design Guide**
>Option 1: A tapped 3mm hole works for M2 screws.
> Option 2: 3mm Hole + thread
# Troubleshooting
# 🛠️ Troubleshooting Guide
Common issues in FDM 3D printing and how to deal with them.
Applies to UltiMaker Cura and UltiMaker series printers.
---
## Model Not Sticking to Build Plate
**Check build plate alignment** — all four pins must be seated properly.
**Clean the plate** — grease from fingers reduces adhesion; always wear gloves. Please speak with a technician, and we will wipe it down using IPA wipes.
**Leveling issue** — Yuwei will help with re-levelling.
**Material Mismatch** — Confirm the filament type in the machine matches the UltiMaker Cura profile and set the temperature accordingly.
- Build plate temperature: 75
- PLA temperature: 215, printing speed 80 - 120
- TPU temperature: 225, printing speed 40 - 80
- PVA temperature: 225 , printing speed 30 - 60, support type: Normal, Blob type: Brim.
- PETG temperature: 245, printing speed 80 - 120
---
## Holes Too Small / Pins Too Large
FDM printing tends to make holes undersized and pins oversized.
**Solution**: Add clearance (0.1–0.2 mm) when designing.
If already printed, carefully sand or file the part (but not in the lab please).
---
## Layer Shifts / Misaligned Print
Check that the **build plate is firmly locked**.
Check your model in Ultimaker Cura - Preview page - X-Ray view, fix your model if there is anything shown in red in the X-Ray view.
And report to Yuwei to check the timing belts, rails etc.
---
## Stringing or Oozing
Caused by filament leaking during travel moves.
Try lowering the **printing temperature** slightly.
Enable or increase **retraction** settings in Cura.
Set the fan spining speed higher.
---
## “Conflict” Error Shown on the Machine Screen
It means the **loaded filament** or **print core (AA/BB)** does not match the Cura profile.
- AA is for PLA, TPU, PETG
- BB is for PVA
- We use 0.4 nuzzles at the moment, so you will need to set Print Core to be AA 0.4 for material 1, and BB 0.4 for material 2, **uncheck the material 2 box in Cura**.
-
Click on the material icon on the 3D printer screen, and check the available materials and nozzles for the correct combination.
Message Yuwei if you need other types of material to be loaded on a certain machine.
---
## Print Head Rubber Damaged
- The silicone shroud/wiper around the nozzle is broken or missing.
- **Do not print** until replaced, please report to Yuwei, she will replace it.
---
# 📊 Quick Reference Table
| Problem | Likely Cause | Solution |
|---------------------------------|----------------------------------------|--------------------------------------------|
| Model not sticking | Grease on plate, misalignment, wrong leveling | 1.Set the build plate temperature to 75, and materials in right tempreture (PLA -> 215) 2. Or talk to Yuwei, she will use IPA to clean plate, and then re-level bed |
| Holes too small / pins too large| Printing tolerance issue (FDM shrink/expansion) | Add 0.1–0.2 mm clearance in design; sand if needed (please don't sand in the lab) |
| Layer shifts / misaligned print | Loose plate, loose belts, vibration | Lock build plate, check belts, ensure stable surface |
| Stringing / oozing | Too high temperature, weak retraction | Lower temp, enable/adjust retraction in Cura |
| “Conflict” error | Wrong filament or nozzle/core mismatch | Check machine screen; confirm material/core and change in your Cura |
| Print head rubber damaged | Worn or broken silicone shroud | Stop printing and report to Yuwei |
# Glossary
Nozzle
We have two types of nozzles: AA and BB, and two nozzle sizes available to use: 0.8 mm and 0.4 mm. So we will call them AA0.4/BB0.4/AA0.8/BB0.8
Different nozzle sizes mean that you can print with different filaments and speeds as well as acheiving different finishes on your prints. The wider the nozzle, the faster you can print; thinner nozzles give finer detailed prints.
Dual Extrusion
Dual extrusion means that we can print multiple materials at once, allowing for dual colour and dual material prints. For example, a PLA(AA0.4) and a PVA (BB0.4) print or Tough PLA(AA0.4) and TPU(AA0.4) print.
PLA Polylactic Acid
A type of plastic derived from cornstarch more natural materials that can be succesfully anaerobically digested.
PVA Polyvinyl Alcohol
Not the same as the glue PVA. A particular type of filament that can be dissolved in water used to print supports for prints, allowing more complex geometries to be printed with our printers.
Tough PLA Tough Polylactic Acid
Tough PLA has almost the same chemical make-up as PLA but with properties that make it stronger and harder than PLA. It is an alternative to ABS which has chemicals in it that are unsafe for students to use in a workshop environment.
TPU
TPU is a flexible rubber filament that can be printed into complex shapes and merged with other materials in one print.
Material Station
the material station is where different types of filament rolls are stored. These rolls are automatically fed into the 3D printer; when a roll runs out the printer switches to the next available roll.
Ultimaker
Ultimaker is the company that makes the 3D printers we use. Ultimaker also own Thingiverse, a useful repository of free-to-use open source 3D models that can be printed using our 3D printers.
Build-plate
The build-plate is a flexible steel plate that is sat on a heated moving platform where the 3D print is constructed.
Print head/extruder
The print head houses the nozzle for 3D printing it is made up of a series of fans to cool the print head.
Filament
Filament is the plastic material used for 3D printers that is kept on reels. It is an extruded polymer filament.
Ultimaker Cura
Ultimaker Cura is a free slicing software for MAC and Windows users that helps you to prepare your files for 3D printing.
# About the our 3D printers
In the Digital Fabrication Lab we have a range of 3D printing equipment for CCI students to use, once they have done an induction, this equipment includes;
Six Ultimaker S7 fused filament printers:
[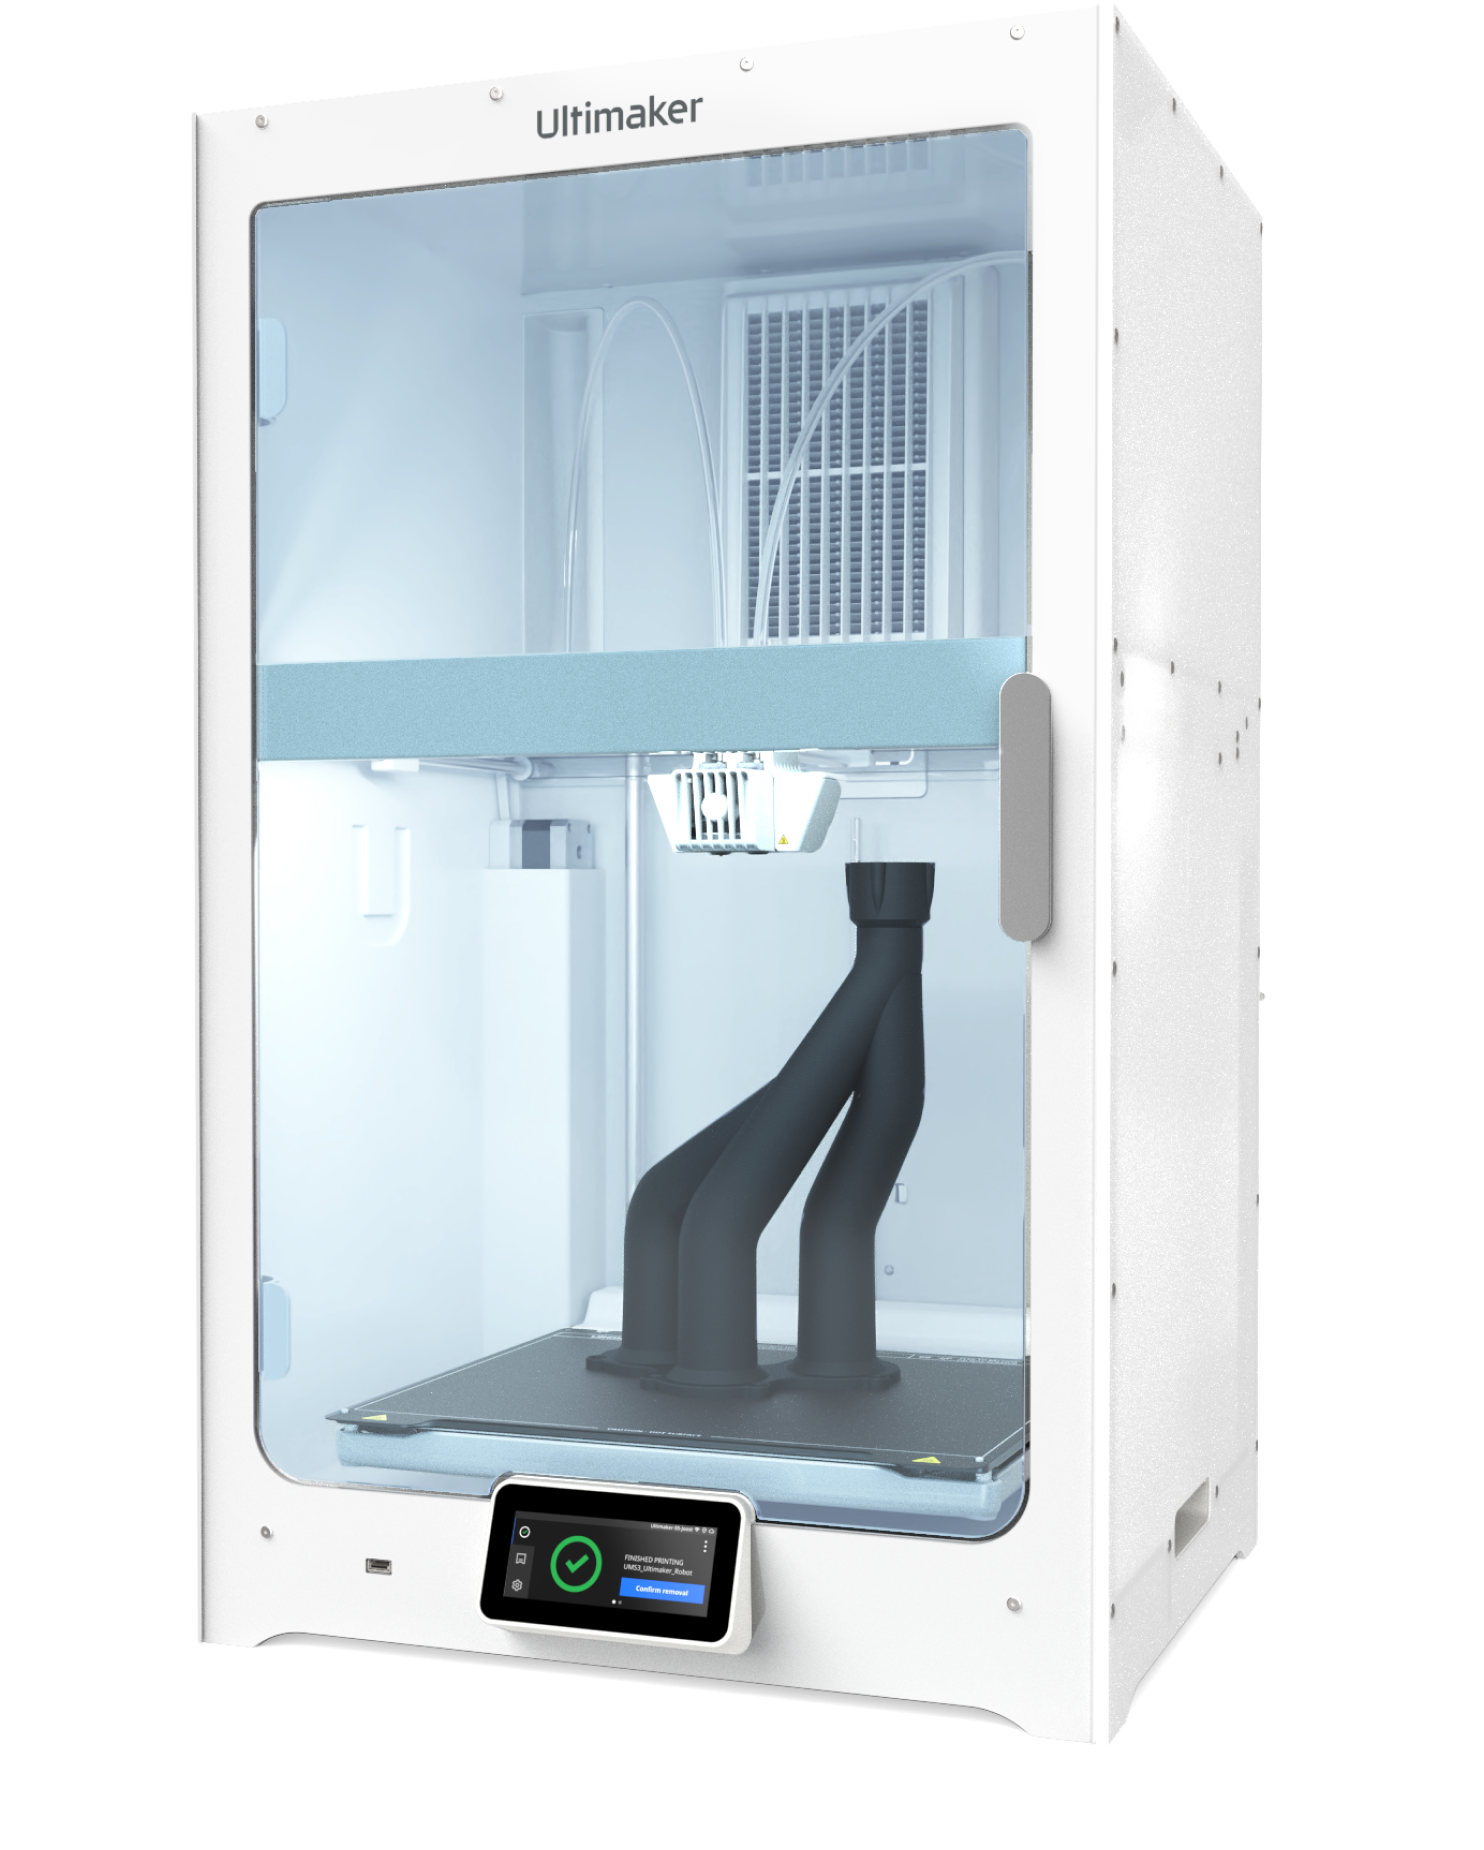](https://wiki.cci.arts.ac.uk/uploads/images/gallery/2023-10/j7pQlkvAn8A1oHwW-image-1697800731015.png)
these printer can print black and white PLA filament as well a special type of support filament called PVA which dissolves in water.
in order to prepare files for 3D printing on these machines you need to slice them using a piece of software called Cura which you can download for free for mac and windows OS by following the link below
[https://ultimaker.com/software/ultimaker-cura/#links](https://ultimaker.com/software/ultimaker-cura/#links)
[https://ultimaker.com/3d-printers/s-series/ultimaker-s7/](https://ultimaker.com/3d-printers/s-series/ultimaker-s7/)
a Formlabs 3+ resin printer:
[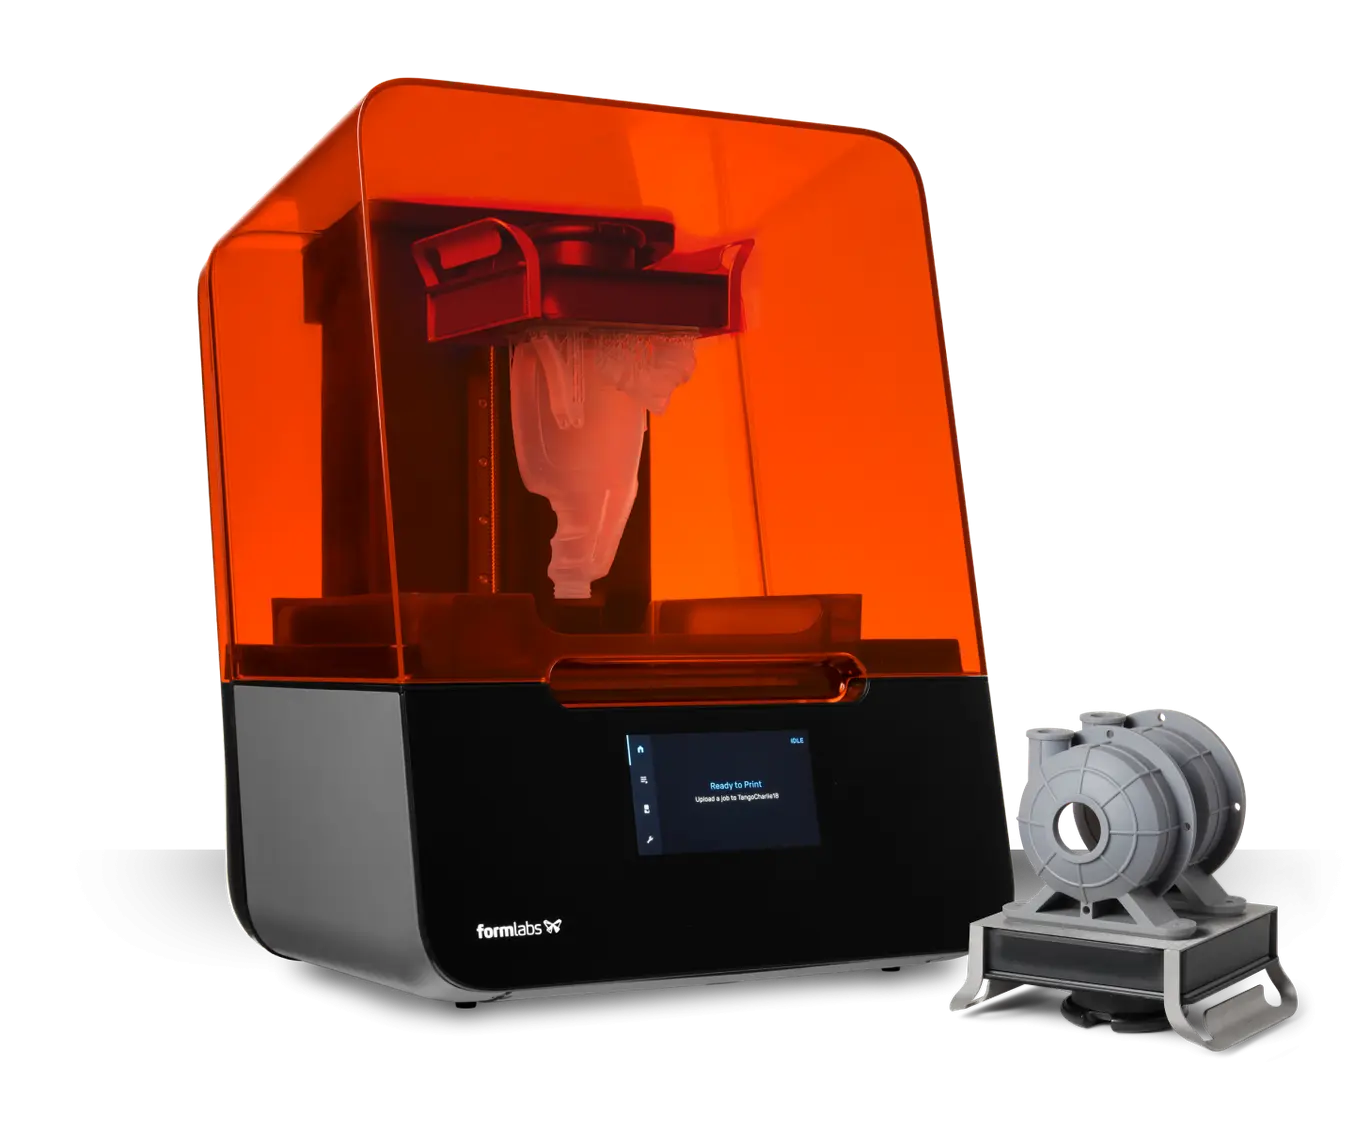](https://wiki.cci.arts.ac.uk/uploads/images/gallery/2023-10/Yi4xswphzxdWRwa2-image-1697800769811.png)
[https://formlabs.com/uk/3d-printers/form-3/](https://formlabs.com/uk/3d-printers/form-3/)
# Design Your Objects
# Design Your Model
- **Recommended software**: Fusion 360 or Nomad/Zbrush.
(Rhino is nice if you are familiar, and choose Blender only if you have prior experience.)
- **Learning resource**: [Autodesk Learn](https://www.autodesk.com/learn)
---
# Export and Slice
- Export your design as **STL** (OBJ also works).
- Open the file in **UltiMaker Cura** and slice for printing.
- Export the print file as **.ufp** for the printer.
- Also save a **.3mf project file**, useful if you need to adjust settings later.
# 3D Modelling Tips
- Do not use sharp edges on your models, or your model will bend away from the build plate. Use rounded or chamfered edges for better, smoother edges on your print. If you've already made the design, you could use a brim to stick it to the build plate. (Ultimkaer > Print Setting > Show Custom > **Enable Prime Bolb ☑️** > BuildPlateAdhensionType - Brim)
- If you print something very small, could also use a raft or a brim to stick it to the build plate. (- The larger the bottom surface of your print is, the easier it will stick to the build plate. The trick to making it stick is to increase your base surface area.)
- If you have lots of small objects, print them close together to save on space and your print time.
- Do not use fillets on edges that are directly touching the build plate horizontally; otherwise, you will need to enable supports. (Ultimkaer > Print Setting > Show Custom > **Generate Supports ☑️** > **❗️Support Overhang Angle: 45**)
# Blender Object Preparing
Fusion360 is recommened, and Blender for 3D Printing would be harder but not banned, here are some **Key Considerations**
1. **Use Manifold Geometry**. Ensure the model is watertight—no holes, loose edges, or non-manifold geometry.
2. **Set Correct Units.** Set the unit system to Metric and choose millimeters to match most slicers and printers. (Scene Properties > Units)
3. **Apply Scale & Transforms**. Use Ctrl+A to apply Scale, Rotation, and Location before exporting.
4. **Model with Thickness**. Avoid zero-thickness surfaces. All parts of your model must have physical volume.
5. **Normals Facing Outward** Recalculate normals so all faces point outward. (Edit Mode > Select All > Shift+N)
6. **Check Wall Thickness**. Thin parts may not print well. Minimum recommended wall thickness is usually 0.8mm to 1.2mm, depending on the printer.
7. **Avoid Too Much Detail**. Overly fine details may not appear well on small prints.
8. **Use 3D Print Toolbox Add-on**. Enable this built-in add-on: (Edit > Preferences > Add-ons (or Get Extensions) > Search: “3D Print Toolbox”) It helps detect non-manifold edges, intersecting faces, and other print issues. If you could't get it installed, please update your blender to a newer version (4.2+).[https://extensions.blender.org/add-ons/print3d-toolbox/](https://extensions.blender.org/add-ons/print3d-toolbox/)
10. **Export as STL**, and name it use your slack name Use 3D Print Add-ons > Export > STL[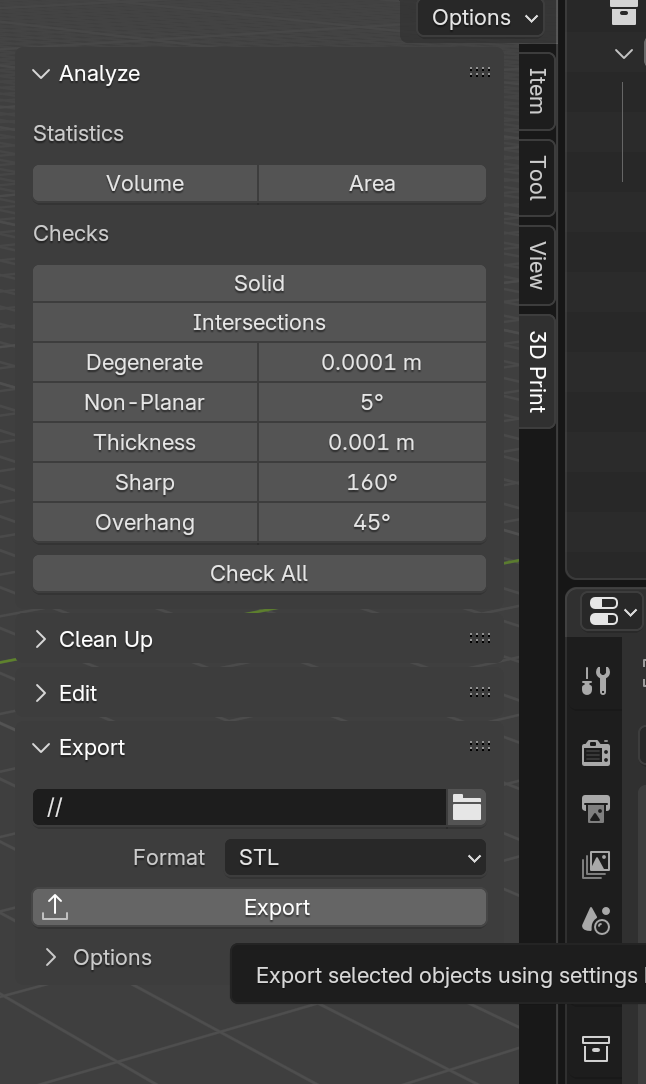](https://wiki.cci.arts.ac.uk/uploads/images/gallery/2025-05/XsDsjcBUAxCWCrn4-image-1746719237783-47-13.png)
11. **Check “Selection Only”** if you only want to export the active object.
12. **Test in Slicer Software,** Import the STL into Cura to preview printability and generate G-code
# Laser Cutter - Trotec Speedy 400
We have a Trotec Speedy 400 which can cut, engrave or etch paper, card, wood and plastic designs.
# About
The laser cutter is a Trotec Speedy 400 with an 80 watt CO2 metal tube and Run on Ruby (integrated touch screen). It can take a maximum upto 1000 x 600 mm sheet of material.
The machine also additional features a computer vision camera that allows cutting outlines to be aligned precisely with a printed document.
The use of the laser cutter is free to use for [all authorised users](https://wiki.cci.arts.ac.uk/books/about/page/who-can-access-cci-technical-resources), however it should only be used for projects directly related to your study and/or research at UAL.
This machine is not for personal use, such as making business cards, wedding invites or items for sale.
# How to access the laser cutter
1. Check you are an [authorised users](https://wiki.cci.arts.ac.uk/books/about/page/who-can-access-cci-technical-resources).
1. [Book](https://wiki.cci.arts.ac.uk/books/facilities/page/inductions) and complete a safety induction with a member of technical staff.
1. Design your project.
1. Purchase suitable materials.
1. Book a slot.
# Safety
The laser cutter while generally quite safe to use when operated correctly, however it can be a dangerous machine as it works by vapourising and burning material using a high power laser focused onto a combustable material.
## Risks include:
1. **Unattended operation** - This could result in a fire that destroys the laser cutter, causes serious damage to the building, or could kill people.
1. **Using unsuitable materials** - Materials like PVC can cause corrosive and carcinogentic fumes that will destroy the machine and cause severe breathing problems. [Check which materials are approved for use.](https://wiki.cci.arts.ac.uk/books/facilities/page/materials)
1. **Defeating the safety interlocks** - This will enable the invisible infrared (IR) laser to bounce around the room in an uncontrolled manor burning people and materials it contacts, this could result in fires, skin burns, or instant blindness.
1. **Inhalation of fumes** - Opening the lid during operation, or defeating the safety interlocks will enable the fumes inside the machine to escape which are carcinogenic, and toxic, causing short term breathing problems, and longer term issues such as occupational asthma.
## Rules
By following these simple rules you can ensure that you and others are kept safe, anyone breaking these rules will be permenantly banned from using the laser cutter.
1. Never leave the laser cutter running unsupervised under any circumstances for any period of time.
1. [Only use approved materials](https://wiki.cci.arts.ac.uk/books/facilities/page/materials).
1. Never bypass any safety systems, open panels, or ignore safety alerts from the machine.
1. Never permit someone else to use your access to the laser cutter.
# Fire safety
Because of how the laser cutter operates there will always be a risk of fire, being near the laser cutter to react quickly is what stops this happening:
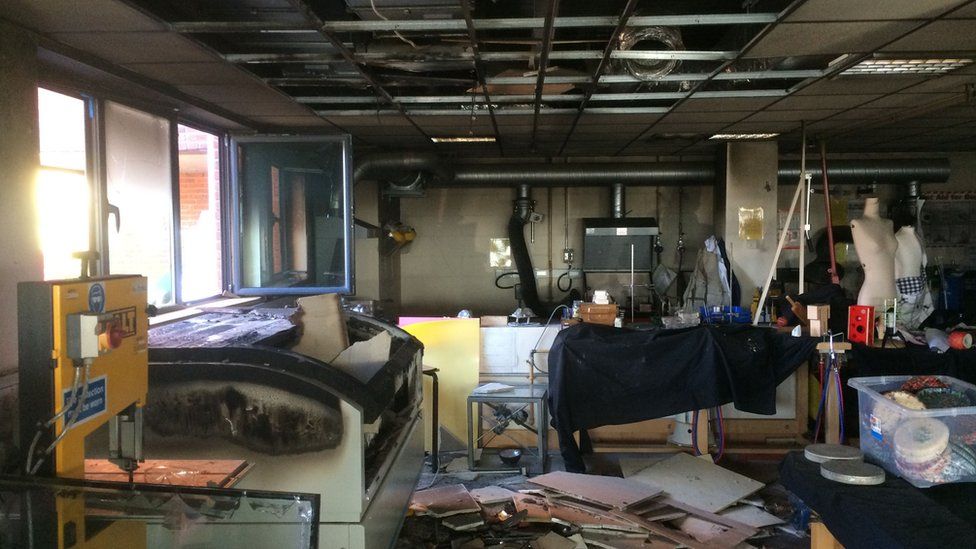
[This UK school workshop was destroyed in 2015](https://www.bbc.co.uk/news/uk-england-hampshire-34814476) after a laser cutter fire.
## Flaming up
Some materials will "flame up" when you are cutting, this is caused by the vapourised material gases burning, this isn't necessarily a problem, but it can be hard for in-experienced users to tell the difference and it can be scary.
Over prolonged periods of time this flame can deposit soot on the lens and will need reglar cleaning - please seek advice from a technician.
If you are unsure whether the material is on fire, of the gases are burning press the run/pause button on the laser cutter, the flames should stop as soon as the laser does:
## What to do
If the material is on fire **press the emergency stop button** this will cut all power to the laser cutter, the fire should go out immediately.
### Small fires
If the fire is small (<5 cm):
1. Lift the lid of the laser cutter.
1. Use the CO2 (black and red) fire extinguisher:
- Point the horn outwards
- Pull the pin
- Squeeze the handle while pointing the horn at the base of the flames.
Do not touch the horn it will get very cold and could injure your hands.
If the fire continues after the extinguisher has run out proceed to large fires:
### Large fires or not extingushed
If the fire is large, or the extinguisher has run out:
1. Press the emergency stop button if it's safe to do so.
1. Leave the room closing the door behind you.
1. Press the fire alarm call point outside the classroom by the lift lobby doors.
1. Leave the building and encourage others to go with you.
1. Call 999 or 112 from your phone or 5999 or 5112 from a UAL desk phone, tell a member of estates staff or the emergency services:
> Laser Cutter on fire in B block, 4th floor, room B401A
# Laser Safe Materials
Only approved materials can be used in the laser cutter. If you are unsure please visit the CCI technical office on the 5th floor of B block, Peckham Road, post in [`#technical`](https://slack.com/app_redirect?channel=CKSUQRZC2) on Slack.
---
# Available in the Art Shop
The following materials form this list are in the Camberwell Art Shop in the D Block at Peckham Road:
- Cast Acrylic
- Plywood
- Polypropylene
- thin single walled cardboard e.g. 2mm cardboard
- paper
---
# Approved materials
The following materials are approved for use in the laser cutter:
Be sure that the material is what you think it is before using it in the laser cutter.
## Acrylic
Acrylic is probably one of the most commonly used materials in a laser cutter, there are two types:
### Cast Acrylic
Cast acrylic, also known as PolyMethyl MethAcrylate (PMMA) is available in a vast number of colours and finishes under numerous brands including Perspex, Plexiglass and many others.
This material is a popular choice for laser cutting because it produces a smooth glass-like edge finish. When engraved it also produces a very clean effect, and can also be etched to produce a matt whitened finish.
### Extruded Acrylic
Acrylic plastic is also available in an extruded version, the difference is how the product if fabricated. Cast acrylic is cast in a mould, where extruded acrylic is extruded through a form to create a sheet.
Extruded acrylic tends to be dimensionally more accurate than cast because of how it is produced. This means in specific engineering situations extruded acrylic might be preferable because it's thickness varies less across the sheet, however extruded acrlyic does not produce the same matt whitened finish when it's etched.
Cast acrylic is usually better for the type of work we undertake at UAL because the variation in thickness usually isn't substancial enough to cause problems. Laser-cutted Extruded acrylic would have blurry edges as shown below.
[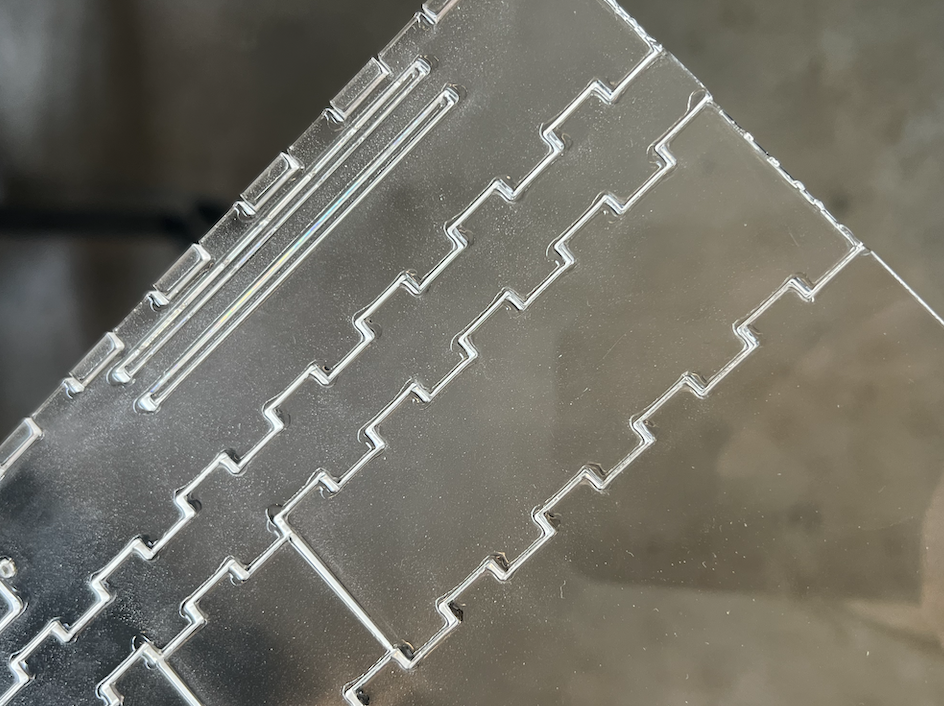](https://wiki.cci.arts.ac.uk/uploads/images/gallery/2025-05/J5131Dpfx5mLGuqG-image-1746628820914-40-18.png)
## Plywood
Plywood is a commonly used material in laser cutting, however it has a very specific aesthetic, leaving a dark burned edge unless sanded. Additionally plywood is relatively absorbant and has no protective covering so it will stain with the vapourised fumes.
To prevent vapour staining you can cover the surfaces with masking tape that can be removed after.
Laser cut woods of all types can smell of burning for a long time after they've been processed in the laser cutter.
## Paper and Cardboard
Paper and Cardboard are very quick to laser cut which makes them ideal for testing before cutting more expensive materials.
### Paper
When laser cutting paper you must not cut more than 1 sheet at a time due to the risk of fire caused by heated gases being caught between the layers of paper.
Additionally you may need to reduce the air assist to prevent it from blowing smaller pieces of paper around.
### Solid Cardboard
There are various types of solid cardboard such as grey board and thick paper stock.
### Single wall corrugated cardboard
Only single wall corrugated cardboard should be used, the more layers the more risk of fire.
Corrugated cardboard can easily be cut but care should be taken as the flutes of the sheet can hold the hot gases and cause fire.
---
# Materials with Limitations
The following materials can be used, subject to limitations detailed:
Ask a technician before using these materials in the laser cutter.
## Polypropylene sheet
Polypropylene (PP) sheets are available in a number of thin sheets, it can be cut easily but the material it's not possible to etch into the surface as the plastic will only melt.
PP comes in a small number of colours including white and black, and usually has two different grains on the surface, one is fine the other more coarse. Because PP cuts at a relatively low power you will need to adjust the power levels for different colours that absorb more or less of the laser power.
## Metal
Although metal can be cut by laser cutters, our laser cutter is not designed for this. Our laser cutter has an 80 watt CO2 laser tube which is fairly powerful, it's the wrong type of laser and its not powerful enough. A typical metal laser cutter would be a 12,000 watts fiber laser.
Our machine can however etch the surface of some metals such as annodised aluminium.
## Glass, ceramic and stone
It is impossible to laser cut these materials, however they can be etched, but materials like glass can cause injury, please consult with a technician first.
---
# Materials to Avoid
The following materials should be avoided:
Do not use these materials in the laser cutter.
## MDF
MDF and Laser (Safe) MDF are not permitted to be used in the laser cutter as they leave a lot of residue inside the machine, block the filters and smell after being cut.
---
# Forbidden Materials
These materials must not be used under any circumstances:
Never use these materials in the laser cutter.
## PVC
Under no circumstances can PVC be cut, it produces toxic and corrosive gas which will cause serious damage to the laser cutter, potentially destroying it and the cases are very harmful to life.
## Polycarbonate
PolyCarbonate (PC) is often confused with clear acrylic as they're visibly indistinguishable from one another, however PC does not behave the same when laser cut, the edges yellow and become brittle and/or cracked and produces a lot of flames when cutting.
## Faux leather, pleather
These materials contain PVC, see above.
# Creating a file in Illustrator
Although it's outside the scope of this guide to tell you how to use Adobe Illustrator, we'll cover preparing a simple file.
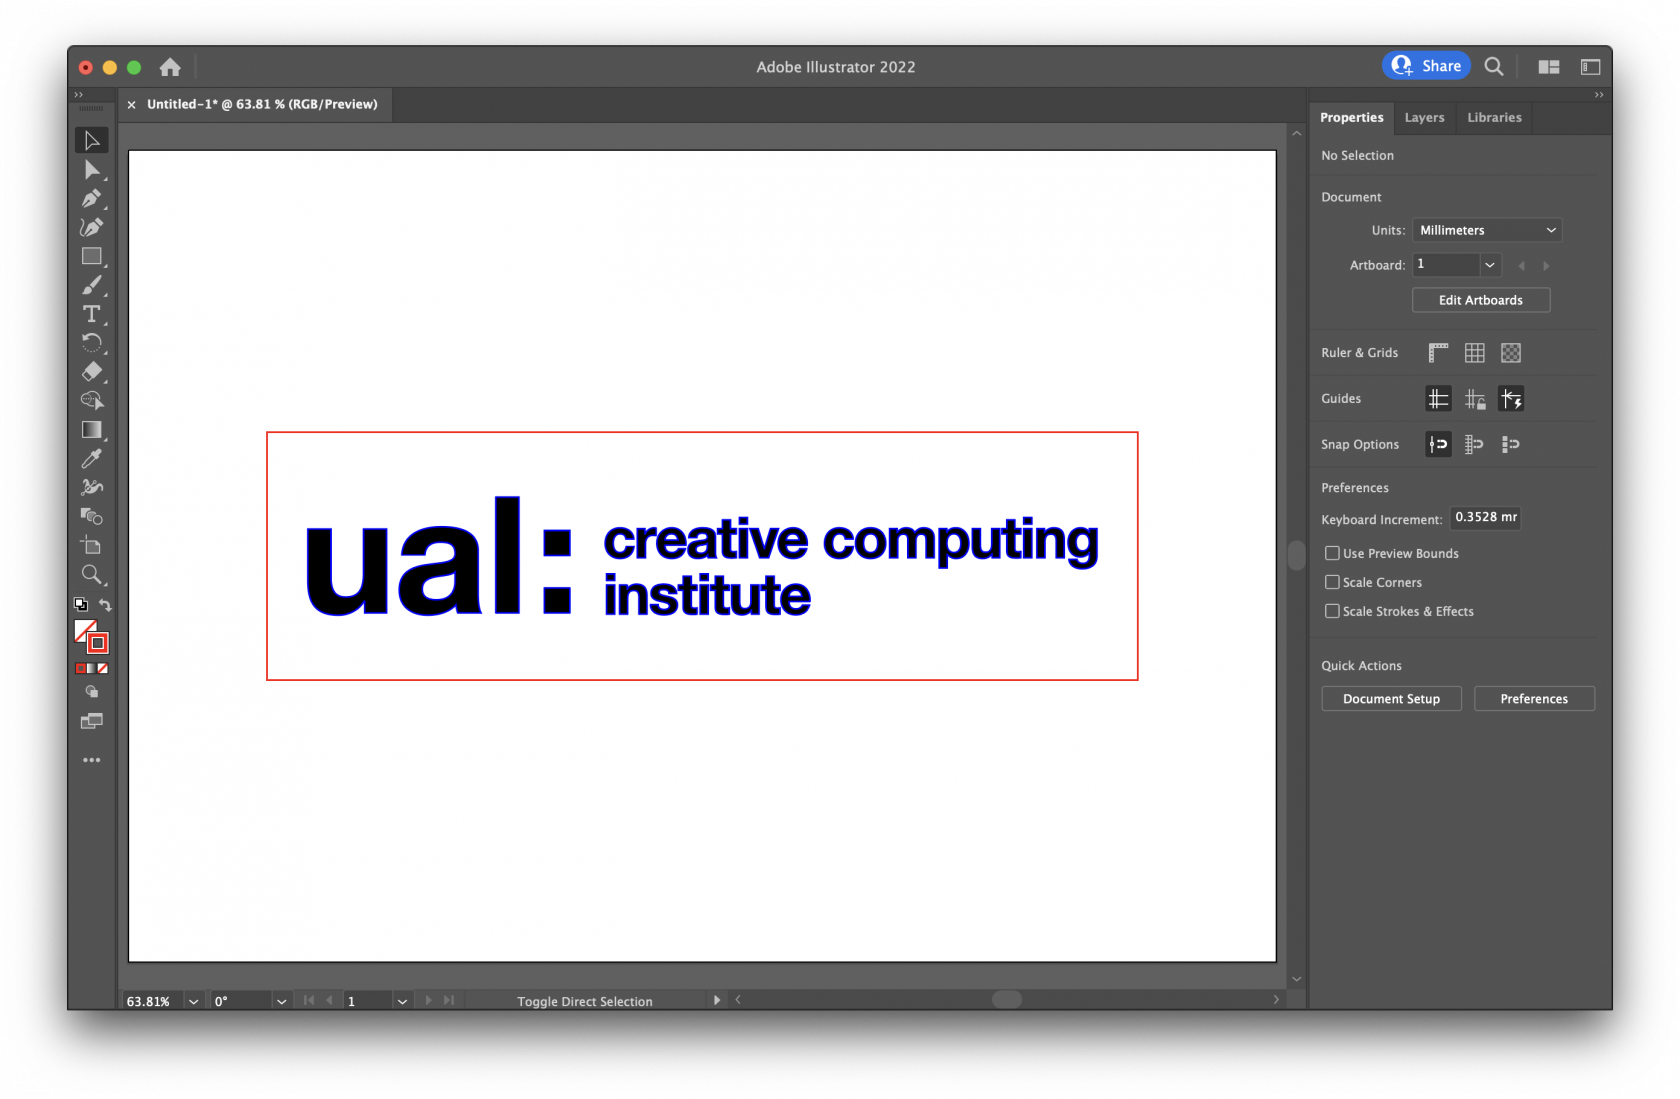
We're going to etch the UAL Creative Computing Institute logo, outline it with an engraved line, and then cut out a bounding box.
# Step 1
The laser cutter can etch raster images, however to be able to cut out or engrave we need to provide vector lines which is why you will need to use software such as:
- Adobe Illustrator
- Corel Draw
- Affinity Designer
- Inkscape
- ❗️ Please don't export SVG from Fusion 360 for laser cutting
Here you can see we've created an Illustrator document in RGB colour mode (not CMYK) and added a vector of the CCI logo to the artboard:
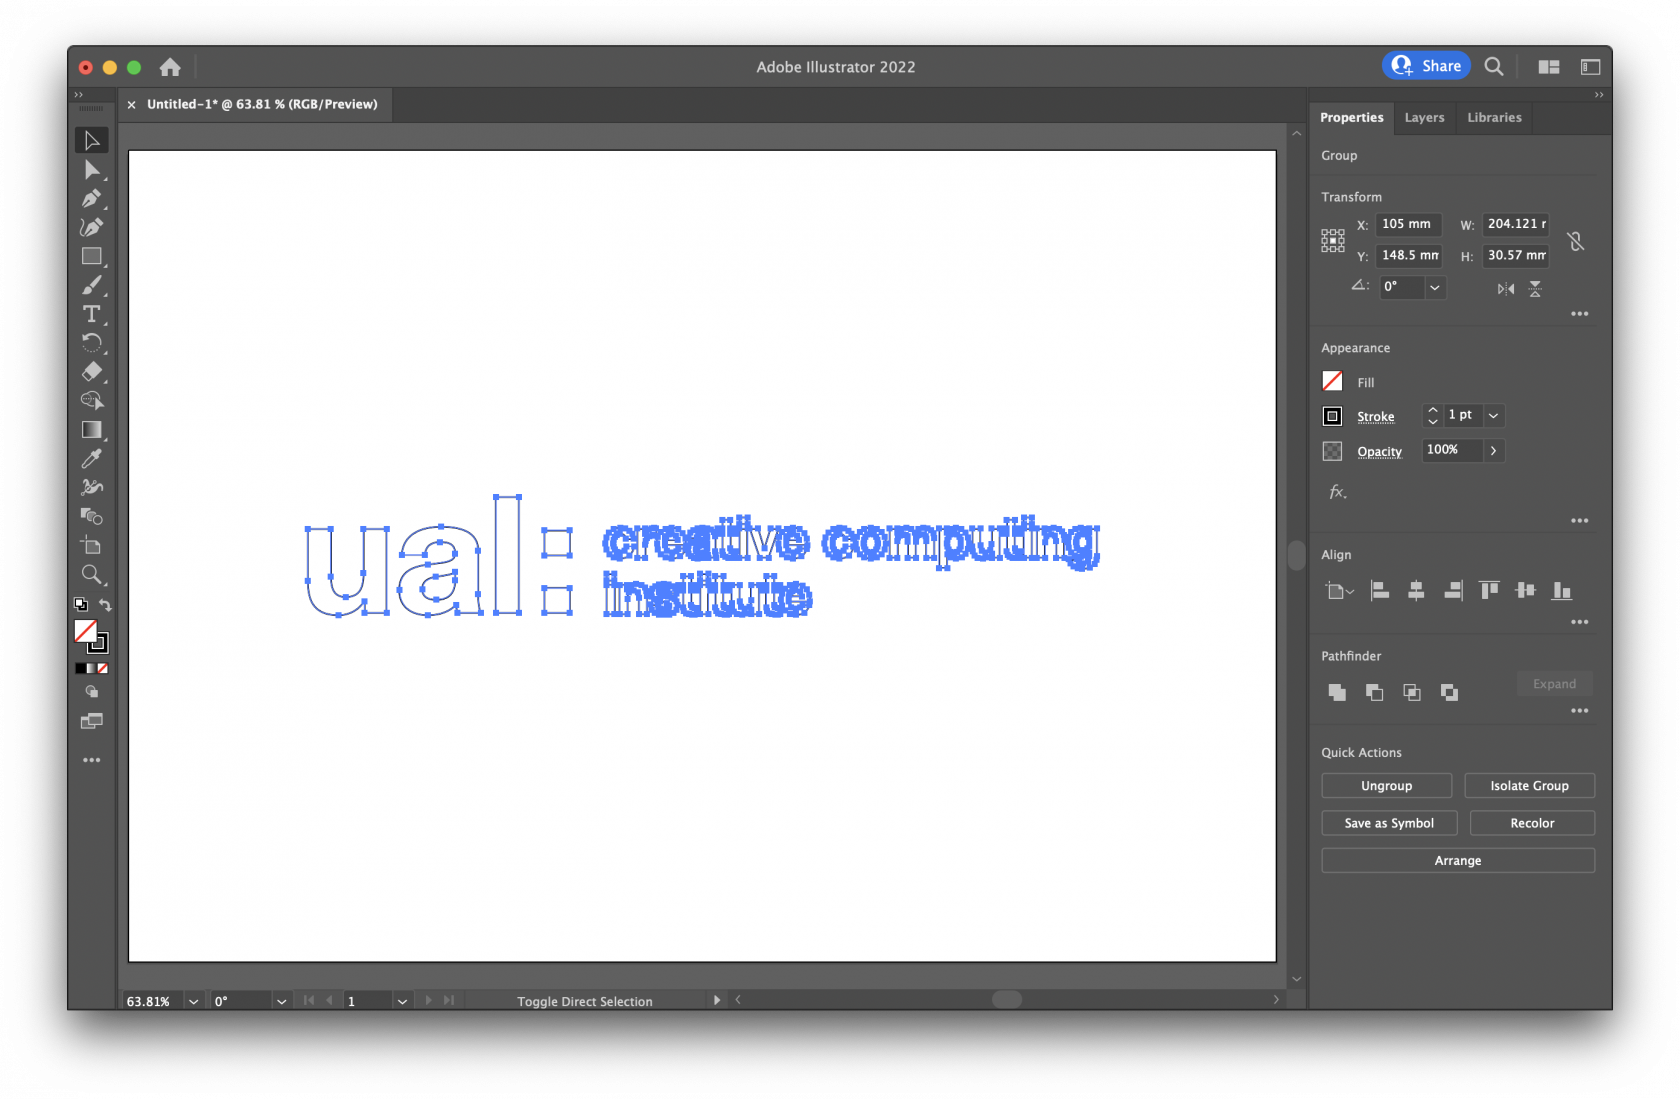
# Step 2
When preparing files for laser cutting with most machines you usually have to use specific colour and line thicknesses, and it's good practice to retain this with Trotec Ruby, however it is far more forgiving than older software.
As a general rule there are 3 types of action, and these are the colour fill and stroke settings for those actions:
- **Cut** - This is a vector line all the way through a piece of material.
Stroke: #ff0000 - RGB Red
Fill: None
- **Engrave** - This is a vector line cut into the surface of the material.
Stroke: #0000ff - RGB Blue
Fill: None
- **Etch** - This is an area etched into the surface of the material.
Stroke: None
Fill: #000000 - RGB Black
By selecting these colours and strokes you will save yourself work later, if theres a mistake you can change it in the design step in Ruby.
# Step 3
Now you need to save the file, Ruby will accept various formats including:
- AI
- PDF
- JPG/JPEG
- PNG
- BMP
- SVG
- TSF
Save the file to your computer.
# Ruby: Introduction
This is the first of several pages that will guide you through how to use Trotec Ruby to prepare a design for laser cutting. Preparing files for laser cutting is relatively straight forward, and some simple projects can even be made using just the tools built into Ruby.
# Login
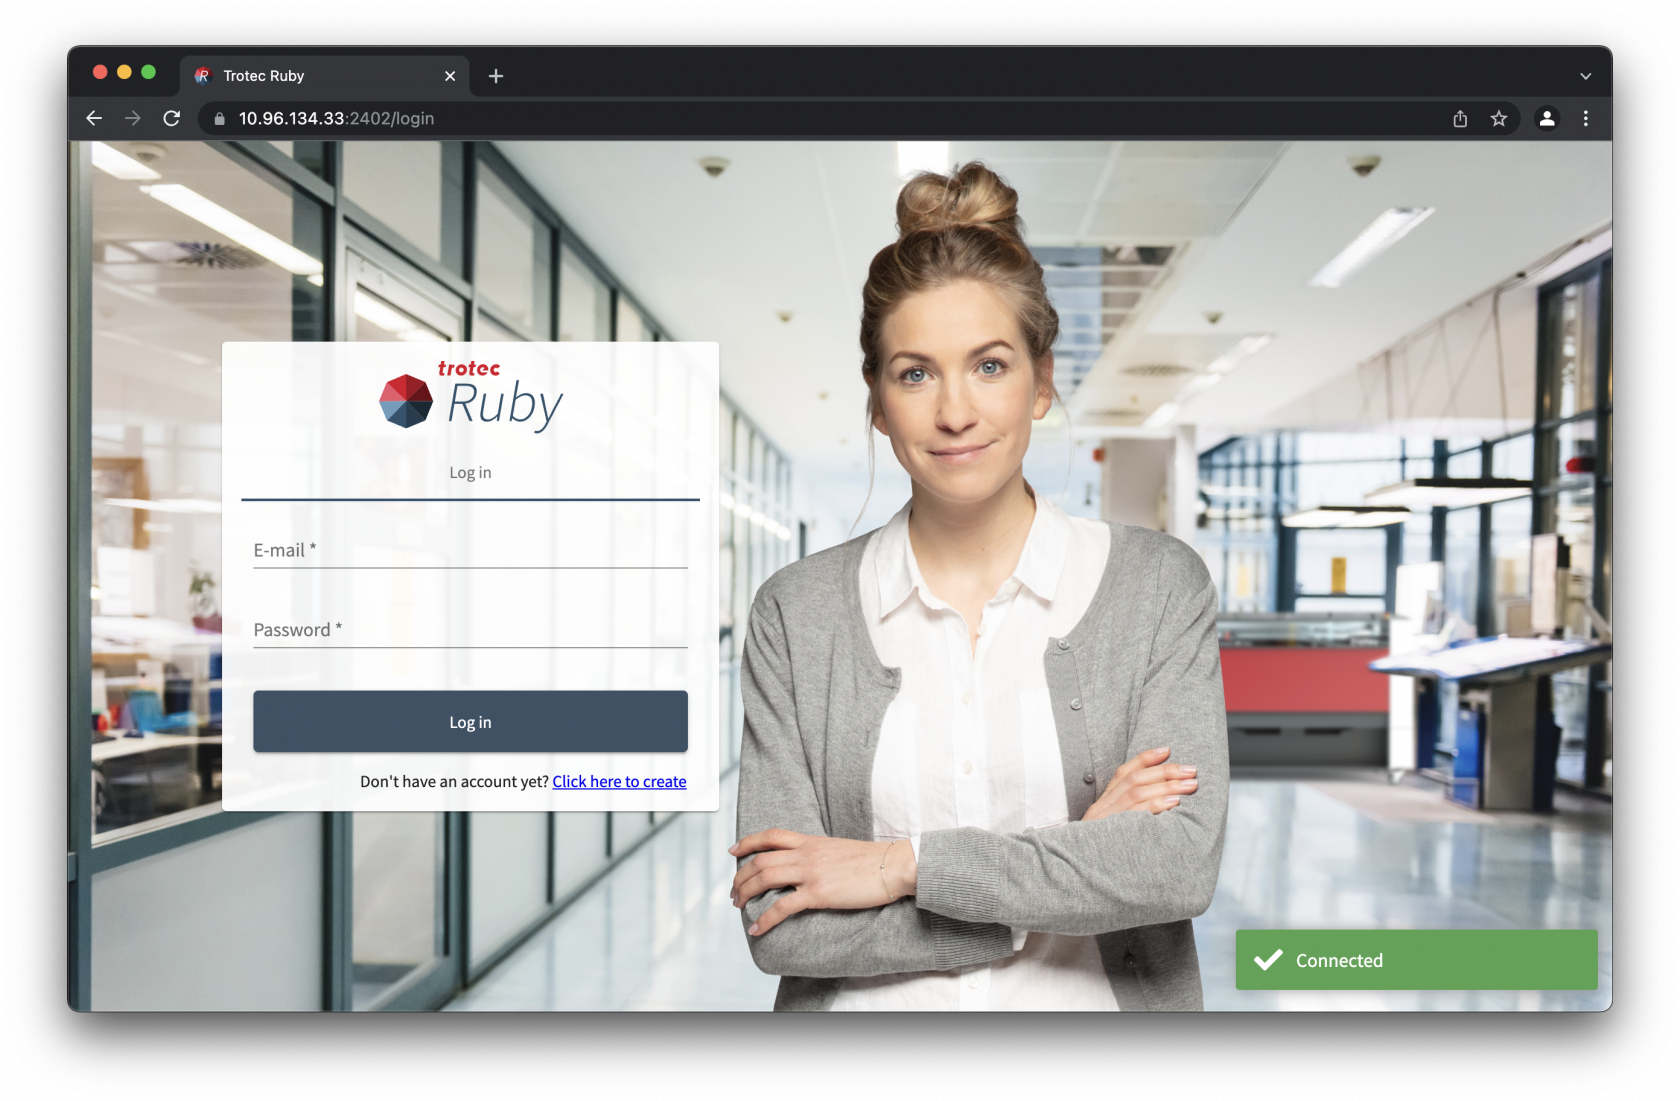
Trotec Ruby is only officially supported in Google Chrome at this time, to use the laser cutter after being inducted you will be provided with a username (email address) and password. You need to be on UAL wifi to access the software.
To access the login screen open the browser and go to [https://ruby-g6auhvm:2402/login](https://ruby-g6auhvm:2402/login). If it doesn't work, please use the Chrome browser, click on **'Advanced,'** and then **proceed anyway.** If it still doesn't work after you've changed your browser, please speak to the technician.
[](https://wiki.cci.arts.ac.uk/uploads/images/gallery/2022-01/ayl7YF9s5fV6JpWg-ruby-1.png)
## Security Certificate
Before you can login and access the laser cutter you must install the security certificate to ensure that access to the web interface is not blocked by browser security requirements.
- [Windows 10](https://wiki.cci.arts.ac.uk/books/digital-making/page/how-to-trust-trotec-ruby-certificate-on-windows-10)
- [macOS](https://wiki.cci.arts.ac.uk/books/digital-making/page/how-to-trust-trotec-ruby-certificate-on-macos)
# Overview
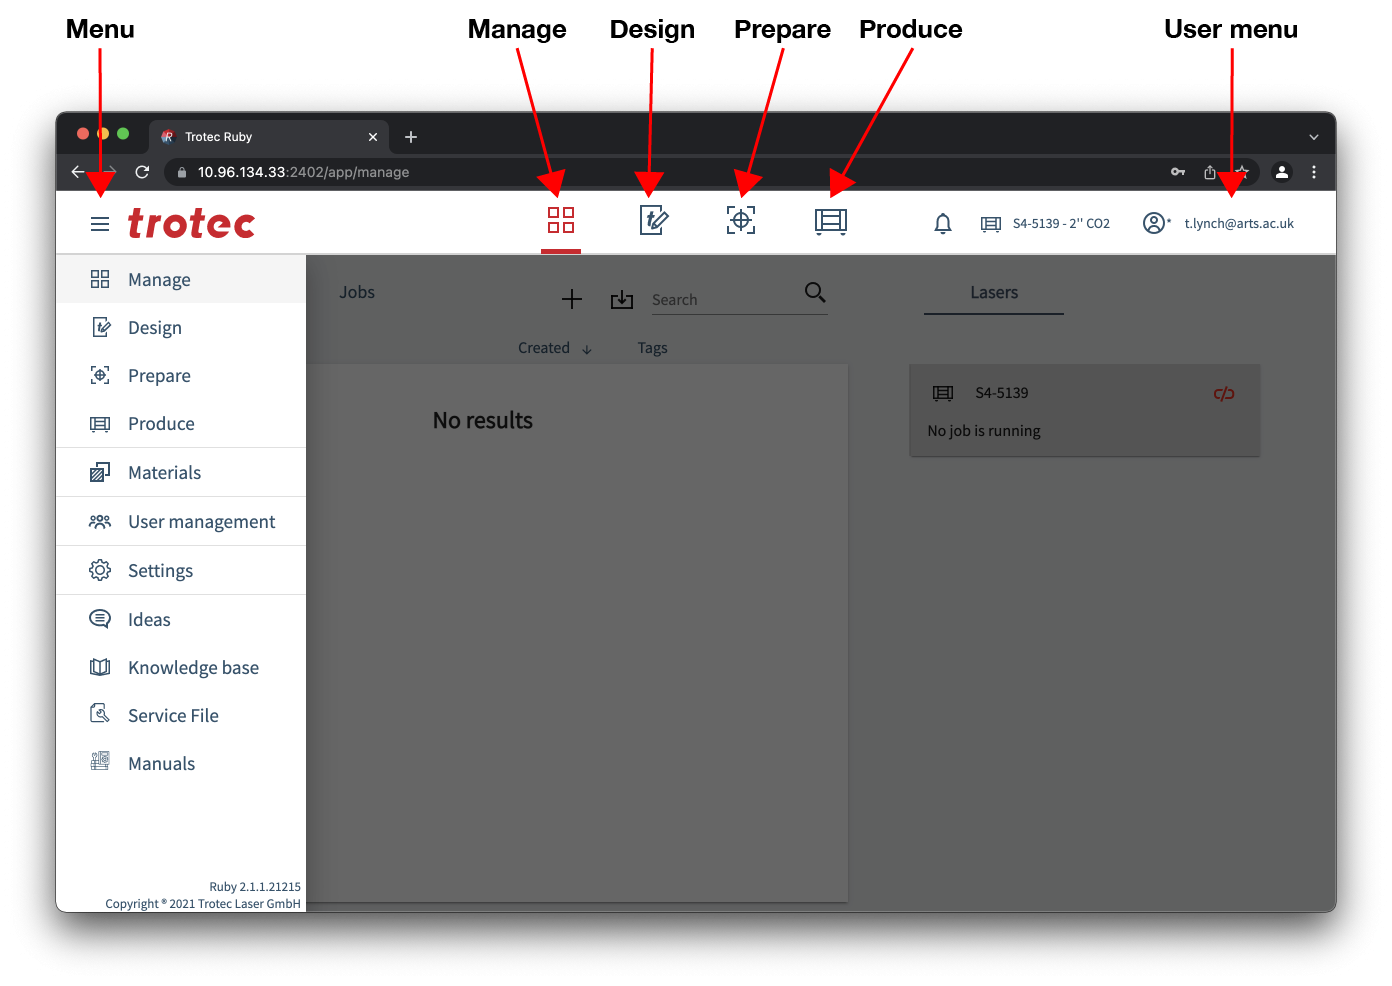
## Top Bar
At a high level the way Ruby works is by stepping through each of the menu bar options from left to right:
**[Manage](https://wiki.cci.arts.ac.uk/books/facilities/page/ruby-manage-screen)** – This is where you can upload and manage your designs and jobs.
**[Design](https://wiki.cci.arts.ac.uk/books/facilities/page/ruby-design-screen)** – The design screen is where you can make or edit designs, the typical workflow is to create the file in another program such as Adobe Illustrator and then send the design to the prepare screen.
**[Prepare](https://wiki.cci.arts.ac.uk/books/facilities/page/ruby-prepare-screen)** – The prepare screen is where multiple designs can be combined into a single job on the laser bed.
**[Produce](https://wiki.cci.arts.ac.uk/books/facilities/page/ruby-produce-screen)** – The produce screen is where you can queue, reorder and view running jobs.
## Sidebar
Like man web applications Ruby has a side bar which is opened by clicking the hamburger menu to the left of the Trotec logo.
- **[Manage](https://wiki.cci.arts.ac.uk/books/facilities/page/ruby-manage-screen), [Design](https://wiki.cci.arts.ac.uk/books/facilities/page/ruby-design-screen), [Prepare](https://wiki.cci.arts.ac.uk/books/facilities/page/ruby-prepare-screen) and [Produce](https://wiki.cci.arts.ac.uk/books/facilities/page/ruby-produce-screen)** - These are repeated from the top bar.
- **[Materials](https://wiki.cci.arts.ac.uk/books/facilities/page/ruby-materials-screen)** - This is where you can view, create, edit and delete material and settings.
- **User management** - This is for administrators only, do not enter this area.
- **Settings** - This is for administrators only, do not enter this area.
- **Ideas** - This is where you can send suggestions to Trotec for improvements to Ruby.
- **Knowledge base** - This is where you can find help around using Ruby direct from Trotec.
- **Service File** - This is for administrators only, do not click this option.
- **Manuals** – This is where you can find the manual for all Trotec laser cutters.
# How to trust Trotec Ruby certificate on Windows 10
This guide will show you how to trust the Trotec Ruby certificate on Windows 10 to avoid security warnings.
1. [Download the certificate](http://10.96.134.33:5000/certificate) (Right click, Save As)
2. Locate the `TrotecRubyCA.crt` file in your downloads and open it.
3. Windows will ask you to confirm if you want to open the file, press open.
[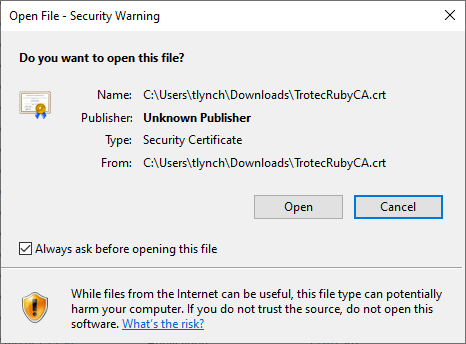](https://wiki.cci.arts.ac.uk/uploads/images/gallery/2022-01/Hb8KzSZAGzMilYMK-image-1642629822034.png)
4. Windows will show you the details of this security certificate and say it is not trusted. This is because the certificate is issued by Trotec, rather than a global certificate authority. This normal and the certificate should still be installed.
[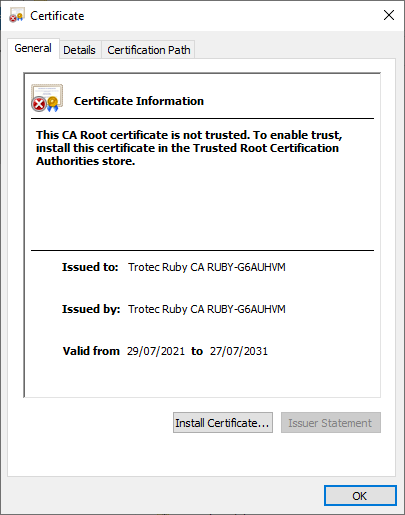](https://wiki.cci.arts.ac.uk/uploads/images/gallery/2022-01/Yb6g8qrCugGeafHI-image-1642629878567.png)
5. Install the certificate on the "Local Machine" and press Next.
[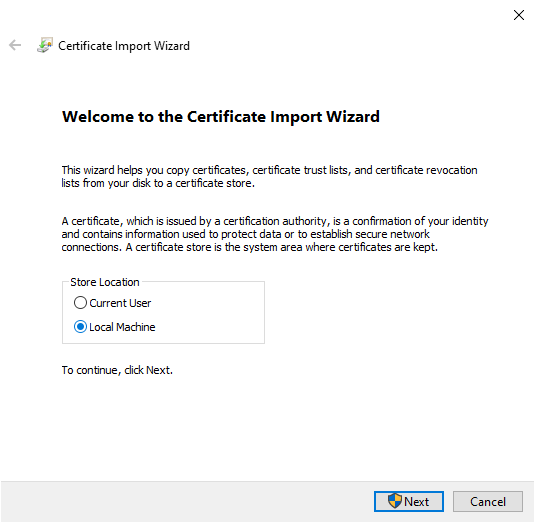](https://wiki.cci.arts.ac.uk/uploads/images/gallery/2022-01/Z20MFNbt4xDA377r-image-1642631116315.png)
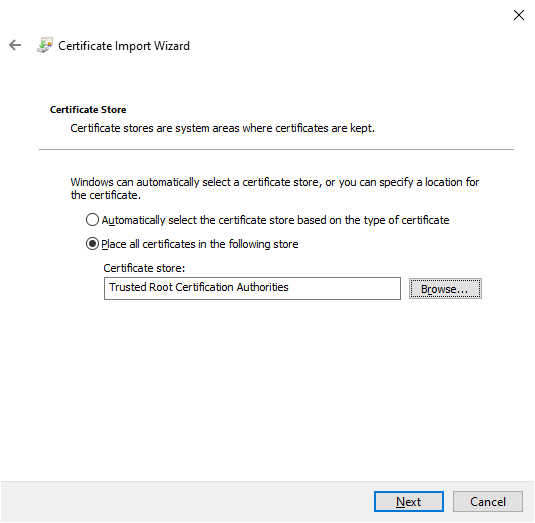
6. Click "Place all certificates in the following store" and select browse.
[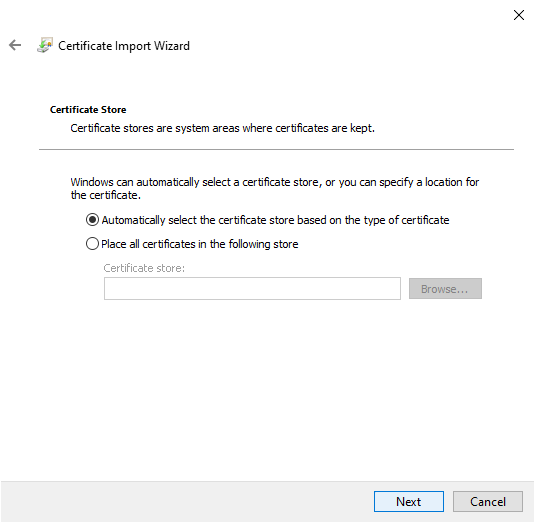](https://wiki.cci.arts.ac.uk/uploads/images/gallery/2022-01/NuBB7ot5xGj8VQWY-image-1642630085680.png)
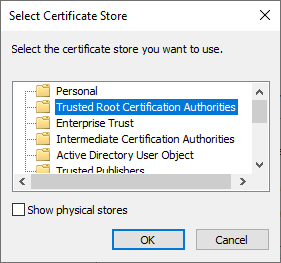
7. Select "Trusted Root Certification Authorities" and press OK.
[](https://wiki.cci.arts.ac.uk/uploads/images/gallery/2022-01/La6KqhogM0DuOOKr-image-1642630759903.png)
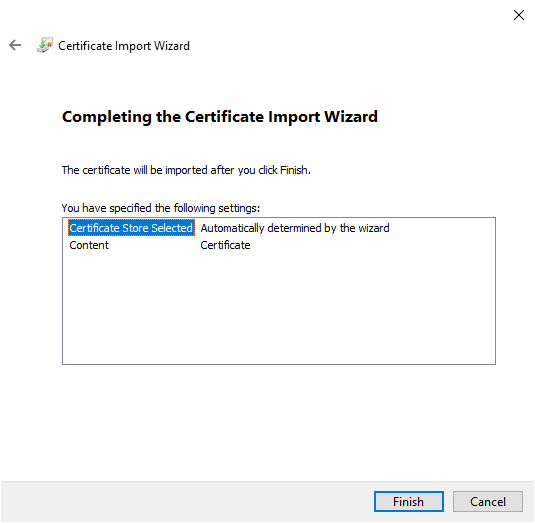
8. Press next.
[](https://wiki.cci.arts.ac.uk/uploads/images/gallery/2022-01/CW84Xp4pdbYKNyvy-image-1642630711613.png)
9. Press finish to complete the installation of the certificate.
[](https://wiki.cci.arts.ac.uk/uploads/images/gallery/2022-01/SHcEJwoXVJQgxQde-image-1642630151775.png)
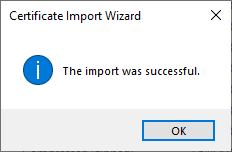
10. Windows will take a few moments and then confirm the outcome. You can now press okay to this prompt and close the certificate information window.
[](https://wiki.cci.arts.ac.uk/uploads/images/gallery/2022-01/VNYmdgm2TpNUIJR8-image-1642630179939.png)
11. Reboot your computer.
# How to trust Trotec Ruby certificate on macOS
This guide will show you how to trust the Trotec Ruby certificate on macOS to avoid security warnings.
1. [Download the certificate](http://10.96.134.33:5000/certificate) (Right click, Save As)
2. Locate the `TrotecRubyCA.crt` file in your downloads and open it.
3. macOS will ask if you want to add the certificate to the Keychain. Ensure "login" is selected and press "Add".
[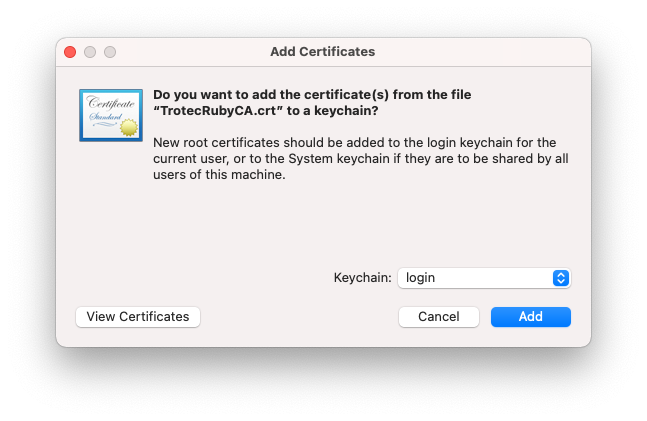](https://wiki.cci.arts.ac.uk/uploads/images/gallery/2022-01/u7bXNjJsmWjJePzn-screenshot-2022-01-19-at-22-37-07.png)
4. In the main Keychain app window select "login" on the left, then search for "Trotec" in the top right corner.
[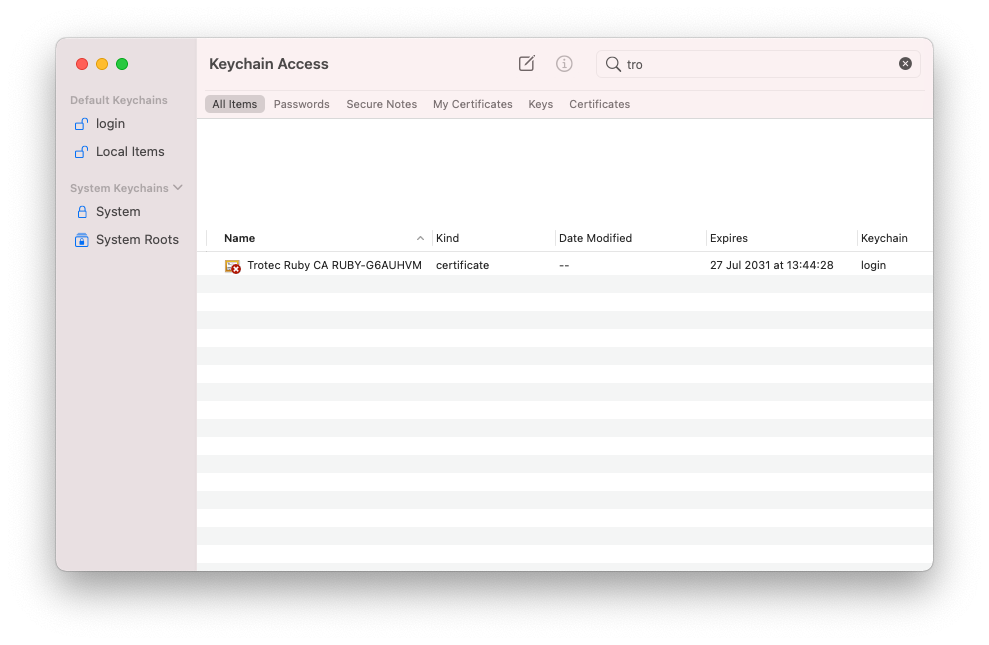](https://wiki.cci.arts.ac.uk/uploads/images/gallery/2022-01/ZbAbtrkHGiIqC80O-screenshot-2022-01-19-at-22-37-47.png)
5. Double click on the "Trotec Ruby CA RUBY-G6AUHVM" certificate and expand the "Trust" section. Set "Secure Sockets Layer (SSL)" to "Always Trust"
[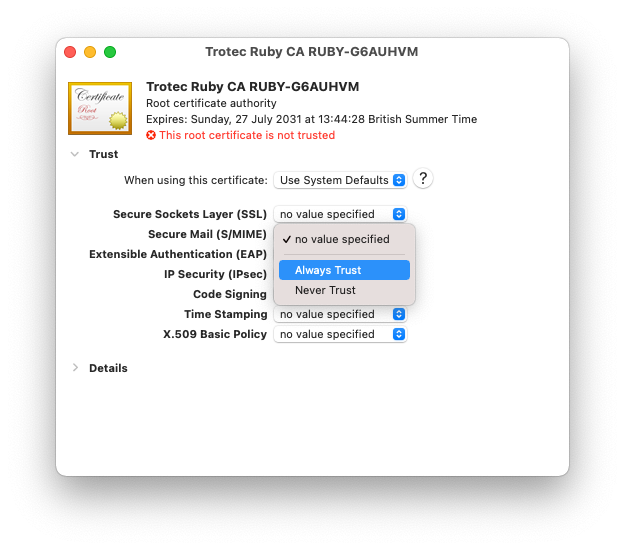](https://wiki.cci.arts.ac.uk/uploads/images/gallery/2022-01/8PaQNbtuH9jFnI2k-screenshot-2022-01-19-at-22-38-00.png)
6. Close the window to save, and confirm with your admin password or Touch ID.
7. Reboot your computer.
# Ruby: Manage Screen
The manage view allows you to open, delete or upload files as well as organise them, we'll start by uploading a file.
# Uploading a file
In Ruby switch to the manage screen and drag and drop the file(s) onto the dropzone:
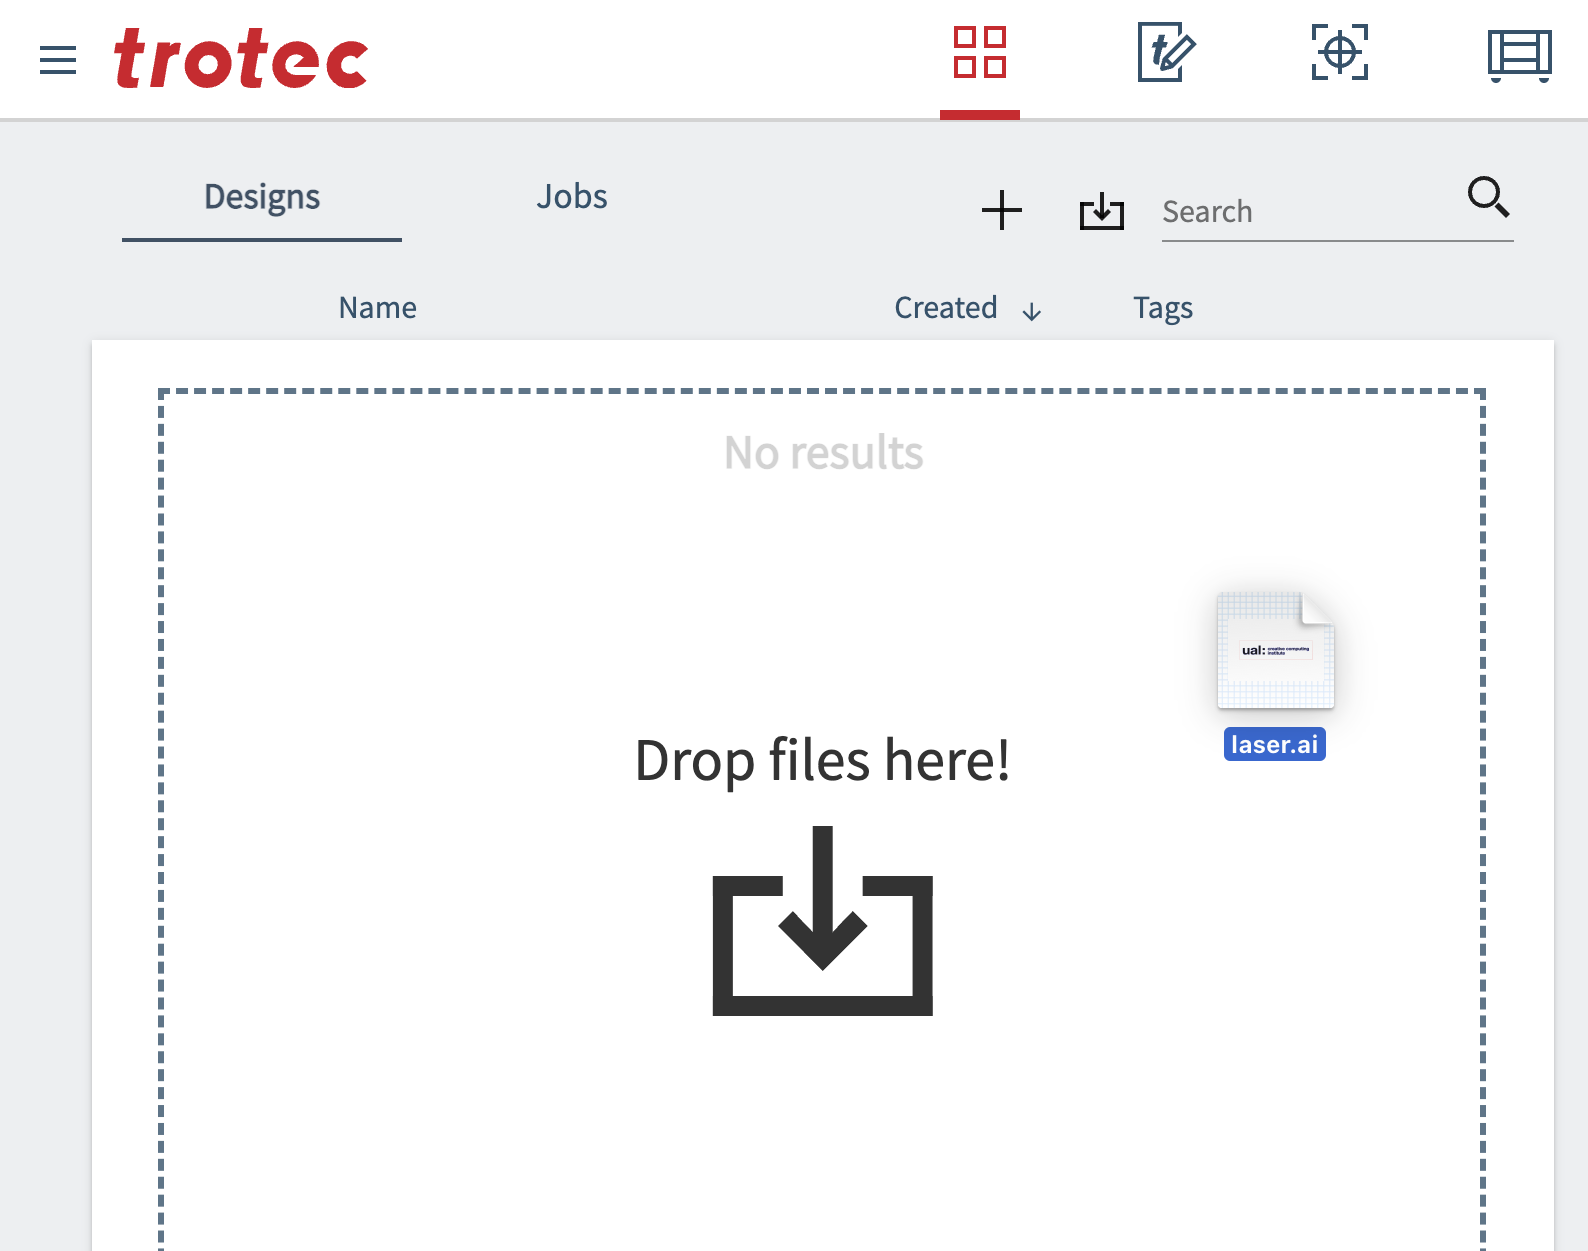
Alternatively click the "Import File" icon and find the file(s) in the pop up dialog:

# Open a design
After your file is uploaded to Ruby it becomes part of a new design. You can see a small preview in your list of designs that you can open in the [Design Screen](https://wiki.cci.arts.ac.uk/books/facilities/page/ruby-design-screen) by double clicking, delete or download by clicking the relivent icons next to the design.
# Ruby: Design Screen
Once you open the design in Design Screen you should see the artwork you've created. You will be able to see artboard size, as well as all the colours and lines were all retained.
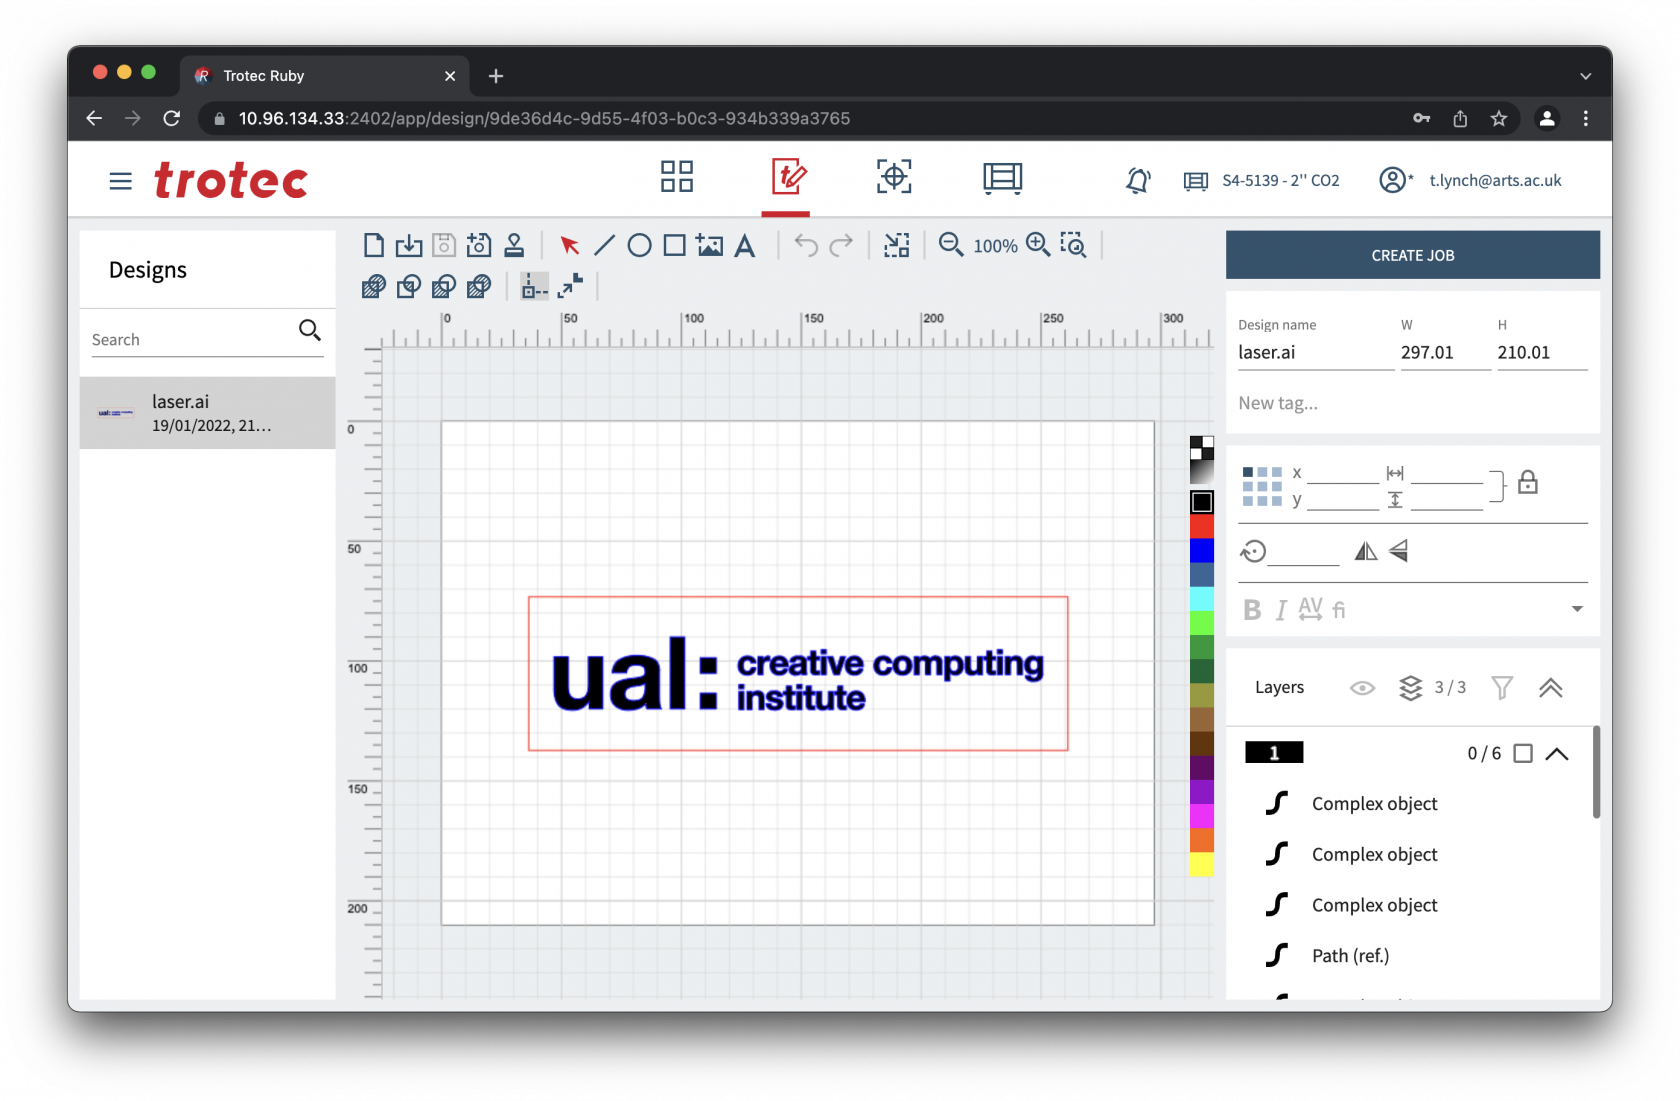
The design screen is split into 3 columns:
- Left: Design browser
- Middle: Work area
- Top: Toolbar
- Bottom: Work area
- Right
- Top: Design name and tags
- Middle: Object parameters
- Bottom: Layers
# Toolbar
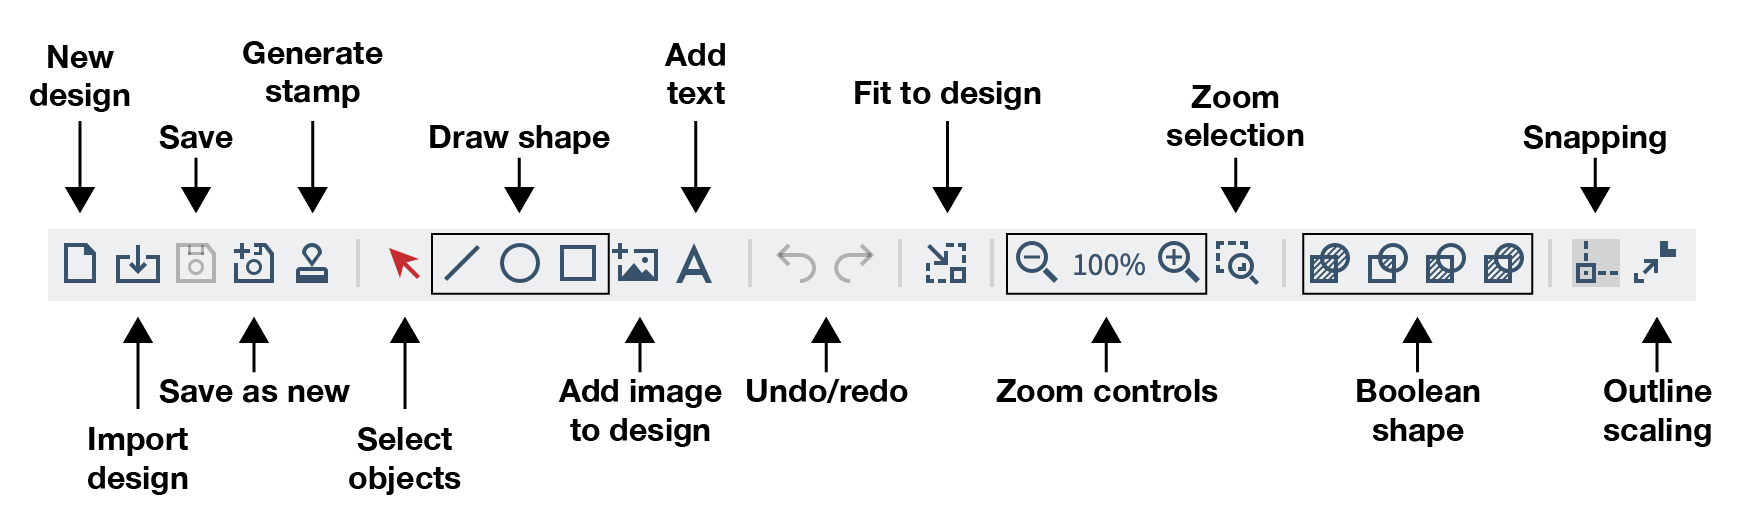
- **New design** - Create a new design.
- **Import design** - Upload a file from your computer.
- **Save** - Save the open design. *Greyed out means there are no changes to save.*
- **Save as new** - Save the open design as a new design.
- **Generate stamp** - Convert the open design into a stamp as a new design.
- **Select objects** - Switches the active tool select objects.
- **Draw shape** - Switches the active tool to draw the selected shape.
- **Add image to design** - Allows you to insert an image into your design from your computer.
- **Undo/redo** - Undo the previous action or redo it. *Greyed out means there are no further undo/redo steps available.*
- **Fit to design** - Shrinks the artboard to the smallest size that encompases all design elements.
- **Zoom controls** - Zooms the viewport in and out on the design.
- **Zoom selection** - Lets you draw a selection box to zoom into.
- **Boolean shape** - Allows you to Union, Intersect, Difference, or Exclusion vector shapes.
- **Snapping** - Toggle object snapping.
- **Outline scaling** - *We're not sure what this does yet!*
# Fit to Design
As we created the whole design in Illustrator already the only thing we would probably want to do is reduce the size of the artboard to the design.
We could do this in Illustrator but Ruby offers a tool to do it automatically by selecting "Fit to design" in the toolbar which will prompt you for a margin size, we'll leave this as 0.00mm and click "Fit to design":
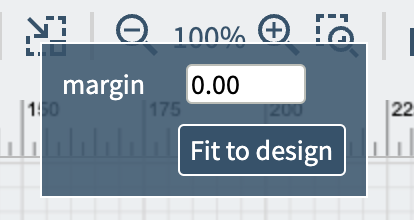
After you'll see the white area of your artboard has been made to perfectly fit the design we created, this might seem like a simple task, but it makes it easy to tightly pack multiple designs onto a piece of material.
# Check your layers
As we've already setup the original file with 3 primary RGB colours and it's a simple design there should be 3 layers.
Layers are different in Ruby to most drawing packages, they're basically a way of defining multiple tasks for the laser cutter, for example:
1. Etch the black area
2. Engrave the blue line
3. Cut the red line
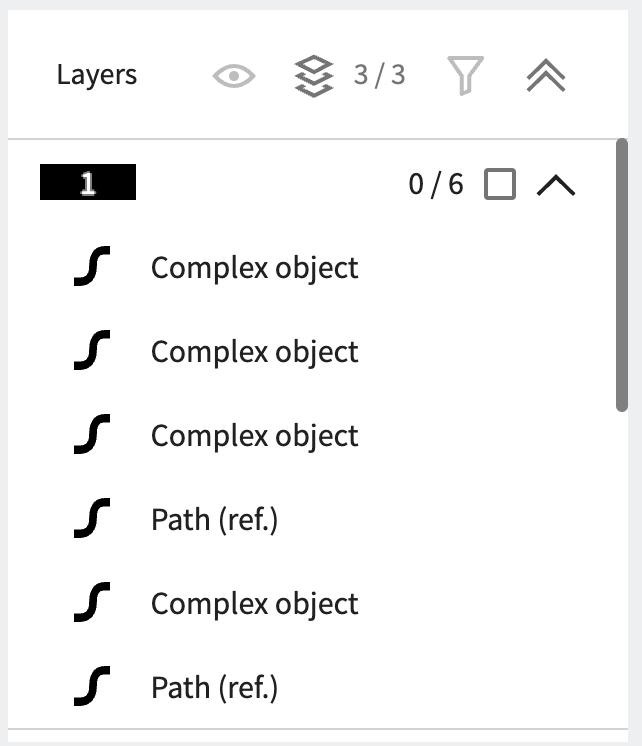
## Changing colours / Merging layers
If any object is the wrong colour you can select it by clicking the object on screen or in the layers, you can select multiple by pressing Command or Control and clicking each object. Or you can select all objects in a layer by pressing the tickbox next to that layer in the layers area.
Once you've selected the object(s) you can change the colour by selecting from those listed:

# Create Job
Once the design(s) are complete you can click "Create Job" to move to the [Prepare Screen](https://wiki.cci.arts.ac.uk/books/facilities/page/ruby-prepare-screen).

# Powering on the laser cutter
The laser cutter key is currently stored in the CCI staff office PR_B503.
To turn on the laser cutter you will need the key.
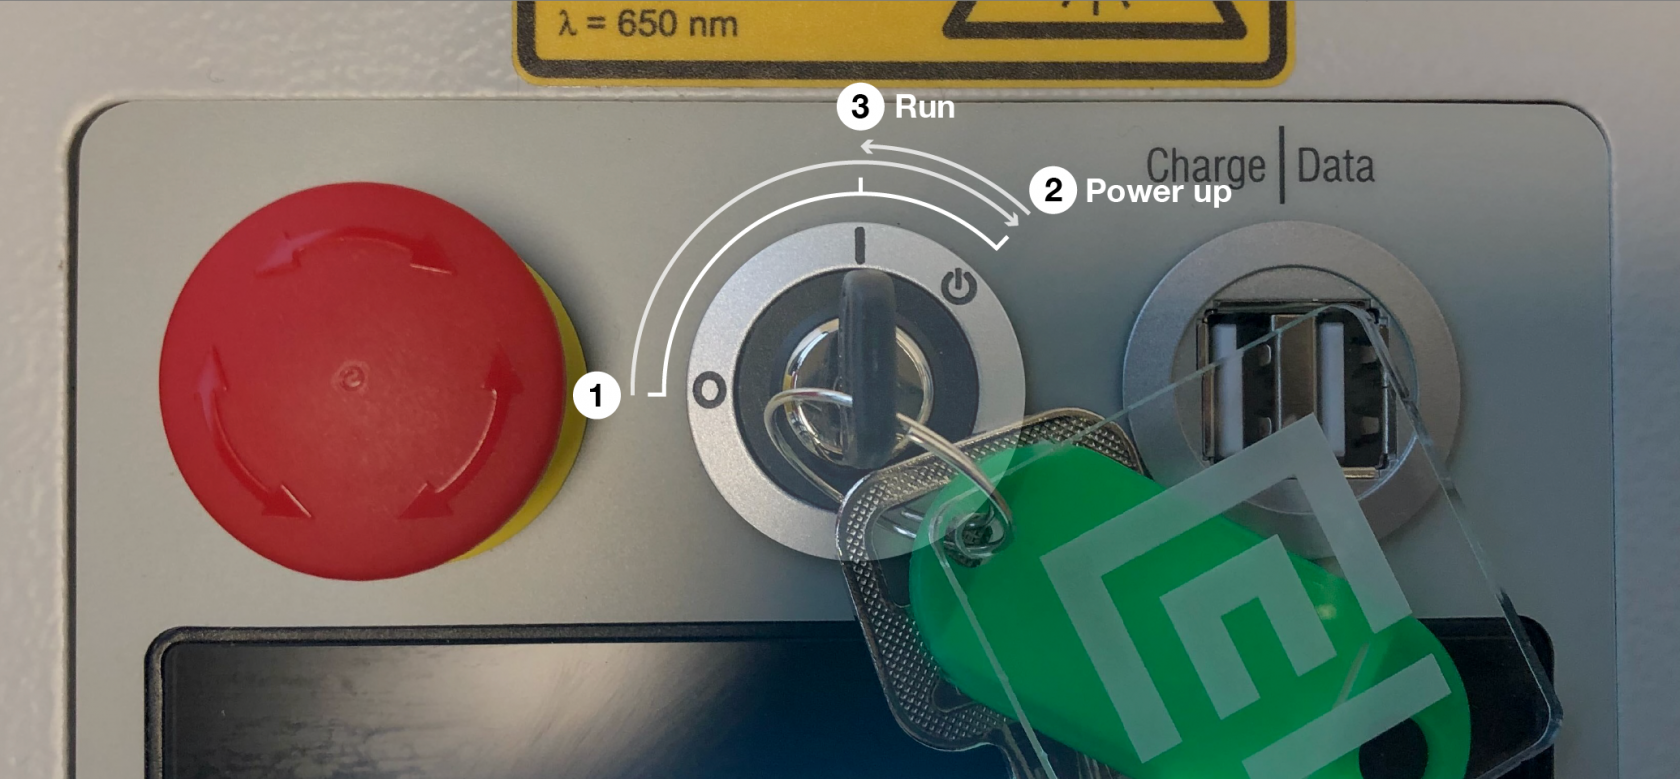
1. Insert the key into the key switch.
2. Rotate all the way past the `I` mark to the power symbol, the machine will click and power up.
3. Allow the spring to return the key to the `I` mark.
## What to check if the laser won't turn on
If the laser won't turn on normally there are 4 places to check, after each check try powering with the key switch:
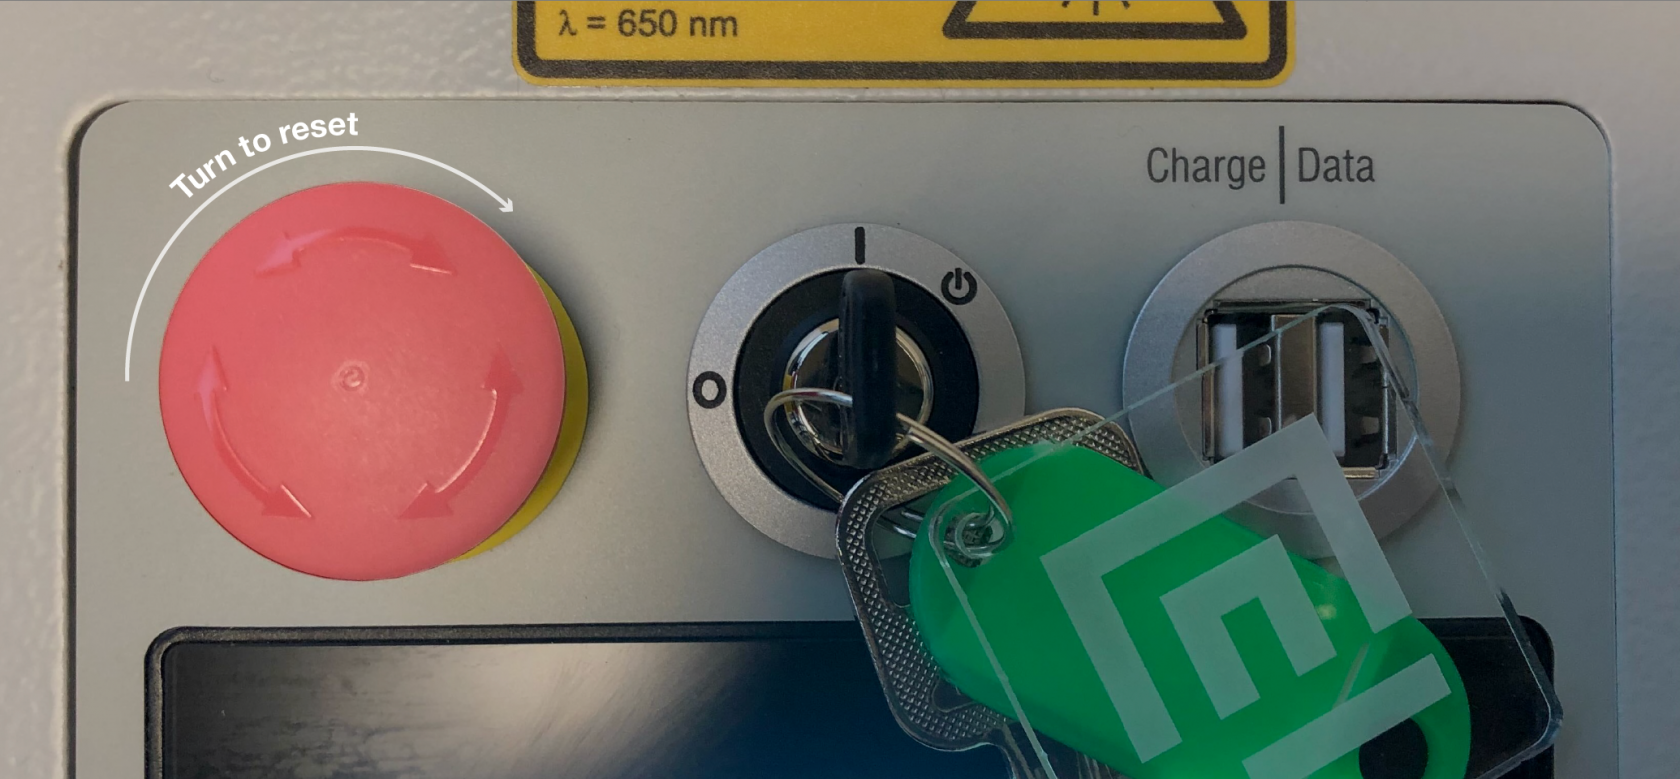
### Step 1 - E-stop reset
Check the red e-stop mushroom next to the key switch, it will turn the machine off if it is pressed in.
You can reset it by turning it a fraction until it pops up from the down position.
[](https://wiki.cci.arts.ac.uk/uploads/images/gallery/2022-03/u3qZzgxRCTfF6YQR-estop.png)
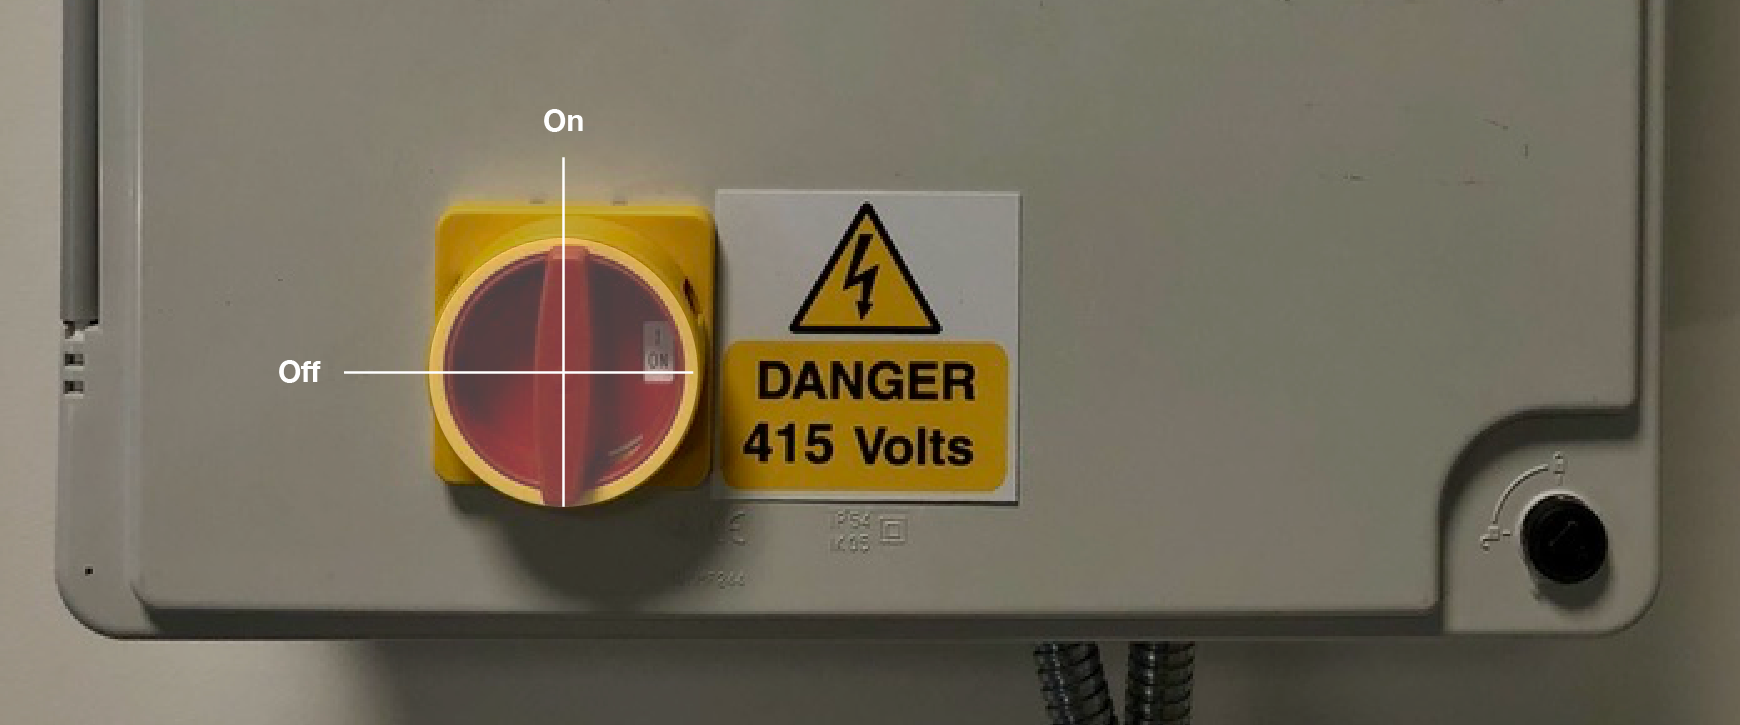
### Step 2 - Wall isolator switch
On the wall box there is a red rotary switch, if this is off you will also find that the Ruby software isn't accessible from your computer.
### Step 3 - Laser power switch
On the back of the machine there is a small rocker switch this should be on. If it is off you will find the Ruby software isn't accessible from your computer.
### Step 4 - Power cable
Check the power cable running from the wall box to the back of the laser is properly inserted. If it isn't the Ruby software won't be accessible from your computer.
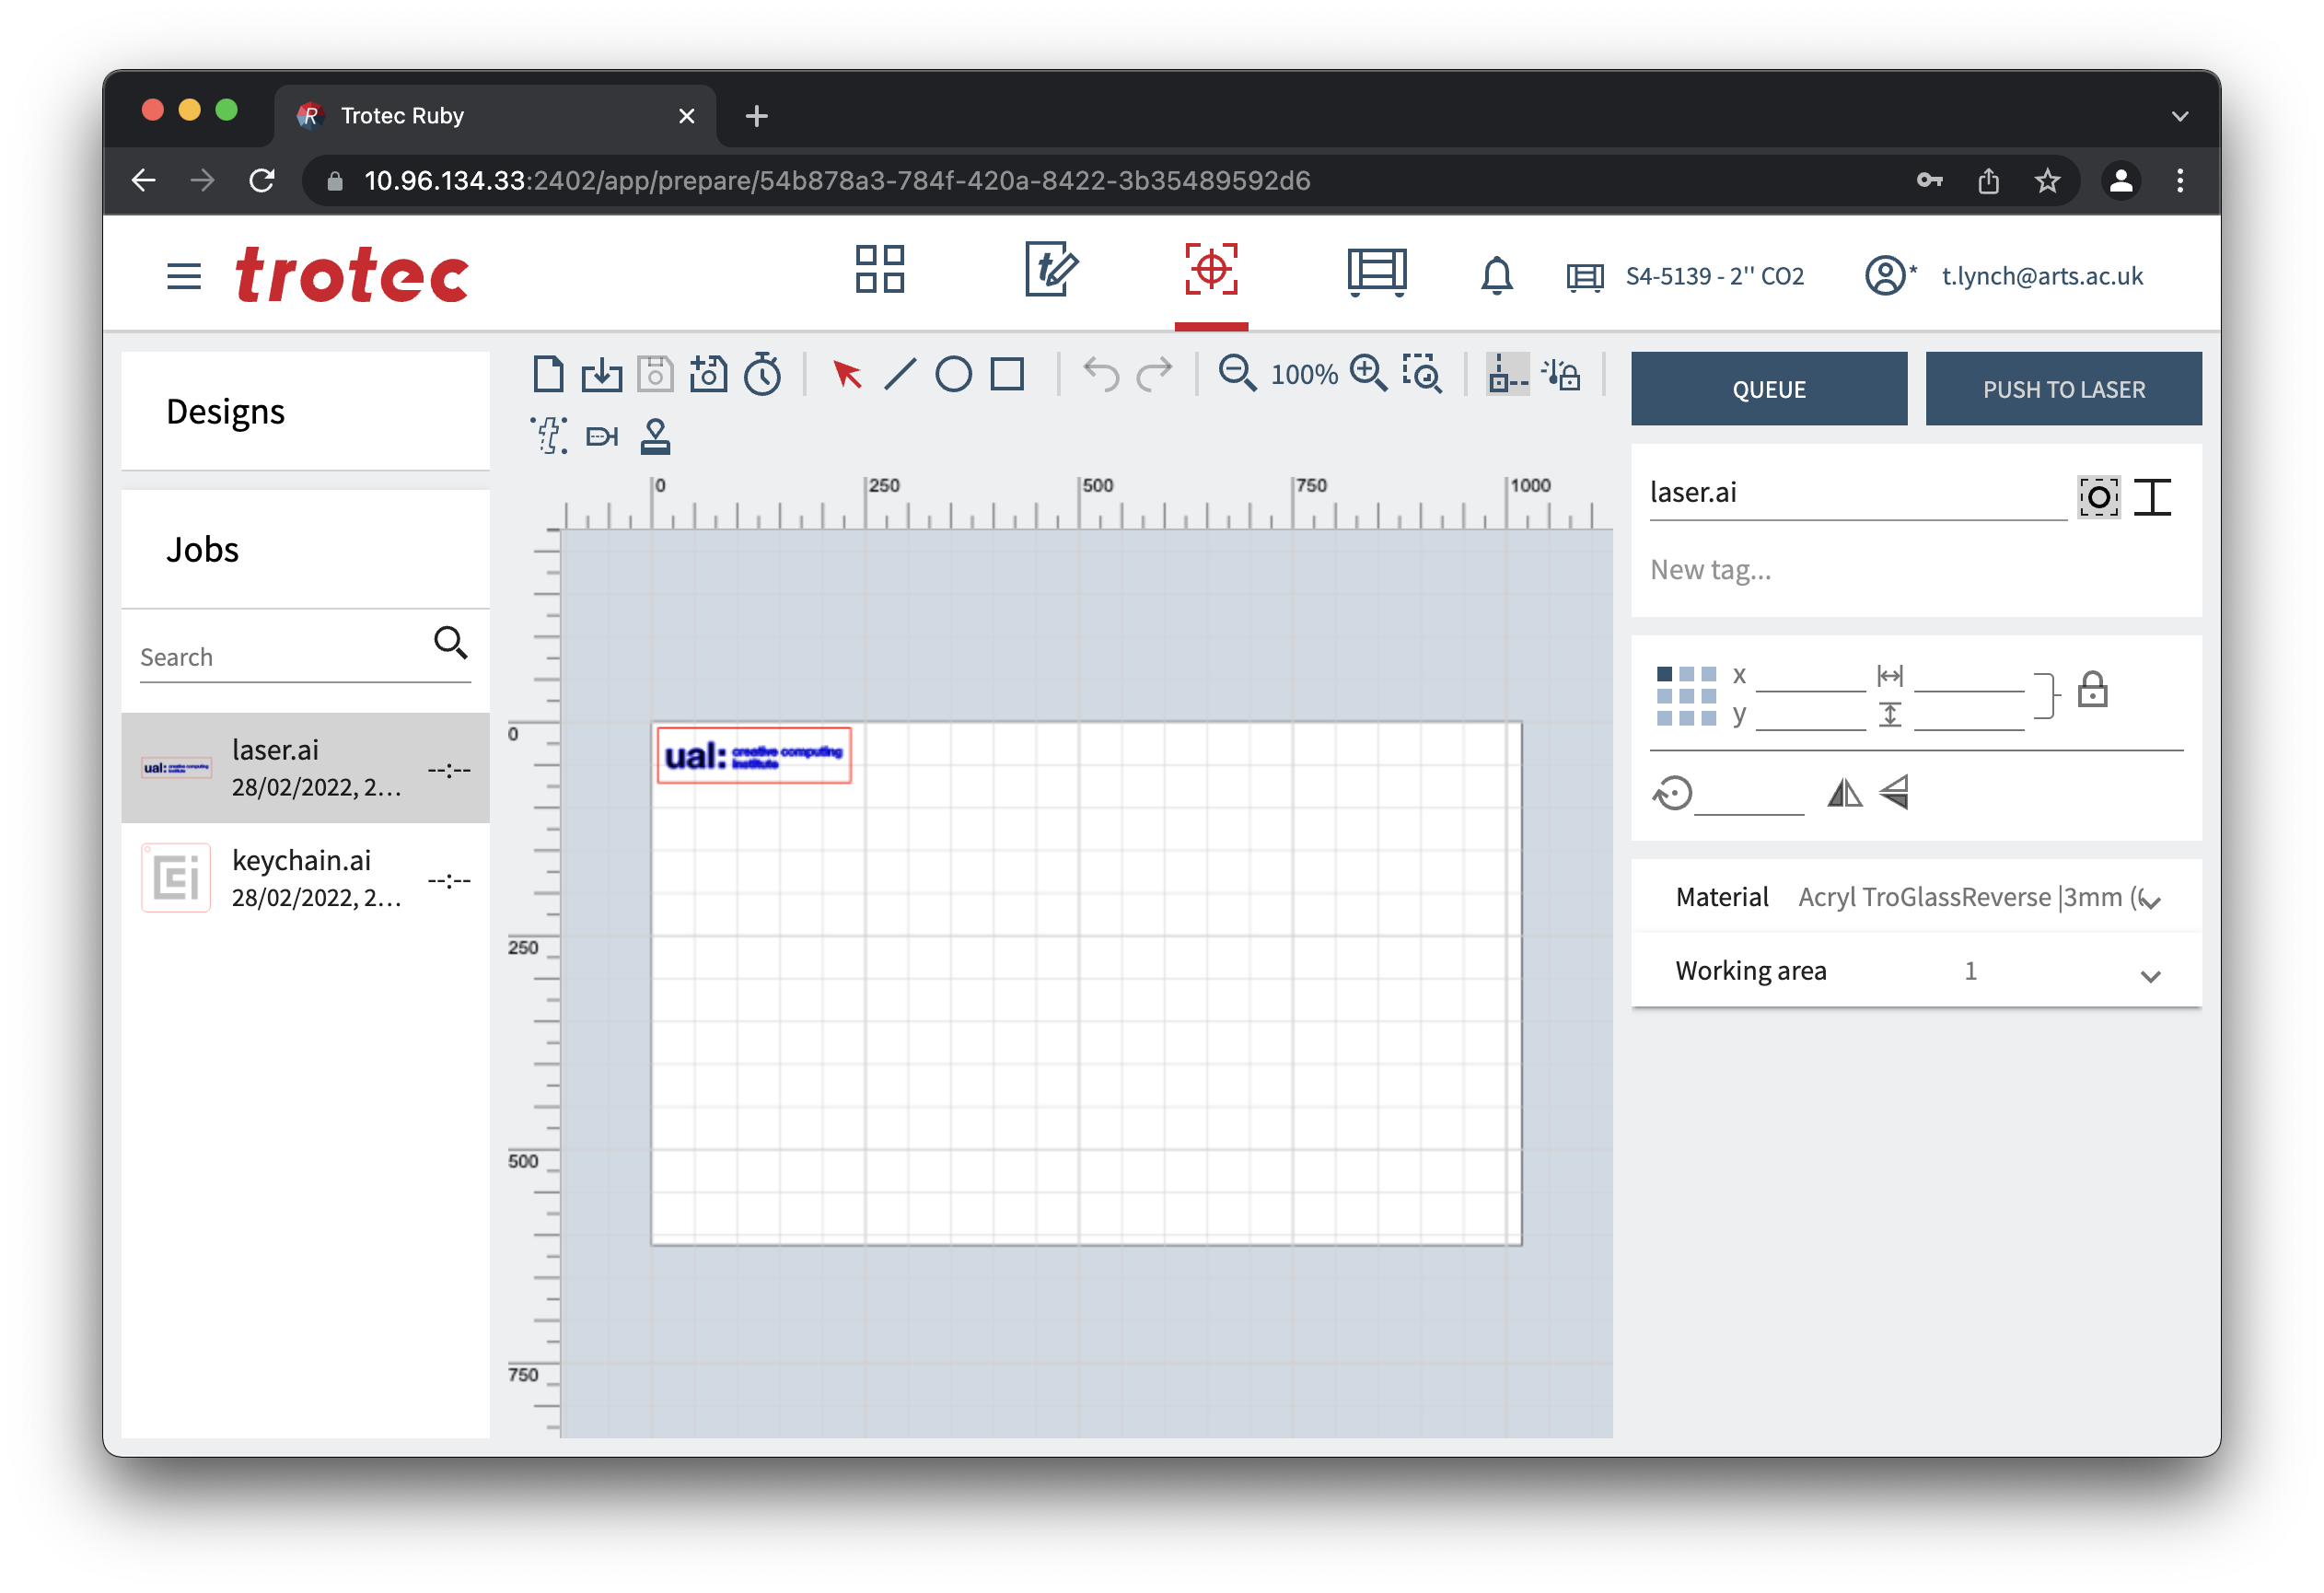
# Ruby: Prepare Screen
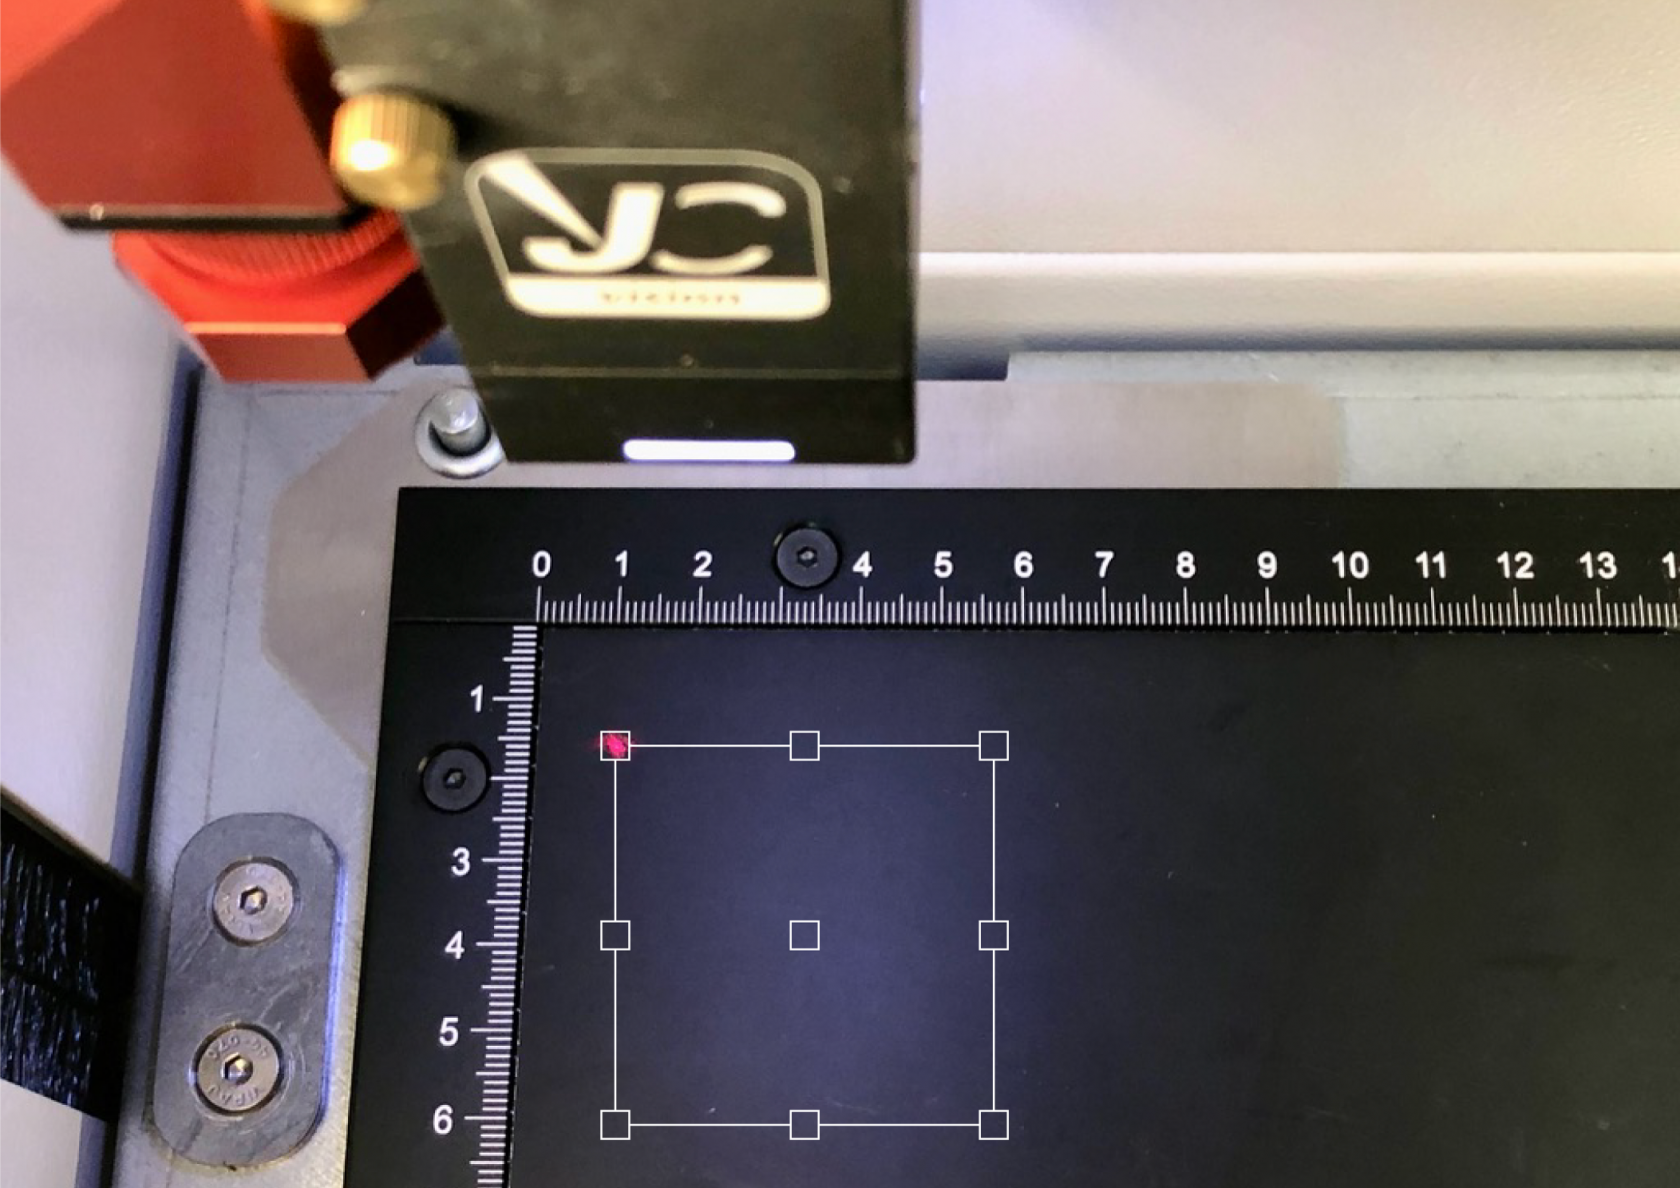
Once you've pushed your design over to the Prepare Screen you'll see it sitting in the working area. This area shows the entire working area of the laser bed, with the top left corner reprisenting the back left of the laser cutter bed.
When the machine is running you'll find the red dot laser position matches an icon on the work area in this screen.
This screen will allow you to take one or more designs and position them onto a material in the working area ready to be lasered.
Typically you would come to this screen by pressing "Create Job" on the Design Screen, but you can also create a new job and then add designs from your library directly into a job.
The Prepare Screen is split into 3 columns:
- Left: Browsers
- Top: Design browser
- Bottom: Job browser
- Middle: Work area
- Top: Toolbar
- Bottom: Working area
- Right
- Top: Job name and tags
- Middle: Design parameters
- Bottom: Materials and list of designs included in the job
# Toolbar
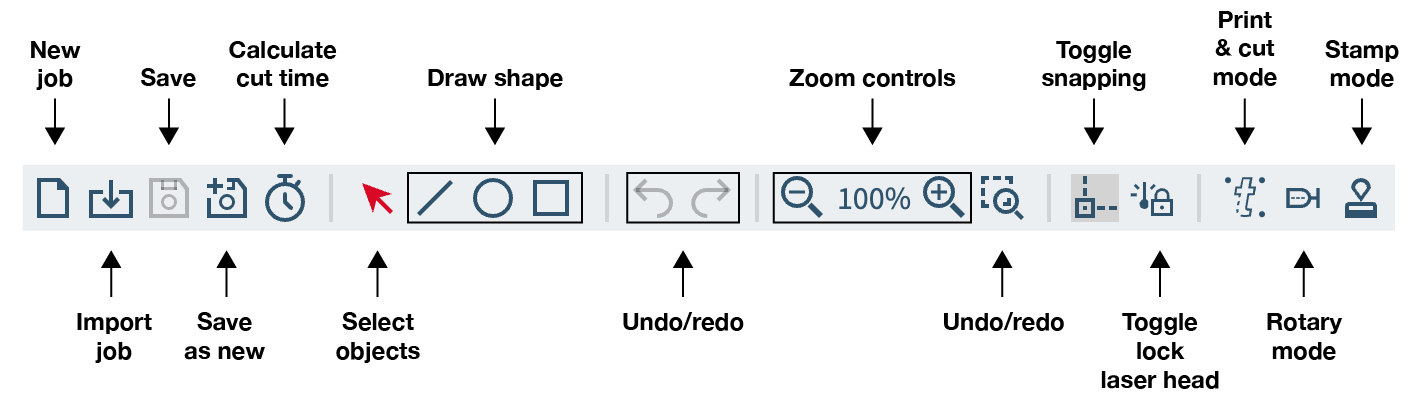
- **New job** - Create a new job.
- **Import job** - Upload a file from your computer.
- **Save** - Save the open job. *Greyed out means there are no changes to save.*
- **Save as new** - Save the open design as a new job.
- **Calculate cut time** - Calculated how long the job will take.
- **Select objects** - Switches the active tool select objects.
- **Draw shape** - Switches the active tool to draw the selected shape.
- **Undo/redo** - Undo the previous action or redo it. *Greyed out means there are no further undo/redo steps available.*
- **Zoom controls** - Zooms the viewport in and out on the job.
- **Zoom selection** - Lets you draw a selection box to zoom into.
- **Toggle Snapping** - Toggle object snapping.
- **Toggle lock laser head** - We're not sure what this does.
- **Print & cut mode** - Used with the computer vision camera attachement.
- **Rotary mode** - Used with the rotary engraver attachement.
- **Stamp mode** - Used when creating a stamp.
# Adding a design
If your design isn't on the working area open the designs browser on the top left, and drag the design(s) out into the working area where you want them.
# Positioning a design
At this point in the process you'll want to put your material into the laser cutter and position the red dot laser on the material where you want it to cut.
Moving the laser X, Y and Z axis can cause damage to the machine if you crash the laser head, gantry or bed into your materials.
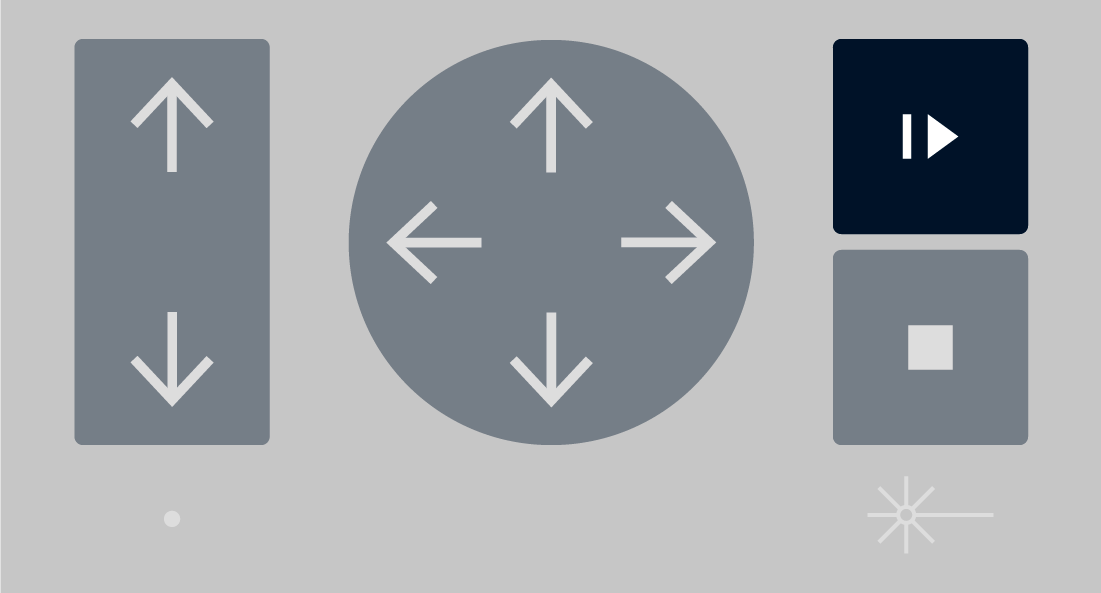
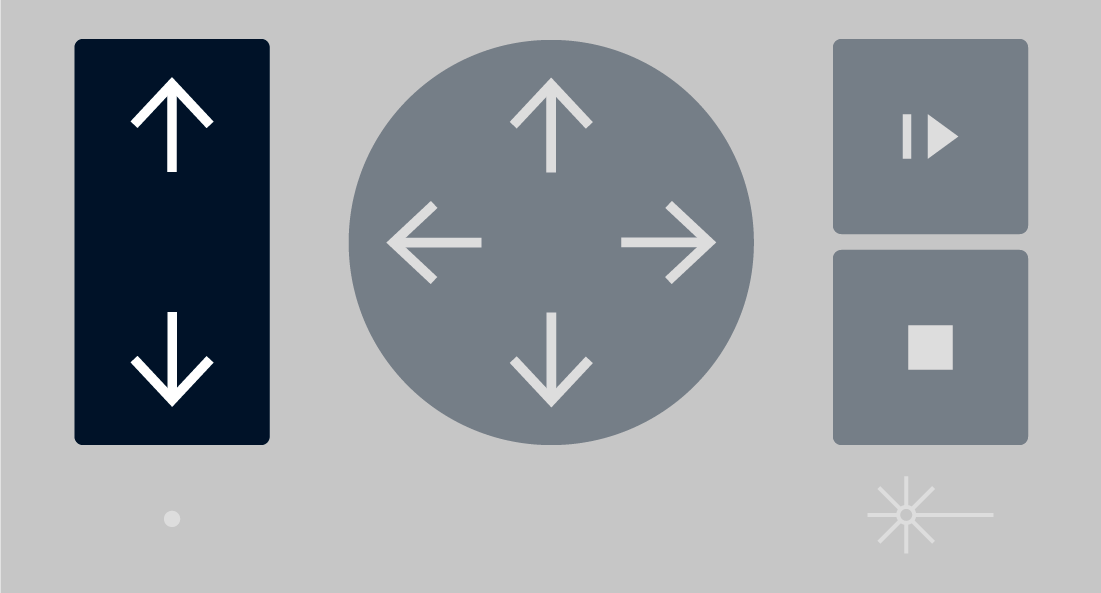
When the machine is on you can move the laser head around using the X and Y axis control buttons:
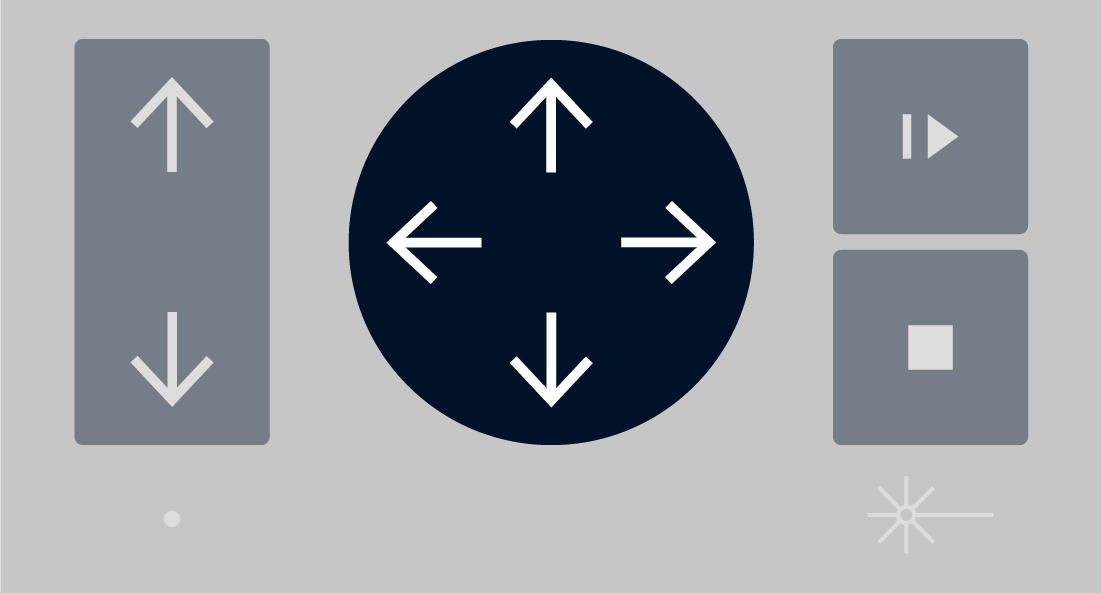
The red dot will be mirrored in the Prepare Screen by an icon, and you can position the design in relation to this icon, around any one of the 9 snappable positions around the bounding box of your design, most commonly people use the top left corner.
## What are X, Y & Z axis?
- X axis is the left to right movement of the laser head.
- Y axis is the backward and forward movement of the laser gantry.
- Z axis is the up and down movement of the laser bed.
# Selecting a material
Once you've got your design(s) laid out in the correct places you will need to set the material for the job.
You cannot have different materials for each design.
Select the material from the lower right corner, make sure you pick the exact material you have. The thickeness and the type are important.
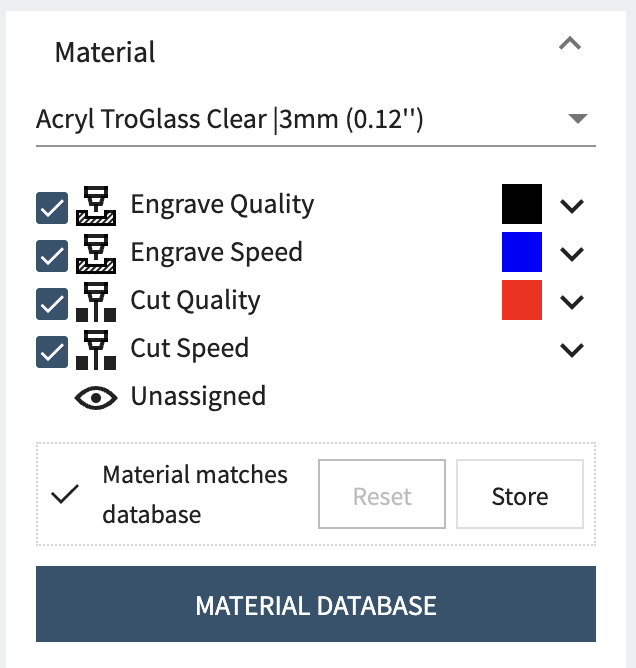
In this screenshot you can see we are using the black, blue and red colours but that the 4th "effect" is unassigned, this colour is RGB green `#00ff00` but was not included in our example design so it is shown as unassigned.
From this area you can also disable certain effects if you want to skip them by unchecking the boxes next to them.
## Tweaking effects
By clicking the dropdown icon to the right of an effect you can open the effect settings, this lets you get full control over the machines power, speed and other settings.
These settings are very granular, but we ask that you avoid adjusting without the support of a technician as there is a greater risk of fire or damage to the machine if you use these incorrectly.
# Queue the job
Once you are ready to send the job to the laser cutter press Queue, the machine won't start until you press the start button on the laser cutter.

# Ruby: Design Array
One of the most useful features in Ruby is the ability to automatically create a repeating grid from your design as a job. Trotec call this a Design Array, but you might also call it a grid, matrix or repeat.
When making a simple design like our key chain one of the most common things to do is to make lots of the, and it's also a really easy way to make a mistake as you copy and paste multiple files and have to update the duplicates too when any changes are made.
The Design Array feature in Ruby does this for you, allowing you to specify the number of repeats in an X and Y axis, as well as the spacing between them, the offset from any corner of the laser bed, and also an alternating offset which allows round objects to be interlaced to save space.
In this example you can see a 5x5 grid of our key chain design with a 5mm wide and tall margin from the bed, and from one design to the next:
# How to create a Design Array
1. Create a new job / open an existing job
2. Find the design in the left side bar.
3. Double click the arrow:
4. Choose your options:
5. Press Add
Now your Design Array is created. This is a one time process which means if you change the design or want to change the array parameters you'll need to start again.
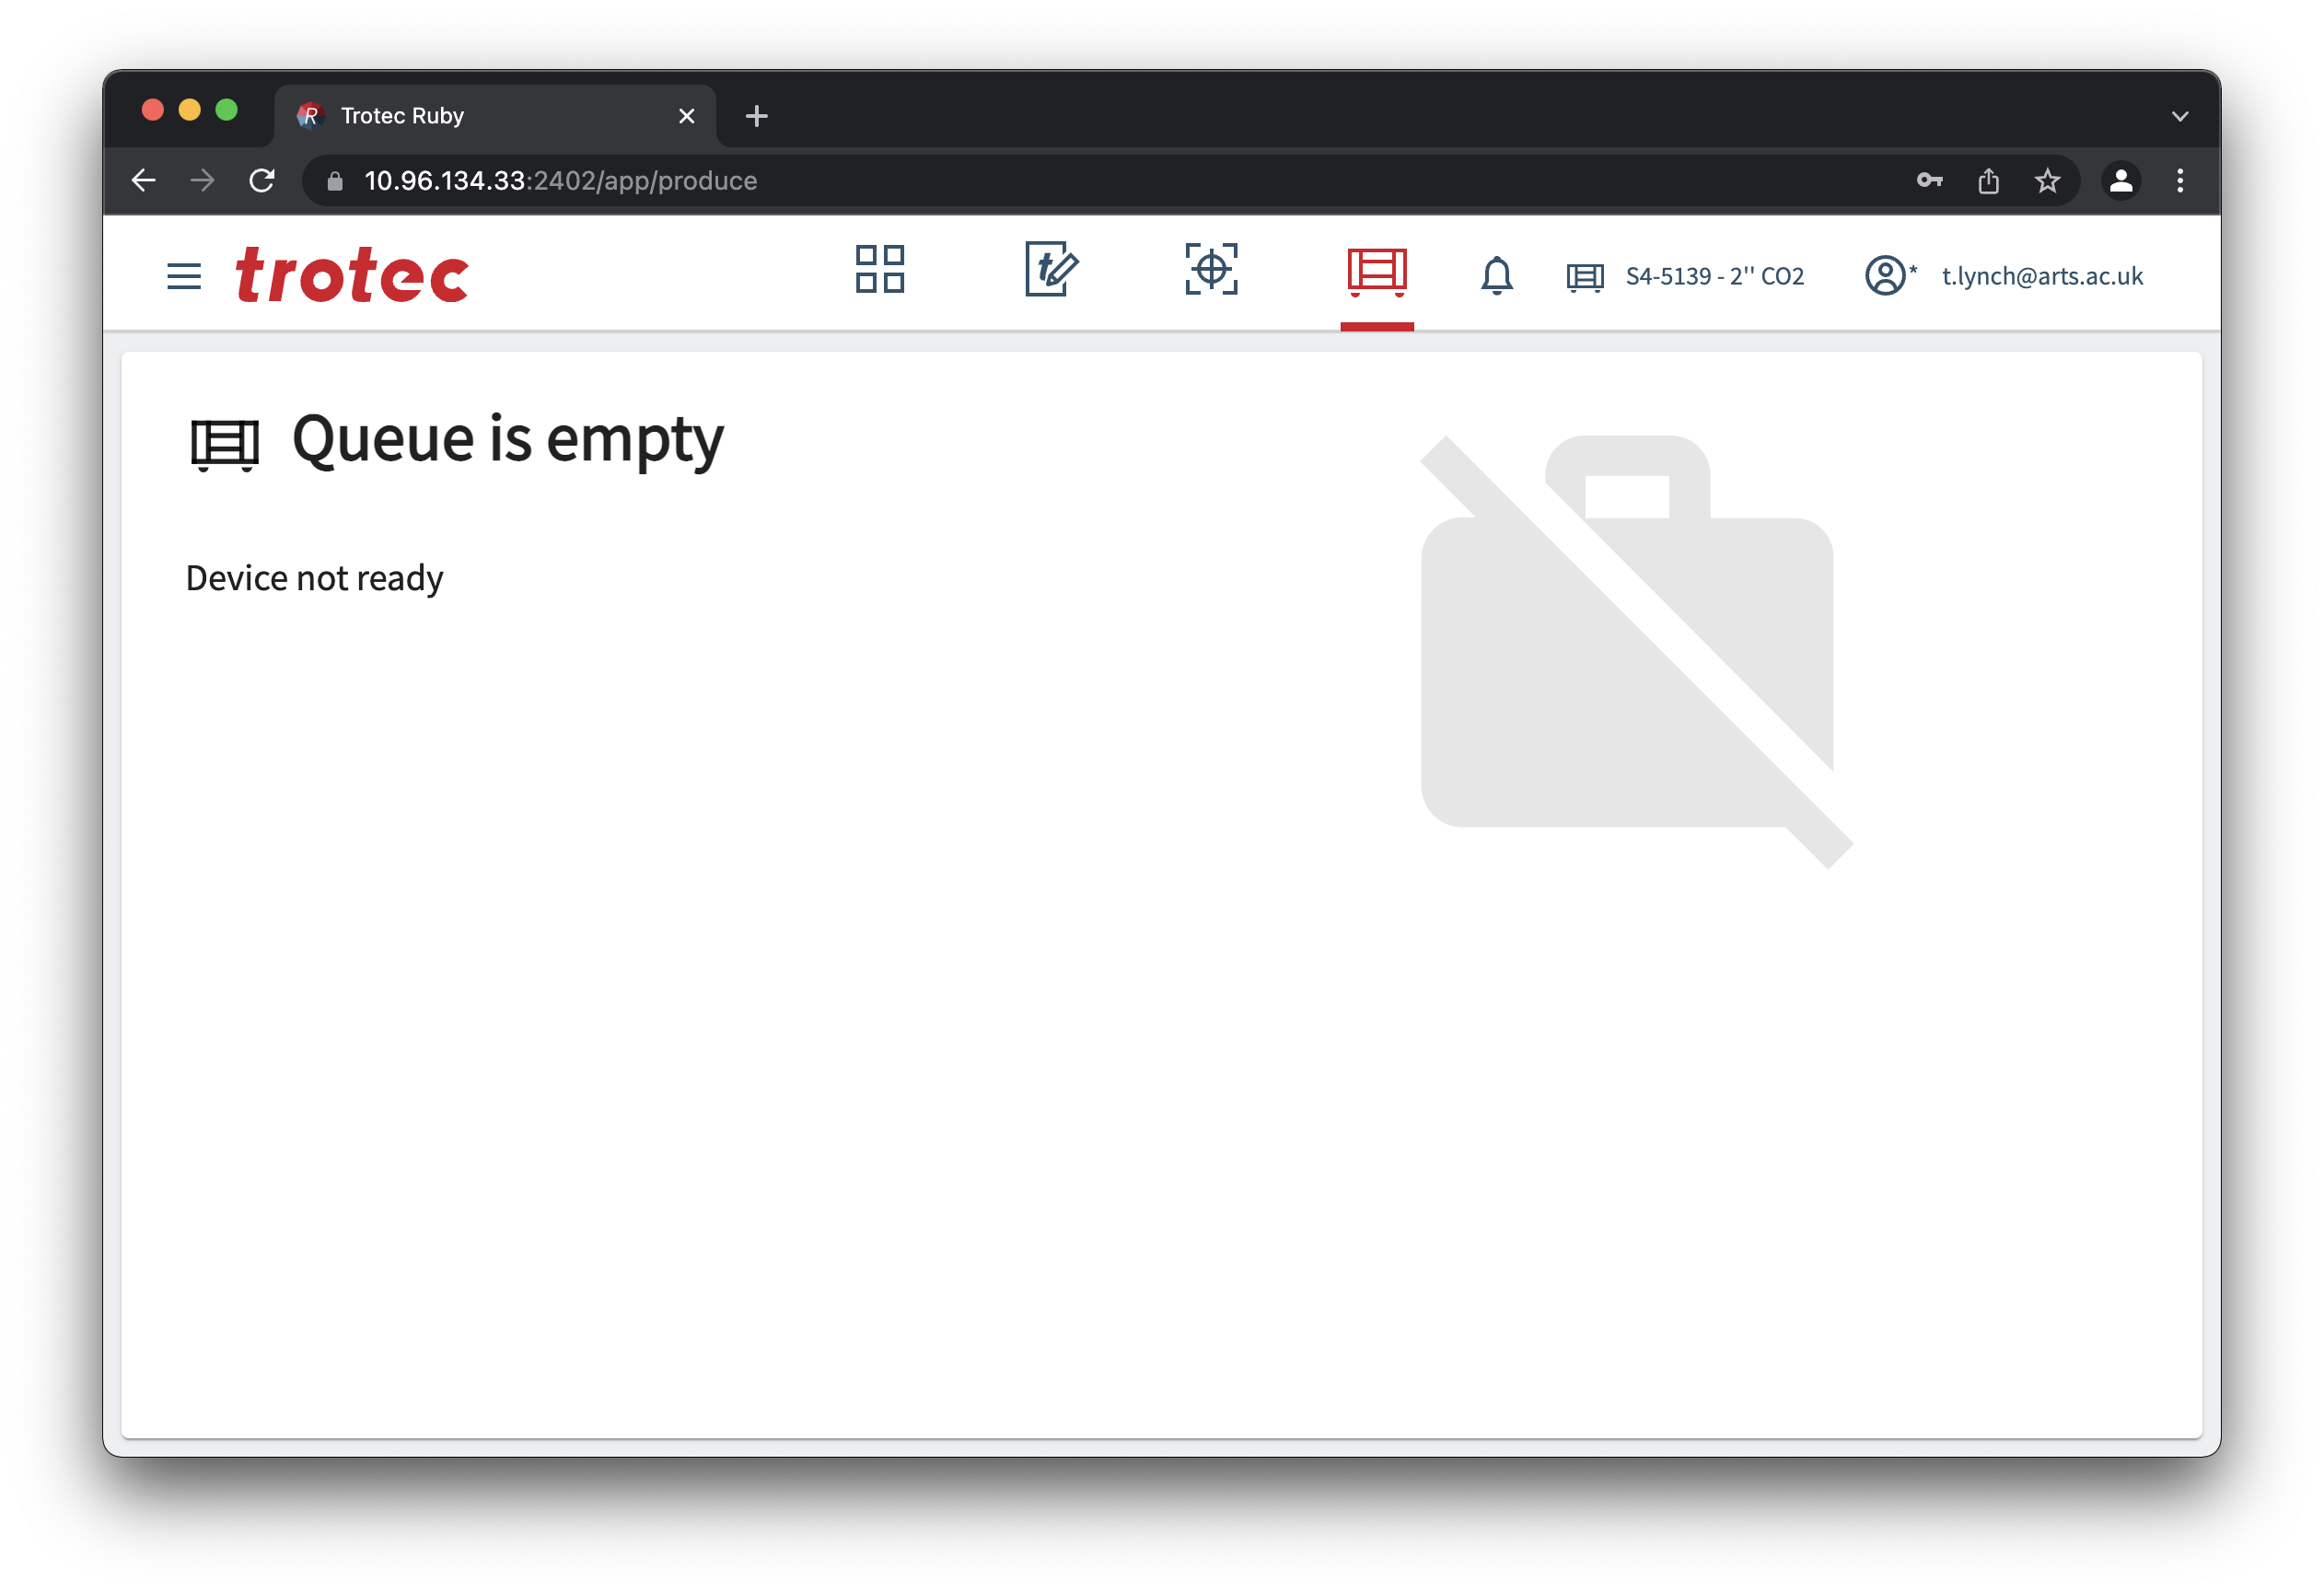
# Ruby: Produce Screen
On this screen you can see the queued jobs and monitor their progress remotely. This is useful if you are waiting for someone else to finish working.
This screen must not be used as a substitute for direct supervision of the laser cutter.
At the time of writing Ruby v2.1 shows play and stop icons which don't function on our type of machine, these should be ignored.
# Focusing the laser
Once your material has been put in, you need to focus the laser beam onto the surface of the material.
When focusing the laser cutter it's possible to damage the machine by running the laser head or X-axis arm into the material.
Operating the laser cutter out of focus increases the likelihood of fire and will result in poor cut quality.
There are 2 ways of doing this:
# Auto Focus
When using sheet materials like acrylic, wood, paper and fabric you can use auto focus, position the red dot over the material and press the up and down Z axis buttons on the keypad:
# Manual Focus
Manual focusing should be done when the material isn't flat.
To do this hang the focus tool off the left or right side of the laser head, and slowly nudge the Z axis upward until the tool is slightly displaced.
The laser focus tool should be stored in the maintenance box under the laser cutter.
# Running a job
Once you've designed, prepared and queued up your job it will appear on the touch screen ready to cut.
Before you press the run/start button check:
1. [Is the correct material selected in Ruby?](https://wiki.cci.arts.ac.uk/books/facilities/page/ruby-prepare-screen)
1. [Is this material approved for use?](https://wiki.cci.arts.ac.uk/books/facilities/page/laser-safe-materials)
1. [Is the laser focused?](https://wiki.cci.arts.ac.uk/books/facilities/page/focusing-the-laser)
Once you are certain, close the lid, and press the run/start button.

If there is an issue during the operation of the laser cutter you can stop the machine:
# Emergency stop
To stop the laser cutter in an emergency such as fire or other risk to yourself, others or the machine, any of these will work:
1. Press the red emergency stop button
1. Power off using the key
1. Power off with the red rotary isolator.
# Pause job
If you need to pause the job to move a piece of material press the run/pause button again, the machine will carry on for a few seconds until it can safely pause.
If you move the material the laser cutter will not track this, and you could ruin the job.
# Box maker software/apps
Any material box makers:
For cardbord boxes:
For any other boxes https://en.makercase.com
# Drawing Machine
We have an Evil Mad Scientist AxiDraw V3 A3 as well as a Silhouette Cameo 4, which you'll find under the vinyl cutter page.
# Using the AxiDraw V3 A3
We have a [Evil Mad Scientist AxiDraw V3 A3](https://wiki.evilmadscientist.com/AxiDraw) this machine can be used at no cost other than providing your own paper and pens. You will need to install the [AxiDraw software](https://wiki.evilmadscientist.com/Axidraw_Software_Installation), which works with Inkscape.
## Setup
The [Axidraw User Guide](https://wiki.evilmadscientist.com/AxiDraw_User_Guide) has full notes on setting up AxiDraw to use with Inkscape. I've added a condensed version here, but if you have issues it's worth trying out the full instructions first. It also has pictures!
1. Follow the instructions to install the [AxiDraw software](https://wiki.evilmadscientist.com/Axidraw_Software_Installation) and Inkscape 1.2
2. To check it's installed (re)open Inkscape and look in the 'Extensions' menu: you should see an 'Axidraw Control' option. Click on it and it should open the Axidraw Control menu
3. Use a micro USB to connect to the machine to your computer. The Axidraw also needs to be externally powered -- there should be one already with the machine, but if not it uses a 9V DC power supply with minumum 1.5A current draw. Please double-check the label on the power supply before plugging it in!
4. Before you add in the pen, use the 'setup' tab in the Axidraw Control
5. Screw the pen in 3-6mm above the page, and tape some paper to the desk (see 'understanding the layout' below to figure out how to align)
6. Now you can use the 'plot' tab in the Axidraw Control menu to print your file! start with something small to check it works
Failed to connect error If you are using a new mac (or a CCI mac) you might have USB accessories disabled. Choose the Apple menu > System Settings. Click Privacy & Security. Scroll down and click the pop-up menu next to "Allow accessories to connect". If you're on a CCI mac you will need a technician's help to authorise this!
### Understanding the Layout
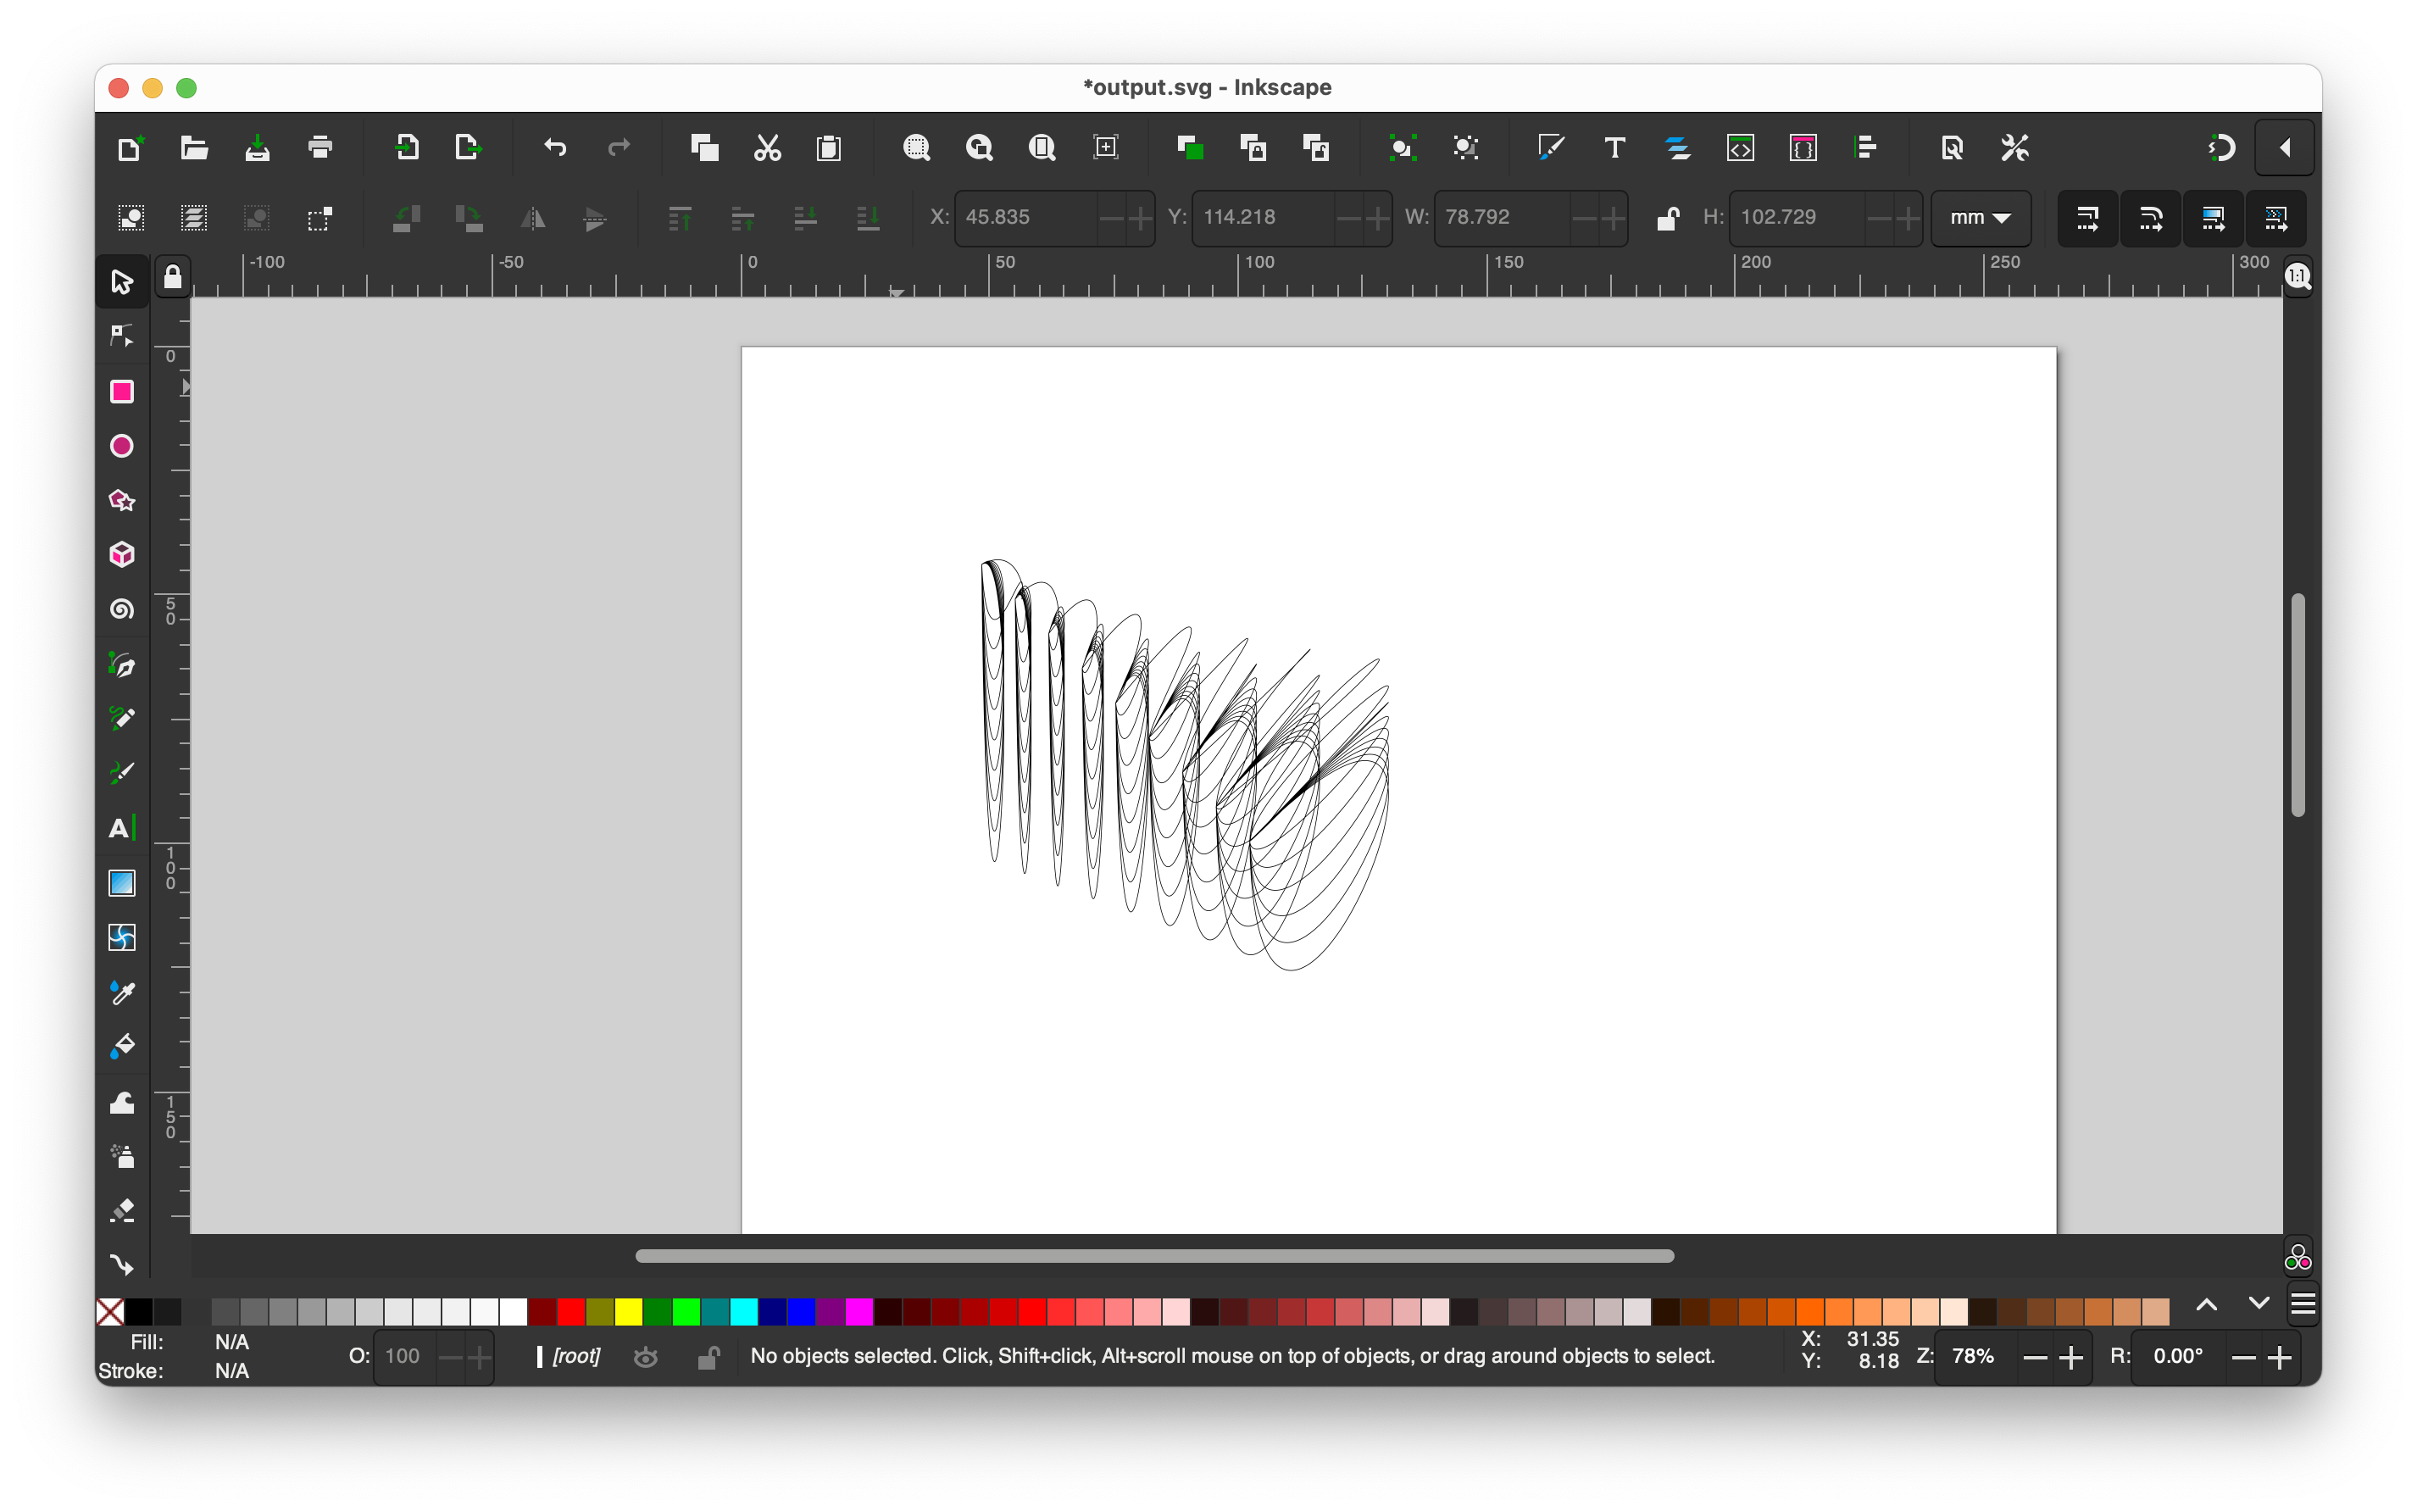
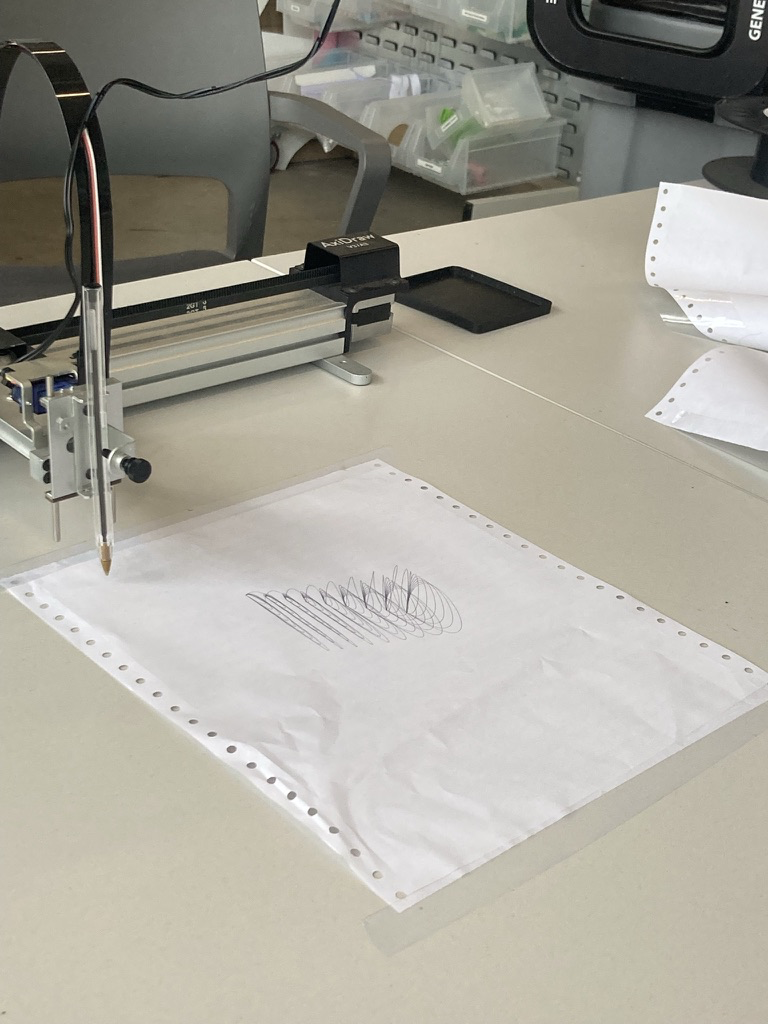
The top left-hand corner of the page you want to draw on should be aligned with the default position of the pen. The 'y-direction' is parallel to the arm that holds the pen; the x-direction is perpendicular to it. Here's a comparison of the output from the plotter vs what was on my computer:
To help yourself out with scale it's worth setting up Inkscape to use cm or mm by default, so you can get a sense for how large the output will be.
## Workflow: Processing to Axidraw
In order for the plotter to draw a file, it needs to be in SVG format. For this, we can use the Processing SVG library -- it comes installed with Processing already, so you don't need to download anything to use it.
Here's a little example file that draws a circle and saves it as 'circle.svg' in the same directory as the code. To change this code, add in whatever you'd like to draw instead of the circle.
```java
import processing.svg.*;
void setup() {
// Starting up, 500px canvas
size(500, 500);
beginRecord(SVG, "circle.svg");
// only want to draw once
noLoop();
}
void draw() {
//we only want an outline
noFill();
//draw a circle in the centre of the canvas
circle(250, 250, 250);
// save our SVG file
endRecord();
}
```
### Alternative interfaces
There are some other interfaces to Axidraw -- if you try one out let
- [CLI API](https://axidraw.com/doc/cli_api/#introduction)
- [Python API](https://axidraw.com/doc/py_api/#introduction)
- [Processing and Axidraw](https://www.generativehut.com/post/axidraw-processing) (this I think is just the same SVG setup described above, but with some extra bits, still worth a read if you're interested though)
- [R Direct drive](https://rdrr.io/github/thomasp85/fawkes/man/axi_manual.html)
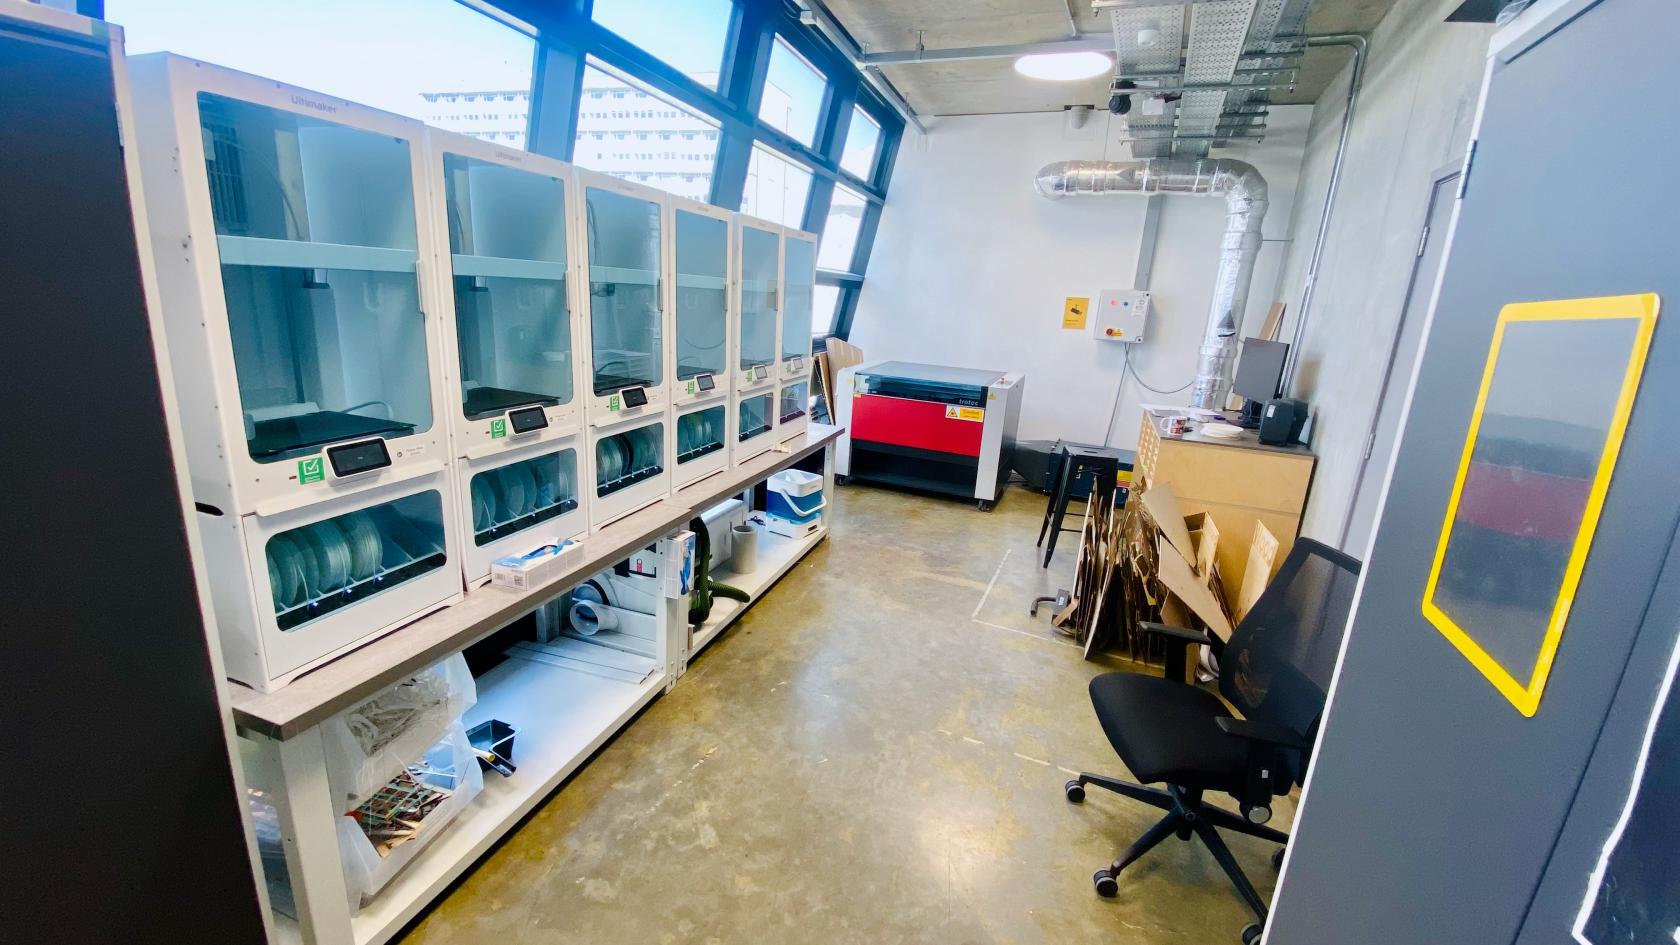

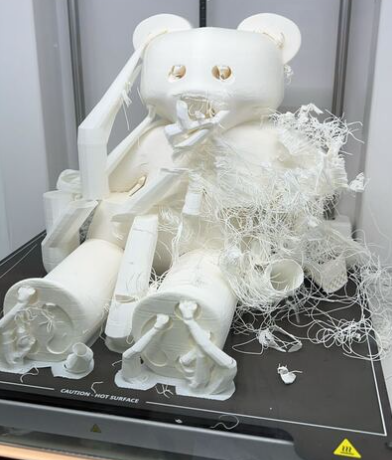
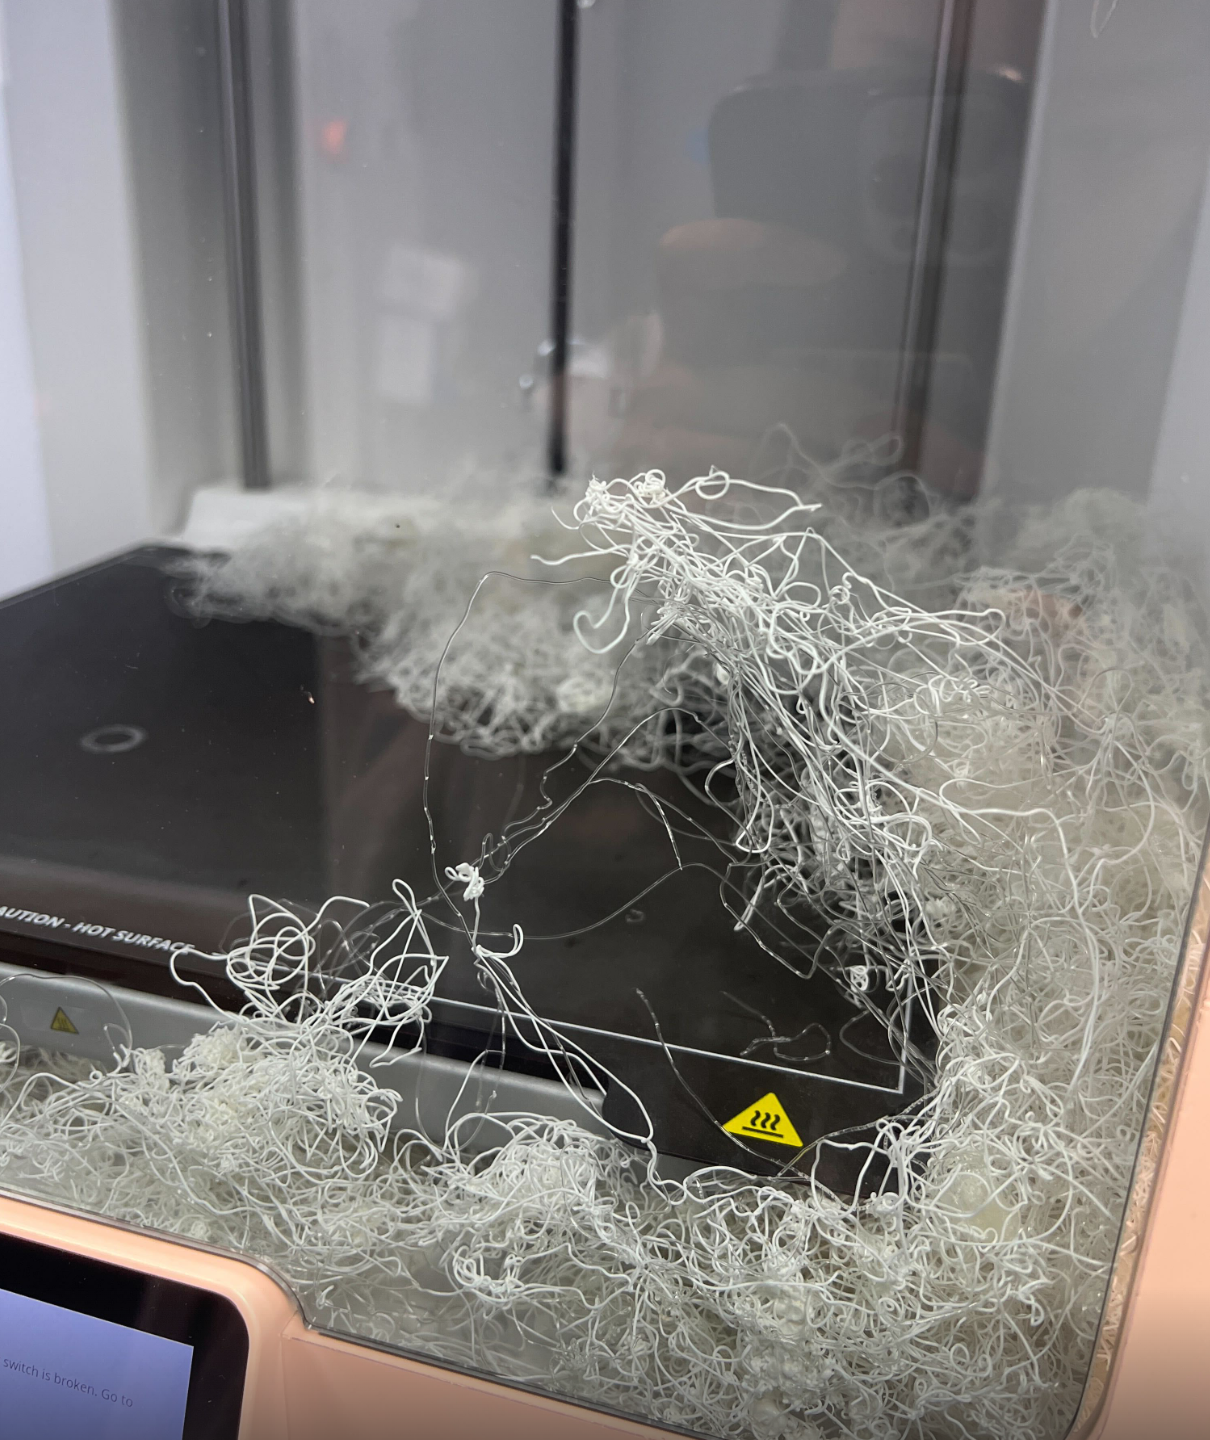
 3. **Gloves on** if touching the plate; grease prevents adhesion.
4. **Clear stray filament** around the plate before and after printing.
3. **Gloves on** if touching the plate; grease prevents adhesion.
4. **Clear stray filament** around the plate before and after printing.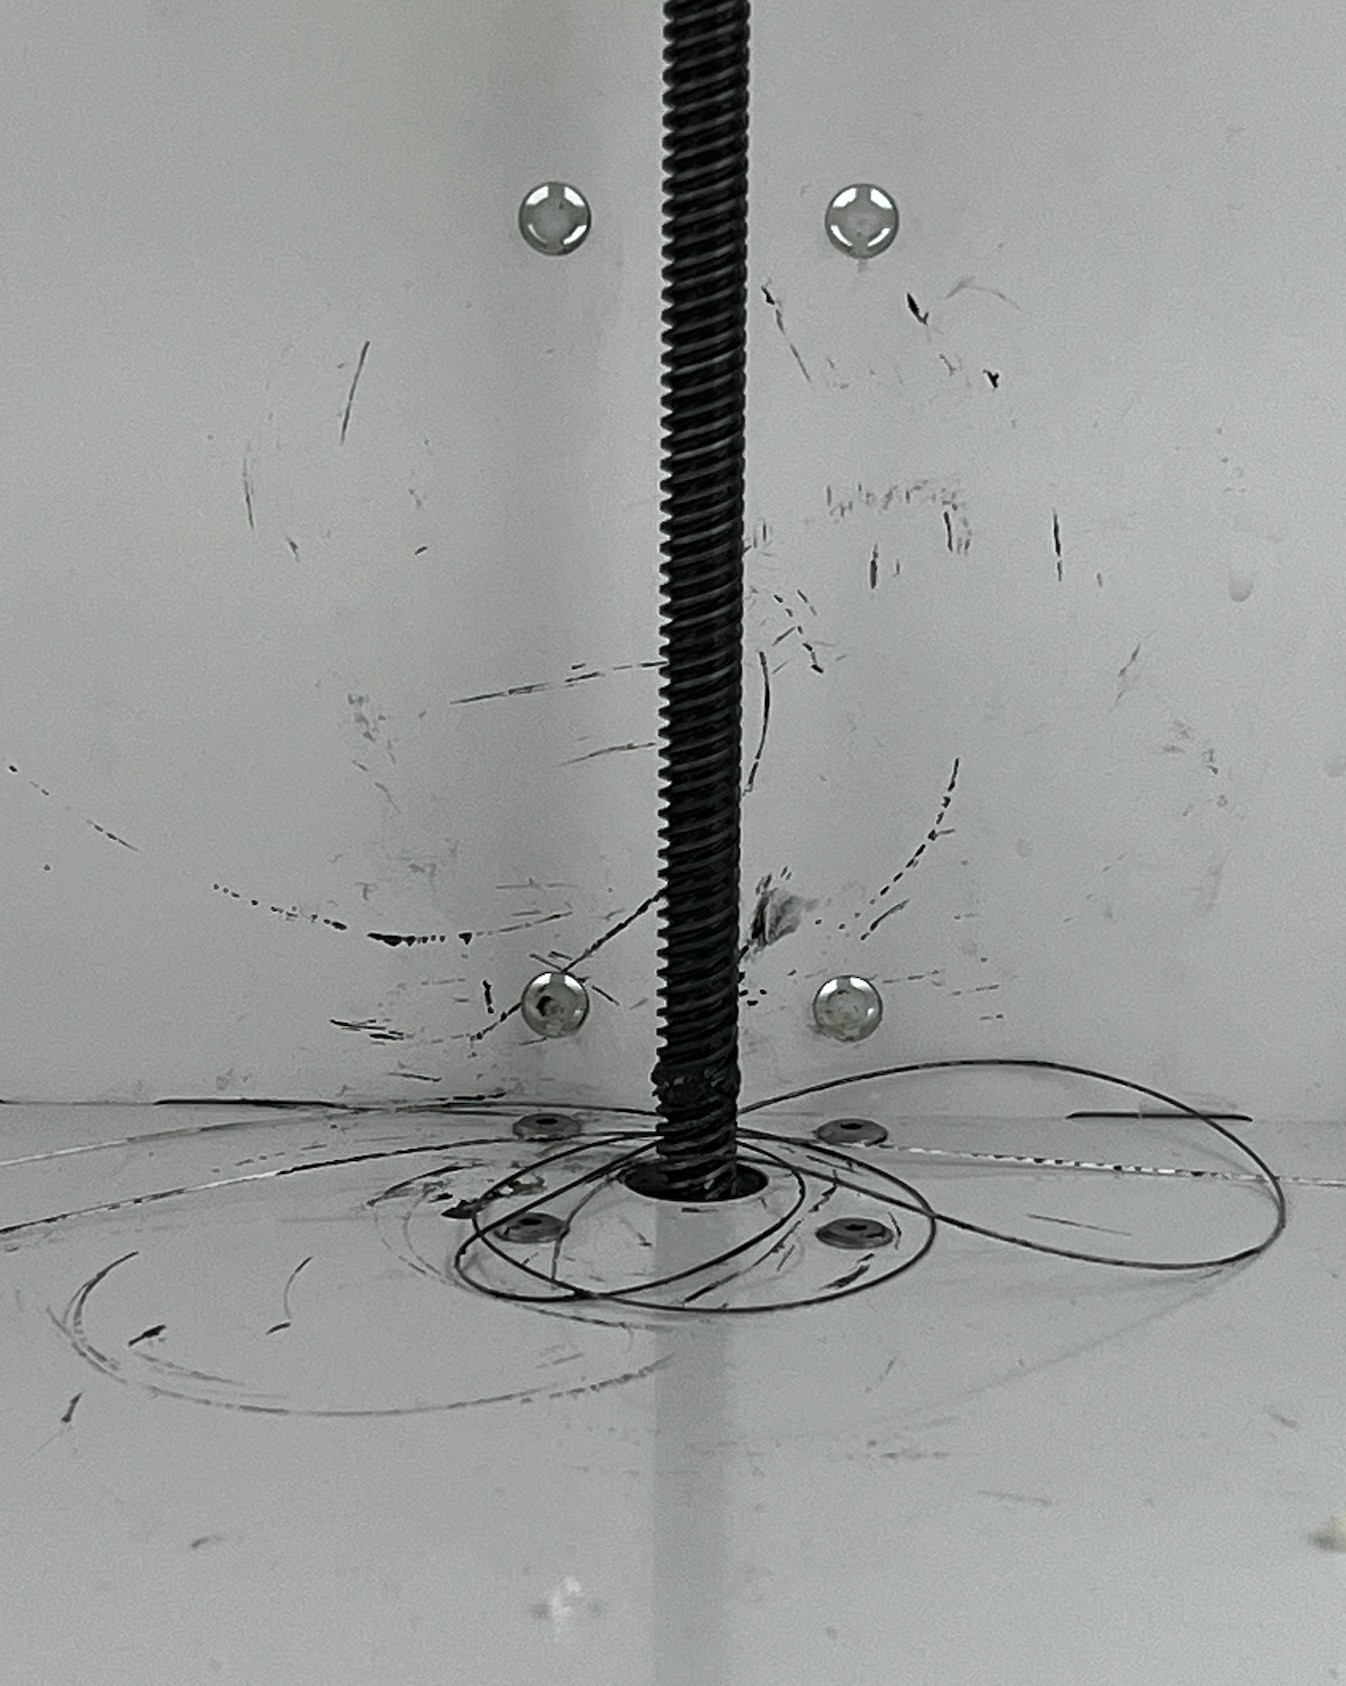


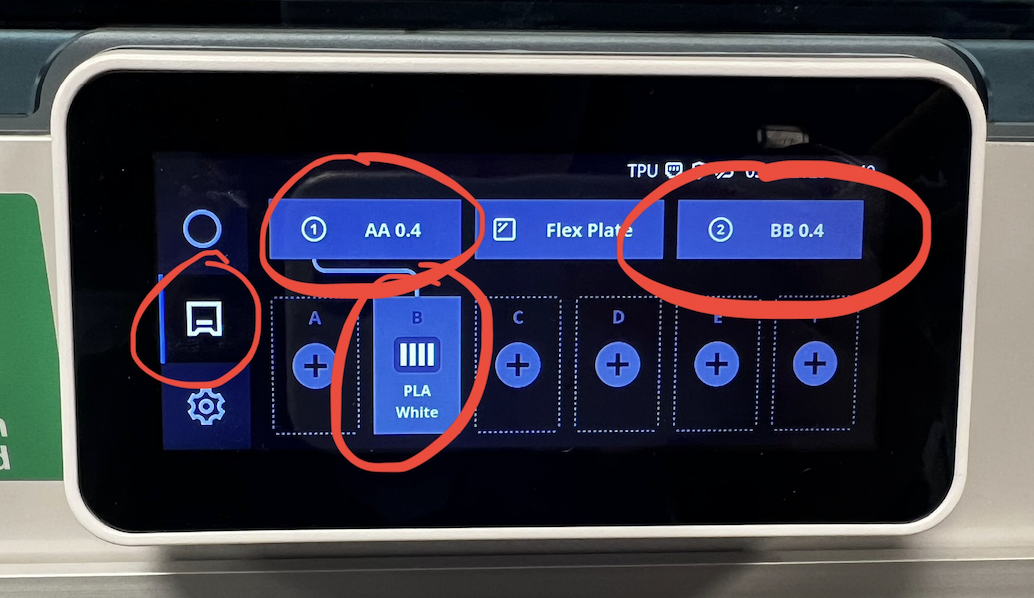
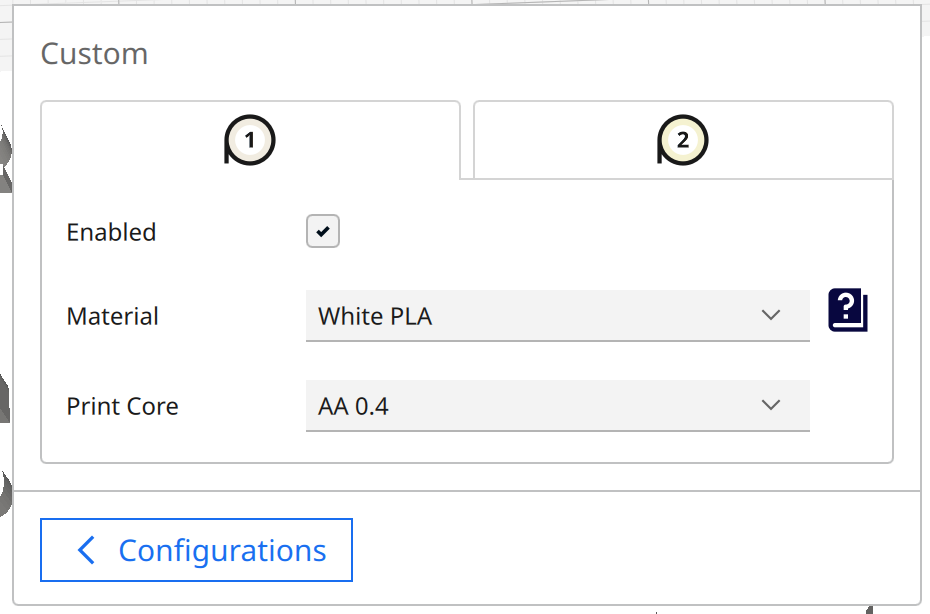
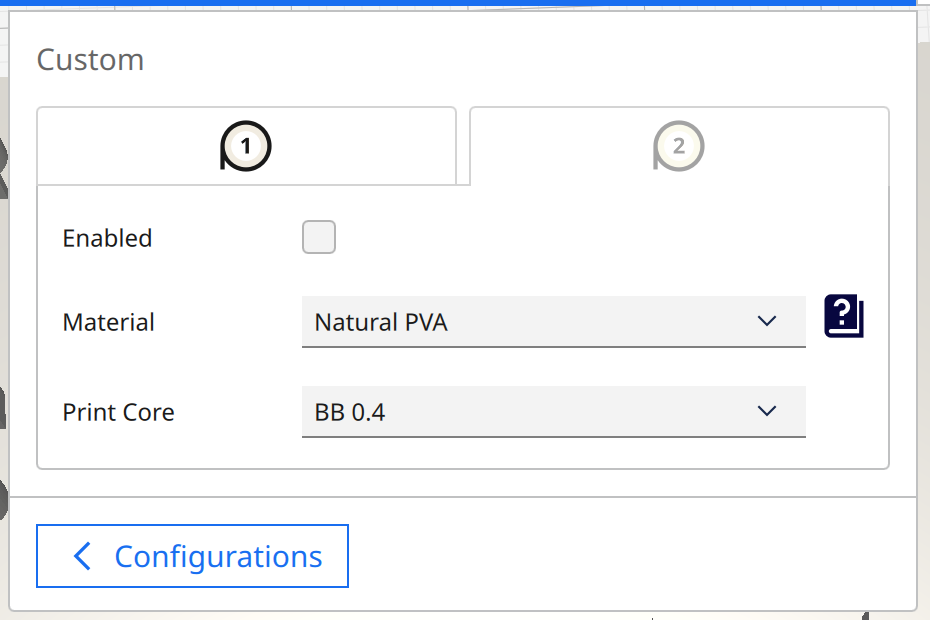
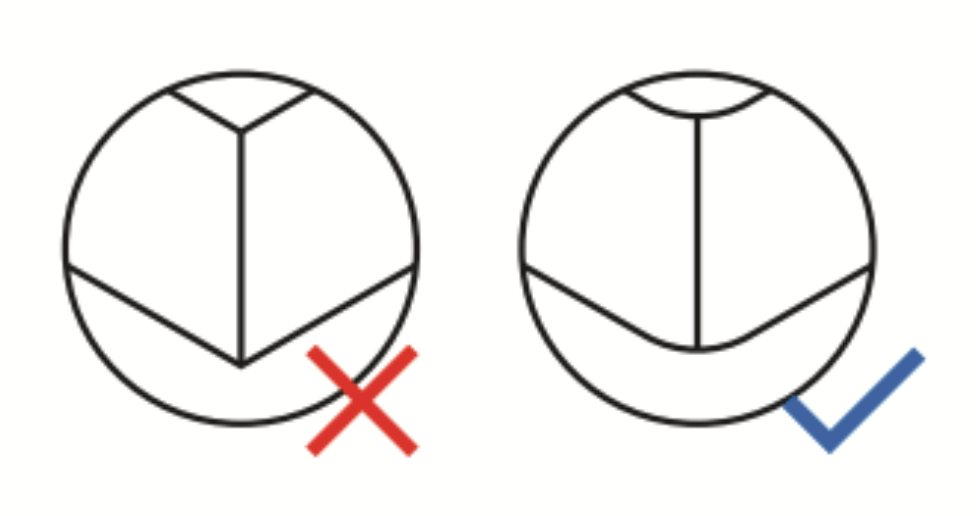
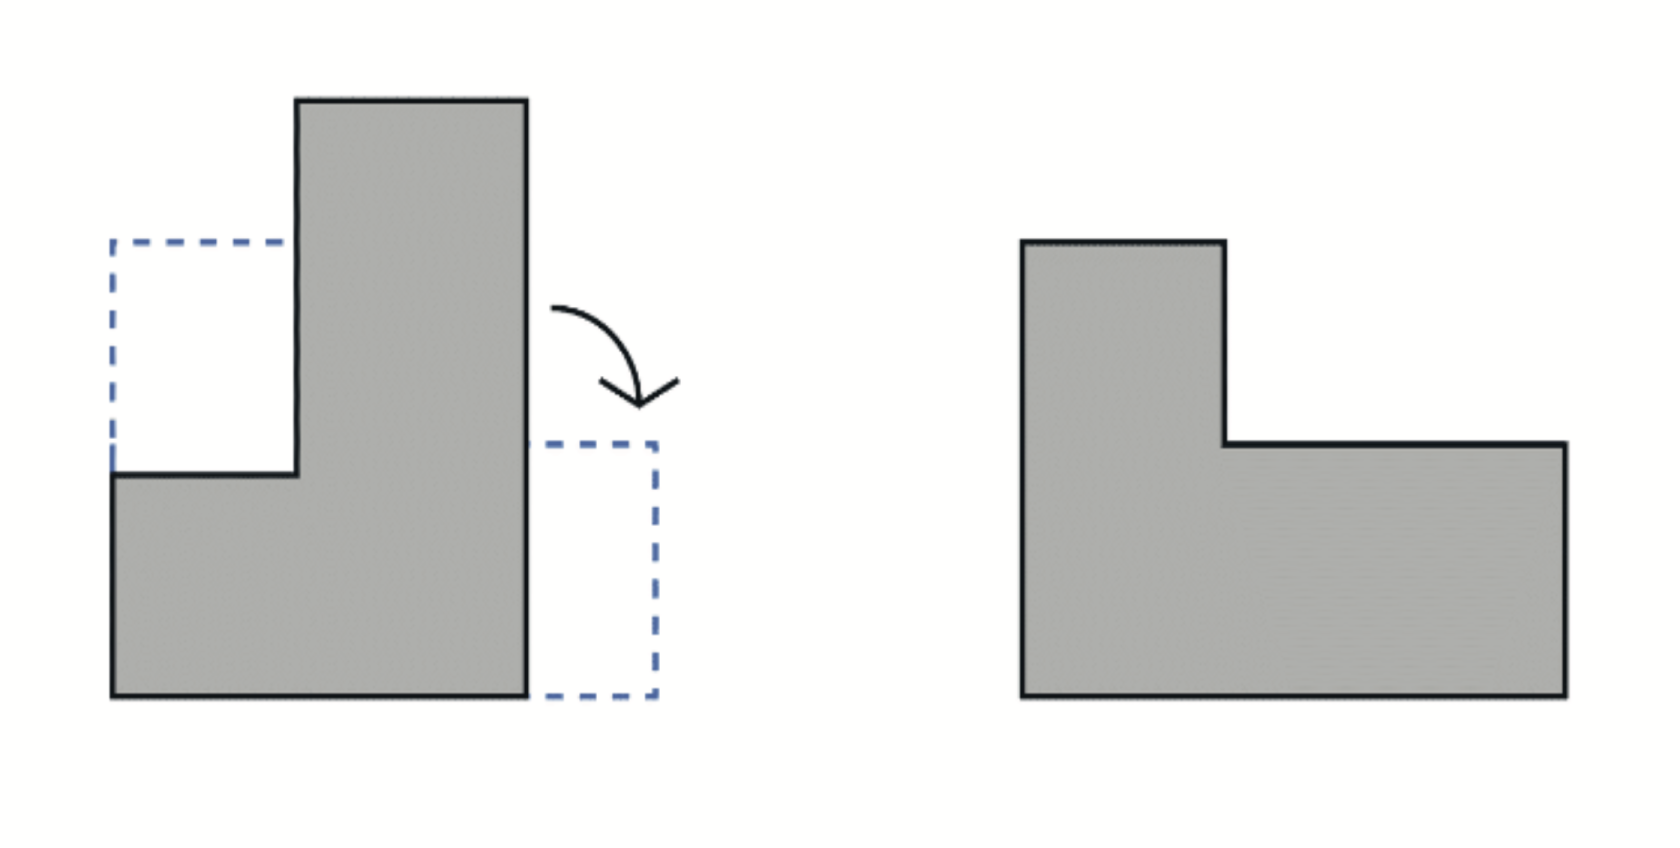
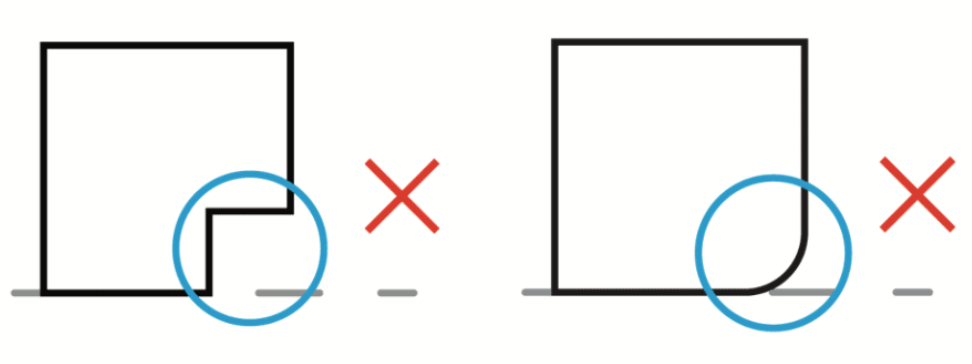
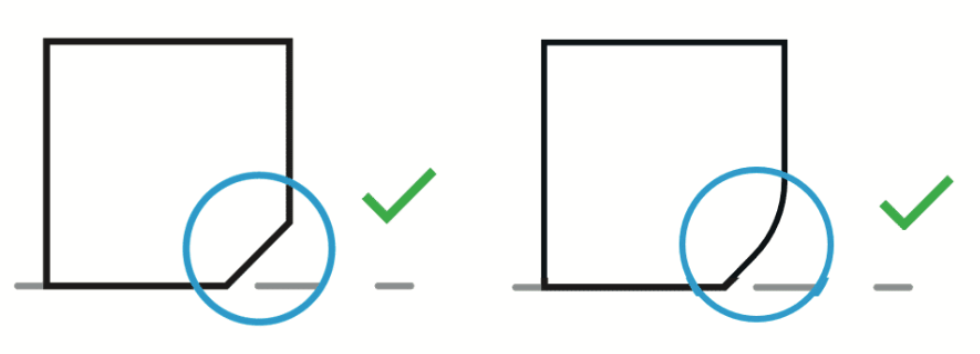

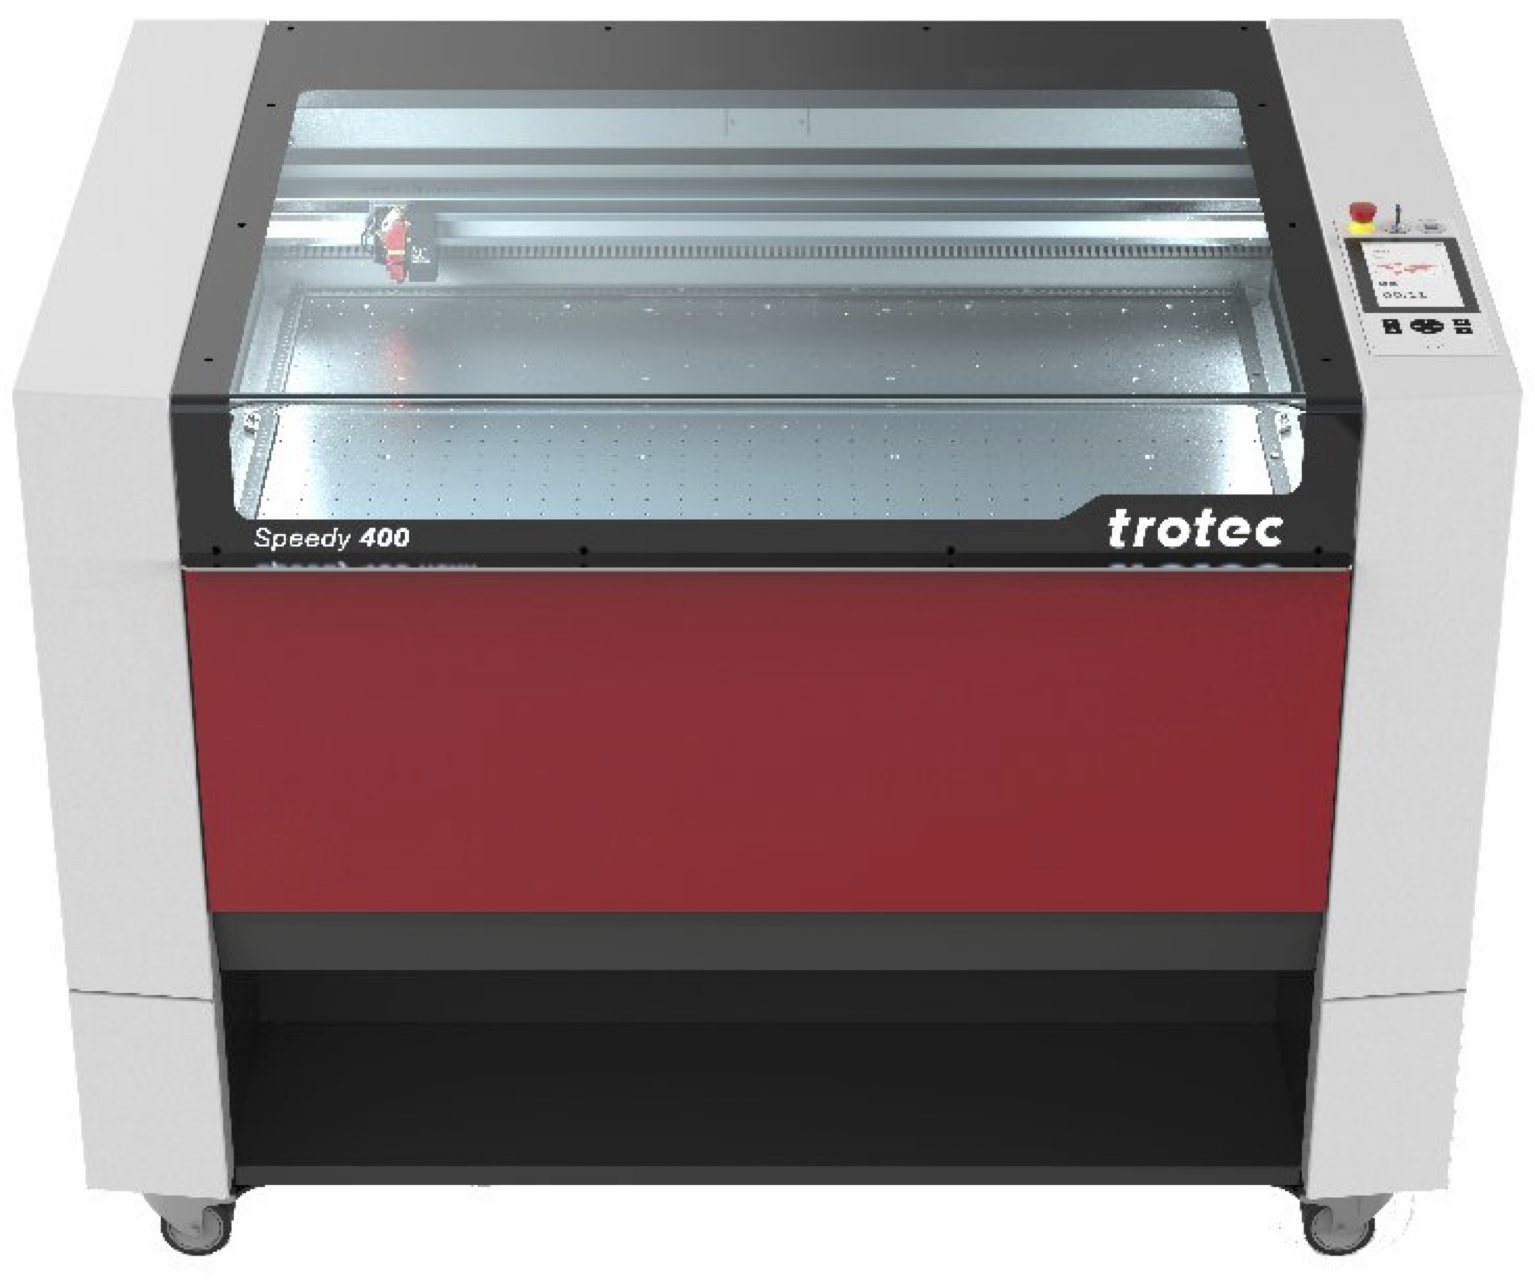 The use of the laser cutter is free to use for [all authorised users](https://wiki.cci.arts.ac.uk/books/about/page/who-can-access-cci-technical-resources), however it should only be used for projects directly related to your study and/or research at UAL.
 **[Design](https://wiki.cci.arts.ac.uk/books/facilities/page/ruby-design-screen)** – The design screen is where you can make or edit designs, the typical workflow is to create the file in another program such as Adobe Illustrator and then send the design to the prepare screen.
 **[Prepare](https://wiki.cci.arts.ac.uk/books/facilities/page/ruby-prepare-screen)** – The prepare screen is where multiple designs can be combined into a single job on the laser bed.
 **[Produce](https://wiki.cci.arts.ac.uk/books/facilities/page/ruby-produce-screen)** – The produce screen is where you can queue, reorder and view running jobs.
## Sidebar
Like man web applications Ruby has a side bar which is opened by clicking the hamburger menu to the left of the Trotec logo.
- **[Manage](https://wiki.cci.arts.ac.uk/books/facilities/page/ruby-manage-screen), [Design](https://wiki.cci.arts.ac.uk/books/facilities/page/ruby-design-screen), [Prepare](https://wiki.cci.arts.ac.uk/books/facilities/page/ruby-prepare-screen) and [Produce](https://wiki.cci.arts.ac.uk/books/facilities/page/ruby-produce-screen)** - These are repeated from the top bar.
- **[Materials](https://wiki.cci.arts.ac.uk/books/facilities/page/ruby-materials-screen)** - This is where you can view, create, edit and delete material and settings.
- **User management** - This is for administrators only, do not enter this area.
- **Settings** - This is for administrators only, do not enter this area.
- **Ideas** - This is where you can send suggestions to Trotec for improvements to Ruby.
- **Knowledge base** - This is where you can find help around using Ruby direct from Trotec.
- **Service File** - This is for administrators only, do not click this option.
- **Manuals** – This is where you can find the manual for all Trotec laser cutters.
# How to trust Trotec Ruby certificate on Windows 10
This guide will show you how to trust the Trotec Ruby certificate on Windows 10 to avoid security warnings.
1. [Download the certificate](http://10.96.134.33:5000/certificate) (Right click, Save As)
2. Locate the `TrotecRubyCA.crt` file in your downloads and open it.
3. Windows will ask you to confirm if you want to open the file, press open.
[](https://wiki.cci.arts.ac.uk/uploads/images/gallery/2022-01/Hb8KzSZAGzMilYMK-image-1642629822034.png)
4. Windows will show you the details of this security certificate and say it is not trusted. This is because the certificate is issued by Trotec, rather than a global certificate authority. This normal and the certificate should still be installed.
[](https://wiki.cci.arts.ac.uk/uploads/images/gallery/2022-01/Yb6g8qrCugGeafHI-image-1642629878567.png)
5. Install the certificate on the "Local Machine" and press Next.
[](https://wiki.cci.arts.ac.uk/uploads/images/gallery/2022-01/Z20MFNbt4xDA377r-image-1642631116315.png)
6. Click "Place all certificates in the following store" and select browse.
[](https://wiki.cci.arts.ac.uk/uploads/images/gallery/2022-01/NuBB7ot5xGj8VQWY-image-1642630085680.png)
7. Select "Trusted Root Certification Authorities" and press OK.
[](https://wiki.cci.arts.ac.uk/uploads/images/gallery/2022-01/La6KqhogM0DuOOKr-image-1642630759903.png)
8. Press next.
[](https://wiki.cci.arts.ac.uk/uploads/images/gallery/2022-01/CW84Xp4pdbYKNyvy-image-1642630711613.png)
9. Press finish to complete the installation of the certificate.
[](https://wiki.cci.arts.ac.uk/uploads/images/gallery/2022-01/SHcEJwoXVJQgxQde-image-1642630151775.png)
10. Windows will take a few moments and then confirm the outcome. You can now press okay to this prompt and close the certificate information window.
[](https://wiki.cci.arts.ac.uk/uploads/images/gallery/2022-01/VNYmdgm2TpNUIJR8-image-1642630179939.png)
11. Reboot your computer.
# How to trust Trotec Ruby certificate on macOS
This guide will show you how to trust the Trotec Ruby certificate on macOS to avoid security warnings.
1. [Download the certificate](http://10.96.134.33:5000/certificate) (Right click, Save As)
2. Locate the `TrotecRubyCA.crt` file in your downloads and open it.
3. macOS will ask if you want to add the certificate to the Keychain. Ensure "login" is selected and press "Add".
[](https://wiki.cci.arts.ac.uk/uploads/images/gallery/2022-01/u7bXNjJsmWjJePzn-screenshot-2022-01-19-at-22-37-07.png)
4. In the main Keychain app window select "login" on the left, then search for "Trotec" in the top right corner.
[](https://wiki.cci.arts.ac.uk/uploads/images/gallery/2022-01/ZbAbtrkHGiIqC80O-screenshot-2022-01-19-at-22-37-47.png)
5. Double click on the "Trotec Ruby CA RUBY-G6AUHVM" certificate and expand the "Trust" section. Set "Secure Sockets Layer (SSL)" to "Always Trust"
[](https://wiki.cci.arts.ac.uk/uploads/images/gallery/2022-01/8PaQNbtuH9jFnI2k-screenshot-2022-01-19-at-22-38-00.png)
6. Close the window to save, and confirm with your admin password or Touch ID.
7. Reboot your computer.
# Ruby: Manage Screen
The manage view allows you to open, delete or upload files as well as organise them, we'll start by uploading a file.
# Uploading a file
In Ruby switch to the manage screen and drag and drop the file(s) onto the dropzone:

Alternatively click the "Import File" icon and find the file(s) in the pop up dialog:

# Open a design
After your file is uploaded to Ruby it becomes part of a new design. You can see a small preview in your list of designs that you can open in the [Design Screen](https://wiki.cci.arts.ac.uk/books/facilities/page/ruby-design-screen) by double clicking, delete or download by clicking the relivent icons next to the design.

# Ruby: Design Screen
Once you open the design in Design Screen you should see the artwork you've created. You will be able to see artboard size, as well as all the colours and lines were all retained.

The design screen is split into 3 columns:
- Left: Design browser
- Middle: Work area
- Top: Toolbar
- Bottom: Work area
- Right
- Top: Design name and tags
- Middle: Object parameters
- Bottom: Layers
# Toolbar

- **New design** - Create a new design.
- **Import design** - Upload a file from your computer.
- **Save** - Save the open design. *Greyed out means there are no changes to save.*
- **Save as new** - Save the open design as a new design.
- **Generate stamp** - Convert the open design into a stamp as a new design.
- **Select objects** - Switches the active tool select objects.
- **Draw shape** - Switches the active tool to draw the selected shape.
- **Add image to design** - Allows you to insert an image into your design from your computer.
- **Undo/redo** - Undo the previous action or redo it. *Greyed out means there are no further undo/redo steps available.*
- **Fit to design** - Shrinks the artboard to the smallest size that encompases all design elements.
- **Zoom controls** - Zooms the viewport in and out on the design.
- **Zoom selection** - Lets you draw a selection box to zoom into.
- **Boolean shape** - Allows you to Union, Intersect, Difference, or Exclusion vector shapes.
- **Snapping** - Toggle object snapping.
- **Outline scaling** - *We're not sure what this does yet!*
# Fit to Design
As we created the whole design in Illustrator already the only thing we would probably want to do is reduce the size of the artboard to the design.
We could do this in Illustrator but Ruby offers a tool to do it automatically by selecting "Fit to design" in the toolbar which will prompt you for a margin size, we'll leave this as 0.00mm and click "Fit to design":

After you'll see the white area of your artboard has been made to perfectly fit the design we created, this might seem like a simple task, but it makes it easy to tightly pack multiple designs onto a piece of material.

# Check your layers
As we've already setup the original file with 3 primary RGB colours and it's a simple design there should be 3 layers.
Layers are different in Ruby to most drawing packages, they're basically a way of defining multiple tasks for the laser cutter, for example:
1. Etch the black area
2. Engrave the blue line
3. Cut the red line

## Changing colours / Merging layers
If any object is the wrong colour you can select it by clicking the object on screen or in the layers, you can select multiple by pressing Command or Control and clicking each object. Or you can select all objects in a layer by pressing the tickbox next to that layer in the layers area.
Once you've selected the object(s) you can change the colour by selecting from those listed:

# Create Job
Once the design(s) are complete you can click "Create Job" to move to the [Prepare Screen](https://wiki.cci.arts.ac.uk/books/facilities/page/ruby-prepare-screen).

# Powering on the laser cutter
**[Produce](https://wiki.cci.arts.ac.uk/books/facilities/page/ruby-produce-screen)** – The produce screen is where you can queue, reorder and view running jobs.
## Sidebar
Like man web applications Ruby has a side bar which is opened by clicking the hamburger menu to the left of the Trotec logo.
- **[Manage](https://wiki.cci.arts.ac.uk/books/facilities/page/ruby-manage-screen), [Design](https://wiki.cci.arts.ac.uk/books/facilities/page/ruby-design-screen), [Prepare](https://wiki.cci.arts.ac.uk/books/facilities/page/ruby-prepare-screen) and [Produce](https://wiki.cci.arts.ac.uk/books/facilities/page/ruby-produce-screen)** - These are repeated from the top bar.
- **[Materials](https://wiki.cci.arts.ac.uk/books/facilities/page/ruby-materials-screen)** - This is where you can view, create, edit and delete material and settings.
- **User management** - This is for administrators only, do not enter this area.
- **Settings** - This is for administrators only, do not enter this area.
- **Ideas** - This is where you can send suggestions to Trotec for improvements to Ruby.
- **Knowledge base** - This is where you can find help around using Ruby direct from Trotec.
- **Service File** - This is for administrators only, do not click this option.
- **Manuals** – This is where you can find the manual for all Trotec laser cutters.
# How to trust Trotec Ruby certificate on Windows 10
This guide will show you how to trust the Trotec Ruby certificate on Windows 10 to avoid security warnings.
1. [Download the certificate](http://10.96.134.33:5000/certificate) (Right click, Save As)
2. Locate the `TrotecRubyCA.crt` file in your downloads and open it.
3. Windows will ask you to confirm if you want to open the file, press open.
[](https://wiki.cci.arts.ac.uk/uploads/images/gallery/2022-01/Hb8KzSZAGzMilYMK-image-1642629822034.png)
4. Windows will show you the details of this security certificate and say it is not trusted. This is because the certificate is issued by Trotec, rather than a global certificate authority. This normal and the certificate should still be installed.
[](https://wiki.cci.arts.ac.uk/uploads/images/gallery/2022-01/Yb6g8qrCugGeafHI-image-1642629878567.png)
5. Install the certificate on the "Local Machine" and press Next.
[](https://wiki.cci.arts.ac.uk/uploads/images/gallery/2022-01/Z20MFNbt4xDA377r-image-1642631116315.png)
6. Click "Place all certificates in the following store" and select browse.
[](https://wiki.cci.arts.ac.uk/uploads/images/gallery/2022-01/NuBB7ot5xGj8VQWY-image-1642630085680.png)
7. Select "Trusted Root Certification Authorities" and press OK.
[](https://wiki.cci.arts.ac.uk/uploads/images/gallery/2022-01/La6KqhogM0DuOOKr-image-1642630759903.png)
8. Press next.
[](https://wiki.cci.arts.ac.uk/uploads/images/gallery/2022-01/CW84Xp4pdbYKNyvy-image-1642630711613.png)
9. Press finish to complete the installation of the certificate.
[](https://wiki.cci.arts.ac.uk/uploads/images/gallery/2022-01/SHcEJwoXVJQgxQde-image-1642630151775.png)
10. Windows will take a few moments and then confirm the outcome. You can now press okay to this prompt and close the certificate information window.
[](https://wiki.cci.arts.ac.uk/uploads/images/gallery/2022-01/VNYmdgm2TpNUIJR8-image-1642630179939.png)
11. Reboot your computer.
# How to trust Trotec Ruby certificate on macOS
This guide will show you how to trust the Trotec Ruby certificate on macOS to avoid security warnings.
1. [Download the certificate](http://10.96.134.33:5000/certificate) (Right click, Save As)
2. Locate the `TrotecRubyCA.crt` file in your downloads and open it.
3. macOS will ask if you want to add the certificate to the Keychain. Ensure "login" is selected and press "Add".
[](https://wiki.cci.arts.ac.uk/uploads/images/gallery/2022-01/u7bXNjJsmWjJePzn-screenshot-2022-01-19-at-22-37-07.png)
4. In the main Keychain app window select "login" on the left, then search for "Trotec" in the top right corner.
[](https://wiki.cci.arts.ac.uk/uploads/images/gallery/2022-01/ZbAbtrkHGiIqC80O-screenshot-2022-01-19-at-22-37-47.png)
5. Double click on the "Trotec Ruby CA RUBY-G6AUHVM" certificate and expand the "Trust" section. Set "Secure Sockets Layer (SSL)" to "Always Trust"
[](https://wiki.cci.arts.ac.uk/uploads/images/gallery/2022-01/8PaQNbtuH9jFnI2k-screenshot-2022-01-19-at-22-38-00.png)
6. Close the window to save, and confirm with your admin password or Touch ID.
7. Reboot your computer.
# Ruby: Manage Screen
The manage view allows you to open, delete or upload files as well as organise them, we'll start by uploading a file.
# Uploading a file
In Ruby switch to the manage screen and drag and drop the file(s) onto the dropzone:

Alternatively click the "Import File" icon and find the file(s) in the pop up dialog:

# Open a design
After your file is uploaded to Ruby it becomes part of a new design. You can see a small preview in your list of designs that you can open in the [Design Screen](https://wiki.cci.arts.ac.uk/books/facilities/page/ruby-design-screen) by double clicking, delete or download by clicking the relivent icons next to the design.

# Ruby: Design Screen
Once you open the design in Design Screen you should see the artwork you've created. You will be able to see artboard size, as well as all the colours and lines were all retained.

The design screen is split into 3 columns:
- Left: Design browser
- Middle: Work area
- Top: Toolbar
- Bottom: Work area
- Right
- Top: Design name and tags
- Middle: Object parameters
- Bottom: Layers
# Toolbar

- **New design** - Create a new design.
- **Import design** - Upload a file from your computer.
- **Save** - Save the open design. *Greyed out means there are no changes to save.*
- **Save as new** - Save the open design as a new design.
- **Generate stamp** - Convert the open design into a stamp as a new design.
- **Select objects** - Switches the active tool select objects.
- **Draw shape** - Switches the active tool to draw the selected shape.
- **Add image to design** - Allows you to insert an image into your design from your computer.
- **Undo/redo** - Undo the previous action or redo it. *Greyed out means there are no further undo/redo steps available.*
- **Fit to design** - Shrinks the artboard to the smallest size that encompases all design elements.
- **Zoom controls** - Zooms the viewport in and out on the design.
- **Zoom selection** - Lets you draw a selection box to zoom into.
- **Boolean shape** - Allows you to Union, Intersect, Difference, or Exclusion vector shapes.
- **Snapping** - Toggle object snapping.
- **Outline scaling** - *We're not sure what this does yet!*
# Fit to Design
As we created the whole design in Illustrator already the only thing we would probably want to do is reduce the size of the artboard to the design.
We could do this in Illustrator but Ruby offers a tool to do it automatically by selecting "Fit to design" in the toolbar which will prompt you for a margin size, we'll leave this as 0.00mm and click "Fit to design":

After you'll see the white area of your artboard has been made to perfectly fit the design we created, this might seem like a simple task, but it makes it easy to tightly pack multiple designs onto a piece of material.

# Check your layers
As we've already setup the original file with 3 primary RGB colours and it's a simple design there should be 3 layers.
Layers are different in Ruby to most drawing packages, they're basically a way of defining multiple tasks for the laser cutter, for example:
1. Etch the black area
2. Engrave the blue line
3. Cut the red line

## Changing colours / Merging layers
If any object is the wrong colour you can select it by clicking the object on screen or in the layers, you can select multiple by pressing Command or Control and clicking each object. Or you can select all objects in a layer by pressing the tickbox next to that layer in the layers area.
Once you've selected the object(s) you can change the colour by selecting from those listed:

# Create Job
Once the design(s) are complete you can click "Create Job" to move to the [Prepare Screen](https://wiki.cci.arts.ac.uk/books/facilities/page/ruby-prepare-screen).

# Powering on the laser cutter
 These settings are very granular, but we ask that you avoid adjusting without the support of a technician as there is a greater risk of fire or damage to the machine if you use these incorrectly.
# Queue the job
Once you are ready to send the job to the laser cutter press Queue, the machine won't start until you press the start button on the laser cutter.

# Ruby: Design Array
One of the most useful features in Ruby is the ability to automatically create a repeating grid from your design as a job. Trotec call this a Design Array, but you might also call it a grid, matrix or repeat.
When making a simple design like our key chain one of the most common things to do is to make lots of the, and it's also a really easy way to make a mistake as you copy and paste multiple files and have to update the duplicates too when any changes are made.
The Design Array feature in Ruby does this for you, allowing you to specify the number of repeats in an X and Y axis, as well as the spacing between them, the offset from any corner of the laser bed, and also an alternating offset which allows round objects to be interlaced to save space.
In this example you can see a 5x5 grid of our key chain design with a 5mm wide and tall margin from the bed, and from one design to the next:
These settings are very granular, but we ask that you avoid adjusting without the support of a technician as there is a greater risk of fire or damage to the machine if you use these incorrectly.
# Queue the job
Once you are ready to send the job to the laser cutter press Queue, the machine won't start until you press the start button on the laser cutter.

# Ruby: Design Array
One of the most useful features in Ruby is the ability to automatically create a repeating grid from your design as a job. Trotec call this a Design Array, but you might also call it a grid, matrix or repeat.
When making a simple design like our key chain one of the most common things to do is to make lots of the, and it's also a really easy way to make a mistake as you copy and paste multiple files and have to update the duplicates too when any changes are made.
The Design Array feature in Ruby does this for you, allowing you to specify the number of repeats in an X and Y axis, as well as the spacing between them, the offset from any corner of the laser bed, and also an alternating offset which allows round objects to be interlaced to save space.
In this example you can see a 5x5 grid of our key chain design with a 5mm wide and tall margin from the bed, and from one design to the next:
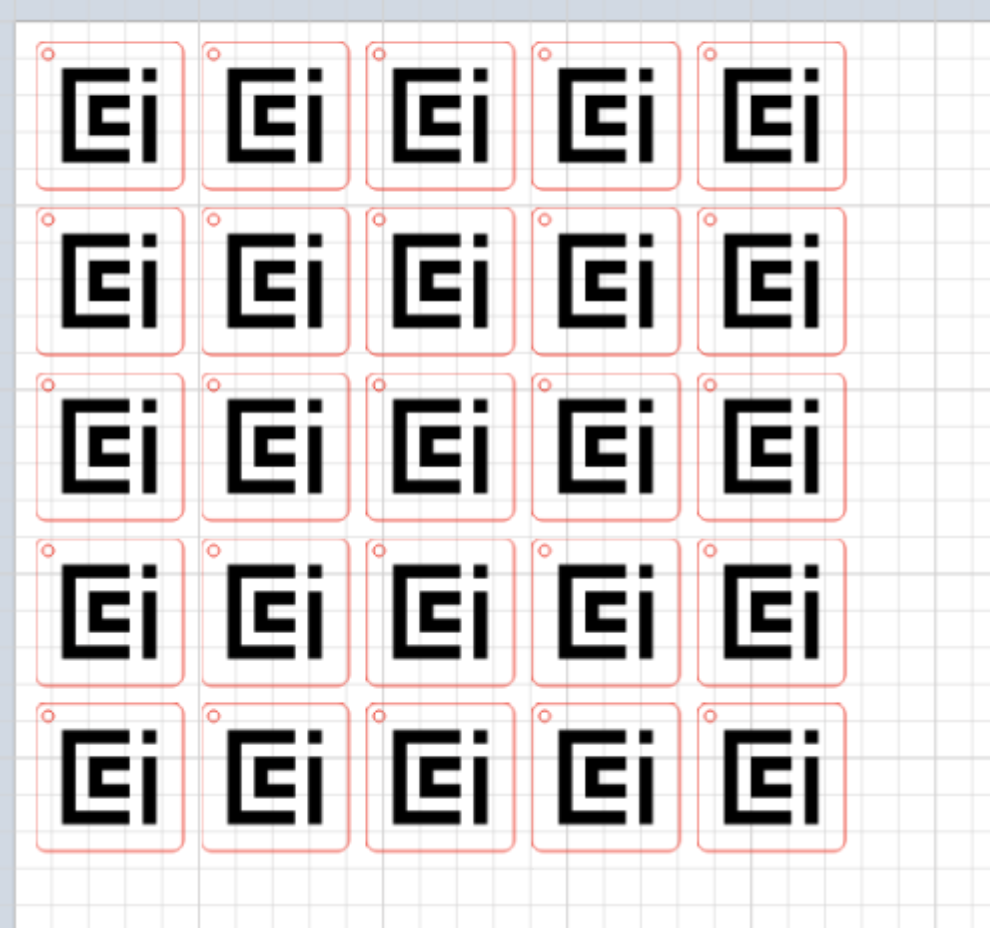 # How to create a Design Array
1. Create a new job / open an existing job
2. Find the design in the left side bar.
3. Double click the arrow:
# How to create a Design Array
1. Create a new job / open an existing job
2. Find the design in the left side bar.
3. Double click the arrow:
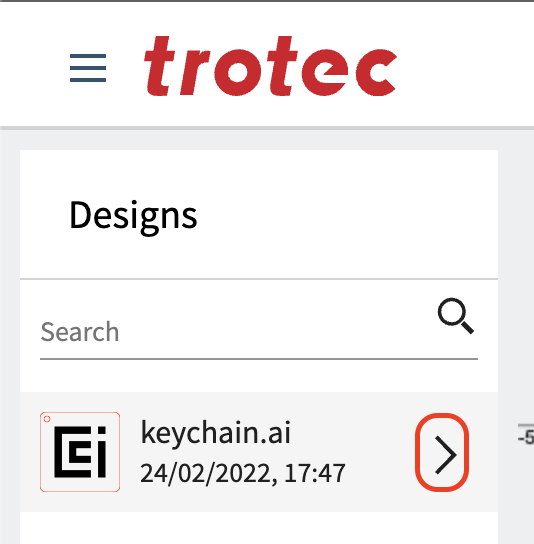 4. Choose your options:
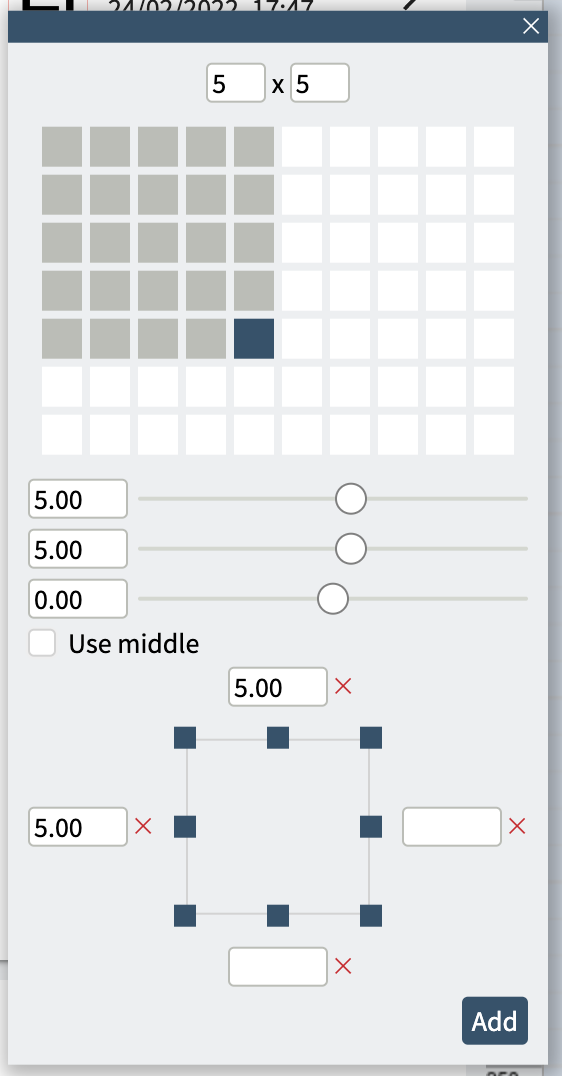 5. Press Add
Now your Design Array is created. This is a one time process which means if you change the design or want to change the array parameters you'll need to start again.
# Ruby: Produce Screen
On this screen you can see the queued jobs and monitor their progress remotely. This is useful if you are waiting for someone else to finish working.
5. Press Add
Now your Design Array is created. This is a one time process which means if you change the design or want to change the array parameters you'll need to start again.
# Ruby: Produce Screen
On this screen you can see the queued jobs and monitor their progress remotely. This is useful if you are waiting for someone else to finish working.
 We have a [Evil Mad Scientist AxiDraw V3 A3](https://wiki.evilmadscientist.com/AxiDraw) this machine can be used at no cost other than providing your own paper and pens. You will need to install the [AxiDraw software](https://wiki.evilmadscientist.com/Axidraw_Software_Installation), which works with Inkscape.
## Setup
The [Axidraw User Guide](https://wiki.evilmadscientist.com/AxiDraw_User_Guide) has full notes on setting up AxiDraw to use with Inkscape. I've added a condensed version here, but if you have issues it's worth trying out the full instructions first. It also has pictures!
1. Follow the instructions to install the [AxiDraw software](https://wiki.evilmadscientist.com/Axidraw_Software_Installation) and Inkscape 1.2
2. To check it's installed (re)open Inkscape and look in the 'Extensions' menu: you should see an 'Axidraw Control' option. Click on it and it should open the Axidraw Control menu
3. Use a micro USB to connect to the machine to your computer. The Axidraw also needs to be externally powered -- there should be one already with the machine, but if not it uses a 9V DC power supply with minumum 1.5A current draw. Please double-check the label on the power supply before plugging it in!
4. Before you add in the pen, use the 'setup' tab in the Axidraw Control
5. Screw the pen in 3-6mm above the page, and tape some paper to the desk (see 'understanding the layout' below to figure out how to align)
6. Now you can use the 'plot' tab in the Axidraw Control menu to print your file! start with something small to check it works
We have a [Evil Mad Scientist AxiDraw V3 A3](https://wiki.evilmadscientist.com/AxiDraw) this machine can be used at no cost other than providing your own paper and pens. You will need to install the [AxiDraw software](https://wiki.evilmadscientist.com/Axidraw_Software_Installation), which works with Inkscape.
## Setup
The [Axidraw User Guide](https://wiki.evilmadscientist.com/AxiDraw_User_Guide) has full notes on setting up AxiDraw to use with Inkscape. I've added a condensed version here, but if you have issues it's worth trying out the full instructions first. It also has pictures!
1. Follow the instructions to install the [AxiDraw software](https://wiki.evilmadscientist.com/Axidraw_Software_Installation) and Inkscape 1.2
2. To check it's installed (re)open Inkscape and look in the 'Extensions' menu: you should see an 'Axidraw Control' option. Click on it and it should open the Axidraw Control menu
3. Use a micro USB to connect to the machine to your computer. The Axidraw also needs to be externally powered -- there should be one already with the machine, but if not it uses a 9V DC power supply with minumum 1.5A current draw. Please double-check the label on the power supply before plugging it in!
4. Before you add in the pen, use the 'setup' tab in the Axidraw Control
5. Screw the pen in 3-6mm above the page, and tape some paper to the desk (see 'understanding the layout' below to figure out how to align)
6. Now you can use the 'plot' tab in the Axidraw Control menu to print your file! start with something small to check it works