Digital Embroidery
We have a Brother PR1055X 10-Needle Embroidery Machine which can be programmed to create custom embroidered pieces using your own Processing sketch or using the Brother software.
You must have completed the induction to use this machine. They are bookable on ORB here.
Please be aware that the embroidery machine will be in use for inductions on Thursdays and Fridays 14:30-16:00
- Using the Brother PR1055X Embroidery Machine
- PE Design 11
- Inkscape and Ink/Stitch
- p5.embroider
- Workshop: Generative Embroidery with p5.embroider
- Workshop: Data Representation with p5.embroider
- Workshop: Using Arduino with p5.embroider
- PEmbroider
- Workshop: Generative Embroidery with PEmbroider
- Workshop: Using Arduino with PEmbroider
Using the Brother PR1055X Embroidery Machine
To use this machine, you must have had an induction from one of the technical staff. This guide is to serve as a resource for students who have already had this induction, as a reminder of setup steps and as a troubleshooting guide.
Overview
The Brother PR1055X is a top-end commercial embroidery machine that can be used to produce high-quality digital embroidery on a range of fabrics.
Embroidery machines work by moving a piece of fabric (fixed within a hoop) in the x-y direction, beneath a needle that stitches by moving up and down. In this sense, they have a lot in common with many other 2-axis CAD machines (like laser cutters, routers, plotters), though because of the paticular qualities of working with stitches as opposed to straight toolpaths, embroidery software weirdness, and working with different fabrics, there's some practice involved in getting consistent results.
This guide is a condensed overview of the machine operation -- if you'd like a more detailed reference, see the Brother PR1055X User Manual.
Producing embroidery files
In order to embroider your design, you must first create a file in the .PES format (there are other embroidery file formats, but they are not typically compatible with Brother machines). These are then loaded onto the machine via memory stick. At CCI, there are 2 main ways that this can be done:
- using the open-source PEmbroider package with Processing -> tutorial
- using Brother's PE Design 11 software
Both approaches have their advantages and disadvantages depending on the kind of design you want to make. In general, PEmbroider gives you a huge amount of control over how the design is stitched, whereas PE Design auto-generates stitches for you, allowing you to choose from a few different presets, and has a lot of features. As such, the learning curve with PEmbroider is a bit steeper, and generally requires a bit more tinkering to achieve a result, but is programmable, so can make generative designs, and can produce things that can't be made using PE Design.
As PEmbroider is just an extension of Processing, it can be run on your computer. PE Design is a piece of proprietary Windows software, for which we have one license, so it must be used on the dedicated Windows machine next to the embroidery machine. There is a Windows-only trial version available here.
Machine Setup
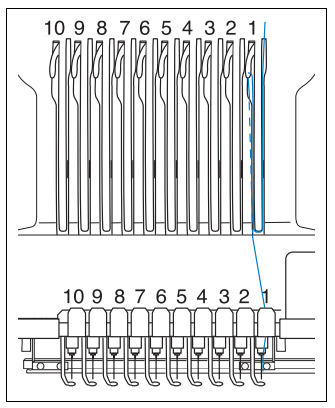
Threading the machine
This machine can be threaded with 10 different colours at the same time meaning that you shouldn't have to change the threads very often. If you do want to change a colour, the manual has a detailed description of this process which you can find here. You can, for the most part, just copy the path of a different thread to show you where to go.
Here are some main points to remember (these are not necessarily in order):
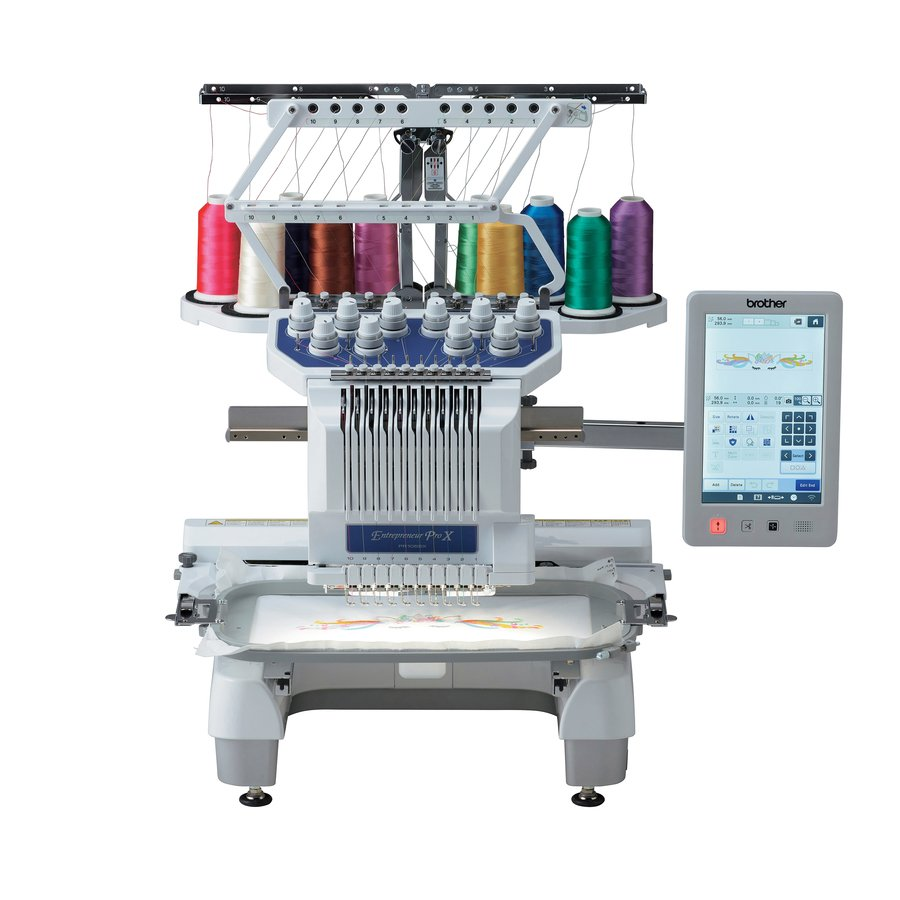
Thread tension guide
The thread tension guide has a sliding part that helps control the tension. To thread the machine you must slide this to the left to reveal the holes but remember to slide it back once you have finished threading!
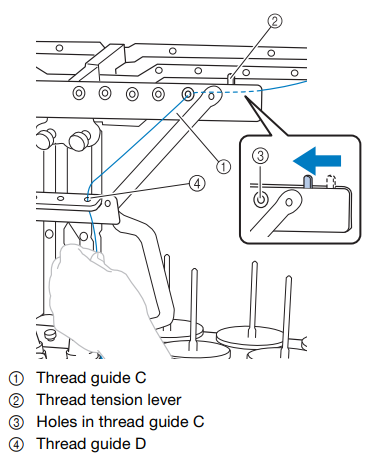
Guide Plates
Twice along the threading mechanism, there are these guide plates.

To feed the thread underneath, hold it with both hands and slide it under the guide plates from the right.
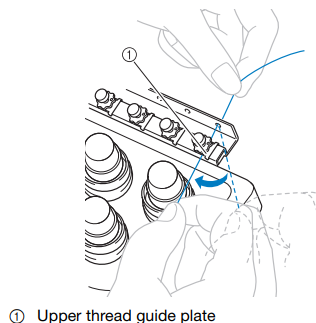
Tension Disks
Each thread has its own tension disk to be able to individually adjust the tensions. To thread it, wrap around once in a clockwise direction as shown by the arrows.
Thread guide pins
This part is very similar to a traditional sewing machine. The thread follows a path as below, going down the right hand side, scooping under and back up to feed through the take-up lever hole and back down again.
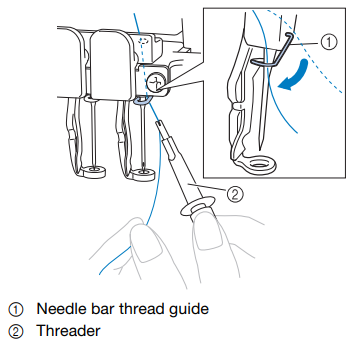
Needle Bar Thread Guide
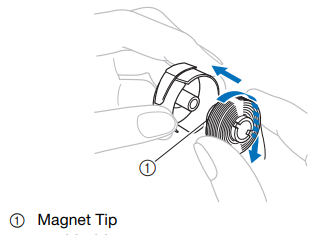
This is definitely the most fiddly part. Using the threader tool (which should be on the magnetic strip on the wall to the left of the machine), hook the thread around the needle bar thread guide. It helps to hold the end of the thread and pull gently to get it to properly slot in.
Threading the needle
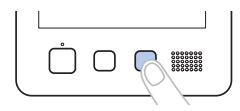
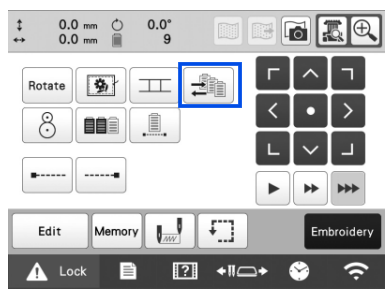
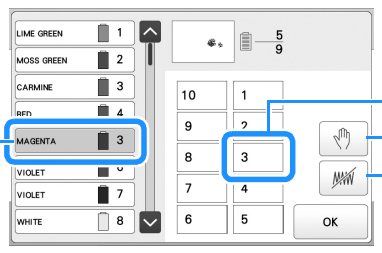
- To thread the needle, the machine must have the correct one selected. To do this, touch
 from the bottom bar menu and select the needle that you want to thread.


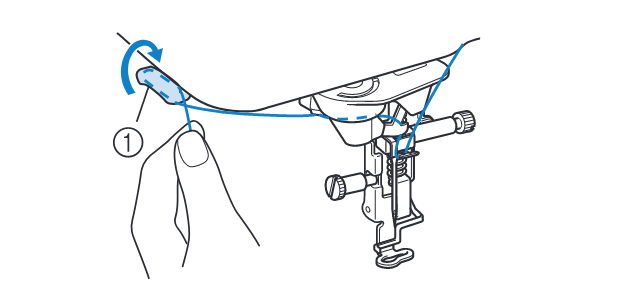
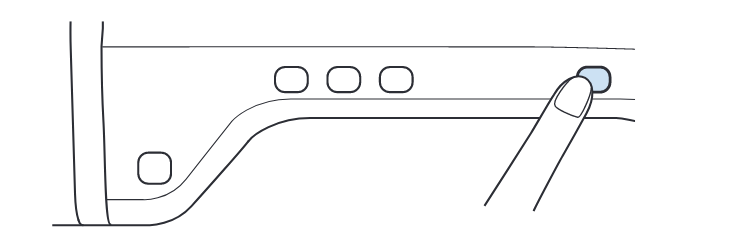
- Press the automatic threader button.
- As seen in the illustration below, pass the thread under the fork of the automatic needle threading mechanism from the right, and then catch the thread with the hook that passes through the eye of the needle.

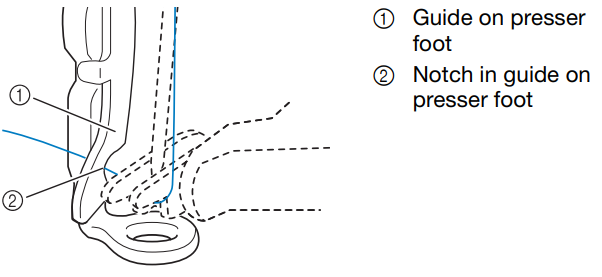
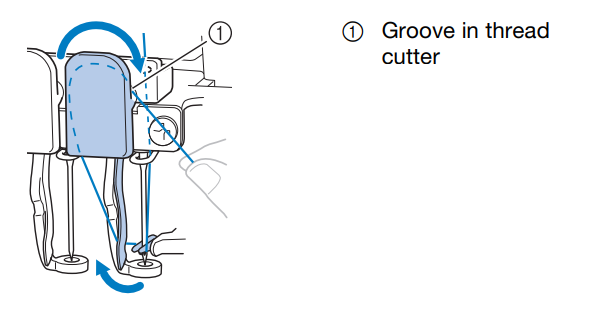
- Pass the thread under the guide on the presser foot, as seen below.
- Securely pass the thread through the groove in the thread cutter, then lightly pull the thread to cut it.
- Press the automatic needle threading button again to thread the needle!
Changing and selecting the thread colours
After you have changed the thread colour on a needle, you should also change the colour on that needle in the embroidery machine settings by 'anchoring' it. To do this:
-
Select
 then
then 
-
Select the needle you want to change the colour of.
-
If it already has a colour anchored to it, click
 to first unanchor.
 -
Select the new colour you have just threaded onto that needle (if you are using a Brother thread, you can type in the colour code on the reel, if not just choose one that looks similar).
-
Press
again to anchor the new colour to the needle.


Selecting the colours for your design.
You now need to manually select which needles you want to embroider the different colours in your design. This is done at the 'embroidery settings' part of the process.
- From the embroidery settings page select


- The machine will automatically number each section starting at 1. Select each section and then choose the colour/needle you want it to be. This is where having the correct colours anchored to each needle is important as it will make this process a lot easier.
Changing the bobbin thread
The bobbin thread is what binds the top thread to the fabric, and sits on what's known as the 'wrong side'. This part can be slow the first time you do it, but precision is important -- if your bobbin is not set up properly you will spend a lot longer trying to figure out why your design hasn't come out right!
This machine uses pre-wound bobbins which makes this process easier that some other machines. For a full step-by-step instruction, the guide in the manual is very thorough, though if you are unsure then please ask for a refresher.
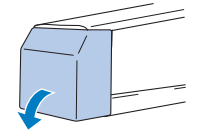
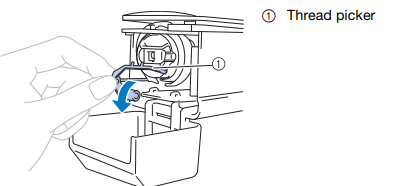
- Open the hook cover and pull the thread picker towards you.
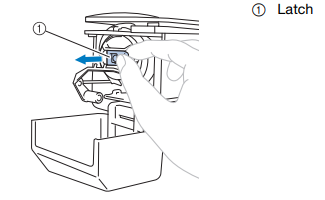
- Grab the bobbin latch and remove the bobbin case.
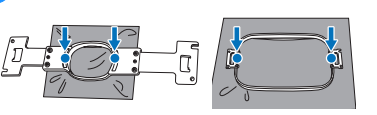
- Insert the prewound bobbin into the case, making sure it is the correct way round. (if you are looking at the open side of the bobbin case, the thread on the bobbin should be wound in a clockwise direction).
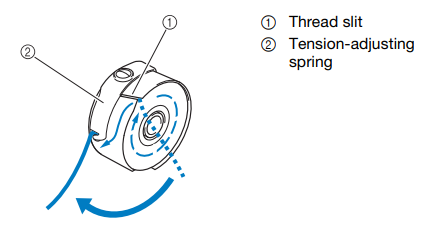
- Pass the thread through the thread slit and under the tension adjust spring and pull so that the tail is about 50mm.
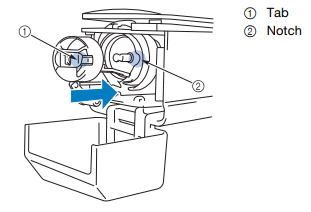
- Insert back into the machine, aligning the tab with the notch, and pushing until it snaps into place.
- Close the hook cover and you are ready to go!
Tip: When about to embroider a large design, it's worth checking that there's a fair amount of thread left on the bobbin, to avoid having to change it midway (it's not an issue, just annoying).
Hoops, fabric, and backing
In order to embroider fabric, it must be stretched taut in an embroidery hoop, which is tightened using one or two adjustable screws, then mounted onto the machine. It then moves the fabric relative to the needle. This is low-key one of the most crucial bits of getting a design to work, and if you're having issues with distortion it's probably going to be here.
There are currently 4 flat hoop sizes and a cylinder hoop available to use at CCI. In general, try and use the smallest possible hoop that will fit your design -- the larger the hoop, the less supported the fabric is, and the more likely you are to encounter distortion. This is particularly relevant if you are using a thin or stretchy fabric. The largest hoop is not a challenge!!
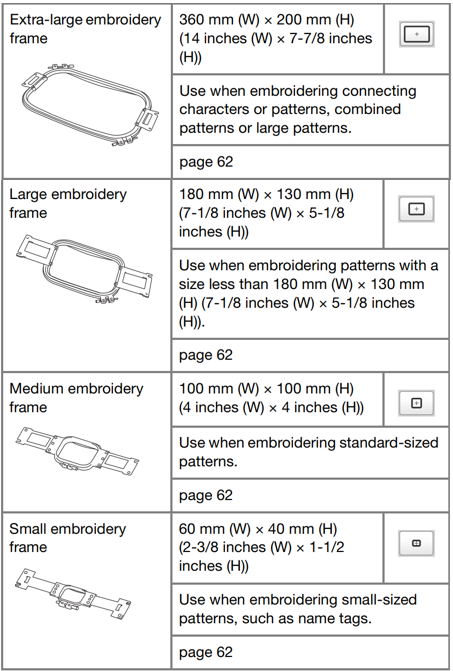
If you don't know what hoops you can use, the machine will tell you -- just look for the hoop icon in the top while browsing designs. Designs too big for the hoop will be greyed out and you will not be able to stitch with them. The machine knows what hoop you have mounted and will adjust this accordingly.
We have both iron-on and tear-away embroidery backing. For delicate or stretchy fabric, iron-on keeps it more stable so is recommended. Iron this onto the fabric before putting it into the hoop. For other fabrics, either is fine.
Place the fabric and backing right side up on top of the outer part of the hoop. Press the inner part down and pull the edges of the fabric to make sure it is taut with no wrinkles.
Then use the 3 way screwdriver to tighten the screws of the frame.

Tip: If you are using a stretchy or delicate fabric, take care not to over-stretch when putting the fabric into the hoop (or the design will pucker when you come to remove the fabric from the hoop). I would strongly suggest using the stock canvas we have at the CCI to test designs, especially when you are learning to use the machine.
You can also use the iron on stabiliser to 'float' very small pieces of fabric, ribbons or corners.
Embroidering designs
If you are using PE Design on the lab computer, you can directly upload designs to the machine within the program. Otherwise, use a memory stick to transfer your design over.
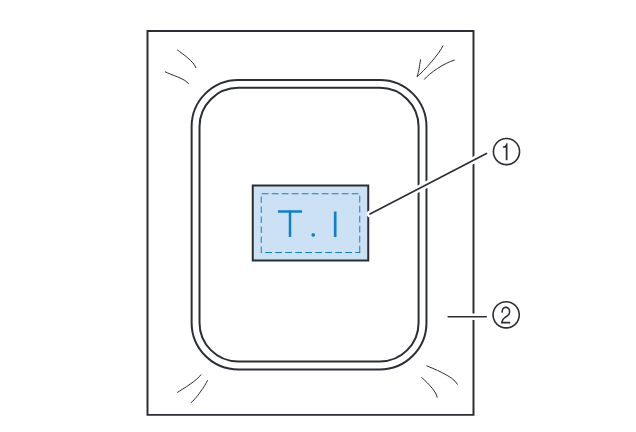
Aligning the design on your fabric properly is really important. This machine has a camera built in that can help you align your designs. On the edit page, press the camera button. This will take a scan of the fabric in the hoop and display an image of it underneath the design you have uploaded. You can then position your design precisely.

All the hoops also come with special alignment sheets that can help you line things up. This is by far the most annoying part of the whole process, but it's worth getting right.
Within the edit window (shown above), you can also rotate and resize your design along with a few other modification. When you resize it, this will just take the existing stitches and stretch them (so you might not get the desired density). It is therefore recommended that the design is the correct size in the program you have created it in.
Running the machine
Before you start, check that you have enough time to finish the design. The machine's time estimates are normally pretty accurate (if anything, it normally takes a bit longer). You MUST be next to the machine throughout, it CANNOT be left unattended.
While embroidering:
- pay attention to the sounds the machine is making, and to whether any messages appear on the screen (e.g. telling you to re-thread the top or bottom thread).
- if at any point the machine seems unhappy, press the stop button, and check each part of the machine to see what is wrong. If in doubt, ask one of us to help.
If the top thread breaks during embroidery
This is not uncommon, and can cause some stitches to be skipped. Luckily, it's also easy to resolve. If this happens multiple times in the same design, however, there might be something wrong (see 'my top thread keeps breaking' in the troubleshooting section).
Enter the stitch counting menu (indicated below), then modify the stitch number using the needle icons. The machine's needle will move as you adjust, allowing you to see what's going on. Press the -/+ stitch button at the bottom to open up the menu.
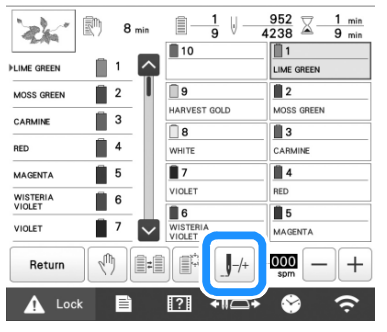
You can then press this below button to check the needle drop point and then the numbered buttons to adjust the stitch number.
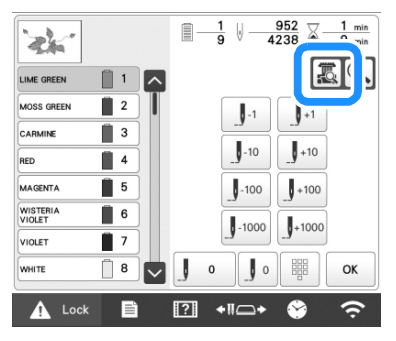
For most cases (unless a lot of stitches were skipped), I'd recommend going back 10 at a time, then using +-1 stitch to line up the needle with the last proper stitches (go a couple in to ensure they can't come loose).
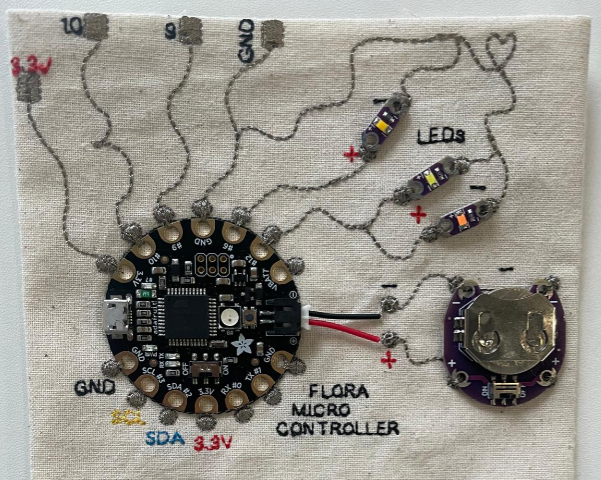
Using conductive thread
We have two thicknesses of Madiera silver plated thread. Use the thinner one (it should normally be threaded onto the machine already) as the thicker one is too thick for this machine and will not work properly.
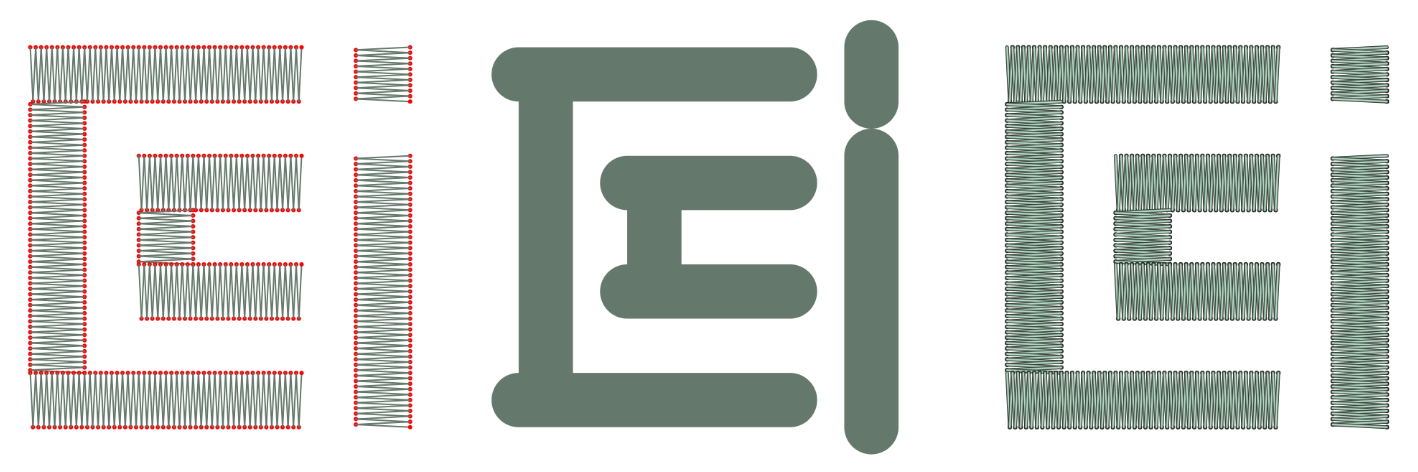
You can use this to make embroidered circuits, like the example below, or touch sensors.
Troubleshooting
My design is distorted/puckered
This issue is almost certainly to do with hooping. If you're trying larger and more complex designs, I would recommend watching this hooping tutorial which gives a lot of detail on proper technique.
Before you change anything in your design, check:
- is the fabric properly stretched on the hoop
- have you ironed on stabiliser to the back of the fabric (and is it properly bonded).
If the answer to both these questions is yes, this is likely not down to a single issue, and instead part of a set of different trade-offs:
- thin or stretchy fabric -> thin/stretchy fabric is easily distorted by embroidery. The first thing to try here is adjusting the tension of the thread (loosen a little for stretchy fabrics), and also to ensure that the fabric isn't being over-stretched in your hoop.
- size of design/hoop -> if your design is anywhere near the border between 2 hoop sizes, try rounding down the size to fit the smaller hoop. This will make the fabric much more stable.
- complexity/density of design -> dense and detailed stitch fills can easily distort fabrics. You could try reducing the stitch density, increasing the stitch size, or even not filling in particular areas to try and combat this
Tip: Before you tear up your design, try ironing it: sometimes even pretty bumpy designs look a lot better after a bit of ironing.

The bobbin thread is coming through the top of the fabric
This is a really common and very annoying issue, and may have a few root causes. A very common mistake when starting to use the machine is putting in the bobbin thread the wrong way round: if you have anything more than 1mm thread showing on top I would suggest addressing that first.
-
adjust the tension:
If the pull-through effect is quite slight, you might just need to correct the tension for the fabric you are using. Try lowering the tension if you have bobbin thread showing. This can be done without needing to remove anything from the machine. Press the needle button to move it out of the way of the fabric, then
-
re-thread the bobbin
Thread pull-through is very often associated with an incorrectly threaded or otherwise unhappy bobbin. You can correct this without restarting the design. Raise up the needle and presser foot, and gently remove the hoop. Open up the bobbin case, and remove the bobbin. You will want to check 3 things:
- is the bobbin the correct kind of bobbin? -> please only use the pre-wound bobbins that are provided. They should either be in the clear plastic box next to the machine or component draws.
- is there thread/dirt/fluff in the bobbin case? -> if there are small amounts of thread or dust, gently clean around the bobbin area. If there is a large amount, or anything is caught, please get a member of staff and we can help. Don't unscrew anything!
- IMPORTANT: is the bobbin the correct way round? -> when you replace the bobbin in the case, ensure that it matches the direction in the picture below. This is the root of almost all beginner problems, and gladly easily resolved.
-
re-thread the top thread
This is less usually an issue, but worth checking if you've tried the other steps already.
-
test out a different design
If there are still issues, use a design you know works to verify it's a machine issue, and not an issue with the specific file you are using.
-
turn the machine off and on again
If none of the above approaches work, try restarting the machine. Before you do this, note down the position and stitch number in your design (if you want to continue to stitch your design) as restarting will start sewing from scratch. If this approach is effective, that's great, but let us know as it might indicate that the machine needs a service. (nb: I only added this step because I am used to using less reliable machines, it shouldn't be needed here)
The machine says my design will take over an hour to stitch
In my experience, the machine is rarely lying here, and what you probably have is a large, complex design with a lot of filled areas, that will genuinely take that long. This kind of design will also use a lot of thread. If this is your first or second time using the machine, or you don't have 2 hours, I'd advise trying out a different design for now.
The design is blank in the machine's selection menu
This is a bug with patterns made using PEmbroider, and only applies to the first menu -> if you click into it, the design should show up. You can use the machine to save a copy of the file, which will be recognisable: I would recommend either doing this or giving your files distinctive names to prevent confusion.
The top thread keeps breaking
Firstly, check that you are using the correct thread (you cannot use this machine with regular sewing thread). All of the CCI embroidery threads are Brother brand, which will appear on the top of the spool.
If you have brought your own embroidery thread, that does not necessarily mean that it will work well on this machine. Check first that the thread is suitable for machine embroidery. Cheap embroidery threads (even if they are the correct type) can sometimes be poor quality and break easily on the machine. To test this, if you can fairly easily break the thread with your hands, it's probably too weak to avoid this issue. If you do want to buy your own thread, I would personally recommend Madeira thread (it's a bit more economical than Brother, and they have a great range).
If you are using the CCI Brother thread, then check that the top thread is threaded correctly, either by referring to the manual, or asking one of the technical staff. Check in particular that thread is unwinding in the correct direction, and that the 'notch' on the spool points away from the unwinding direction (or it can get caught).
I broke a needle
Alas. First of all, make sure you remove all the loose bits of needle and put them in the sharps bin. It's also worth checking at this point that the top thread isn't caught on anything, and that the bobbin thread isn't caught/bunched. If you're unsure about this, try to gently remove the hoop and loosen any caught threads.
Replacing the needle on this machine is quite a tricky process. It is no trouble as we have loads of replacements but please talk to either Agnes or Rosie to put a new one in!
PE Design 11
PE Design 11 is Brothers software used for creating digital embroidery patterns. The interface is quite user friendly so use this guide as a pointer for how to get started! The full instruction manual can be found here.
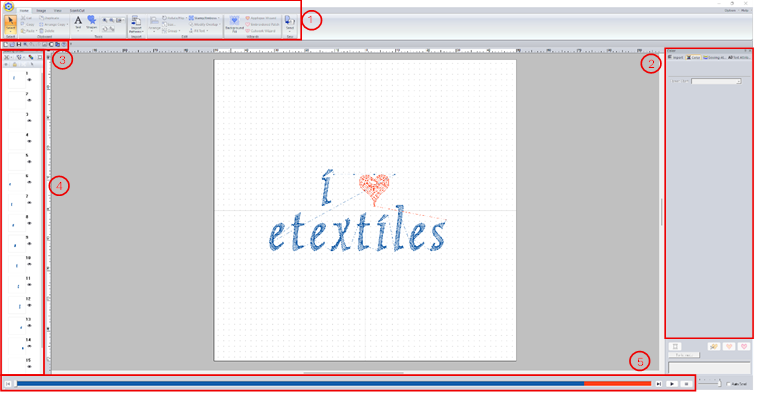
The interface contains a few main sections, some with subsections:
Ribbon
Home

Under the home tab you will find options for creating text and drawing simple shapes and lines. On the far right you will also have the option to send your file directly to the embroidery machine from this computer.
Image
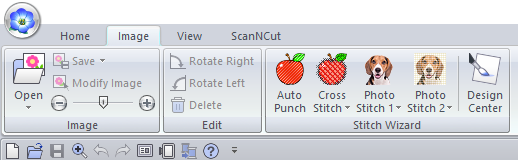
Under this tab you will find options for converting images into embroidery patterns. First import your image using the Open button the select one of the 'Stitich Wizard' modes. There are 5 differnt methods to choose from:
- Auto Punch
- Cross Stitch
- Photo Stitch 1
- Photo Stitch 2
- Design Center
Each will convert the image using a slightly different technique/style. The first four don't give much control over the specifics of the design whereas Design Center lets you go into more detail. It is, however, not very good at picking up thin lines so if you find it is not converting your image well, I would recommend having a go with Inkscape instead.
View

Under this tab you can change view options such as the preview mode. You can also add features such as a grid and can toggle whether the design snaps to it. This can be very useful when drawing the design yourself within the program.
Shape
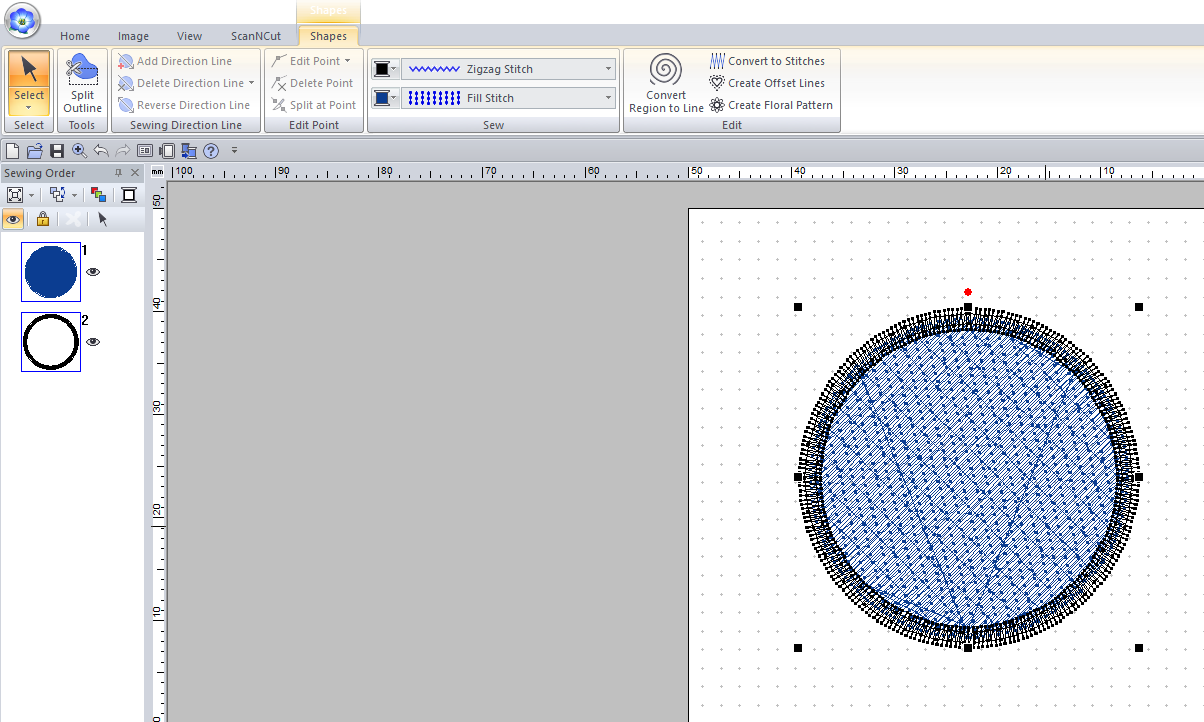
This tab allows you to edit any shapes that you add to the canvas. You can change options such as the type of stroke and fill stitches. This is something that will effect the appearance of your embroidery a fair amount, so is something you should definitely consider.
Text
Side pane
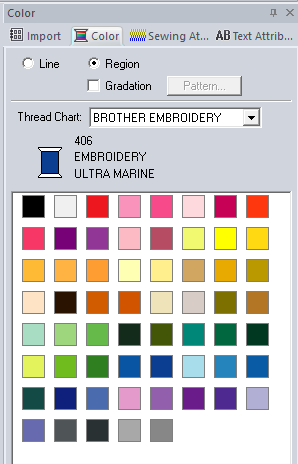
Colour attributes
This panel is used to change the preview colour of your design. As this software is made by Brother, the colour numbers will match up with the Brother threads that we have.
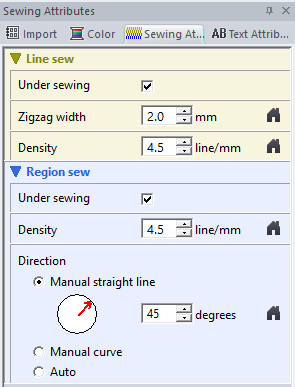
Sewing attributes
In this section we can change some attributes of the stitches such as density, width, and direction. For different fill types, there may be slightly different options in this section.
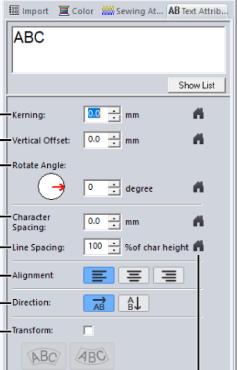
Text attributes
Here we can adjust specifics such as the kerning, character spacing, and text alignment. To get a new line when entering the text, press Ctrl+Enter.
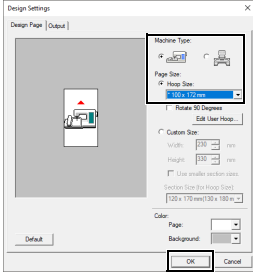
Quick access toolbar

Most of these are standard options (open, save, zoom, etc). The other one that is regularly is the design settings option (8th from the left), which can be used to change the size of the hoop you are designing for.
Sewing Order pane
This pane will show you the order in which the sections of your design will be sewn. A useful option is the optimise sewing order button (with the red, green, and blue squares) which will group together all parts in the same colour to make the sewing process more efficient.

Stitch simulator pane
This pane gives you an overview of the sections to be sewn. If you click the play button at the side, it will simulate the sewing process, allowing you to double check that everything is how you intended it to be.
Inkscape and Ink/Stitch
Inkscape is a free vector graphics software similar to Adobe Illustrator. It has an extension called Ink/Stitch that allows you to convert vector images directly into embroidery files. To use this software, you need to download BOTH Inkscape and Ink/Stitch separately.
The embroidery computer in the eTextiles Lab has Inkscape installed but you will have to individually install Ink/Stitch onto your account
Download Inkscape HERE
Download Ink/Stitch HERE
Converting to vector format
If your image is not already an .svg file, you can use the Trace Bitmap function.
Bring your image into Inkscape, select it, then click Path > Trace Bitmap.
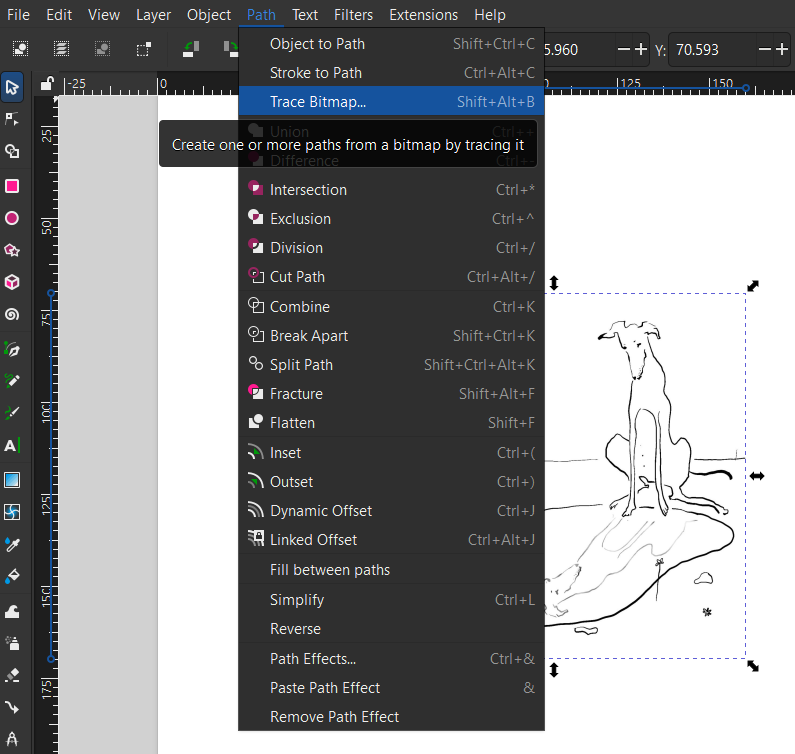
This will bring up a window on the right with a few options and a preview of the converted image.
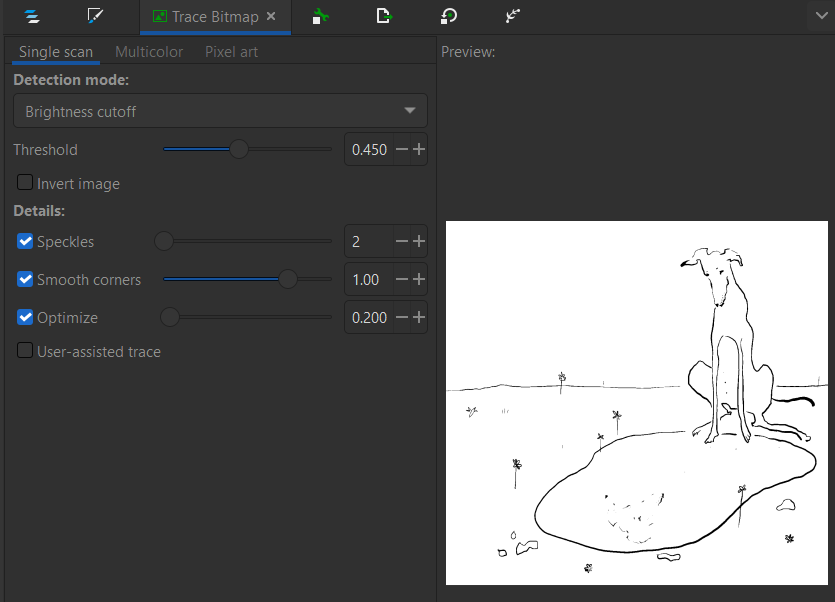
Have a play around with the different settings to get the best preview then click Apply. This will generate a vector version of your image that you can now convert to an embroidery file.
Converting to embroidery file
Once you have your vector image, go to Extension > Ink/Stitch > Params.
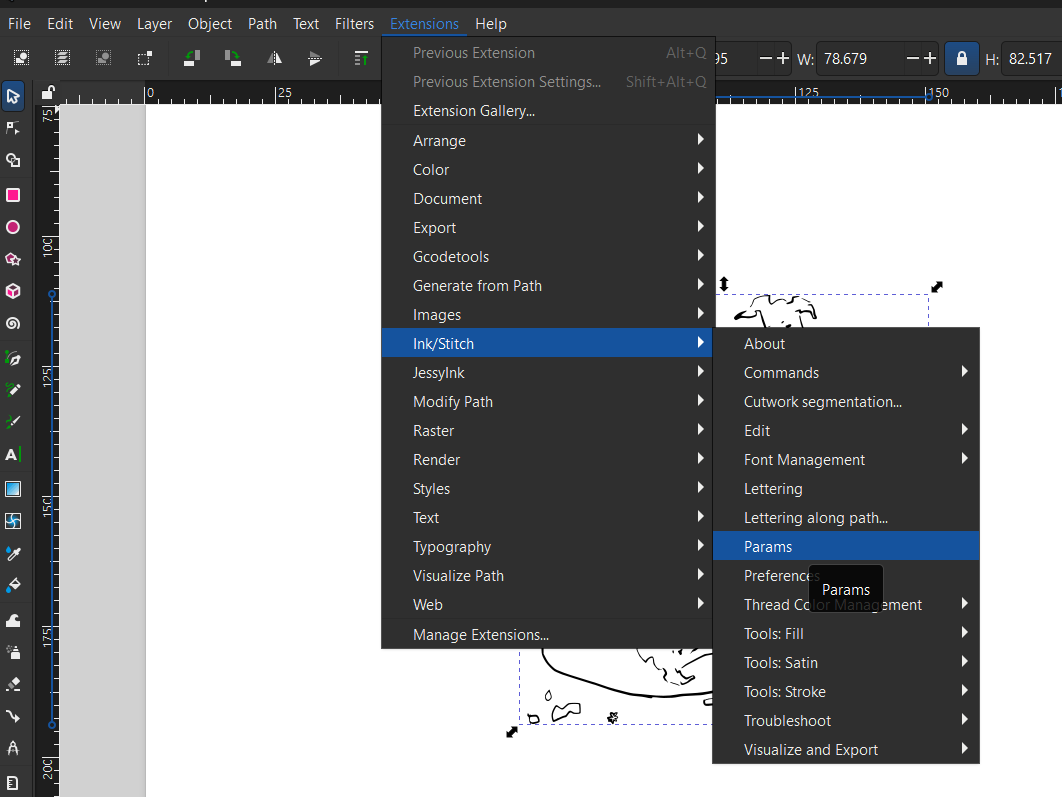
This will bring up the Ink/Stitch window and will show you a preview of the design as an embroidery pattern.
Note: Be patient! The conversion to embroidery file can take a while - up to a few minutes for large or more detailed designs. Before the Ink/Stitch window comes up, there will be a small, blank dialog box open in Inkscape. This isn't an error you just need to wait. It has finished converting when it shows you the preview like below.
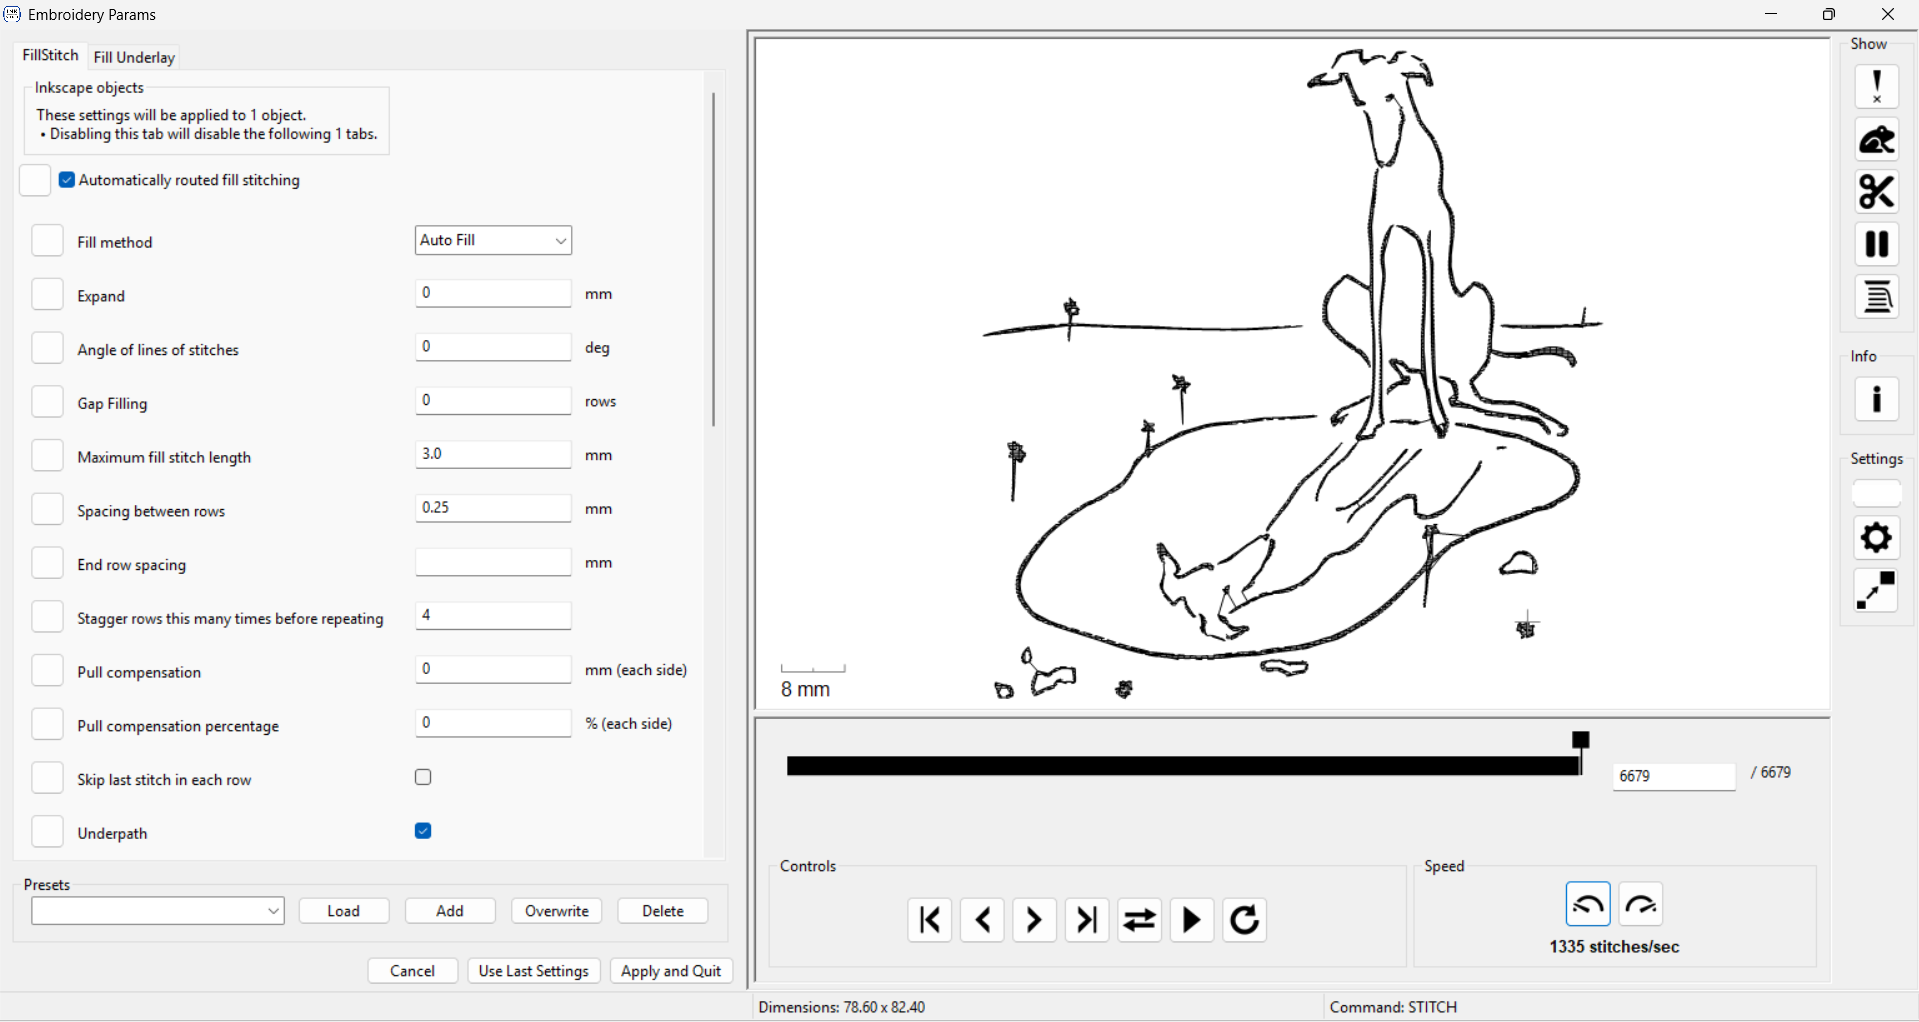
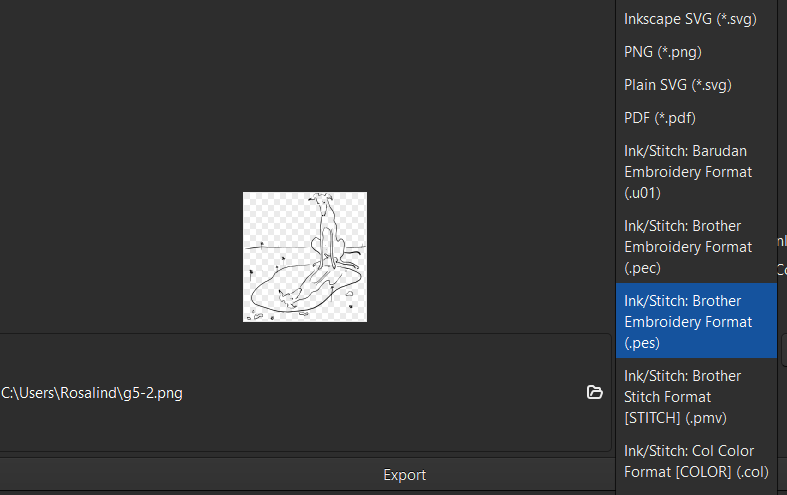
Here you can change the parameters such as stitch length, density, and fill type. Once you are happy, click Apply and Quit. This will take you back to Inkscape. It will seem like nothing has changed, however you can now export the file as a .pes and embroider it!
p5.embroider
p5.embroider is a p5.js library for creating digital embroidery patterns. It takes your p5.js sketches and converts them directly to embrodiery meaning it is easy to take your sketches and create them on fabric!
Resources
Installation
To use p5.embroider in your project, include the library in your HTML file:
<script src="https://unpkg.com/p5.embroider/lib/p5.embroider.js"></script>
Template
Below is a template sketch for you to get started.
let _drawMode = "stitch";
let roygbiv = ["red", "orange", "yellow", "green", "blue", "indigo"];
function setup() {
createCanvas(mmToPixel(150), mmToPixel(150));
let exportPESButton = createButton("Export PES");
exportPESButton.mousePressed(() => {
exportPES("template_example.pes");
});
exportPESButton.position(0, height + 60);
noLoop();
}
function draw() {
background("#FFF5DC");
let stitchWidth = 8;
// Set the drawing mode to show stitches
stroke(255, 0, 0);
noFill();
setDrawMode(_drawMode);
// Begin recording stitches
beginRecord(this);
strokeWeight(stitchWidth);
setStitch(0.1, 0.5, 0);
setStrokeMode("zigzag");
//p5 SKETCH CODE HERE
// End recording stitches
endRecord();
}
Let's take a closet look at some of the parts of this sketch
beginRecord() and endRecord()
Anything drawn between the beginRecord() and endRecord() functions will be converted into embroidery. This means you can add extra parts to your p5 sketch that then won't be included in the completed embroidery pattern, such as text to guide the user interaction or buttons to export the design.
Units and measurement
p5.embroider uses mm instead of pixels (like the rest of p5.js) for size specifications to create embroidery data at actual size. Anything inside of the beginRecord() and endRecord() functions will be in mm and anything outside will be in pixels.
For example, when creating the canvas, use the mmToPixel() function to specify your canvas size in mm and convert it to pixels, as this is outside of the recording.
function setup(){
...
// Create a 100mm x 100mm p5 graphics instance
createCanvas(mmToPixel(100), mmToPixel(100));
...
}
Stitch parameters
There are a few functions that we can use to set the stitch parameters (length, width, stitch type, etc). For these, we will want the units to be in mm, therefore they need to be called within the beginRecord() and endRecord() functions
function draw(){
...
beginRecord(this);
...
setStitch(0.3, 1, 0); //setStitch(minLength, desiredLength, noise)
setStitchWidth(0.1);
setStrokeMode("zigzag"); //can be 'zigzag', 'parallel', or 'sashiko'
//Alternatively, you can use the setStrokeSettings function
setStrokeSettings({ // Configure stroke stitch settings
stitchLength: 0.5, // Length of each stitch
stitchWidth: 0.2, // Width of each stitch
noise: 0.0, // Random coefficient
strokeInterpolate: true, // Enable stroke interpolation
});
...
endRecord();
}
Draw Mode
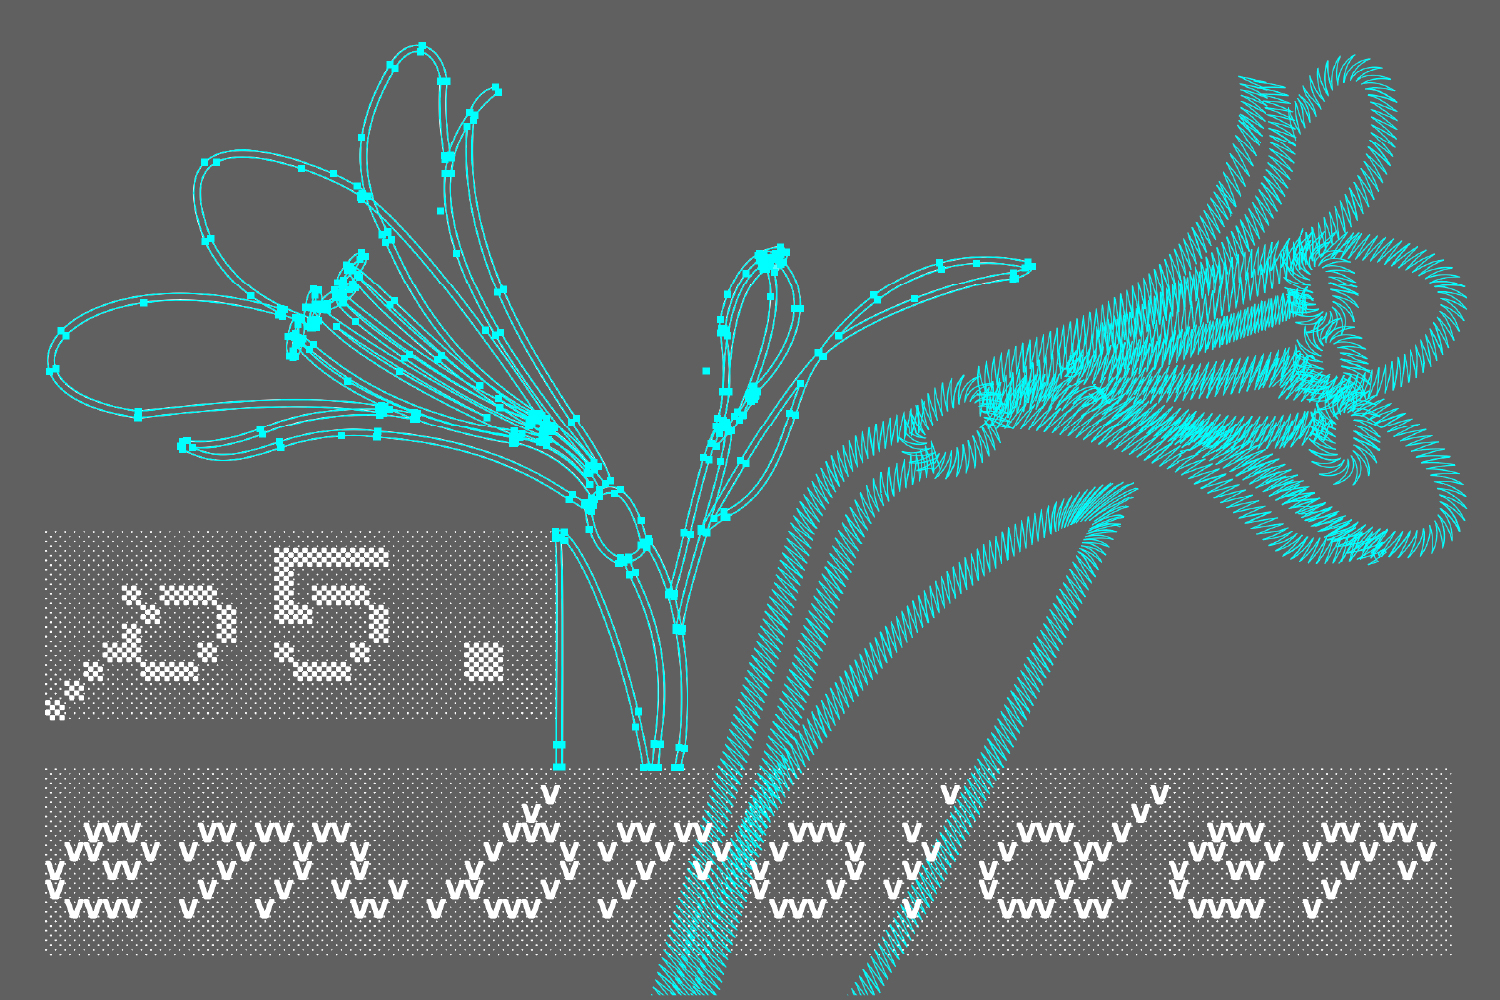
There are three different drawing modes to view your sketch; stitch, p5, and realistic.
setDrawMode('p5'); //stitch', 'p5', 'realistic'
Below you can see the difference between the three (in order; stitch, p5, realistic). This setting will have no effect on your embroidery file, just the visualisation of it.
As you can see here, not everything that looks good in stitch will look good in p5 and vice versa.
Export PES
To be able to stitch your design with our machine, you must export it as a PES file. This can be done with the exportPES() function (written by agnes!!). In the examples from the library, the setup function contains export buttons for DST and GCode but we can change it to be a PES button with the code below.
function setup(){
...
let exportPESButton = createButton("Export PES");
exportPESButton.mousePressed(() => {
exportPES("template_example.pes");
});
exportPESButton.position(0, height + 60);
...
}
Workshop: Generative Embroidery with p5.embroider
This is the written version of the e-textiles embroidery workshop, and can either accompany the live workshop or be worked through by itself. Copies of the files used for each of the exercises that can be downloaded here, but I'd recommend trying to generate the files yourself where possible.
1. Hello World: Drawing a Line
We are using a template JS and HTML file in the Github Repository, but this will also work in the p5.js web editor if you prefer.
Template File
All files in p5.embroider have a similar structure. We'll be using this as the basis for all the files in the workshop. The specific code here draws a single line, but we can change that to anything we like.
<script src="https://unpkg.com/p5.embroider/lib/p5.embroider.js"></script>
function setup() {
//10cm by 10cm canvas
createCanvas(mmToPixel(100), mmToPixel(100));
let exportPesButton = createButton("Export PES");
exportPesButton.mousePressed(() => {
exportEmbroidery("template.pes");
});
exportPesButton.position(0, height + 30);
}
function draw() {
background("lightgrey");
setStitch(0.5, 5, 0);
beginRecord(this);
// commands go here
stroke(255);
line(0, 0, 100, 100);
trimThread();
endRecord();
}
In order, this file:
- sets up a new canvas, of size 100 by 100mm (which gets translated into pixels)
- adds a button to let us export the file we create
- sets some properties of the canvas and the line
- draws a line on the canvas
There are some other lines that are 'commented out' (have slashes in front of them) and don't run. These we might use later but for now we don't need to use them.
When you run this file, you should see an output that looks like this (if you don't see this, you will want to check over the setup steps again):

The red dots represent the ends of stitches, where the needle enters the fabric. Shortly we will experiment with different stitch types and lengths, but for now we are using the default settings.
Exercise 1.1
- Can you make the canvas larger?
- Can you make the canvas rectangular rather than square?
Drawing lines
The p5.embroider code for drawing a line is:
line(x1, y1, x2, y2);
This means that (x1, y1) is the coordinates of the point where the line starts, and (x2, y2) is the point where the line ends. In our code, we get a diagonal line because we draw from the point (0, 0) to the point (100, 100) (the edge of the canvas).
Exercise 1.2
- Can you make the line draw only halfway across the original canvas?
- Are you able to draw a vertical line? What about drawing 2 lines?
2. Playing with shapes
From now on, unless we're changing more of the file, I'm going to list just the 'content' code that we're changing, using ... to represent the rest of the file. In our last exercise, the content was a single line, but it can be more -- the important part is that it goes in the same place in the file each time.
Try changing out the line for a circle:
...
circle(50, 50, 90);
...
You should see a centered circle that fills most of the canvas. In the documentation, the circle() method is listed as:
circle(x, y, r);

Exercise 2.1
- What do you think
rrepresents in this method? - Can you place the circle in the center of the canvas? What about a circle that fills the whole canvas?
- The p5.embroider method for drawing a rectangle is
rect(x, y, w, h);. Can you replace the circle-drawing line with a line that draws a rectangle instead? What do you thinkwandhrepresent?
3. Fills and Hatching
Up until now, all the shapes we've been drawing have been outlines. p5.embroider supports some different kinds of fills, which we will experiment with now. The way settings work in p5.embroider (and in p5 generally!) is that you set a bunch of settings, then draw the thing you want the settings to apply to, and then if you want to draw something with different settings, you change the settings and then draw the thing. For example, the order you'd do things if you wanted to draw a red square and a blue square would be:
> set fill to red
> draw square
> set fill to blue
> draw square
In our case, what this means is that if we add some code that adjusts the fill settings, this needs to go before the part where we draw our shape. Let's try drawing a filled circle:
...
fill(255, 155, 0);
setFillMode("tatami");
circle(50, 50, 90);
...
Fill Types
There are 3 different fill types in total in p5.embroider. These can each be set using the following lines of code:
setFillMode("tatami");
setFillMode("satin");
setFillMode("spiral");
Exercise 3.1
- One at a time, try out the different fill types on your shape. Which is your favourite?
Fill Settings
As well as being able to change the type of fill, it's also possible to change the fill settings, namely the spacing of the fill lines, the colour of the fill, and the angle of the fill lines (for satin and parallel fills, where the lines have a prevailing angle).
We can do this using the same principles as before (e.g. putting the settings before the thing we want them to apply to). The fill settings are adjusted using a method called setFillSettings.
setFillSettings({
angle: 0, // number between 0-360
stitchLength: 3, // average stitch length in mm
stitchWidth: 0.2, // number between 0-1
rowSpacing: 0.8, // space between rows in mm
minStitchLength: 0.5, // minimum stitch length in mm
resampleNoise: 0.2, // space between rows in mm
alternateAngle: true,
});
Exercise 3.2
- Try making one shape with a diagonal hatch fill, and another with a vertical fill. What happens when you place them on top of each other?
- To un-set fill settings, you can use the line
noFill(). Can you use this line to make some code that draws a filled shape, and then draws an outline shape afterward?
4. Stroke and Stitch Settings
The final group of settings we're going to look at is modifying the stroke (line) style. Similarly to fills, you need to modify the settings before drawing your line.
There are 2 stroke types in PEmbroider; tangent is the one we've been using by default, but perpendicular can be used to get a thicker, more defined outline.
setStrokeMode("line");
setStrokeMode("parallel"); // parallel lines
setStrokeMode("zigzag");
setStrokeMode("ramp");
setStrokeMode("square"); // thick line in squares
setStrokeMode("sashiko"); // repeating blocks of stitches
As before, stroke color can be set using RGB values. The other settings are the thickness of the line (stroke weight) and the stroke spacing (e.g. for perpendicular strokes).
stroke(R, G, B); // sets the stroke color
setStitch(0.5, 5, 0); // min stitch length, stitch length, noise
strokeWeight(2); // sets the thickness of the stroke in mm
Exercise 4.1
- create a file with 4 different lines, each with different stroke settings. How much variation can you get?
5. Loops and Randomness
For loops
For loops are structures that allow the same piece of code to be repeated multiple times with different inputs. We're going to try out a for loop that repeatedly draws lines on the canvas, changing the position of the line each time it draws.
...
for (i = 1; i < 10; i++) {
line(10, i*10, 90, i*10);
}
...
In this code, we create a number, i, that will go from 1 to 10, increasing every time. The first time the code runs, i is equal to 1, and so i*50=50. The next time, i=2, so i*50=100, and so on, up till i reaches 9. i cannot reach 10 (as the code will only run for i<10) and so the for loop ends.
Exercise 5.1
- What happens when the number multiplying
iis different fory1andy2? - Can you make a series of vertical lines instead of horizontal lines by changing where
iis used? - Can you draw a grid?
- What happens when you increase and decrease the number of repeats (e.g. the number 10 in the example)
- Experiment with using
iin different positions. What happens when you add or subtract it (or multiples of it)? Can you make a radial pattern?
Random numbers
Another very useful tool for making generative patterns is randomness. Unlike the code we were using before (which used scaled variations where we could predict what the outcome would be), randomness adds an element of chance. In Processing, the function random(50) will return a random number between 0-50. This number will be a decimal (float) rather than a whole number (int), so if we want to use it like a whole number we also need to use the int() method.
...
for (i = 1; i < 10; i++) {
circle(i*10, 50, 5+Math.random()*15);
}
...
Exercise 5.2
- Run this code a few times. What do you notice? What is being randomly varied?
- What happens when you add a number to the random number? What if you multiply it by something?
- Can you make the randomness affect the y position?
Nesting for loops
The last thing we will look at is using 2 nested for loops to create 2D designs. This isn't the only way to achieve this -- remember the grids from exercise 5.1 -- but this will help us a lot.
Before we get there, we could also look at what happens when we nest for loops inside other loops, in this case, the circle drawing code from before.
for (i = 1; i < 10; i+=2) {
for (j = 1; j < 10; j+=2) {
circle(i*10, j*10, 5 + Math.random()*30);
}
}
Now we get a whole grid of circles!
Exercise 5.3
- Experiment with randomness in different nested for loops -- can you use randomness to make the positioning less square?
6. Polylines and curves
As well as having preset shapes, PEmbroider (like Processing) supports making custom shapes by defining a set of points along a line. To start one of these shapes, you need to bookend the line with:
beginShape();
// ...points
endShape();
If the final co-ordinate matches the first co-ordinate, we can also fill the shape: if not, it's just a stroke. Polylines are also great as within the line the machine doesn't need to make a jump; this is helpful for avoiding too many floats later on.
Each point on the line is given by vertex(x, y), a single point in space. To draw a spiky shape, we can draw a bunch of points:
beginShape();
vertex(10,10);
vertex(90,50);
vertex(95,70);
vertex(30,50);
vertex(20,30);
vertex(10,10);
endShape();
Exercise 6.1
- Have a go at making a shape of your own: can you make a 5-pointed star? Can you add a fill?
Curves
There are a number of different ways to render curves in p5, which inherit from the different curve-drawing techniques in computer graphics. These are: arcs, splines and Bézier curves.
- Use
arc()when you need a segment of a circle or an ellipse. You can't make continuous arcs or use them as part of a shape. - Use
curve()(the spline function) when you need a small curve between two points. UsecurveVertex()to make a continuous series of curves as part of a shape. - Use
bezier()when you need long, smooth curves. UsebezierVertex()to make a continuous series of Bézier curves as part of a shape.
The tutorial gives a great overview of the different types and I'd recommend experimenting with all of them.
The simplest kind of curve is called a curve spline -- this will fit the line to curve around a series of x, y points:
for (i = 1; i < 10; i++) {
beginShape();
for (j = 1; j < 10; j++) {
curveVertex(i*10 + Math.random()*10 -5, j*10);
}
endShape();
}
But there are also some other kinds of curve we can use! One very popular type is a bézier curve, which is used in computer graphics. In these curves, points aren't defined directly -- instead, a 'hull' of 4 control points is defined that a curve passes through.

These can produce some really beautiful shapes:
beginShape();
vertex(10, 10);
for (i = 1; i < 10; i++) {
for (j = 1; j < 10; j++) {
bezierVertex(i*i + (10-i), 0, i*10, j*10 + (15-j), i*5 - 1, i*5);
}
}
endShape();
Workshop: Data Representation with p5.embroider
Using p5.embroider, we can use data imported from a csv file to create embroidered data representations.
Wind Speed Example
Below, you can see a pattern created using a sample of wind speed data. Each vertical line represents one year and each sine curve going down shows a month. The more exaggerated the curve, the higher the average wind speed was for that month.

In order to achieve something like this, there are two steps we need to take.
1. Import .csv file
To do this, we need to create a table variable and load the data from the .csv into it.
let table;
function preload() {
table = loadTable('wind.csv', 'header');
}
The header argument indicates that the table has column headers so should be removed if it doesn't.
2. Access Data from Table
For this example, the structure of the csv file is as below.
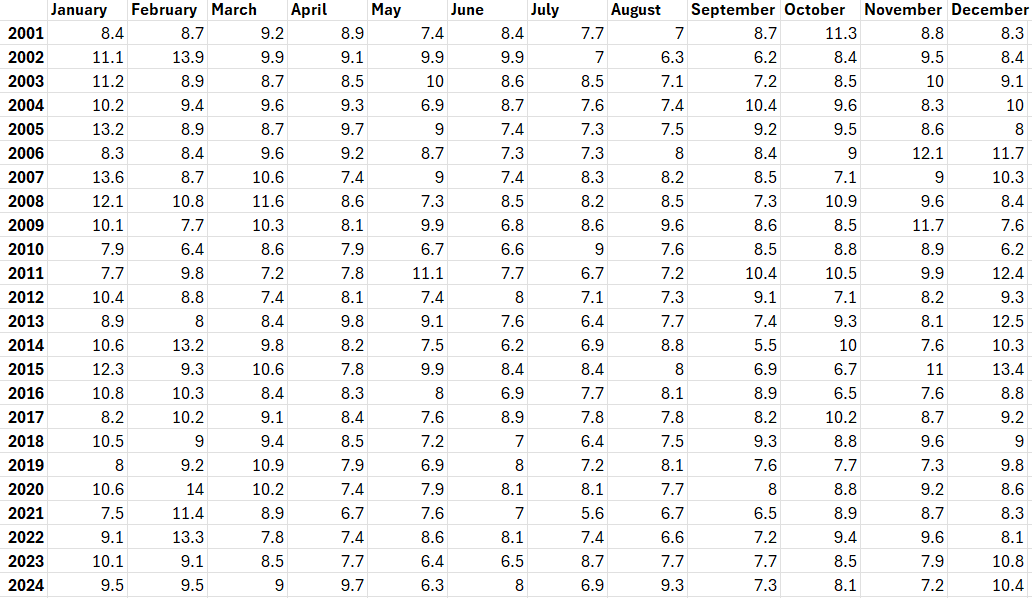
We can use .getRows() and a for-loop to iterate through the rows of the table (the years, in this case). Then, .getNum() can be used to access each value within the row. .getNum() takes either an index or the name of the column (e.g. .getNum(0) or .getNum('January'))
let tableRows = table.getRows();
for (let row of tableRows) {
for (let i=0; i<table.getColumnCount()-1; i++){
console.log(row.getNum(i));
}
}
Workshop: Using Arduino with p5.embroider
This is a write up of part of the p5.embroider tech skills workshop explaining how to use inputs from Arduino to alter a p5.embroider sketch.
There are a few steps to this process:
1. Circuit
First, you need to build your circuit. This is the same as you would build any Arduino circuit and can use anything that will give you a reading such as potentiometer, LDR, button, switch, etc. Below is the circuit for a potentiometer.

2. Arduino Code
The setup for the arduino code is nice and simple, we just need to read our value then print it to serial. Make sure you are using Serial.println() so each value prints on a new line.
void setup() {
Serial.begin(9600);
}
void loop() {
int val = analogRead(A0);
Serial.println(val);
delay(100);
}
If we have multiple readings, we just need to print each one, except the last, with Serial.print() followed by a comma. The last value is printed with Serial.println() to start a new line for the next reading.
void setup() {
Serial.begin(9600);
}
void loop() {
int val1 = analogRead(A0);
int val2 = analogRead(A1);
Serial.print(val1);
Serial.print(",");
Serial.println(val2);
delay(100);
}
Once you have uploaded this, make sure that the Serial Monitor is closed. If left open, p5 won't be able to read the data. Also, make sure that the frequency used in Serial.begin()is 9600, as this is what p5 uses.
3. p5 Code
Libraries
For this sketch, we will be using the library p5.WebSerial to retrieve the data from the Arduino alongside p5.embroider. To be able to use these libraries, we must include the following lines with the head of the index.html file.
<script src="https://unpkg.com/p5-webserial@0.1.1/build/p5.webserial.js"></script>
<script src="https://unpkg.com/p5.embroider/lib/p5.embroider.js"></script>
p5.WebSerial
Below is a template for using p5.WebSerial
// variable to hold an instance of the p5.webserial library:
const serial = new p5.WebSerial();
// HTML button object:
let portButton;
let inData; // for incoming serial data
let outByte = 0; // for outgoing data
let vals;
let dataCount = 0;
function setup() {
createCanvas(400, 400); // make the canvas
//Serial setup
// check to see if serial is available:
if (!navigator.serial) {
alert("WebSerial is not supported in this browser. Try Chrome or MS Edge.");
}
// if serial is available, add connect/disconnect listeners:
navigator.serial.addEventListener("connect", portConnect);
navigator.serial.addEventListener("disconnect", portDisconnect);
serial.getPorts(); // check for any ports that are available:
serial.on("noport", makePortButton); // if there's no port chosen, choose one:
serial.on("portavailable", openPort); // open whatever port is available:
serial.on("requesterror", portError); // handle serial errors:
serial.on("data", serialEvent); // handle any incoming serial data:
serial.on("close", makePortButton);
}
function draw() {
background(0);
}
// read any incoming data as a string
// (assumes a newline at the end of it):
function serialEvent() {
inData = serial.readLine();
if(inData != null){
inData = trim(inData);
vals = int(splitTokens(inData, ","));
}
}
// if there's no port selected,
// make a port select button appear:
function makePortButton() {
// create and position a port chooser button:
portButton = createButton("choose port");
portButton.position(10, 10);
// give the port button a mousepressed handler:
portButton.mousePressed(choosePort);
}
// make the port selector window appear:
function choosePort() {
if (portButton) portButton.show();
serial.requestPort();
}
// open the selected port, and make the port
// button invisible:
function openPort() {
// wait for the serial.open promise to return,
// then call the initiateSerial function
serial.open().then(initiateSerial);
// once the port opens, let the user know:
function initiateSerial() {
console.log("port open");
}
// hide the port button once a port is chosen:
if (portButton) portButton.hide();
}
// pop up an alert if there's a port error:
function portError(err) {
alert("Serial port error: " + err);
}
// try to connect if a new serial port
// gets added (i.e. plugged in via USB):
function portConnect() {
console.log("port connected");
serial.getPorts();
}
// if a port is disconnected:
function portDisconnect() {
serial.close();
console.log("port disconnected");
}
function closePort() {
serial.close();
}
Let's take a closer look at the function serialEvent();
function serialEvent() {
inData = serial.readLine();
if(inData != null){
inData = trim(inData);
vals = int(splitTokens(inData, ",")); //splits up the data at each comma
}
}
This function is called each time a new piece of data is sent from the serial monitor. It then splits the data at the commas and stores them in an array called vals. This data can then be used within the sketch to influence certain variables.
NOTE: Make sure that the noLoop() function in setup() has been removed as we need the sketch to loop in order to be effected by incoming data.
We can then combine this sketch with p5.embroider to use the arduino data to control our embroidery pattern! For example, we could add the following into the draw() function:
function draw() {
background(0);
stitchWidth = 7;
stroke(255, 255, 255);
noFill();
setDrawMode(_drawMode);
if(typeof(vals[0]) != "undefined" && !isNaN(vals[0])){ //make sure data is being received
beginRecord(this);
strokeWeight(stitchWidth);
setStitch(0.2, 0.8, 10);
setStrokeMode("zigzag");
ellipse(pixelToMm(200),pixelToMm(200),abs(vals[0]),abs(vals[1]));
trimThread(); //trims threads between colours
endRecord();
}
}
This sketch will vary the height and width of an ellipse with the changing potentiometer data.
PEmbroider
PEmbroider is an open-source library for embroidery design, maintained by CMU's Studio for Creative Enquiry. Designs are created using Processing code, particularly the Processing Drawing API which can be used to generate embroidery designs computationally. PEmbroider is well-documented online -- this tutorial page is here to point you to existing resources, and explain a couple of foibles with the software.
For a good overview of where to start, use the PEmbroider Cheat Sheet.

Setup
Setup instructions are here. When running an example sketch, if you would like to use the design, make sure that it exports in the .PES file format, as this is the form used by the machine.
In the PEmbroider example files, the file format is always declared in the variable outputFilePath, normally in the setup() section of the code. So, to change this (e.g. in the example file PEmbroider_shape_hatching_experimental), from:
...
E = new PEmbroiderGraphics(this, width, height);
String outputFilePath = sketchPath("PEmbroider_shapes_hatching_experimental.vp3");
...
to:
...
E = new PEmbroiderGraphics(this, width, height);
String outputFilePath = sketchPath("PEmbroider_shapes_hatching_experimental.pes");
...
If you create a file in the wrong format, you can always re-run the code, but it is also possible to convert between different embroidery file formats online here.
Using PEmbroider
The full API for PEmbroider is documented here.
Setting up your sketch
Below are templates for both a looping and non-looping sketch that you can start from when creating your design.
The non-looping sketch does everything within the setup() function meaning that it runs once then produces the file whilst the looping sketch includes a draw() function that will repeat whilst the program is running.
Which one you want to use depends on how you want your code to produce the pattern. If you are using any kind of interaction, such as data from an Arduino, then the code must loop in order to use the data as it is received.
Non-looping
// Example non-looping PEmbroider program
import processing.embroider.*;
PEmbroiderGraphics E;
void setup() {
// Starting up:
noLoop();
size(800, 600);
E = new PEmbroiderGraphics(this, width, height);
String outputFilePath = sketchPath("filename.pes");
E.setPath(outputFilePath);
E.beginDraw();
E.clear();
//-------
// Content goes here:
E.fill(0, 0, 0);
E.circle(200, 200, 200);
//----------
// Visualization and export:
// NOTE: Leave optimize() and endDraw() commented out,
// until you are ready to export the embroidery file!
// Don't forget to un-comment them when you want to export!
//
// E.optimize(); // VERY SLOW, but essential for file output!
E.visualize(); // Display the embroidery path on-screen.
// E.endDraw(); // Actually writes out the embroidery file.
}
Looping
// Example looping PEmbroider program
import processing.embroider.*;
PEmbroiderGraphics E;
void setup() {
size(800, 600);
E = new PEmbroiderGraphics(this, width, height);
String outputFilePath = sketchPath("filename.pes");
E.setPath(outputFilePath);
}
void draw() {
background(220);
E.beginDraw();
E.clear();
//-------
// Content goes here:
E.fill(0, 0, 0);
E.circle(200, 200, 200);
//----------
// Visualization and export:
// NOTE: Leave optimize() and endDraw() commented out,
// until you are ready to export the embroidery file!
// Don't forget to un-comment them when you want to export!
//
// E.optimize(); // VERY SLOW, but essential for file output!
E.visualize(); // Display the embroidery path on-screen.
// E.endDraw(); // Actually writes out the embroidery file.
}
Stitch size and spacing
Because of how Processing generates images, measurements are in pixels, not in mm -- this can make it a bit trickier to compare with other pieces of software.
In my experience, the default stitches used in PEmbroider are very small and very dense, much moreso than the defaults used by Brother software. Partly, this is a matter of taste, however, when using finer or stretchier fabrics, such tight and dense stitches can cause puckering (and these designs also take a lot longer).
This is something that's best to test out yourself and adjust, but I have included the presets I use below as a guide:
PEmbroiderGraphics E;
...
void setup() {
...
E.strokeSpacing(2.0) // this spaces the stroke (outline) stitches by 2 pixels
E.hatchSpacing(3.0); // this spaces hatch (fill) stitches by 3 pixels
E.setStitch(5, 15, 0.0) // this sets minimum stitch to be 5px
// desirable stitch length to be 15px
// resample noise to be 0.0
...
}
(note: you set both the minimum and desired stitch length, as when embroidering curved shapes not all stitches will be the same length).
Warnings and errors
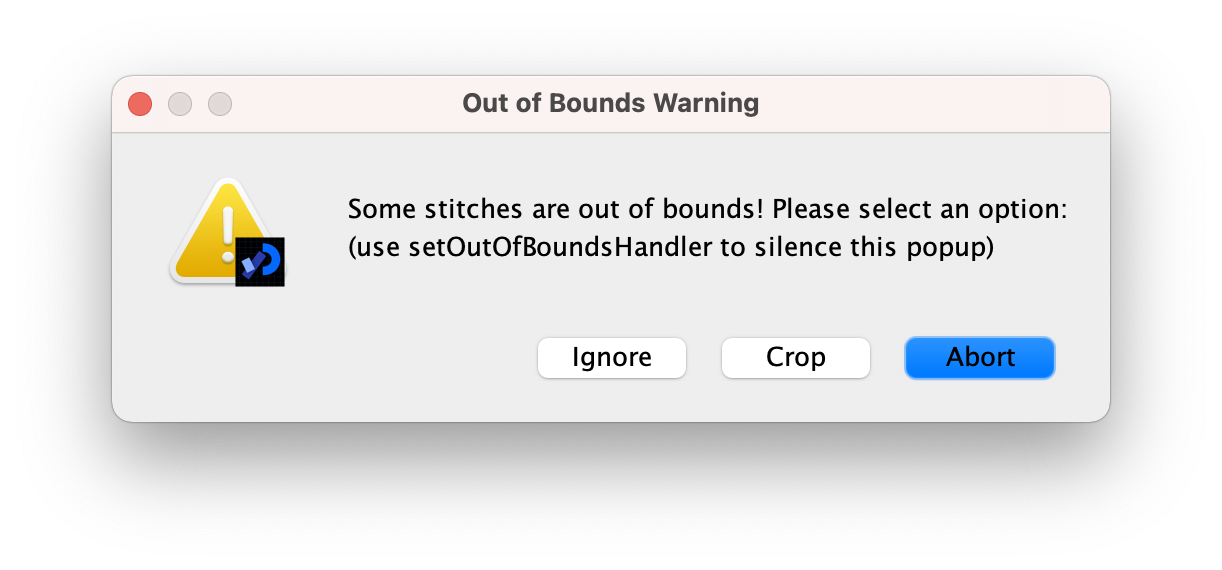
Stitches are out of bounds
A common warning is this one: it occurs when you have a design that goes right to the edge of the canvas. In my experience, so long as the design looks OK to you, this is normally fine to ignore, but it's worth making sure that the the design looks right before embroidering.
Designs don't display on the Brother embroidery machine selection menu
This only applies to the selection menu: if you click into the file, the design should show up, and the information the machine gives you about the design's size (and corresponding hoops) should be correct. If this is an issue, you can use the machine to save a copy of the file, which will be recognisable: if you are embroidering multiple designs in one session, I would recommend either doing this or giving your files distinctive names to prevent confusion.
Examples
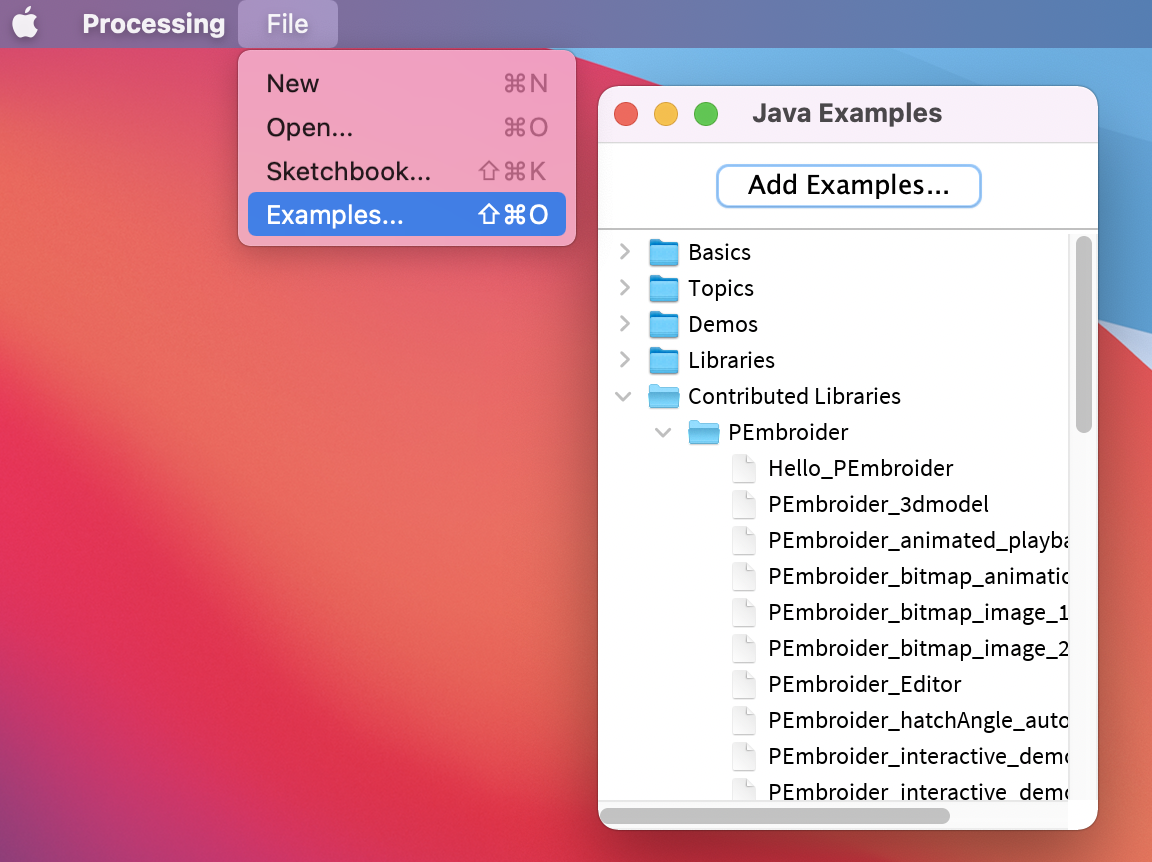
PEmbroider comes with a wide range of examples, that give a good idea of a number of different features of the machine. These are also good things to modify if you want to test out different stitch lengths and densities. Once you have installed PEmbroider, these may be accessed through the Processing examples menu. Many of these have already been stitched on the Brother machine as demos, and can be found behind the machine.
I've included some additional examples below that make use of some of the affordances of programmatic stitch generation.
Creating pixellated designs
One thing that programs like PEmbroider are particularly well adapted for is designs where the stitches need to be very precisely laid-out. It's much harder to get stitches to do what you want in software like PE Design, where you can control the parameters but not the actual stitch placement.
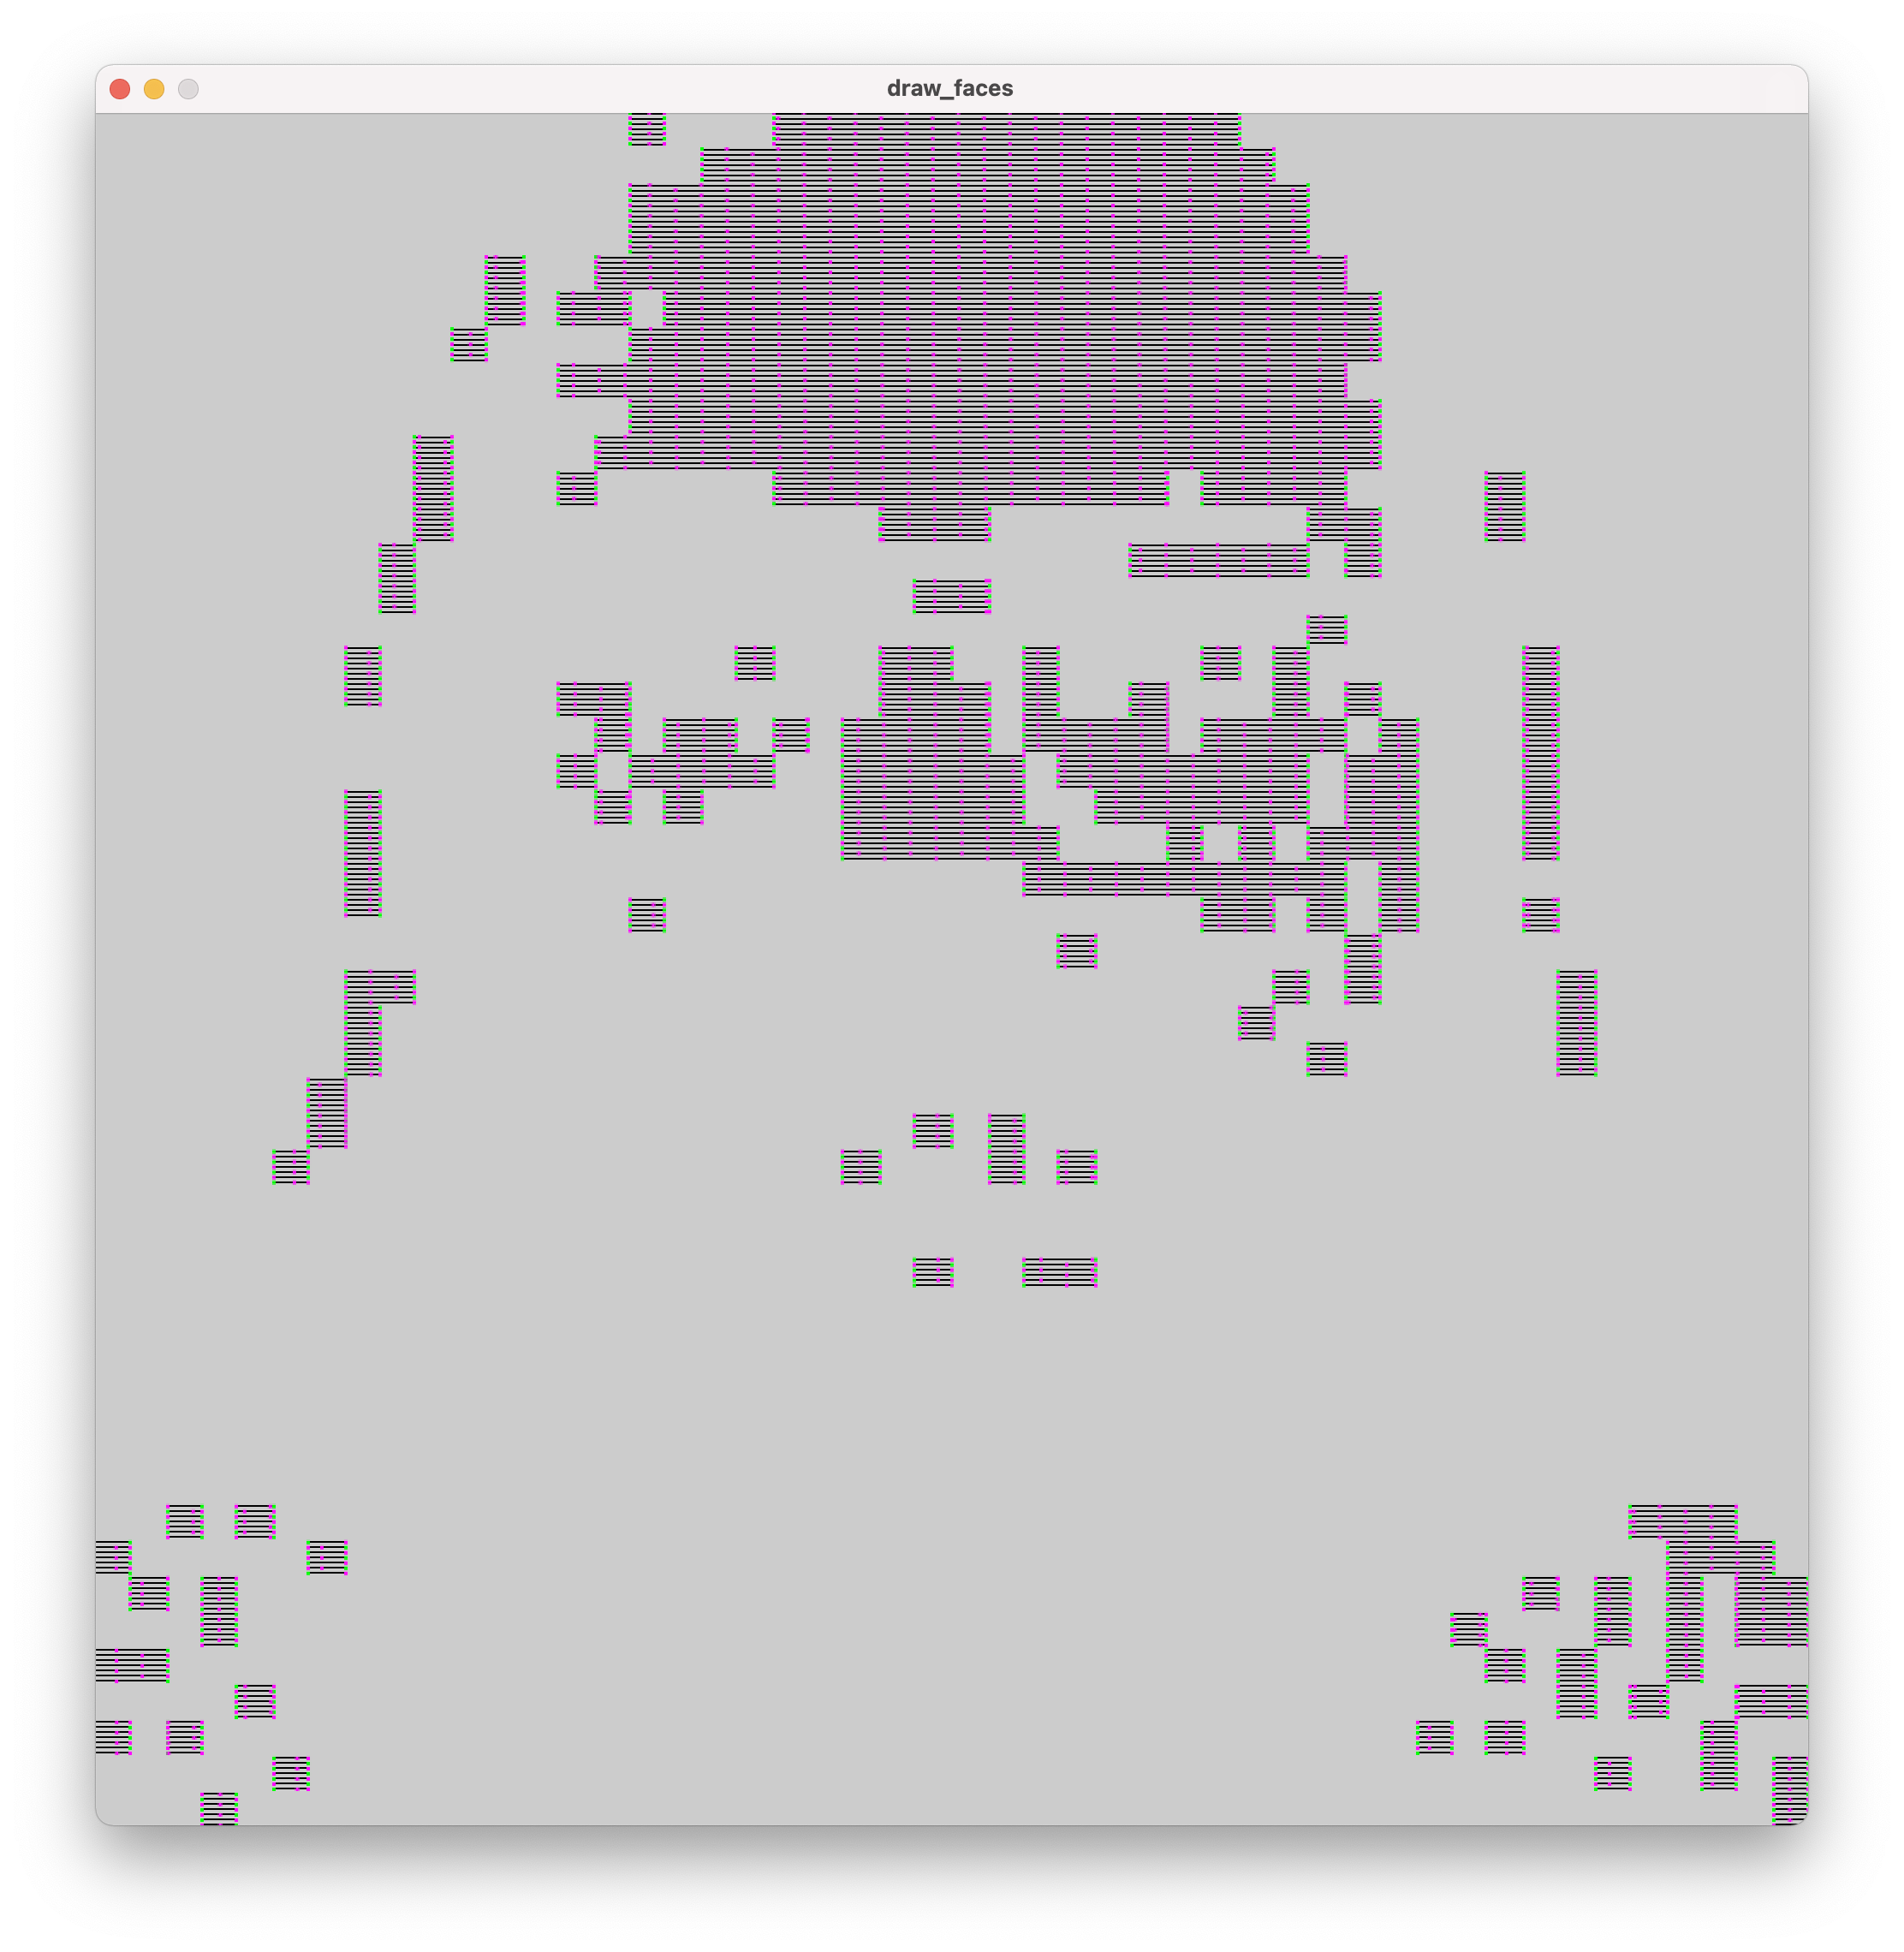
One such use-case is creating pixellated designs -- below is an example image and code that I have used in the past, that demonstrates how to manipulate stitches on a grid basis.
// PEmbroider script to stitch pixellated images
// author: Agnes Cameron
import processing.embroider.*;
PEmbroiderGraphics E;
void setup() {
size(1000, 1000);
noLoop();
// Load the bitmap image to embroider.
// Should consist of white shapes on a black background.
PImage myImage = loadImage("ken.gif");
// Create and configure the PEmbroider object, E
E = new PEmbroiderGraphics(this, 1000, 1000);
String outputFilePath = sketchPath("ken.pes");
E.setPath(outputFilePath);
// Initial setup of PEmbroider object.
E.beginDraw();
E.clear();
E.fill(0, 0, 0); // start the design at 0
E.noStroke();
// Parallel hatch
E.setStitch(5, 30, 0); //set the stitch to be the same size as the 'pixels'
E.hatchMode(PEmbroiderGraphics.PARALLEL);
E.hatchAngleDeg(0); // you want to set this to 0 for a 'pixel' effect -- default is angled
E.hatchSpacing(3.0); // this is nice and not overly dense
E.image(myImage, 0, 0);
// finishes the file and shows
E.optimize();
E.visualize(); // show the file
E.endDraw(); // write out the embroidery file
}
This code is created to run with a 1000x1000 .gif image, with a 'pixel' size (e.g. white squares) of
To run this code, create a folder called 'data' in the same folder as the processing file, and then save this image as 'ken.gif'. You can test this out with your own images, too.
The output should look something like this:
Workshop: Generative Embroidery with PEmbroider
This is the written version of an embroidery workshop in the CCI, and can either accompany the live workshop or be worked through by itself. As we go through the exercises, it's a good idea to have the PEmbroider Cheat Sheet open in a tab for reference. These notes are also heavily adapted from the cheat sheet. This workshop is based on Carpentries format, which means that participants should code alongside whoever is running it.
Copies of the files used for each of the exercises that can be downloaded here, but I'd recommend trying to generate the files yourself where possible.
1. Hello World: Drawing a Line
Follow the instructions here to set up PEmbroider on your computer. You will need Processing 4. The first thing we will do in PEMbroider is draw a single line, which we can also use to test everything is working correctly.
Template File
All files in PEmbroider have a similar structure, and the cheat sheet helpfully provides a template, which I've adapted slightly to match the file format we use in the CCI. We'll be using this as the basis for all the files in the workshop. This file draws a single line, but we can change that to anything we like.
// Example PEmbroider program
import processing.embroider.*;
PEmbroiderGraphics E;
void setup() {
// Starting up:
noLoop();
size(600, 600); // 100 is 1cm
E = new PEmbroiderGraphics(this, width, height);
// change this line you want a different file type
String outputFilePath = sketchPath("filename.pes");
E.setPath(outputFilePath);
E.beginDraw();
E.clear();
//-------
// Content goes here:
E.line(0, 0, 600, 600);
//----------
// Visualization and export:
// NOTE: Leave optimize() and endDraw() commented out,
// until you are ready to export the embroidery file!
// Don't forget to un-comment them when you want to export!
//
// E.optimize(); // VERY SLOW, but essential for file output!
E.visualize(true, true, false); // Display the embroidery path on-screen.
// E.endDraw(); // Actually writes out the embroidery file.
}
In order, this file:
- sets up a new canvas, of size 600x600 pixels
- tells the computer that it's an embroidery canvas, and sets an output file path
- draws a line on the canvas
- shows it to us (visualize) -- the
true, true, falsepart tells the computer whether to draw colours, stitches and the routes taken by the machine. I prefer these settings but they can all be helpful
There are some other lines that are 'commented out' (have slashes in front of them) and don't run. These we might use later but for now we don't need to use them.
When you run this file, you should see an output that looks like this (if you don't see this, you will want to check over the setup steps again):
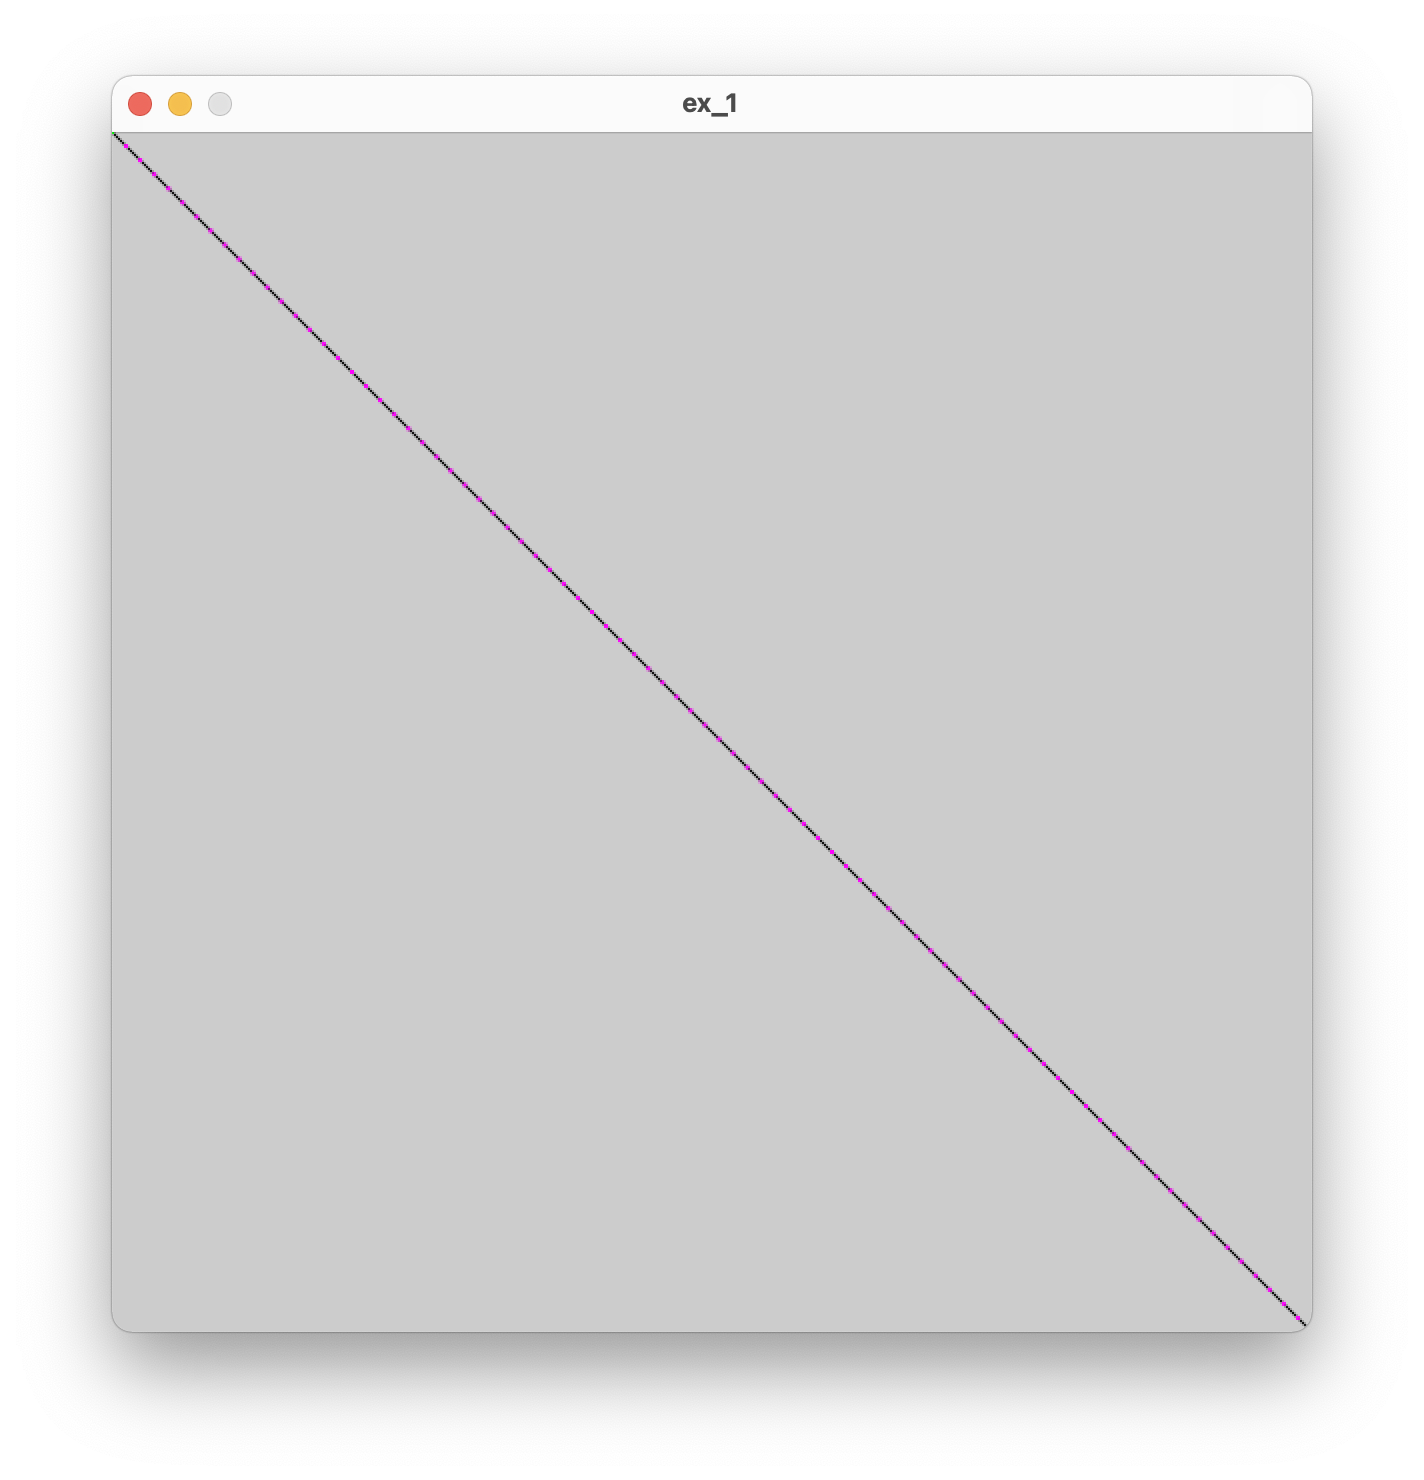
The pink dots represent the ends of stitches, where the needle enters the fabric. Shortly we will experiment with different stitch types and lengths, but for now we are using the default settings.
The first thing we will look at is the structure of the canvas. If you like, you can also try 'commenting out' the content line, to just see a plain canvas.
Exercise 1.1
- Can you make the canvas larger?
- Can you make the canvas rectangular rather than square?
Drawing lines
The PEmbroider code for drawing a line is:
E.line(x1, y1, x2, y2);
This means that (x1, y1) is the coordinates of the point where the line starts, and (x2, y2) is the point where the line ends. The E.line() part means "use the line function that belongs to PEmbroider, which is represented in our code by the letter E". We call this a 'method' In our code, we get a diagonal line because we draw from the point (0, 0) to the point (600, 600) (the edge of the canvas).
Exercise 1.2
- Can you make the line draw only halfway across the original canvas?
- Are you able to draw a vertical line? What about drawing 2 lines?
You might find these notes on coordinate grids in Processing helpful here!
2. Playing with shapes
From now on, unless we're changing more of the file, I'm going to list just the 'content' code that we're changing, using ... to represent the rest of the file. In our last exercise, the content was a single line -- the E.line() method -- but it can be more -- the important part is that it goes in the same place in the file each time.
Try changing out the line for a circle:
...
E.circle(200, 200, 200);
...
You should see a slightly off-center circle. In the documentation, the E.circle() method is listed as:
E.circle(x, y, r);
Exercise 2.1
- What do you think
rrepresents in this method? - Can you place the circle in the center of the canvas? What about a circle that fills the whole canvas?
- The PEmbroider method for drawing a rectangle is
E.rect(x, y, w, h);. Can you replace the circle-drawing line with a line that draws a rectangle instead? What do you thinkwandhrepresent?
Composite Shapes
PEmbroider also allows us to merge outlines to make composite shapes. This can quickly allow us to create more complex drawings. In this example, we merge together 2 circles:
...
E.beginComposite();
E.composite.circle(320, 250, 200);
E.composite.circle(420, 250, 200);
E.endComposite();
...
Exercise 2.2
- Experiment with changing the size and the position of the circles. What happens when you make one of the circles very large?
- Try adding a third circle. Can you make a clover shape? What about a snowman?
- What happens when you move the line
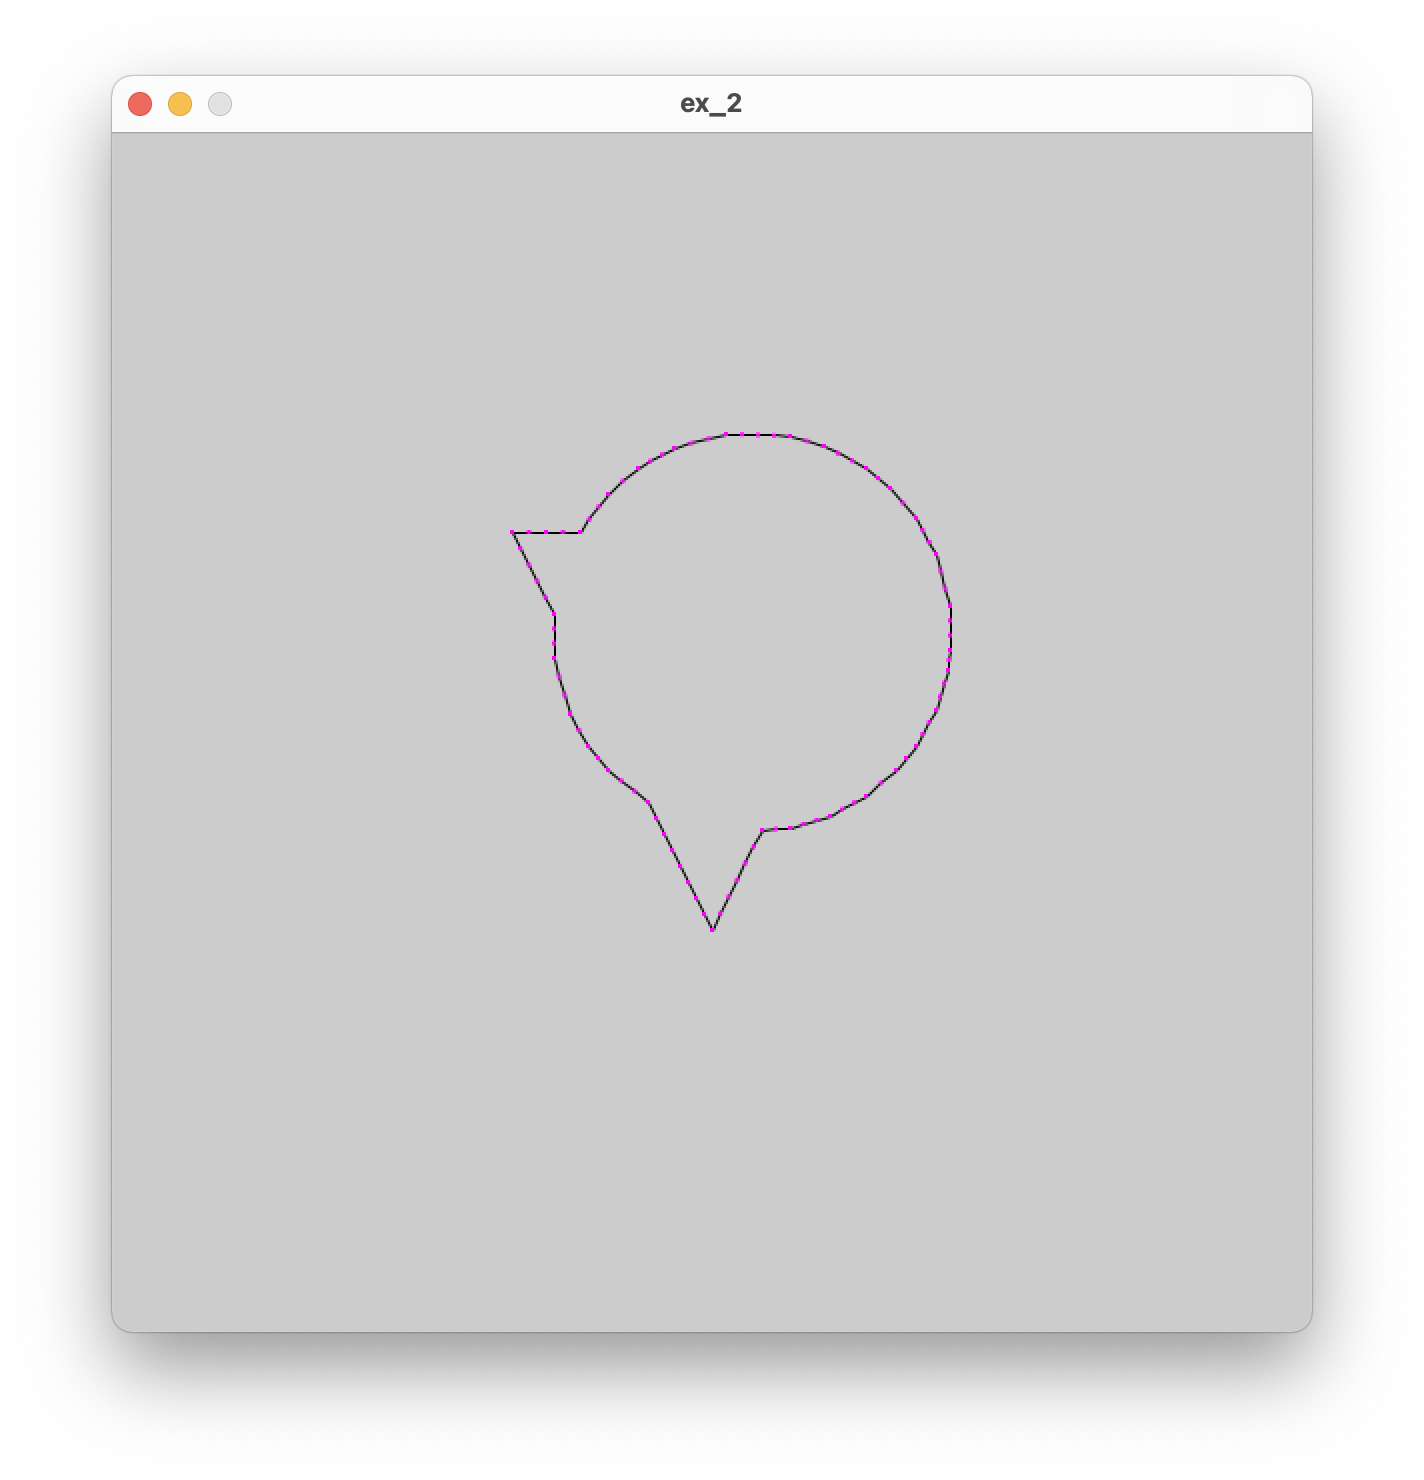
E.composite.circle(420, 250, 200);to after the lineE.endComposite();? Why do you think that happened? - Can you make a composite from a rectangle and a circle? Do you need to add anything to the original rectangle-drawing method?
- The PEmbroider method for drawing a triangle is
E.triangle(x1, y1, x2, y2, x3, y3);. Can you make a composite shape from a triangle and a circle? - Can you draw 2 separate composite shapes on the same canvas?
here's one I made earlier:
3. Fills and Hatching
Up until now, all the shapes we've been drawing have been outlines. PEmbroider supports several kinds of fills, which we will experiment with now. The way settings work in PEmbroider (and in Processing!) is that you set a bunch of settings, then draw the thing you want the settings to apply to, and then if you want to draw something with different settings, you change the settings and then draw the thing. For example, the order you'd do things if you wanted to draw a red square and a blue square would be:
> set fill to red
> draw square
> set fill to blue
> draw square
In our case, what this means is that if we add some code that adjusts the fill settings, this needs to go before the part where we draw our shape. Let's try drawing a filled circle:
...
E.hatchMode(E.PARALLEL);
E.fill(0,0,0);
E.circle(300, 300, 200);
...
Fill Types
There are 6 different fill types in total in PEmbroider. These can each be set using the following lines of code:
E.hatchMode(E.CONCENTRIC);
E.hatchMode(E.PARALLEL);
E.hatchMode(E.SATIN);
E.hatchMode(E.SPIRAL);
E.hatchMode(E.PERLIN);
E.hatchMode(E.CROSS);
Exercise 3.1
- Instead of drawing a circle, try and fill one of the shapes you made in the last exercise
- One at a time, try out the different fill types on your shape. Which is your favourite?
Fill Settings
As well as being able to change the type of fill, it's also possible to change the fill settings, namely the spacing of the fill lines, the colour of the fill, and the angle of the fill lines (for satin and parallel fills, where the lines have a prevailing angle).
We can do this using the same principles as before (e.g. putting the settings before the thing we want them to apply to). The methods to adjust the settings are listed below (note that we always need to specify a fill colour, even if it's just black):
E.hatchSpacing(spacing); // sets the density of adjacent runs (in machine units)
E.hatchAngleDeg(angle); // sets the orientation for SATIN & PARALLEL (in degrees)
E.fill(R, G, B); // sets your thread color (numbers between 0-255)
Exercise 3.2
- Try making one shape with a diagonal hatch fill, and another with a vertical fill. What happens when you place them on top of each other?
- What happens when you adjust spacing on concentric mode? What about Perlin mode?
- To un-set fill settings, you can use the line
E.noFill(). Can you use this line to make some code that draws a filled shape, and then draws an outline shape afterward?
Another really important line is the setStitch() property. This sets the length of the stitch. Unlike hatch spacing, setStitch takes 3 arguments:
E.setStitch(minLength, desiredLength, noise);
- minLength: the shortest the stitch can possibly be
- desiredLength: what length most stitches should be
- noise: how much this should vary (e.g. should the stitches be very even). The noise property changes the texture of fills significantly.
Exercise 3.3
- experiment with modifying the stitch lengths in your fills
4. Stroke and Stitch Settings
The final group of settings we're going to look at is modifying the stroke (line) style. Similarly to fills, you need to modify the settings before drawing your line.
There are 2 stroke types in PEmbroider; tangent is the one we've been using by default, but perpendicular can be used to get a thicker, more defined outline.
E.strokeMode(E.PERPENDICULAR); // Stitches are perpendicular to the stroke
E.strokeMode(E.TANGENT); // Stitches go in the same direction as stroke
As before, stroke color can be set using RGB values. The other settings are the thickness of the line (stroke weight) and the stroke spacing (e.g. for perpendicular strokes).
E.stroke(R, G, B); // sets the stroke color, just like Processing.
E.strokeWeight(width); // sets the thickness of the stroke (in machine units)
E.strokeSpacing(spacing); // sets the density of the hatching within the stroke
Exercise 4.1
- create a file with 4 different lines, each with different stroke settings. How much variation can you get?
5. Loops and Randomness
Now we have a good idea of what you can do with PEmbroider's API, we can try out some generative code.
For loops
For loops are structures that allow the same piece of code to be repeated multiple times with different inputs. We will have a go with them here, but for a full tutorial it's worth going through this page on for loops in Processing.
We're going to try out a for loop that repeatedly draws lines on the canvas, changing the position of the line each time it draws.
...
for (int i = 1; i < 10; i++) {
E.line(50, i*50, 550, i*50);
}
...
In this code, we create a number, i, that will go from 1 to 10, increasing every time. The first time the code runs, i is equal to 1, and so i*50=50. The next time, i=2, so i*50=100, and so on, up till i reaches 9. i cannot reach 10 (as the code will only run for i<10) and so the for loop ends.
Exercise 5.1
- What happens when the number multiplying
iis different fory1andy2? - Can you make a series of vertical lines instead of horizontal lines by changing where
iis used? - Can you draw a grid?
- What happens when you increase and decrease the number of repeats (e.g. the number 10 in the example)
- Experiment with using
iin different positions. What happens when you add or subtract it (or multiples of it)? Can you make a radial pattern?
Random numbers
Another very useful tool for making generative patterns is randomness. Unlike the code we were using before (which used scaled variations where we could predict what the outcome would be), randomness adds an element of chance. In Processing, the function random(50) will return a random number between 0-50. This number will be a decimal (float) rather than a whole number (int), so if we want to use it like a whole number we also need to use the int() method.
...
for (int i = 1; i < 10; i++) {
E.circle(50 + i*50, 100, int(random(50)));
}
...
Exercise 5.2
- Run this code a few times. What do you notice? What is being randomly varied?
- What happens when you add a number to the random number? What if you multiply it by something?
- Can you make the randomness affect the y position?
Nesting for loops
The last thing we will look at is using 2 nested for loops to create 2D designs. This isn't the only way to achieve this -- remember the grids from exercise 5.1 -- but this will help us a lot.
Before we get there, we could also look at what happens when we nest for loops inside other things, in this case, the composite shapes code from before.
...
E.beginComposite();
for (int i = 1; i < 10; i++) {
E.composite.circle(50 + i*50, 100, 50 + int(random(50)));
}
E.endComposite();
...
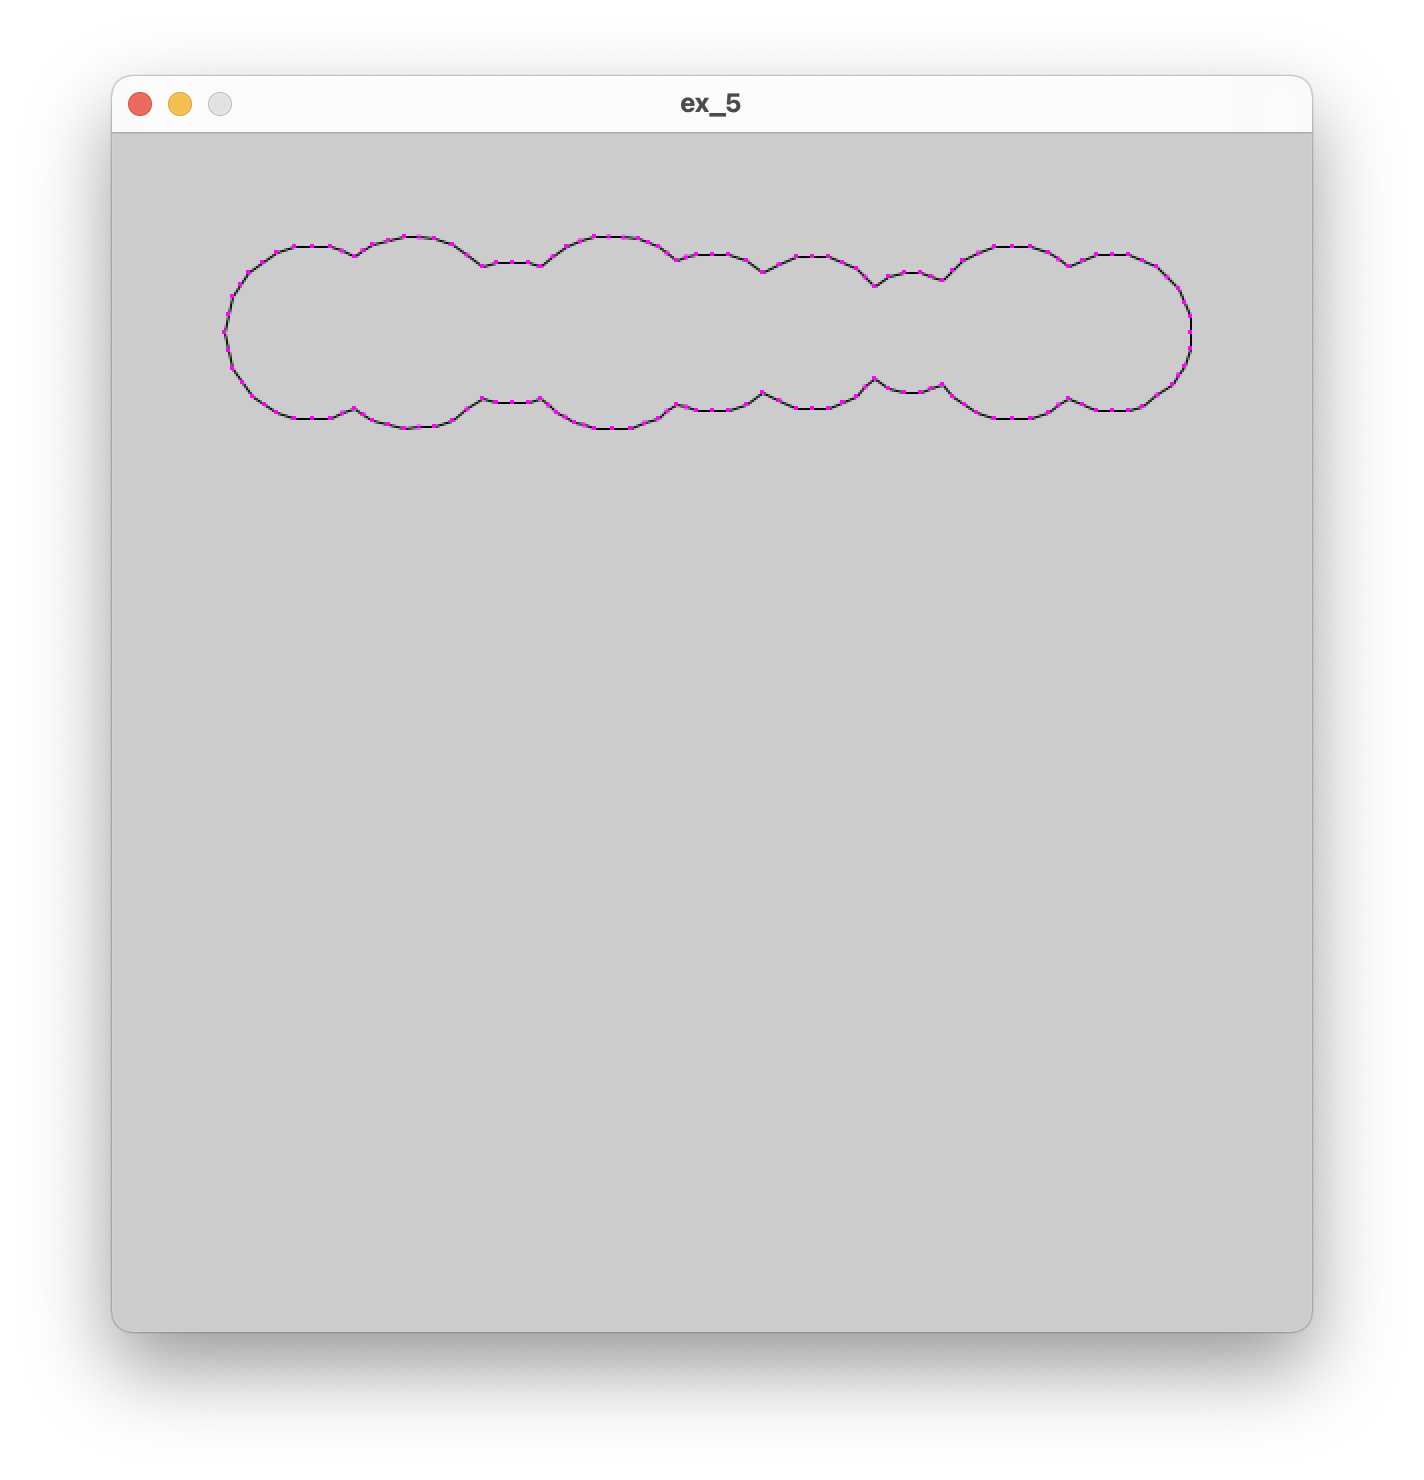
By putting the for loop inside E.beginComposite(); and E.endComposite();, it's the same (from the point of view of the computer) as writing 10 separate composite circle lines, but for us it's a whole lot quicker.
and look! A beautiful worm:
We can use the same principle to put one for loop inside another:
for (int i = 1; i < 10; i++) {
for (int j = 1; j < 10; j++) {
E.circle(i*50, j*50, 50 + int(random(50)));
}
}
Now we get a whole grid of circles!
Exercise 5.3
- You can also use
random(-60, 60)to generate a number that can be positive or negative. Try using this in one of the position values. - Have a go at making these circles into a composite shape. What happens when you change the numbers that are multiplied and added? Have a go at playing with these till you get an image that you like.
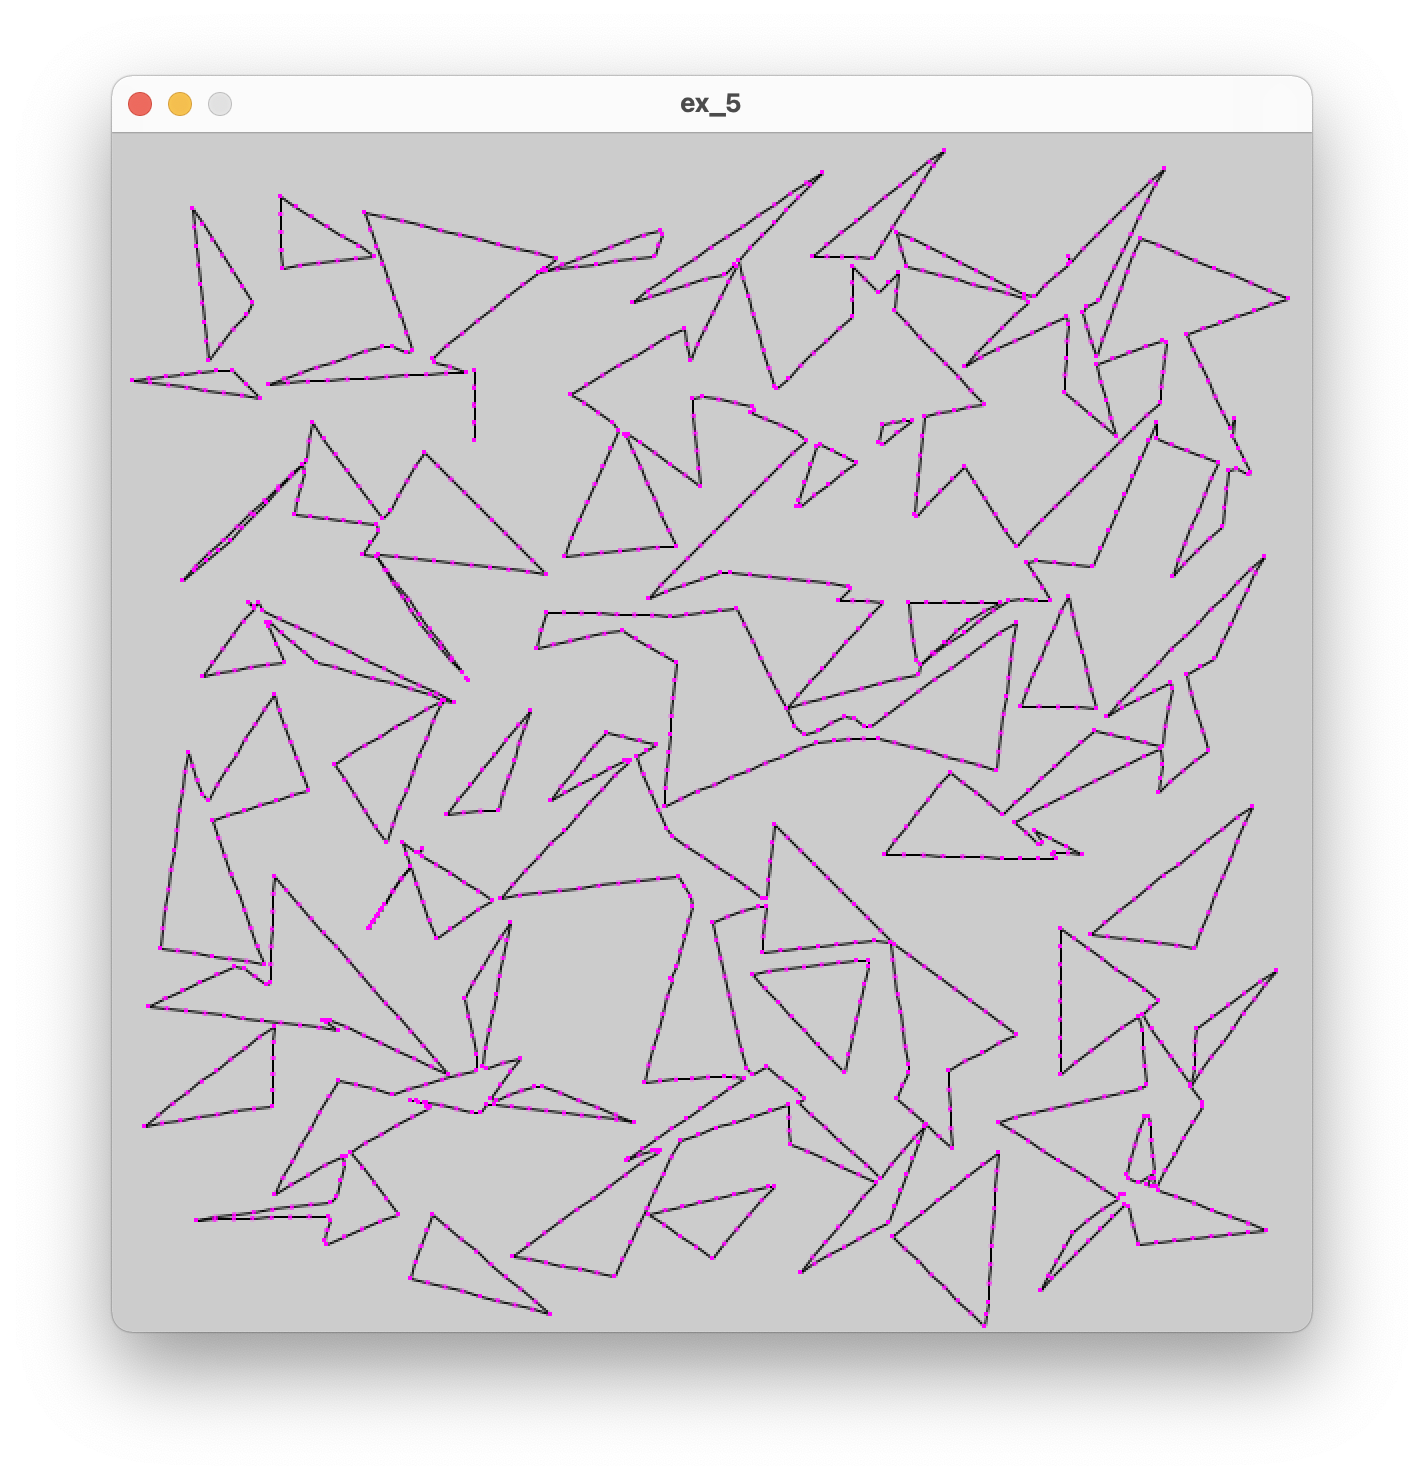
- Can you do this with a different shape? What about triangles?
Here's one I made earlier:
6. Polylines and curves
As well as having preset shapes, PEmbroider (like Processing) supports making custom shapes by defining a set of points along a line. To start one of these shapes, you need to bookend the line with:
E.beginShape();
// ...points
E.endShape();
If the final co-ordinate matches the first co-ordinate, we can also fill the shape: if not, it's just a stroke. Polylines are also great as within the line the machine doesn't need to make a jump; this is helpful for avoiding too many floats later on.
Each point on the line is given by E.vertex(x, y), a single point in space. To draw a spiky shape, we can draw a bunch of points:
E.beginShape();
E.vertex(10,10);
E.vertex(500,50);
E.vertex(450,250);
E.vertex(350,140);
E.vertex(200,300);
E.vertex(10,10);
E.endShape();
Exercise 6.1
- Have a go at making a shape of your own: can you make a 5-pointed star? Can you add a fill?
Curves
There are a number of different ways to render curves in Processing, which inherit from the different curve-drawing techniques in computer graphics. These are: arcs, splines and Bézier curves. The Processing curves tutorial has a good summary of this:
- Use
arc()when you need a segment of a circle or an ellipse. You can't make continuous arcs or use them as part of a shape. - Use
curve()(the spline function) when you need a small curve between two points. UsecurveVertex()to make a continuous series of curves as part of a shape. - Use
bezier()when you need long, smooth curves. UsebezierVertex()to make a continuous series of Bézier curves as part of a shape.
The tutorial gives a great overview of the different types and I'd recommend experimenting with all of them.
7. Generating embroidery from data
Processing allows data to be loaded in CSV and JSON formats. For this exercise, we're going to use NASA's Land Ocean Surface Temperature dataset, which gives the mean global temperature since 1880 till present-day. To do this task, I have created a folder called datasets within the processing sketch folder, and created a file inside that called temp.csv.
First, make an empty sketch and try to read in the data from the .csv file:
Table table;
void setup() {
table = loadTable("datasets/temp.csv", "header");
println(table.getRowCount() + " total rows in table");
for (TableRow row : table.rows()) {
int year = row.getInt("year");
float temp = row.getFloat("unsmoothed");
println("year " + year + " temp " + temp);
}
}
You should see the data from the csv printed to the terminal.
The for loop that starts for (TableRow row : table.rows()) is where we're going to use our values. First, we can try a simple example of drawing circles for each entry in the table, with the radius proportional to the temperature. As some temperature values are negative, we will need to adjust these up.
We want to add the embroidery template setup before the table is created (and also E.optimize()) after! To draw our circle, we can add directly to the for loop:
...
for (TableRow row : table.rows()) {
int year = row.getInt("year");
float temp = row.getFloat("unsmoothed");
float radius = (temp + 1.0)*45;
E.circle(100, 100, radius);
}
...
This code will create all the circles drawn in the same place. Ideally we'd like to space them out! We can do this by adding a counter:
...
int counter = 0;
for (TableRow row : table.rows()) {
int year = row.getInt("year");
float temp = row.getFloat("unsmoothed");
float radius = (temp + 1.0)*45;
E.circle(100, counter*20, radius);
counter = counter + 1;
}
...
7.1 Creating a grid from linear data
An issue we have here is that the data comes as one long list, which makes it hard to generate a tractable embroidery file. There are a number of ways around this, one of which is to use the modulo operator. This gives you the remainder when a number is divided by another number. This means, we can define a row length and count along our dataset in rows.
...
int counter=0;
int rowLength = 13;
int spacing = round(900/(rowLength));
for (TableRow row : table.rows()) {
int i = counter % rowLength;
int j = floor(num/rowLength);
int year = row.getInt("year");
float temp = row.getFloat("unsmoothed");
float radius = (temp + 1.0)*45;
E.circle((i+1)*spacing, (j+1)*spacing, radius);
counter=counter+1;
}
...
8. Tips, notes, further reading and extension exercises
We've scratched the surface of PEmbroider's full capabilities, which include things like image imports, interpolation, clipping and more.
8.1 Saving files + naming
To save the file as an embroidery file, you need to
String outputFilePath = sketchPath("triangles" + str(int(random(0, 100))) + ".pes");
8.2 Scale, density and stitch sizing
I personally find PEmbroider's presets a bit dense, and think they make for quite tough-feeling embroidery. My main recommendation is to make a sample sheet where you experiment with different fill densities, stitch lengths and stroke widths till you find some you like, but failing that, my defaults are:
E.strokeSpacing(2.0) // this spaces the stroke (outline) stitches by 2 pixels
E.hatchSpacing(3.0); // this spaces hatch (fill) stitches by 3 pixels
E.setStitch(5, 30, 0.0) // this sets minimum stitch to be 5px
If you want to use these throughout, just stick this above the 'content' section of your file.
Extension exercises
- Have a go at using randomness to control the fill, colour, and spacing properties of different shapes.
- Take a look at the
shape_cullingexample in the PEmbroider examples folder. Have a go at using your favourite of the culling options on different overlapping shapes. Can you add composite shapes to their code? How do they compare? - Take a look at the
hatchangle_autodemo. What lines are they using to follow the mouse? Could you use those numbers to generate other things?
Workshop: Using Arduino with PEmbroider
This is a write up of part of the PEmbroider tech skills workshop explaining how to use inputs from Arduino to alter a PEmbroider sketch. It shows the example of using an LDR to vary the radius of a circle.
There are a few steps to this process:
1. Circuit
First, you need to build your circuit. This is the same as you would build any Arduino circuit and can use anything that will give you a reading such as potentiometer, LDR, button, switch, etc. Below is the circuit for an LDR.
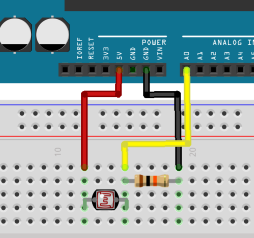
2. Arduino Code
The setup for the arduino code is nice and simple, we just need to read our value then print it to serial. Make sure you are using println() so each value prints on a new line.
void setup() {
Serial.begin(9600);
}
void loop() {
int val = analogRead(A0);
Serial.println(val);
delay(100);
}
Once you have uploaded this, make sure that the Serial Monitor is closed. If left open, processing won't be able to read the data. Also take note of the frequency used in Serial.begin() and the COM number when connecting as these both need to be matched in the Processing code.
3. Processing Code
There are a few things that we need to set up in this part of the code.
Import libraries and create objects
First, we need to import the correct libraries and create our Serial object, a variable to store the value from the Arduino (which will be a string), and a file number variable (which we will use later).
import processing.serial.*;
import processing.embroider.*;
PEmbroiderGraphics E;
Serial myPort; // Create object from Serial class
String val = "0"; //Create variable to hold value from Arduino
int fileNumber = 0;
Setup
Within the setup() function, we will find and connect to the correct serial port.
println(Serial.list());
String portName = Serial.list()[0]; //change the 0 to match your port
myPort = new Serial(this, portName, 9600); //this freq value must match the arduinos
The first line here will print all the available ports. Using this, you can then select the same one that your Arduino is connected to by changing the number in the square brackets on the second line. Also, make sure that the frequency value matches the Arduino's Serial port.
Draw
Inside the draw() function we will then read the data from the Arduino.
if(myPort.available() > 0){
val = myPort.readStringUntil('\n');
}
This can then be used as a variable within our sketch. For example, as the radius of a circle.
float r = map(float(val),0,800,0,300);
E.circle(width/2,height/2,r);
The value is read as a string so we have to cast it to float in order to use it. The map() function is used to take the values given from the Arduino and map them to the range of values you want to be used in the sketch.
Write out file
This sketch is currently not actually producing an embroidery file so we need to add a trigger that will cause the file to write out. You could use a variety of inputs both from the Arduino or computer to do this. Below, we are using the space bar.
void keyPressed() {
// Export the embroidery file when we press the space bar.
E.optimize(); //important to include - optimizes the embroidery paths
if (key == ' ') {
String outputFilePath = sketchPath("PEmbroider_arduino_demo_" + fileNumber + ".pes");
save("PEmbroider_arduino_demo_" + fileNumber + ".pes");
E.setPath(outputFilePath);
E.endDraw(); // write out the file
fileNumber += 1;
}
}
Here we are using the fileNumber variable we created before so that each time we write out a file, it has a new name and won't overwrite previous one.
Full Code
So, for this sketch, the full code would be as below:
import processing.serial.*;
import processing.embroider.*;
PEmbroiderGraphics E;
Serial myPort; // Create object from Serial class
String val = "0";
int fileNumber = 0;
void setup() {
size(600, 600);
E = new PEmbroiderGraphics(this, width, height);
println(Serial.list());
String portName = Serial.list()[6]; //change the 0 to a 1 or 2 etc. to match your port
myPort = new Serial(this, portName, 9600);
}
void draw(){
background(200);
E.beginDraw();
E.clear();
E.noFill();
// If data is available, read and store in val
if ( myPort.available() > 0) {
val = myPort.readStringUntil('\n');
}
float r = map(float(val),0,800,0,300);
E.circle(width/2,height/2,r);
//----------
E.visualize(true, true, false); // Display the embroidery path on-screen.
}
void keyPressed() {
// Export the embroidery file when we press the space bar.
E.optimize(); //important to include - optimizes the embroidery paths
if (key == ' ') {
String outputFilePath = sketchPath("PEmbroider_arduino_demo_" + fileNumber + ".pes");
save("PEmbroider_arduino_demo_" + fileNumber + ".pes");
E.setPath(outputFilePath);
E.endDraw(); // write out the file
fileNumber += 1;
}
}
Importing Multiple Readings
If you have multiple readings from the Arduino, there are a few ways you could get all the data over to Processing. In this example, we combine all readings into one variable which is sent across then split apart within Processing.
Arduino Code
To combine the readings into one variable, we must make sure that each value is the same length. To do this, we cast the readings to strings them add 0s to the beginning until it reaches the desired length. These are then combined into one string and printed to serial.
int val1 = analogRead(A0);
int val2 = analogRead(A1);
Serial.print(val1);
Serial.print(",");
Serial.print(val2);
Processing Code
Once this string is received in Processing, we can split it apart to get each value.
int val1 = int(val.substring(0,4));
int val2 = int(val.substring(4,8));