Digital Knitting Machine

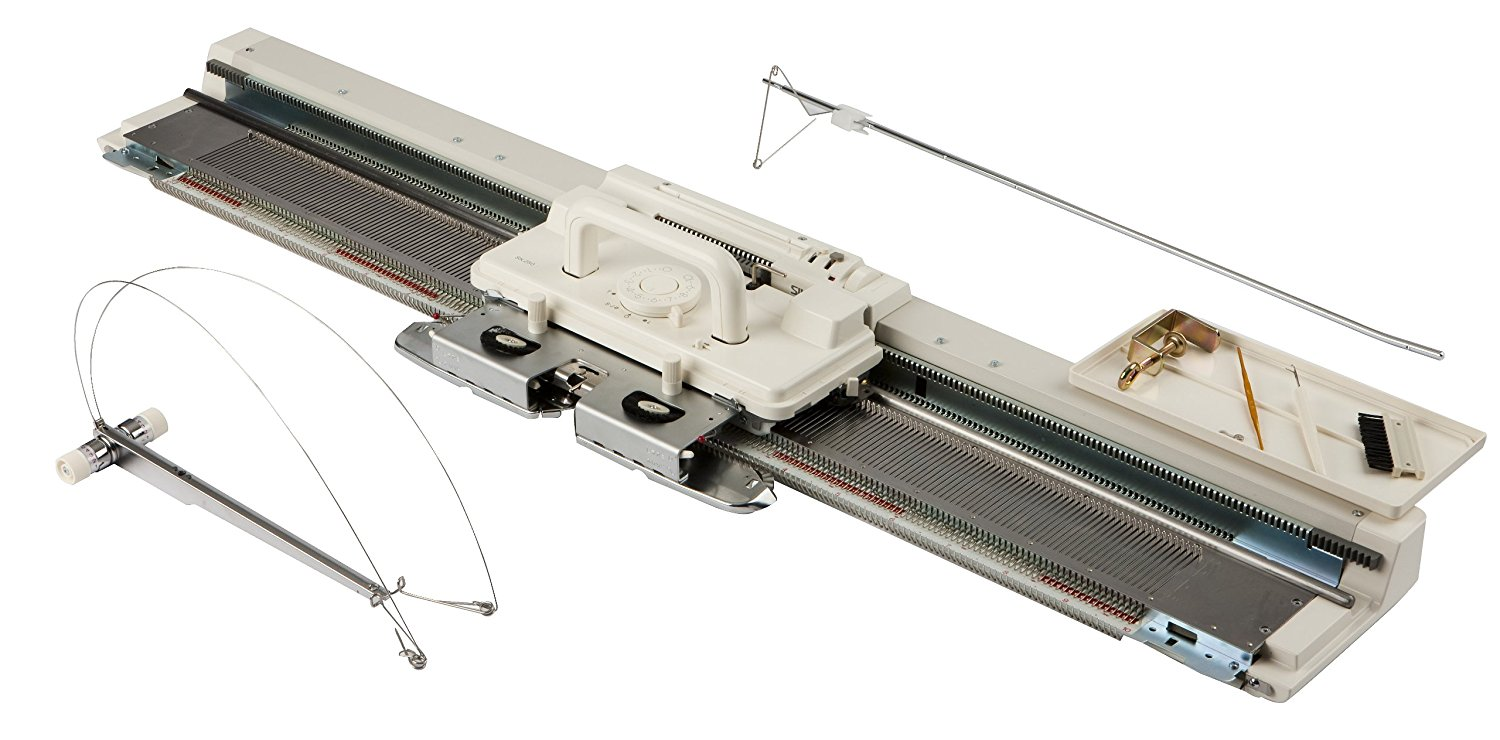
We have a Silver Reed SK840 Knitting Machine which can be programmed to create custom knitted pieces. Students must complete an induction (or demonstrate existing ability to use a knit machine) in order to use this machine. Inductions last 3 hours, and give a full overview of basic technique.

These are bookable on ORB here. Please only book an induction if you are definitely want to use the machine, you are available to attend for the entire time, and you can commit to practicing using the machine for at least 3 hours in the week following. If you have questions about the machine and are not sure whether you want to use it for a project, you can book a technical tutorial with Agnes to discuss.

Using the Silver Reed SK840 Knitting Machine

Overview

The Silver Reed SK840 knitting machine is a 4.5mm standard-gague knitting machine that is intended for use with 3- and 4-ply yarns. The Silver Reed manual is available online here, and we have a paper copy in the workshop (as the online copy is poorly digitised, we will also make a better copy soon). You must be trained by a member of staff (currently, ask Agnes) before using the machine -- this guide is here for reference and troubleshooting.

A picture of the silver reed knitting machine, showing different accessories laid out beside the needle bed.

The SK840 is a domestic knitting machine, and requires some manual input to operate. Fully-automated machines are normally referred to as 'industrial' knitting machines, to differentiate them from their domestic equivalents. Despite the lack of full automation, domestic knitting machines are often used in fashion for prototyping and designing new textiles. To learn more about industrial machines, this video gives an overview of common types, and this video is a good intro guide to knitting in general. If you want to look deeper into industrial knitting principles, the Indian Institute of Technology's textile technology department has a whole lecture series online that's very clear and gives a great amount of detail.

Learning Machine Knitting

This post is not a detailed tutorial, but instead should serve as an introduction to the capabilities of our machine, an idea of different avenues to explore, and an overview of the steps involved in creating knitted textiles in the CCI. Machine knitting is detailed and complex, and requires time to learn and develop technique.

How to search for knitting tutorials

When looking for guides online, you will notice many variations in machine make and type, including machines with plastic beds, doubled beds, different needle gagues and tools, and a variety of carriages. While there are details particular to the Silver Reed, a lot of technique can also be learned from general 'knitting machine' tutorials on any machine as the core operation of the needles and carriage is very similar. The caveats to this are when someone is using a carriage we don't have (e.g. a lace carriage), or using both beds of a double-bed machine (if they're using one bed, it's totally fine). If you're unsure, just ask (more likely than not, we can do it on our machine).

Steps to Create Knitted Textile

In machine knitting, knitted fabric is created by manually sliding the carriage back and forth over the needle bed, which loops a single strand of yarn a row at a time. Knitting is distinct from weaving: in weaving, fabric is created by interlacing 2 sets of threads at right angles to one another, while knitting involves taking a single thread and looping it around itself, one row at a time. (we currently don't have any weaving capabilities in the CCI).

A diagram showing the structure of knitted fabric

Casting on and off

Because of the structure of knitted fabric, the top and bottom edges of the textile need to be made using a special stitch, to prevent the fabric from unravelling. At the start of the piece this is called 'casting on'; at the end it's called 'casting off'. Depending on the yarn, if you are just experimenting with samples then you can get away without casting off (the fabric will still be vulnerable to unravelling), though there is no way to knit without casting on.

Casting on

There are a few different cast-on techniques that can be used on the Silver Reed, 2 of which are enumerated in the manual:

Casting/binding off

Casting off is an important technique to learn, and while slow at first will get much faster over time. The general idea is to bind off one stitch at a time by looping it into the next stitch along, working your way across the fabric until there is a single stitch left to tie off.

There are 2 main techniques: latch tool cast-off and transfer tool cast-off. Transfer tool is a little slower, but considerably easier to learn (and the one I'd recommend starting with). This video does a good job of demonstrating both techniques.

Photo of the edge of knitted fabric, showing the casting off

Different Types of Stitch

The SK840 supports a range of options for different kinds of stitch, which can be selected by changing the dial on the top of the carriage. Many of these stitches may also be used alongside the

The SK840 may be computer-controlled using the DesignaKnit software and SilverLink module, that connects to the knitting carriage. Currently at CCI we do not have either a lace carriage or a ribber. A key to the core machine parts is pictured below:

The simplest knitting style on the machine is called 'Stockinet' -- this is a style of knitting that will result in a smooth 'knit' side on one side of the fabric, and a rougher 'purl' side on the other.

Stockinet

This is the simplest form of knitting, and equivalent to a 'knit-purl' alternating stitch in hand knitting. It produces a flat, smooth side (the 'right side') and a rougher side ('wrong side'). To knit stockinet, select the 'O' stitch setting on the carriage.

All stitch varieties listed here still require a stockinet cast-on.

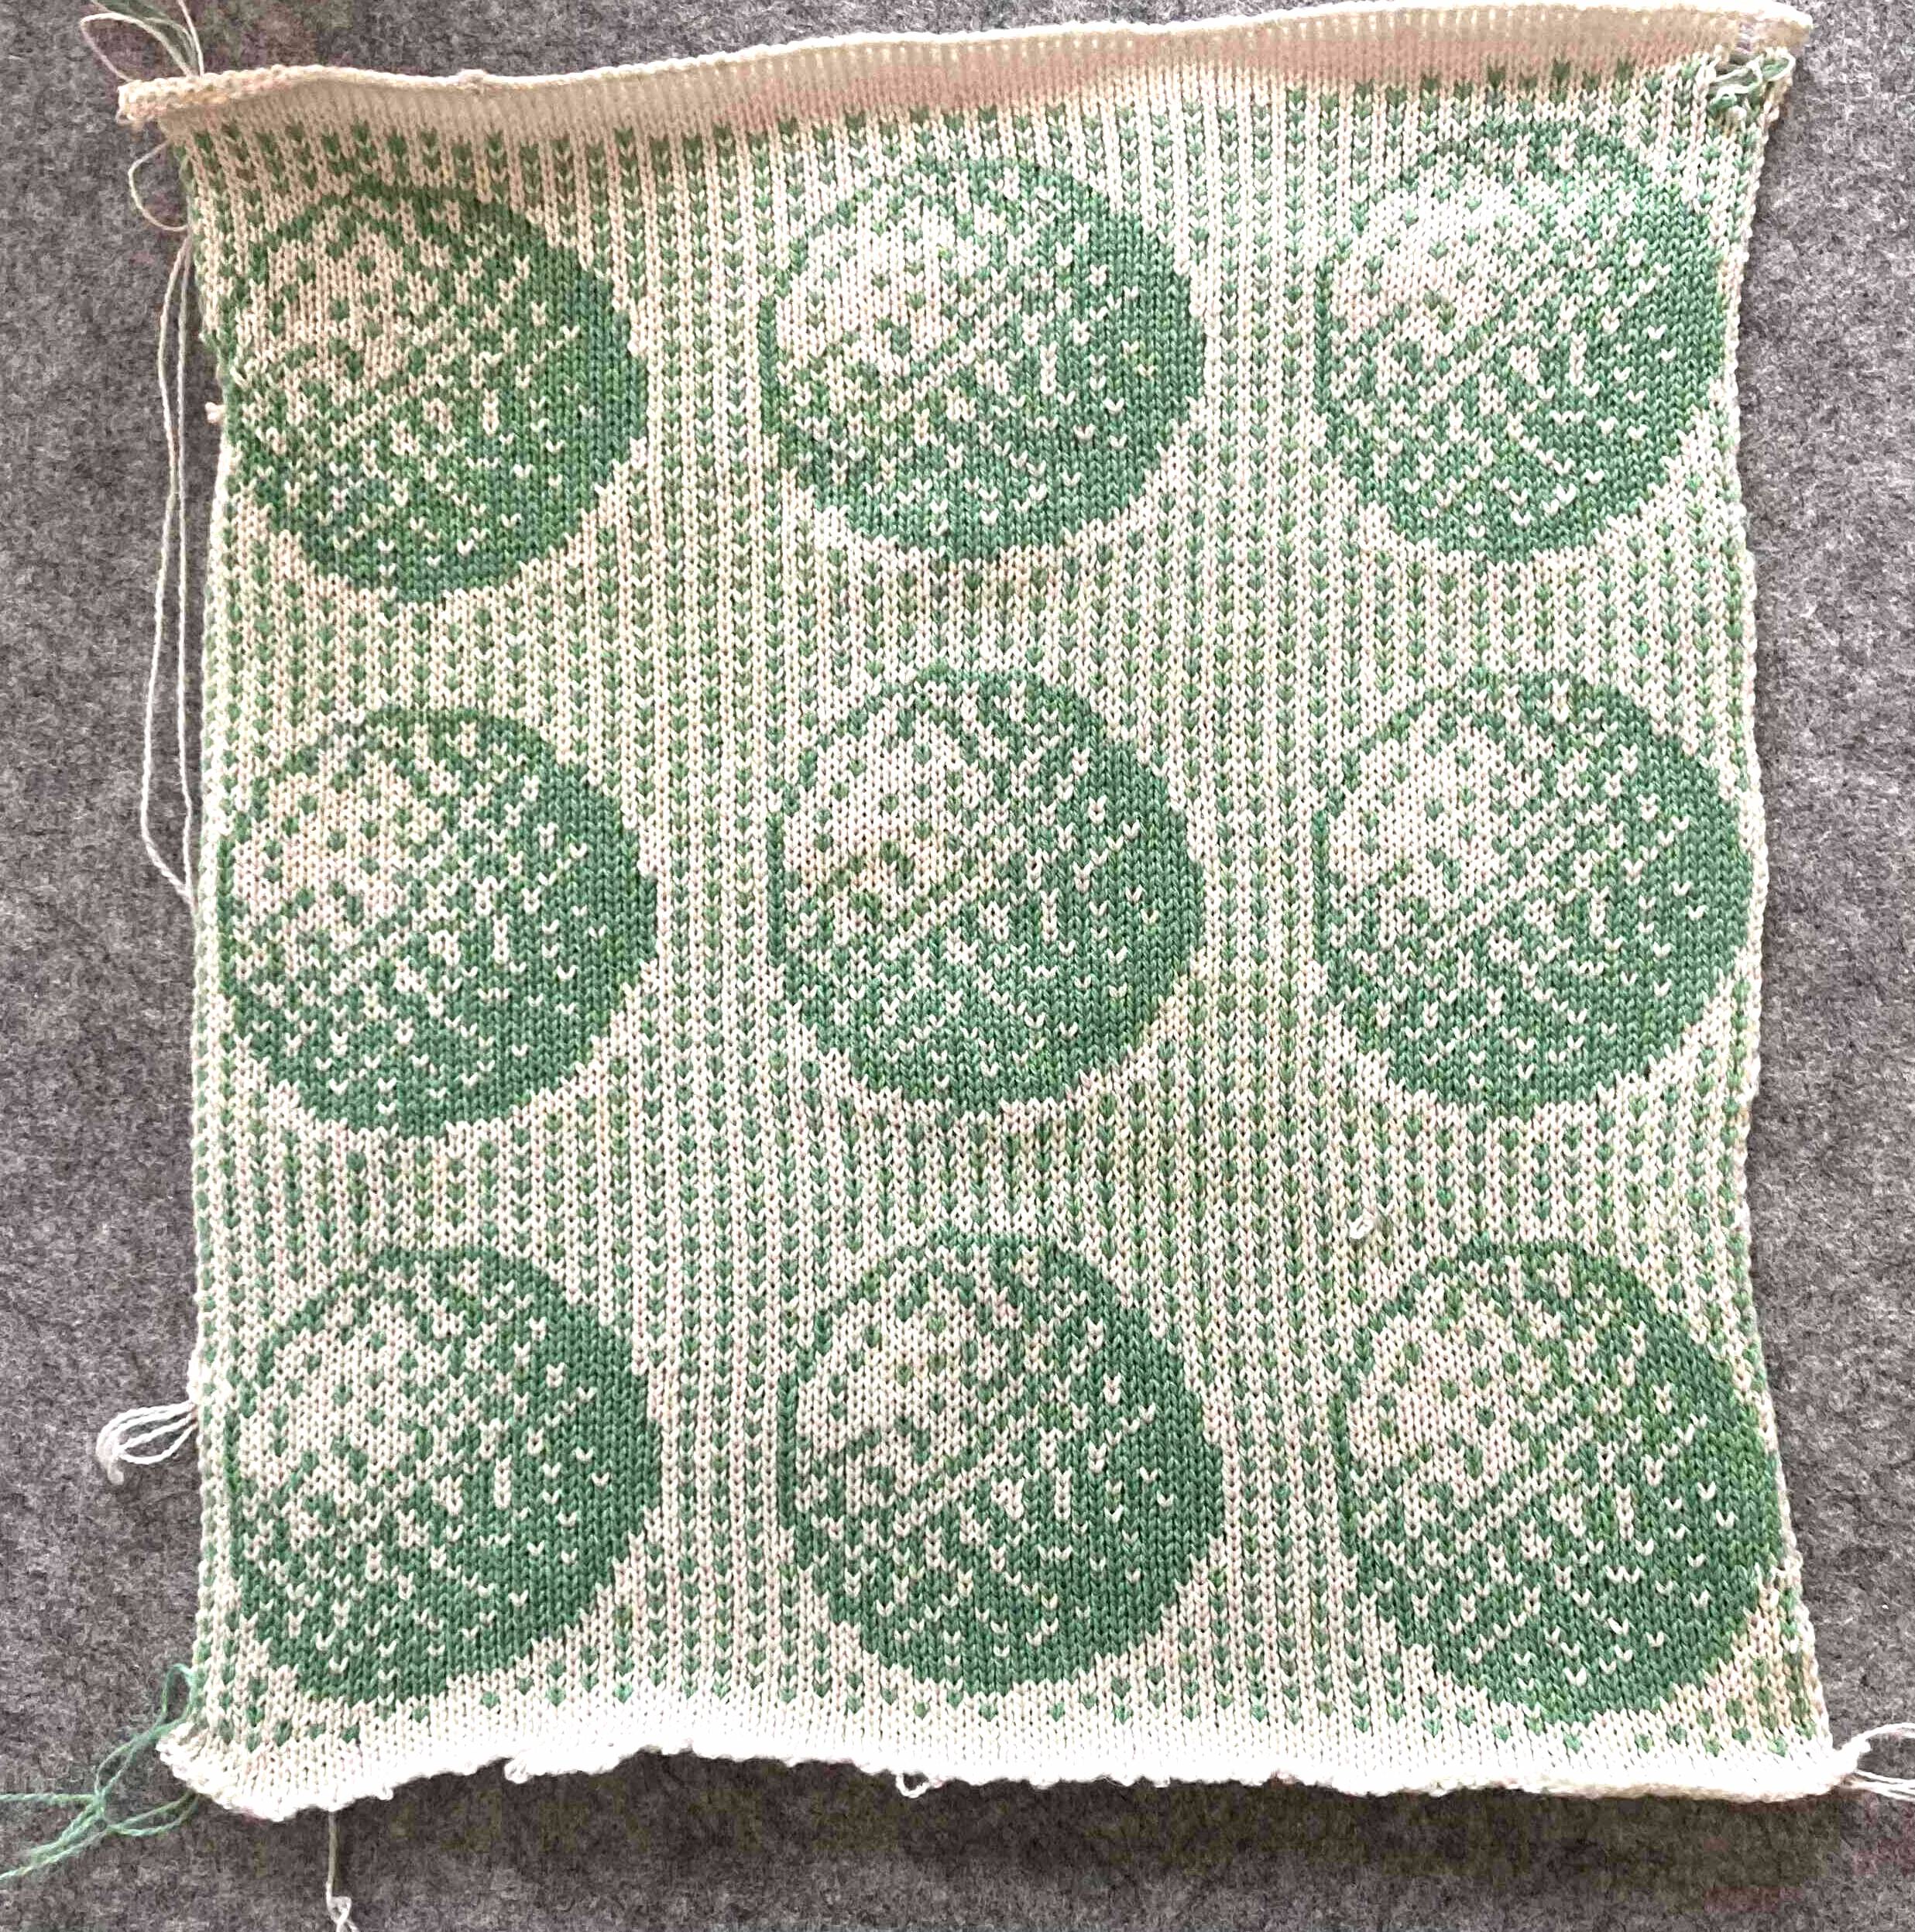
Fair Isle and Patterning

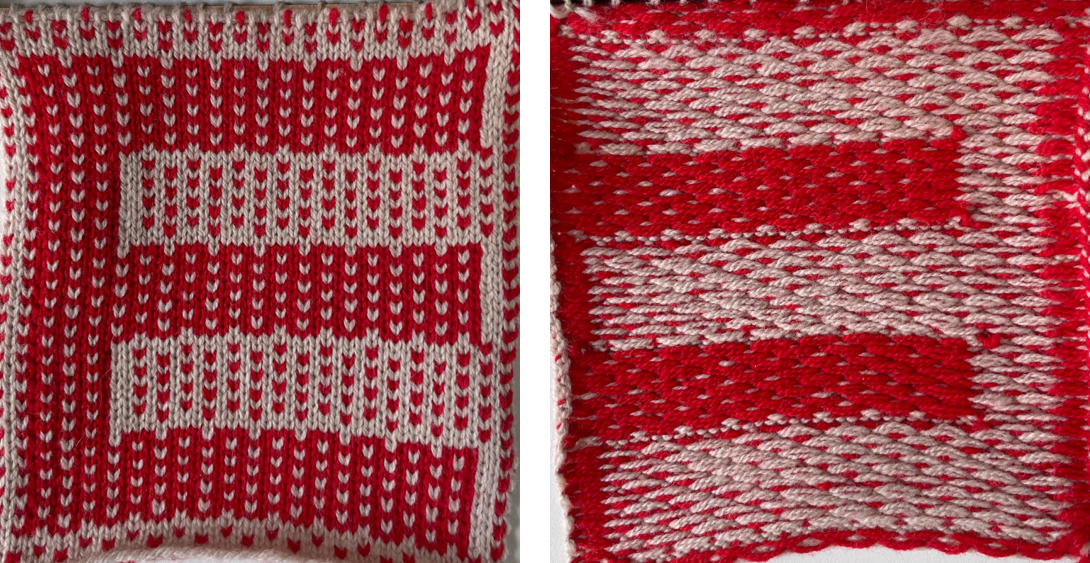
Fair Isle knitting is a common way of creating patterns in knitted textiles, by alternating between 2 colours within each row. On the SK840, this is also one of the three stitches (the others being slip and tuck stitches) that may be automatically controlled using the SilverLink controller; it's quite low-effort to produce some really beautiful, impressive things that it would be very hard to knit by hand.

To knit Fair Isle, the machine should be connected to the computer via the SilverLink, and DesignaKnit should be in interactive knitting mode. The carriage should be turned to 'F' for Fair Isle, and the arm should be threaded with 2 yarns (the first in position 1, the second in position 2).

This video shows the technique using punch-cards rather than the computer, but the core ideas are the same. For more guidance on creating patterns using DesignaKnit, see the wiki page on Creating Digital Knitting Patterns with DesignaKnit.

orbs.jpeg

Bird's Eye

Bird's Eye is a pattern that can be added to fair isle pieces to control the length of floats. This is useful when creating pieces where the reverse side will be open, such as jumpers, to reduce the chance of catching threads.
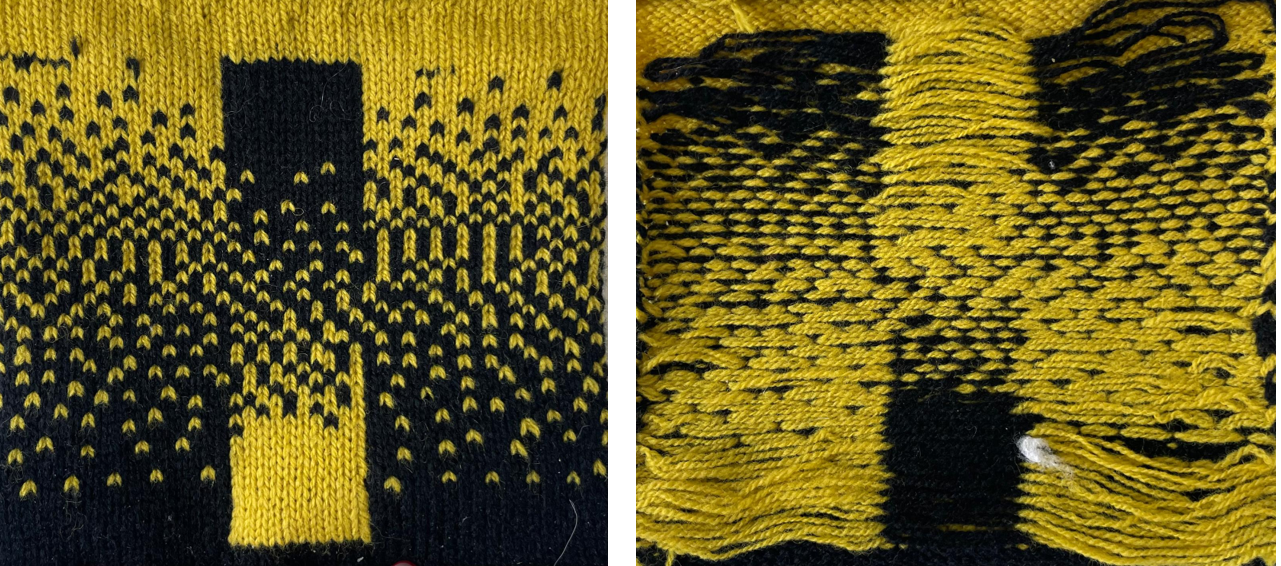
Dithering

Dithering is an intentionally applied form of noise commonly used to convert a grayscale image to black and white, so that the density of black dots in the new image approximates the average gray level in the original. As we can only use two colours per row, this can be used to convert greyscale images into fair isle knitting patterns.

Short Rowing (or Partial Knitting)

Short rowing is a method that allows you to put needles 'on hold' and knit a row without adding a new stitch onto every needle (called a short or partial row). This allows you to create interesting shapes including non-flat and curved swatches (such as the heel or toe of a sock).
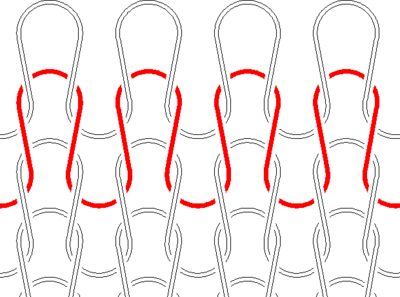
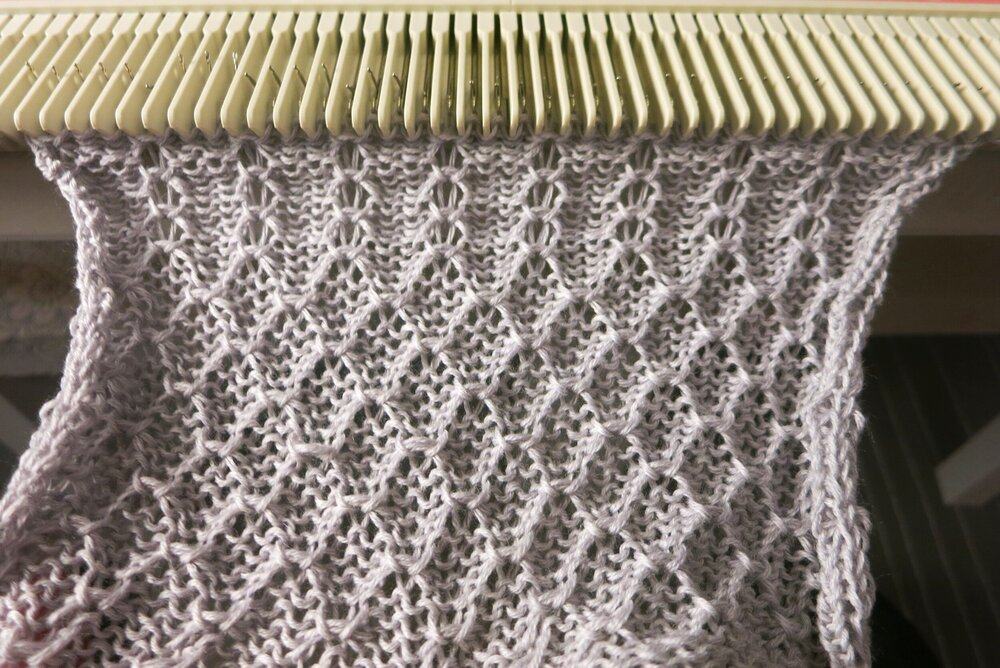
Slip Stitch

Slip stitch is a knitting technique where a stitch is skipped (or 'slipped'), that can be used to add texture to knitted fabrics either manually or automatically (using the SilverLink). Skipping stitches creates patterns in the strands of un-knitted yarn, and is often used alongside other texturing techniques.
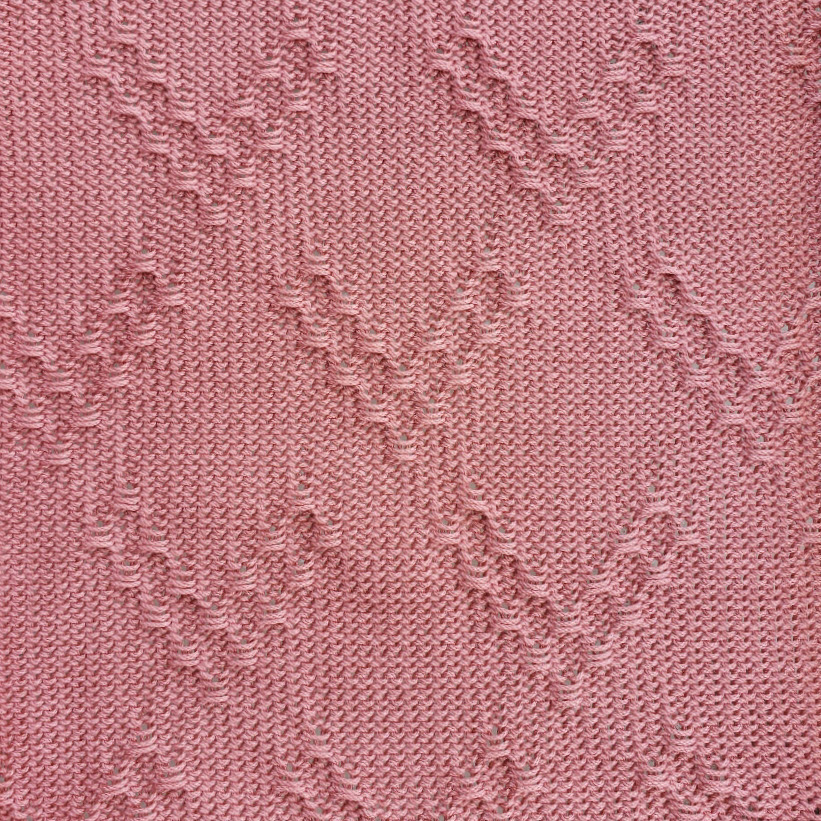
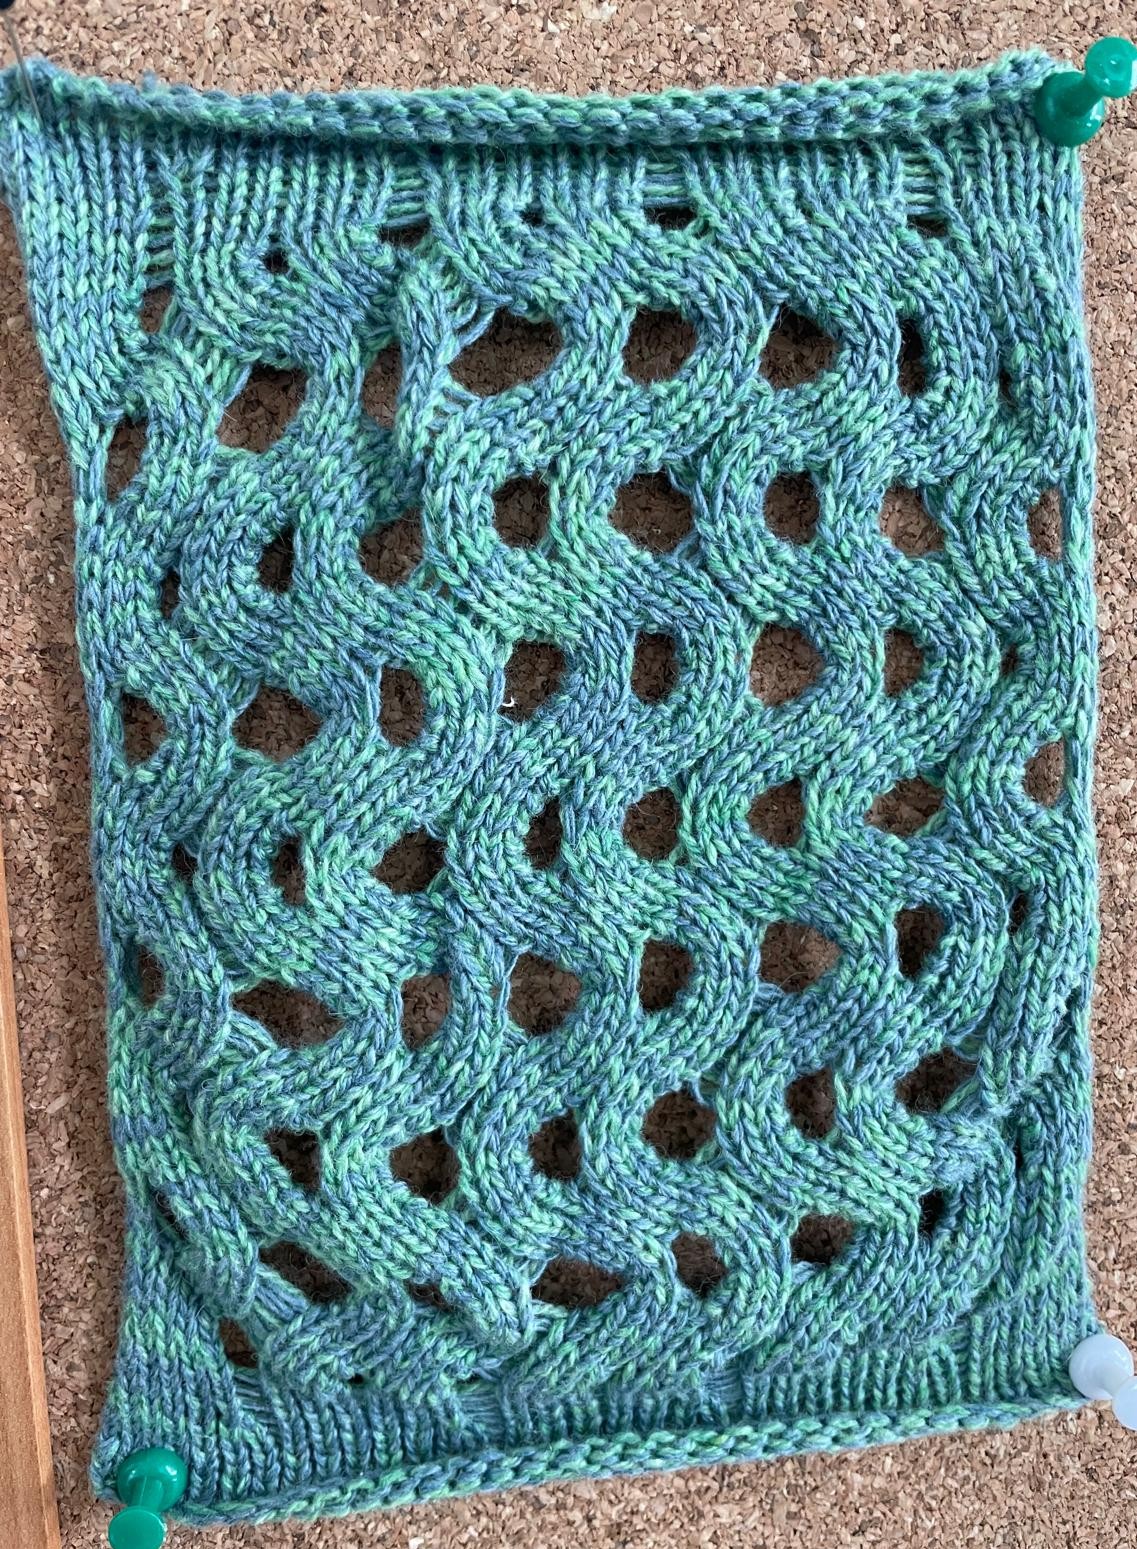
Tuck Stitch

Tuck stitch is a knitting technique that involves tucking a stitch from one row into a row above. Like slip stitch, tuck stitch can manipulate the texture of the knitted fabric, though somewhat more dramatically, as depending on the depth of the tuck the fabric can be structured in all sorts of interesting ways. Stitches may be tucked automatically using the SilverLink.
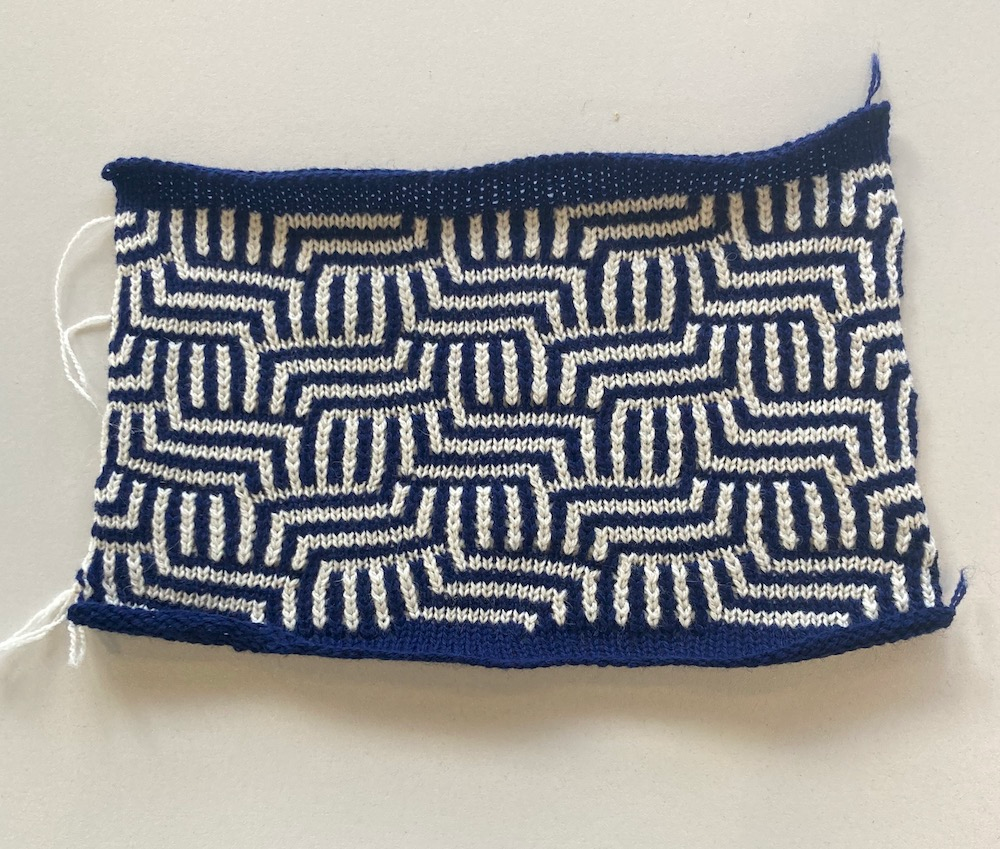
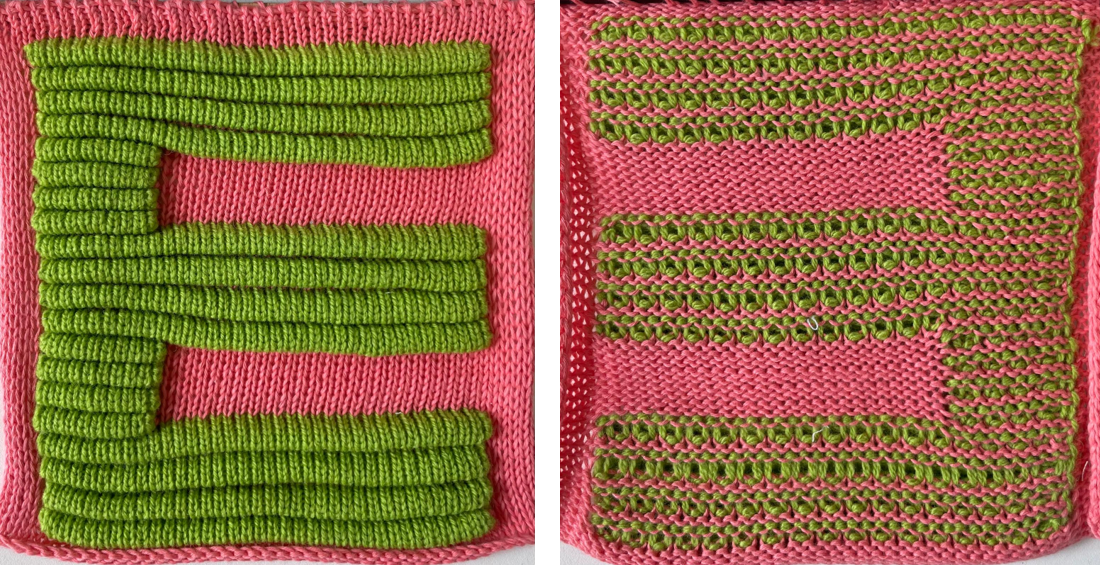
Tuck Mosaic

The 2 colours here are knitted in horizontal stripes, but with a regular pattern of stitches 'tucked' into the stitch above, manipulating the structure to resemble vertical lines. The result looks very beautiful, but it's time-consuming to change the colour every 2 rows.

What's interesting about tuck patterns is that they look nothing like the patterns that produce them. There's a great and incredibly detailed blog post on Alessandrina (very helpful knitting blog) which explains in great detail.

Mock Rib

Many knitted garments are hemmed with a stretchier 'rib' edge (think cuffs, collar and bottom of a sweater, for example). This adds structural stability to the fabric and also looks great. Typically this is done using a 'ribber', or a double bed machine, which we don't have in the CCI. However, it's perfectly possible to make a mock rib using a single bed machine that's functionally very similar.

I watched this video for guidance, which was pretty good (it's in Norwegian, but English subtitles), which gives a good guide to creating a 'mock' rib on a single bed machine.

Knitting with every other needle

This is used to knit yarns like mohair, or chunkier yarns. This video (it's in Norwegian, but has English subtitles) gives a good demonstration of the cast-on technique required: after casting on, knit as normal, but with only half the needles engaged.

Special tools and carriages

Intarsia

The Intarsia Carriage is an alternate carriage for the machine that allows multiple colours to be used in a single row, without having floats along the back like in Fair Isle. It produces large blocks of colour (if you want to use fine detail, Fair Isle is normally a better bet), though requires considerably more manual effort than the digital fair isle. Below is an image of the intarsia carriage, and a sample of knit made using it.

Automatic Colour Changer

We have an automatic colour changer in the CCI, that makes changing colour between rows considerably faster, and also allows selection between 4 yarns, rather than 2. It cannot change colours within a row (for that, you want either fair isle or intarisa) -- instead think of it as a way of making stripes a lot more efficient. It's particularly useful when knitting tuck mosaic patterns that require regular colour change. The automatic colour changer may also be used with fair-isle or other patterning techniques (see example below), though when using 2 yarns (as in Fair Isle) only one may be changed automatically.

Please talk to Agnes before using the automatic colour changer for the first time.

photo of an automatic colour changer attached to the end of a knitting machine

fair isle sample made using the automatic colour changer

E-textiles and technical knits

The knitting machine can also be used to create textiles with electronic properties, including conductive and stretch sensors, and even radio components. Please see this guide to knitting with conductive yarn for more information.

Resources

Choosing Yarns

We provide a range of yarns at the CCI that are compatible for use with the machine. It is strongly suggested that when starting to use the machine, you make use of the 2-ply lambswool we provide (and that will be used during tutorials). 2 strands of the lambswool are threaded through the tensioner together to create a 4-ply yarn.

If you are planning to create larger projects (e.g. bigger than a standard sample swatch), we ask that you source your own yarns. Finding yarns suitable for machine knitting is a different task than for hand knit: this guide offers a good overview of considerations. In general, you will have more luck with yarns intended for machine knitting -- talk to Agnes if you would like more advice.

At the CCI, our main yarn supplier is Uppingham Yarns, who have a wide range and high quality. Other recommended suppliers include:

Machine Knit Inspiration

electronic textiles

machine knitting for actuation/active textiles

textbooks

Basic Skills and Techniques

This page gives an overview and step-by-step instructions for some basic skills and techniques from the knitting machine induction. If you have not completed the induction, do not use this page to try to use the machine, you must have been inducted first.

These methods are all also described in the knitting and operation manuals which you can find in the eTextiles Lab.

A diagram that points out the different parts of the Silver Reed machine. Parts include the rail, the carriage (slides along the rail, and contains russel levers, a stitch dial, cam and release leavers), the arm (attached to the carriage, contains a yarn feeder, weaving knobs and weaving yarn holders, and a yarn cutter), and a diagram of a latch needle

Contents

  1. Threading the machine
  2. Casting on
  3. Casting off
  4. Increases and decreases
  5. General advice and debugging

Threading the machine

To thread the machine, follow the instructions and diagram below.

Note: the threading mechanism in the diagram can only be threaded with 2 different yarns whereas the one on the knitting machine in the e-textiles area can be threaded with 4. This means that there are two paths that the yarn can take on either side of the post as opposed to just one. Try not to cross the yarns over when threading more than one colour on one side, keep one on the inside path and the other on the outside.

Casting on

Before beginning a piece we must first 'cast on' which creates the first row using a special stitch that stops the piece from unravelling.

There are many cast on methods but the main two (and the ones taught in the induction) are:

  1. Weaving cast on: this is the easiest way to cast on but leaves a messy edge and is recommended only for prototyping and sampling, not for a final project.
  2. E-wrap cast on: this is slightly more fiddly but leaves a nicer and neater edge.

Whilst knitting the first few rows, there won't be enough material to hang the weights. This means that you must be especially careful that each stitch has fully looped through, and doesn’t slip off. Some way to make sure of this are:

It is generally easier to start the cast on with the the carriage on the side of your dominant hand. If you find this difficult, try the other way around and see what feels best to you.

Weaving cast on

This is the easiest method on the Silver Reed, though has the downside of leaving a slightly scrappy-looking edge. It's great for quick sampling, though. For a video explaination, this is a good reference.

  1. Pull the needles you wish to knit with into D position (all the way forward).
  2. With no yarn in the carriage and the russel levers set to II, run the carriage across the needles to move them into B position. End with the carriage on the side of your dominant hand.
  3. Pull every other needle forward into D position.
  4. With the machine and carriage threaded, hold the end of the yarn in your non-dominant hand and lay it across the top of the needles.
  5. Knit a row. Make sure that as you run the carriage across the needles you are not pulling on the end of the yarn but just holding it and allowing the carriage to pull it in as it knits.
  6. Knit a second row to complete the cast on.

weaving.png

E-wrap cast on

This is a cast on technique common to all knitting machines, and is the "official" method that will give you a neat edge. There is a detailed guide here as well as the instructions below.

  1. Pull the needles you wish to knit with into D position.
  2. With the machine threaded (but the yarn not through the carriage) and the carriage on the side of your dominant hand, create a slip knot in the yarn and loop it around the first needle on the opposite side to the carriage. Wrap the end of the yarn around the nearest clamp post.
  3. Starting with the needle furthest from the carriage, hold the end of the yarn in your non-dominant hand and use your dominant hand to wrap the yarn under and around the needle. If you are right-handed, this will be the same motion as drawing a lowercase e (hence the name e-wrap), see the picture below.
  4. Use your non-dominant hand to push the stitch up to the sinker posts.
  5. When wrapping the next stitch, use your non-dominant hand to hold the previous stitch to make sure that the wrap is not too tight.
  6. Continue this, wrapping each needle individually until you reach the last one.
  7. Run the yarn under the carriage and through the gate.
  8. Knit a row.

Note: You want to make sure that the stitches are not too tight which can happen as there is tension on the yarn from the threading mechanism. If you are finding this difficult, pull a long length of yarn through then use the white yarn clip to hold it whilst you cast on. This will eliminate the tension and stop the yarn from tugging.

Casting off

After a piece has been completed, we need to cast off to stop it from unravelling.

  1. Remove the yarn from the carriage and measure a length approximately 4x the width of your project then cut.
  2. On the side of the carriage, use the transfer tool to pick up the outermost stitch and move it one needle inwards (either moving behind or in front of the sinker posts). cast off 1.png
  3. Push the needle now holding two stitches into D position, making sure both loops are behind the latch.
  4. Loop the working yarn over the needle, ensuring that it is laying in the needle hook (one way to help with this is to loop it over then hold the end out parallel with the needle). cast off 2.png
  5. Using your hand, manually push the needle back into B position, looping the working yarn through the two stitches. cast off 3.png
  6. Repeat steps 2-5 for every needle until you have only one stitch left.
  7. Pull on the last loop so that the end of the yarn in brought through, leaving no more loops and a secure piece.

Note: when completing step 2 (moving the stitch inwards), you can either pass it behind or infront of the sinker posts. Passing it behind is more fiddly (it's very easy to drop stitches whilst doing it) but leaves a neater, more even edge. The first couple of times you cast off, go in front of the posts and when you feel more comfortable with that, try going behind. If passing behind the sinker posts, once casting off is done, pull the piece off of each post carefully to finish.

Increases and Decreases

In order to knit a piece that isn't the same width the whole way, we have to be able to increase or decrease the number of needles we are working with. There are two ways to do each of these which are used for increasing different numbers of stitches and leave slightly different edges.

Fully Fashioned

This method is used for increasing/decreasing 1 needle and can be performed at either side of the piece. This will leave a smooth edge (as seen below) as the outer stitch does not change.

Fully fashioned increase

  1. Use the transfer tool to pick up the outer two stitches on the side that you want to increase.
  2. Move these stitches one needle outwards, leaving the third needle from the edge empty. ff increase 1.png
  3. Use the transfer tool to pick up the horizontal 'bar'/loop from one of the stitches adjacent to the empty needle and hook that on to fill the gap (This step stops small holes from forming due to the empty needle, however it can be quite fiddly so if you are just prototyping/sampling and want to be fast, you can skip it). ff increase 2.png
  4. Continue knitting.

Fully fashioned decrease

  1. Use the transfer tool to pick up the outer two stitches on the side that you want to dencrease.
  2. Move these stitches one needle inwards, leaving the outermost needle empty. ff decrease.png
  3. Push the empty needle back to A position.
  4. Continue knitting.

E-wrap increase/cast off decrease

These methods are used for increasing/decreasing by a larger number of stitches and can only be performed on the side closest to the carriage. These will both leave a right-angle like shape (as seen below) as the outer stitch is changing.

E-wrap increase

This is essentially the same as the e-wrap cast on so make sure you are comfortable with that before trying this.

  1. On the side closest to the carriage, pull the number of needles you want to increase into D position.
  2. Using the same method as the e-wrap cast on, wrap the yarn under then over each needle in turn. ewrap increase.png
  3. Make sure the working yarn is back through the carriage, then continue knitting.

Note: when using this method, treat the new needles as you would a proper cast on, checking each stitch and pulling them down after every row.

Cast off decrease

This is essentially the same as casting off so make sure you are comfortable with that before trying this.

  1. On the side of the carriage, pick up the outermost stitch and move it one needle inwards.
  2. Push the needle now holding two stitches into D position, making sure both loops are behind the latch. cast off decrease.png
  3. Loop the working yarn over the needle, ensuring that it is laying in the needle hook (one way to help with this is to loop it over then hold the end out parallel with the needle).
  4. Manually push the needle back into B position, looping the working yarn through the two stitches.
  5. Continue this for each needle that you want to decrease, pushing each empty needle back into A position.

Note: like for casting off, you can either pass the loop behind or infront of the sinker posts. If passing behind, knit a few rows, then pull the cast off stitch off of the sinker posts before continuing. To make sure you don't drop any stitches in the process, push a few of the needles on the side of the decrease into D position first.

General Advice and Debugging

Like with coding, sometimes there is a problem with your knitting and you can't immediately see why. Here is a small list of things to check when you are having issues.

1. Tension

Tension is very important when knitting and is the cause of a lot of problems that can occur. It is controlled both by the dial on the carriage and the threading mechanism. Check that the carriage dial is not set too high or too low (generally we want it to be set at around 6) and that the gap between points 4 and 5 on the picture below is around 10-20cm.

Make sure that the yarn has an easy and clean path from the reel to the needles, that there is nothing getting caught and that the reels are placed directly under the yarn feeder.

2. Loops on the needles

In order to properly knit the next row, each stitch from the previous row must have been fully looped through. When looking down on each stitch, it should form an 'A' shape (see picture below).

If the stitch is missing the horizontal bar, then the stitch has not been properly looped meaning that there will be two loops of yarn over the needle. One of these is the stitch from the previous row, which will be tighter and further back on the needle, and the other is the new stitch, which will be looser and futher forwards. To remedy this, do the following step:

  1. Using your hand, push the needle into D position.
  2. Slowly push it away from you making sure that the new stitch goes over the latch and into the hook and the old stitch stays behind the latch.
  3. Fully push it back, looping the new stitch through the old one.

3. Weights

The weights should ideally be within the 5-20cm range below the needle bed and placed right at the edge of the piece. To add addition weight, you can pull down gently on the weights as you slide the carriage across.

4. Carriage settings

Are you using the right stitch? Are the russel levers in the correct position? Is there yarn in the carriage?

Casting on

For casting on specifically, here are a few things to check:

Stuck Carriage

The carriage sometimes requires a fair amount of force but it is gets properly stuck, don't try to force it! This can bend or damage the needles. If this happens, there is a release switch is on the bottom right of the carriage (shown below as D) that will lift it up and allowing it to be moved to the side.

After resolving whatever tangle you found yourself in, check the above debugging points to try to prevent it from happening again.

happy knitting! :)

Creating Digital Knitting Patterns with DesignaKnit

DesignaKnit is a pattern drafting, garment design and interactive machine control software. It is compatible with multiple different kinds of knitting machines, including the Silver Reed SK840, which is the machine we use at the CCI.

A screenshot of the DesignaKnit software's stitch designer window

DesignaKnit includes multiple different features, which may be used separately or together. The main ones to know about are:

Video tutorials from Prism's Creations are a great resource. They go through different features of the software one-at-a-time, eventually creating an asymmetric patterned jumper. To get into patterns, I would start with the second video: Stitch Designer Basics.