CCI Server
Find out how to connect to the CCI Server cci.arts.ac.uk.
- How to access the CCI IoT data
- How to connect to the CCI server
- Using CCI's MQTT endpoint
- How to Connect to MySQL Database on the CCI Server
How to access the CCI IoT data
We have several IoT sensors, including AirGradient indoor and outdoor air quality sensors, which log data every 30 seconds via MQTT and are available to students and staff who want to access this data, and power reporting for classroom lecterns.
MQTT Server
The MQTT server sits at mqtt.cci.arts.ac.uk on port 1883.
The read-only student username and password can be provided by asking on Slack in the #technical channel.
Air Quality Data
Data Format
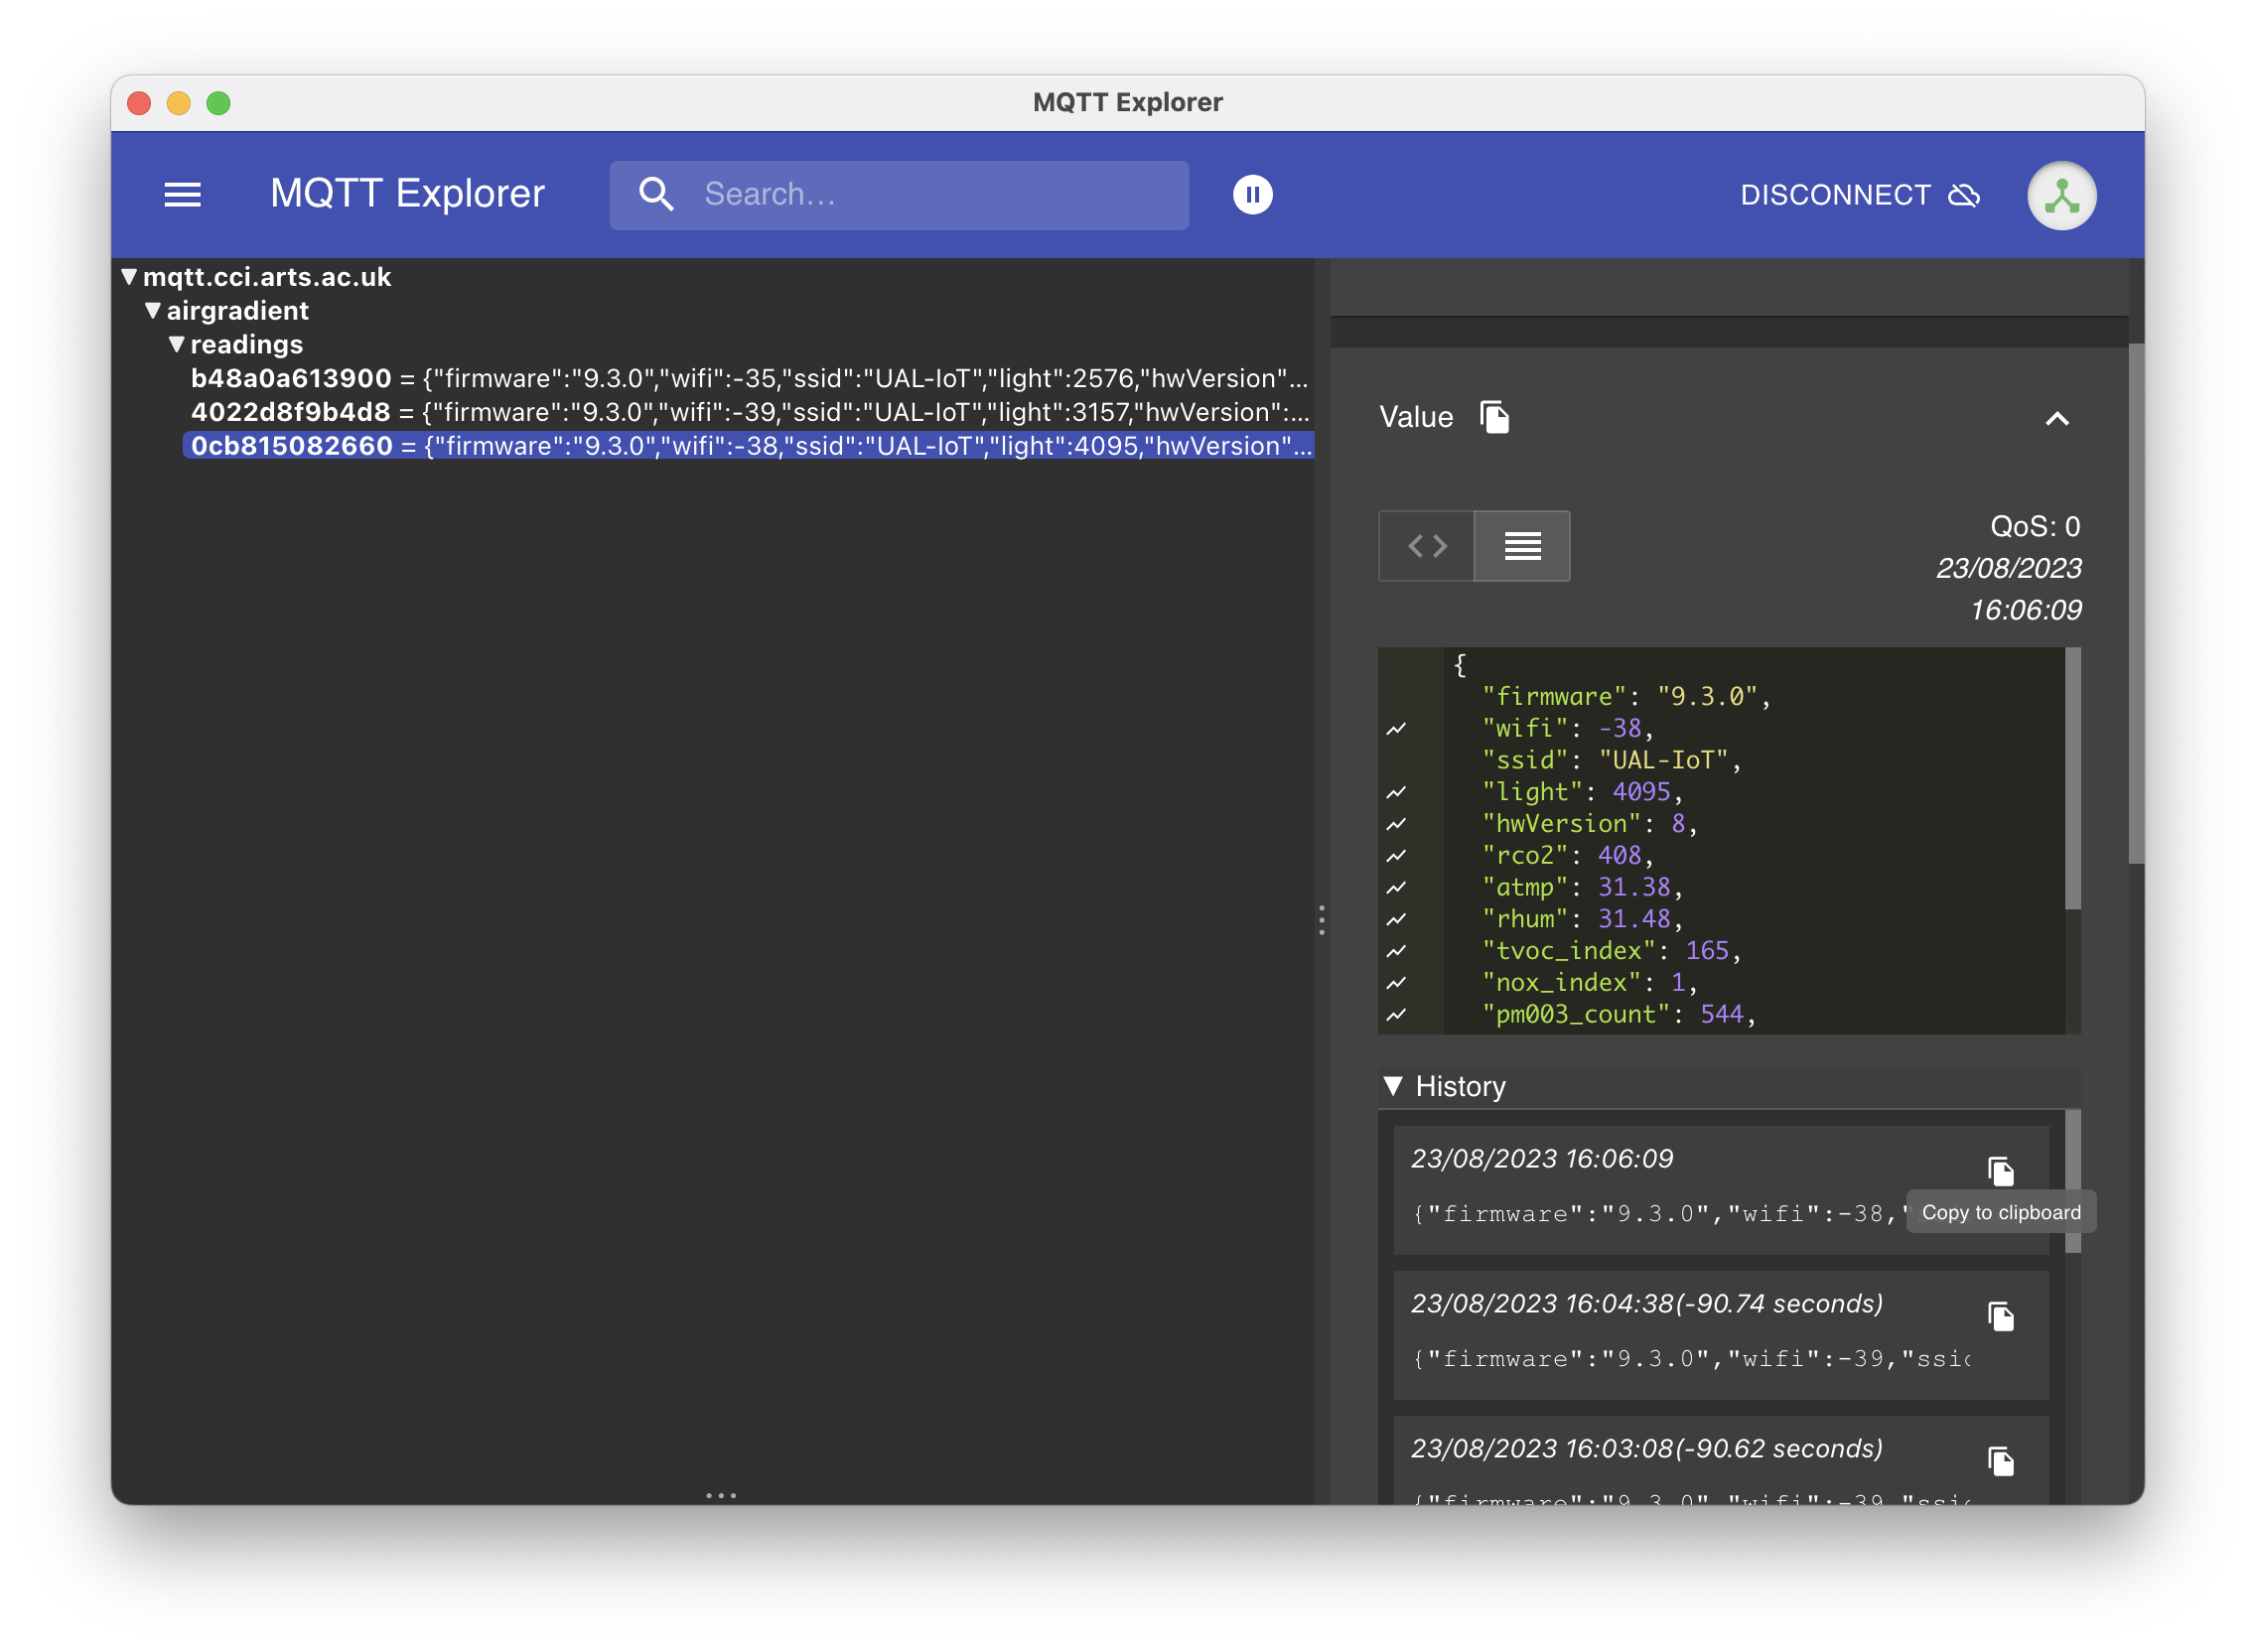
The data format is airgradient/readings/(sensor), the sensors is the MAC address and serial number of that location, the locations are:
Greencoat
- GB_G03 – Classroom = 0cb815082660
- GB_G04 – Classroom = 4022d8f9b4d8
- GB_G05 – Dark Lab = d83bda1c51e0
- GB_G10 – Prototyping Lab = 34b7da9f6b9c
- GB_G11 – Robotics Lab = d83bda1b8e2c
Peckham Road
- PR_B401A – Digital Fabrication Lab = 34b7da9fdf28
- PR_B501D – Classroom = dc5475bb845c
- PR_B501E – Classroom = b48a0a613900
- PR_B501F – Classroom = dc5475bcc430
- PR_B503 – Physical Computing Lab = d83bda1c47f8
High Holborn
- HH_302 – Classroom = dc5475bce770
- HH_308 – Classroom = dc5475bacb84
Millbank (Chelsea College of Arts)
- MB_AG06 - Lecture Theatre
- a842e3285cf8
- 64b70835462c (tbc)
- c049ef0c92fc
- MB_ALG02 - Interior Design Studio
- c049ef0c9514
- 90380c6dc6c8
- a842e3283e84
- a842e3285cf0
- MB_BLG19B = c049ef0c8648
- MB_BLG19C = 0cb815081120
- MB_BLG19D = 64b70834d3b0
- MB_BLG20 = 64b70834fa14
- MB_BLG20A = 64b7083502c8
Example data:
{
  "firmware":"9.3.0",
  "wifi":-39,
  "ssid":"UAL-IoT",
  "light":4095,
  "hwVersion":8,
  "rco2":409,
  "atmp":31.2,
  "rhum":31.55,
  "tvoc_index":164,
  "nox_index":1,
  "pm003_count":544,
  "pm01":2,
  "pm02":2,
  "pm10":2,
  "boot":1537,
  "wdog":1
}
What are these values?
pm003_count: PM0.3 particle countpm01: PM1 µg/m3pm02: PM2.5 µg/m3pm10: PM10 µg/m3nox_index: NOx Index (Ind41)tvoc_index: TVOC Index (Ind40)rhum: Relative Humidity %atmp: Temprature ºCrco2: CO2 PPM
Subscribing to the data
In order to view the data in something like a GUI you need to subscribe with a wildcard such as airgradient/# the default subscription for apps like MQTT Explorer shown below is just # however the permissions of the student account only allow you to view the data inside airgradient, sensors.
If you wanted just 1 sensor, you could subscribe to airgradient/sensors/(sensor) where sensor is one of the sensors listed in the sections above.
Power Monitoring
How to connect to the CCI server
We run the CCI server as a resource to host websites and projects for students and staff at CCI, the server currently hosts:
- Apache 2 (Web Server)
- PHP
- Node.js
- Python
- MySQL
- MQTT
For security reasons access to the server is via SSH (Secure SHell) using key authentication. To connect to the server you'll need to:
- Request access via Slack #technical for a username and password
- Create a public/private key pair on your computer
- Upload the public key to the server
- Login using SSH or SFTP
Creating an SSH key requires some basic SSH commands on your computer, it's also really important that you keep the private key secret and that you revoke it immediately if you ever loose it or suspect illegal access to your computer.
Check for an existing key
- Open the Terminal / Command Prompt
- View the contents of the
.sshfolder in your home directory
macOS/*nix: ls .ssh and press enter
Windows: dir .ssh and press enter
- Check for 2 files
id_rsaandid_rsa.pub
If these files exist then you have existing keys, otherwise follow the instructions to create a key
Create a key
- Open the Terminal / Command Prompt
- Type
ssh-keygen -t RSAand press enter. The computer will hold onGenerating public/private rsa key pair.for a short time. - Press enter when you see
Enter file in which to save the key (/Users/username/.ssh/id_rsa): - Press enter when you see
Enter passphrase (empty for no passphrase):unless you want to be prompted for a password when you connect to the server, in which case you should type this now (when typing passwords in the Terminal it will not be visible. - When you see
Enter same passphrase again:either retype the passphrase or press enter for no password. - You'll see a number of lines output:
Your identification has been saved in id_rsa.
Your public key has been saved in id_rsa.pub.
The key fingerprint is:
SHA256:wS+TjYgAeQftejsnZOE4b7SQJ+iRAPAd6FwA1/ykCcY username@computername
The key's randomart image is:
+---[RSA 3072]----+
|=++B.            |
|o+E.*...         |
|.=o=.=  o        |
|. o.=... *       |
|...=... S o      |
|.oB B    o       |
|. .@ o           |
| .  B .          |
|   . +           |
+----[SHA256]-----+
After this is complete you should check the key using the previous instructions.
Upload the key
- Open the Terminal / Command Prompt
- Copy the contents of
id_rsa.pub
macOS: Type pbcopy < ~/.ssh/id_rsa.pub and press enter, this will copy the key to your clipboard.
Windows/Linux users go to your file browser and find the folder .ssh in your home directory and then open id_rsa.pub in your plain text editor and copy the text.
Tip
Your username is the one for the CCI server, not your UAL login.
- Open a web browser and login using your username and password a https://cci.arts.ac.uk:20000
- Select SSH Configuration
- On your first login you need to select Key Type as
RSA (for SSH v2)and then pressSetup SSH Keys - Select "Authorised Keys"
- Click "Add a new SSH 2 authorised key"
- Type a key name as one word i.e. "MyKey"
- Set the type to "RSA"
- Paste the key into the large text box, and remove the suffix (
ssh-rsa) and prefix (username@computer) as highlighted...
ssh-rsa AAAAB3NzaC1yc2EAAAADAQABAAABgQCvYsTJEu5YabS5sXnquAh7Cxn+UK9Rmcf2iM+qsObyOp4VWcSCGHUHgsgUPnSeOijtwgRDGQI8M7ZcXKuUFSOV2FCHTFzTiG7F/lrFWt/PpgPUajCF3WXmH19baCBO6ymTV3wUWXg7xHsSc83k+cb9af5QT+ml315vqSF45oO935DadaOJnKTZkMHLBydmIVSkxDFWHLkNURw7jmDNwZ2yNCru6y2iamgdQFwGxoNIVewhG+k2jUKURN7JeGP/4dOD8u+ajeY57wp3+GxQKcp/JvtDhFUx92TO+1SlYk1ZcKiIxActc3L6j2U3TIk3LOCRyBmwPNeeHuhLgD4ePsR4PsHz5zdOsmTLvjfM4n6B5K+Y52Re+gOE3dG5gjkvY/bhQdKGes1hBP2p3NW8/vJdZ08/auCswEFWoCnDKT9h8OQUTEjtywDzius6LYIHZFsLTnedEf54CfePzVcDNhdSuKc2SD6dfgE+Jk/zzqpBNmLJwCb0jxrWU0xyQDGbQFk= username@computer
- Press Create
Verify SSH key
Tip
Remember to replace username with your CCI server username, not your UAL username!
- Open the Terminal / Command Prompt
- Type
ssh username@cci.arts.ac.uk -p 2020and press enter - You will the UAL CCI logo if you've logged in correctly:
    _
| ||_||   o
|_|| ||__ o
 __
/   __ _  _ _|_ o     _
\__ | (/_(_| |_ | \_/(/_
 __       _              _
/   _ __ |_)   _|_ o __ (_|
\__(_)||||  |_| |_ | | |__|
___
 | __  _ _|_ o _|_   _|_ _
_|_| |_>  |_ |  |_|_| |_(/_

Welcome to the CCI server

Ada Lovelace
cci.arts.ac.uk

❤️
- Type
exitand press enter to disconnect.
If you've seen the UAL CCI logo it means everything is working, otherwise you'll need to check your steps, or contact support in Slack #technical sharing a screenshot of the issue you're trying.
Using SFTP with CyberDuck
Tip: Don't type your password as it may not work.
- Open CyberDuck
- Click the
+button in the bottom left corner of the main window

- Choose "SFTP" from the dropdown list at the top
- Pick a nickname like "CCI"
- Enter the server details:
- Server:
cci.arts.ac.uk - Port:
2020 - Username: your cci server username
- Password: leave blank
- SSH Private Key: Pick from the list, there will probably only be one option ending...
/.ssh/id_rsa
- Close the window, no need to save!

- Double click on the blue drive icon that appeared with your nickname "CCI" in the main window.
You should now be connected, if you experience issues please screenshot and share in Slack #technical.
Using CCI's MQTT endpoint
MQTT is a networking protocol that uses a 'publish-subscribe' model (where some machines 'publish' data to an endpoint, and others subscribe to that data stream) to share data. It's commonly used to share networked sensor data.
We run a MQTT server at the CCI, where we publish things like the air quality data, and also allow students to publish dedicated streams for physical computing projects.
In order to follow any of the below instructions, you will first need a username and password. Ask for this on the #technical channel in Slack! The MQTT server sits at mqtt.cci.arts.ac.uk on port 1883.
Warning
Data published to the CCI's MQTT server is readable by anyone we have given access to! If you need the data you are publishing to be private, consider setting up your own server using a Raspberry Pi using the instructions linked below.
Accessing MQTT Data Through a GUI
To use MQTT on your computer, download an application like MQTT Explorer. The setup for accessing the CCI's topics is as follows.

Topics will appear in the interface as messages are published to them -- if you don't see everything at once, it's because it hasn't yet had a message in the time you've been subscribed. You can also use the interface to publish to a topic (see below).

MQTT from the Command Line
The best package for programatically interfacing to MQTT is mosquitto. On a mac, this can be installed using Homebrew. Once it is installed, use the following commands in separate terminal windows, substituting the corresponding values for the variables in triangle brackets:
To subscribe:
mosquitto_sub -h mqtt.cci.arts.ac.uk -p 1883 \
-u <your-username> -P <your-password> \
-t "sandbox/<your-topic>"
To publish:
mosquitto_pub -h mqtt.cci.arts.ac.uk -p 1883 \
-u <your-username> -P <your-password> \
-t "sandbox/<your-topic>" -m "hello everyone"
You could also use this method to connect to an MQTT endpoint via a Raspberry Pi -- you can use these instructions to get set up. (if you're interested in setting up your own MQTT endpoint, rather than using ours, you can also use a Pi to do this).
MQTT from ESP32 (for use with Arduino)
If you want to publish data using a microcontroller (the ESP32/ESP8266 are obvious candidates, as they're networked already!), the PubSubClient library provides support for microcontroller boards including the ESP32 and Arduino Ethernet.
There's a nice tutorial for doing this available here -- note that instead of needing to set up the Raspberry Pi mosquitto broker as they suggest, you can use the CCI's MQTT server as described above.
The last thing you will need to do, if you want to run this project on campus, is to register your devices with UAL-IoT, as they won't work over UAL's general wifi. (if it's just a one-off, phone hotspot wifi will also work for this!)
How to Connect to MySQL Database on the CCI Server
Please consult this article, if you don't know how to connect to the CCI Server.
Download and install MySQL Workbench
MySQL Workbench is a convenient GUI that helps you work with MySQL databases.
- This link will take you to the MySQL Workbench's download page.
- Click on the download button.
- In case you don't have an Oracle account, you will need to create one (you can use your university email).
- Download and install MySQL Workbench.
Connecting MySQL Workbench to CCI Server
- Open Connect to Database window, by clicking Database > Connect to Database.

- Name the connection as CCI Server or something similar
- For the Connection Method select Standard TCP/IP over SSH.
- SSH Hostname: cci.arts.ac.uk:2020
- SSH Username: use the one you use to connect to the SSH server.
- SSH Password: use the one you use to connect to the SSH server.
- SSH Key File can be found here /Users/username/.ssh/id_rsa (.ssh is a hidden folder)
- MySQL Hostname: 127.0.0.1
- MySQL Server Port: 3306
- Username and Password: use the same as SSH Hostname and SSH Password.
Check if you are connected
The simplest way to check that you are connected is to check the server status. If the server is running you are good to go!
