Computer Use
Contains how-to guides for the command line, operating systems, filesystems, software installation and handling media formats.
- Installing and Launching the Command Line on Your Computer
- Workshop: File Systems and the Command Line
- Workshop: Image, Sound and Video
- Workshop: Make and Publish a Website
Installing and Launching the Command Line on Your Computer
The command line -- sometimes also called the terminal or the shell -- is a way of navigating and using your computer that is similar to using the file browser (on mac: Finder, on Windows: File Explorer). It can be used to find, open and move files, run code, use version control software such as git, and install software.
The command line can be counter intuitive to use for the first time, and like many computer programming tools requires practice to be able to use fluently. It's also extremely useful, and presumed knowledge in software engineering jobs. The benefits of using the command line are many -- and you don't need to use it for everything to get good results.
Installing a Command Line
An important way to think about the command line is one way among many to navigate the computer. There are several different 'command lines' that you can have access to. For this guide, we will use Terminal for Mac users, and Git Bash for Windows users, which will allow us to use the same commands.
On a Mac
The most commonly used command line on Mac is called Terminal. This comes installed by default on all macs, so you don't need to do anything. Scroll down for the launching instructions.
On Windows
In this guide, we will give instructions for using a "Unix type" command line. This does not come installed by default on Windows systems, which instead have something called 'Command Prompt' -- commands used on Unix type command lines are different.
The command line we will install instead is called Git Bash.
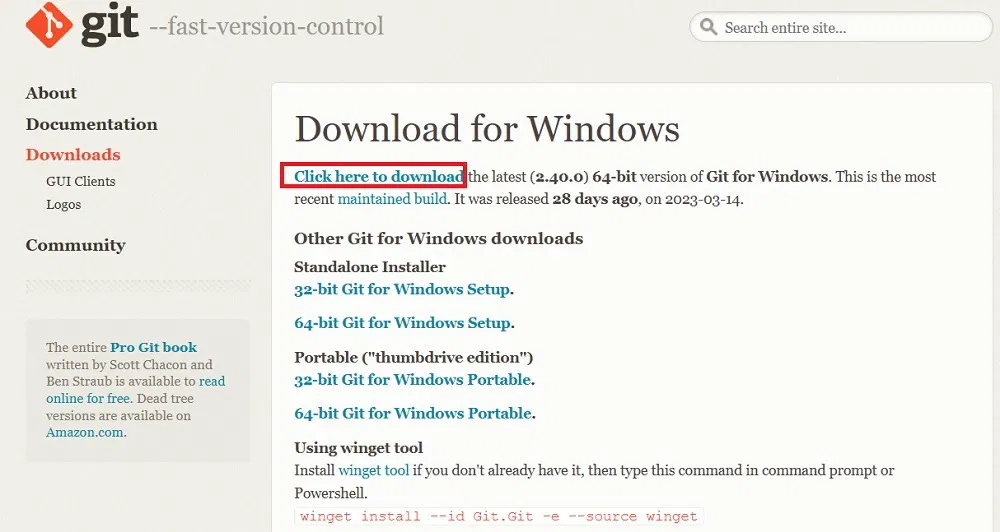
Step 1: Download You need to download Git Bash by clicking the 'Windows' link on this website. This will take you to a page with multiple different options. To get the most recent installer, click the link circled in red below.
Step 2: Launch Installer Once your installer has downloaded, navigate to the 'Downloads' folder on your computer and double click the file called something like 'Git-2.49.0-64-bit.exe' (the numbers in yours might be different). This will open the installer.
Step 3: Click through Installer Click through each step, selecting the default options. When you reach the 'Select Components' option, make sure the following tools are selected.
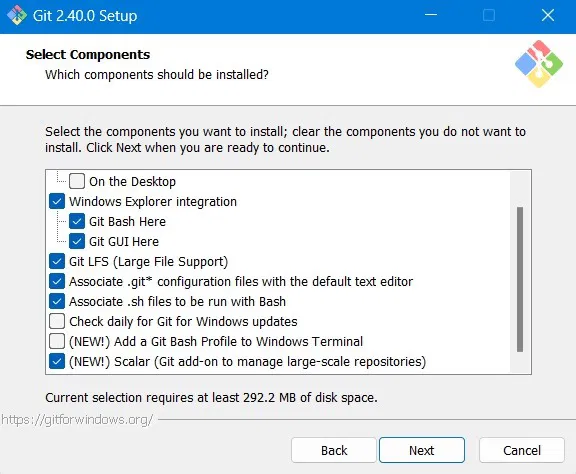
Select Nano as the default editor. This is easier to use than Vim, which is set as the default. You can also select any other listed editor that you are comfortable with.

Leave everything else as default, and click through to the end!
Launching the Command Line
On a Mac
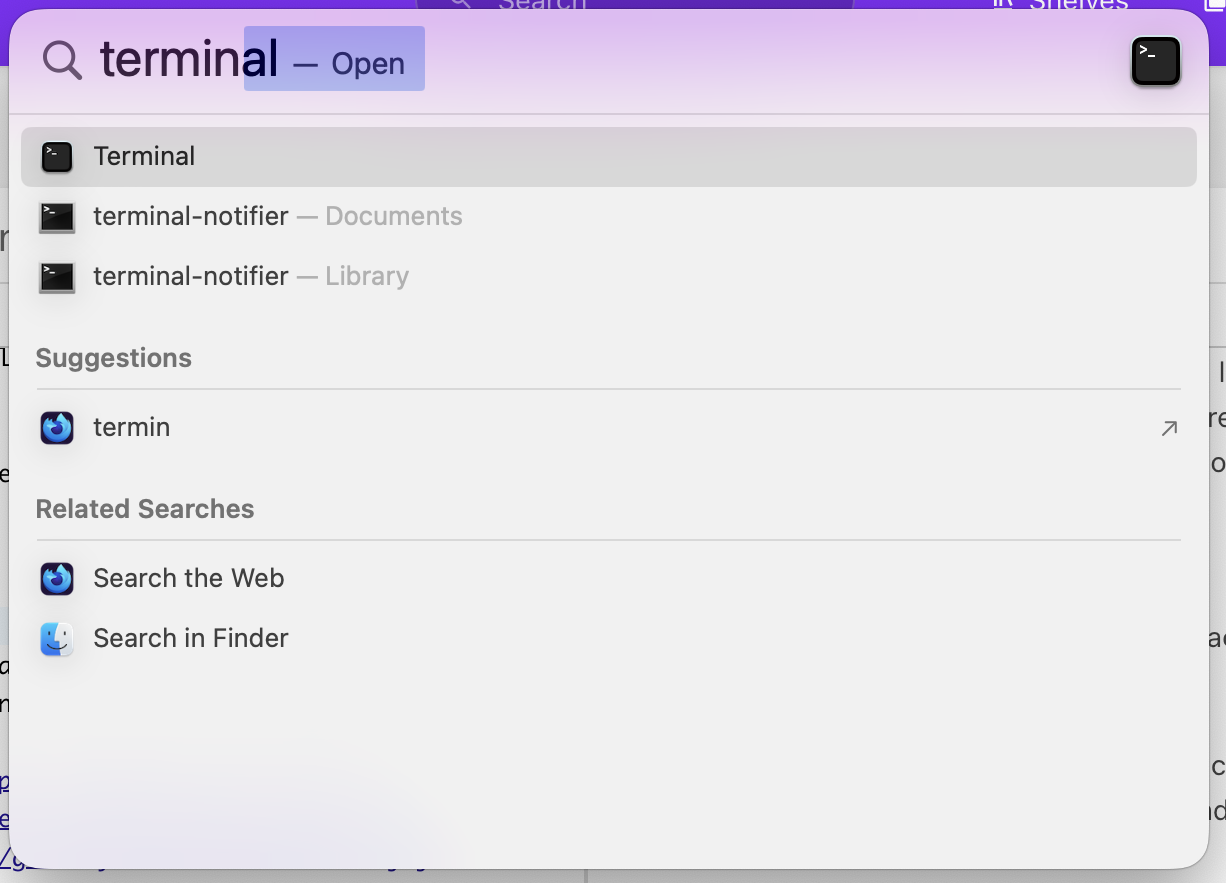
Step 1: To open the Terminal, press ⌘ and Space to open the 'Spotlight Search'. Type 'Terminal', and you should see a black icon with a white triangle.
Step 2: Press enter, and a window should open. Depending on your computer's settings, it will have either a white or a black background. It should say 'zsh' at the top, and have a ~ symbol, possibly combined with your username.
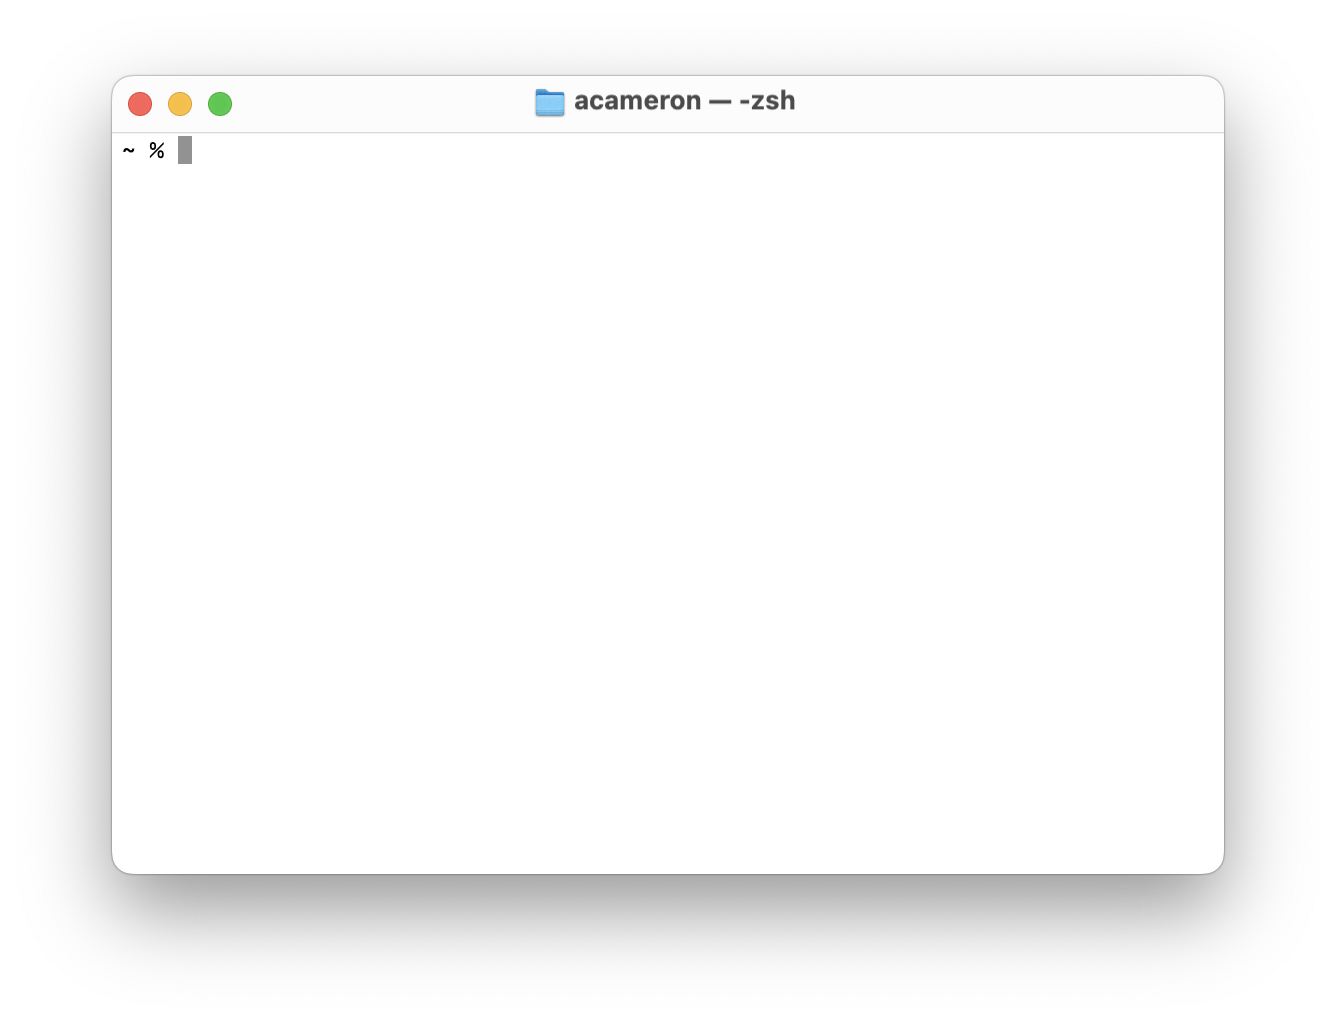
Step 3: Sometimes, the first time you open a Terminal on a Mac, it might come up with a message saying “The default interactive shell is now zsh.” -- this is fine and you don't need to do anything! This is just giving you some information about the software that runs the command line.
On Windows
Step 1: To open Git Bash, navigate to the Start menu and start to type 'Git Bash'. Click on the application to open a window.
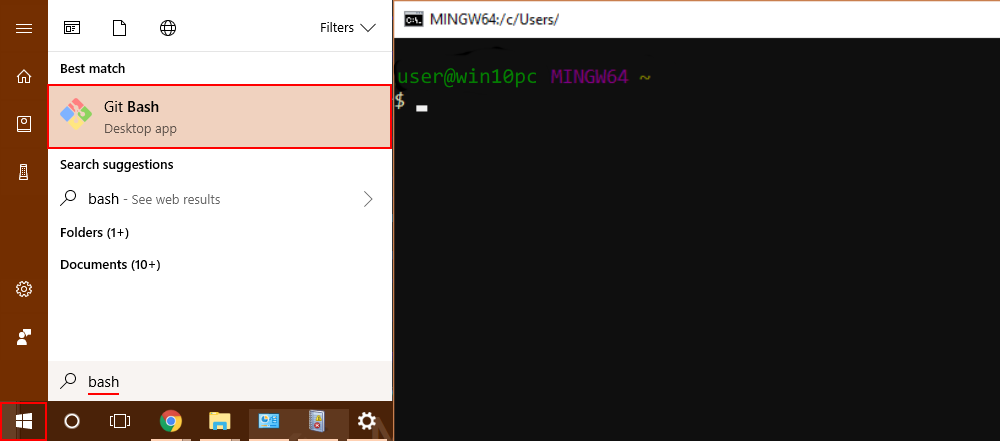
Step 2: You should see a window open, probably green, pink, yellow and white text on a black background. This will have your computer's name followed by a ~ symbol, and a $ with a flashing cursor next to it.
Congratulations, you've got a command line!
Workshop: File Systems and the Command Line
In this workshop we will get to know our computer better, learn about the idea of the filesystem, and explore it using a tool called the Command Line. We will learn some useful commands, and also learn more about how computers work, which will prepare us for writing code. If you need a reference at any point in the workshop, there is a list of commands included at the end of the page.
To get set up for this workshop, you need to have a suitable Command Line that you can launch installed on your computer. Please follow the instructions in this guide to make sure you have this, especially if you use Windows.
The exercises in this workshop are heavily inspired by Melanie Hoff's Folder Poetry class, which Agnes attended many years ago, and is a great introduction to the computer.
Intro: What are Computers?
Computers are Everywhere!
We have access to a lot of different devices that run code and software. These include systems like a laptop or a desktop computer, but also phones, watches, cars, tablets and e-Readers. Some of these devices, like desktop computers, give us some control over how they operate, and allow us to look inside them. Others, like phones, hide a lot of their inner systems away and make it hard for the average user to look inside.
Your Computer is a Load of Files
Lots of things have changed about computers in the past few decades -- they're a lot faster, there is a lot of emphasis on graphics, and it's much easier to find things than it used to be -- but the way that computers work has not fundamentally changed. All computers use something called an 'operating system' to work: you might use an operating system like Mac or Windows, or maybe one of a family of systems called Linux.
These different operating systems will work on slightly different principles, but at the core there are lots of similarities.
- Your computer handles things on the level of files. Some are files that are made by you, like Word Documents or Images
- Some kinds of files on your computer require special software to open. Microsoft Word and LibreOffice are both examples of software that can open 'Word documents', which are identified by the ending '.docx'
- These pieces of software are also made from files. These are files that you can't normally see, and are wrapped in something called a 'binary' or an 'executable'
- The really big, truly secret thing: all computer software is made by people, and it's not too hard to learn how to write software yourself. That's why you are at the CCI!
What is a file? It's a way that your computer stores a load of information, grouped together in one place, and represented by a specific format. We will explore formats more next week.
Demo: Secret Files
We are going to look inside an application and see all the files that make it up. You are welcome to follow along -- but it's also fine to watch this part! In this demo, I will also show you how to make your file browser a better tool for seeing inside your computer. When I do these steps, have a go at doing them with me.
Activity: Command Line House Tour
In this part of the workshop, we will make an explorable game using the command line. By the end of this activity, you should be more familiar with your file browser
We will use generic names to refer to specific things. So:
- 'file browser' means the graphical interface used to view and change files. On a Mac this is called 'Finder'. On Windows it is called 'Git Bash'
- 'command line' means, the text interface used to view and change files. On a Mac this is called 'Terminal', on Windows this is called the 'Command Line'
Intro: the filesystem
The filesystem is the name given to the system on your computer that manages and looks after files. It's the part of your computer that you navigate in order to open, read and edit different files.
Part 1: Navigating using the File Browser
Step 1: Open
Open the file browser. on your computer. On a Mac, this is called Finder. On Windows, this is called 'File Explorer'
Step 2: Desktop
Click to navigate to the 'Desktop' in the file browser. The desktop is just another folder, but on both Mac and Windows, it behaves like a special folder where you can see the files on your main computer screen.
Step 3: Class Folder
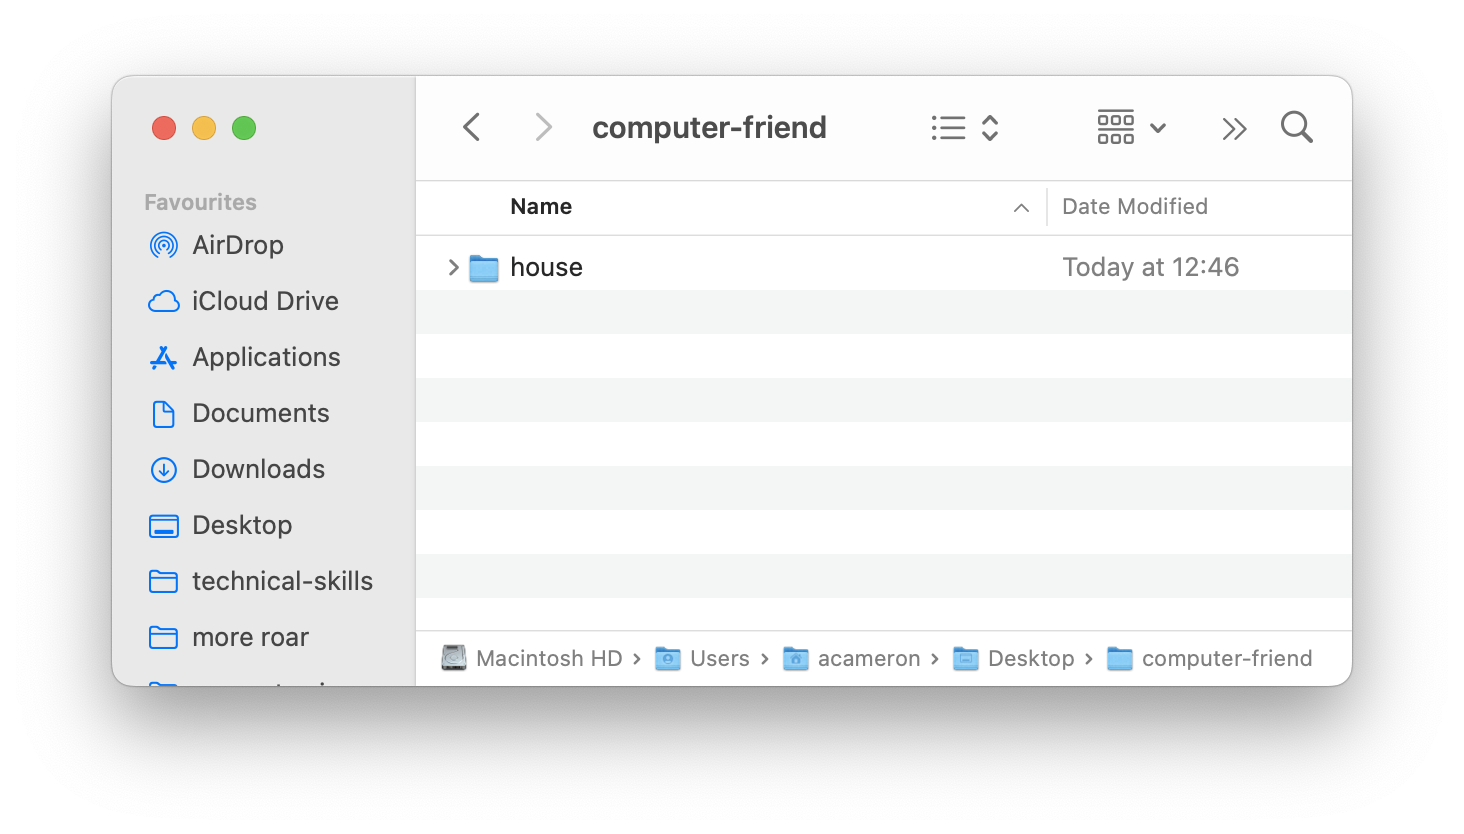
We are going to make a folder to store all the files made in this workshop. In your Desktop, create a new folder called 'computer-friend'. Make sure you use a dash rather than a space! We'll find out later why this is important.
Part 2: Exploring the House
I've made a small game to demonstrate the activity. We're going to download and extract it, put it in our new folder, and then look inside.
Step 1: Download
Download the 'house-tour' folder by clicking on this link.
Step 2: Extract
This is a 'zipped' folder -- it is a way of compressing a bunch of files into a smaller, single object so it can be sent around. We need to extract the files
- On a Mac: double click on the zipped file. It will make a new folder next to it with the same name, with a blue folder icon. This is the folder we will use.
- On Windows: right click the zipped file, and select 'Extract All', and use the default options in the dialog
Step 3: Move
We are going to move the unzipped folder into the 'computer-friend' folder we made in part one. Open a second file browser window, then drag and drop the 'house' folder inside of the 'computer friend' folder. You should end up with a folder layout that looks like this (look at the path bar to see the structure):
Part 3: Navigating using the Command Line
Now we are familiar with our house, we are going to explore it again, but this time using the command line.
Step 1: Launch the Command Line
Open the command line on your computer. Use this guide as a reference if you're not sure how! If you use windows and you haven't done this already, make sure you follow the instructions in that guide to install and open Git Bash.
We are going to use the cd command to navigate. Type out the follwing line, and press enter. To make sure you learn it, type it manually rather than copy pasting!
Challenge: Find the secret room
There's a hidden room in the house! You can modify the ls command with ls -a to show hidden folders and files. Try to locate this secret room and solve the puzzle inside!
Part 4: Making folders and files using the Command Line
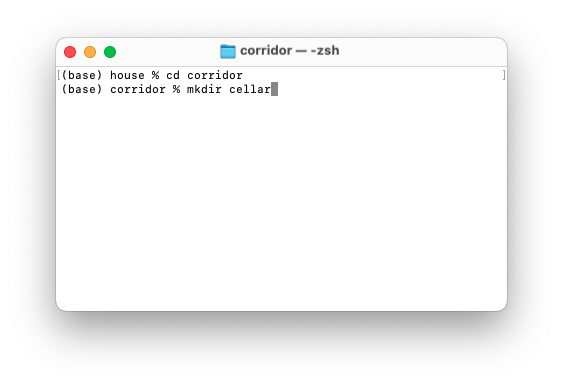
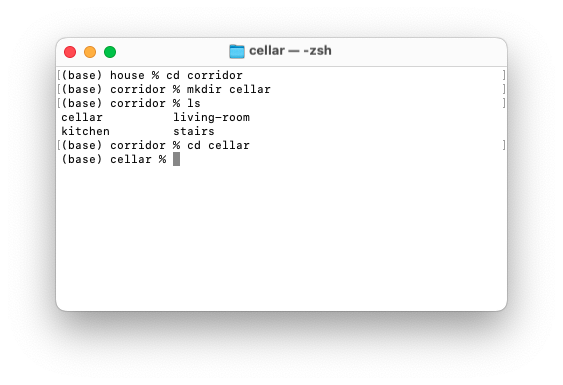
We are going to make an extension for the house! As an example, we are going to make an extra room called cellar, and then fill it with objects that people in the house have thrown away.
Step 2: Making a Folder
We've already made a folder in our file browser. To do the same thing in our command line, we're going to a command called mkdir, which stands for 'Make Directory'. To use the command, type mkdir, then a space, then the name of the folder you want to make (without a space in it). Then press enter.
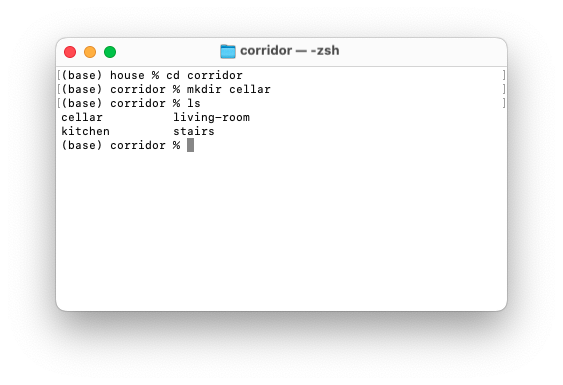
When you type in ls, you should see the new file.
Step 3: Making a File
To make some objects in the cellar, we need to go inside it. Use the cd command to navigate.
The command we use to make a new file is touch. This is a weird name, and refers to an old way of talking about how opening a file could affect computer memory. To create a text file, we will use it like this:
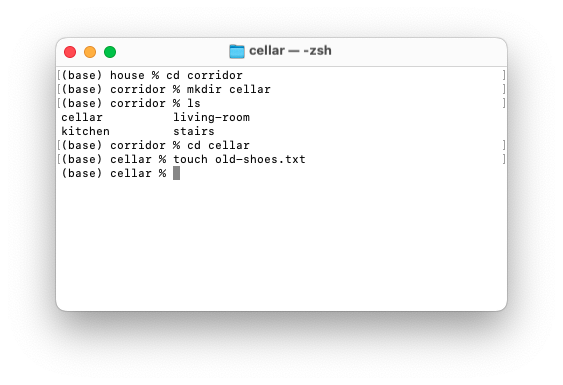
We can now open this file in a text editor.
Challenge: Add another room
Now you have a sense for how these commands work, try adding another room somewhere in the house, using the mkdir command! Try adding some objects using the touch command.
Extra tips
touch and mkdir can be used to make multiple things at once. So, if you type mkdir house garden street, it will make three folders in your current location: one called house, one called garden, one called street
Part 5: Make your Own Adventure
Step 1: space
Think of a space that you'd like to give someone a tour of. It could be real or imaginary, manmade or natural -- maybe it's your house, or a forest near where you grew up, or the top of a skyscraper
Step 2: make it a home
Navigate back to your 'computer-friend' folder in the command line, using the cd .. command. Now, use mkdir your-space-name (replace 'your-space-name' with the name of your space) to make it a folder. You can use the ls command, or the file browser, to check that it was made in the place you thought!
Step 3: add rooms and objects!
Navigate inside it using cd your-space-name (again replacing 'your-space-name' with whatever you called the folder.
Step 4: add rooms and objects!
Still using the command line, and the commands we learned above, try fleshing out your space by adding rooms, folders and objects. Consider using a piece of paper to make a map to help you plan! If you get lost, there's a cheatsheet of commands at the bottom of this page.
Try and make a space that contains at least 4 rooms, and 6 objects.
Part 6: Text Adventure Swap
Step 1: Compress the Files
Using your file browser, navigate to the Desktop, where you should be able to see the 'computer-friend' folder.
- On a Mac:

- On Windows: right clock the file, select 'Send to' and then select 'Compressed (zipped) folder'
Tools and Further Reading
File Browser Commands
- on a Mac: ⌘ + shift + .
- on Windows: "View" > "Hidden Items"
Show path bar:
- on a Mac: "View" > "Show Path Bar"
- on Windows: shown by default
List of Command Line Commands
In this session, we are going to use the following commands:
| command | name | meaning |
|---|---|---|
pwd |
"print working directory" | print out a path to my current location |
ls |
"list" | list the files and folders in the current location |
cd |
"change directory" | move to a different folder |
cd .. |
"change directory" | move UP one folder |
cd ~ |
"change directory" | navigate to the Home directory |
touch file.txt |
"touch" | make a new, empty file called file.txt |
cat file.txt |
"concatenate" | print out the contents of a file called file.txt |
mkdir my-folder |
"make directory" | make a new folder called 'my-folder' |
echo "some text" |
"echo" | write out the text "some text" |
echo "some text" > file.txt |
"write" | overwrite the contents of file.txt with "some text" |
echo "some text" >> file.txt |
"append" | add the text "some text" to the end of file.txt |
Neat tricks:
- Type
cd(cd and then a space), and then drag and drop the folder you want to navigate to onto the command line. Press enter and it will take you there - Use the Tab key to autocomplete folder and file paths
- Use the up and down arrow keys to find and select commands you already ran
- on a Mac: hold down the 'option' key to place your cursor anywhere on the command line
Watch out for:
- make sure you use spaces to separate between a command, and the thing you are using it on. For example,
cd..won't work, butcd ..will! - if you get a message that says 'command not found', double check that it's spelt right and that you used spaces in the correct place!
- for the same reason that spaces are used to separate out commands, they will cause issues if you use them in the names of files and folders! The best way to do this is to avoid it completely -- use a dash or underscore instead!
Further Reading
If you would like to explore more of the ideas covered in the workshop, take a look at one or all of the following readings:
- The Computer Is A Feeling, Tim Hwang and Omar Rizwan: This is a short text which explores our way of thinking about and using computers.
- What is Code, Paul Ford: This is a very long piece that explores in detail lots of aspects of computers and code. It's worth reading in full, but the most relevant part for this workshop is the Introduction, and Section 2, entitled 'Let's Begin'
Workshop: Image, Sound and Video
This workshop will cover different types of files and media. We will look at audio, video and image files, and how they are made, learn how to convert between them and how to find them online. We will use computer search tools and the command line to make tiny media libraries, and share them with one another!
Intro: file formats
At the most basic level, information on computers is represented by strings of ones and zeroes. The ones and zeroes are grouped together into 'files' (containers for information), and those files arrive in a 'format'. To differentiate the ones and zeroes that make up an image, from those that make up text, audio or video files, computers need a lot of structuring information. You can think of a 'file format' as a set of standardised rules for how the computer should read and display the information it finds in a file, and how it should structure that information for files that can be read in the same way.

^ an image displayed in 'hex code'
Many of the distinctions between different kinds of media file formats are based on mathematical differences about how information in them is compressed. For example, the difference between the audio formats .mp3, .wav and .ogg, or the image formats .jpg, .png and .bmp are mostly to do with how much space they take up on a computer. There are also political and legal differences -- for example, the differences between the the Microsoft Word Binary File Format (.doc), the Open Document Format (.odt), and the Open Office XML format (.docx) are that the first file format belongs to Microsoft, the second was explicitly intended to be an open standard, and the third became the standard interchange with heavy influence from Microsoft.

^ A protest in Bangalore, India, against the ECMA's adoption of the .docx standard. The banner in the background reads "Liberate Your Documents"
File formats are not naturally occurring phenomena -- there are large bureaucratic bodies dedicated to the design, development and standardisation of different file formats. Historically, there have been huge debates about file formats -- particularly around questions of proprietary file formats and licensing.
Recognising file formats
File names give you core information about the files themselves. The part you are interested in is the end, or extension. Normally the letters and numbers in a file's extension relate to a longer sequence of words that describe the process of formatting that file -- so ".pdf" stands for "portable document format", and ".jpeg" stands for "joint photographic experts group", the name of the organisation who came up with the standard for JPEG formatting.
Plain text file formats
A file is referred to as "plain text" if it can be represented just as characters (letters, numbers, punctuation, symbols), and not its graphical representation.
- Almost all code files are plain text (.py, .js, .c, .json)
- The .txt file format is plain text -- so are formats like .md and .html, which are called 'markup'
- There are some plain text data formats like .csv, which represent information like spreadsheets
Not all files which are about text are 'plain text' files! Word documents (.docx),
Binary file formats
A 'binary' file is any non-text file. To view the file in the way it was intended to be displayed, it would need to be opened in software that is designed to read that kind of file.
For example, to view a .jpg file, one needs to open it in an image viewer, a web browser, or another type of software designed to open images.
However -- all binary files, just like all text files, are still composed of strings of binary data. Unlike a text file, the characters that make up a binary file rarely form a good representation of the file's contents. This doesn't mean we can't still look at them!
Activity 1: Glitch a JPG
For the first activity, we are going to use a hex editor. On a mac, the editor we recommend is Hex Fiend, and on Windows, is HxD. HxD is available in many languages -- you can download in whichever is best for you. Hex fiend and H look slightly different but behave in the same way.
Step 1: Find a JPG file on your computer. If you can't find one, then feel free to use this example image of a Pallas' Cat from the Wikipedia page Pallas' Cat. Right click to save the file -- you can save it anywhere, but the easiest place to find it is your Downloads folder.
Step 2: Get some info about the file! One really helpful thing a computer can do is tell you loads of information about the files. On a Mac, the way to do this is to right click the file and select Get Info. On Windows, right click and select Properties. Look for a file that's between 800kB and 1.5MB. This will work with other files, but files in this range tend to work best!

Step 3: We will now open this file using a text editor. First of all, make a copy of the file if you'd like to keep it! Then, to open the copy:
On Mac:
This time, right click the file again and select open with, scroll to the end and click 'other'

When the selection of applications opens, navigate to the bottom and change the drop-down to All applications

In the list of applications, scroll down until you reach Textedit, and click to open the file. If it's greyed out, make sure you've completed the previous step.

You should see a text file full of characters appear!
On Windows
Right click on the file and choose "Open with" > "Choose another app". Scroll down and select Notepad. You should see a text file full of characters appear!

Step 4: (if on Hex Fiend -- change the mode to Insert!). Scroll through the file to get a sense of the shape of it. Avoid editing characters in the first section -- this often contains information about the file, rather than the contents, and can make the file no longer able to open.
Once you've scrolled down a way, try deleting a couple of characters -- save the text file, and see if any changes happen to the image. You will notice that information about the image tends to be organised in left-to-right rows -- edits earlier in the file will affect higher up rows. Here's a set of consecutive edits made to a JPEG as an example:

Demo 1: computer find tools
Finding files on a computer is not always straightforward, but many systems include more advanced tools to make finding things easier.
Windows 11 no longer supports search filtering
Demo 2: finding using the command line
This demo will build on the command line commands from last weeks' session. If these are unfamiliar or you need more practice, a cheatsheet is available at the end of this page, and the full session is linked here.
1. find
The first command we will look at is the find command. Like the name suggests, this is used for finding things, and can be a useful and precise search tool.
Let's open up a command line and try and use it. First of all, I am going to navigate to the desktop using cd:

Next, I want to try and find a file. I'm looking for an image called "shrimp.jpg" -- I can use the find tool to search for it. Notice that it found it even though it's not in the same folder! That's because find searches subfolders of the folder you are in.

What if we just want to find jpg files? We can do that too, using the wildcard symbol *. * often stands in in computing for "anything you like". Here we use it to say, we want all the things that end in .jpg:

You'll notice that I had to specify I wanted to find by name! That's because find can be used to find all sorts of things. We can also try finding things that are larger than a certain size! Here's the command to list files bigger than 100MB -- notice the list is a lot shorter, and just includes things like screen recordings and photoshop files!

There's a good guide here to a list of common use cases for the command.
2. copy
The second command we're going to look at is the copy command. This is used for making a copy of a file in one location, and storing the duplicate in another. This can be really useful if we don't want to touch the original files!
Say I want to make a copy of some of the jpeg files from before in a new folder. First of all, let's list them! Maybe I only want ones less than 300kB in size:
 The copy command takes the form:
cp /path/to/a.txt /other/path
This means -- copy the file a.txt into the new location /other/path. In this case, I'm going to make a folder on my Desktop called lores-jpeg where I'm going to keep all these images.

In order to make sure the file paths are preserved, I'm going to wrap all the paths in quotation marks, or use the tab key:

Note that without much extra effort, we could make a tool that would do this for all these tools automatically. In this instance, we can use a bash script!
This is just for demo purposes to show you how these things can become useful: it's not within the scope of today's workshop to show you this in detail!
find . -name "*.jpg" -size -300k|while read i; do
cp "$i" lores-jpeg/
done
this code runs the find command, reads it in line by line, and then runs the copy command on each line in turn!
Activity 2: Files Treasure Hunt
Using the find command, try and find at least one of each of the following types of file on your computer. Use the cp command to copy each of these files into one folder, with all the types in it. Don't use mv, because that will remove the files from their original location!
- .txt
- .docx
- .png
- .jpg
- .gif
- .epub
- .mp4
- .mp3
- .txt
Example for finding jpg files:
$ mkdir my-file-storage
$ cd my-file-storage
$ find ~/Desktop -name *.jpg
$ cp ~/a/b.jpg ./
Challenge: rare format try and find as many file types as you can on your computer that don't appear on this list! See Wikipedia for a full list of file formats
Activity 3: Gallery/Mixtape
For the third activity, we are going to use the find, mv and cp commands to create a mixtape or gallery for someone. This can be anyone you like, they don't need to be in class! Your mixtape or gallery (or anthology if you like) should be a collection of files united by a theme, and arranged and named with some kind of intention. It's totally up to you what that is!
To do this, we will need to find some files. There are lots of places on the internet to find different kinds of media -- here are a few sources I like. Some are very broad, others are quite specific!
- Wikimedia Commons -- repository of public domain images
- freesound -- open online repository of sounds
- internet archive -- huge collections of books, audiobooks, films and other references
- prelinger archive a subcollection of the internet archive focussed on films
- are.na a website that sits somewhere between a social media site and bookmarking tool, used extensively by artists and researchers to collect materials
- queer.archive.work library of archival texts associated with queer and revolutionary history
Writing a README
An important part of sharing files with other people is explaining what the files are for, what they contain, and how to read, use and open them. This is considered good practice in a lot of disciplines, but is particularly important when writing code, as the interaction of files can be complex. Within software development, there's a convention to title these files 'README' -- which functions as a command.
README files are always written in a plaintext format, so no special software is required to read them. Normally this is either a .txt ("text file") or .md ("markdown file").
Task: Write a short README file in txt format for your mixtape / gallery. Instruct the listener / viewer what software they should open the files in, and feel free to include artistic notes, thoughts, etc.
Tools and Further Reading
There's a nice list of common file formats here.
Reading
- Radical Tactics of the Offline Library, Henry Warwick -- an essay on the politics and possibilities of offline file storage and sharing
- In Defense of the Poor Image, Hito Steyerl -- an essay about the decay of JPEGs that travel the internet
File Browser Commands
- on a Mac: ⌘ + shift + .
- on Windows: "View" > "Hidden Items"
Show path bar:
- on a Mac: "View" > "Show Path Bar"
- on Windows: shown by default
List of Command Line Commands
In this session, we are going to use the following commands:
| command | name | meaning |
|---|---|---|
mv a.txt b/ |
"move" | move the file "a.txt" into the folder "b" |
mv a/ b/ |
"move" | rename the folder called "a" to "b" |
mv a.txt b.txt |
"move" | rename the file "a.txt" to "b.txt" |
cp a.txt b/ |
"copy" | copy the file "a.txt" into the folder "b" |
cp "~/Downloads/c.mp3" ./ |
"copy" | copy the file "c.mp3" from "Downloads" into the current folder |
find . -name "*.txt" |
"find" | find all files ending in .txt inside the current folder |
Commands we learned last week:
| command | name | meaning |
|---|---|---|
pwd |
"print working directory" | print out a path to my current location |
ls |
"list" | list the files and folders in the current location |
cd |
"change directory" | move to a different folder |
cd .. |
"change directory" | move UP one folder |
cd ~ |
"change directory" | navigate to the Home directory |
touch file.txt |
"touch" | make a new, empty file called file.txt |
cat file.txt |
"concatenate" | print out the contents of a file called file.txt |
mkdir my-folder |
"make directory" | make a new folder called 'my-folder' |
echo "some text" |
"echo" | write out the text "some text" |
echo "some text" > file.txt |
"write" | overwrite the contents of file.txt with "some text" |
echo "some text" >> file.txt |
"append" | add the text "some text" to the end of file.txt |
Neat tricks:
- Type
cd(cd and then a space), and then drag and drop the folder you want to navigate to onto the command line. Press enter and it will take you there - Use the Tab key to autocomplete folder and file paths
- Use the up and down arrow keys to find and select commands you already ran
- on a Mac: hold down the 'option' key to place your cursor anywhere on the command line
Watch out for:
- make sure you use spaces to separate between a command, and the thing you are using it on. For example,
cd..won't work, butcd ..will! - if you get a message that says 'command not found', double check that it's spelt right and that you used spaces in the correct place!
- for the same reason that spaces are used to separate out commands, they will cause issues if you use them in the names of files and folders! The best way to do this is to avoid it completely -- use a dash or underscore instead!
Workshop: Make and Publish a Website
Making a site and putting it online
In this workshop, we will use a template to make a website, but we will also go through the process of setting up from blank files. You can download the template here.
Download and unzip the folder, and then right click to open the 'index.html' file in your browser. Right click again to open it in parallel in your text editor.
Modifying your site
The template contains basic HTML, CSS and Javascript. The only thing you actually need to have a website is HTML. CSS allows you to change the look of the website, and Javascript is used for interactivity.
First of all, have a go at editing the html file. This will let us change things like text and content on the page. For this workshop, we're making small informational websites about a favourite fact, artwork or object. W3 Schools has an intro guide to structuring HTML elements here, and a full reference for all the different kinds of elements here.
We'll also look at using CSS to style the site. Because it's a brief workshop we're just going to cover the basics!
Static Websites
'Static' websites comprise most of the websites you might make at the CCI. They're called static because broadly, they don't change permanently -- they might be interactive, but every time you load them they should look the same. These can be made using 'vanilla' HTML+CSS+JS, using libraries (like p5, jQuery), using Javascript frameworks.
we love vanilla JS
You will hear the phrase 'vanilla' used to describe websites that are made using just HTML, CSS and Javascript. These are the building blocks of the web, it's important to know how to use them! You can make really good websites just using these -- their downside is when you need to make lots of pages (it can get laborious writing HTML), or when your site needs to be edited by people that don't code.
an aside: pure html There's been some nice projects in recent years to revive the practice of making sites just using vanilla HTML and CSS. A nice one is html.energy.
Hosting
The biggest part of putting anything online is this -- how do you 'host' your site, so it stays up and people on the internet can find and use it. The hosting method you use will depend on the kind of site you are making, who needs to edit your site, whether you're needing to store information in a database, and whether you're doing anything that depends on physical infrastructure that you've built.
All static sites are comprised of files (HTML, CSS and JS files) that are sent to visitors to the site (the 'client') when they load a webpage. Static sites are the easiest kinds of sites to host, and there are lots of different options! At this point in web history, you should basically never have to pay to host a static site (unless you have like 10million visitors), though you will still have to pay for domains.
Github Pages
Using Github Pages is popular in the department, and depending on the class you take, your teacher might get you to use Github or the git.arts server. These look very similar, the main difference is that git.arts is managed by us, and you will need to use your CCI account to connect to it. For the purpose of this workshop, we will use Github. We have tutorials on the wiki for using these.
Github Pages gives you a way to host a site that is saved as a repository on Github. You can create this either as a git repository on your computer, or directly edit the files in Github itself. The former is a good idea as it also allows you to test the site out, and make the most of the versioning tools.
Domains, DNS and SSL
The last part of hosting a website is often adding your own domain to it. Providers like Github Pages, Netlify and Vercel will allow you to modify the domain they give you. Domains need to be bought and renewed year-on-year and can vary wildly in price. The companies that trade in domains tend to be a bit sneaky and will also often try and sell you stuff on top of it. Moniker are meant to be OK, and generally I recommend picking one company and sticking with it.
The steps for pointing your domain name to your host depend on where you're hosting your site! For services like Github Pages, Netlify and Vercel, you normallly need to point your domain at their 'load balancing IP'. You can do this by creating what's called an Apex or A record, or changing the one that already exists for your site.
For some reason, it can often be hard to find the servers to point your domains to -- I think this is because they sometimes change and there's a few different ways to do it, but for the sake of simplicity:
- Github Pages: 185.199.108.153
- Netlify: 75.2.60.5
- Vercel: 76.76.21.21
Free domains forever with one neat trick
I love making subdomains! This is a great way to host loads of different sites from a single domain. You create a new Apex record for each domain and point it to the IP address you want. It took me years to realise I could do this!!
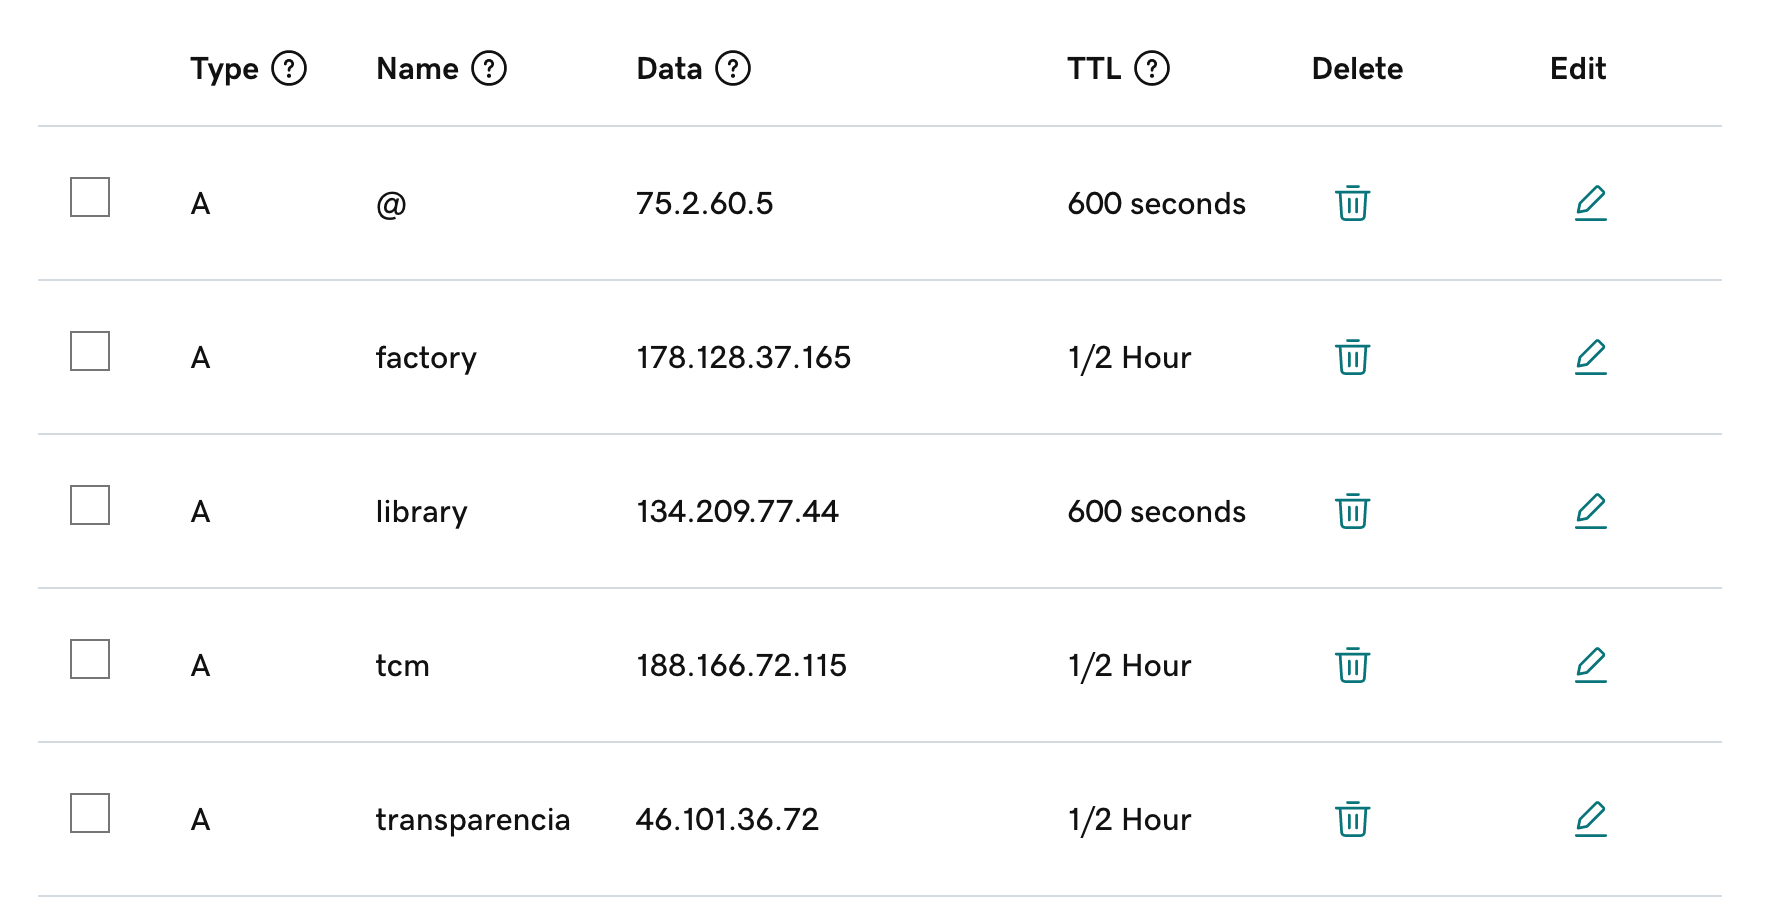
You can tell from this screenshot that my website is hosted on Netlify :)
Putting the site online
To put this site online, we are going to use Github Pages, following these steps. You could also use netlify, vercel or another static hosting service.
bonus round: making a sticker
For the last part of the workshop, we're going to encode the website urls in NFC stickers. There's a great free and open source phone app you can use to do this, called NFC tools. This is inspired by a project from the web designer Spencer Chang.
:)