Creative Coding
- Intro to Exif Image Metadata
- Making Websites and Putting Them Online
- Software Defined Radio
- Adding a Processing Library
- How to Debug Web Code
- Sending data between TouchDesigner and Arduino
- Projection Mapping Workshop
Intro to Exif Image Metadata
Image files captured using digital cameras often contain a large amount of information about how and where they were taken, the type of camera that took them, and other information about the image. This is called the 'exif metadata', and it is standard across all digital images. Using code to read this information can tell you a lot about the image and can be useful in particular for geolocation. Likewise, if you are concerned about privacy, this might be information you would like to remove.
exif metadata in the file browser
On a mac computer, exif metadata about an image can be viewed by right-clicking 'get info', and then expanding the 'more info' panel in the window. Here you can see that the exif metadata about an image taken on my phone includes the latitude and longitude (the geolocation), information about my phone, and then the settings applied to the image.

exiftool
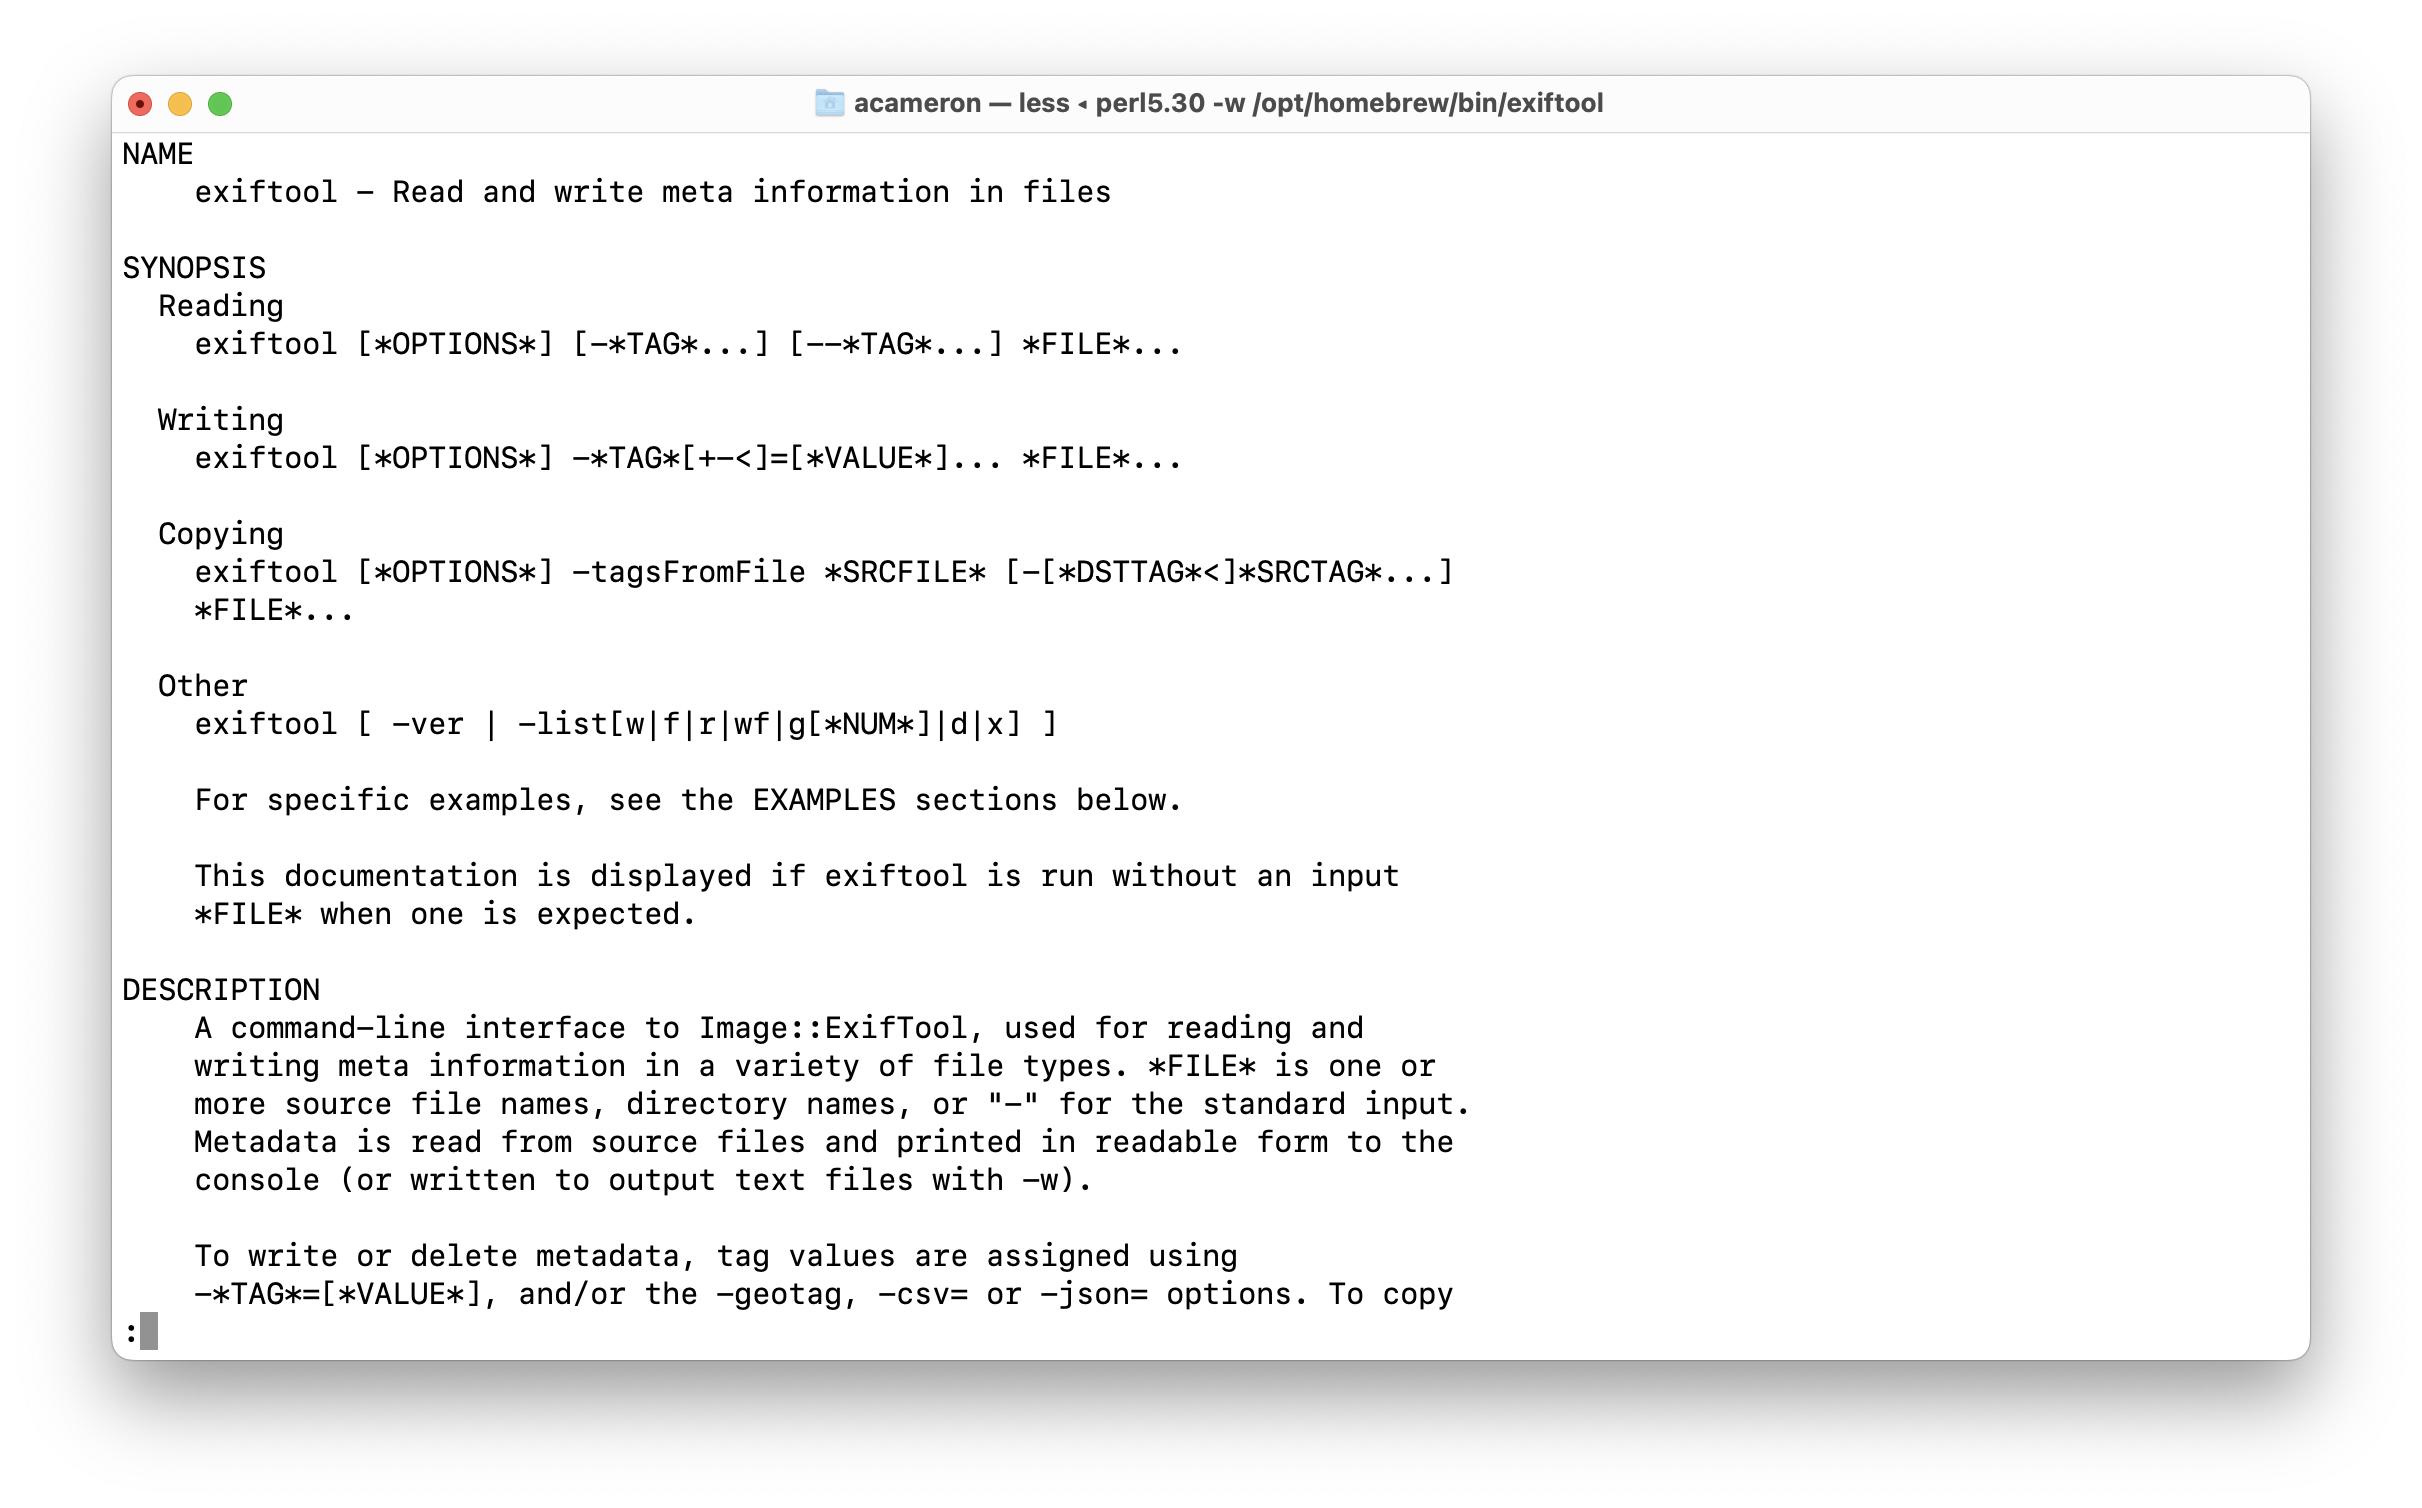
If you want to use information contained in images programatically (or edit this information), the best option is to use exiftool. Exiftool is a command line application for reading and writing exif metadata. It can be downloaded here, and can also be installed on mac using the homebrew package manager.
To check if exiftool is properly installed on your computer, open a command line / terminal window and type in exiftool, then press enter. You should see a page like this -- if you instead get a message saying 'command not found' it means you do not have it installed.
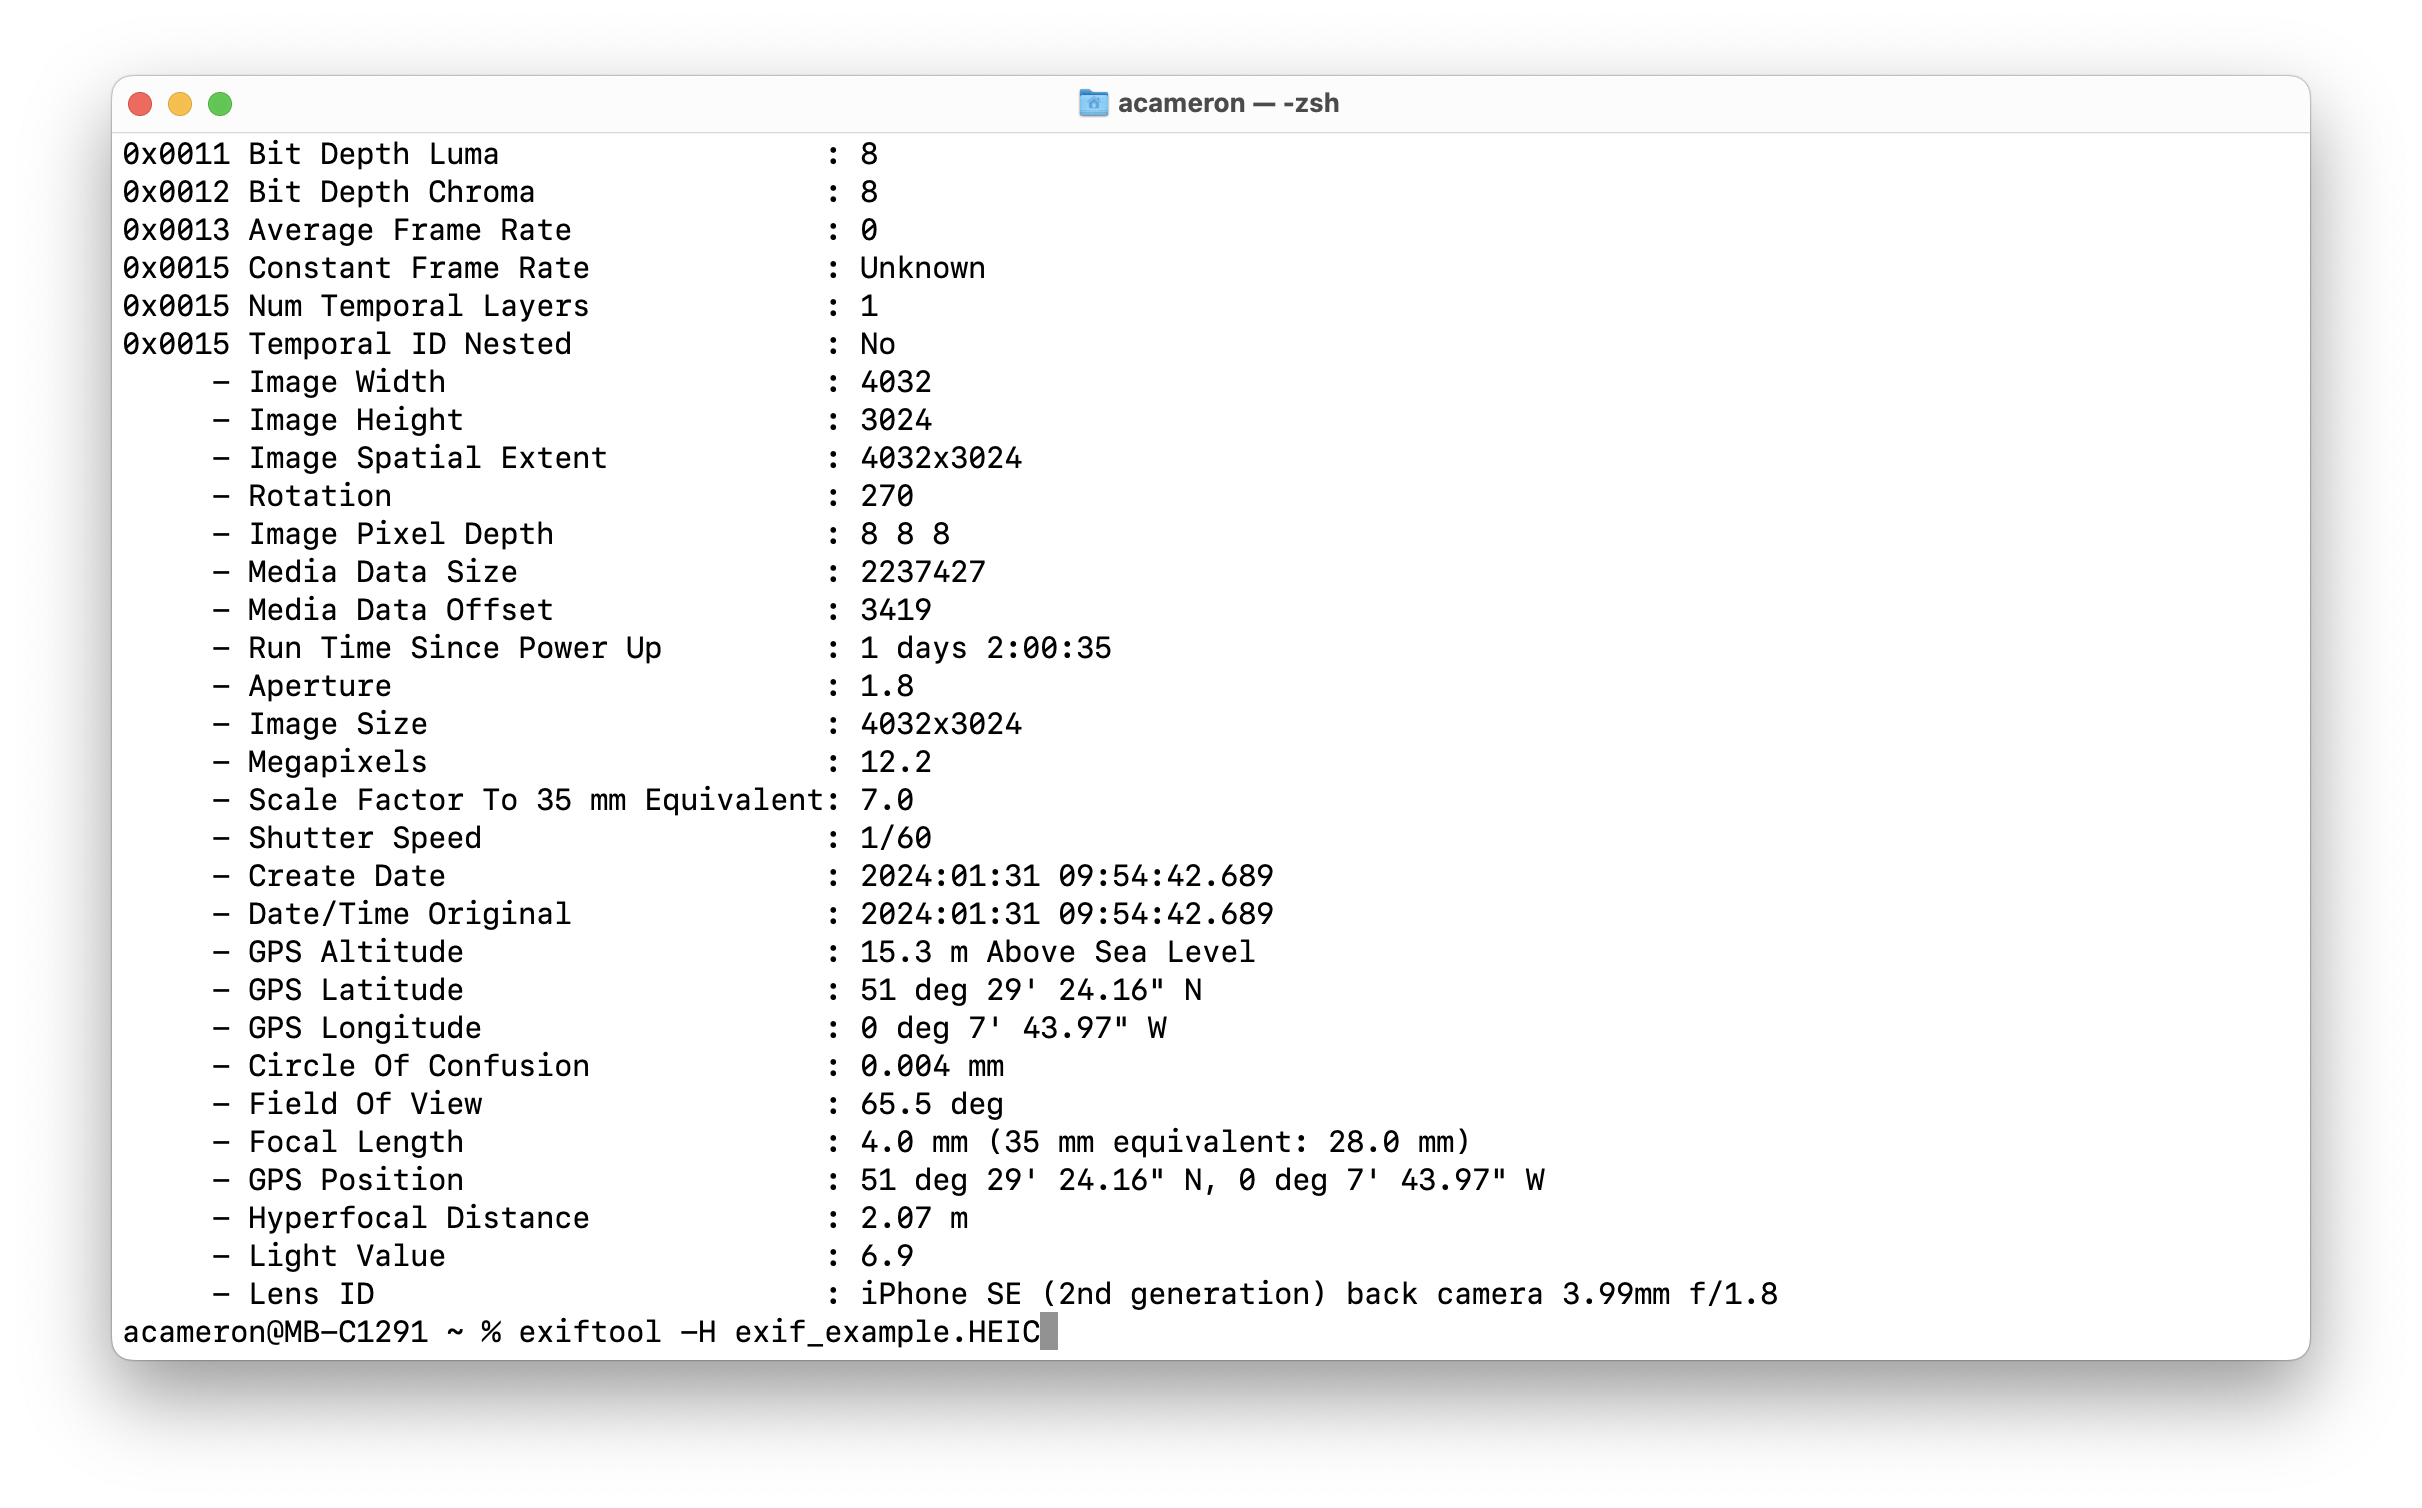
If we wanted to look at exif metadata of the same image, but using exiftool, we can run the following command:
exiftool -H exif_example.HEIC
We get a huge amount of information, including a lot of things that weren't included in the Get Info window.
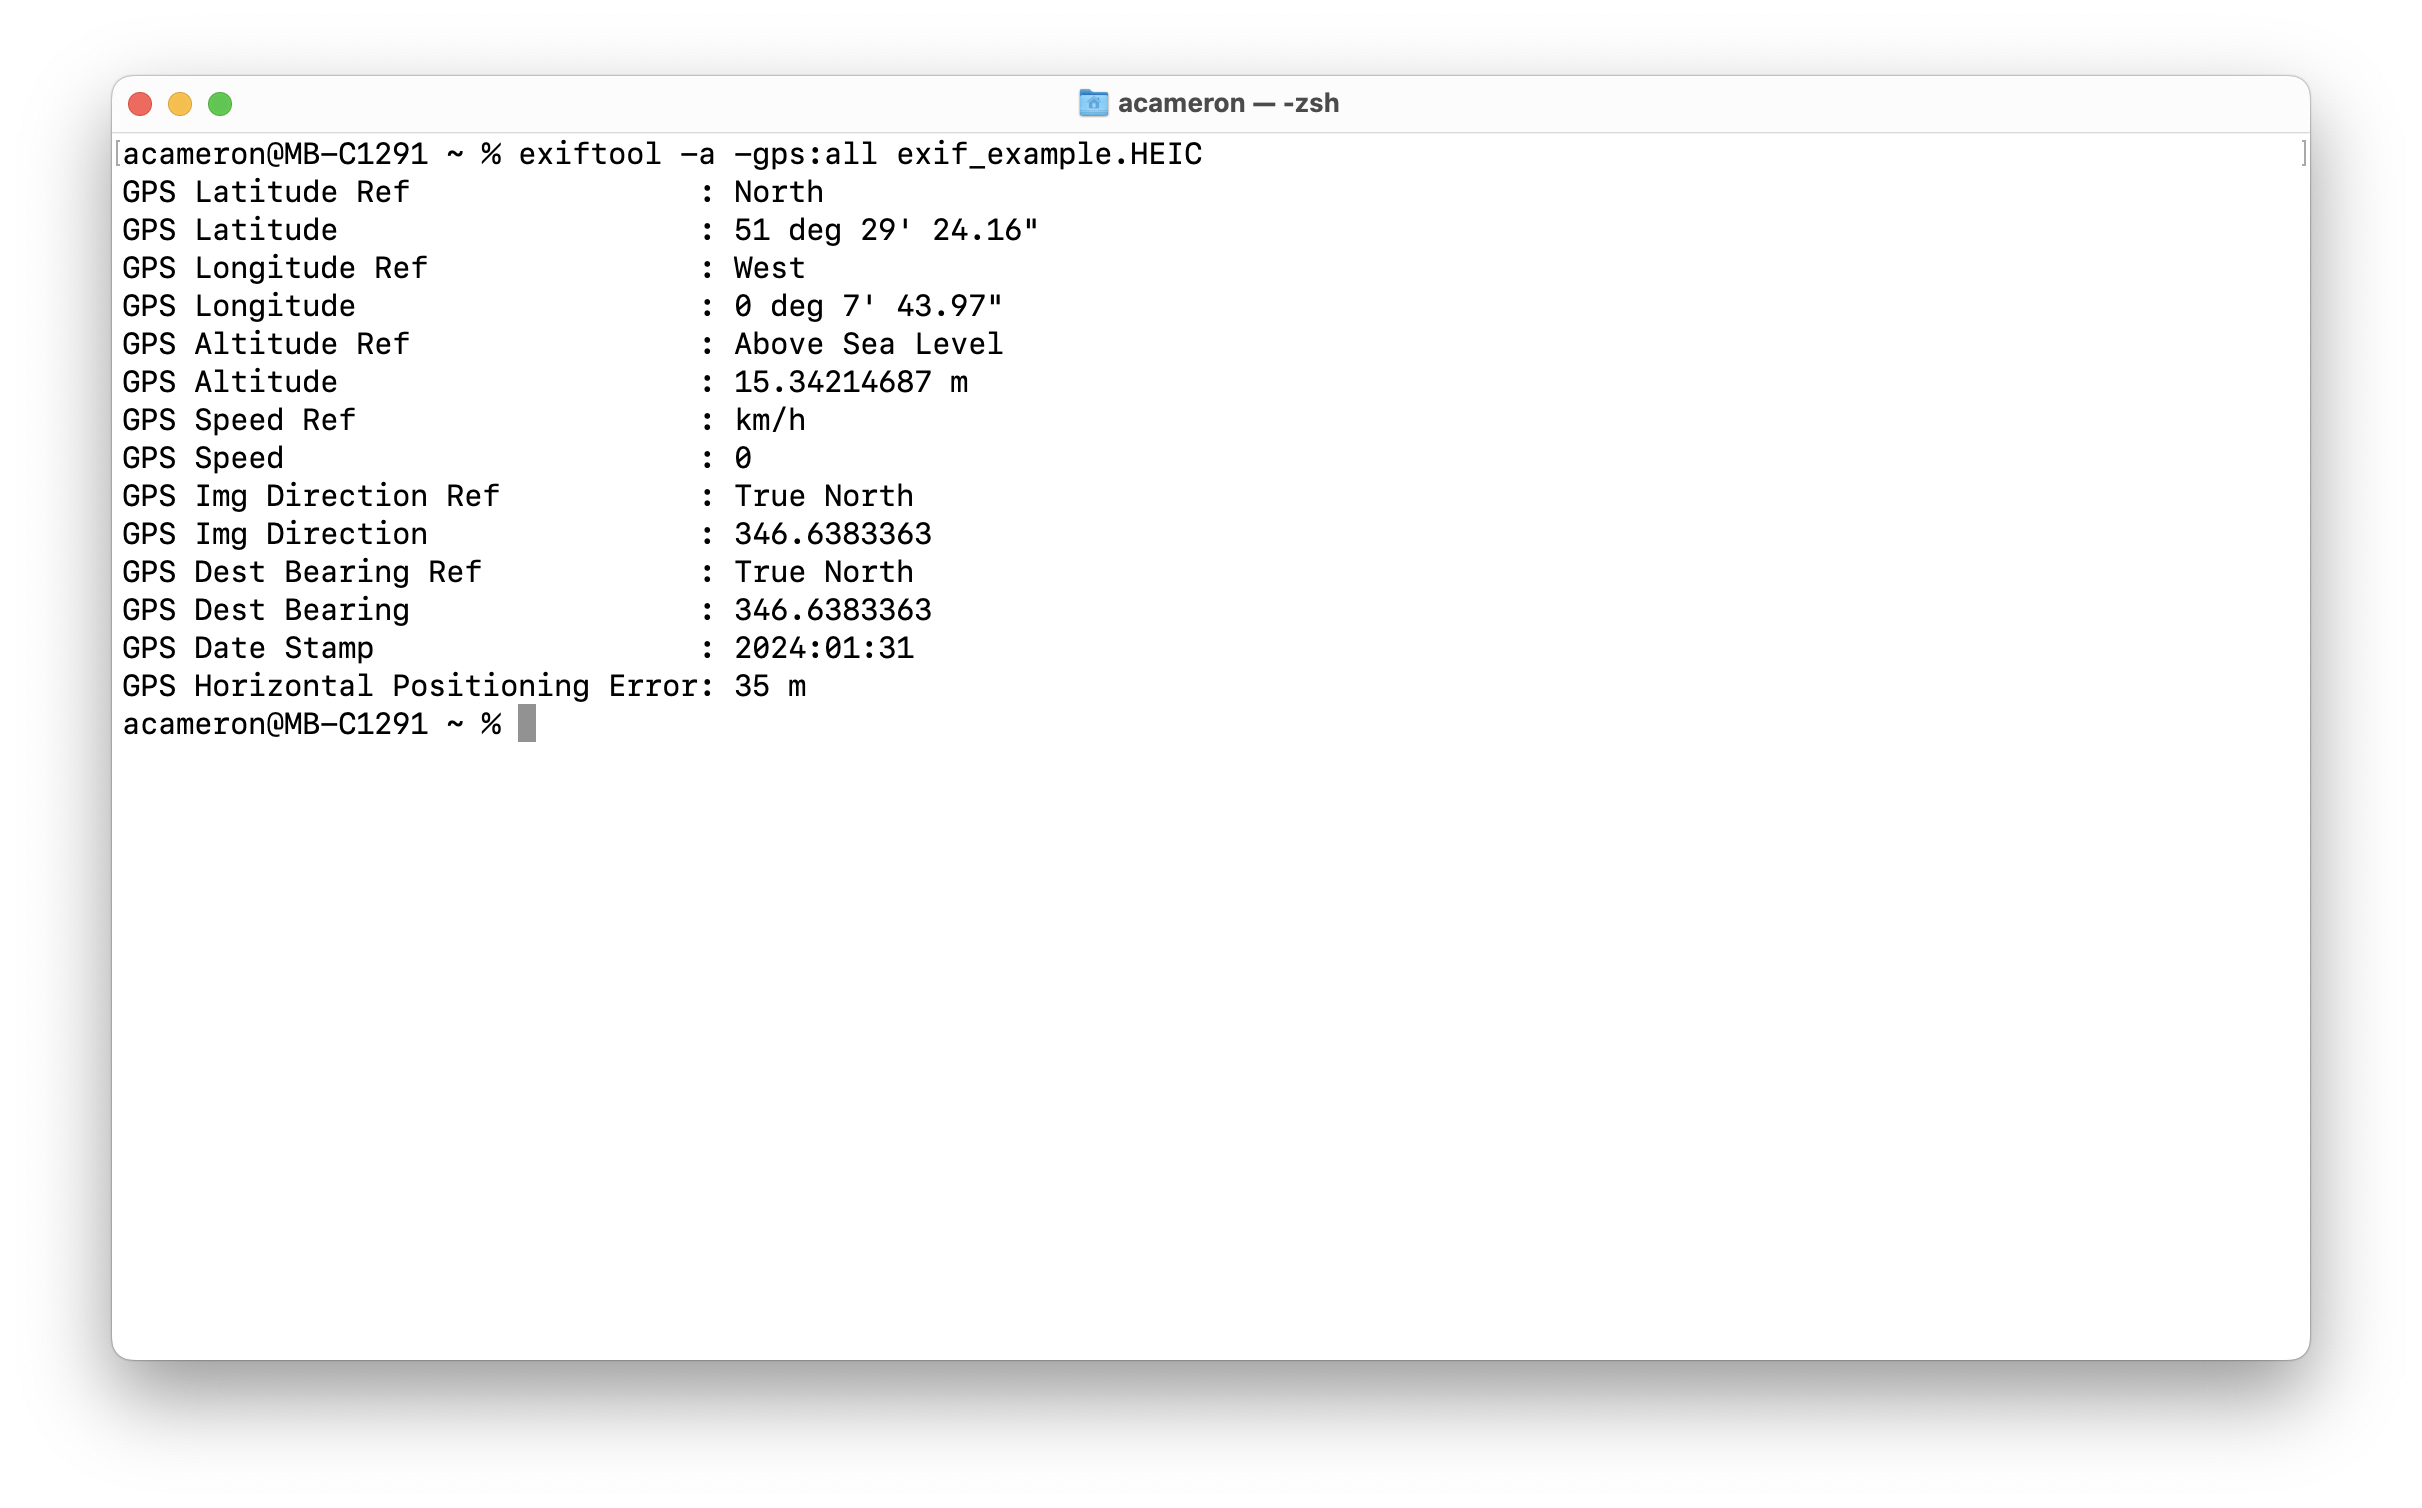
This is loads of information -- if we want an overview, we can also just get the gps component by selecting those tags specifically:
exiftool -a -gps:all exif_example.HEIC
This is great, but you'll notice that our coordinates are in the 'degrees' format -- this makes it easier to read, but it makes it harder for us to use it in code. To use lat and long information programatically, we want to get this information in decimal format. We can use the -c flag to specify the format we want (the "%+6f" bit looks kind of gross, but it's how decimal representation is notated):
exiftool -c "%+6f" -a -gps:all exif_example.HEIC
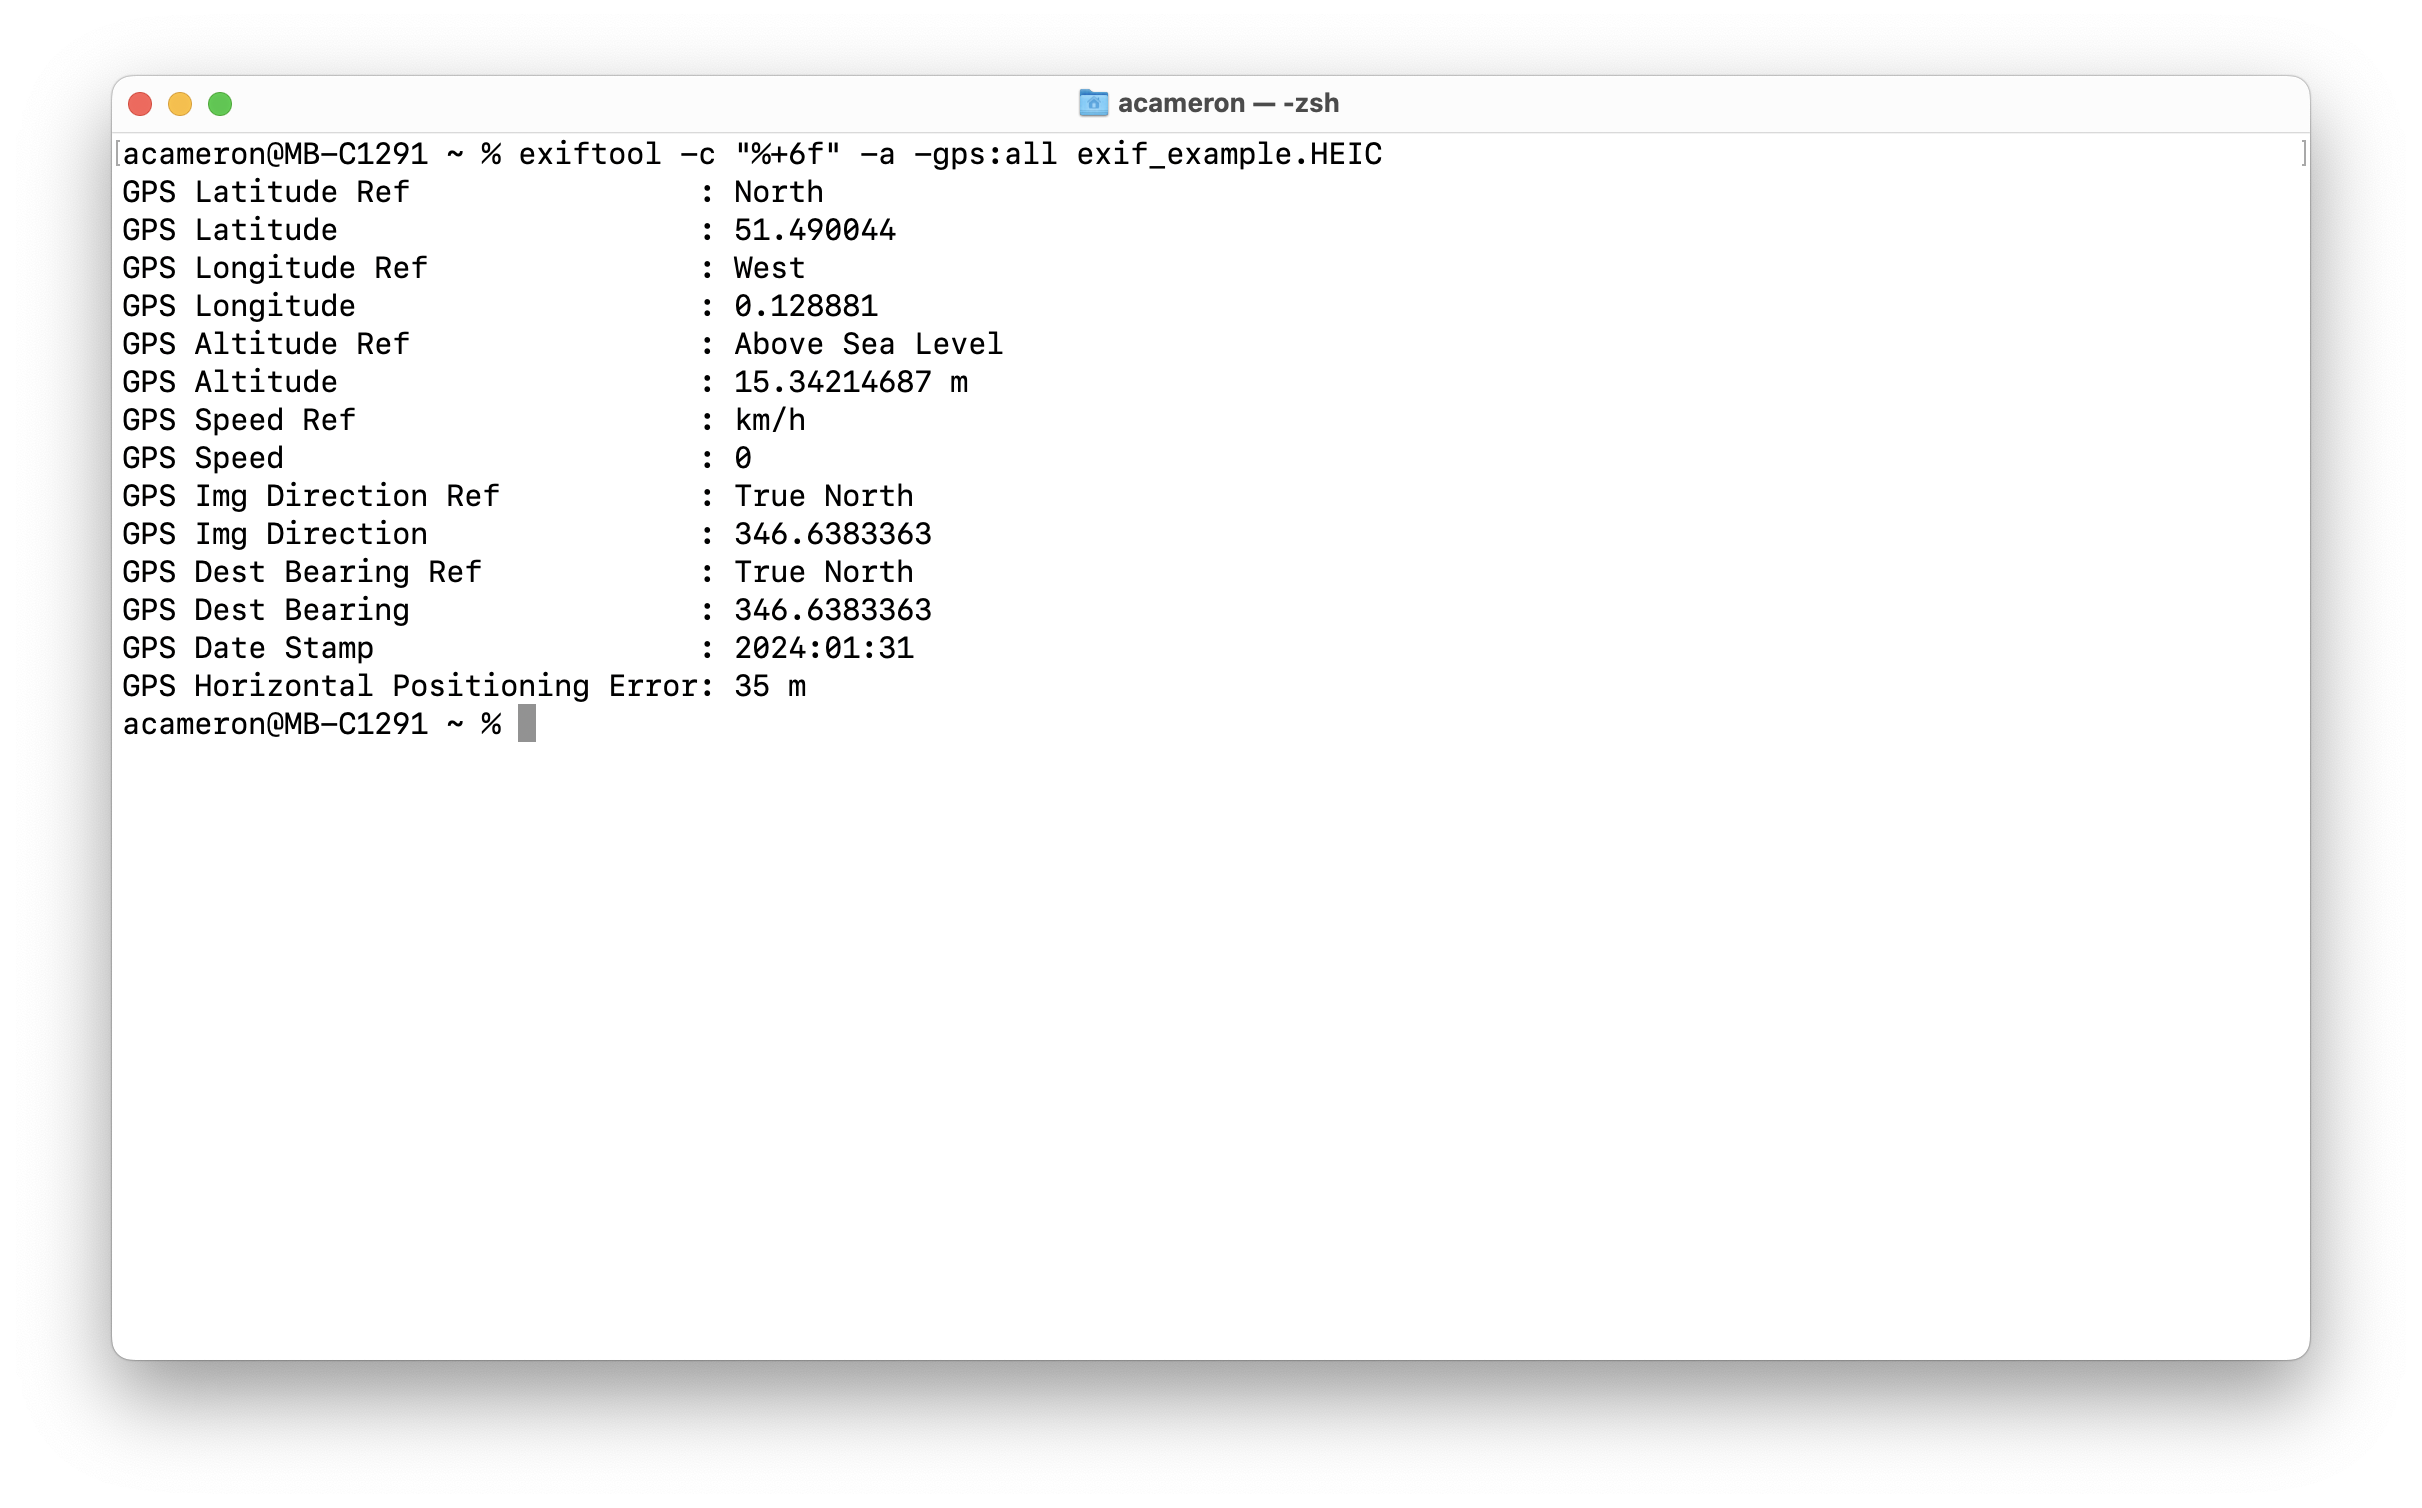
Now we've got the decimal values, it's easy for us to see where this photo was taken. You'll notice that when you load google maps, the url will contain some numbers: these give the latitude and longitude of the photo.
These are the pieces of information we will need to locate the image. The Ref value tells us whether our latitude / longitude is positive or negative. N and E are positive, W and S are negative.
GPS Latitude Ref : North
GPS Latitude : 51.490044
GPS Longitude Ref : West
GPS Longitude : 0.128881
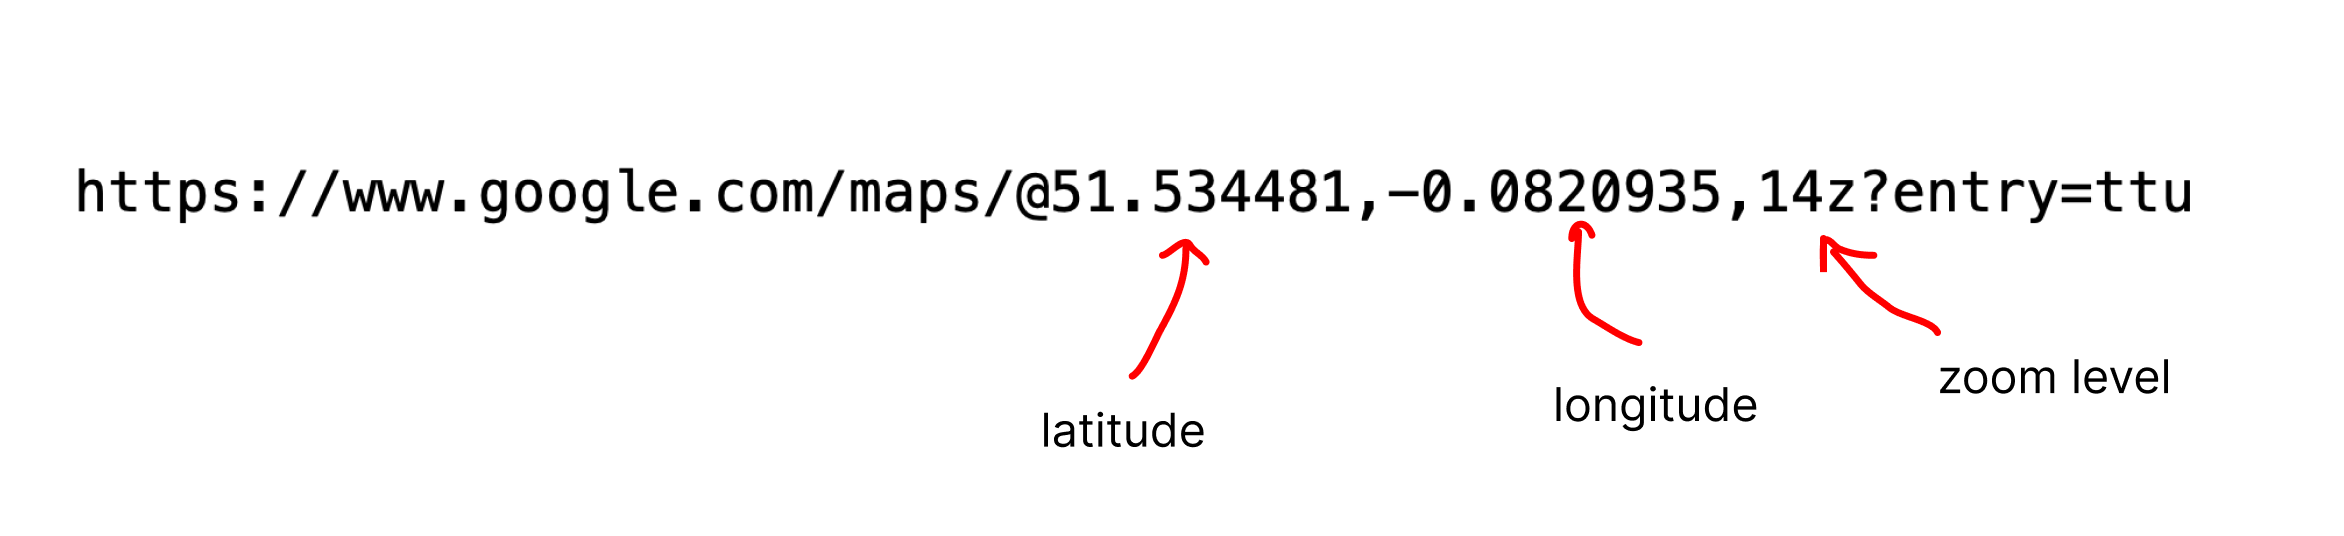
So, for this picture, our final lat and lon values are 51.490044 and -0.128881 respectively. Let's put these in our url!
https://www.google.com/maps/@51.490044,-0.128881,14z?entry=ttu
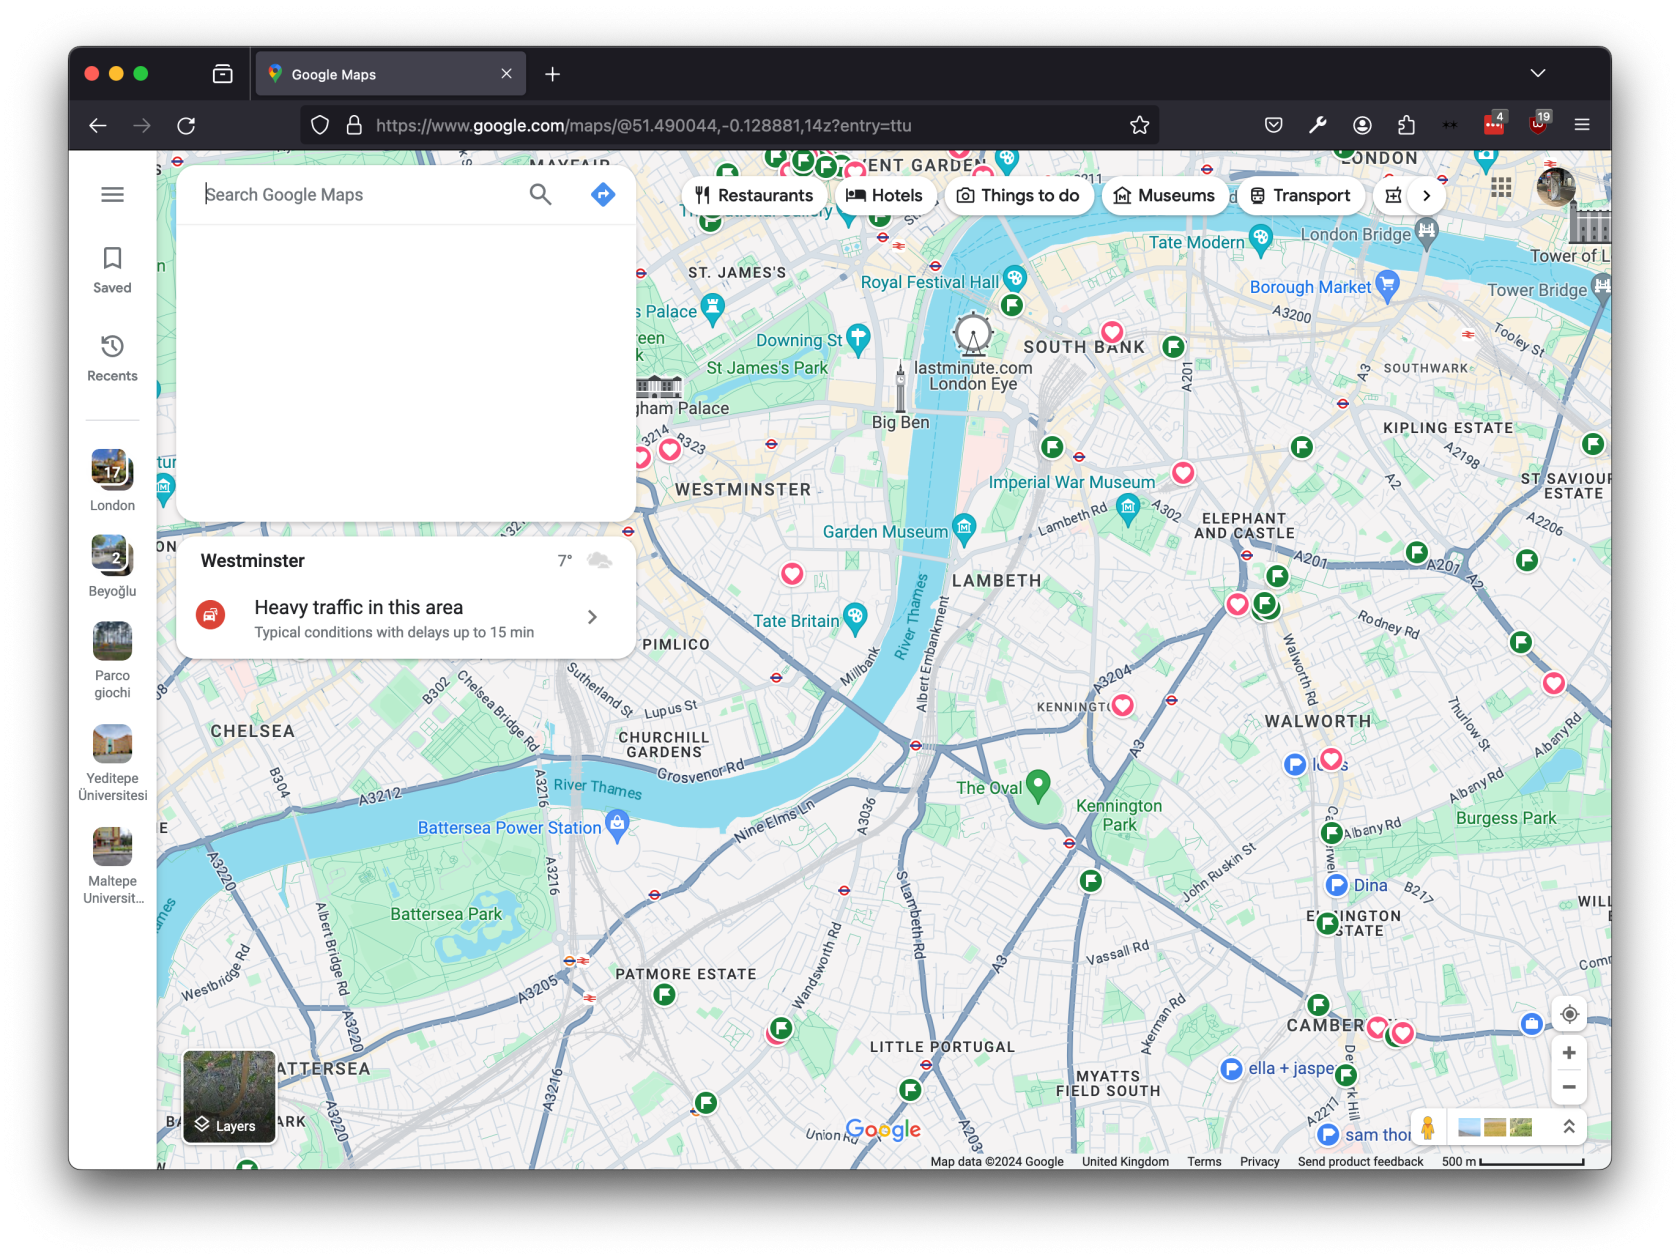
This will center the map on the location. This gives us a vague idea of where the image was taken, but we can do better! If we reformat the url as a query, we can get a pinpoint at the exact location.
https://www.google.com/maps?q=51.490044,-0.128881
Now we can see that this picture was taken in the C block of Chelsea College of Art!
edit/remove metadata using exiftool
If we want to remove exif metadata from an image, we can also do this using the command line -- by including the = at the end of the tag search, it will set all these fields to be blank:
exiftool -a -gps:all= exif_example.HEIC
python programming with exif
(This part of the notes is partly based on this tutorial). To do this part of the tutorial, we'll need a folder full of random images with different exif data. The script used is located here.
As well as using the command line to manipulate exif metadata, we can do this directly using Python code. This works in much the same way. First, to install the package, run:
python3 -m pip install exif
This will install the exif package. (note: if you do not yet have Python on your computer, you can install it using these instructions).
The first thing we want to do is test that we can do the same thing in Python that we were doing in the command line. Let's try analysing our image:
from exif import Image
import os
with open("exif_example.jpg", "rb") as image_file:
image = Image(image_file)
if image.has_exif:
print(image.gps_latitude, image.gps_latitude_ref, image.gps_longitude, image.gps_longitude_ref)
This is what we get out:

If you're trying to use HEIC format, you might run into issues as Python can't easily read these files! There are a few ways around this, probably the quickest is to use the command line command. In order to use it, you need to install imageMagick.
mogrify -format jpg *.HEIC
This is nice, but we're back in a non-decimal degree format. This time, we can just write a function to convert our lat and lon data:
def convert_deg(value, direction):
multiplier = 1
(d, m, s) = value
if direction == "S" or direction == "W":
multiplier = -1
return multiplier*(d + (m / 60.0) + (s / 3600.0))
with open("exif_example.jpg", "rb") as image_file:
image = Image(image_file)
if image.has_exif:
lat_dec = convert_deg(image.gps_latitude, image.gps_latitude_ref)
lon_dec = convert_deg(image.gps_longitude, image.gps_longitude_ref)
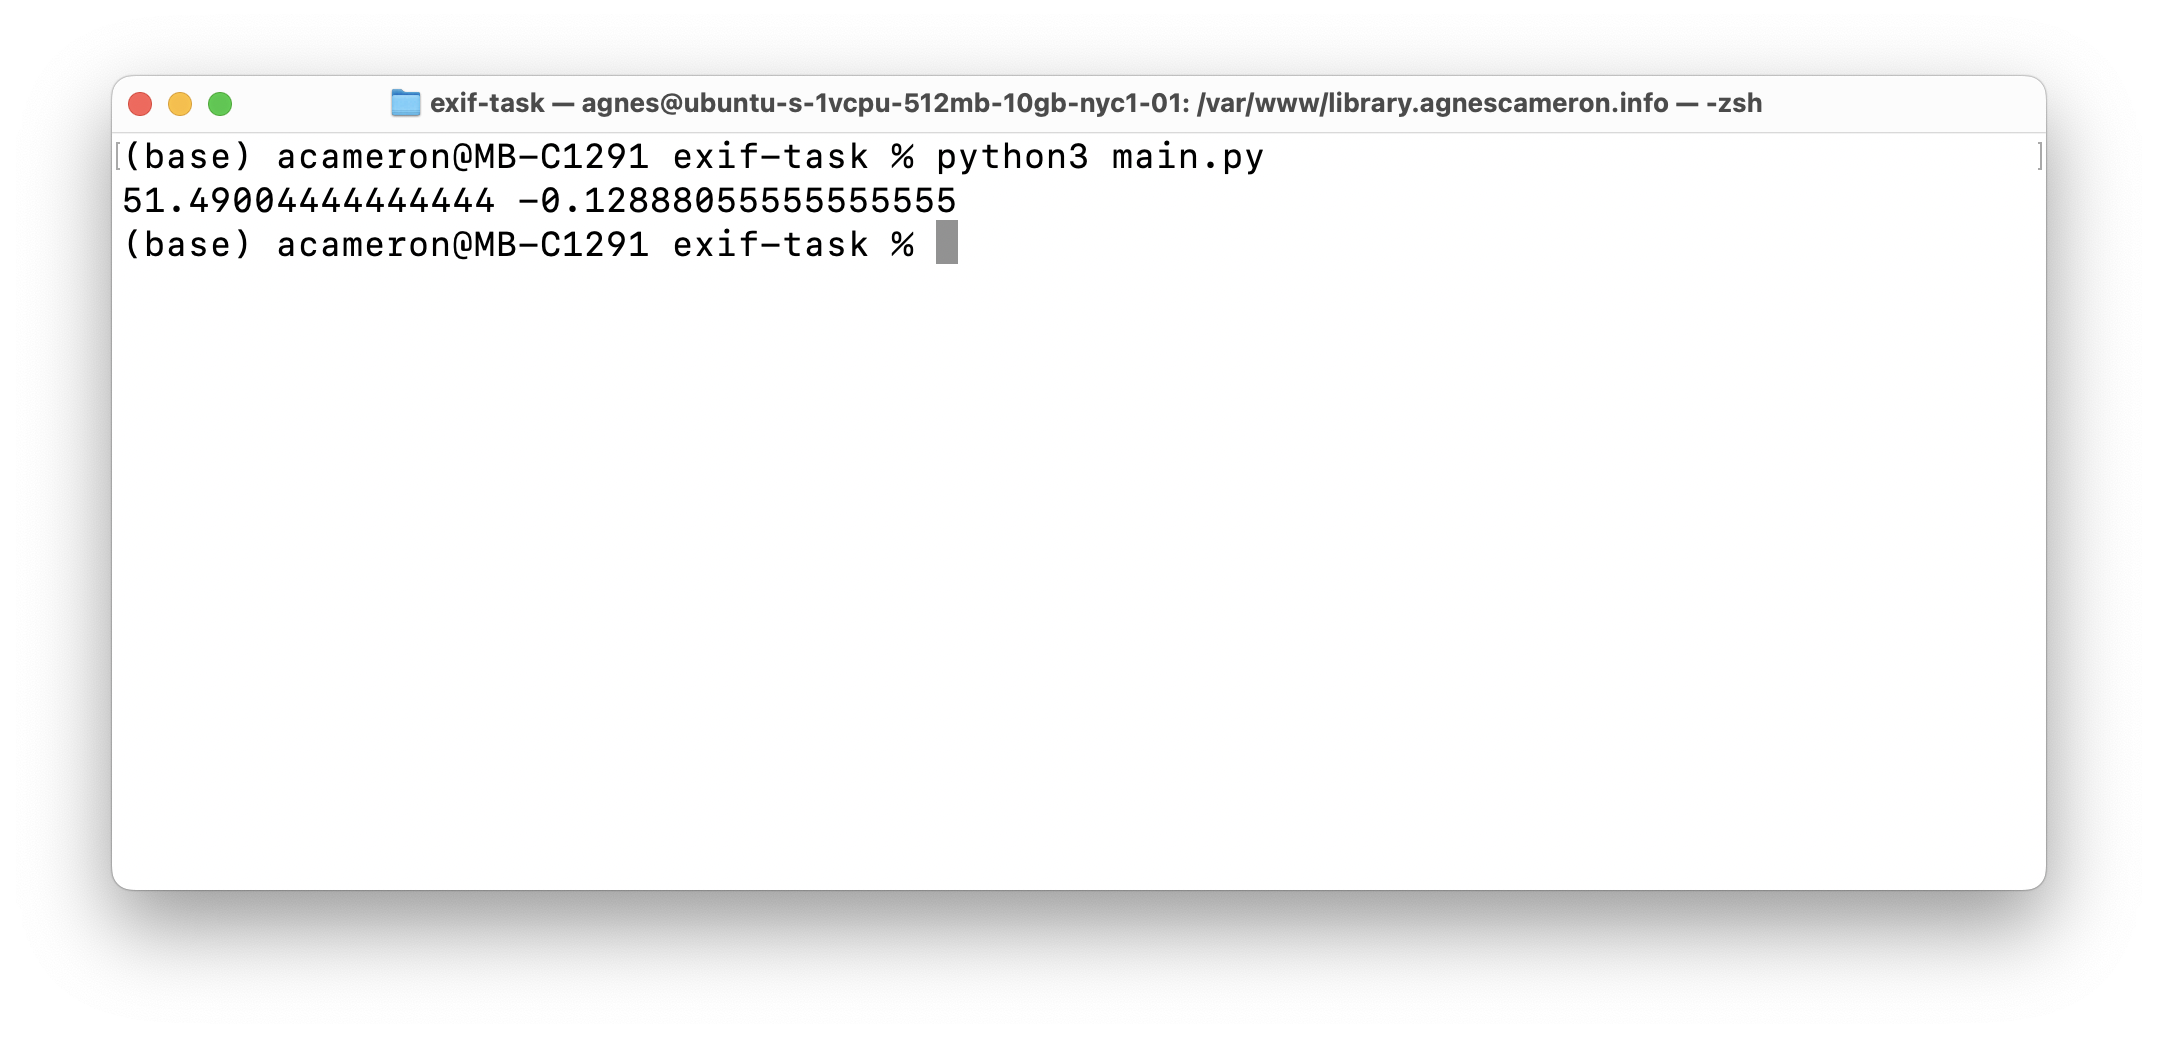
print(lat_dec, lon_dec)
Great, now we have the decimal versions:
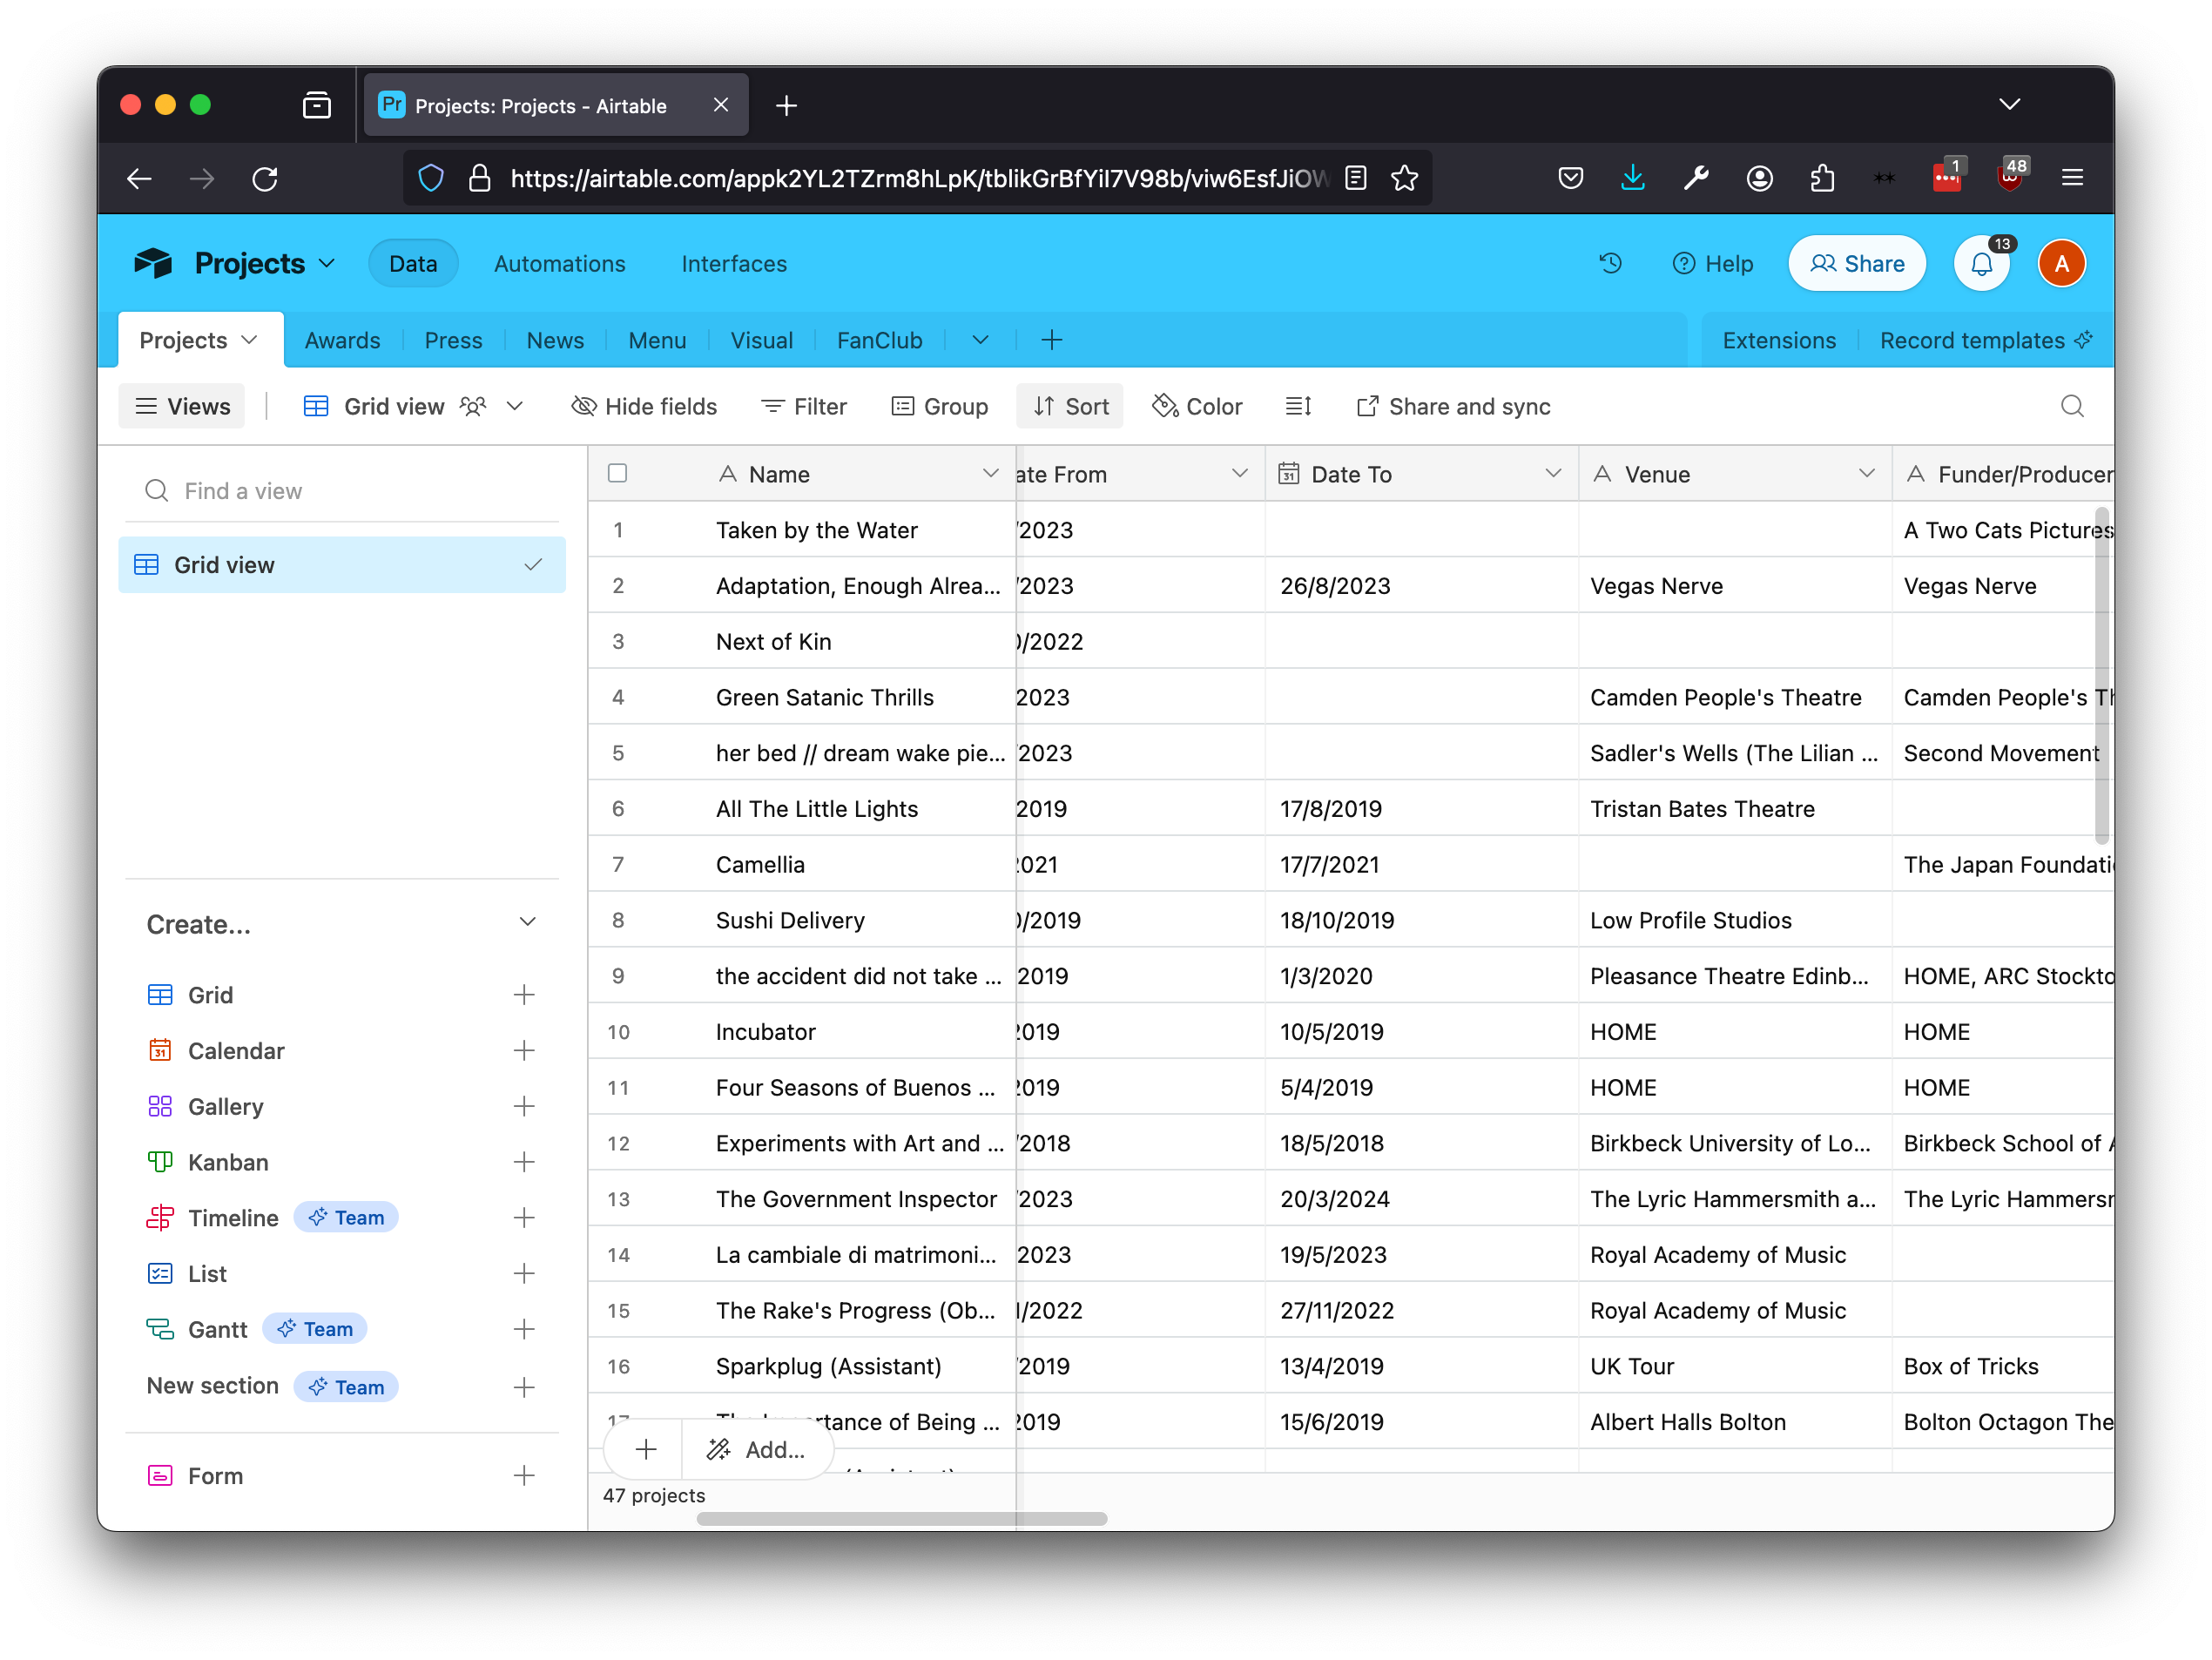
Making Websites and Putting Them Online
There are loads of different ways to put your work online, and trying to figure out what will work for you can be quite overwhelming. The good news is, depending on what you are trying to do, most approaches will work! The approach you take will depend on what kind of website you are trying to make, the tools you are comfortable with, and the software you are using to make your site.
To put a website online, you need to answer 2 distinct (but linked) questions.
- what kind of website am I making? This will determine the tools and frameworks you will use. If you have a project you've already made then you have pretty much answered this question.
- what are my options for hosting? This will include budget constraints, whether the site needs to be editable, and considerations like longevity/stability.
1. What type of website am I making?
One of the hardest things about beginning web development is having an idea of what is and isn't possible with different web technologies. This can take some time to get a sense for, but the core divide with most websites is -- do you need to permanently store changing information? (this is different from just being interactive). This guide assumes you're going to write your own code (out of wholesomeness), there are also ways of doing these things without that step.
If you're not storing information, you most probably will be making a static site. Most websites you might make in the CCI fall under this category:
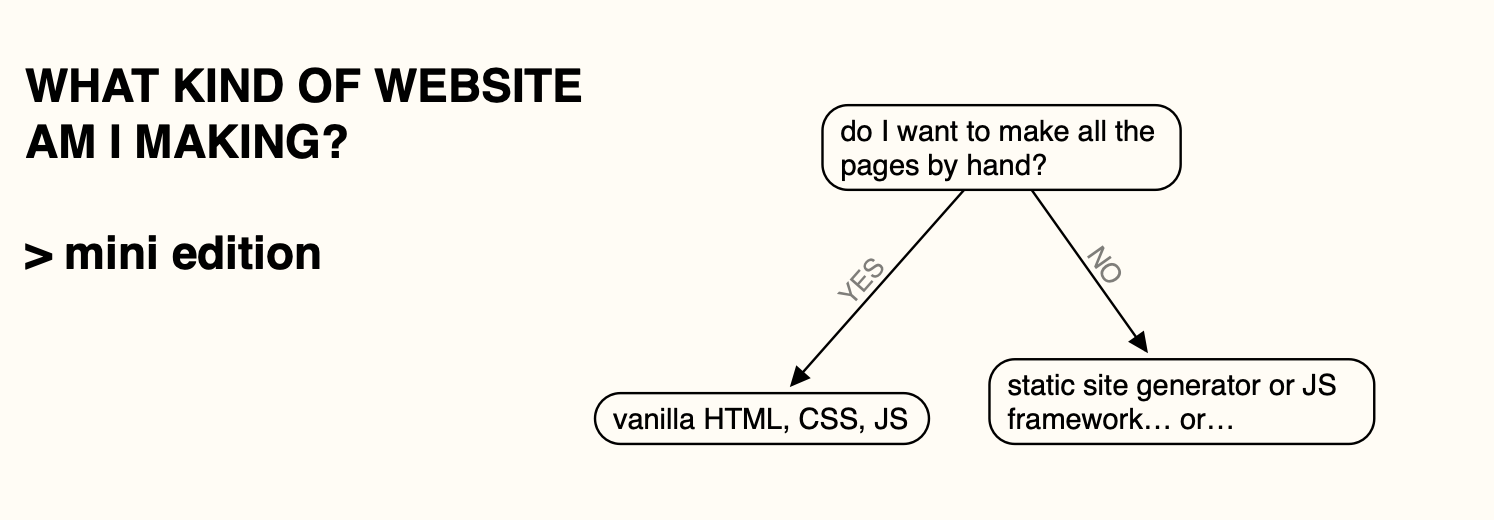
...or! If you're interested in professional web development, or you want to do something funky (maybe you want to get live information from a sensor, or host a multiplayer game or a chat), you might want to look into some more advanced approaches.
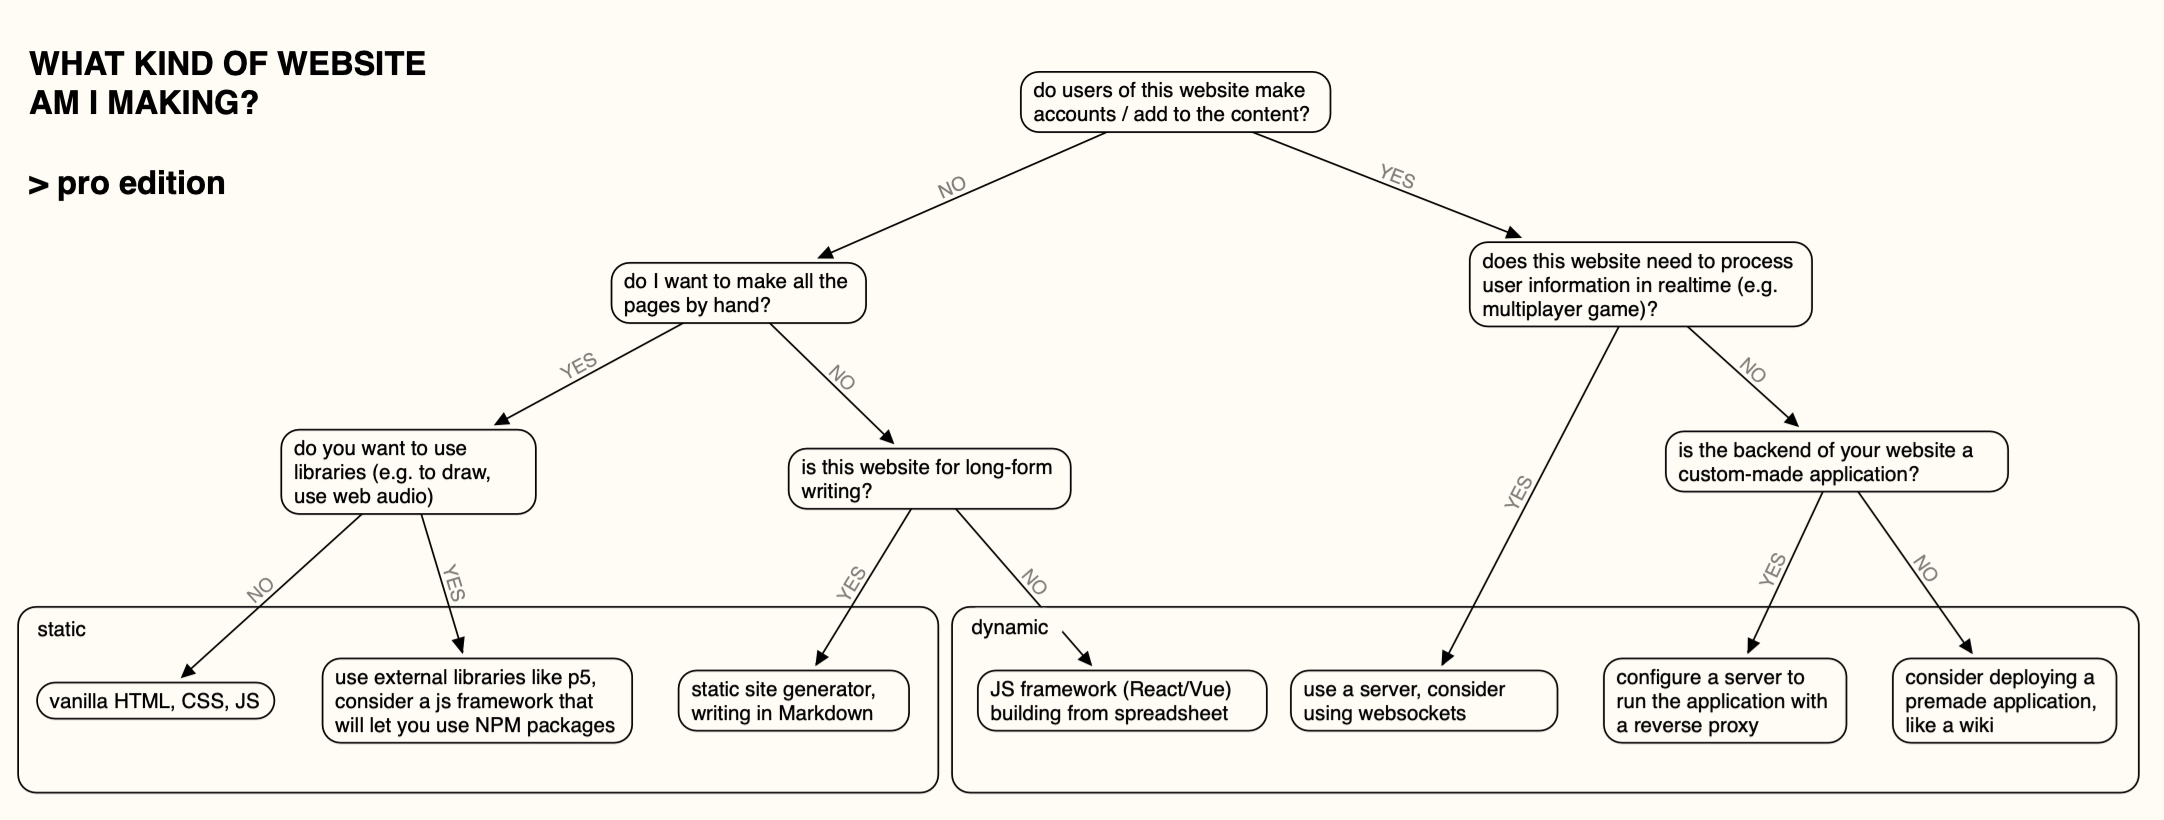
Note that none of these end points are what you have to do -- there's still lots of different ways to do things, and also it's most likely that you will want some combination of what's here if you are doing anything more complicated.
Static Websites
'Static' websites comprise most of the websites you might make at the CCI. They're called static because broadly, they don't change permanently -- they might be interactive, but every time you load them they should look the same. These can be made using 'vanilla' HTML+CSS+JS, using libraries (like p5, jQuery), using Javascript frameworks.
we love vanilla JS
You will hear the phrase 'vanilla' used to describe websites that are made using just HTML, CSS and Javascript. These are the building blocks of the web, it's important to know how to use them! You can make really good websites just using these -- their downside is when you need to make lots of pages (it can get laborious writing HTML), or when your site needs to be edited by people that don't code.
an aside: pure html There's been some nice projects in recent years to revive the practice of making sites just using vanilla HTML and CSS. A nice one is html.energy.
JS Libraries
There are lots of ways to extend the functionality of your code without needing to change the structure of your site. Libraries contain functions written by other people that make it quick and easy to do things (like drawing, interactivity) that would otherwise be laborious to write. Here are some common ones that you may already have met:
- jQuery -- has been around for decades, very useful for interactivity
- p5.js -- the JS implementation of processing, used a lot in the CCI. Very useful for simple drawing, audio and interactive applications
- tone js -- really useful site for JS audio
JS libraries can be included in static sites either through using CDN links or local files. Make sure to include the library in your HTML before other Javascript that uses it! If you're getting to the stage where you are using lots of libraries and finding them hard to manage, you might want to consider using a JS framework that can use node modules (more on this below).
Static Site Generators
These are really great if you want to make a blog, or a site that has a lot of text. My personal website is made using the static site generator Jekyll, and I also used to make my teaching websites that way. Jekyll is great but a bit old-fashioned -- if you're making one today most people use Gatsby.
Static site generators generate HTML, CSS etc from an easier-to-maintain format, often Markdown or JSON. It makes these sites much easier to add to and maintain, and allows you to use some templates to lay out pages.
Somewhat confusingly, static site generators themselves can often be written in a different programming language -- Jekyll is written in Ruby, so to use Jekyll you also need to install Ruby. Gatsby is nice as it's also written in Javascript!
JS Frameworks
These days, lots of websites are written using Javascript frameworks. The most common of these is React, but there are lots of options (Vue is also popular). These frameworks often work along the idea of webpages being made of reusable, interactive components. This can be really helpful in building sites with complex interfaces and changing information.
These also make use of the Node Package Manager, which is used to manage the libraries used by a site. In general, frameworks can make developing complex things a lot easier!
External APIs
Lots of websites draw information from other sources on the web. There's no limit to the number and types of API your site can use. In the case of CMSs, all of the information from your site might be drawn from an external API.
"The backend"
If you're wanting to persist information and update with a high degree of reliability, chances are you are going to want to use a database. There are a bunch of services that allow you to do this without having to run your own server (e.g. AWS), but it can also be very useful to know how to do this yourself.
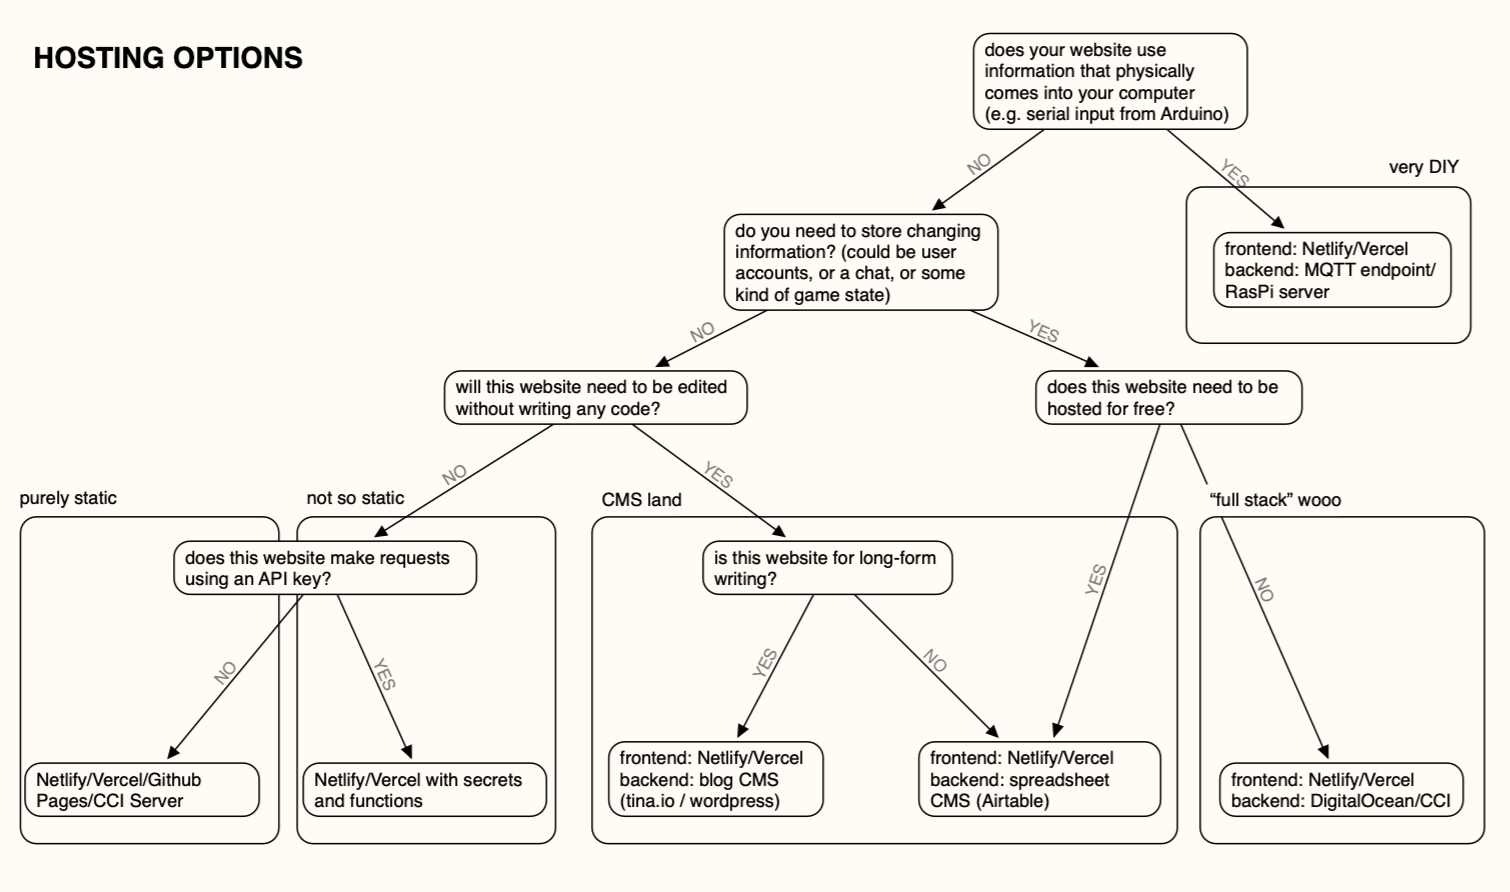
Hosting
The biggest part of putting anything online is this -- how do you 'host' your site, so it stays up and people on the internet can find and use it. The hosting method you use will depend on the kind of site you are making, who needs to edit your site, whether you're needing to store information in a database, and whether you're doing anything that depends on physical infrastructure that you've built.
The most common ways you will host websites in the CCI (if you take a web class) are either on the CCI server, on a web editor like p5, or on Github Pages.
Hosting Static Sites
These are the easiest kinds of sites to host, and there are lots of different options! At this point in web history, you should basically never have to pay to host a static site (unless you have like 10million visitors), though you will still have to pay for domains.
All static sites are comprised of files (HTML, CSS and JS files) that are sent to visitors to the site (the 'client') when they
Web editors (e.g. p5 JS, Glitch)
Online coding editors like Glitch and p5 can allow you to quickly share work with others. You might use these in class, and these can be a good way to set up a site other people can see without having to do any other work! However, often these have quite basic support for using e.g. custom domains and can take some time to load, and don't make a good permanent solution.
The CCI Server
At the CCI we maintain a web server that students and staff can use to host their work. By default, unless you take a class that requires it, you will not have an account on this -- but you can message the #technical channel on slack and we will make you one.
We have a separate wiki page with instructions for connecting to the CCI server. You will use a protocol called FTP -- the File Transfer Protocol. This sends files from your computer to the server directly, and used to be the main way people put things online.
Github Pages
Using Github Pages is popular in the department, and depending on the class you take, your teacher might get you to use Github or the git.arts server. These look very similar, the main difference is that git.arts is managed by us, and you will need to use your CCI account to connect to it. For the purpose of this tutorial, we will use Github. We have tutorials on the wiki for using these.
Github Pages gives you a way to host a site that is saved as a repository on Github. You can create this either as a git repository on your computer, or directly edit the files in Github itself. The former is a good idea as it also allows you to test the site out, and make the most of the versioning tools.
Vercel and Netlify
Vercel and Netlify are free (for regular use) web hosting services that integrate with Github. They have slightly more features and options than Github Pages, though for sites made with HTML, CSS and JS you will not notice much of a difference. Like Pages, these are best used as git repositories, but also allow you to drag and drop files.
I use all of these three (I tend to use Vercel these days) to host static sites. Vercel and Netlify are normally better than Github Pages for hosting sites made with frameworks like React and Gatsby.
Hosting Dynamic Sites
Dynamic websites are websites where information on the site is stored and changed, such that it changes for all users of the site. Examples include multiplayer games, websites with user accounts, wikis, and websites that display the state of some external process (like a weather station or a sensor). These can require quite a lot more steps to make than static sites, but in doing so you learn a lot more about the web!
'Serverless' Processes
Between 'totally static' and 'fully dynamic' websites are sites that are mostly frontend, but will pull information from other sources -- for example, through an external API, or potentially a lightweight CMS like Airtable or Tina. The work of populating this site with information can basically all be done in the frontend, but one thing you need to be careful with is publishing the 'API key' used.
Netlify has a service called functions that can be really useful for this -- these run on the backend of your application, so the client can't see the API keys.
If you don't want to go to all this effort, lots of services (including Airtable) will allow you to make 'controlled access' keys, that only have read permissions. This can be fine if you are only ever reading from a source rather than writing to it directly.
CMS Options
If you make a site for someone in a professional context, chances are that if they have any desire to edit the site, they won't want to edit the code directly. In this instance, you will want to make a CMS, or 'Content Management System'. Normally, what this will look like is some kind of list of pages or files (if you're using a text-based editor like Wordpress or Tina), or a spreadsheet like Airtable.
I like to use Airtable as a CMS for websites, as it's free and has a really good API. I also tend to make websites for artists, who have mostly images and small amounts of text: the only time I wouldn't do this is if someone wanted to host lots of writing.
With a CMS, you fetch the information from the API, and then use it to populate the site you have made. You can do this with vanilla JS, but frameworks like React come with a lot more tools that can make this process easier.
Using a Server
If you want to run a custom-made application, you might be at the point of needing to use a server. A use-case for this might be, for example, a Python-based multiplayer game that has a web interface, or any continually-running process where all clients need to see the same state. Learning to use a server can be a big learning curve in terms of the skills you might need, but is also an amazing way to learn more about how computers work.
Server programming is a huge topic, but I'll list some common tasks you might want to do! If you're getting into server programming, Digital Ocean's tutorials are a great place to start, and I've linked them here.
Domains, DNS and SSL
The last part of hosting a website is often adding your own domain to it. Providers like Github Pages, Netlify and Vercel will allow you to modify the domain they give you. Domains need to be bought and renewed year-on-year and can vary wildly in price. The companies that trade in domains tend to be a bit sneaky and will also often try and sell you stuff on top of it. Moniker are meant to be OK, and generally I recommend picking one company and sticking with it.
The steps for pointing your domain name to your host depend on where you're hosting your site! For services like Github Pages, Netlify and Vercel, you normallly need to point your domain at their 'load balancing IP'. You can do this by creating what's called an Apex or A record, or changing the one that already exists for your site.
For some reason, it can often be hard to find the servers to point your domains to -- I think this is because they sometimes change and there's a few different ways to do it, but for the sake of simplicity:
- Github Pages: 185.199.108.153
- Netlify: 75.2.60.5
- Vercel: 76.76.21.21
Free domains forever with one neat trick
I love making subdomains! This is a great way to host loads of different sites from a single domain. You create a new Apex record for each domain and point it to the IP address you want. It took me years to realise I could do this!!
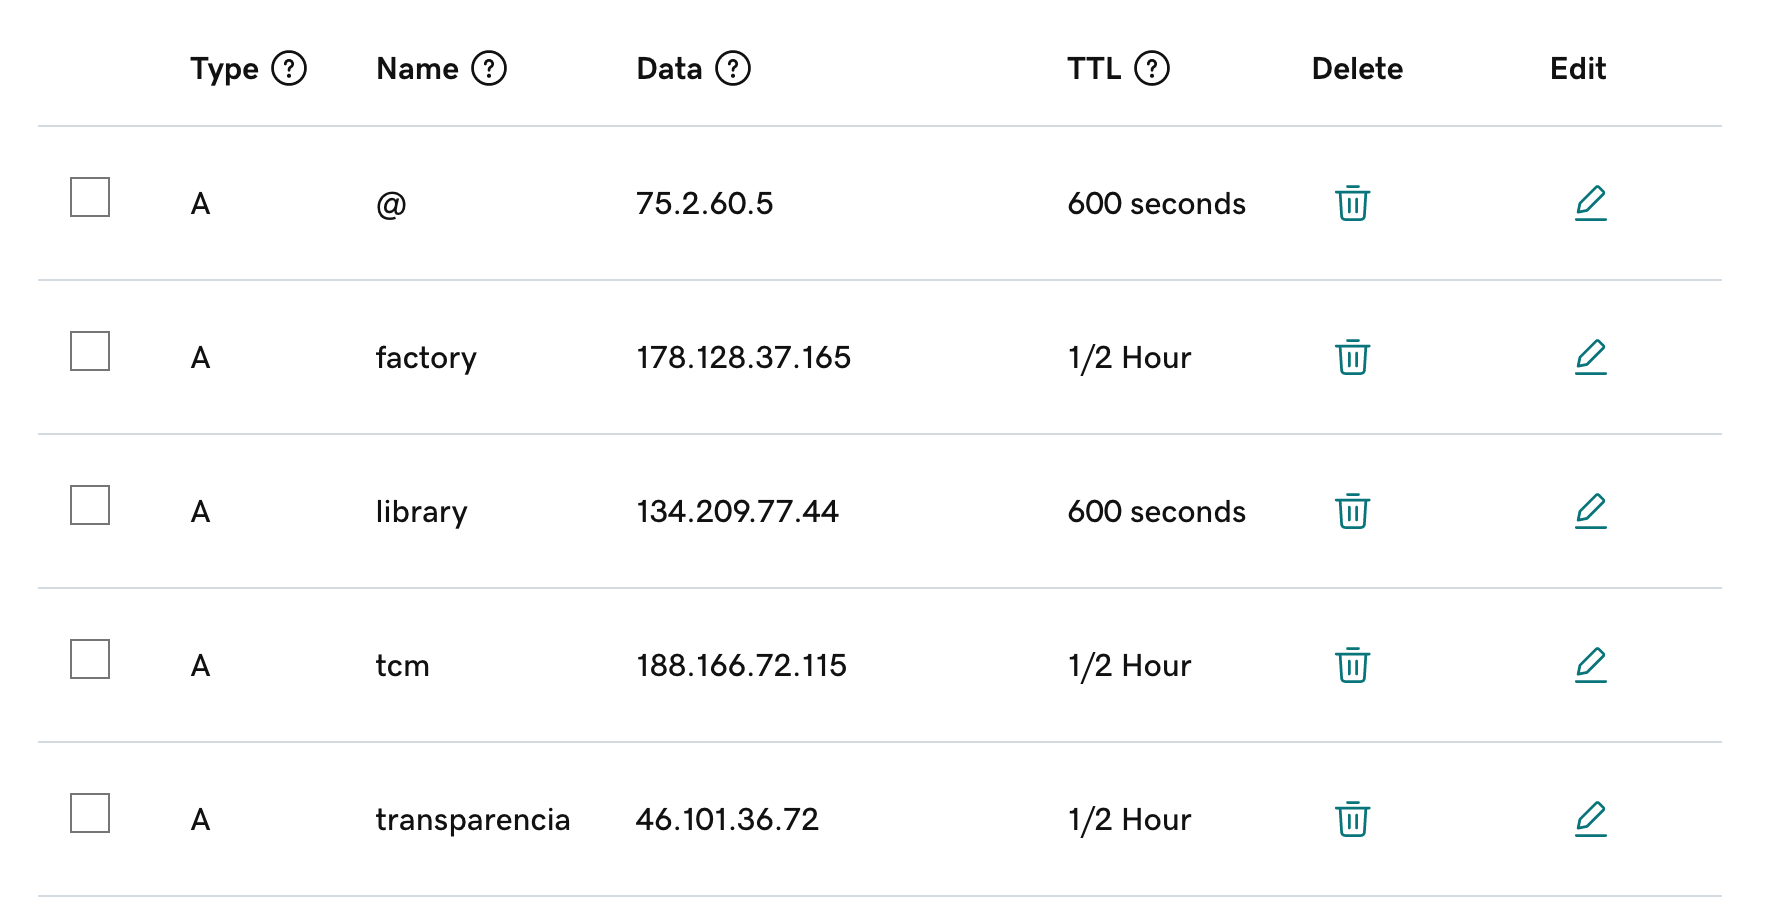
You can tell from this screenshot that my website is hosted on Netlify :)
SSL
These days, all browsers will by default use something called 'SSL', the 'secure sockets layer', which is used to encrypt web traffic. This is done to stop malicious sites from being able to e.g. steal your card details. In order to work over SSL, you need something called an SSL certificate -- services like Netlify, Pages and Vercel will issue one automatically, and we manage the certificates for the CCI Server.
If you are configuring your own server, however, you will need to do this yourself! This is made much easier using a service called LetsEncrypt: Digital Ocean have a good guide to this here.
3. Practical: making a static site and putting it online
For this part of the workshop, we will use a template to make a website, but we will also go through the process of setting up from blank files. You can download the template here.
Download and unzip the folder, and then right click to open the 'index.html' file in your browser.
Modifying your site
The template contains basic HTML, CSS and Javascript. The only thing you actually need to have a website is HTML. CSS allows you to change the look of the website, and Javascript is used for interactivity.
First of all, have a go at editing the html file. This will let us change things like text and content on the page. For this workshop, we're making small informational websites about a favourite fact, artwork or object. W3 Schools has an intro guide to structuring HTML elements here, and a full reference for all the different kinds of elements here.
We'll also look at using CSS to style the site. Because it's a brief workshop we're just going to cover the basics!
Putting the site online
To put this site online, we are going to use Github Pages, following these steps. You could also use netlify, vercel or another static hosting service.
bonus round: making a sticker
For the last part of the workshop, we're going to encode the website urls in NFC stickers. There's a great free and open source phone app you can use to do this, called NFC tools. This is inspired by a project from the web designer Spencer Chang.
:)
Software Defined Radio
The CCI has a small number of Adafruit RTL-SDR software defined radios. These can be used to tune into AM and FM radio bands (like a normal radio), but also to decode other kinds of data sent over radio.
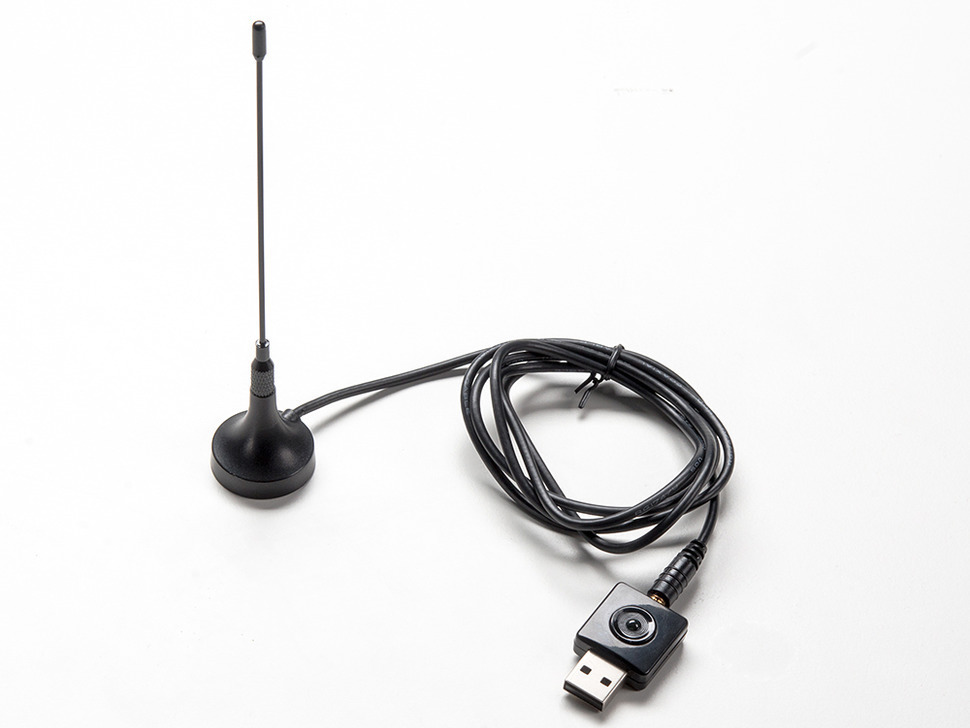
If you're a mac user, Adafruit has a useful guide to using CubicSDR (they also have one for windows users on SharpSDR which we haven't tested but also works). We recommend having a go getting the SDR set up with this first!
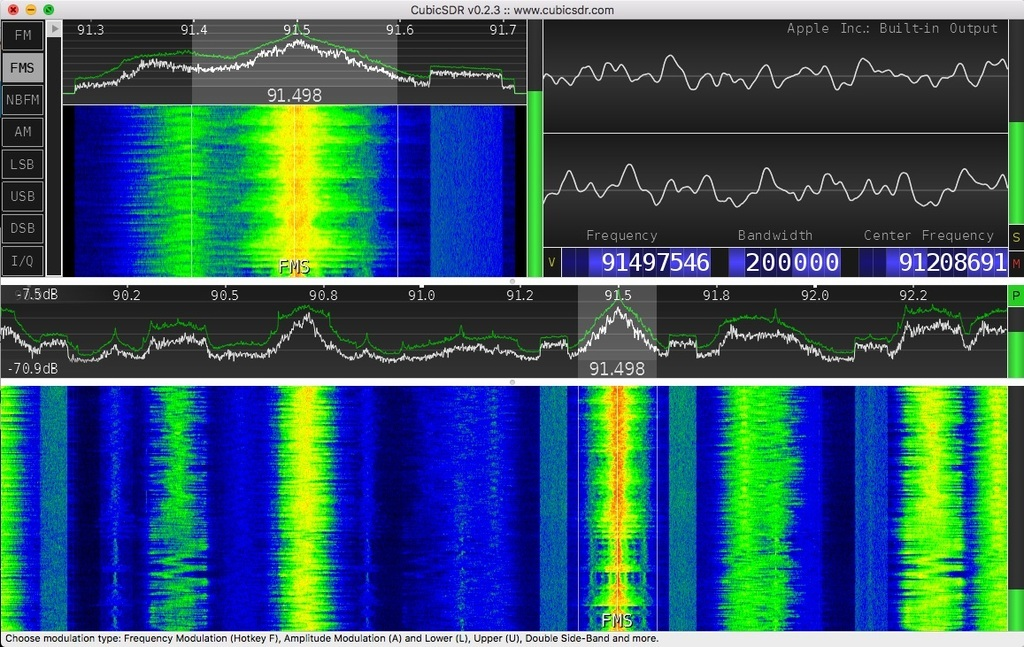
The important thing to note about the colourful SDR interface is that it's a time-domain plot of the frequencies received by the radio, around the band that you're interested in. What this means is, as you drag the black 'tuning' slider around (or zoom in and out) the plot will change in position: you don't zoom or slide on the plot itself.
Decoding signals
Probably the best bet for decoding (rather than just simply listening to) signals using SDR is gnuradio. This can be installed on mac using Homebrew (the macports install has some weird errors) but at present we've also not been able to get it to work with the CCI's RTL SDRs. Investigation continues...
Adding a Processing Library
Processing libraries allow us to use code other people have written within the Processing environment -- these can be really useful when experimenting with more complex projects, and can save a lot of rewriting code. There are some 'core' processing libraries that don't need to be manually installed, but people can also write their own -- these are called 'Contributed Libraries', and these need to be installed manuallt in order to be used.
One that we use in the CCI is Pembroider (which I'll use as the example for this tutorial), that generates embroidery designs, but the same principle applies to all Processing libraries (the Processing website has a searchable index of both core and contributed libraries).
Setup
Make sure you have processing installed, and that the version of Processing you're using matches the version specified by the library. To find your version of Processing, open up the Processing app and select 'About Processing' from the main menu.
Next, download the library. If it's a library distributed via Github, this might be found in the 'releases' section on the right hand side of the window, though for Pembroider it's just linked in the README page. If multiple versions are offered, select the one that matches your version of Processing. Extract the files somewhere you can find them.

Find the 'Processing' folder
When you install and open Processing on your computer, it should automatically create a folder called 'Processing' in your Documents folder (unless you tell it otherwise), on either Windows or Mac. If you aren't able to locate it, take a look in your home folder (one up from Documents), or search 'Processing' on your filesystem.
When you open it up, the contents should look like this:
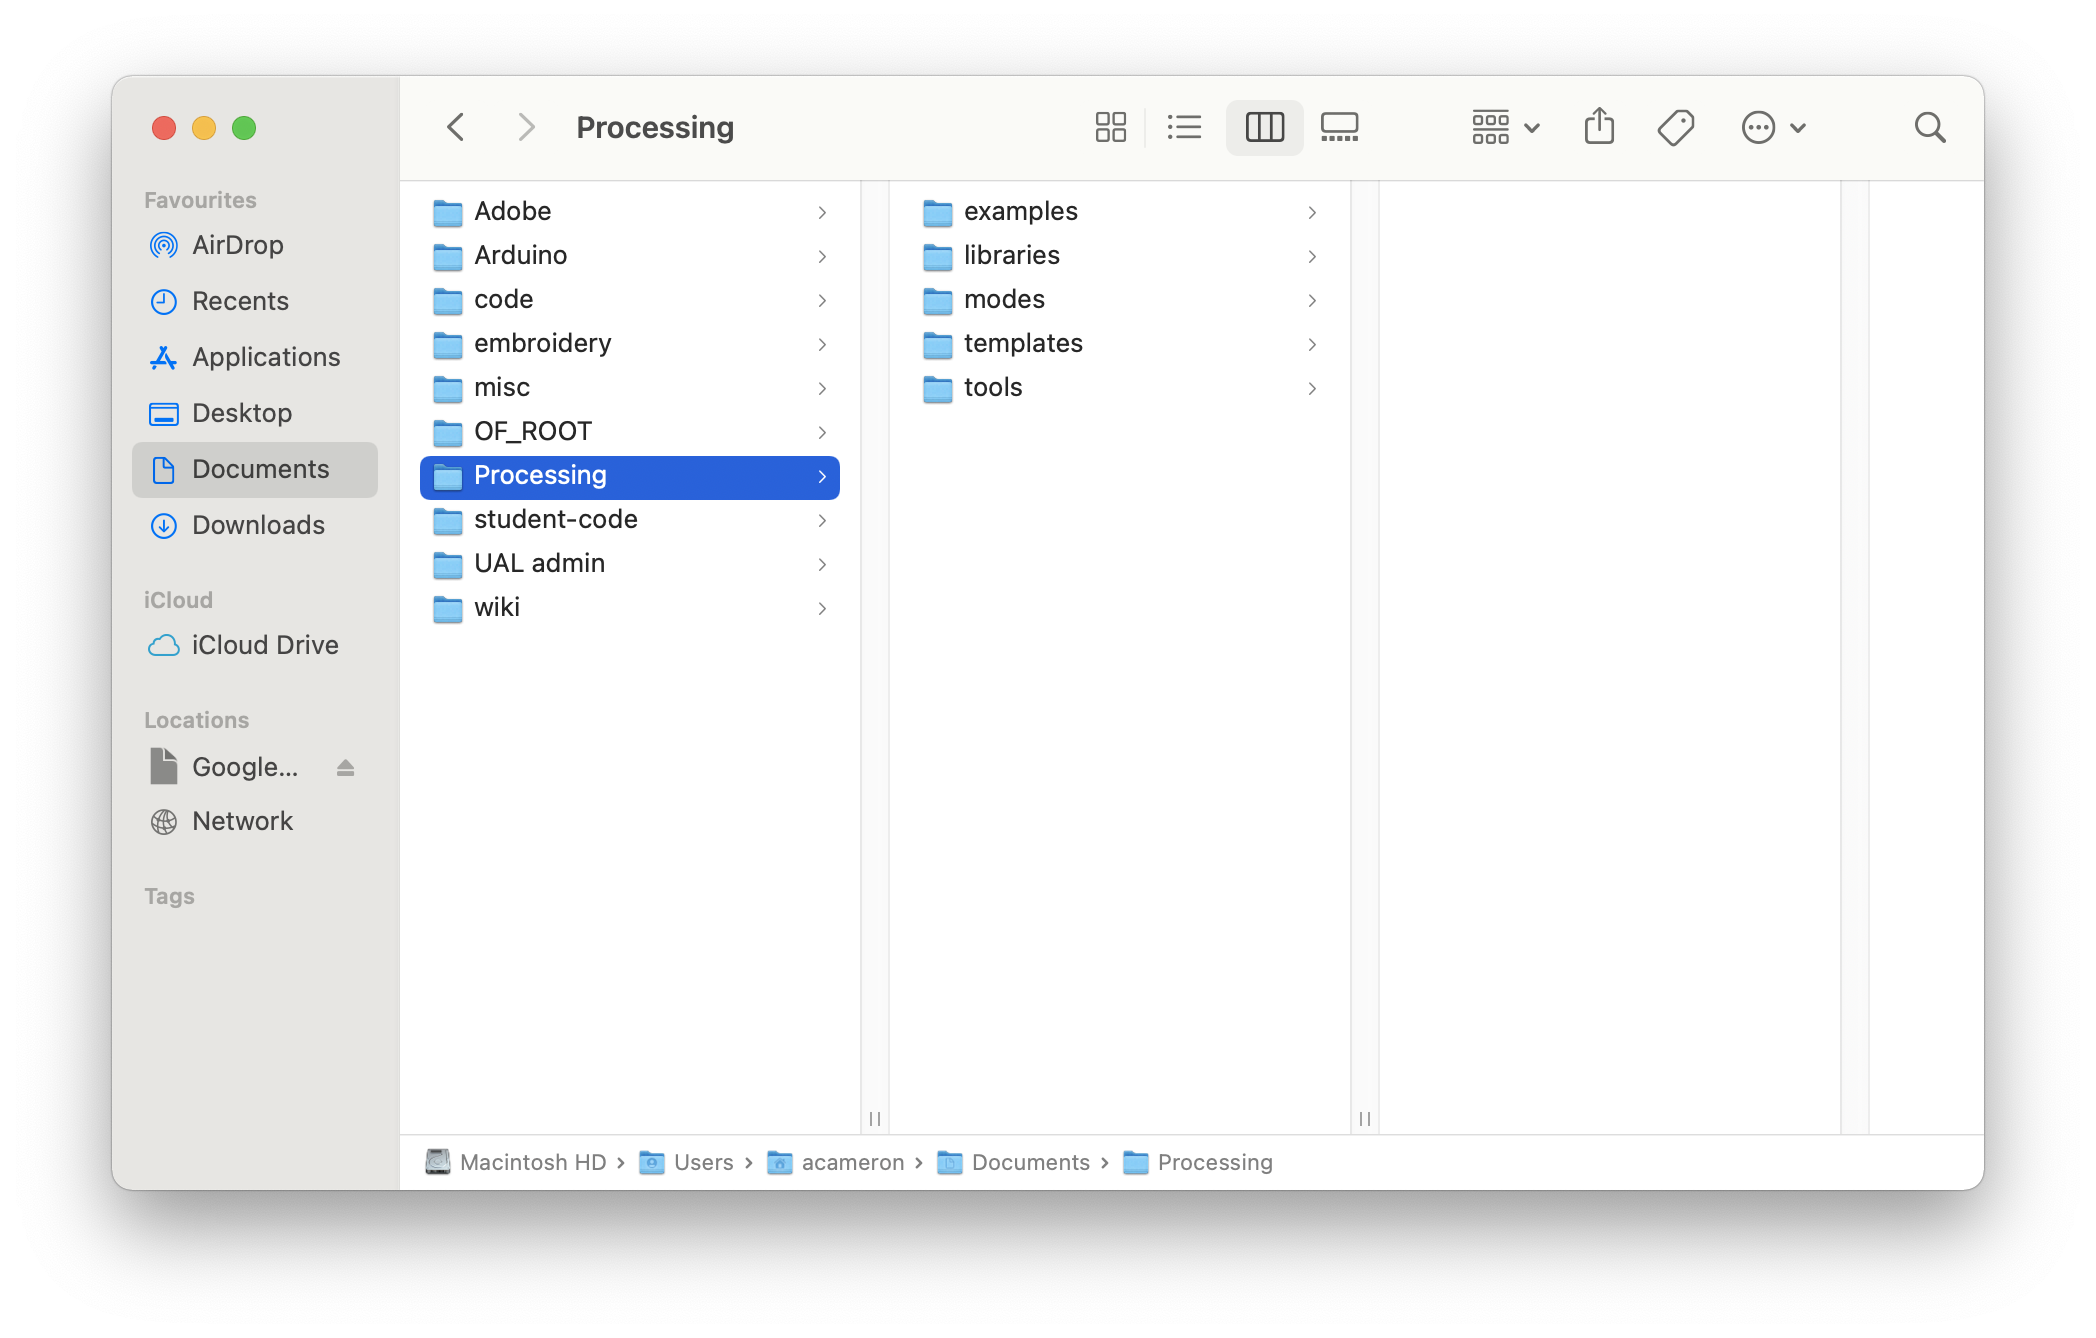
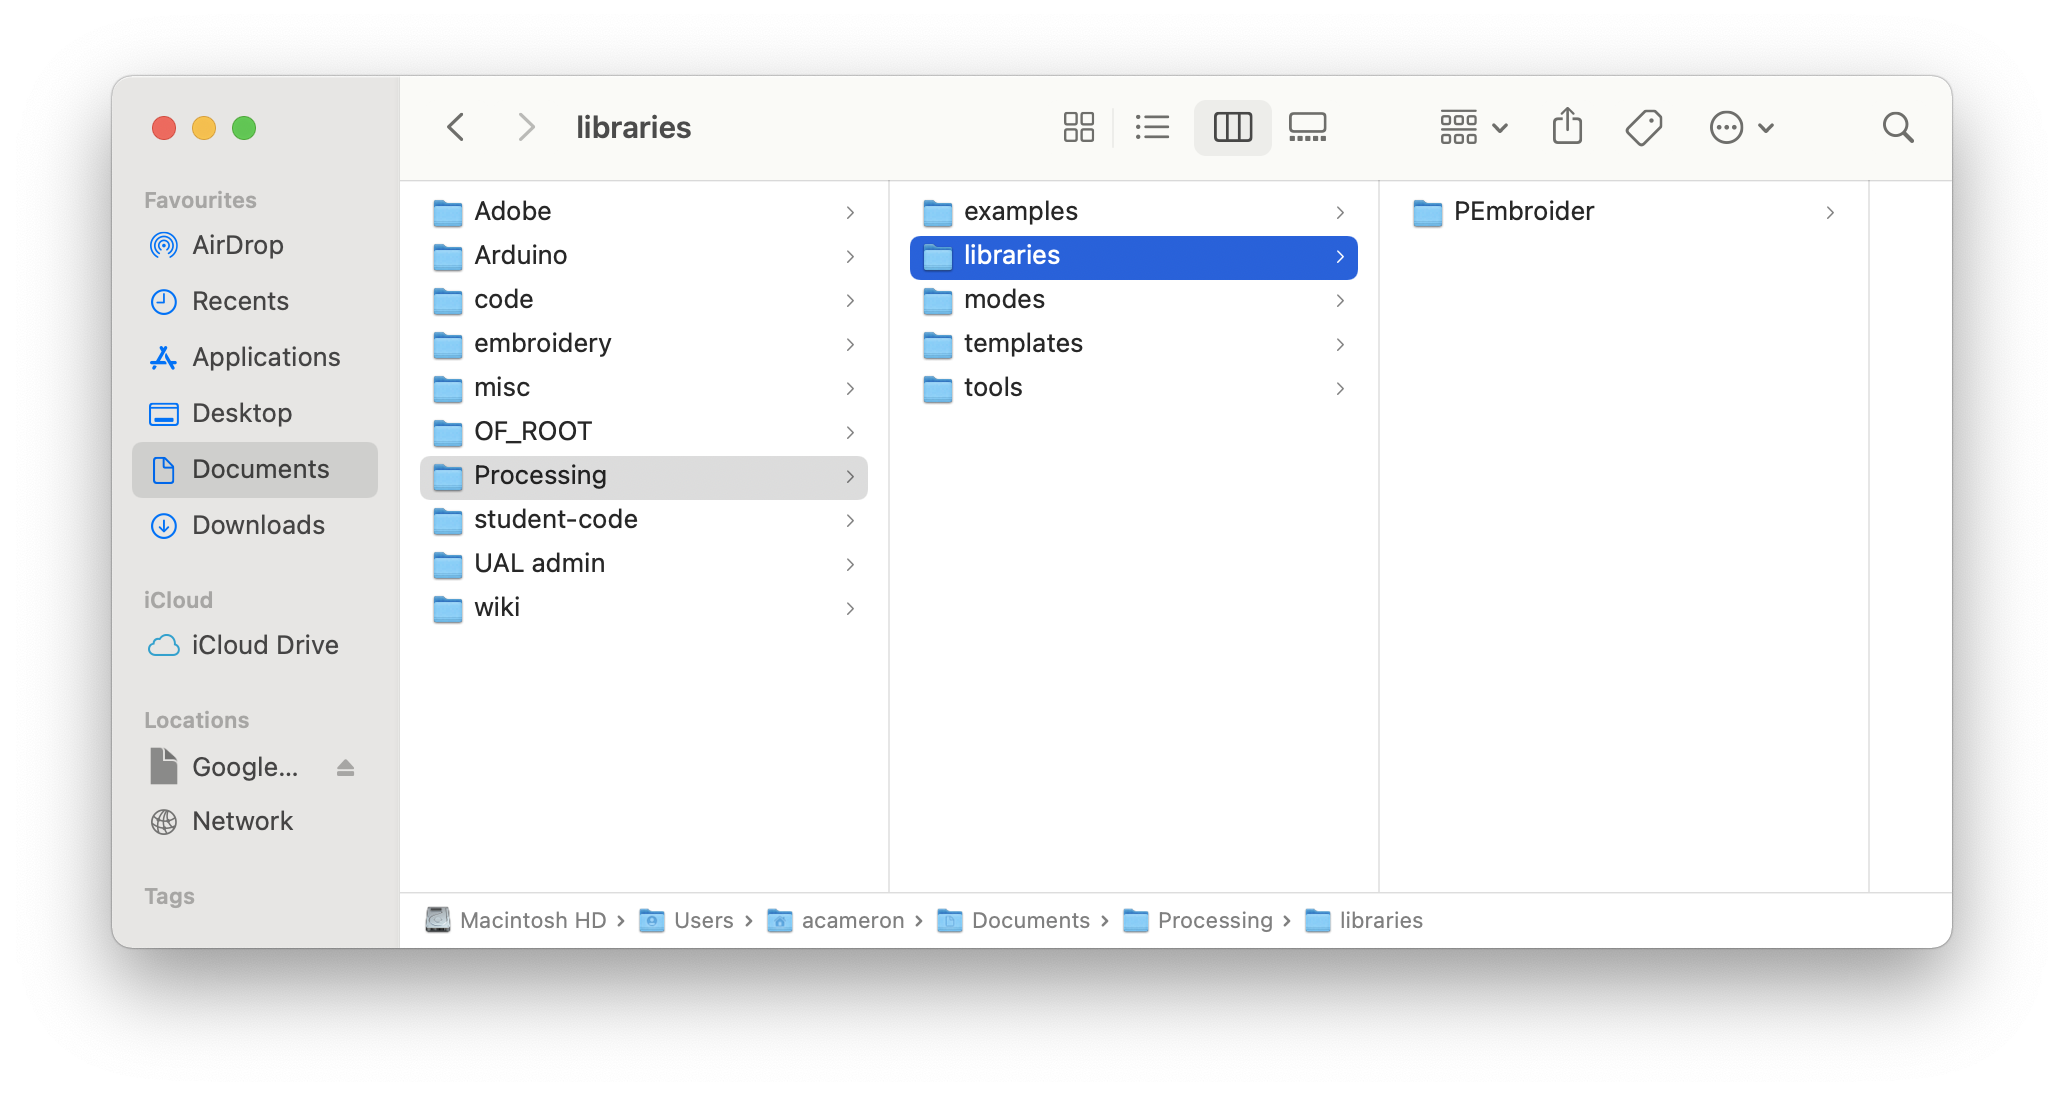
Drag and drop the contributed library into the folder 'libraries' -- you should be able to add as many libraries like this as you want.
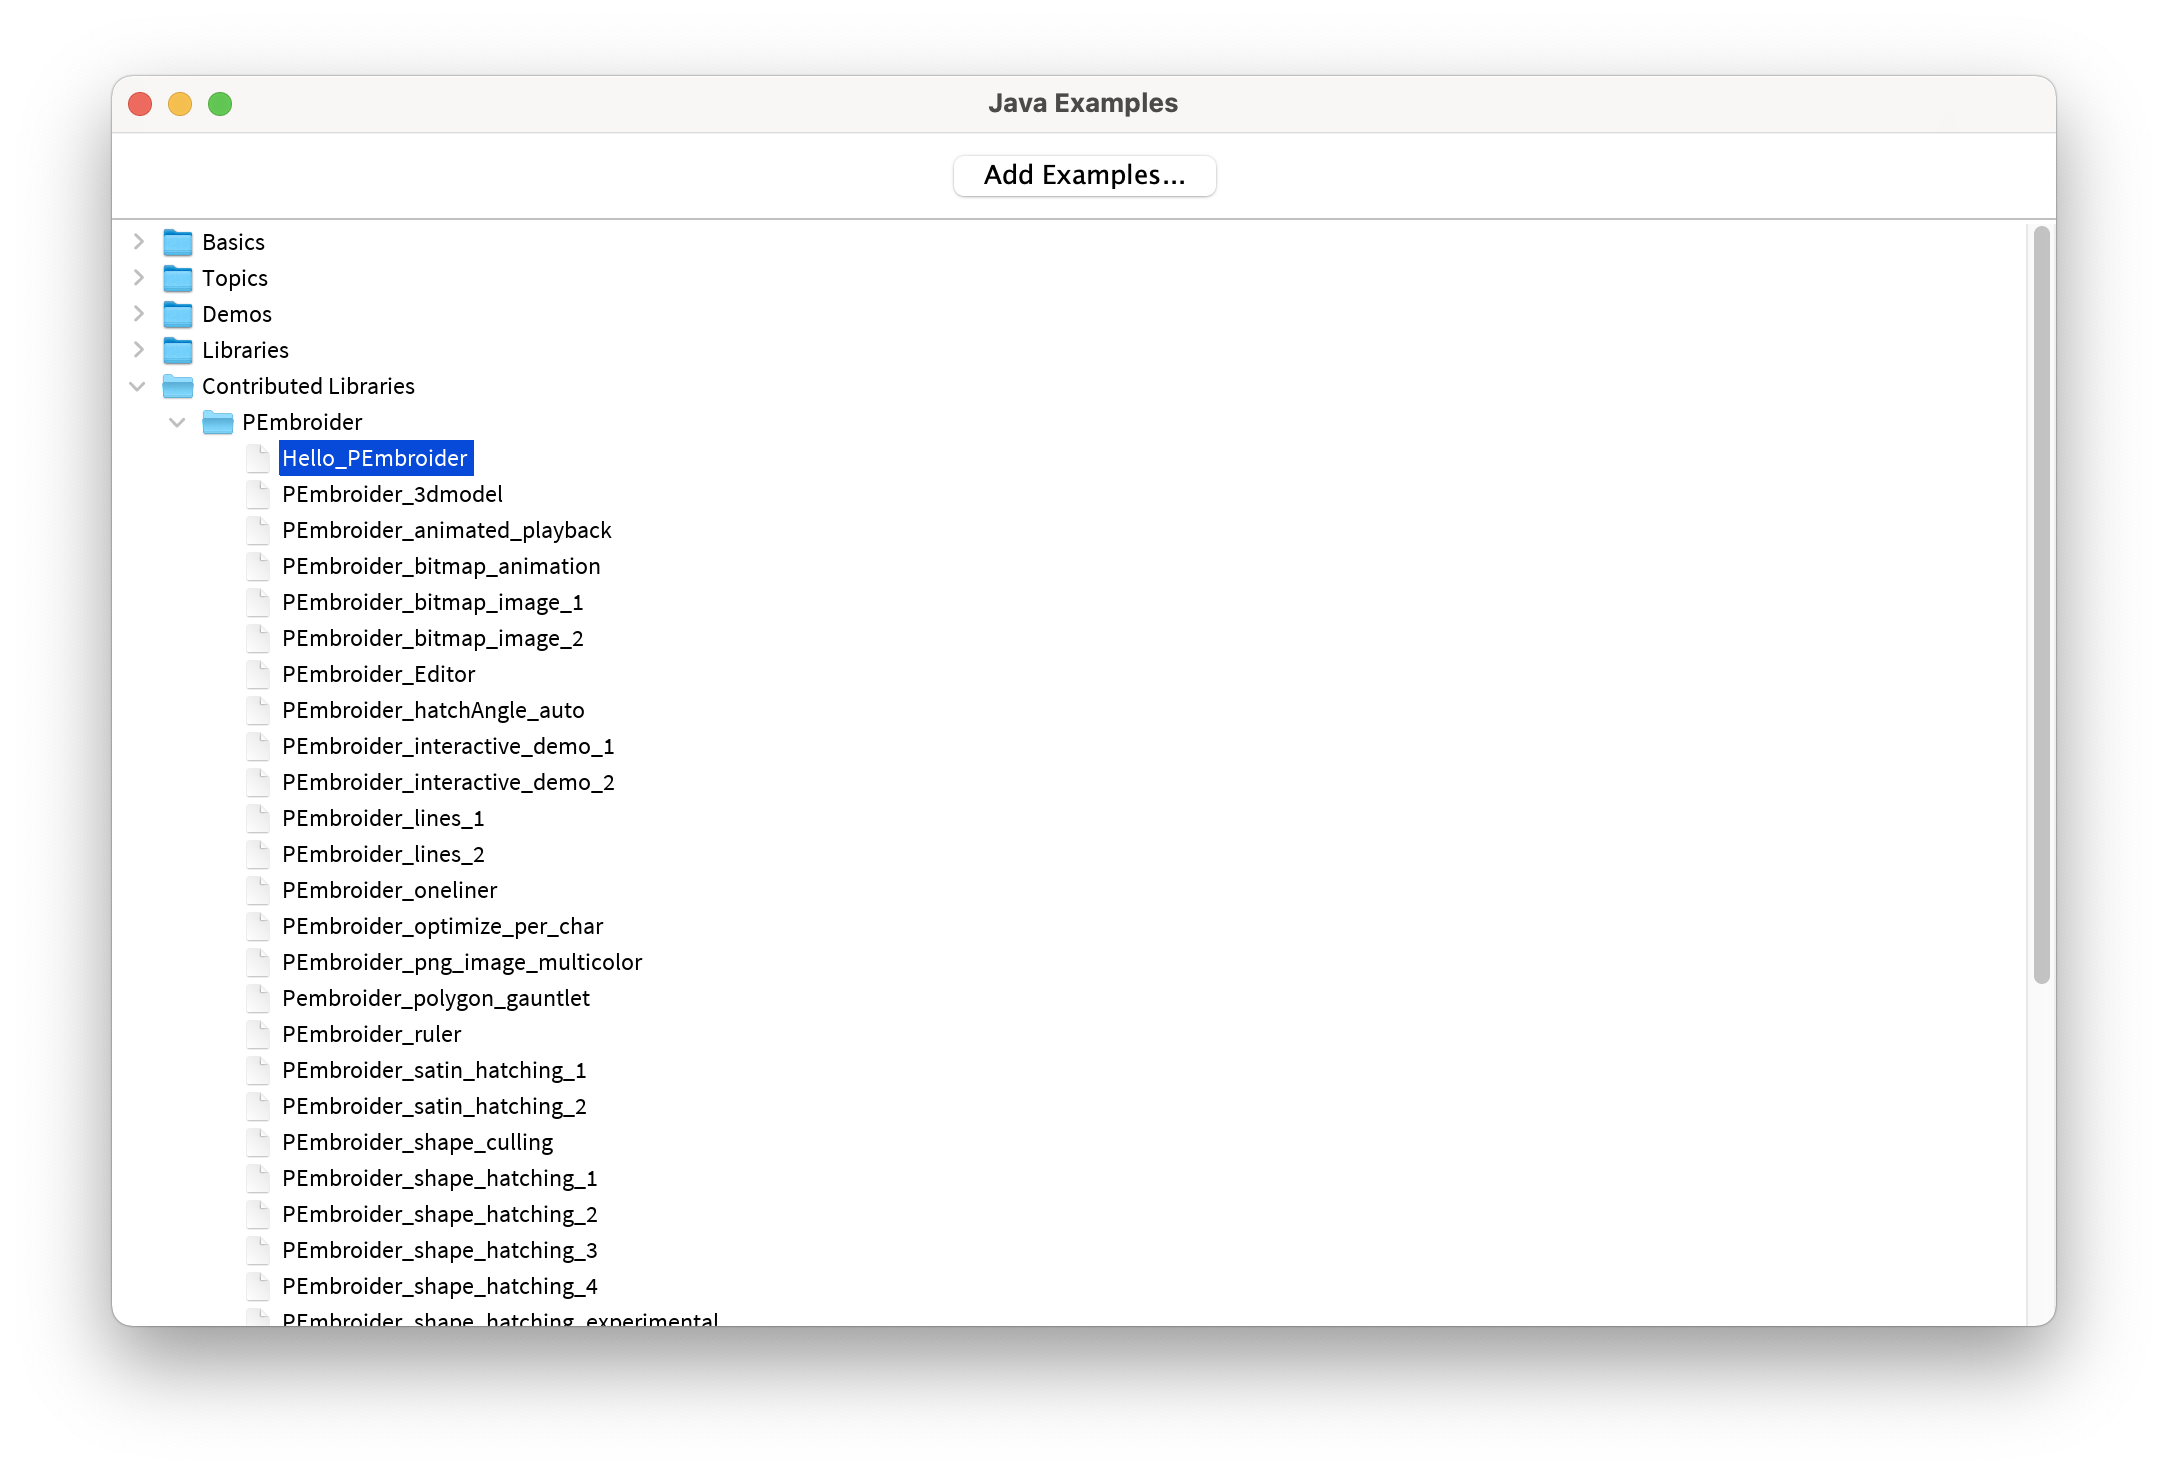
Quit and reopen Processing: to check that the library installed properly, try an example file -- navigate to this using the Files -> Examples -> Contributed Libraries menu (not Libraries -- that contains the core libraries). Try out one of the examples to check that it works!
How to Debug Web Code
Your code is broken but you don’t know why! What gives? The internet won’t help?? What’s a console? A breakpoint?!
This session covers the philosophy and practice of debugging, across a range of different languages and tools. We work through a series of practical examples contained in this repository. Learning to debug is pretty much the essential skill of learning to write code -- nobody writes code without bugs in it, and the skill of programming is knowing how to recognise, diagnose and fix things when they don't work.
A great reading that sums up a lot of the ideas in this workshop is Eric Lippert's How to debug small programs. It gives a nice overview of the steps and frame of mind needed to debug code.

JS example walkthrough
For the JS example, we will use this sample website from the examples repository. We want to open the folder (we will need to edit the HTML, CSS and JS files) in a code editor. We will be using the browser's debugging tools to fix this code, so also either open the html page in your browser, or use the VSCode 'launch' button to serve the files.
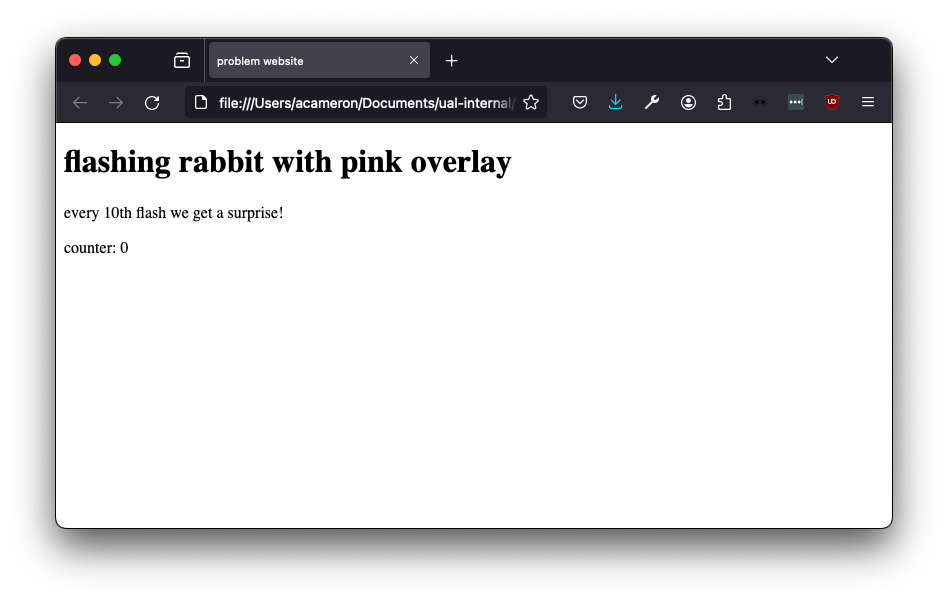
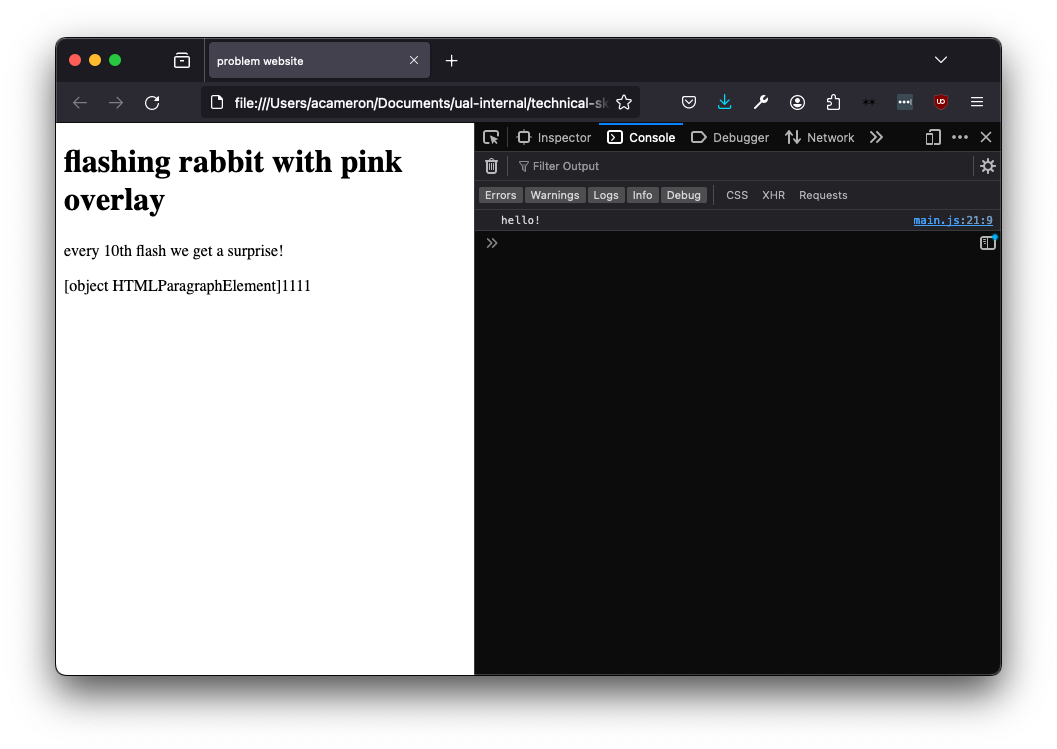
When we load this in the browser we can see that the title (which describes the page) doesn't match what we can see. No rabbit is flashing! Where's the pink overlay? The counter doesn't work!
First of all, we want to check that all our files are included properly. This is a common issue in making websites when we are linking multiple things together! We add in a console.log statement to the JS to check if it's getting called at all... it's not!

There's a bunch of issues with this line! mian.js is a misspelling (we change it to main.js), and we want to use src rather than href to link the file. This second error is more subtle, and found out by googling.
We also realise we haven't linked the CSS file at all!
before:

after:
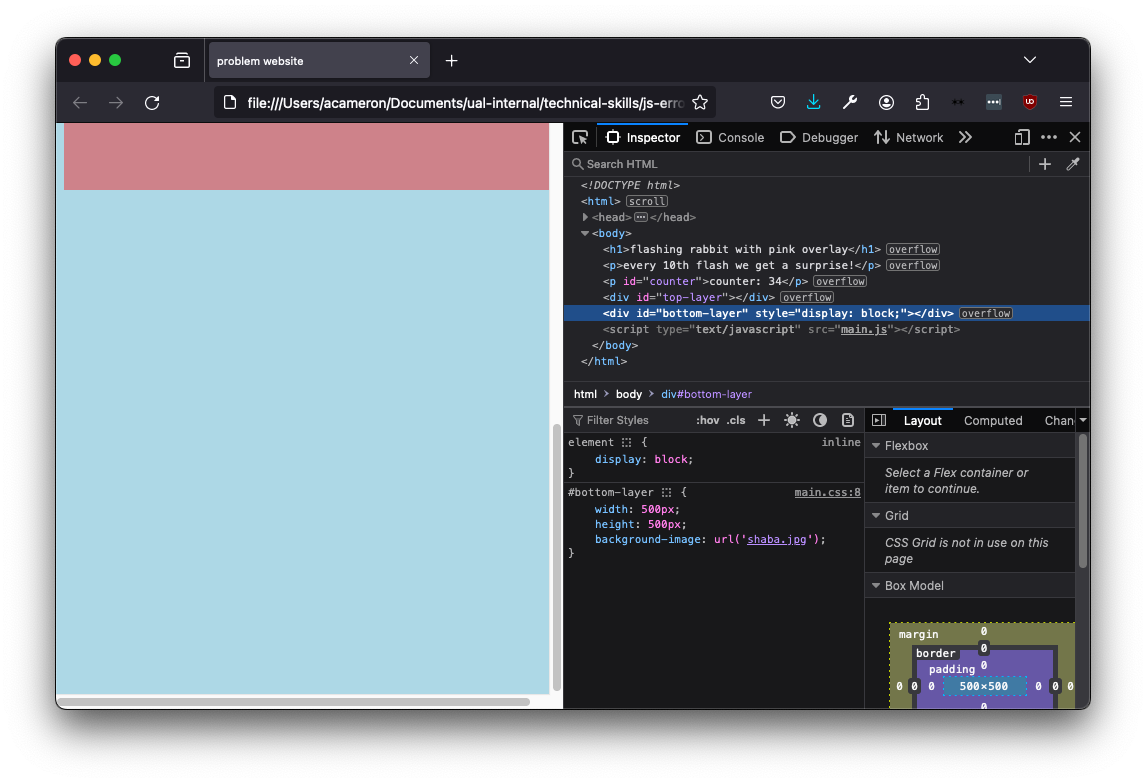
That's all fine, but it's still not working! Now, we can see we have an error. It's telling us our element is null.
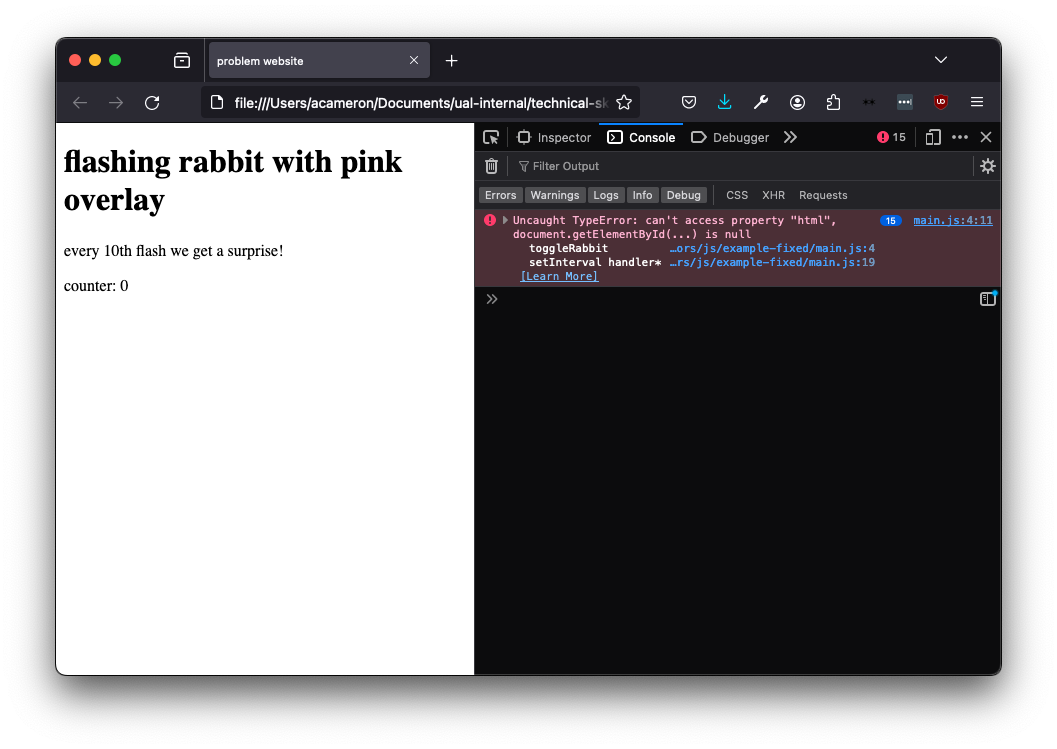
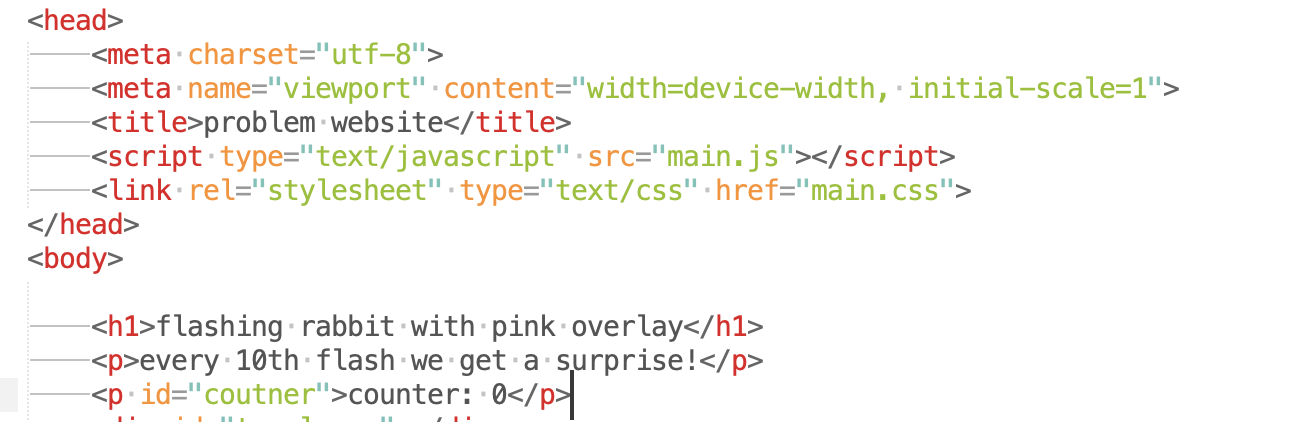
The error is telling us the issue is on line 4, so let's take a look at what's there. We can see that it's referencing an element with an id counter.

We can see that the element id is spelt wrong! However, when we correct it, the error remains. The error we're now getting is actually quite subtle and to do with the order in which the page is constructed. If we move our script tag to after the body (e.g. after all the elements have been made), that error will go away.
Now we get the following error. Note that the issue is still on line 4! At this point you might be getting a bit depressed, but a new error normally fixed the last one, so you should actually be really pleased :)

For this one, we're going to google to get the correct syntax.

Now that's fixed, we're getting something very weird:
To find out what's going on, we're going to log the counter variable and see what's getting written to the element. This seems super mysterious -- we've never set the variable counter! What's happening here is that counter is initially undefined, so when we reference it in the code it gets set to what it should be being set equal to.
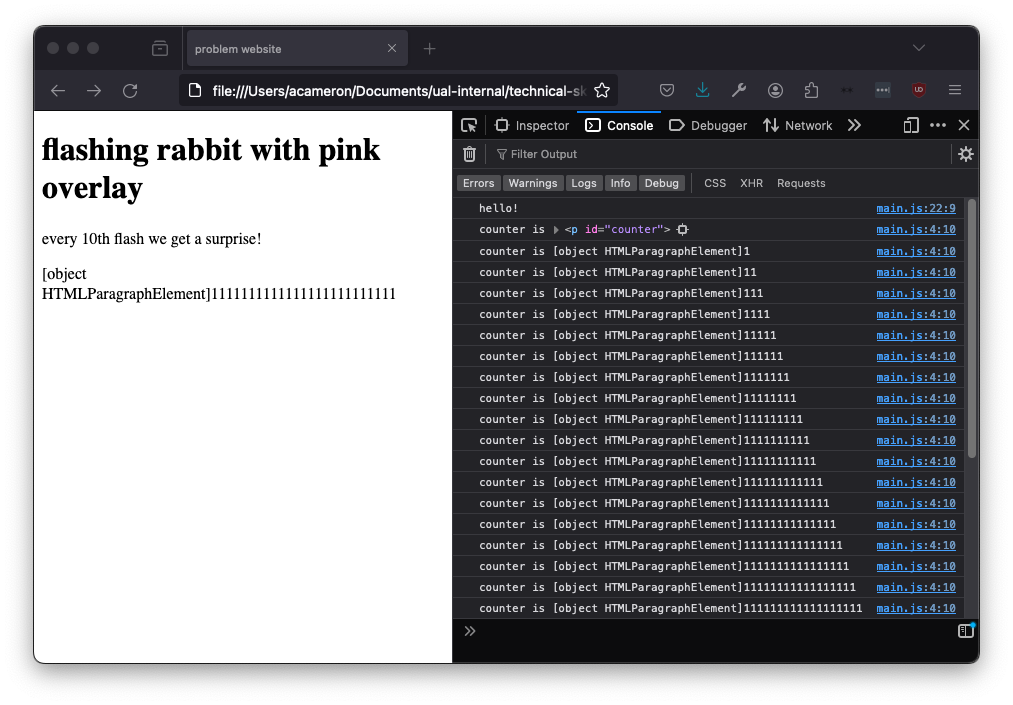
If we initialise the variable properly, it goes away. To make it look nice, we also prepend a string to the text we're adding.

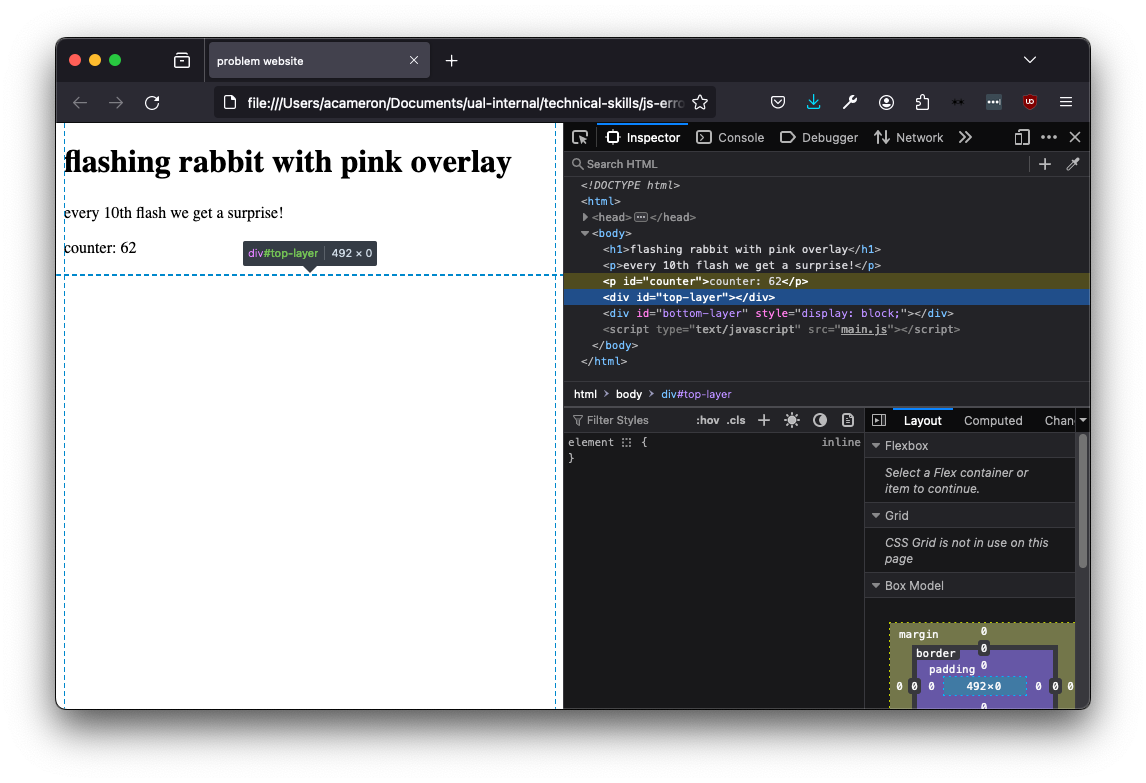
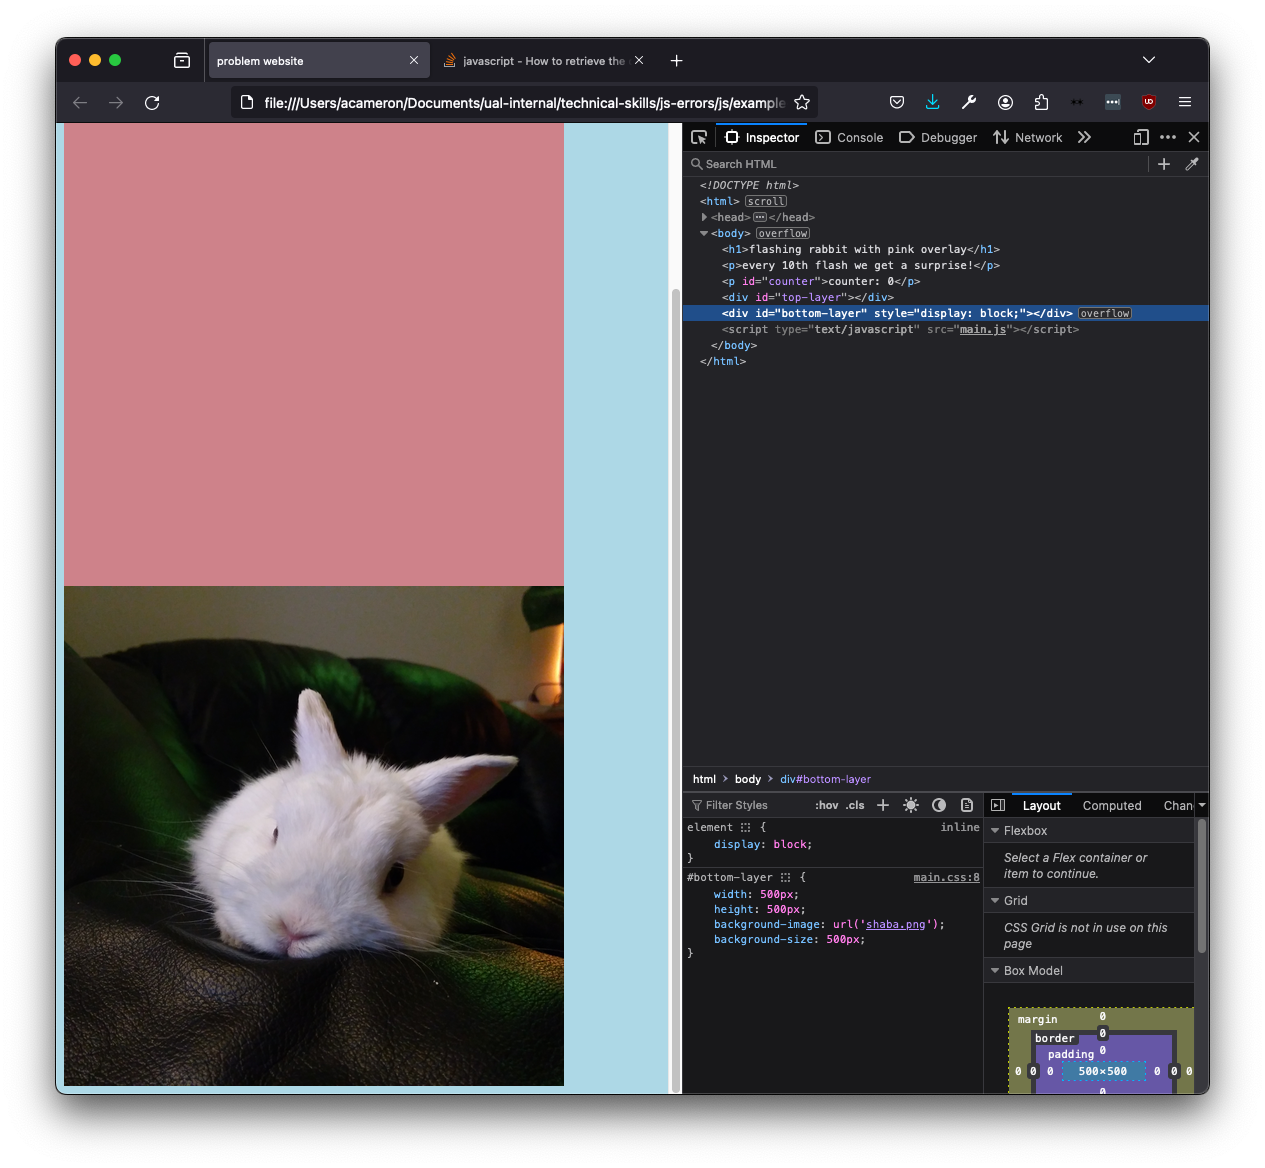
Now that's all sorted, it's time to solve the mystery of where the divs are. We can't see them at all! If we click on the '#top-layer' element we can see that it's currently 0 height. We can also see that there's no style information in the sidebar! We can tell our css is loaded by changing the body colour, and that a height is specified for this element, so what gives?
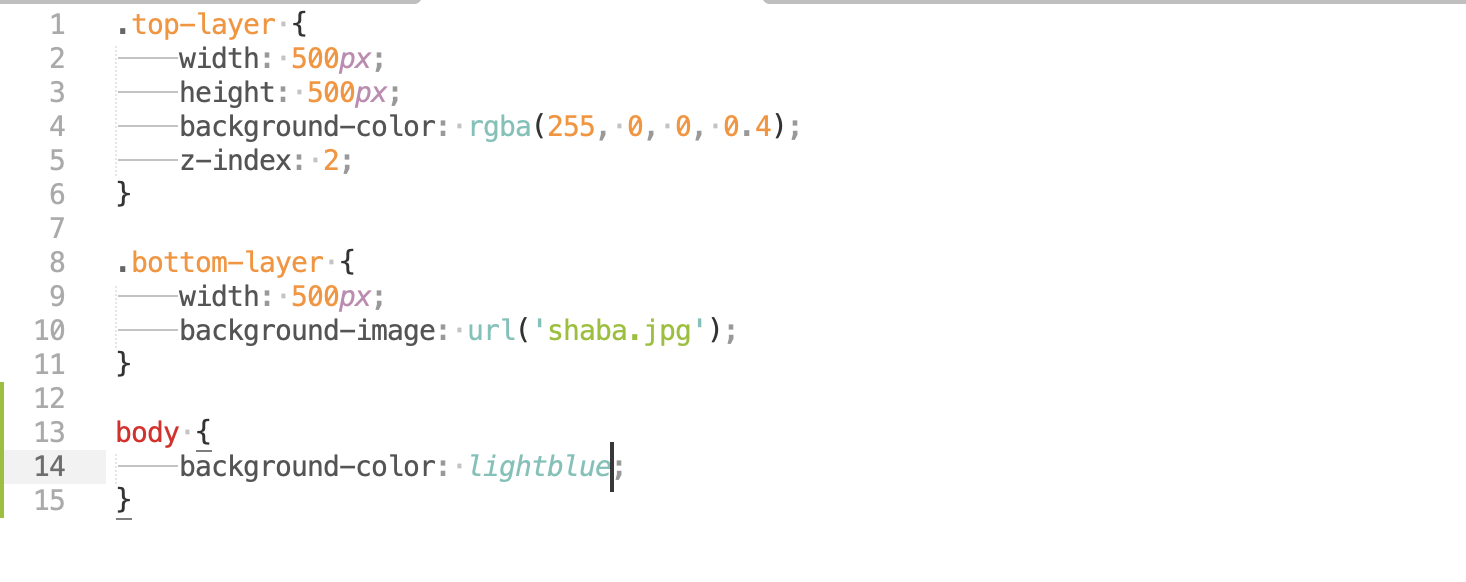
Here we can see that instead of referencing the elements by id (with a '#'), they are addressed by a '.', which represents the class. (Agnes does this basically every time she makes a website). Changing the dots to hashes fixes the error.
Now we have an overlay but still no rabbit. When we look at the css for #bottom-layer, we can see it also has a height of zero. When we change that in the bottom layer, the CSS changes but we still can't see a rabbit!
Let's go back to the JS. We can add some logging to try and discover what's happening with our code:
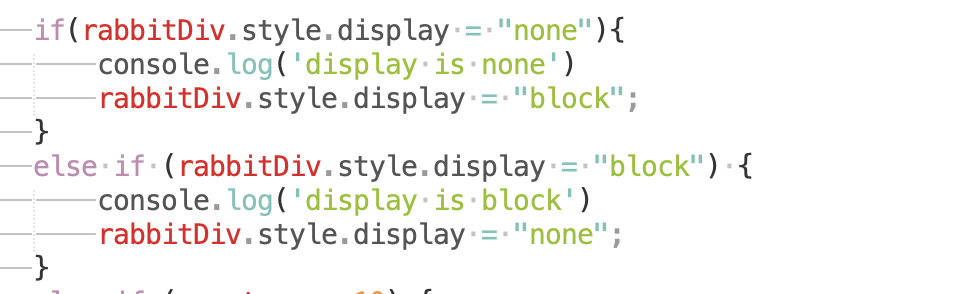

The display is always none! How come? The reason is that we're using a single equals sign in the if statement. This sets the display value to one, rather than checking it. To correct the code, we use the '===' strict equality (for more info on strict and loose equality, e.g. '===' vs '==', see here).
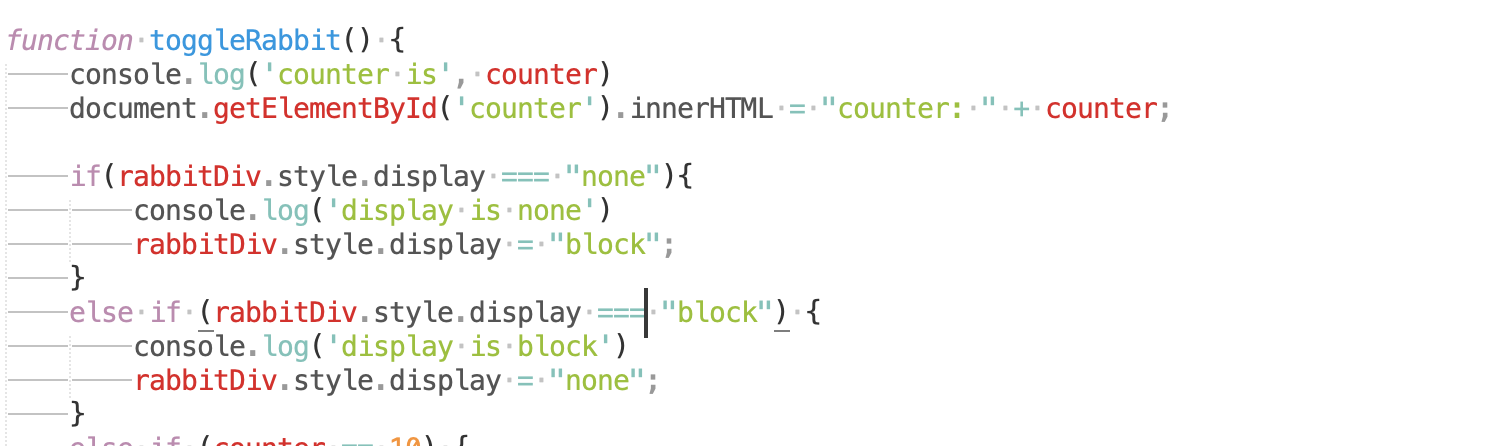
Now, nothing happens! We can also see that there's nothing in the log. If we log the value of rabbitDiv.style.display, we can see that initially it's <empty string>. We can fix this by initialising this property.

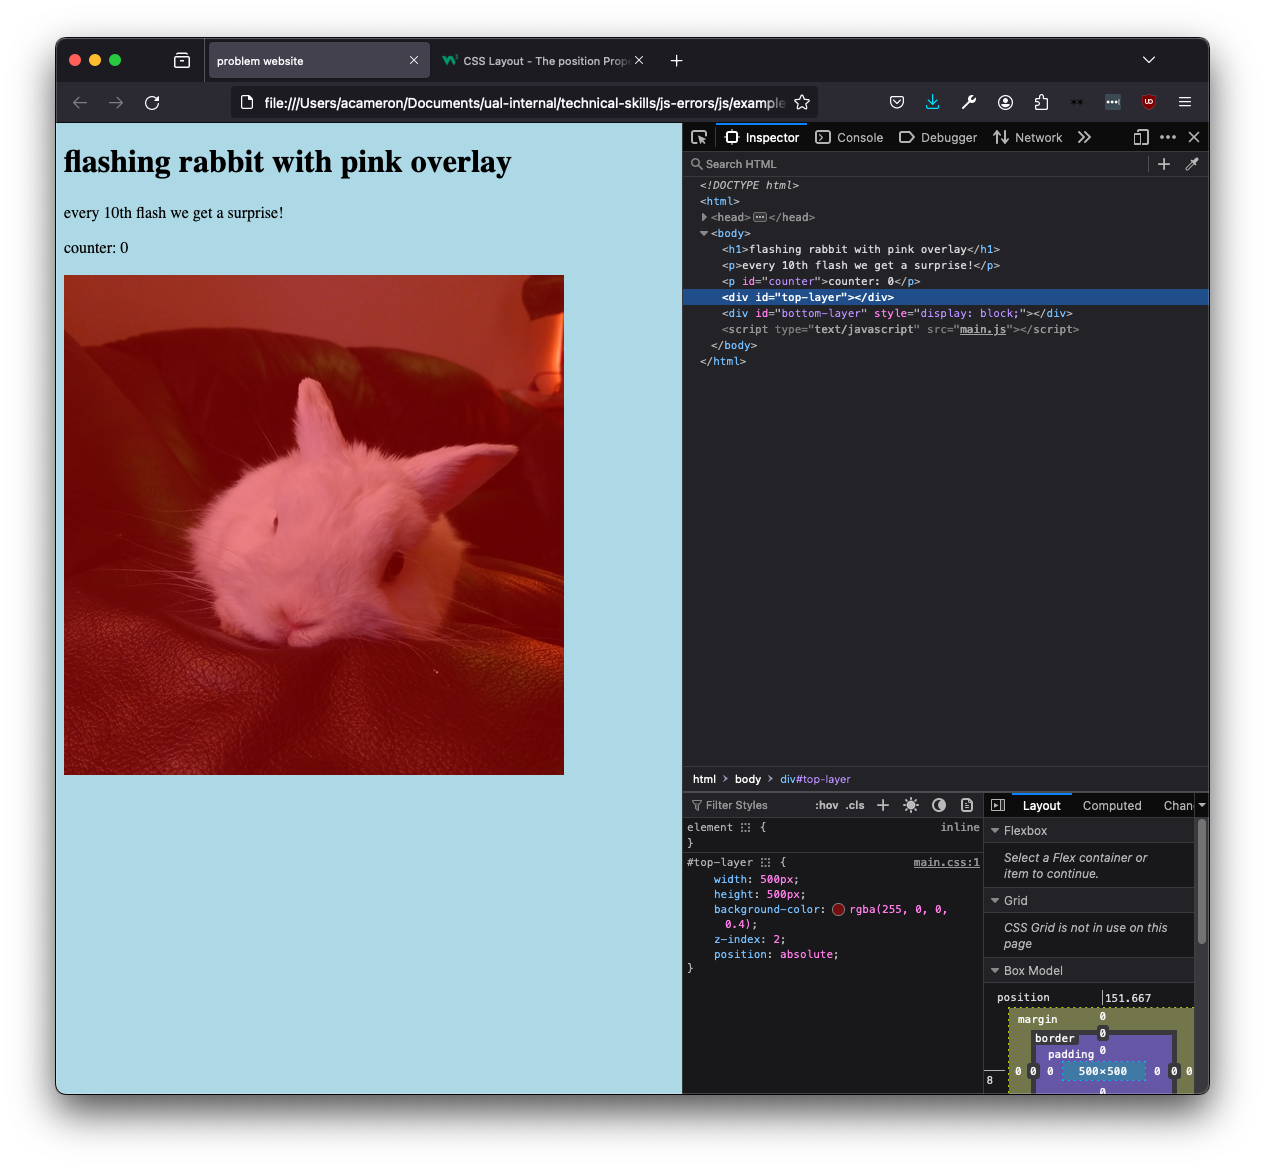
We still can't see a rabbit though! Let's go back to looking at the CSS, this time at the background-img property. We can see that the image isn't loaded. This indicates that we can't find the file!
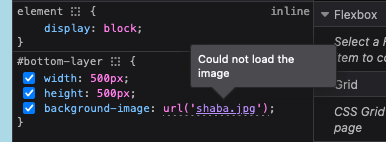
If we look at our folder, we can see that it's a png not a jpg. If we change the path in the CSS, we see the bunny!
However, the pink isn't overlaid. If we go back to the #top-layer element in the inspector, the browser will give us a clue why!
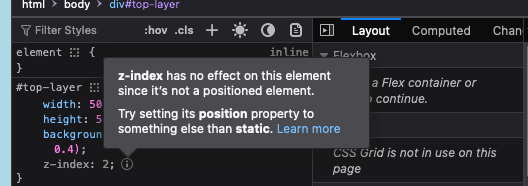
If we change the position value to absolute (more info on CSS layout here), we now get the overlay.
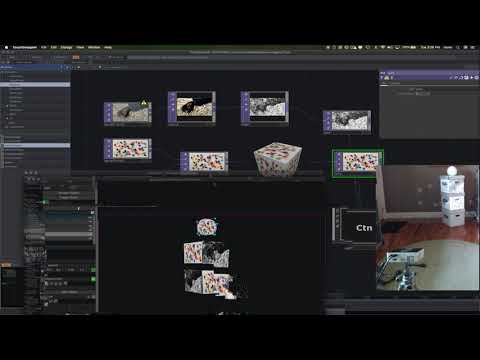
Sending data between TouchDesigner and Arduino
Just like most other creative coding languages and platforms, TouchDesigner allows you to connect an Arduino and hook up sensors, LEDs, servos, etc. to your project.
The makers of TouchDesigner offer a guide about how to do this.
Their article includes sample project files and Arduino code.
Although the sample has some annotations to explain how it works, we will explain a little bit more as it might still be confusing ;)
When you open the 'Arduino_sample.tox', you will be greeted with a screen like here below.
You can use your mouse to rotate/move/zoom the blobby ball, see values coming in from the Arduino, and click on the grey rectangular button to send values back.
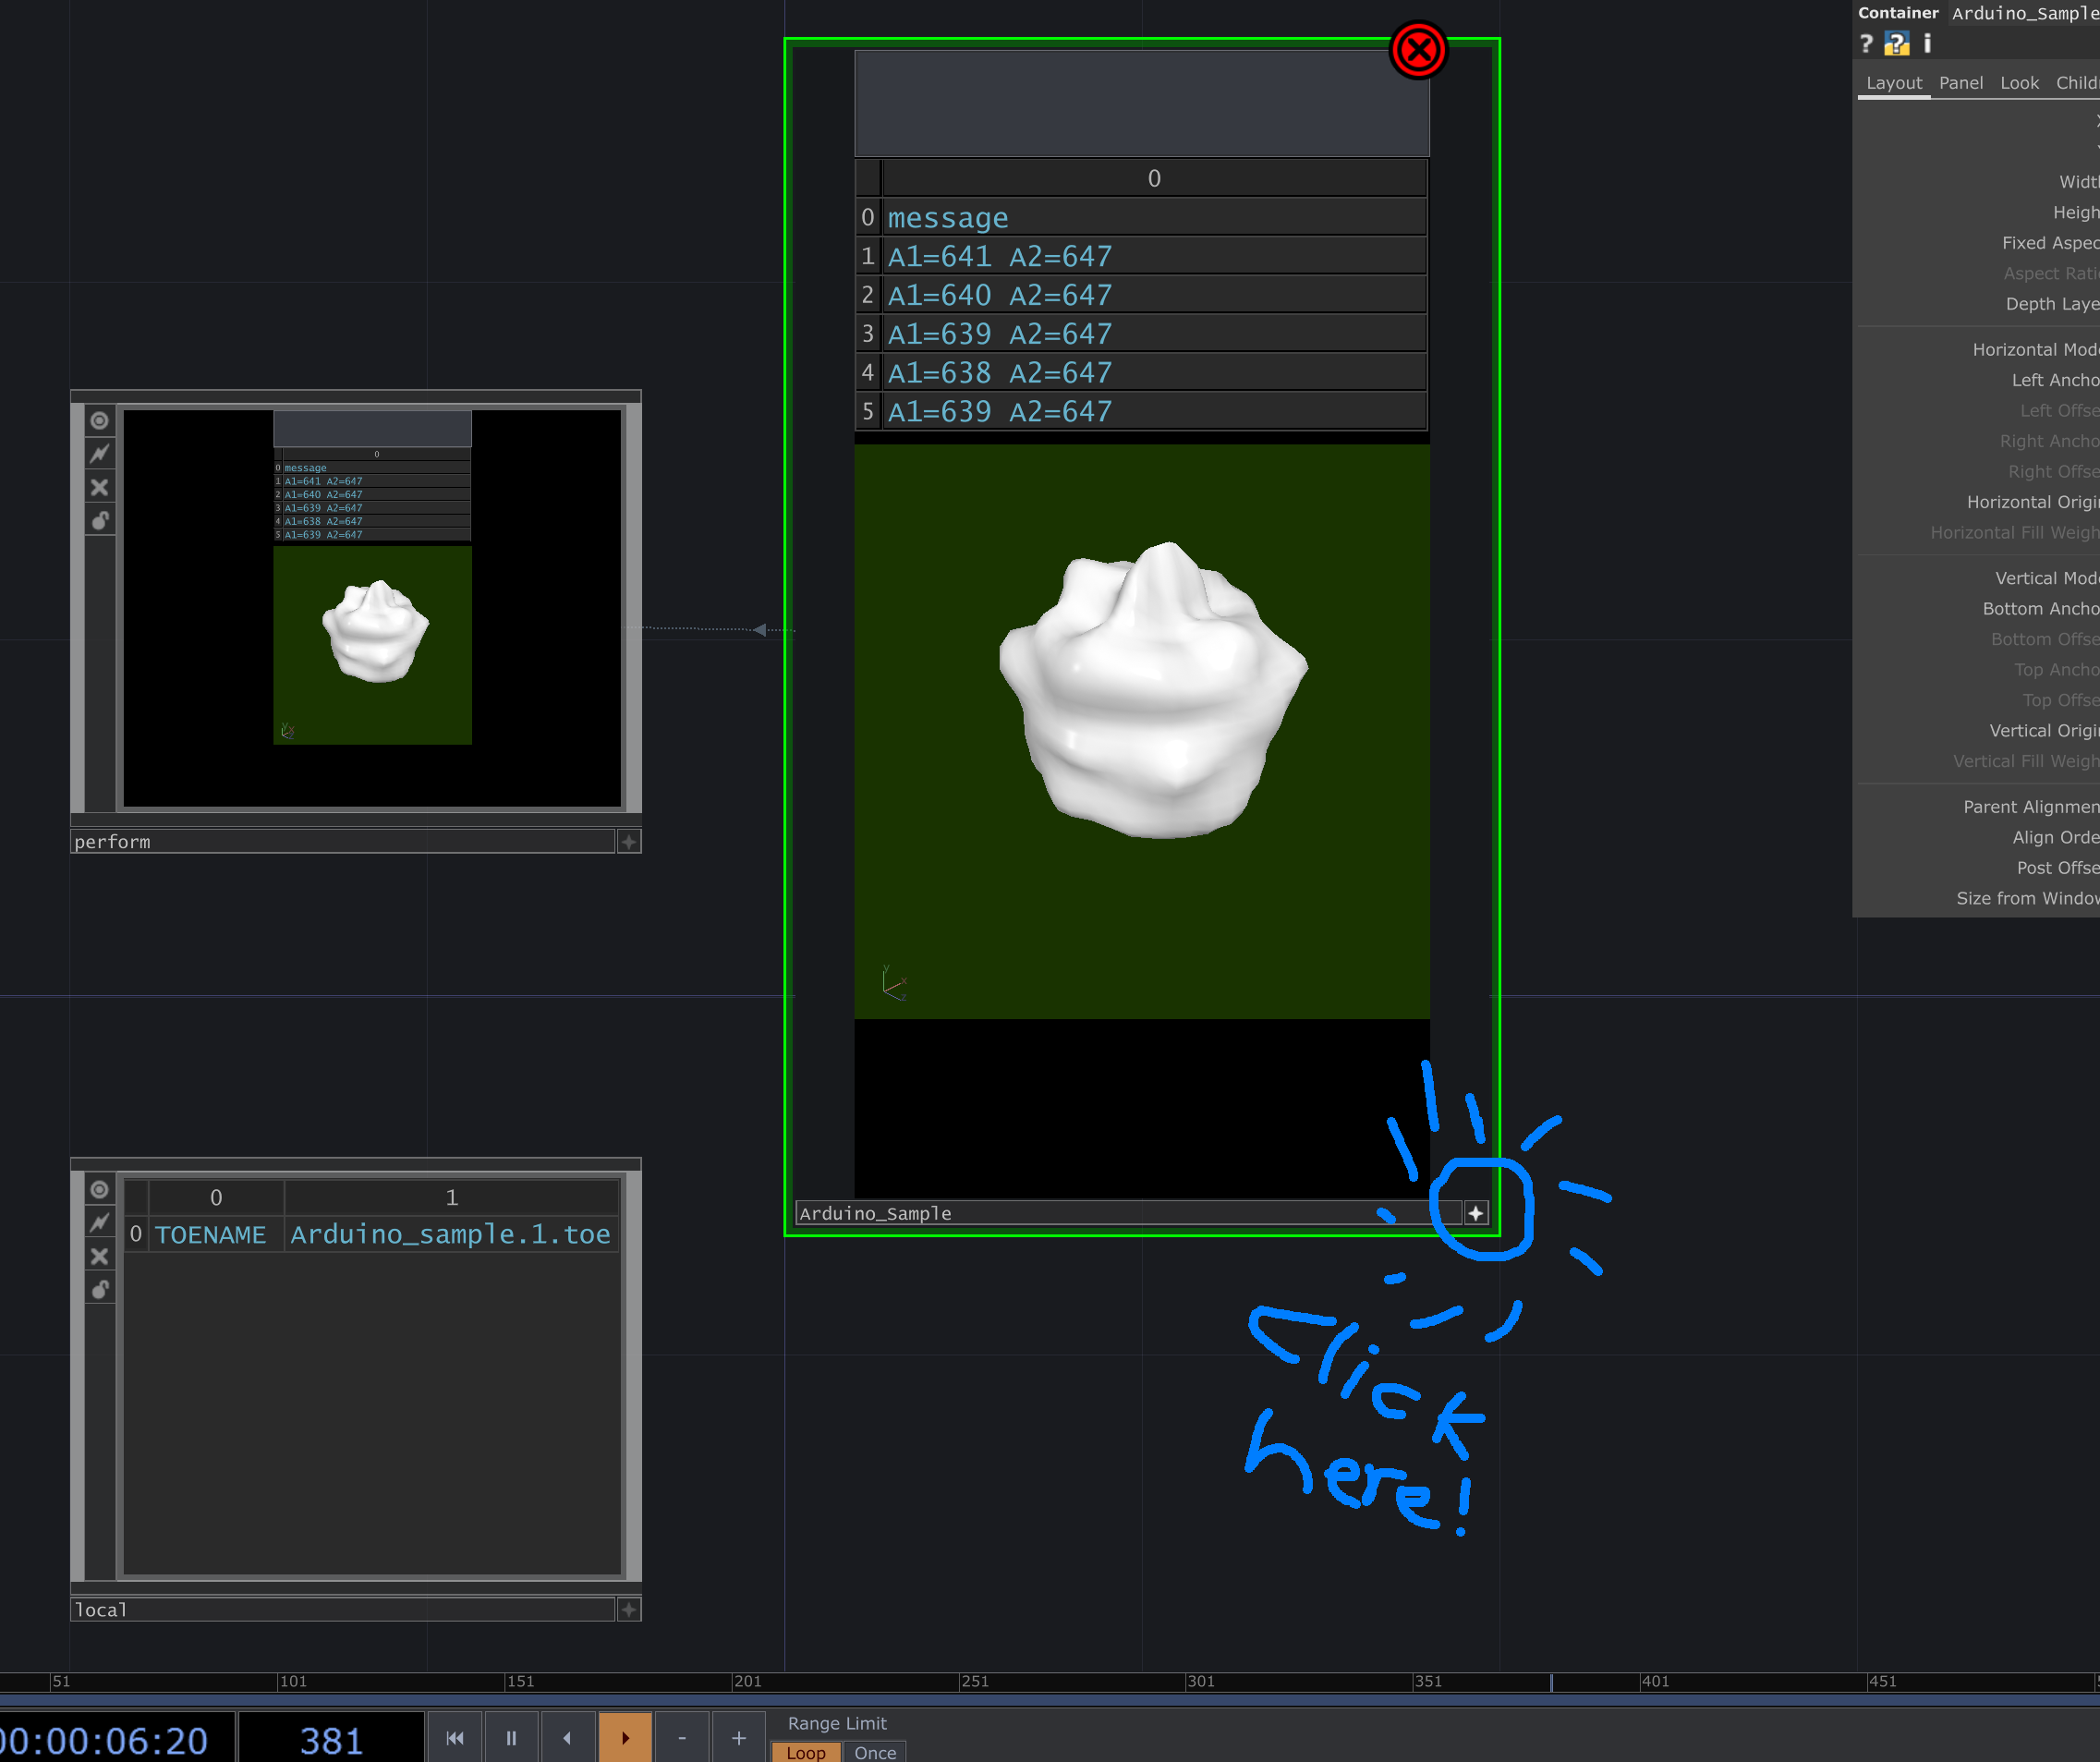
If you click on the little star icon in the bottom right corner of the blobby ball's container panel, it will take it out of interaction mode. You can now zoom all the way in to see the actual sketch inside the container, which looks like this:
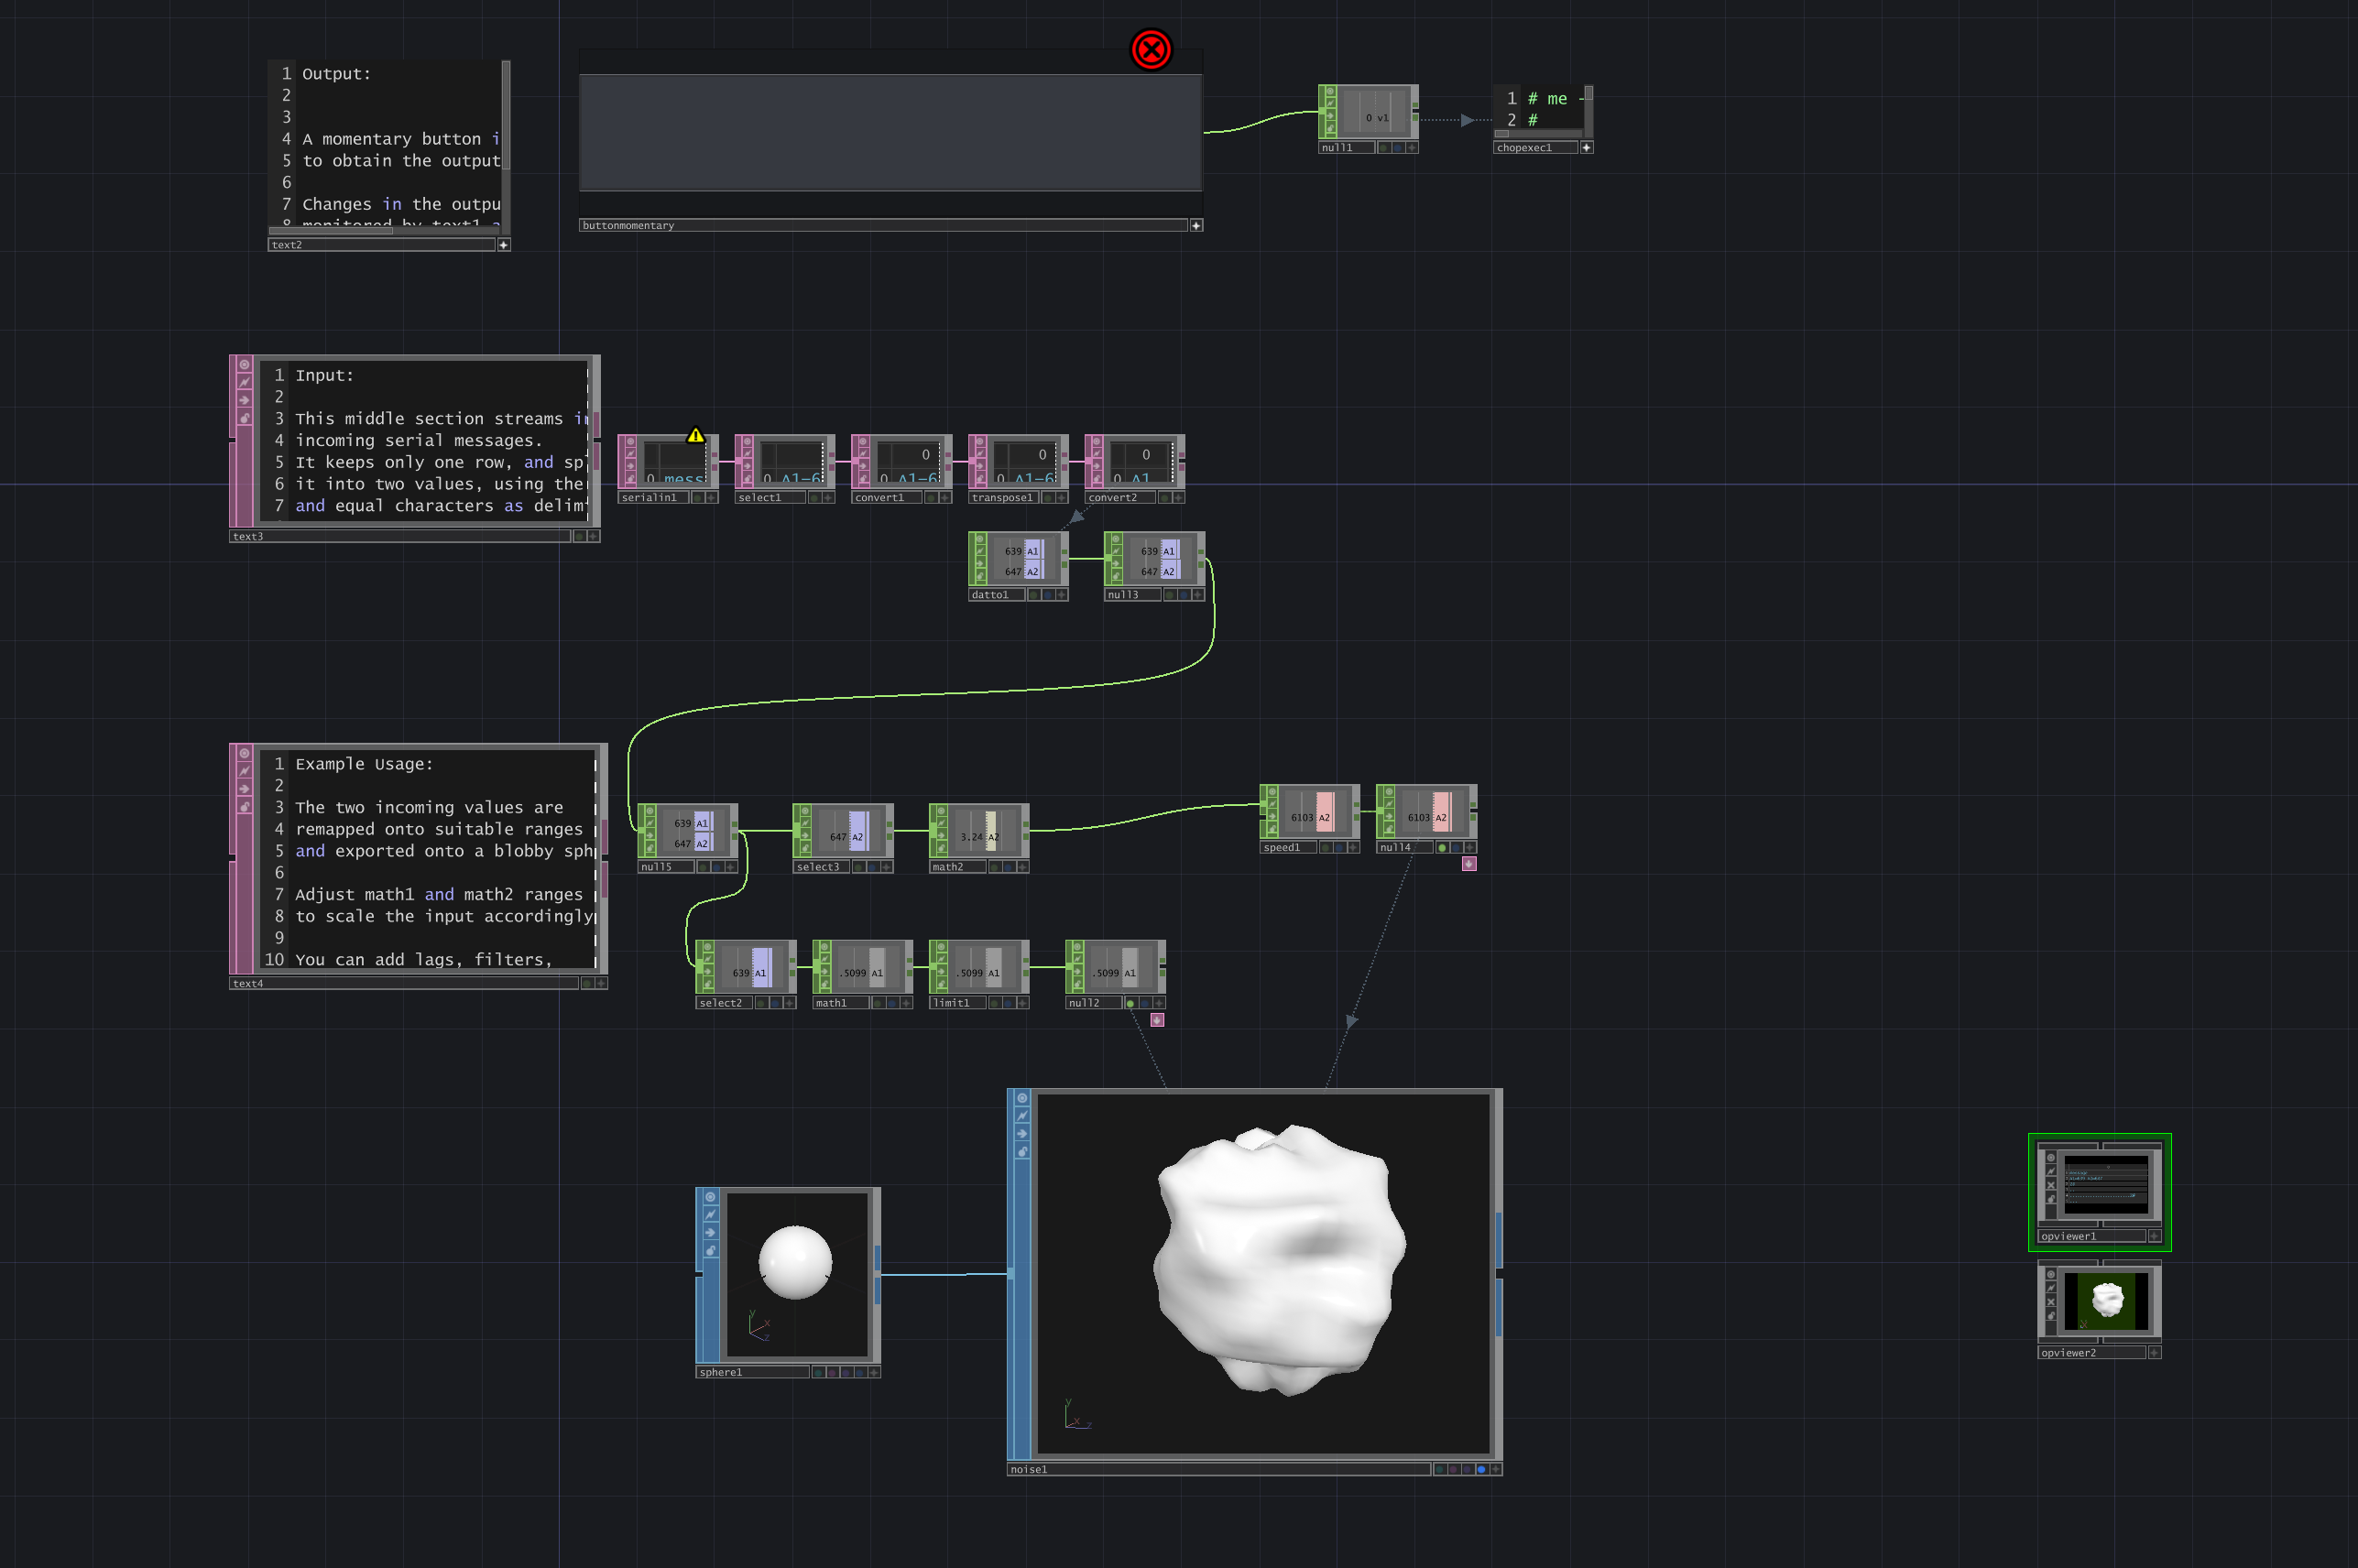
This is where the actual TouchDesigner network is. The top section creates a grey button; if you click it, it will send a command to your Arduino (to turn on/off an LED).
The middle section handles incoming data (messages) from the Arduino. This is what we will focus on here.
The sketch expects that the Arduino sends its messages in a certain format: i.e. "A1=123 A2=456" (see the accompanying Arduino code). Each message represent two analog sensor values, like potentiometers for example.
Let's have a look at how they parse (process) the incoming message!
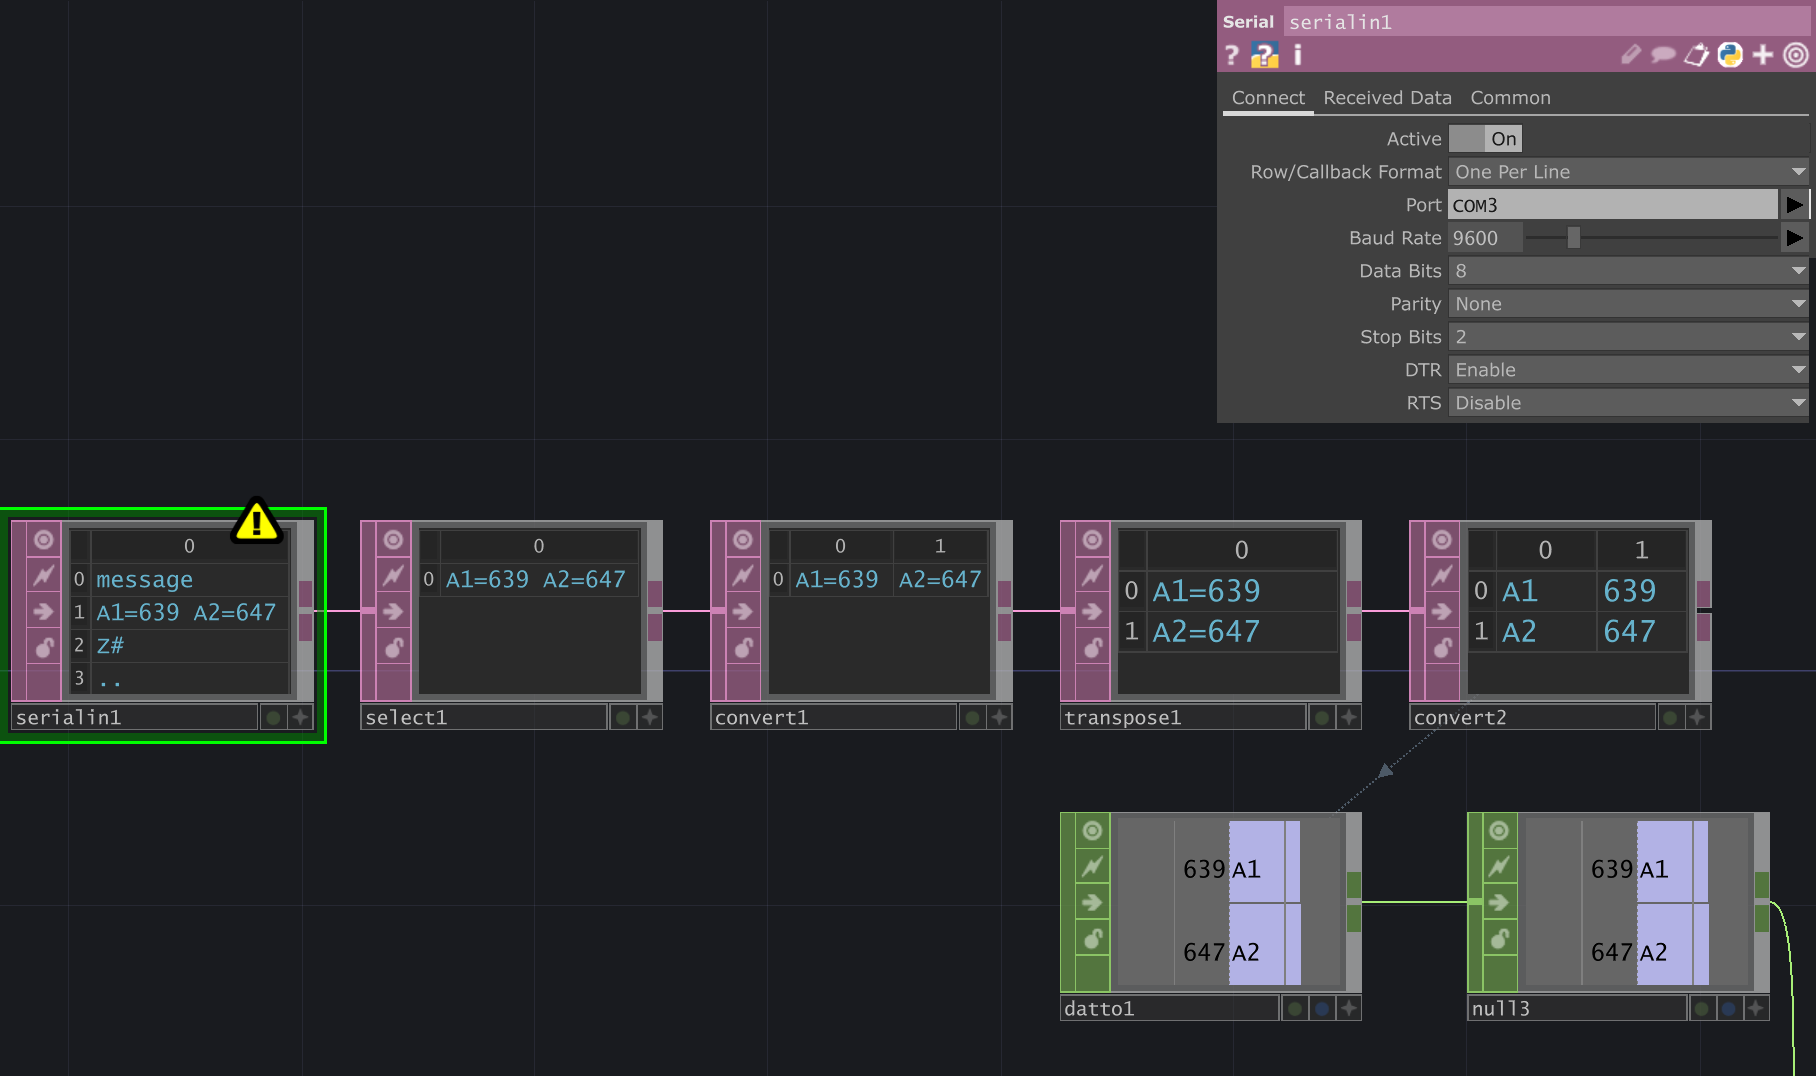
The first box (serialin1) does the serial port communication with the Arduino. It can receive any incoming values.
In the properties panel on the top right, you will want to make sure that the Port matches the port your Arduino is connected to, and that the Baud Rate (speed) matches that of the Arduino sketch.
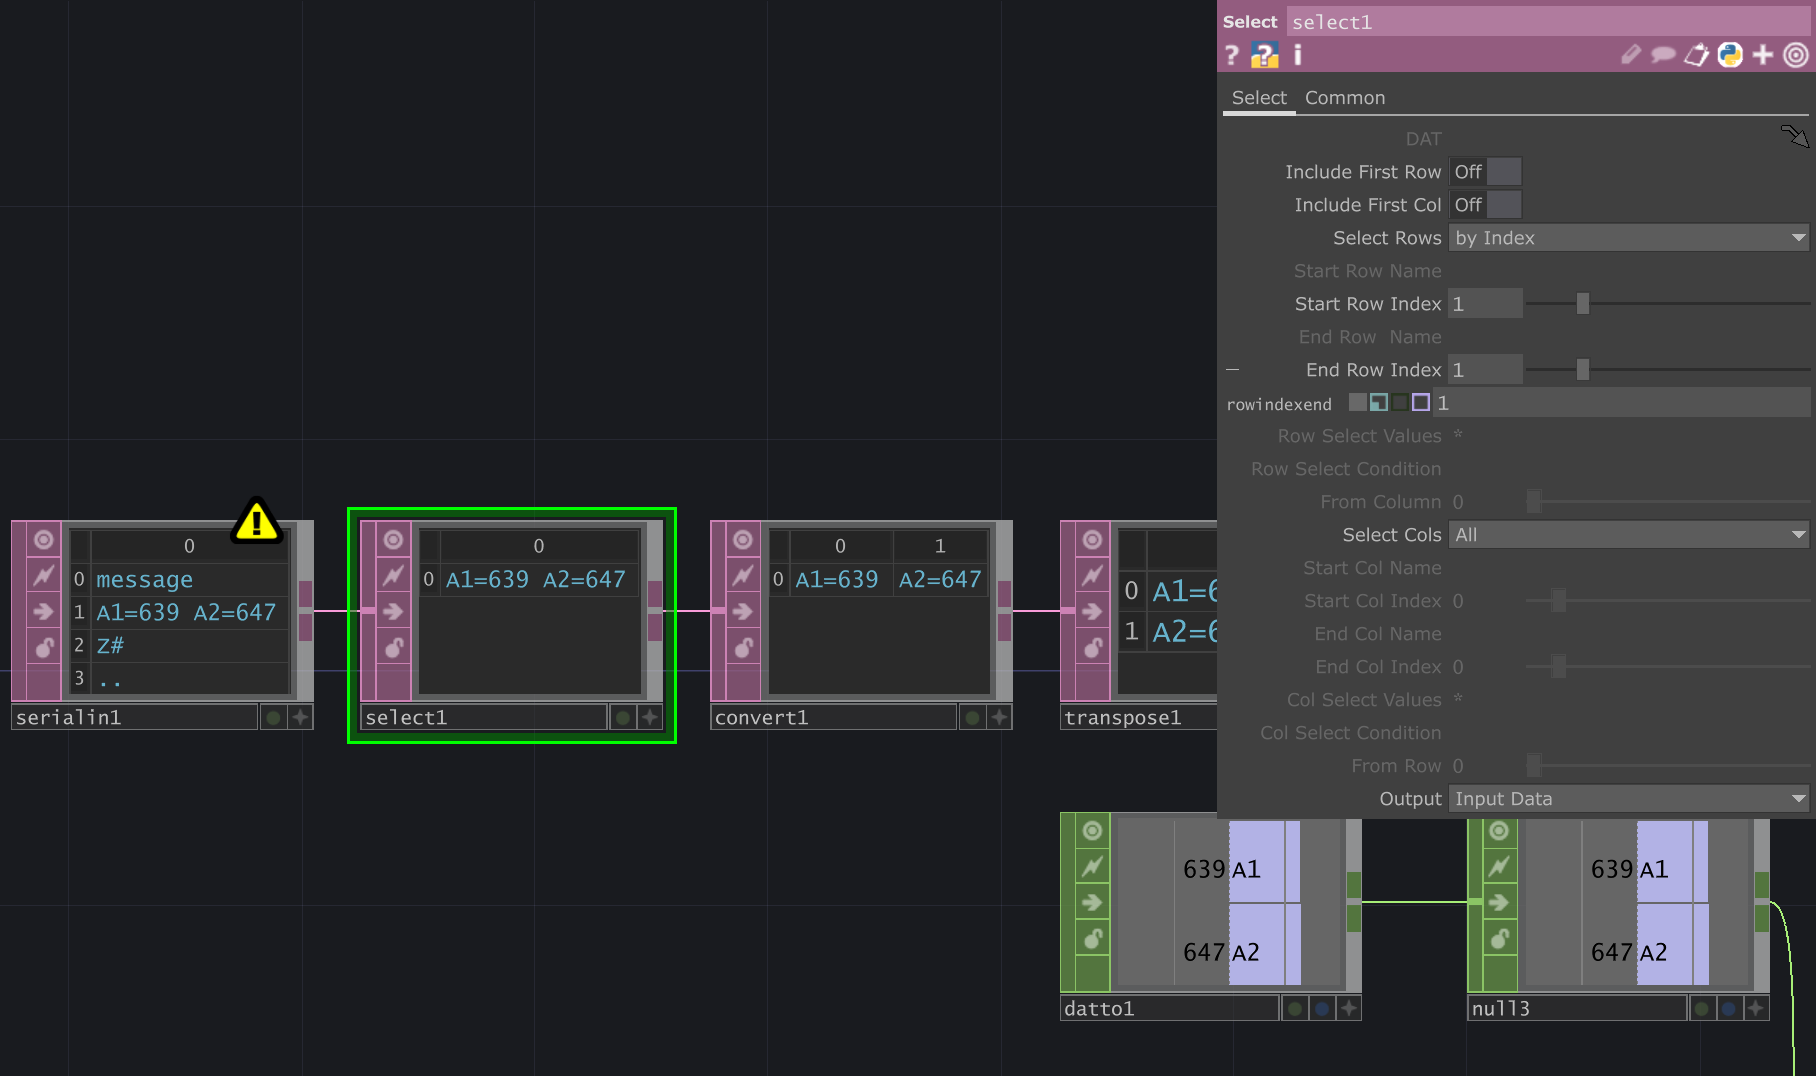
The next box (select1) selects just one row (i.e. one line of received data, one message).
Note the 'Start Row' and 'End Row' index are both set to 1, i.e. it selects just the second row.
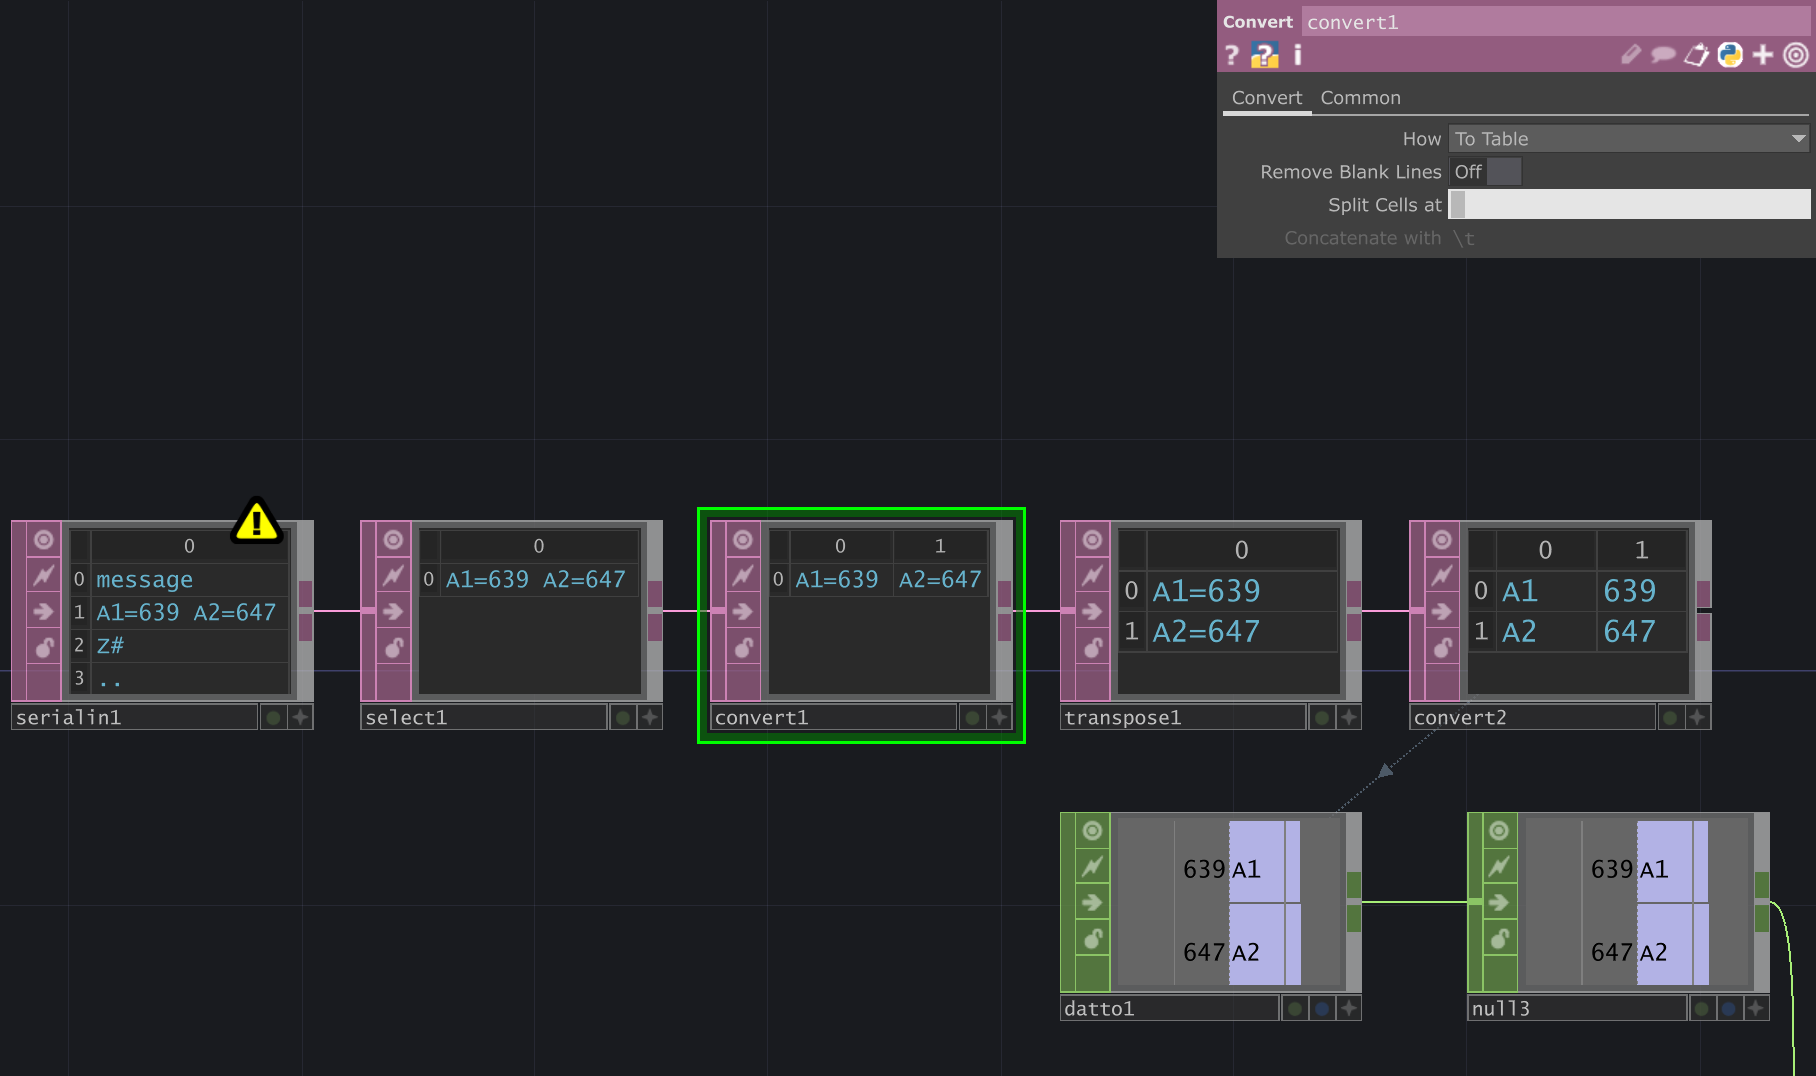
The third box (convert1) splits the line up into multiple cells. Have a close look at the "Split cells at" box - it contains a space character (' '), which will make it split the message at each 'space'.
The result is two cells: each containing an Arduino pin name and the corresponding sensor value. (e.g. "A1=639")
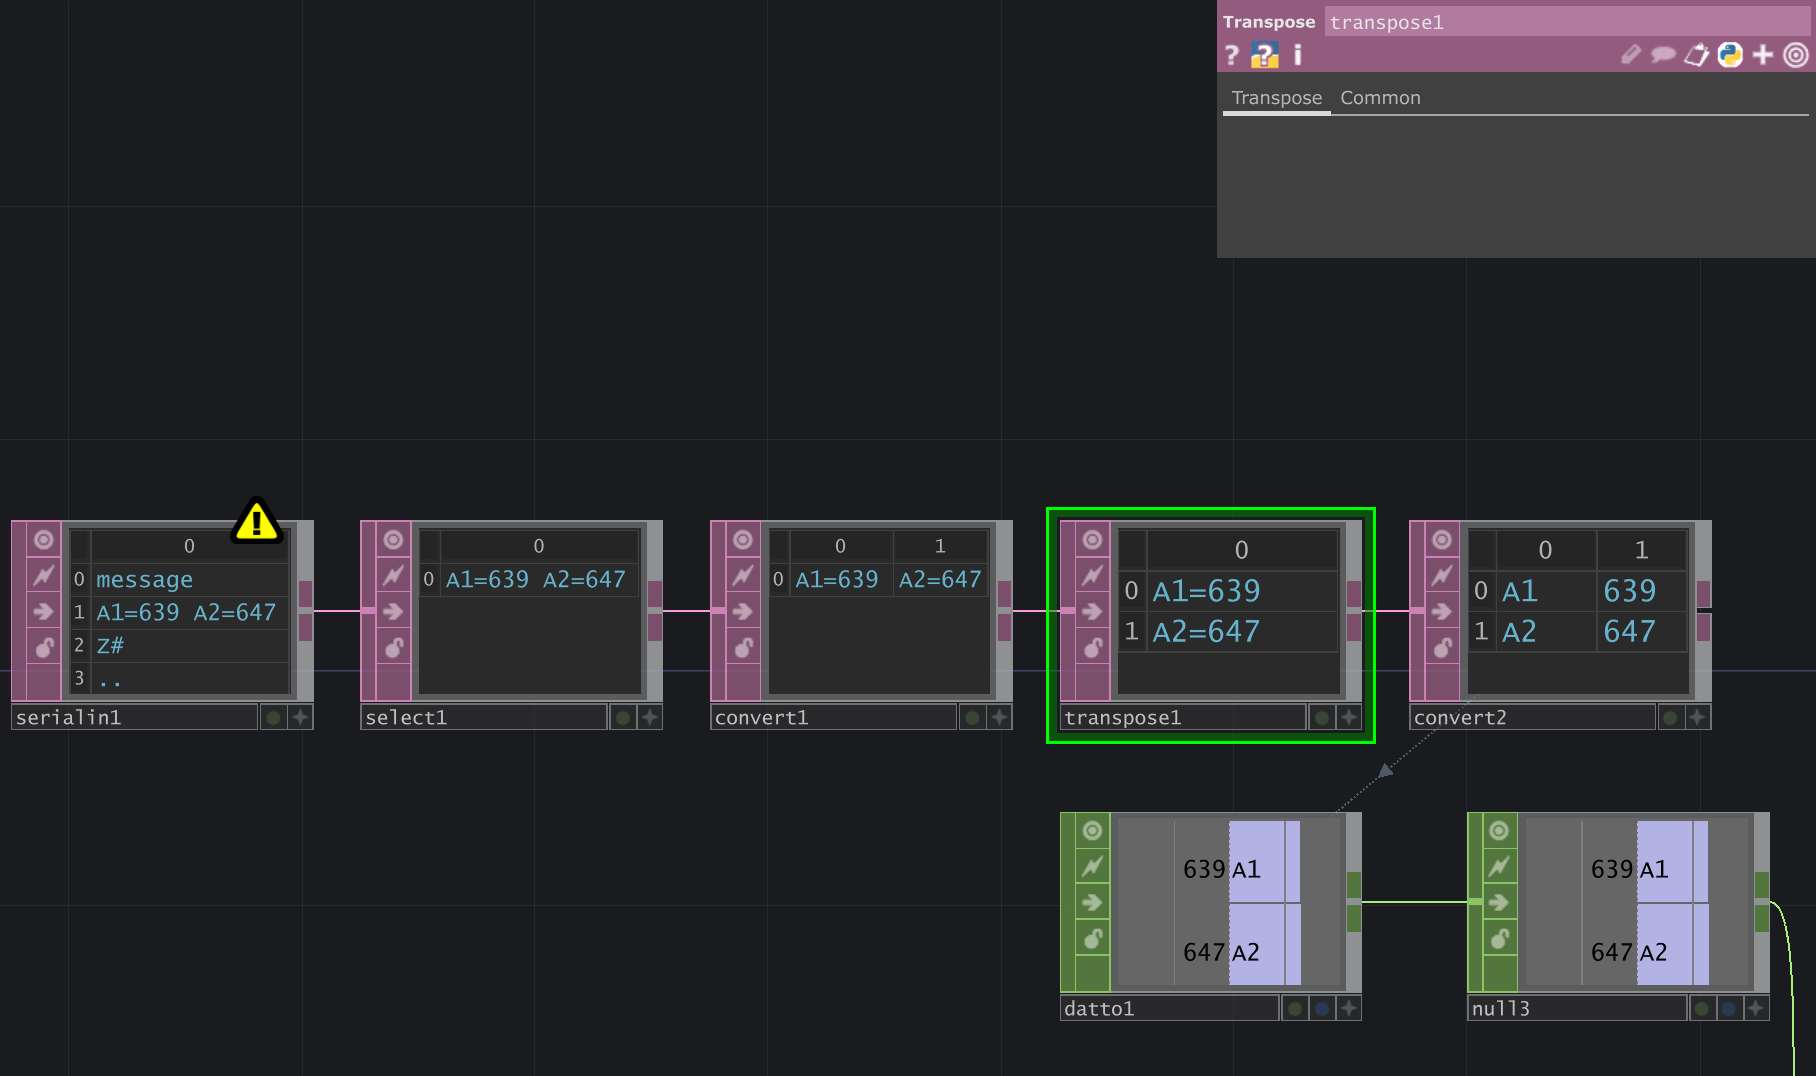
The next box takes those two cells and transposes them - i.e. it turns table rows into colums.
Now you have two lines / rows, instead of the two cells side-by-side
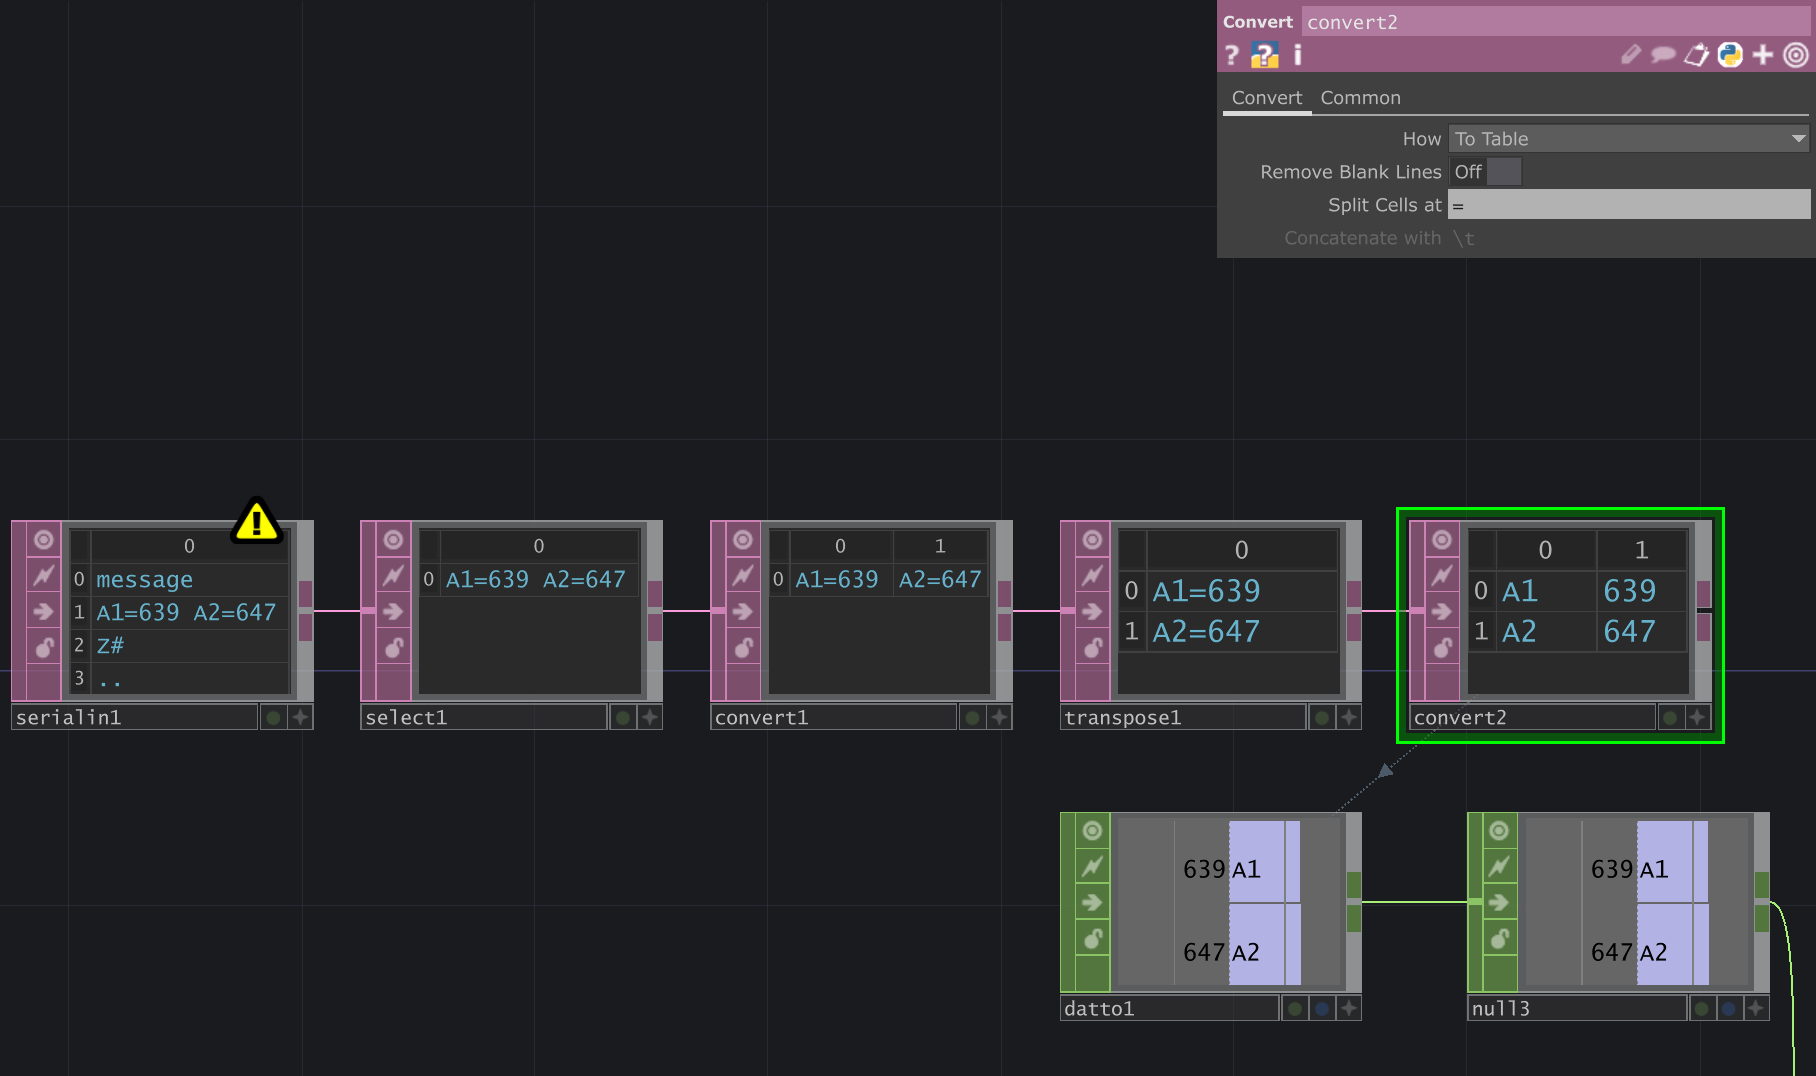
The last convert box (' ') takes these two lines and splits them again, this time cutting the message up at the '=' character.
We now have a table of sensor pin names, and their corresponding values.
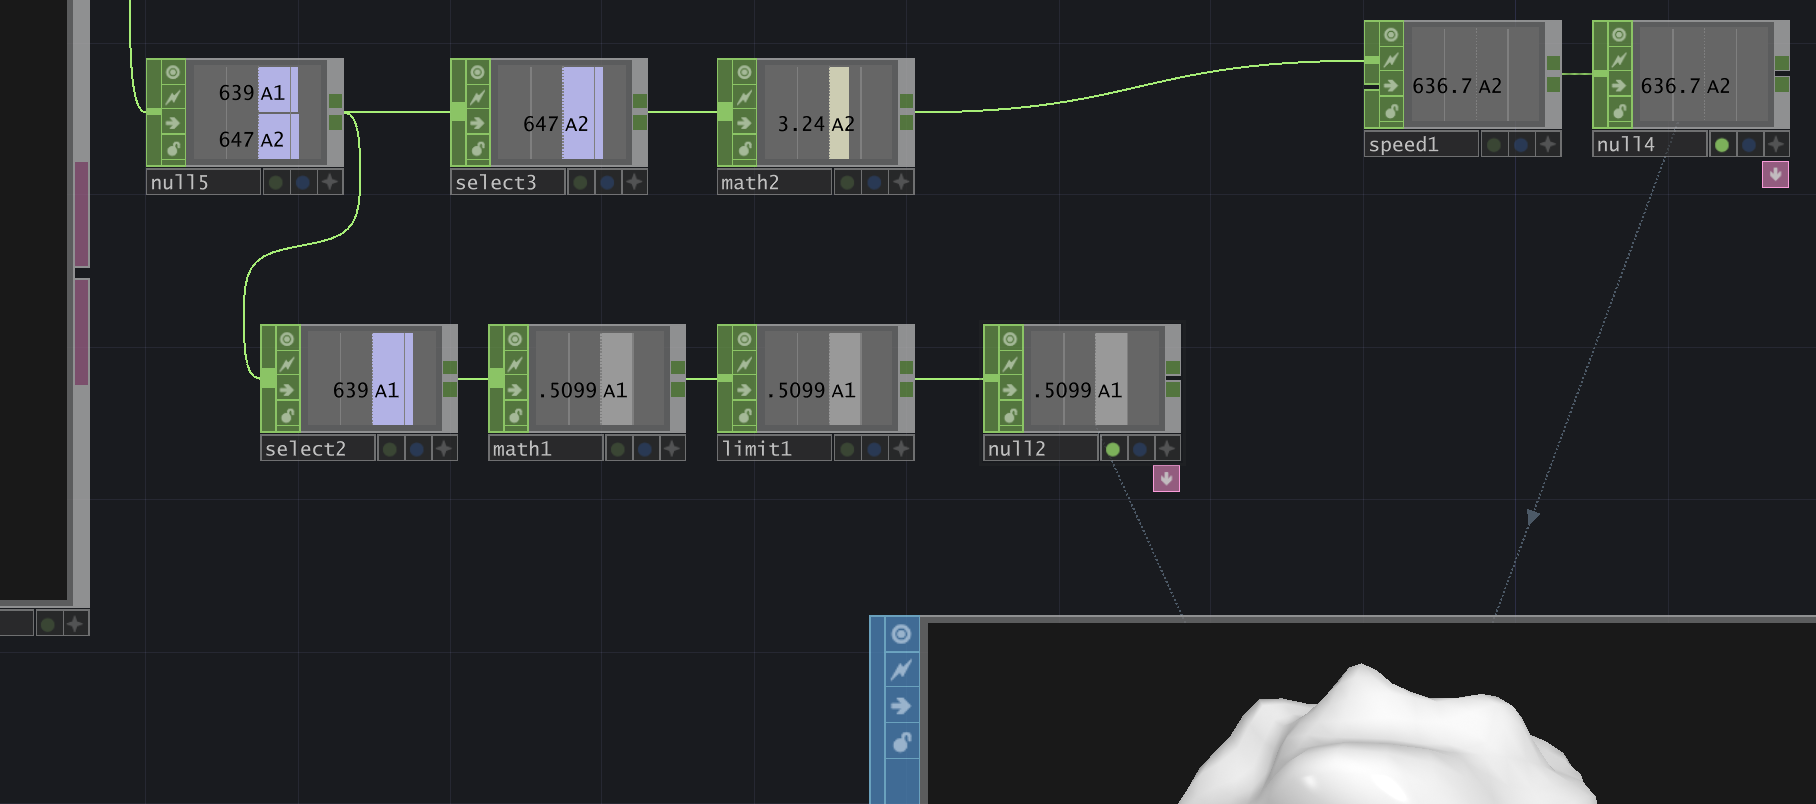
Finally, the 'Dat to' box (datto1) converts the table into single number 'channel' operators (CHOPs) that you can use as input to drive your own audiovisual effects.
The sample uses them to adjust the speed and magnitude of the sphere's wobbliness - but you can go all-out creating your own effects!
And we challenge you to figure out a simpler way to send two sensor values continuously from Arduino ;)
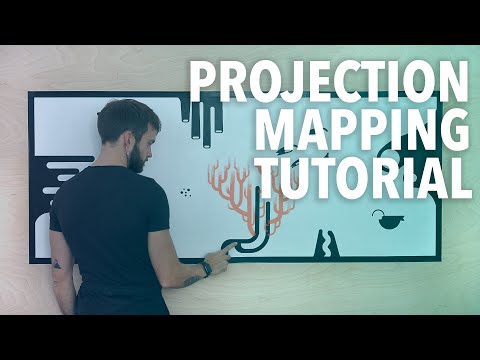
Projection Mapping Workshop
Introduction to Projection Mapping
(document under construction)


TYPES OF PROJECTION MAPPING
2D to 2D: to map an image or video on a flat surface (or for camera-projector mapping). You only need a simple image stretch/warp to map it!
2D to 3D: map 2D videos or images onto different faces (sides) of a 3D object. You can use projection mapping software, or do it directly in e.g. TouchDesigner, Unity, Processing, Photoshop - basically any app that allows you to stretch and warp your content!
3D to 3D: map 3D (perspective) renders of a 'digital twin' (e.g. a 3D scan) of your object/sculpture/environment onto the physical one.
Static vs. Interactive.
SIMPLE 2D MAPPING
- perspective warping (cornerpoints)
- MapMap, MadMapper, TouchDesigner, Unity, etc.
- (infrared) cameras for interaction
SOME EXAMPLES:
BARE CONDUCTIVE
FLIPPAPER
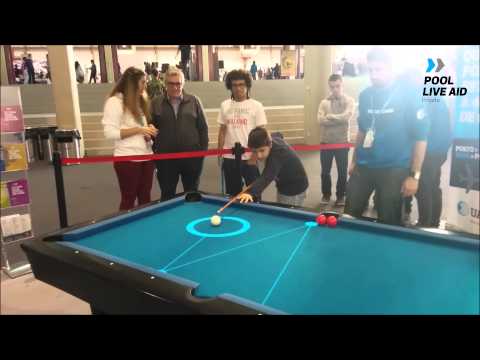
INTERACTIVE POOL TABLE
2D OBJECT MAPPING
Map 2D video onto faces of a physical 3D object: - multiple 2D surfaces (potentially at various angles) - input & output mapping: 'unwrapping' & perspective warping - MapMap / MadMapper / TouchDesigner / etc. - great when the object is not overly complex
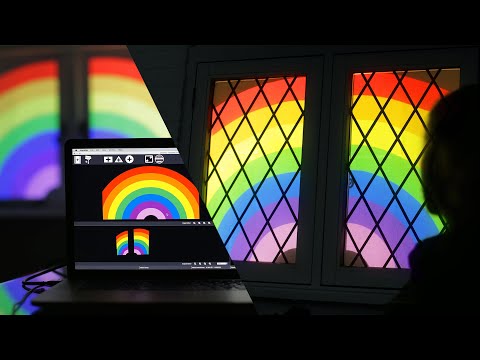
Luma Box - DIY “Thank You” Window Projection Tutorial
THOR HAMMER pt.1
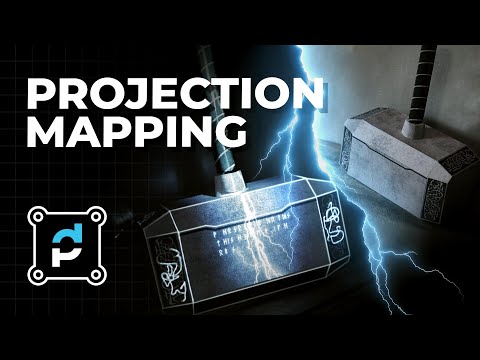
THOR HAMMER pt.2
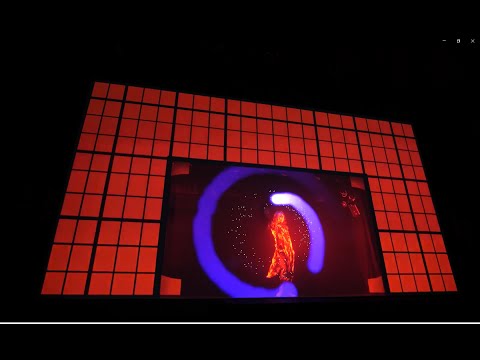
True 3D object mapping
map 3D (perspective) renders of object onto a real object
- Uses a virtual 3D model of whatever you are projecting on
- Map complex objects: no tedious mapping of individual surfaces
- Allows for effects like re-lighting
- Projected effects that are NOT 'flat' (i.e. colors, textures, shadows, etc.) can still look correct from a single 'sweet spot' (anamorphosis)
Re: by Carolien Teunisse and Bram Snijders

ANAMORPHOSIS EXAMPLES
(3D perspective effect - only works from the correct viewing position!)


SOME 3D OBJECT MAPPING TOOLS:
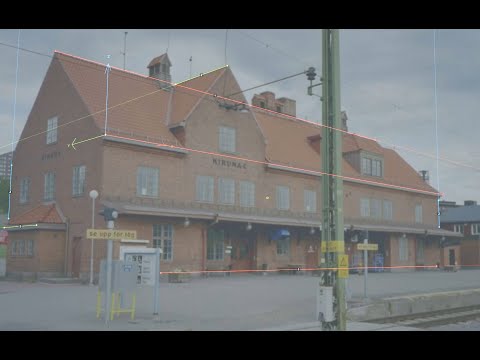
- fSpy (camera (or projector!) viewpoint estimation)
- 3D modeling (e.g. Blender)
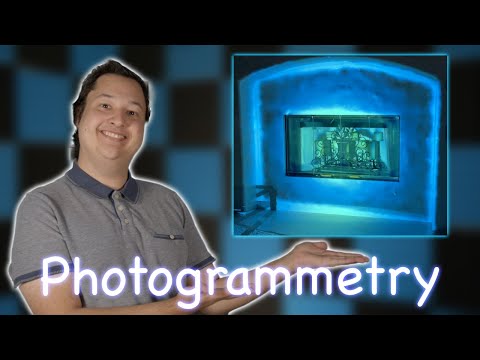
- 3D scanning (photogrammetry, LiDAR, handheld scanners, etc.)
- 3D printing / laser cutting (create sculpture from 3D design)
- output from Blender / Unity / Unreal / Processing / etc.
- Syphon / Spout (to route graphics output from your content creation or rendering app to your projection mapping app (if needed))
FSPY TUTORIALS

PHOTOGRAMMETRY (3D scanning) FOR MAPPING
SNEAKER MAPPING

body tracking

face tracking

BEWARE OF LATENCY THOUGH!
ROBOT-AIDED MAPPING: BOX

Now let's have a go ourselves!!
Try one of the following tutorials:
Mirabelle Jones - TouchDesigner projection mapping (web)
GitHub page
Coaction Lab - Intro to Touch Designer part 2 - Kantan Mapper:
Elburz Sokhabi - Intro to TouchDesigner for Projection Mapping
Reflekkt - advanced 3D scanning + mapping