| Open | Staffed | |
|---|---|---|
| Weekdays | 08:00–21:00 | 10:00–18:00 |
| Saturday | 10:00–18:00 | Unstaffed |
| Sunday | Closed | Closed |
|  |
| Agnes Cameron |
| she/her |
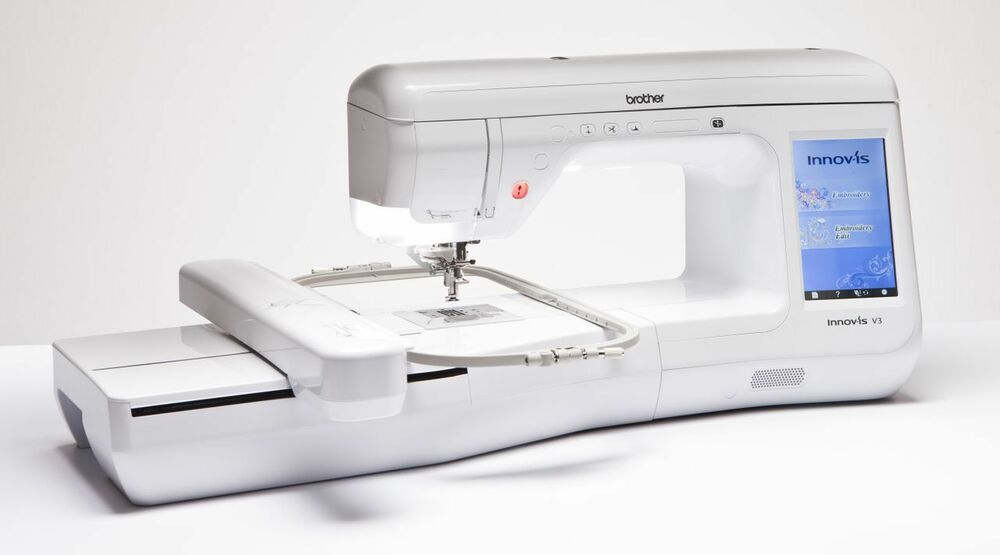 Embroidery machines work by moving a piece of fabric (fixed within a hoop) in the x-y direction, beneath a needle that stitches by moving up and down. In this sense, they have a lot in common with many other 2-axis CAD machines (like laser cutters, routers, plotters), though because of the paticular qualities of working with stitches as opposed to straight toolpaths, embroidery software weirdness, and working with different fabrics, there's some practice involved in getting consistent results.
This guide is a condensed overview of the machine operation -- if you'd like a more detailed reference, see the [Brother Innovis V3 User Manual](https://download.brother.com/welcome/doch000972/882_d80_d82_om03en.pdf).
### Producing embroidery files
In order to embroider your design, you must first create a file in the .PES format (there are other embroidery file formats, but they are not typically compatible with Brother machines). These are then loaded onto the machine via memory stick. At CCI, there are 2 main ways that this can be done:
* using the open-source [PEmbroider](https://github.com/CreativeInquiry/PEmbroider) package with Processing -> [tutorial](https://wiki.cci.arts.ac.uk/books/digital-making/page/digital-embroidery-with-pembroider)
* using Brother's [PE Design 11](https://sewingcraft.brother.eu/en/products/machines/pe-design-software) software
Both approaches have their advantages and disadvantages depending on the kind of design you want to make. In general, PEmbroider gives you a huge amount of control over how the design is stitched, whereas PE Design auto-generates stitches for you, allowing you to choose from a few different presets, and has a lot of features. As such, the learning curve with PEmbroider is a bit steeper, and generally requires a bit more tinkering to achieve a result, but is programmable, so can make generative designs, and can produce things that can't be made using PE Design.
As PEMBroider is just an extension of Processing, it can be run on your computer. PE Design is a piece of proprietary Windows software, for which we have one license, so it must be used on the dedicated Windows machine next to the embroidery machine. There is a Windows-only trial version available [here](http://www.brother.com/common/hsm/ped11/ped11trial.html).
## Machine Setup
### Changing the top thread
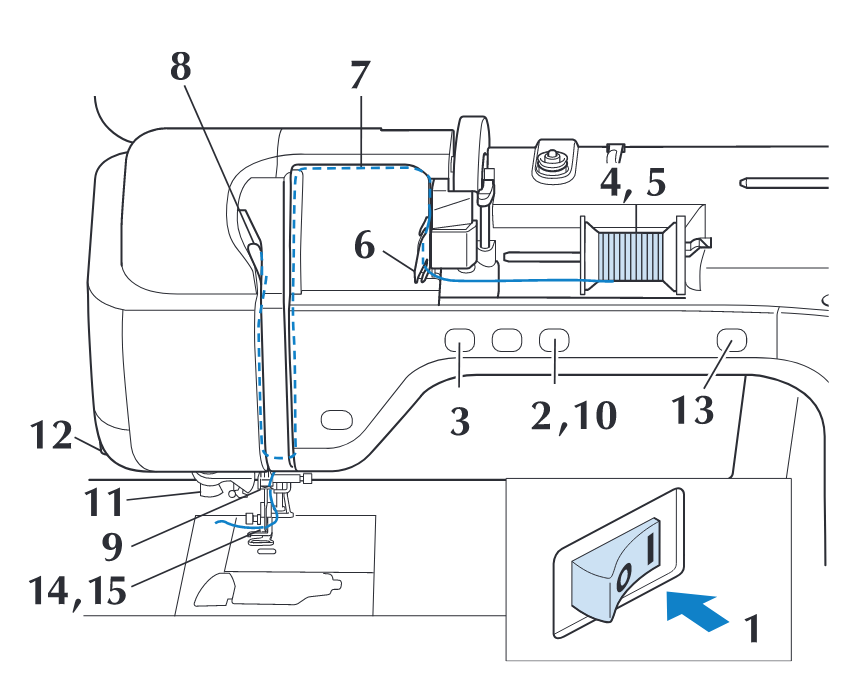
While this machine is threaded using a similar approach to most domestic sewing machines, it has some specific features that are a little less common. This is the thread that will be on the top side of your fabric, and must be machine embroidery thread (for how to tell, see 'my top thread keeps breaking' in troubleshooting).
The diagram below shows how the top thread should look when properly threaded through the machine. For a full step-by-step instruction, the guide in [the manual](https://download.brother.com/welcome/doch000972/882_d80_d82_om03en.pdf) is very thorough (page 38), though if you are unsure then please ask for a refresher.
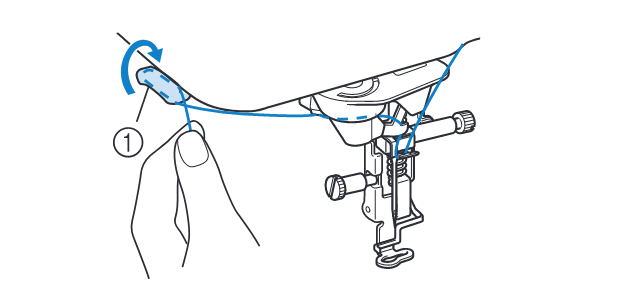
 The final step of threading the top thread is shown below -- pull the thread through the thread cutter, and then press the 'auto thread' button for the machine to automatically thread the needle. (it's also possible to do this by hand but much less efficient).
 ### Changing the bobbin thread
The bobbin thread is what binds the top thread to the fabric, and sits on what's know as the 'wrong side'. Typically, this thread is either black or white -- if you are sewing with dark-coloured thread, you might want to consider using black bobbin thread, but otherwise white thread is fine for most purposes.
This part can be slow the first time you do it, but precision is important -- if your bobbin is not set up properly you will spend a lot longer trying to figure out why your design hasn't come out right!
For a full step-by-step instruction, the guide in [the manual](https://download.brother.com/welcome/doch000972/882_d80_d82_om03en.pdf) is very thorough (page 36, or 31 if you want to wind the bobbin on the machine), though if you are unsure then please ask for a refresher.
Before you start:
1. check you have the correct kind of bobbin (it's approx 11.5mm high, and should have part code SA156 somewhere)
2. check that the bobbin thread is tightly wound. loose thread will ruin your tension later on
3. check that the bobbin thread is actually bobbin thread (compare to the spools of bobbin thread on the desk)
Start by sliding the bobbin cover latch to the right, then gently lifting the bobbin from the machine.
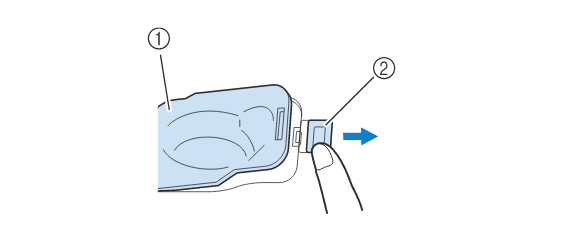 Replace the bobbin, making sure that the direction the thread unwinds in the correct direction (clockwise!). As shown in the diagram below, pull out and around the thread cutter.
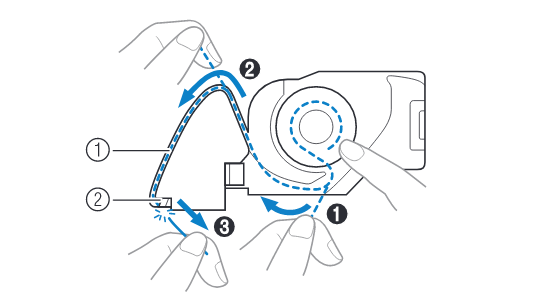 Be sure to replace the bobbin cover -- it should click when pressed in.
__Tip:__ When about to embroider a large design, it's worth checking that there's a fair amount of thread left on the bobbin, to avoid having to change it midway (it's not an issue, just annoying).
__IMPORTANT: make sure the bobbin thread is the correct way round__ (it will be the source of endless mystery issues if not). It has a little picture of the correct thread direction on the bobbin case,
### Hoop Setup
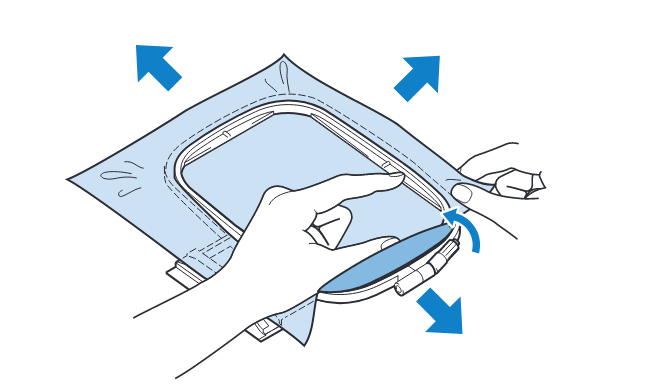
In order to embroider fabric, it must be stretched taut in an embroidery hoop, which is tightened using one or two adjustable screws, then mounted on the arm of the machine. It is this arm that moves the fabric relative to the needle. This is low-key one of the most crucial bits of getting a design to work, and if you're having issues with distortion it's probably going to be here.
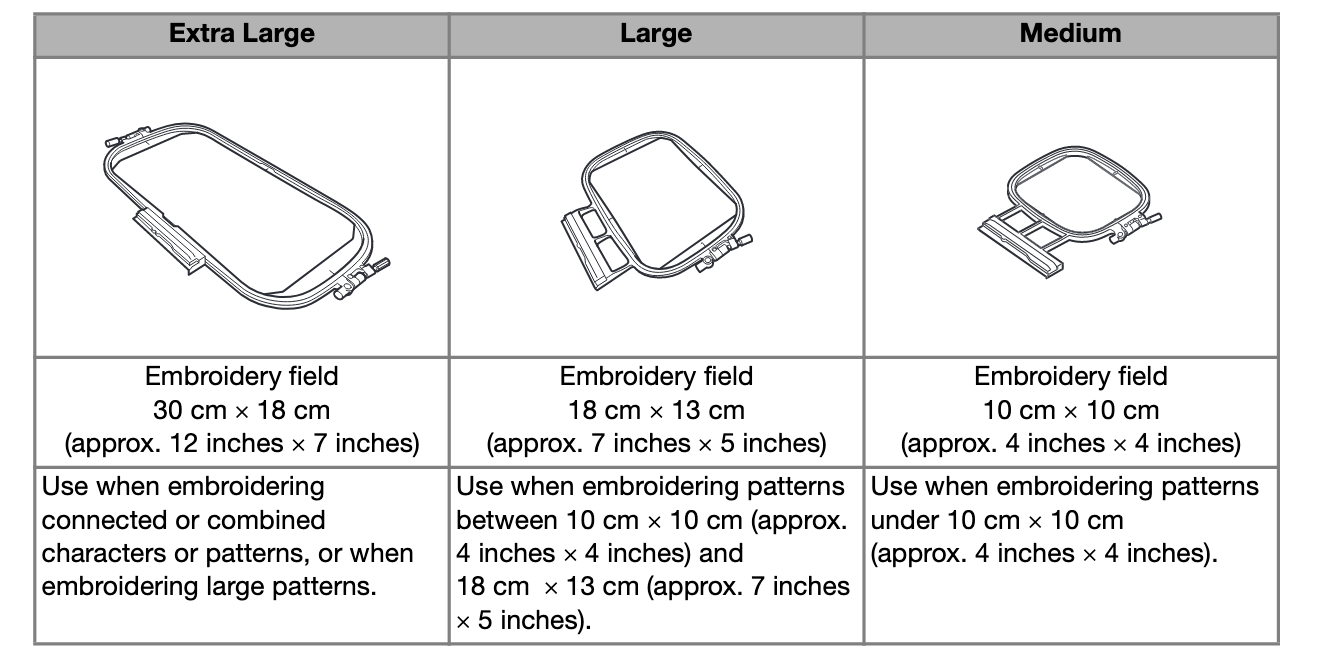
There are currently 3 hoop sizes available to use at CCI. In general, try and use the smallest possible hoop that will fit your design -- the larger the hoop, the less supported the fabric is, and the more likely you are to encounter distortion. This is particularly relevant if you are using a thin or stretchy fabric. The largest hoop is not a challenge!!
[](https://wiki.cci.arts.ac.uk/uploads/images/gallery/2022-01/Q8JNsc1aI8Krw5C7-image-1641399381690-16-17.png)
If you don't know what hoops you can use, the machine will tell you -- just look for the hoop icon in the top while browsing designs. Designs too big for the hoop will be greyed out and you will not be able to stitch with them. The machine knows what hoop you have mounted and will adjust this accordingly.
It is strongly recommended that you use iron-on fabric stabiliser when embroidering -- it will keep the fabric stiffly fixed in one place, and is especially important when working with delicate fabrics. Iron this onto the fabric _before_ putting it into the machine.
[](https://wiki.cci.arts.ac.uk/uploads/images/gallery/2022-01/Amm3hyDjosHRbvRy-image-1641399470375-17-42.png)
__Tip:__ If you are using a stretchy or delicate fabric, take care not to over-stretch when putting the fabric into the hoop (or the design will pucker when you come to remove the fabric from the hoop). I would strongly suggest using the stock canvas we have at the CCI to test designs, especially when you are learning to use the machine.
You can also use the iron on stabiliser to 'float' very small pieces of fabric, ribbons or corners.
[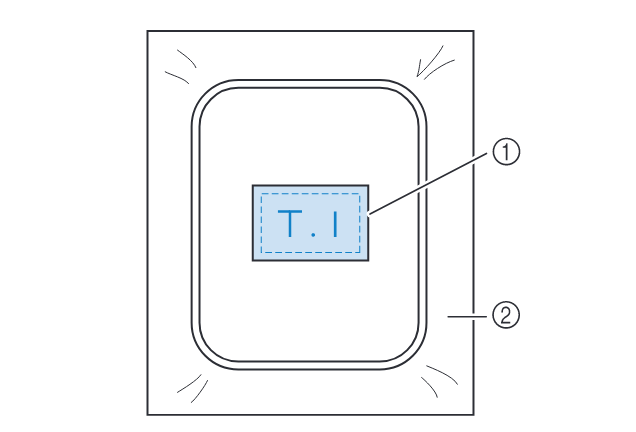](https://wiki.cci.arts.ac.uk/uploads/images/gallery/2022-01/ZMLZr967C5u566XG-image-1641399551709-19-05.png)
#### Alignment
Aligning your fabric properly is really important, and the hoops all come with special alignment sheets that can help you line things up. This is by far the most annoying part of the whole process, but it's worth getting right.
__IMPORTANT:__ be gentle when loading the hoop in and out of the machine. This is the part of the machine that is easiest to break through careless handling. Always make sure the hoop lock is off when pulling it out, and pull straight, not diagonally. Also make sure you put the bobbin in first.
## Embroidering designs
Before you start:
* check you have enough time to finish the design. You need to be next to the machine throughout. The machine's time estimates are normally pretty accurate (if anything, it normally takes a bit longer)
* gently slide the hoop in, and lock in place with the hoop latch
* take time to position your design in the hoop -- you can use the . You can also resize the design by +-5% in the menu, but this will just take the existing stitches and stretch them (so you might not get the desired density)
* you can use the positioning window (pictured below) to position the needle at different edges of your design, to check it lines up as desired
Be sure to replace the bobbin cover -- it should click when pressed in.
__Tip:__ When about to embroider a large design, it's worth checking that there's a fair amount of thread left on the bobbin, to avoid having to change it midway (it's not an issue, just annoying).
__IMPORTANT: make sure the bobbin thread is the correct way round__ (it will be the source of endless mystery issues if not). It has a little picture of the correct thread direction on the bobbin case,
### Hoop Setup
In order to embroider fabric, it must be stretched taut in an embroidery hoop, which is tightened using one or two adjustable screws, then mounted on the arm of the machine. It is this arm that moves the fabric relative to the needle. This is low-key one of the most crucial bits of getting a design to work, and if you're having issues with distortion it's probably going to be here.
There are currently 3 hoop sizes available to use at CCI. In general, try and use the smallest possible hoop that will fit your design -- the larger the hoop, the less supported the fabric is, and the more likely you are to encounter distortion. This is particularly relevant if you are using a thin or stretchy fabric. The largest hoop is not a challenge!!
[](https://wiki.cci.arts.ac.uk/uploads/images/gallery/2022-01/Q8JNsc1aI8Krw5C7-image-1641399381690-16-17.png)
If you don't know what hoops you can use, the machine will tell you -- just look for the hoop icon in the top while browsing designs. Designs too big for the hoop will be greyed out and you will not be able to stitch with them. The machine knows what hoop you have mounted and will adjust this accordingly.
It is strongly recommended that you use iron-on fabric stabiliser when embroidering -- it will keep the fabric stiffly fixed in one place, and is especially important when working with delicate fabrics. Iron this onto the fabric _before_ putting it into the machine.
[](https://wiki.cci.arts.ac.uk/uploads/images/gallery/2022-01/Amm3hyDjosHRbvRy-image-1641399470375-17-42.png)
__Tip:__ If you are using a stretchy or delicate fabric, take care not to over-stretch when putting the fabric into the hoop (or the design will pucker when you come to remove the fabric from the hoop). I would strongly suggest using the stock canvas we have at the CCI to test designs, especially when you are learning to use the machine.
You can also use the iron on stabiliser to 'float' very small pieces of fabric, ribbons or corners.
[](https://wiki.cci.arts.ac.uk/uploads/images/gallery/2022-01/ZMLZr967C5u566XG-image-1641399551709-19-05.png)
#### Alignment
Aligning your fabric properly is really important, and the hoops all come with special alignment sheets that can help you line things up. This is by far the most annoying part of the whole process, but it's worth getting right.
__IMPORTANT:__ be gentle when loading the hoop in and out of the machine. This is the part of the machine that is easiest to break through careless handling. Always make sure the hoop lock is off when pulling it out, and pull straight, not diagonally. Also make sure you put the bobbin in first.
## Embroidering designs
Before you start:
* check you have enough time to finish the design. You need to be next to the machine throughout. The machine's time estimates are normally pretty accurate (if anything, it normally takes a bit longer)
* gently slide the hoop in, and lock in place with the hoop latch
* take time to position your design in the hoop -- you can use the . You can also resize the design by +-5% in the menu, but this will just take the existing stitches and stretch them (so you might not get the desired density)
* you can use the positioning window (pictured below) to position the needle at different edges of your design, to check it lines up as desired
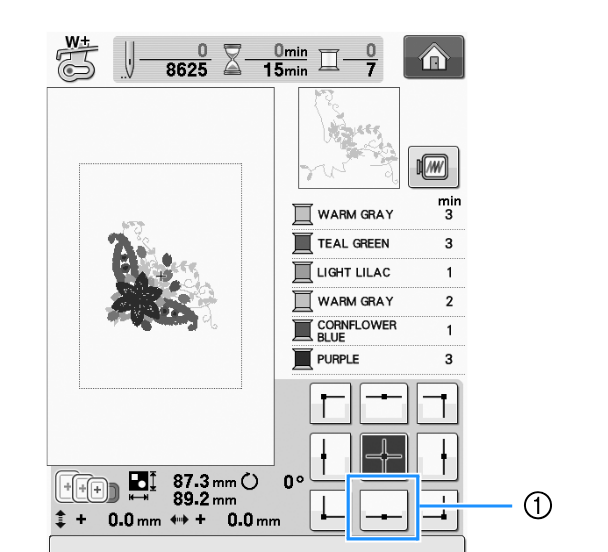 While embroidering:
* bear in mind that you will need to change the top thread manually whenever there is a colour change
* stay near the machine when you are embroidering, and pay attention to the sounds it is making, and to whether any messages appear on the screen (e.g. telling you to re-thread the top or bottom thread).
* to replace either top or bobbin thread, see setup instructions above (for the bobbin thread, you can gently unlock and slide out the hoop without needing to re-start the design)
* if at any point the machine seems unhappy, press the stop button, and verify that the top thread is correctly threaded, and that the bobbin thread is not caught/bunching, by gently moving the handwheel up and down
#### If the top thread breaks during embroidery
This is not uncommon, and can cause some stitches to be skipped. Luckily, it's also easy to resolve. If this happens multiple times in the same design, however, there might be something wrong (see 'my top thread keeps breaking' in the troubleshooting section).
Enter the stitch counting menu (indicated below), then modify the stitch number using the needle icons. The machine's needle will move as you adjust, allowing you to see what's going on.
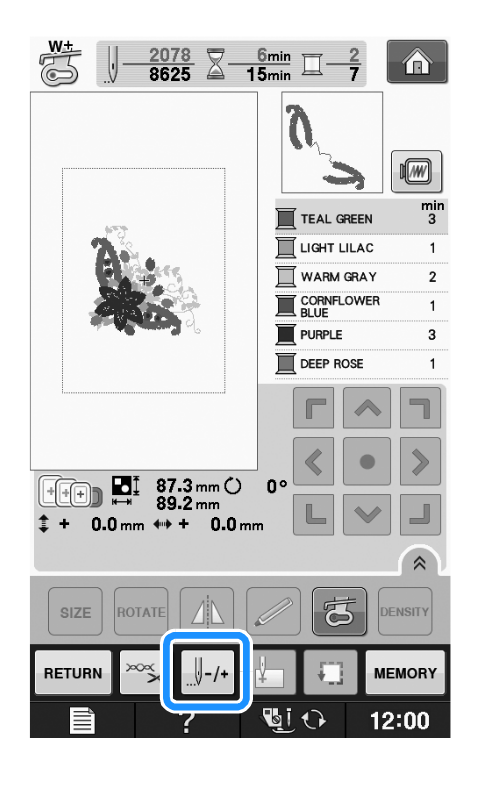
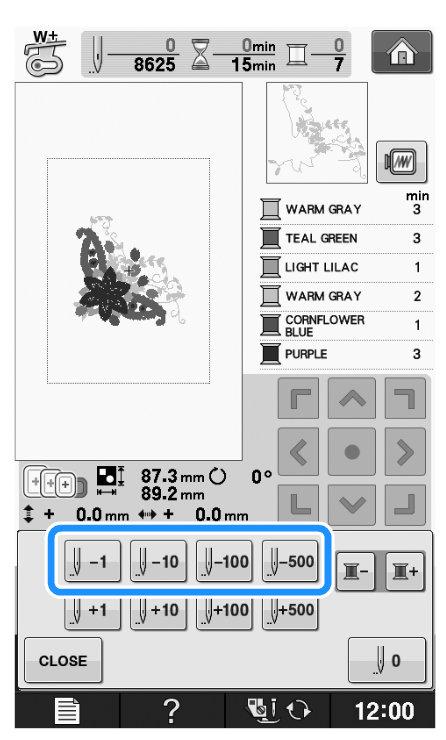 For most cases (unless a lot of stitches were skipped), I'd recommend going back 10 at a time, then using +-1 stitch to line up the needle with the last proper stitches (go a couple in to ensure they can't come loose). The handwheel can be used to lower the needle toward the fabric and check alignment.
#### Skipping colours
To skip out (or, converesely, to redo) an entire coloured section, you can use the same menu used above to recover stitches, but press the button with the spool icon instead of the needle icon. This means 'go on to the next thread colour'. This can be a really quick way of experimenting with multiple versions of a design, with optional parts coded by colour, without needing to produce multiple separate files.
### coming soon: using conductive thread
This part is yet to come as we need to do some tests! To do this, we will get hold of some [conductive embroidery thread](https://tokimodesign.co.uk/product/madeira-hc-12-150m-small-cone-high-conductive-thread) to do this -- the generic conductive thread is too thick to use on the machine.
## Troubleshooting
#### My design is distorted/puckered
This issue is almost certainly to do with hooping. If you're trying larger and more complex designs, I would recommend watching this [hooping tutorial](https://www.digitizingmadeeasy.com/machine-embroidery-beginners-how-to-hoop-tutorial/) which gives a lot of detail on proper technique.
Before you change anything in your design, check:
1. is the fabric properly stretched on the hoop
2. have you ironed on stabiliser to the back of the fabric (and is it properly bonded).
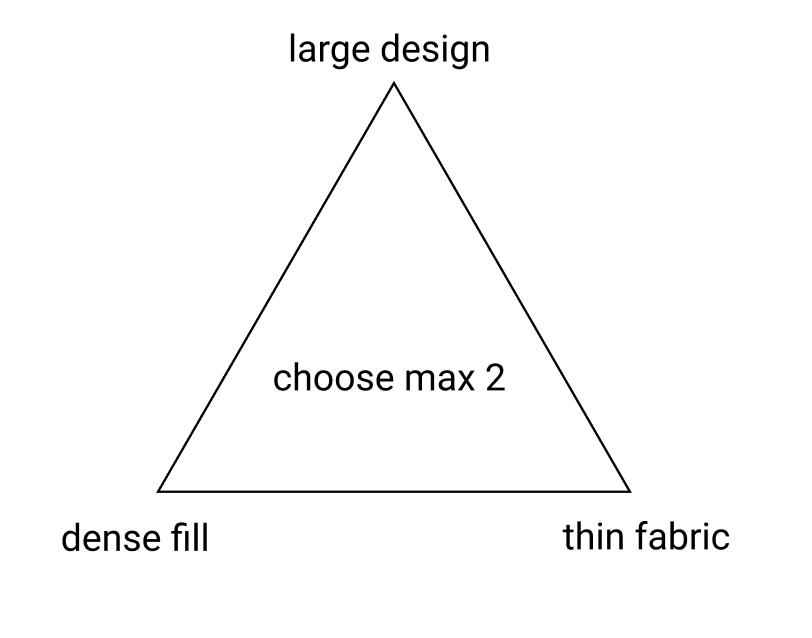
If the answer to both these questions is yes, this is likely not down to a single issue, and instead part of a set of different trade-offs:
* __thin or stretchy fabric__ -> thin/stretchy fabric is easily distorted by embroidery. The first thing to try here is adjusting the tension of the thread (loosen a little for stretchy fabrics), and also to ensure that the fabric isn't being over-stretched in your hoop.
* __size of design/hoop__ -> if your design is anywhere near the border between 2 hoop sizes, try rounding down the size to fit the smaller hoop. This will make the fabric much more stable.
* __complexity/density of design__ -> dense and detailed stitch fills can easily distort fabrics. You could try reducing the stitch density, increasing the stitch size, or even not filling in particular areas to try and combat this
__Tip:__ Before you tear up your design, try ironing it: sometimes even pretty bumpy designs look a lot better after a bit of ironing.
 #### The bobbin thread is coming through the top of the fabric
This is a really common and very annoying issue, and may have a few root causes. A very common mistake when starting to use the machine is putting in the bobbin thread the wrong way round: if you have anything more than 1mm thread showing on top I would suggest addressing that first.
* __adjust the tension:__
If the pull-through effect is quite slight, you might just need to correct the tension for the fabric you are using. Try lowering the tension if you have bobbin thread showing. This can be done without needing to remove anything from the machine. Press the needle button to move it out of the way of the fabric, then
* __re-thread the bobbin__
Thread pull-through is very often associated with an incorrectly threaded or otherwise unhappy bobbin. You can correct this without restarting the design. Raise up the needle and presser foot, and gently remove the hoop. Open up the bobbin case, and remove the bobbin. You will want to check 3 things:
1. __is the bobbin properly wound?__ -> if the bobbin thread looks loose, or not like bobbin thread, I would cut the remaining thread from the bobbin and totally re-wind, or exchange for a prewound bobbin if there is one available.
3. __is the bobbin the correct kind of bobbin?__ -> approx 11.5mm high, and should have part code SA156 (regular machine bobbins are a bit smaller and will cause you problems)
2. __is there thread/dirt/fluff in the bobbin case?__ -> if there are small amounts of thread or dust, gently clean around the bobbin area. If there is a large amount, or anything is caught, please get a member of staff and we can help. Don't unscrew anything!
3. __IMPORTANT: is the bobbin the correct way round?__ -> when you replace the bobbin in the case, ensure that it matches the direction in the picture below. This is the root of almost all beginner problems, and gladly easily resolved.
* __re-thread the top thread__
This is less usually an issue, but worth checking if you've tried the other steps already.
* __test out a different design__
If there are still issues, use a design you know works to verify it's a machine issue, and not an issue with the specific file you are using.
* __turn the machine off and on again__
If none of the above approaches work, try restarting the machine. Before you do this, note down the position and stitch number in your design (if you want to continue to stitch your design) as restarting will start sewing from scratch. If this approach is effective, that's great, but let us know as it might indicate that the machine needs a service. (nb: I only added this step because I am used to using less reliable machines, it shouldn't be needed here)
#### The machine says my design will take over an hour to stitch
In my experience, the machine is rarely lying here, and what you probably have is a large, complex design with a lot of filled areas, that will genuinely take that long. This kind of design will also use _a lot_ of thread. If this is your first or second time using the machine, or you don't have 2 hours, I'd advise trying out a different design for now.
#### The design is blank in the machine's selection menu
This is a bug with patterns made using PEmbroider, and only applies to the first menu -> if you click into it, the design should show up. You can use the machine to save a copy of the file, which _will_ be recognisable: I would recommend either doing this or giving your files distinctive names to prevent confusion.
#### The top thread keeps breaking
Firstly, check that you are using the correct thread (you cannot use this machine with regular sewing thread). All of the CCI embroidery threads are Brother brand, which will appear on the top of the spool.
If you have brought your own embroidery thread, that does not necessarily mean that it will work well on this machine. Check first that the thread is suitable for machine embroidery. Cheap embroidery threads (even if they are the correct type) can sometimes be poor quality and break easily on the machine. To test this, if you can fairly easily break the thread with your hands, it's probably too weak to avoid this issue. If you do want to buy your own thread, I would personally recommend [Madeira](https://www.madeira.co.uk/embroidery-threads/) thread (it's a bit more economical than Brother, and they have a great range).
If you are using the CCI Brother thread, then check that the top thread is threaded correctly, either by referring to the manual, or asking one of the technical staff. Check in particular that thread is unwinding in the correct direction, and that the 'notch' on the spool points away from the unwinding direction (or it can get caught).
#### I broke a needle
Alas. First of all, make sure you remove all the loose bits of needle and put them in the sharps bin. It's also worth checking at this point that the top thread isn't caught on anything, and that the bobbin thread isn't caught/bunched. If you're unsure about this, try to gently remove the hoop and loosen any caught threads.
To replace the needle, you will need a new embroidery needle, and the small, stubby screwdriver, both of which should be in the parts bin near the machine. Press the needle button to move the needle stump all the way up. Using the screwdriver, gently loosen the old needle stump, put it in the sharps bin, then put in a new needle. Make sure:
1. It is a machine embroidery needle (if you're not sure then ask). For almost all purposes we use 75/11 needles.
2. You push the needle all the way up
3. The flat side faces away from you and the screw is properly tightened using the screwdriver
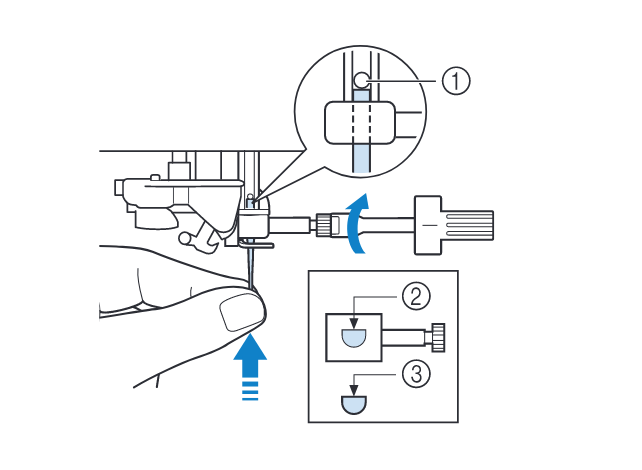 The [User Manual]("https://download.brother.com/welcome/doch000972/882_d80_d82_om03en.pdf") has more diagrams of this process on page 45.
Once the needle is replaced, re-thread the top thread and bobbin thread before starting again. If you break a needle more than once in quick succession, there is probably an issue with your design.
__If you don't feel confident replacing a needle, grab one of us (or if out of hours, leave the hoop in the machine, put a note on it, send us an email and turn the machine off).__
# Creating Digital Embroidery Designs with PEmbroider
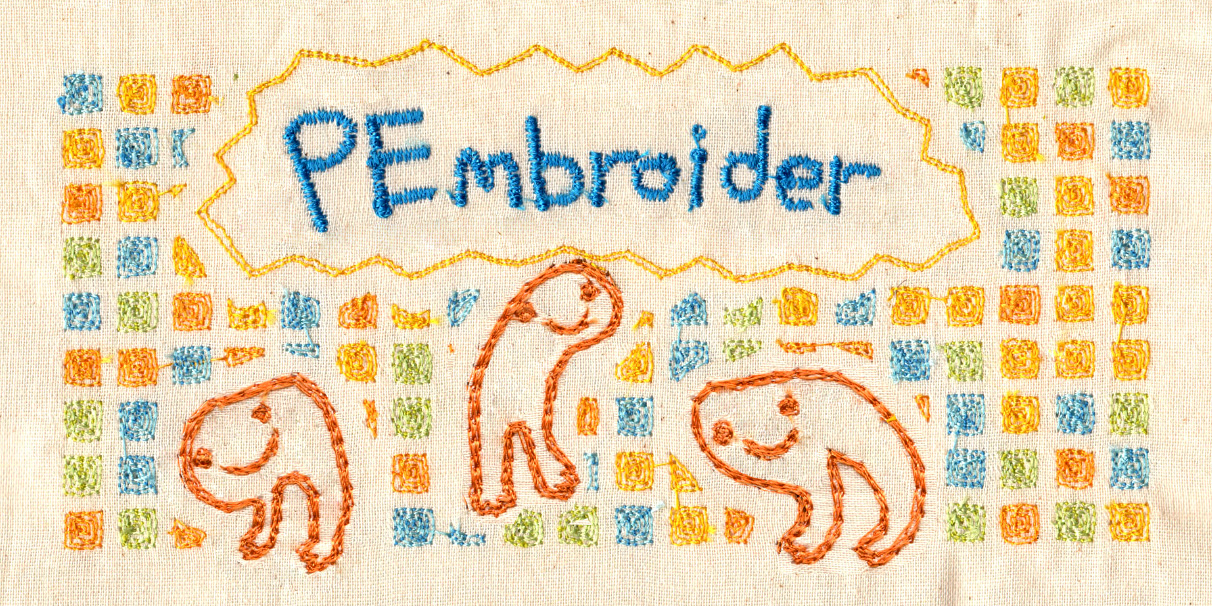
[PEmbroider](https://github.com/CreativeInquiry/PEmbroider) is an open-source library for embroidery design, maintained by CMU's [Studio for Creative Enquiry](http://studioforcreativeinquiry.org/). Designs are created using Processing code, particularly the Processing Drawing API which can be used to generate embroidery designs computationally. PEmbroider is well-documented online -- this tutorial page is here to point you to existing resources, and explain a couple of foibles with the software.
[](https://wiki.cci.arts.ac.uk/uploads/images/gallery/2022-01/D26wI1CnCDPEOnZi-image-1641469122783.png)
### Setup
Setup instructions are [here](https://github.com/CreativeInquiry/PEmbroider#getting-started-with-pembroider-in-processing). When running an example sketch, if you would like to use the design, make sure that it exports in the .PES file format, as this is the form used by the machine.
In the PEmbroider example files, the file format is always declared in the variable `outputFilePath`, normally in the `setup()` section of the code. So, to change this (e.g. in the example file PEmbroider_shape_hatching_experimental), from:
```
...
E = new PEmbroiderGraphics(this, width, height);
String outputFilePath = sketchPath("PEmbroider_shapes_hatching_experimental.vp3");
...
```
to:
```
...
E = new PEmbroiderGraphics(this, width, height);
String outputFilePath = sketchPath("PEmbroider_shapes_hatching_experimental.pes");
...
```
If you create a file in the wrong format, you can always re-run the code, but it is also possible to convert between different embroidery file formats online [here](https://htmtopdf.herokuapp.com/embroidery/).
## Using PEmbroider
The full API for PEmbroider is documented [here](https://github.com/CreativeInquiry/PEmbroider/blob/master/API.md).
#### Stitch size and spacing
Because of how Processing generates images, measurements are in _pixels_, not in _mm_ -- this can make it a bit trickier to compare with other pieces of software.
In my experience, the default stitches used in PEmbroider are very small and very dense, much moreso than the defaults used by Brother software. Partly, this is a matter of taste, however, when using finer or stretchier fabrics, such tight and dense stitches can cause puckering (and these designs also take a lot longer).
This is something that's best to test out yourself and adjust, but I have included the presets I use below as a guide:
```
PEmbroiderGraphics E;
...
void setup() {
...
E.strokeSpacing(2.0) // this spaces the stroke (outline) stitches by 2 pixels
E.hatchSpacing(3.0); // this spaces hatch (fill) stitches by 3 pixels
E.setStitch(5, 15, 0.0) // this sets minimum stitch to be 5px
// desirable stitch length to be 15px
// resample noise to be 0.0
...
}
```
(note: you set both the minimum and desired stitch length, as when embroidering curved shapes not all stitches will be the same length).
## Examples
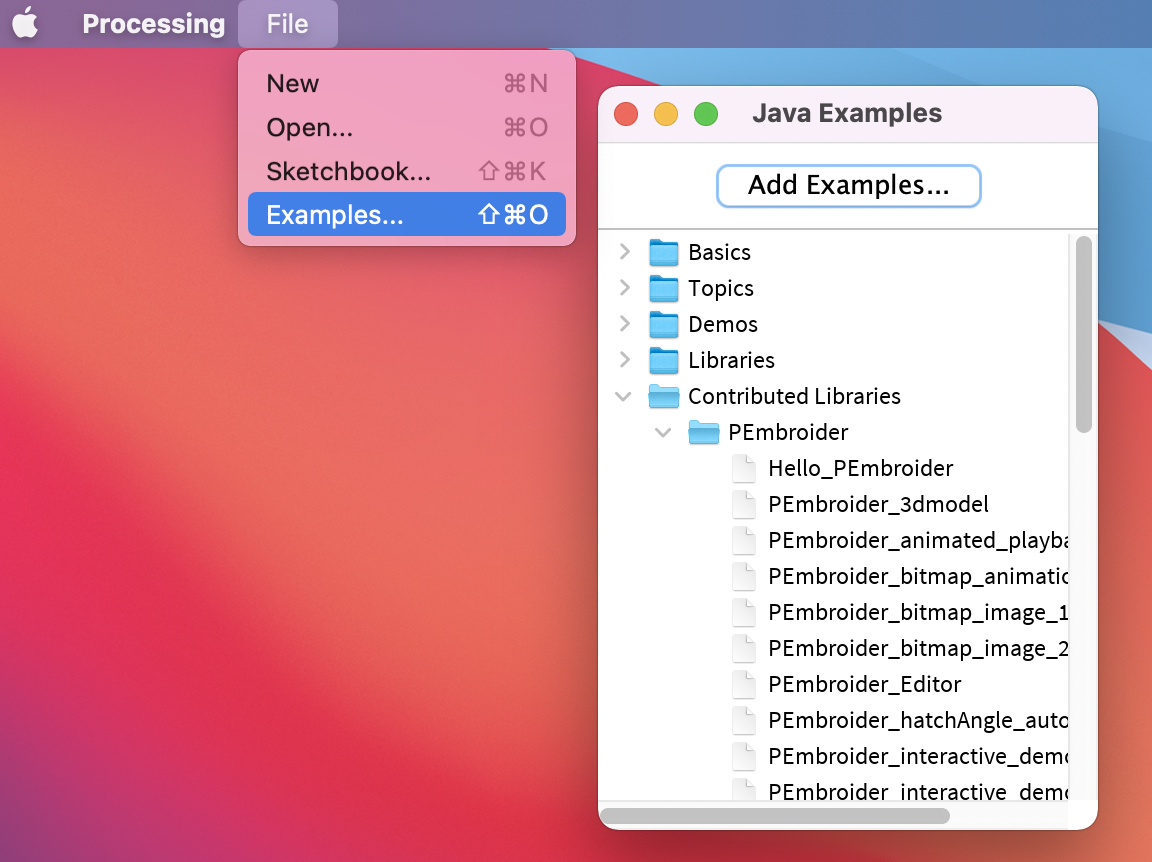
PEmbroider comes with a wide range of [examples](https://github.com/CreativeInquiry/PEmbroider/tree/master/examples), that give a good idea of a number of different features of the machine. These are also good things to modify if you want to test out different stitch lengths and densities. Once you have installed PEmbroider, these may be accessed through the Processing examples menu. Many of these have already been stitched on the Brother machine as demos, and can be found behind the machine.
[](https://wiki.cci.arts.ac.uk/uploads/images/gallery/2022-01/RxIvPoAGORqcdxXK-image-1641472397830-32-38.png)
I've included some additional examples below that make use of some of the affordances of programmatic stitch generation.
#### Creating pixellated designs
One thing that programs like PEmbroider are particularly well adapted for is designs where the stitches need to be very precisely laid-out. It's much harder to get stitches to do what you want in software like PE Design, where you can control the parameters but not the actual stitch placement.
One such use-case is creating pixellated designs -- below is an example image and code that I have used in the past, that demonstrates how to manipulate stitches on a grid basis.
```java
// PEmbroider script to stitch pixellated images
// author: Agnes Cameron
import processing.embroider.*;
PEmbroiderGraphics E;
void setup() {
size(1000, 1000);
noLoop();
// Load the bitmap image to embroider.
// Should consist of white shapes on a black background.
PImage myImage = loadImage("ken.gif");
// Create and configure the PEmbroider object, E
E = new PEmbroiderGraphics(this, 1000, 1000);
String outputFilePath = sketchPath("ken.pes");
E.setPath(outputFilePath);
// Initial setup of PEmbroider object.
E.beginDraw();
E.clear();
E.fill(0, 0, 0); // start the design at 0
E.noStroke();
// Parallel hatch
E.setStitch(5, 30, 0); //set the stitch to be the same size as the 'pixels'
E.hatchMode(PEmbroiderGraphics.PARALLEL);
E.hatchAngleDeg(0); // you want to set this to 0 for a 'pixel' effect -- default is angled
E.hatchSpacing(3.0); // this is nice and not overly dense
E.image(myImage, 0, 0);
// finishes the file and shows
E.optimize();
E.visualize(); // show the file
E.endDraw(); // write out the embroidery file
}
```
This code is created to run with a 1000x1000 .gif image, with a 'pixel' size (e.g. white squares) of
To run this code, create a folder called 'data' in the same folder as the processing file, and then save this image as 'ken.gif'. You can test this out with your own images, too.
[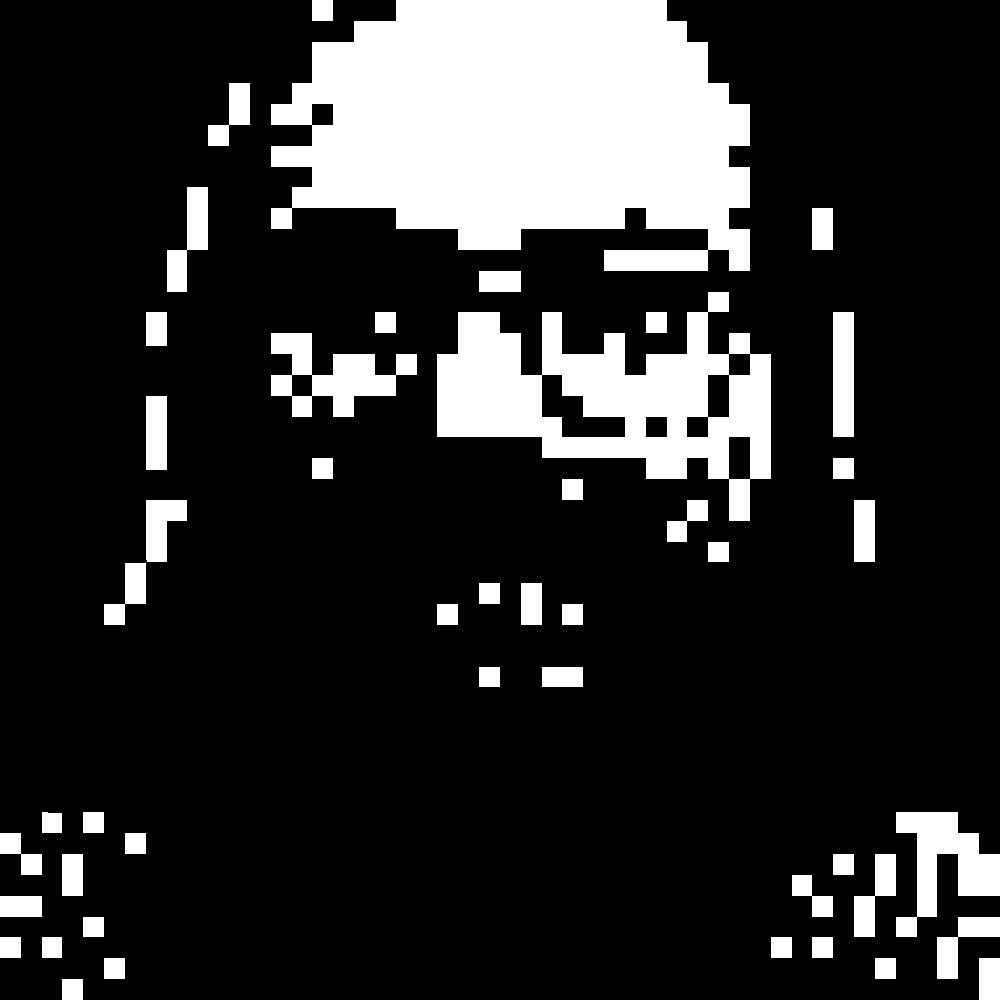](https://wiki.cci.arts.ac.uk/uploads/images/gallery/2022-01/WHpWjg0t4bJvs03D-image-1641471293163.gif)
The output should look something like this:
[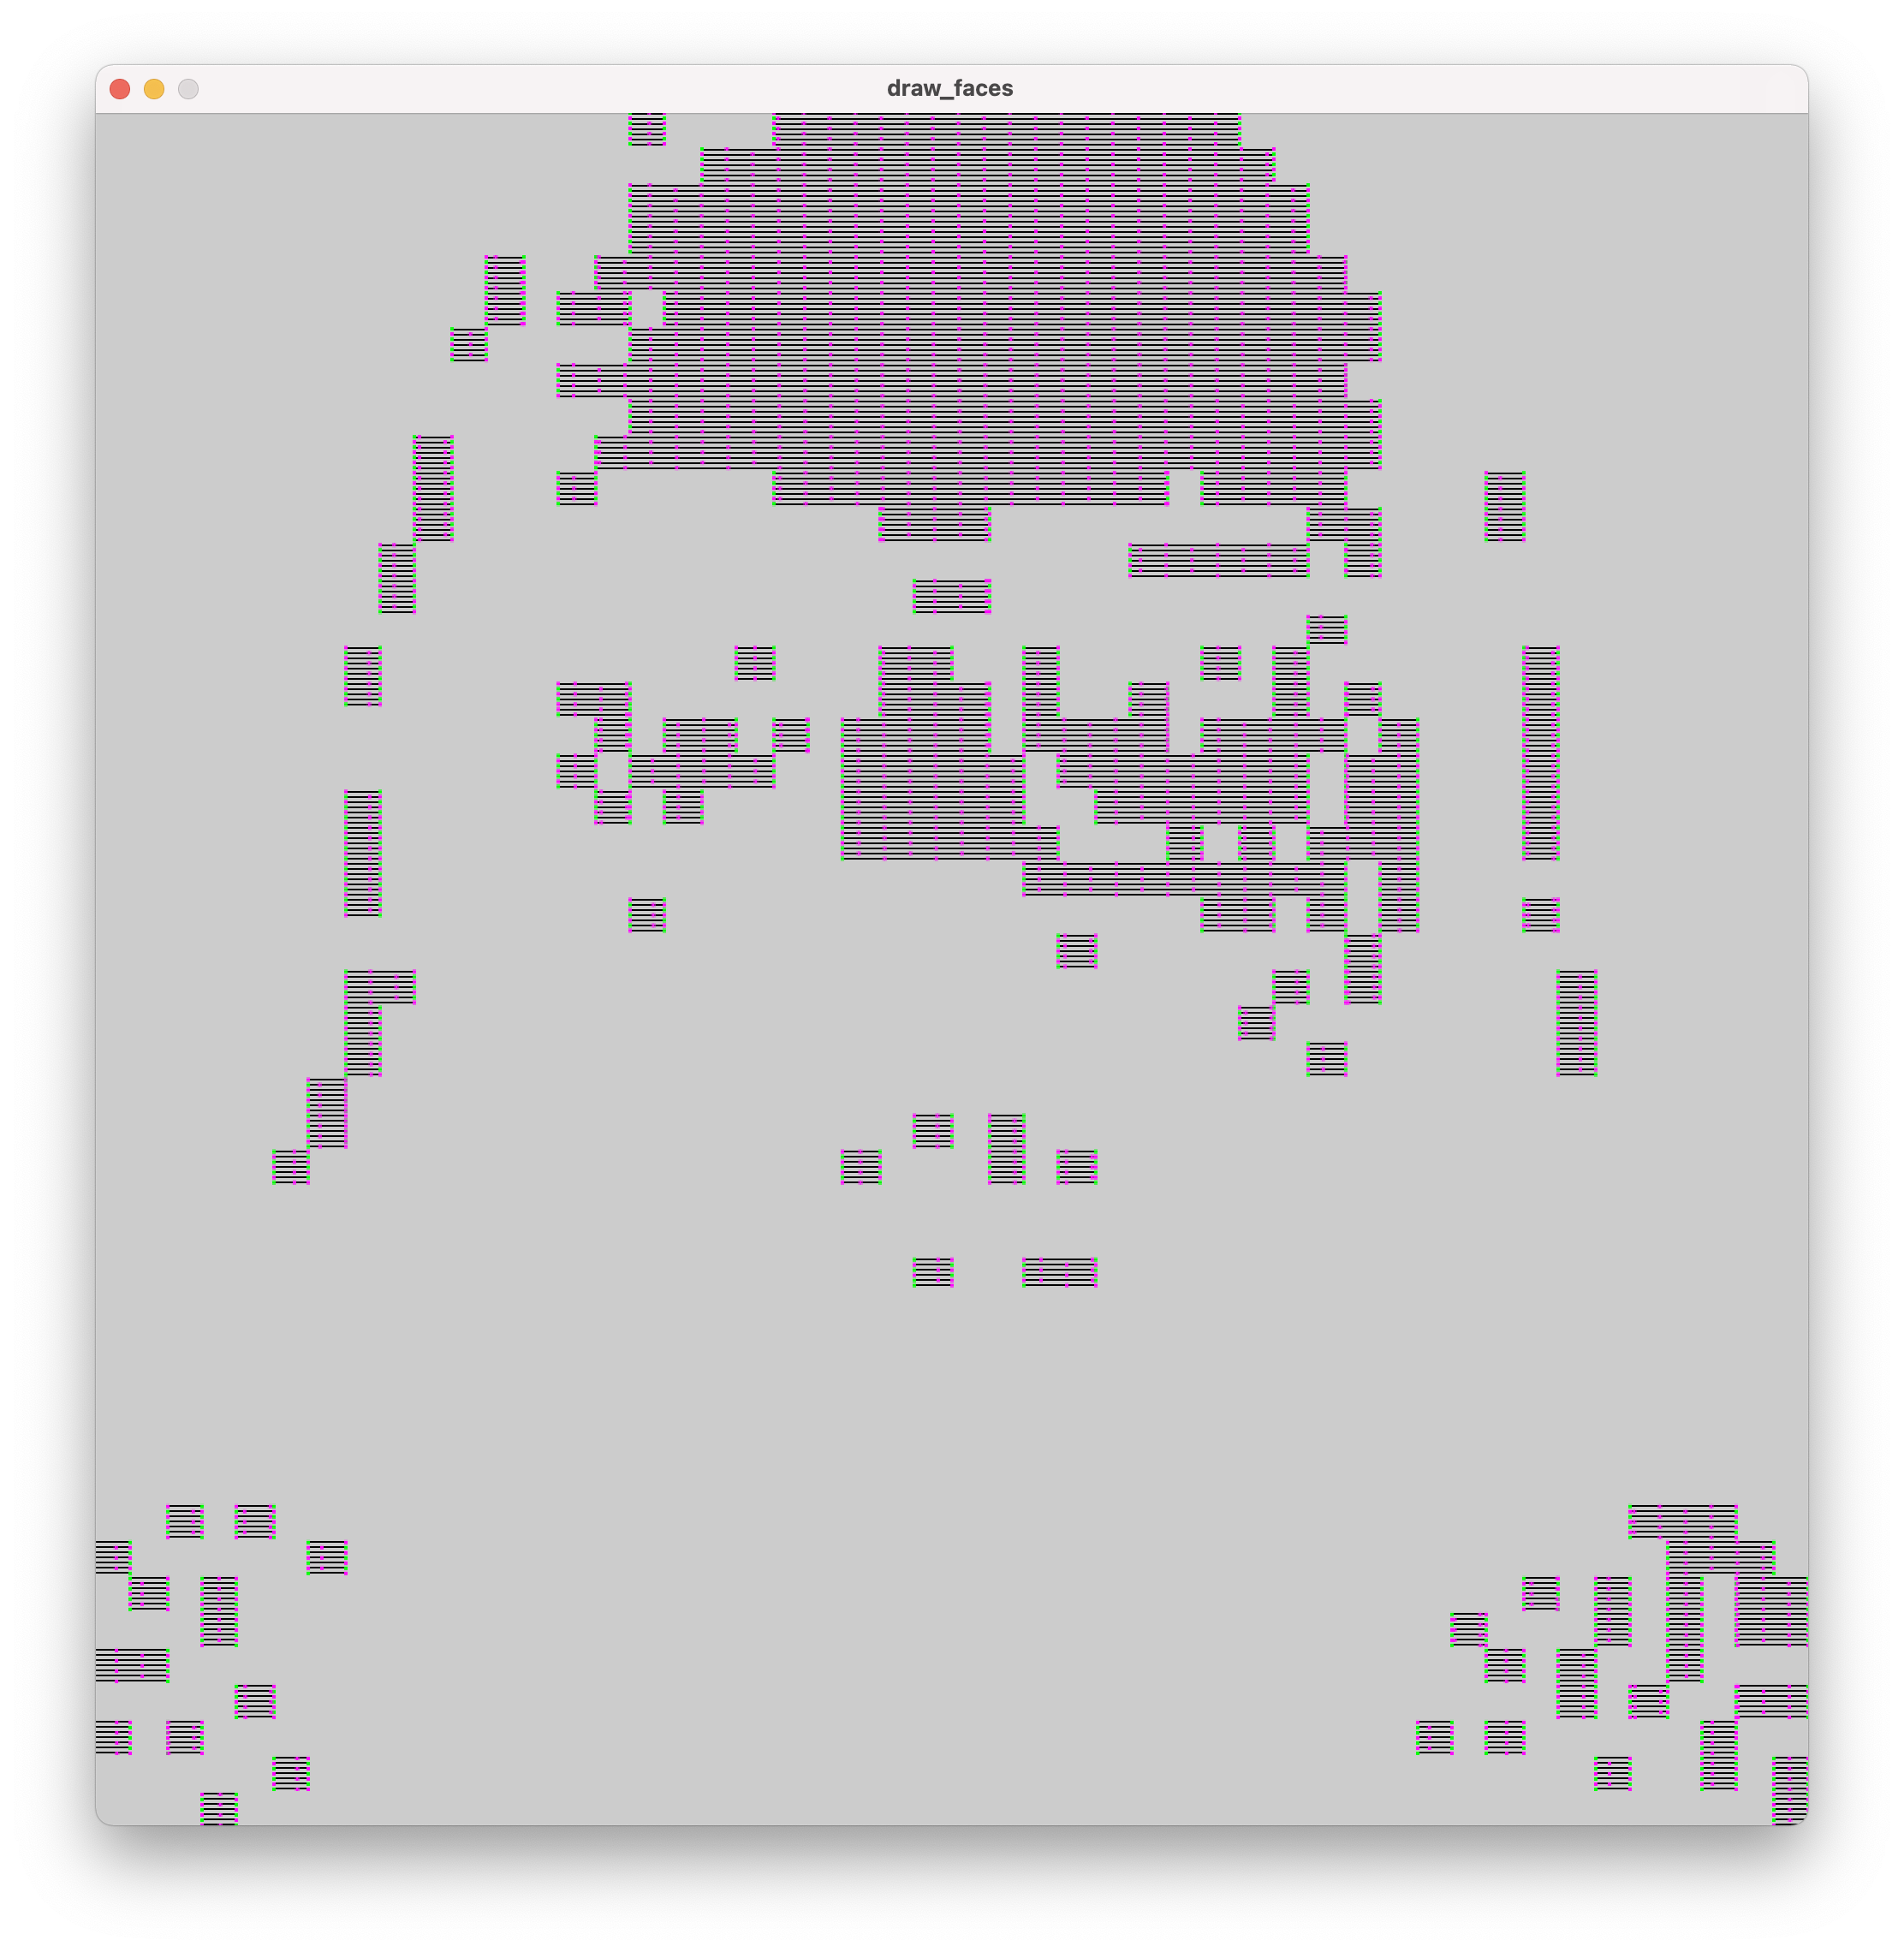](https://wiki.cci.arts.ac.uk/uploads/images/gallery/2022-01/dNZUbPPqH6poFvdf-image-1641471283217-14-38.png)
## Warnings and errors
#### Stitches are out of bounds
A common warning is this one: it occurs when you have a design that goes right to the edge of the canvas. In my experience, so long as the design looks OK to you, this is normally fine to ignore, but it's worth making sure that the the design looks right before embroidering.
[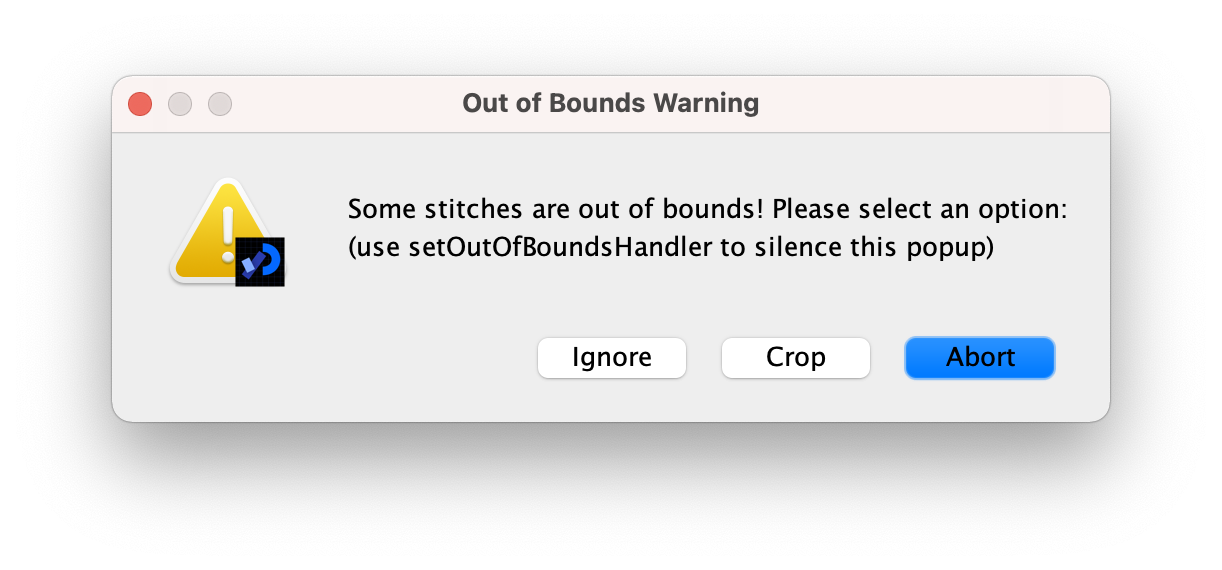](https://wiki.cci.arts.ac.uk/uploads/images/gallery/2022-01/GPiKQHgYDPnsBMS4-image-1641471375105-16-11.png)
#### Designs don't display on the Brother embroidery machine selection menu
This only applies to the selection menu: if you click into the file, the design should show up, and the information the machine gives you about the design's size (and corresponding hoops) should be correct. If this is an issue, you can use the machine to save a copy of the file, which will be recognisable: if you are embroidering multiple designs in one session, I would recommend either doing this or giving your files distinctive names to prevent confusion.
# Creating Digital Embroidery Designs with PE Design 11
coming soon :)
[](https://wiki.cci.arts.ac.uk/uploads/images/gallery/2022-01/8qttbBfDxvzvy09k-image-1641473069947.png)
# Workshop: Generative Embroidery with PEmbroider
This is the written version of an embroidery workshop in the CCI, and can either accompany the live workshop or be worked through by itself. As we go through the exercises, it's a good idea to have the [PEmbroider Cheat Sheet](https://github.com/CreativeInquiry/PEmbroider/blob/master/PEmbroider_Cheat_Sheet.md) open in a tab for reference. These notes are also heavily adapted from the cheat sheet. This workshop is based on [Carpentries](https://carpentries.org/) format, which means that participants should code alongside whoever is running it.
Copies of the files used for each of the exercises that can be downloaded [here](https://github.com/agnescameron/pembroider-workshop), but I'd recommend trying to generate the files yourself where possible.
## 1. Hello World: Drawing a Line
Follow the instructions [here](https://github.com/CreativeInquiry/PEmbroider#getting-started-with-pembroider-in-processing) to set up PEmbroider on your computer. You will need Processing 4. The first thing we will do in PEMbroider is draw a single line, which we can also use to test everything is working correctly.
### Template File
All files in PEmbroider have a similar structure, and the [cheat sheet](https://github.com/CreativeInquiry/PEmbroider/blob/master/PEmbroider_Cheat_Sheet.md) helpfully provides a template, which I've adapted slightly to match the file format we use in the CCI. We'll be using this as the basis for all the files in the workshop. This file draws a single line, but we can change that to anything we like.
```java
// Example PEmbroider program
import processing.embroider.*;
PEmbroiderGraphics E;
void setup() {
// Starting up:
noLoop();
size(600, 600);
E = new PEmbroiderGraphics(this, width, height);
// change this line you want a different file type
String outputFilePath = sketchPath("filename.pes");
E.setPath(outputFilePath);
E.beginDraw();
E.clear();
//-------
// Content goes here:
E.line(0, 0, 600, 600);
//----------
// Visualization and export:
// NOTE: Leave optimize() and endDraw() commented out,
// until you are ready to export the embroidery file!
// Don't forget to un-comment them when you want to export!
//
// E.optimize(); // VERY SLOW, but essential for file output!
E.visualize(true, true, false); // Display the embroidery path on-screen.
// E.endDraw(); // Actually writes out the embroidery file.
}
```
In order, this file:
* sets up a new canvas, of size 600x600 pixels
* tells the computer that it's an embroidery canvas, and sets an output file path
* draws a line on the canvas
* shows it to us (visualize) -- the `true, true, false` part tells the computer whether to draw colours, stitches and the routes taken by the machine. I prefer these settings but they can all be helpful
There are some other lines that are 'commented out' (have slashes in front of them) and don't run. These we might use later but for now we don't need to use them.
When you run this file, you should see an output that looks like this (if you *don't* see this, you will want to check over the setup steps again):
[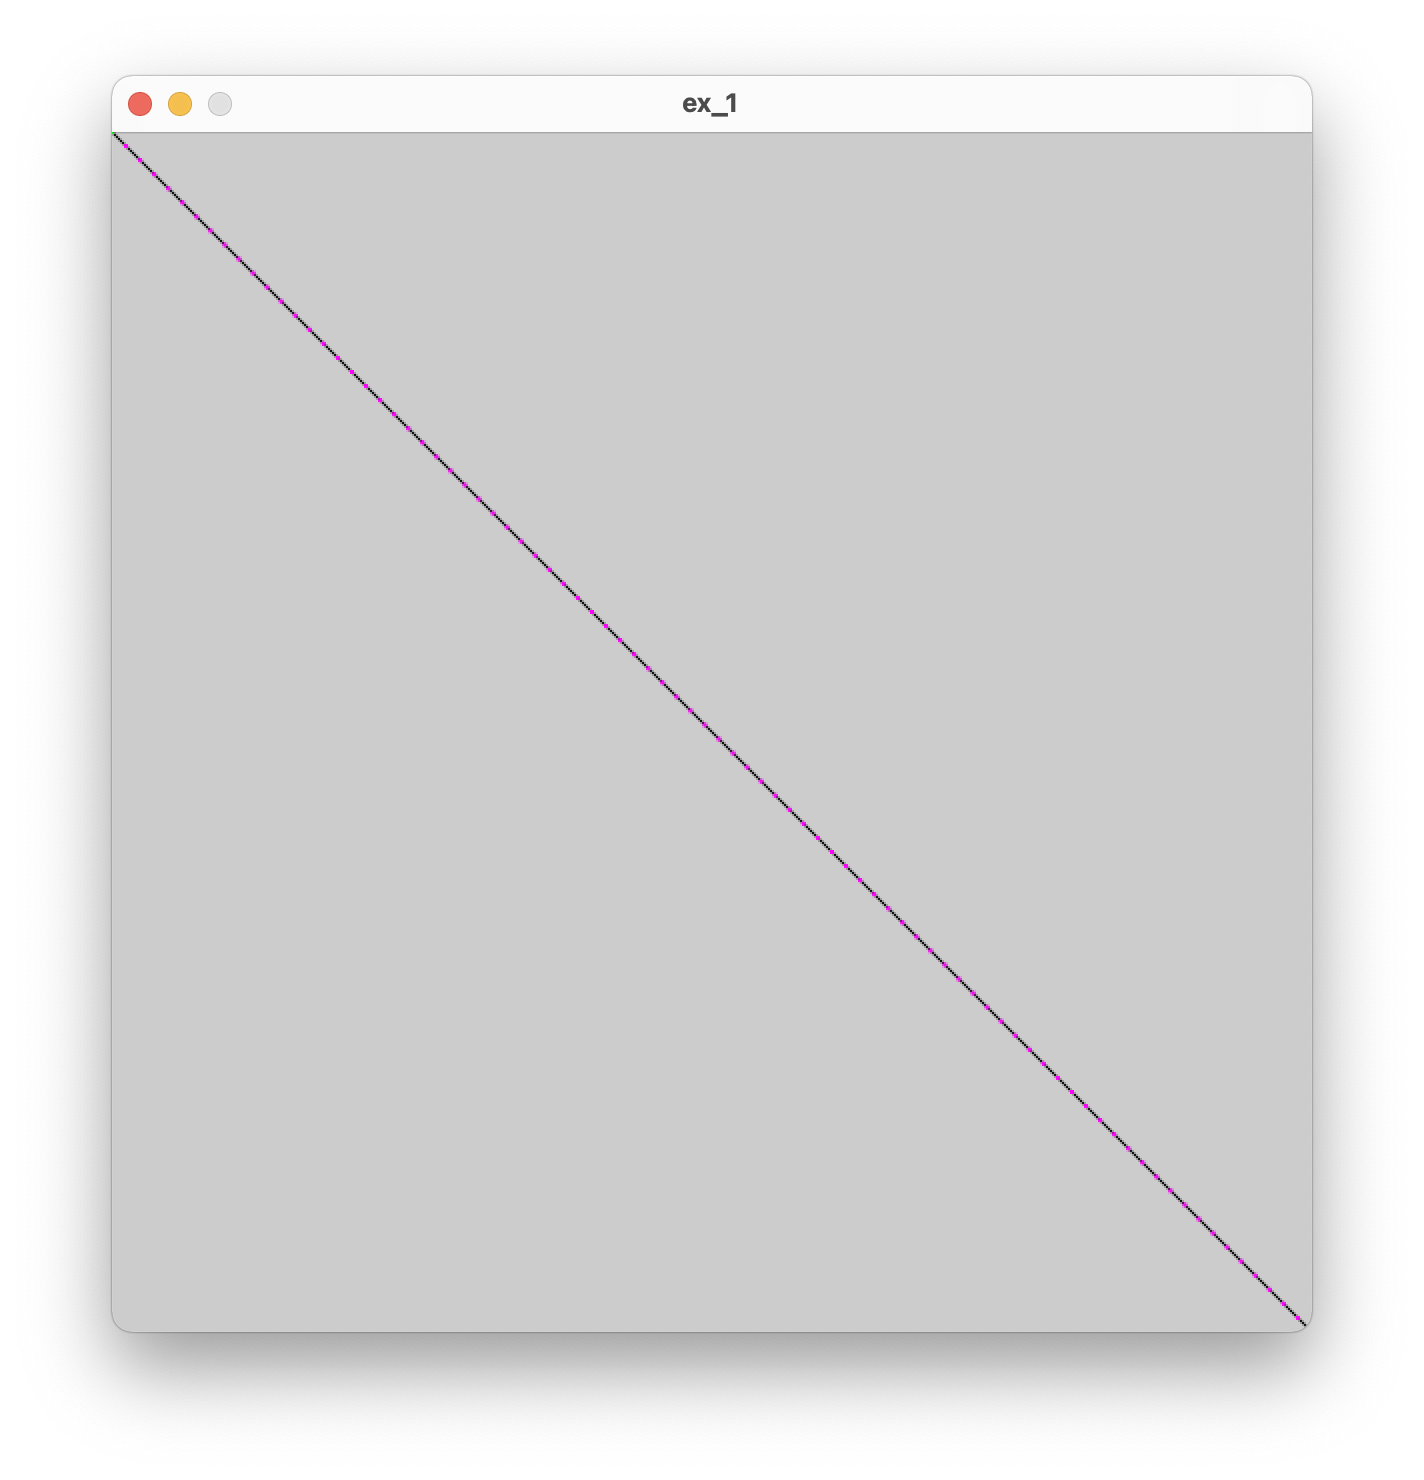](https://wiki.cci.arts.ac.uk/uploads/images/gallery/2022-08/oNeiDiDCFCcp0wjG-image-1660208322307-58-38.png)
The pink dots represent the ends of stitches, where the needle enters the fabric. Shortly we will experiment with different stitch types and lengths, but for now we are using the default settings.
The first thing we will look at is the structure of the canvas. If you like, you can also try 'commenting out' the content line, to just see a plain canvas.
#### Exercise 1.1
* Can you make the canvas larger?
* Can you make the canvas rectangular rather than square?
### Drawing lines
The PEmbroider code for drawing a line is:
```
E.line(x1, y1, x2, y2);
```
This means that (x1, y1) is the coordinates of the point where the line starts, and (x2, y2) is the point where the line ends. The `E.line()` part means "use the line function that belongs to PEmbroider, which is represented in our code by the letter E". We call this a 'method' In our code, we get a diagonal line because we draw from the point (0, 0) to the point (600, 600) (the edge of the canvas).
#### Exercise 1.2
* Can you make the line draw only halfway across the original canvas?
* Are you able to draw a vertical line? What about drawing 2 lines?
You might find these notes on [coordinate grids in Processing](https://py.processing.org/tutorials/drawing/) helpful here!
## 2. Playing with shapes
From now on, unless we're changing more of the file, I'm going to list just the 'content' code that we're changing, using `...` to represent the rest of the file. In our last exercise, the content was a single line -- the `E.line()` method -- but it can be more -- the important part is that it goes in the same place in the file each time.
Try changing out the line for a circle:
```
...
E.circle(200, 200, 200);
...
```
You should see a slightly off-center circle. In the documentation, the `E.circle()` method is listed as:
```
E.circle(x, y, r);
```
#### Exercise 2.1
* What do you think `r` represents in this method?
* Can you place the circle in the center of the canvas? What about a circle that fills the whole canvas?
* The PEmbroider method for drawing a rectangle is `E.rect(x, y, w, h);`. Can you replace the circle-drawing line with a line that draws a rectangle instead? What do you think `w` and `h` represent?
### Composite Shapes
PEmbroider also allows us to merge outlines to make composite shapes. This can quickly allow us to create more complex drawings. In this example, we merge together 2 circles:
```java
...
E.beginComposite();
E.composite.circle(320, 250, 200);
E.composite.circle(420, 250, 200);
E.endComposite();
...
```
#### Exercise 2.2
* Experiment with changing the size and the position of the circles. What happens when you make one of the circles very large?
* Try adding a third circle. Can you make a clover shape? What about a snowman?
* What happens when you move the line `E.composite.circle(420, 250, 200);` to after the line `E.endComposite();`? Why do you think that happened?
* Can you make a composite from a rectangle and a circle? Do you need to add anything to the original rectangle-drawing method?
* The PEmbroider method for drawing a triangle is `E.triangle(x1, y1, x2, y2, x3, y3);`. Can you make a composite shape from a triangle and a circle?
* Can you draw 2 separate composite shapes on the same canvas?
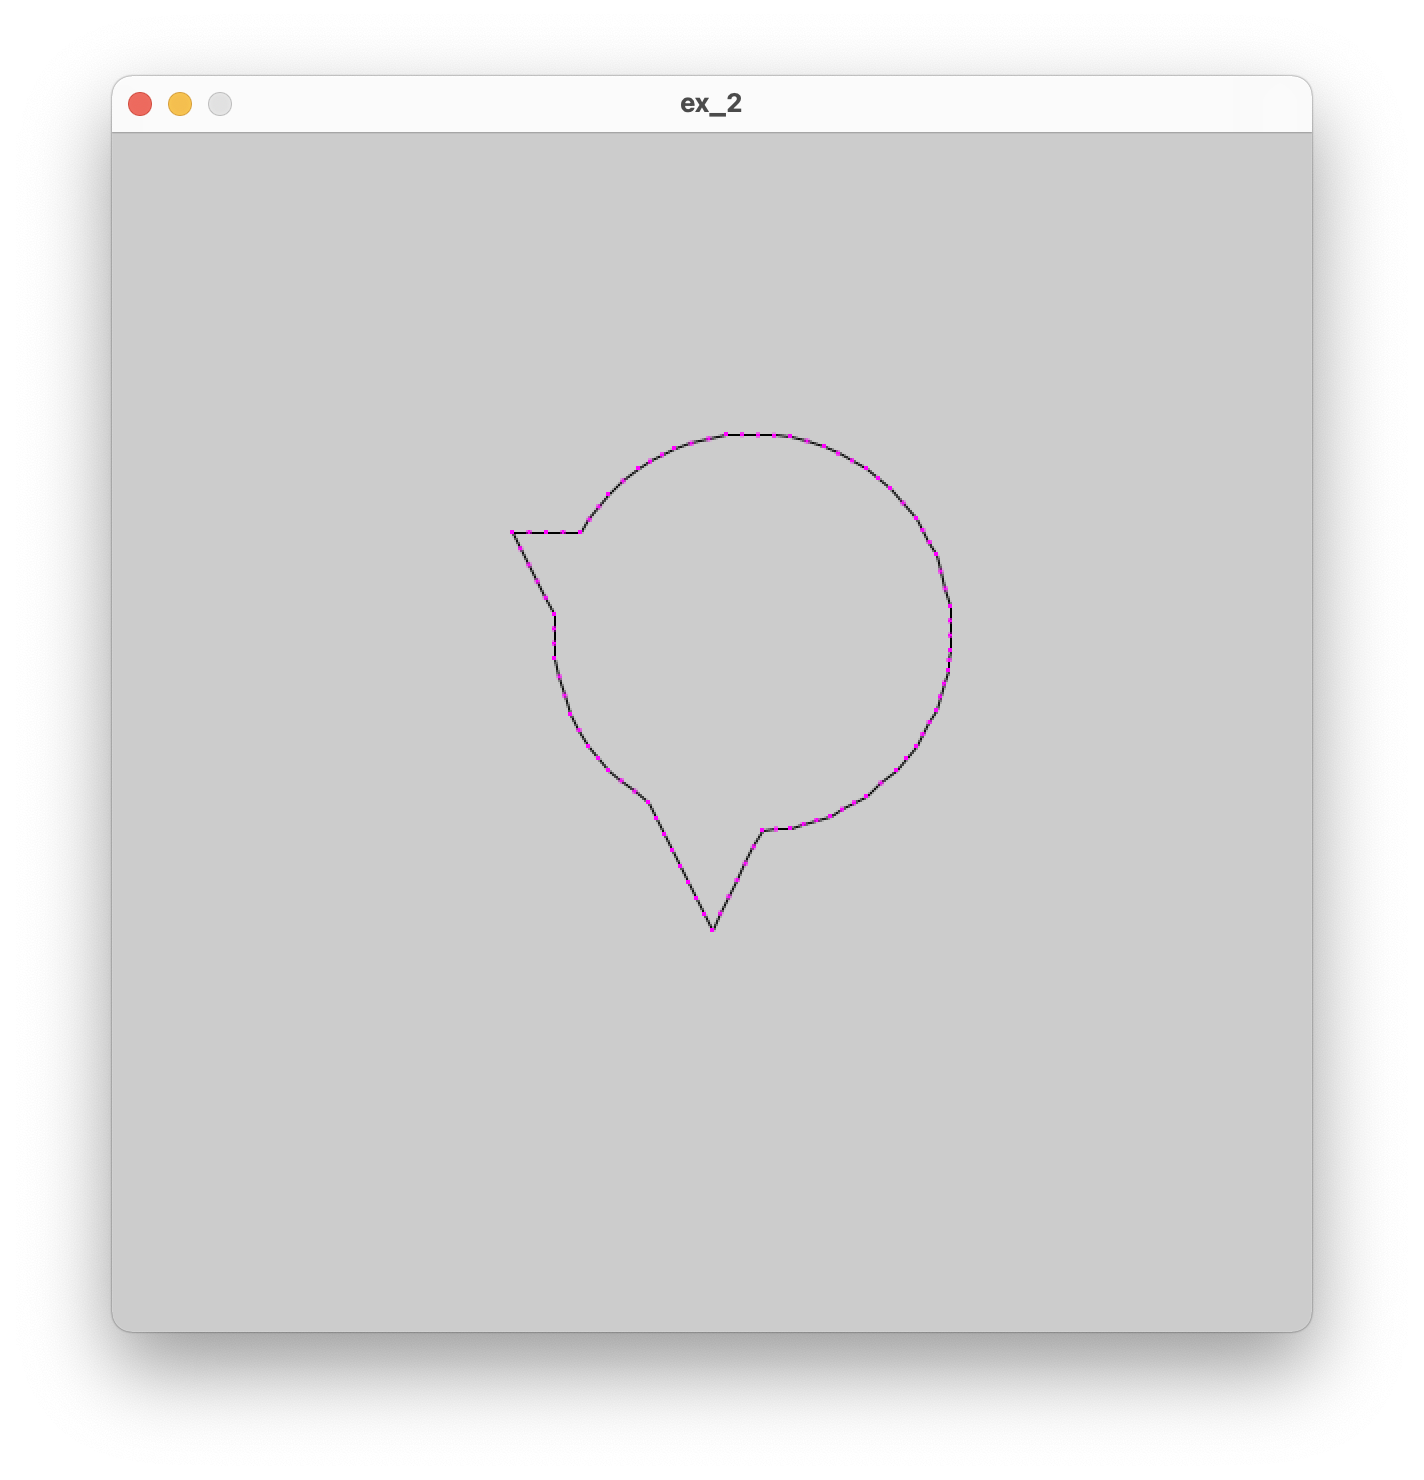
here's one I made earlier:
[](https://wiki.cci.arts.ac.uk/uploads/images/gallery/2022-08/B1zLemlZt1Dddj9O-image-1660213006241-16-43.png)
## 3. Fills and Hatching
Up until now, all the shapes we've been drawing have been outlines. PEmbroider supports several kinds of fills, which we will experiment with now. The way settings work in PEmbroider (and in Processing!) is that you set a bunch of settings, then draw the thing you want the settings to apply to, and then if you want to draw something with *different* settings, you change the settings and then draw the thing. For example, the order you'd do things if you wanted to draw a red square and a blue square would be:
```
> set fill to red
> draw square
> set fill to blue
> draw square
```
In our case, what this means is that if we add some code that adjusts the fill settings, this needs to go *before* the part where we draw our shape. Let's try drawing a filled circle:
```
...
E.hatchMode(E.PARALLEL);
E.fill(0,0,0);
E.circle(300, 300, 200);
...
```
### Fill Types
There are 6 different fill types in total in PEmbroider. These can each be set using the following lines of code:
```
E.hatchMode(E.CONCENTRIC);
E.hatchMode(E.PARALLEL);
E.hatchMode(E.SATIN);
E.hatchMode(E.SPIRAL);
E.hatchMode(E.PERLIN);
E.hatchMode(E.CROSS);
```
#### Exercise 3.1
* Instead of drawing a circle, try and fill one of the shapes you made in the last exercise
* One at a time, try out the different fill types on your shape. Which is your favourite?
### Fill Settings
As well as being able to change the type of fill, it's also possible to change the fill settings, namely the spacing of the fill lines, the colour of the fill, and the angle of the fill lines (for satin and parallel fills, where the lines have a prevailing angle).
We can do this using the same principles as before (e.g. putting the settings before the thing we want them to apply to). The methods to adjust the settings are listed below (note that we *always* need to specify a fill colour, even if it's just black):
```
E.hatchSpacing(spacing); // sets the density of adjacent runs (in machine units)
E.hatchAngleDeg(angle); // sets the orientation for SATIN & PARALLEL (in degrees)
E.fill(R, G, B); // sets your thread color (numbers between 0-255)
```
#### Exercise 3.2
* Try making one shape with a diagonal hatch fill, and another with a vertical fill. What happens when you place them on top of each other?
* What happens when you adjust spacing on concentric mode? What about Perlin mode?
* To un-set fill settings, you can use the line `E.noFill()`. Can you use this line to make some code that draws a filled shape, and then draws an outline shape afterward?
Another really important line is the `setStitch()` property. This sets the length of the stitch. Unlike hatch spacing, setStitch takes 3 arguments:
```
E.setStitch(minLength, desiredLength, noise);
```
* minLength: the shortest the stitch can possibly be
* desiredLength: what length most stitches should be
* noise: how much this should vary (e.g. should the stitches be very even). The noise property changes the texture of fills significantly.
#### Exercise 3.3
* experiment with modifying the stitch lengths in your fills
## 4. Stroke and Stitch Settings
The final group of settings we're going to look at is modifying the stroke (line) style. Similarly to fills, you need to modify the settings before drawing your line.
There are 2 stroke types in PEmbroider; tangent is the one we've been using by default, but perpendicular can be used to get a thicker, more defined outline.
```
E.strokeMode(E.PERPENDICULAR); // Stitches are perpendicular to the stroke
E.strokeMode(E.TANGENT); // Stitches go in the same direction as stroke
```
As before, stroke color can be set using RGB values. The other settings are the thickness of the line (stroke weight) and the stroke spacing (e.g. for perpendicular strokes).
```
E.stroke(R, G, B); // sets the stroke color, just like Processing.
E.strokeWeight(width); // sets the thickness of the stroke (in machine units)
E.strokeSpacing(spacing); // sets the density of the hatching within the stroke
```
#### Exercise 4.1
* create a file with 4 different lines, each with different stroke settings. How much variation can you get?
## 5. Loops and Randomness
Now we have a good idea of what you can do with PEmbroider's API, we can try out some generative code.
### For loops
For loops are structures that allow the same piece of code to be repeated multiple times with different inputs. We will have a go with them here, but for a full tutorial it's worth going through this page on [for loops in Processing](https://happycoding.io/tutorials/processing/for-loops).
We're going to try out a for loop that repeatedly draws lines on the canvas, changing the position of the line each time it draws.
```
...
for (int i = 1; i < 10; i++) {
E.line(50, i*50, 550, i*50);
}
...
```
In this code, we create a number, `i`, that will go from 1 to 10, increasing every time. The first time the code runs, `i` is equal to 1, and so `i*50=50`. The next time, `i=2`, so `i*50=100`, and so on, up till `i` reaches 9. `i` cannot reach 10 (as the code will only run for i<10) and so the for loop ends.
#### Exercise 5.1
* What happens when the number multiplying `i` is different for `y1` and `y2`?
* Can you make a series of vertical lines instead of horizontal lines by changing where `i` is used?
* Can you draw a grid?
* What happens when you increase and decrease the number of repeats (e.g. the number 10 in the example)
* Experiment with using `i` in different positions. What happens when you add or subtract it (or multiples of it)? Can you make a radial pattern?
### Random numbers
Another very useful tool for making generative patterns is randomness. Unlike the code we were using before (which used scaled variations where we could predict what the outcome would be), randomness adds an element of chance. In Processing, the function `random(50)` will return a random number between 0-50. This number will be a decimal (float) rather than a whole number (int), so if we want to use it like a whole number we also need to use the `int()` method.
```
...
for (int i = 1; i < 10; i++) {
E.circle(50 + i*50, 100, int(random(50)));
}
...
```
#### Exercise 5.2
* Run this code a few times. What do you notice? What is being randomly varied?
* What happens when you add a number to the random number? What if you multiply it by something?
* Can you make the randomness affect the y position?
### Nesting for loops
The last thing we will look at is using 2 nested for loops to create 2D designs. This isn't the only way to achieve this -- remember the grids from exercise 5.1 -- but this will help us a lot.
Before we get there, we could also look at what happens when we nest for loops *inside other things*, in this case, the composite shapes code from before.
```
...
E.beginComposite();
for (int i = 1; i < 10; i++) {
E.composite.circle(50 + i*50, 100, 50 + int(random(50)));
}
E.endComposite();
...
```
By putting the for loop *inside* `E.beginComposite();` and `E.endComposite();`, it's the same (from the point of view of the computer) as writing 10 separate composite circle lines, but for us it's a whole lot quicker.
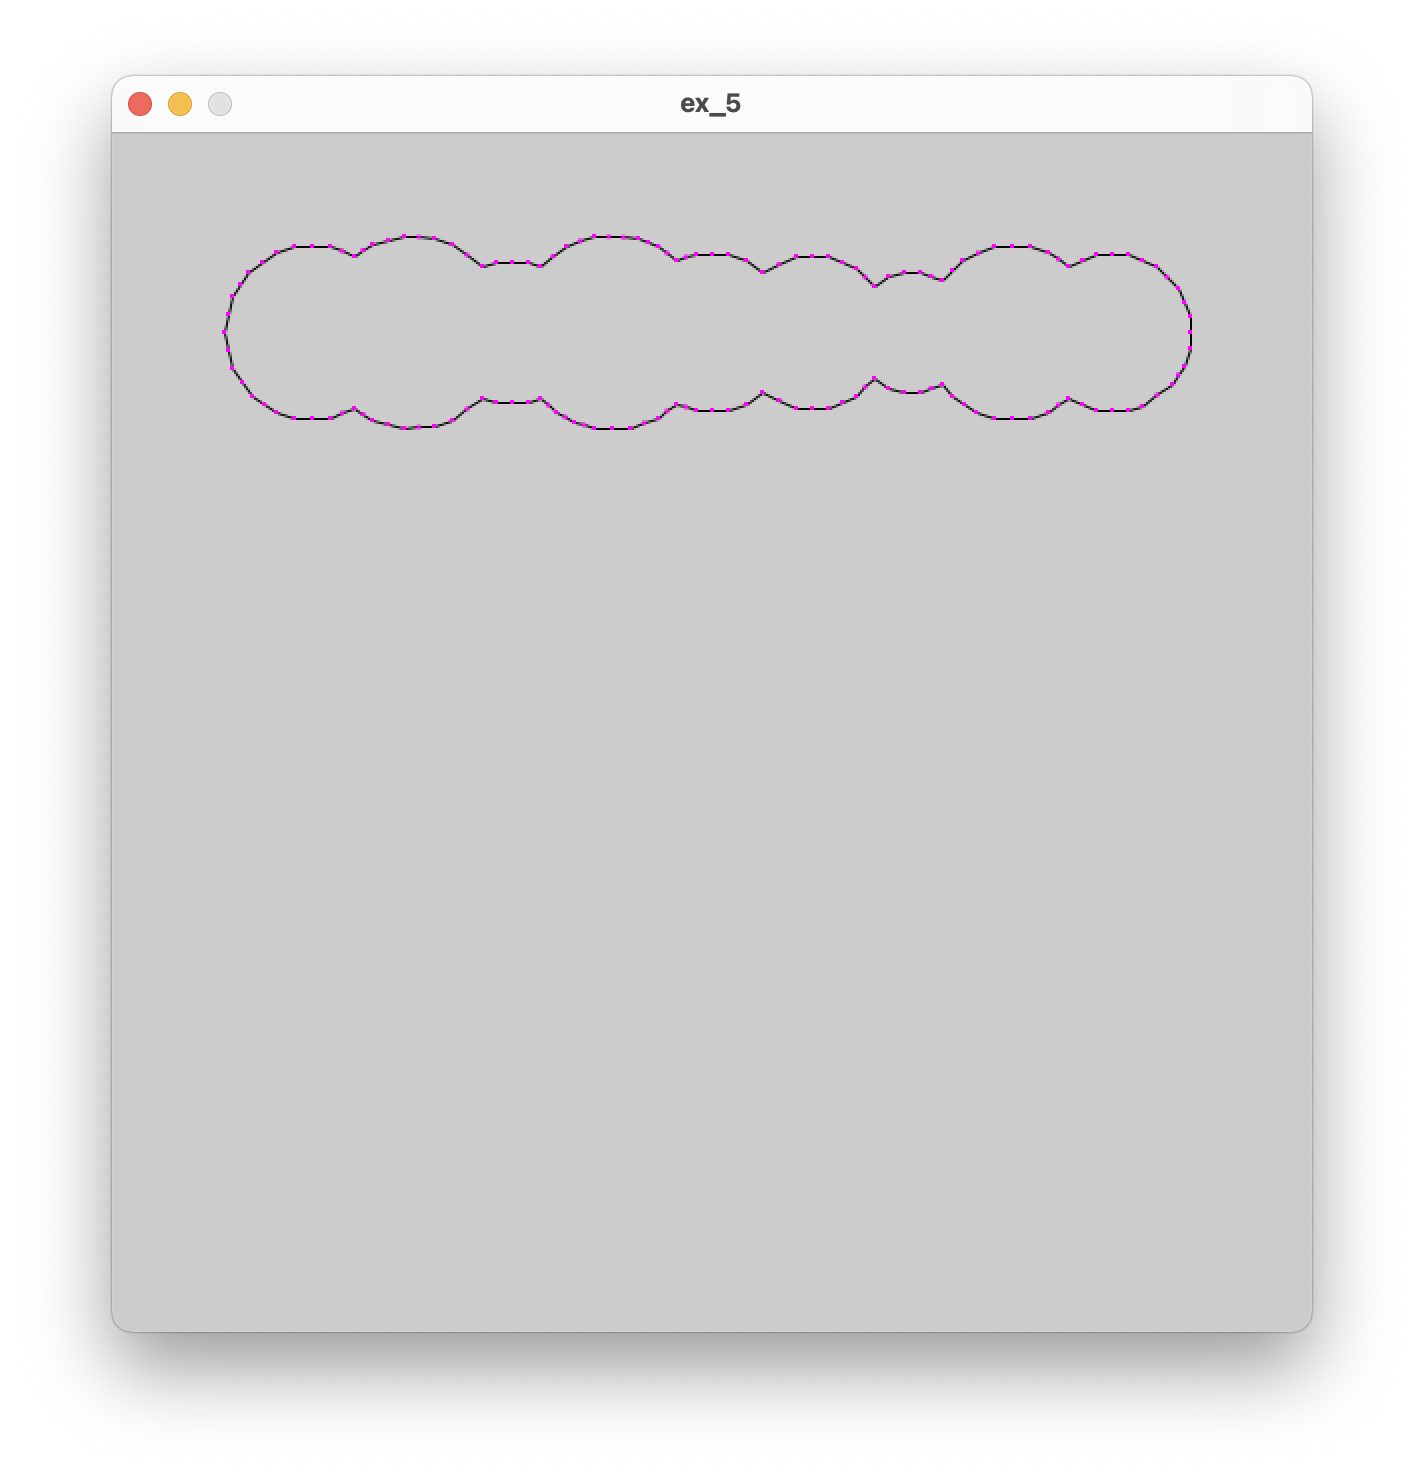
and look! A beautiful worm:
[](https://wiki.cci.arts.ac.uk/uploads/images/gallery/2022-08/9BYuJanjgl31Njzx-image-1660229200690-46-37.png)
We can use the same principle to put one for loop inside another:
```
for (int i = 1; i < 10; i++) {
for (int j = 1; j < 10; j++) {
E.circle(i*50, j*50, 50 + int(random(50)));
}
}
```
Now we get a whole grid of circles!
#### Exercise 5.3
* You can also use `random(-60, 60)` to generate a number that can be positive or negative. Try using this in one of the position values.
* Have a go at making these circles into a composite shape. What happens when you change the numbers that are multiplied and added? Have a go at playing with these till you get an image that you like.
* Can you do this with a different shape? What about triangles?
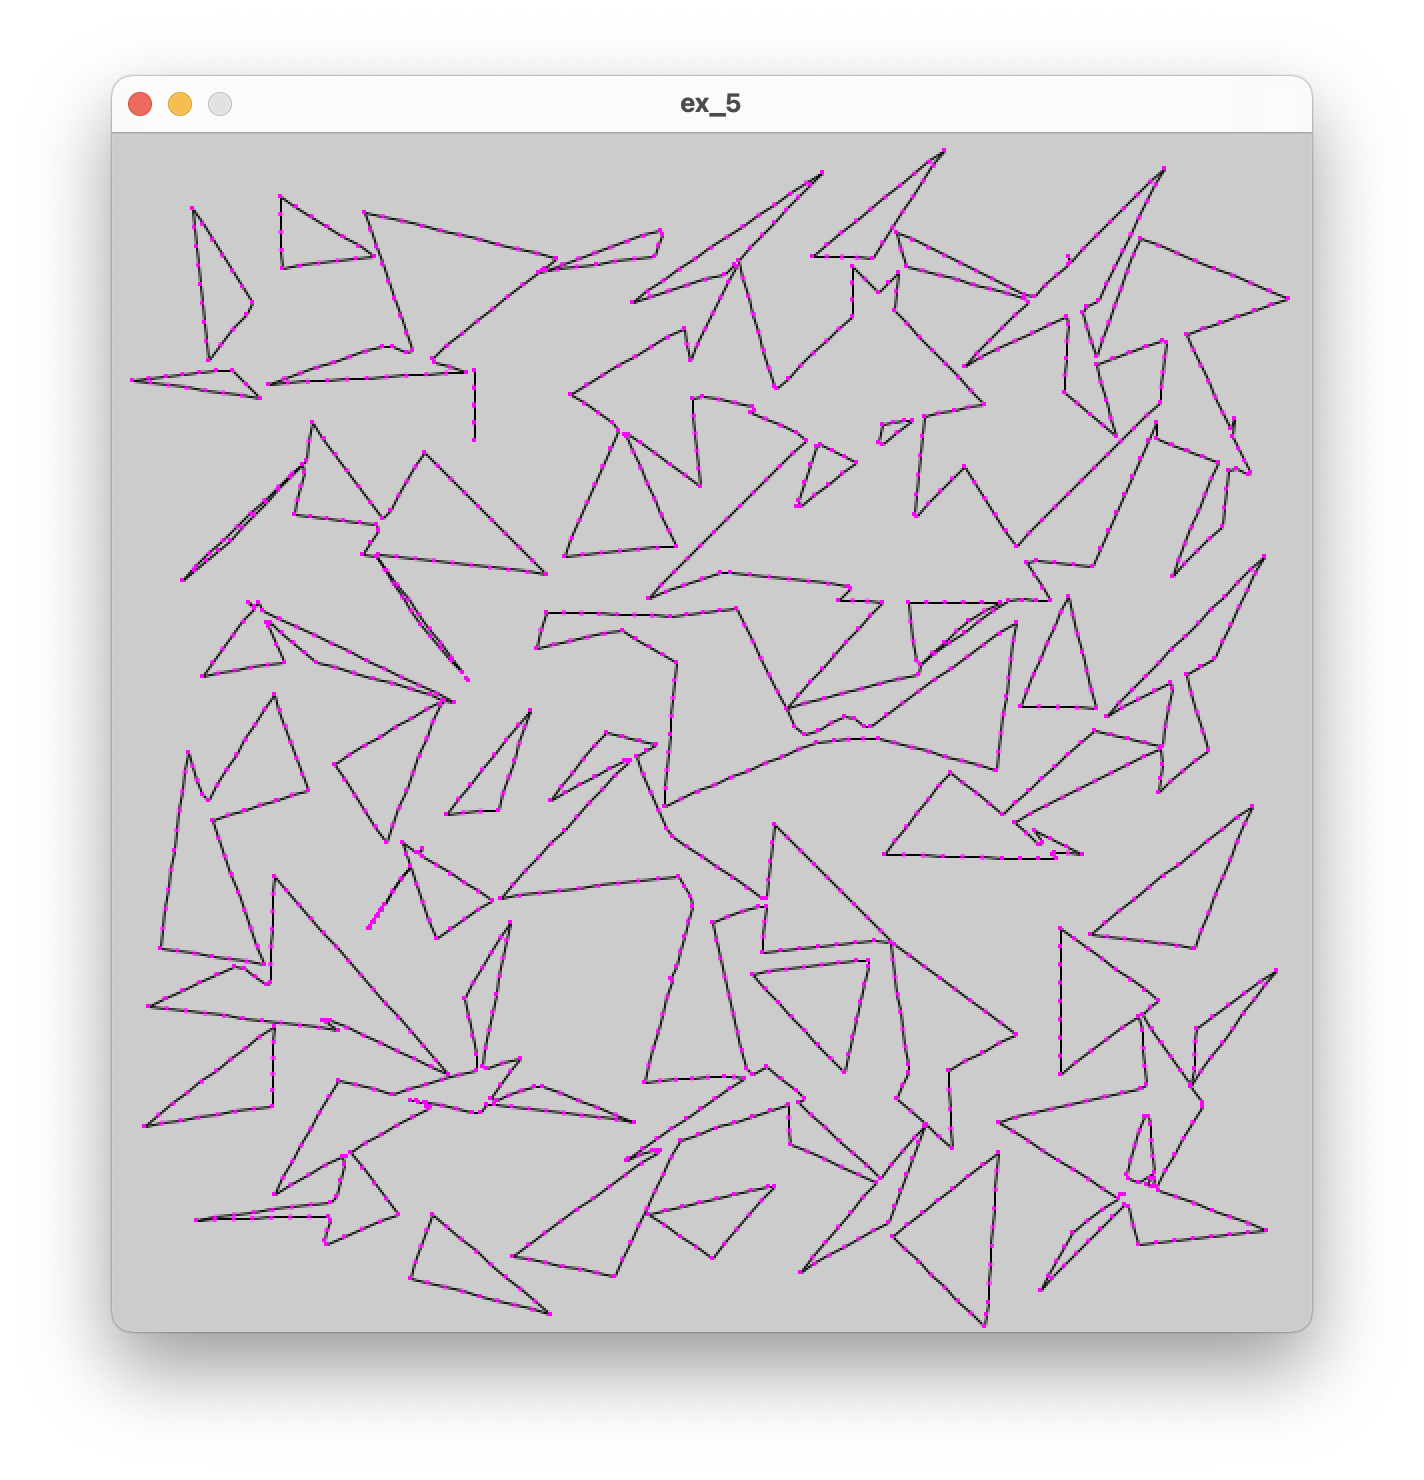
Here's one I made earlier:
[](https://wiki.cci.arts.ac.uk/uploads/images/gallery/2022-08/EFBLrrMZUYEnEysD-image-1660230369677-06-05.png)
## 6. Polylines and curves
As well as having preset shapes, PEmbroider (like Processing) supports making custom shapes by defining a set of points along a line. To start one of these shapes, you need to bookend the line with:
```
E.beginShape();
// ...points
E.endShape();
```
If the final co-ordinate matches the first co-ordinate, we can also fill the shape: if not, it's just a stroke. Polylines are also great as within the line the machine doesn't need to make a jump; this is helpful for avoiding too many floats later on.
Each point on the line is given by `E.vertex(x, y)`, a single point in space. To draw a spiky shape, we can draw a bunch of points:
```
E.beginShape();
E.vertex(10,10);
E.vertex(500,50);
E.vertex(450,250);
E.vertex(350,140);
E.vertex(200,300);
E.vertex(10,10);
E.endShape();
```
#### Exercise 6.1
* Have a go at making a shape of your own: can you make a 5-pointed star? Can you add a fill?
### Curves
There are a number of different ways to render curves in Processing, which inherit from the different curve-drawing techniques in computer graphics. These are: arcs, splines and Bézier curves. The Processing [curves tutorial](https://processing.org/tutorials/curves) has a good summary of this:
* Use `arc()` when you need a segment of a circle or an ellipse. You can't make continuous arcs or use them as part of a shape.
* Use `curve()` (the spline function) when you need a small curve between two points. Use `curveVertex()` to make a continuous series of curves as part of a shape.
* Use `bezier()` when you need long, smooth curves. Use `bezierVertex()` to make a continuous series of Bézier curves as part of a shape.
The [tutorial](https://processing.org/tutorials/curves) gives a great overview of the different types and I'd recommend experimenting with all of them.
## 7. Generating embroidery from data
Processing allows data to be loaded in CSV and JSON formats. For this exercise, we're going to use NASA's [Land Ocean Surface Temperature](https://data.giss.nasa.gov/gistemp/graphs/graph_data/Global_Mean_Estimates_based_on_Land_and_Ocean_Data/graph.txt) dataset, which gives the mean global temperature since 1880 till present-day. To do this task, I have created a folder called `datasets` within the processing sketch folder, and created a file inside that called `temp.csv`.
First, make an empty sketch and try to read in the data from the .csv file:
```
Table table;
void setup() {
table = loadTable("datasets/temp.csv", "header");
println(table.getRowCount() + " total rows in table");
for (TableRow row : table.rows()) {
int year = row.getInt("year");
float temp = row.getFloat("unsmoothed");
println("year " + year + " temp " + temp);
}
}
```
You should see the data from the csv printed to the terminal.
The for loop that starts `for (TableRow row : table.rows()) ` is where we're going to use our values. First, we can try a simple example of drawing circles for each entry in the table, with the radius proportional to the temperature. As some temperature values are negative, we will need to adjust these up.
We want to add the embroidery template setup before the table is created (and also `E.optimize()`) after! To draw our circle, we can add directly to the for loop:
```
...
for (TableRow row : table.rows()) {
int year = row.getInt("year");
float temp = row.getFloat("unsmoothed");
float radius = (temp + 1.0)*45;
E.circle(100, 100, radius);
}
...
```
This code will create all the circles drawn in the same place. Ideally we'd like to space them out! We can do this by adding a counter:
```
...
int counter = 0;
for (TableRow row : table.rows()) {
int year = row.getInt("year");
float temp = row.getFloat("unsmoothed");
float radius = (temp + 1.0)*45;
E.circle(100, counter*20, radius);
counter = counter + 1;
}
...
```
### 7.1 Creating a grid from linear data
An issue we have here is that the data comes as one long list, which makes it hard to generate a tractable embroidery file. There are a number of ways around this, one of which is to use the modulo operator. This gives you the remainder when a number is divided by another number. This means, we can define a row length and count along our dataset in rows.
```
...
int counter=0;
int rowLength = 13;
int spacing = round(900/(rowLength));
for (TableRow row : table.rows()) {
int i = counter % rowLength;
int j = floor(num/rowLength);
int year = row.getInt("year");
float temp = row.getFloat("unsmoothed");
float radius = (temp + 1.0)*45;
E.circle((i+1)*spacing, (j+1)*spacing, radius);
counter=counter+1;
}
...
```
## 8. Tips, notes, further reading and extension exercises
We've scratched the surface of PEmbroider's [full capabilities](https://github.com/CreativeInquiry/PEmbroider/blob/master/API.md), which include things like image imports, interpolation, clipping and more.
### 8.1 Saving files + naming
To save the file as an embroidery file, you need to
```
String outputFilePath = sketchPath("triangles" + str(int(random(0, 100))) + ".pes");
```
### 8.2 Scale, density and stitch sizing
I personally find PEmbroider's presets a bit dense, and think they make for quite tough-feeling embroidery. My main recommendation is to make a sample sheet where you experiment with different fill densities, stitch lengths and stroke widths till you find some you like, but failing that, my defaults are:
```
E.strokeSpacing(2.0) // this spaces the stroke (outline) stitches by 2 pixels
E.hatchSpacing(3.0); // this spaces hatch (fill) stitches by 3 pixels
E.setStitch(5, 30, 0.0) // this sets minimum stitch to be 5px
```
If you want to use these throughout, just stick this above the 'content' section of your file.
### Extension exercises
* Have a go at using randomness to control the fill, colour, and spacing properties of different shapes.
* Take a look at the `shape_culling` example in the PEmbroider examples folder. Have a go at using your favourite of the culling options on different overlapping shapes. Can you add composite shapes to their code? How do they compare?
* Take a look at the `hatchangle_auto` demo. What lines are they using to follow the mouse? Could you use those numbers to generate other things?
# Digital Knitting Machine
We have a Silver Reed SK840 Knitting Machine which can be programmed to create custom knitted pieces. Students must complete an induction (or demonstrate existing ability to use a knit machine) in order to use this machine. Inductions last 3 hours, and give a full overview of basic technique.
These are bookable on ORB here. Please only book an induction if you are definitely want to use the machine, you are available to attend for the entire time, and you can commit to practicing using the machine for at least 3 hours in the week following. If you have questions about the machine and are not sure whether you want to use it for a project, you can book a technical tutorial with Agnes to discuss.
# Using the Silver Reed SK840 Knitting Machine
## Overview
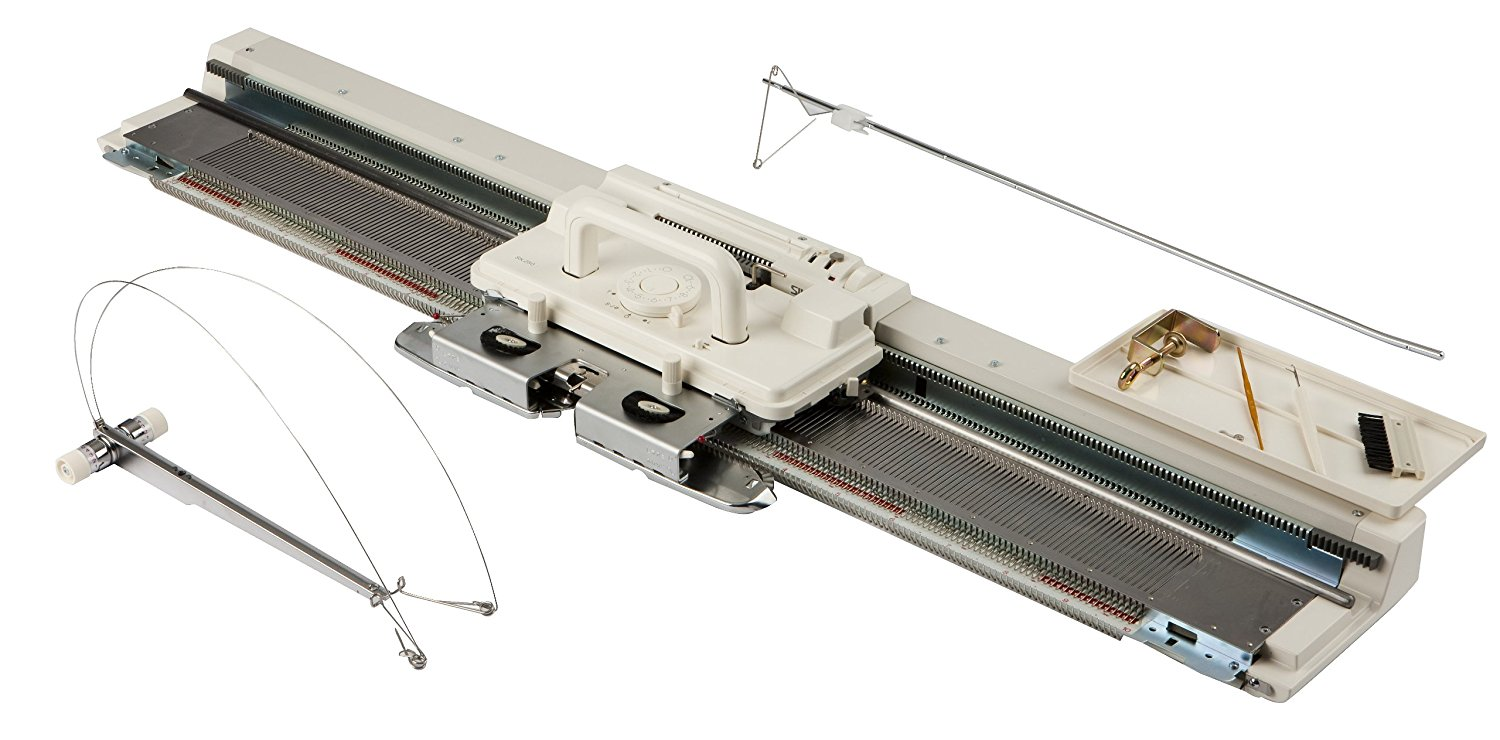
The Silver Reed SK840 knitting machine is a 4.5mm standard-gague knitting machine that is intended for use with 3- and 4-ply yarns. The Silver Reed manual is available online [here](https://arena-attachments.s3.amazonaws.com/14590318/cd3b44ac53cd77ecfe1e746a095bc902.pdf?1641463478), and we have a paper copy in the workshop (as the online copy is poorly digitised, we will also make a better copy soon). You must be trained by a member of staff (currently, ask Agnes) before using the machine -- this guide is here for reference and troubleshooting.
[](https://wiki.cci.arts.ac.uk/uploads/images/gallery/2022-01/J8OydtGuPPpT5DpR-image-1641402097682.png)
The SK840 is a domestic knitting machine, and requires some manual input to operate. Fully-automated machines are normally referred to as 'industrial' knitting machines, to differentiate them from their domestic equivalents. Despite the lack of full automation, domestic knitting machines are often used in fashion for prototyping and designing new textiles. To learn more about industrial machines, [this video](https://www.youtube.com/watch?v=H0pxhgNPgU0) gives an overview of common types, and [this video](https://www.youtube.com/watch?v=U1bk4ZI0Qvc) is a good intro guide to knitting in general. If you want to look deeper into industrial knitting principles, the Indian Institute of Technology's textile technology department has a [whole lecture series](https://www.youtube.com/watch?v=tbpYiWEWuLo) online that's very clear and gives a great amount of detail.
# Learning Machine Knitting
This post is _not_ a detailed tutorial, but instead should serve as an introduction to the capabilities of our machine, an idea of different avenues to explore, and an overview of the steps involved in creating knitted textiles in the CCI. Machine knitting is detailed and complex, and requires time to learn and develop technique.
### How to search for knitting tutorials
When looking for guides online, you will notice many variations in machine make and type, including machines with plastic beds, doubled beds, different needle gagues and tools, and a variety of carriages. While there are details particular to the Silver Reed, a lot of technique can also be learned from general 'knitting machine' tutorials on any machine as the core operation of the needles and carriage is very similar. The caveats to this are when someone is using a carriage we don't have (e.g. a lace carriage), or using both beds of a double-bed machine (if they're using one bed, it's totally fine). If you're unsure, just ask (more likely than not, we can do it on our machine).
## Steps to Create Knitted Textile
[](https://wiki.cci.arts.ac.uk/uploads/images/gallery/2022-01/UHvoAvKFXPx0Xplk-image-1641463976457-12-53.png)
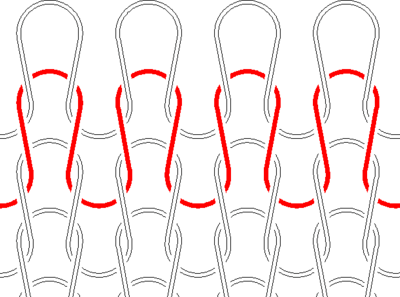
In machine knitting, knitted fabric is created by manually sliding the carriage back and forth over the needle bed, which loops a single strand of yarn a row at a time. Knitting is distinct from weaving: in weaving, fabric is created by interlacing 2 sets of threads at right angles to one another, while knitting involves taking a single thread and looping it around itself, one row at a time. (we currently don't have any weaving capabilities in the CCI).
[](https://wiki.cci.arts.ac.uk/uploads/images/gallery/2022-08/82uY08MCYgv1OvmE-image-1660127607380.png)
### Casting on and off
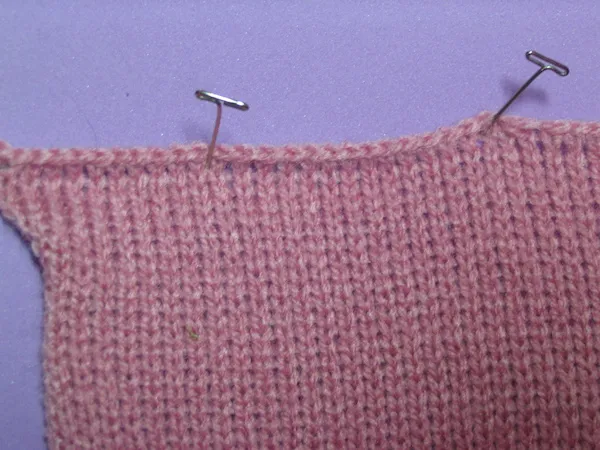
Because of the structure of knitted fabric, the top and bottom edges of the textile need to be made using a special stitch, to prevent the fabric from unravelling. At the start of the piece this is called 'casting on'; at the end it's called 'casting off'. Depending on the yarn, if you are just experimenting with samples then you can get away without casting off (the fabric will still be vulnerable to unravelling), though there is no way to knit without casting on.
#### Casting on
There are a few different cast-on techniques that can be used on the Silver Reed, 2 of which are enumerated in the manual:
* weaving cast on -- this is the easiest method on the Silver Reed, though has the downside of leaving a slightly scrappy-looking edge. It's great for quick sampling, though. The manual contains a good guide, as does this [video](https://www.youtube.com/watch?v=tHxdYDUifcM)
* e-wrap cast on -- this is a cast on technique common to all knitting machines, and is the "official" method that will give you a neat edge. There is a detailed guide [here](https://wickedwoollies.co.uk/ewrap-caston/)
* ravel-cord cast on; similar to the e-wrap technique but involves knitting with waste yarn (cast on with a quick method like weave) for a few rows, then knitting in a silk thread (called a 'ravel cord'), then doing an e-wrap cast on. When the piece is finished, the silk thread is pulled out, leaving a clean cast on edge that's been given structural support by the waste yarn. The manual has a good guide to this, also a video [here](https://creativetien.com/machine-knitting-basics-cast-on-with-waste-yarn-ravel-cord-and-e-wrap/)
#### Casting/binding off
Casting off is an important technique to learn, and while slow at first will get much faster over time. The general idea is to bind off one stitch at a time by looping it into the next stitch along, working your way across the fabric until there is a single stitch left to tie off.
There are 2 main techniques: latch tool cast-off and transfer tool cast-off. Transfer tool is a little slower, but considerably easier to learn (and the one I'd recommend starting with). [This video](https://www.youtube.com/watch?v=dKFwrsKhmbo) does a good job of demonstrating both techniques.
[](https://wiki.cci.arts.ac.uk/uploads/images/gallery/2022-08/VU2UTNel9sH8NFAZ-image-1660127674725.png)
## Different Types of Stitch
The SK840 supports a range of options for different kinds of stitch, which can be selected by changing the dial on the top of the carriage. Many of these stitches may also be used alongside the
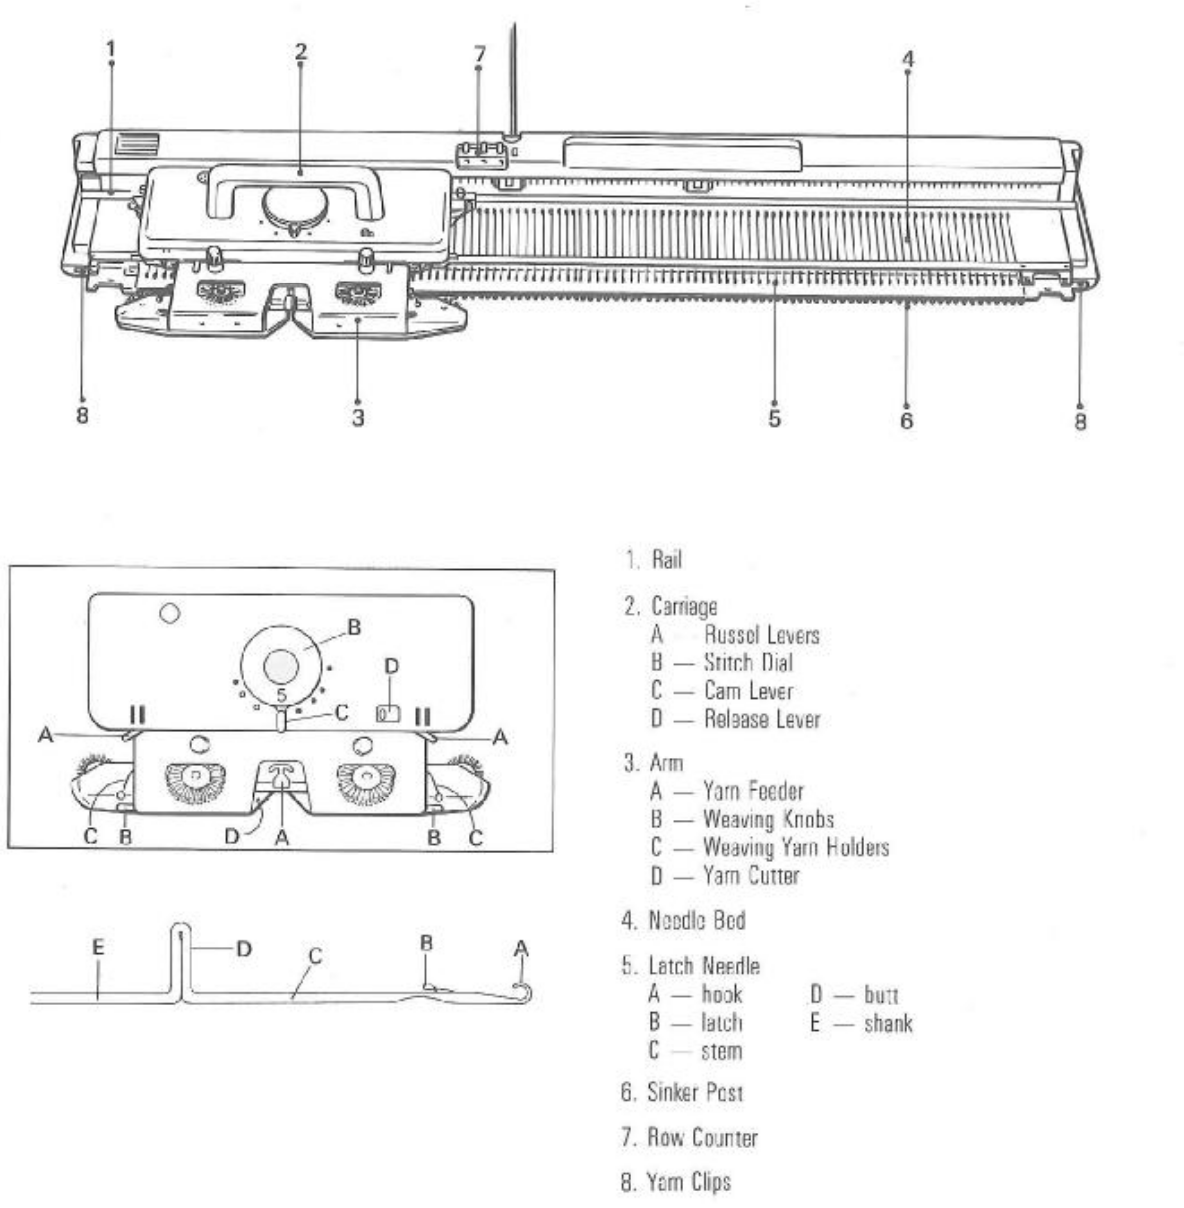
The SK840 may be computer-controlled using the DesignaKnit software and SilverLink module, that connects to the knitting carriage. Currently at CCI we _do not_ have either a lace carriage or a ribber. A key to the core machine parts is pictured below:
The simplest knitting style on the machine is called 'Stockinet' -- this is a style of knitting that will result in a smooth 'knit' side on one side of the fabric, and a rougher 'purl' side on the other.
### Stockinet
This is the simplest form of knitting, and equivalent to a 'knit-purl' alternating stitch in hand knitting. It produces a flat, smooth side (the 'right side') and a rougher side ('wrong side'). To knit stockinet, select the 'O' stitch setting on the carriage.
All stitch varieties listed here still require a stockinet cast-on.
### Fair Isle and Patterning
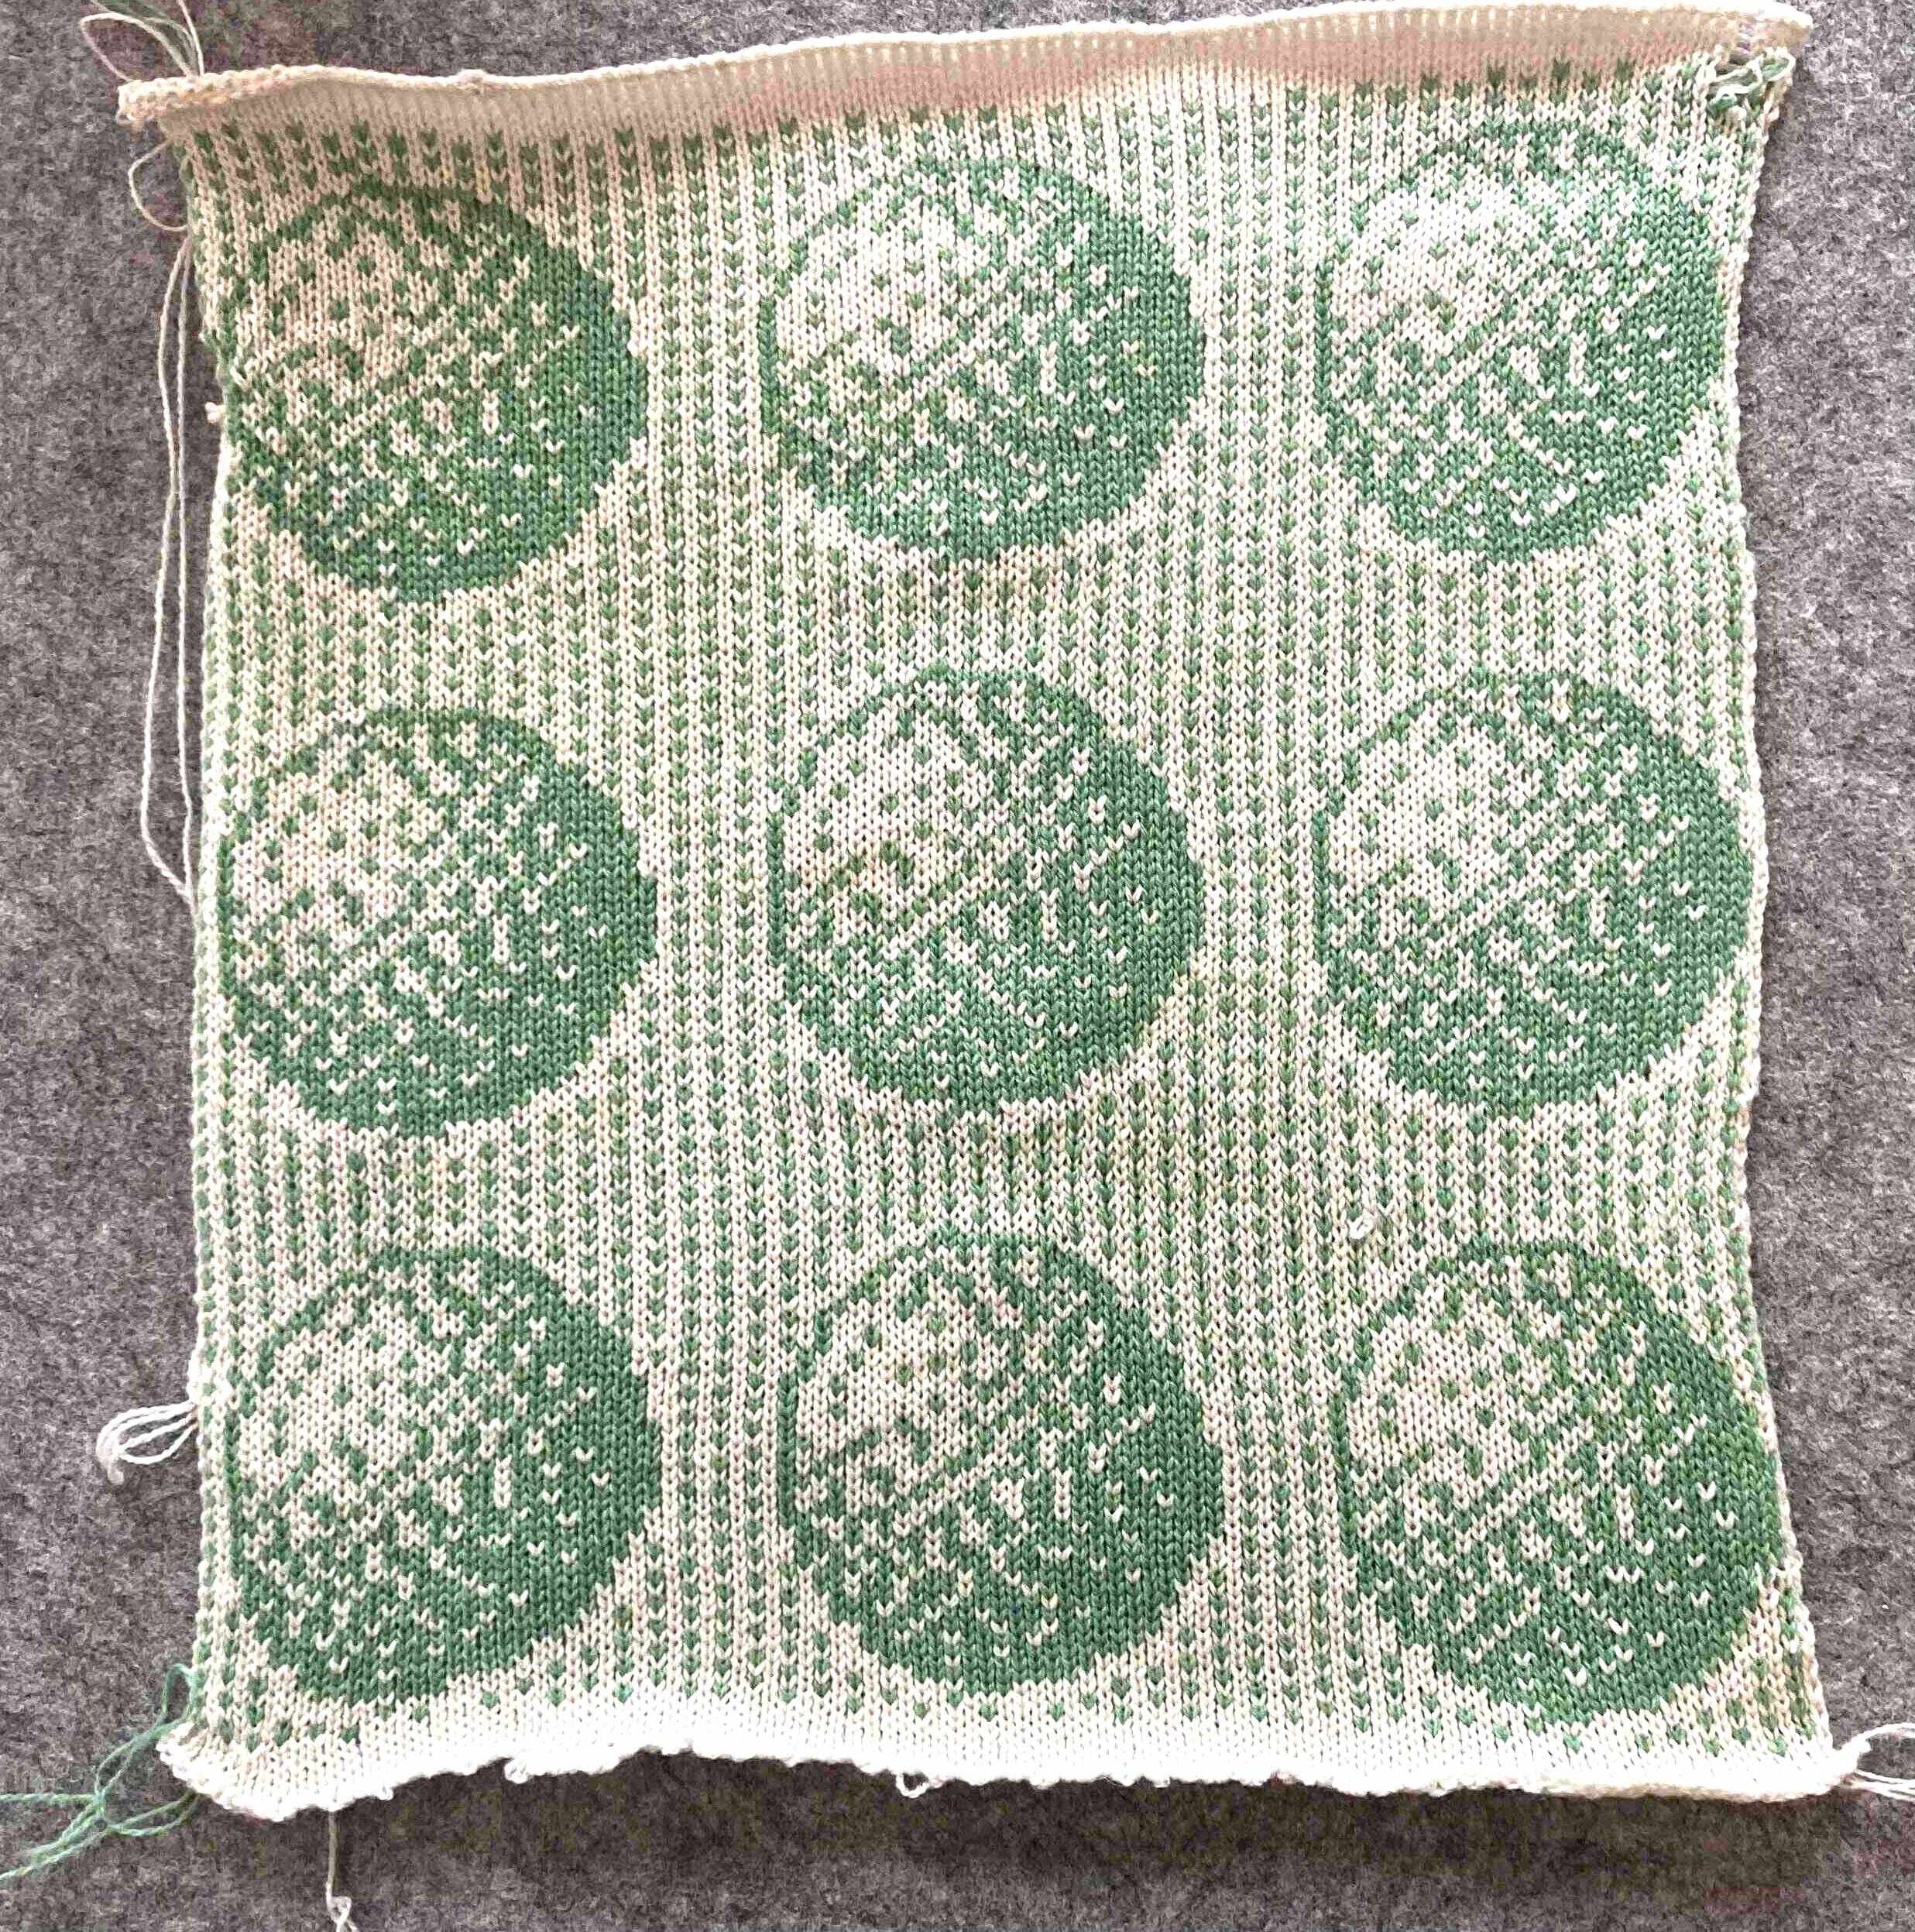
Fair Isle knitting is a common way of creating patterns in knitted textiles, by alternating between 2 colours within each row. On the SK840, this is also one of the three stitches (the others being slip and tuck stitches) that may be automatically controlled using the SilverLink controller; it's quite low-effort to produce some really beautiful, impressive things that it would be very hard to knit by hand.
To knit Fair Isle, the machine should be connected to the computer via the SilverLink, and DesignaKnit should be in interactive knitting mode. The carriage should be turned to 'F' for Fair Isle, and the arm should be threaded with 2 yarns (the first in position 1, the second in position 2).
[This video](https://www.youtube.com/watch?v=Scyx_8A83tQ) shows the technique using punch-cards rather than the computer, but the core ideas are the same. For more guidance on creating patterns using DesignaKnit, see the wiki page on [Creating Digital Knitting Patterns with DesignaKnit](https://wiki.cci.arts.ac.uk/books/textiles-area/page/creating-digital-knitting-patterns-with-designaknit).
[](https://wiki.cci.arts.ac.uk/uploads/images/gallery/2022-08/331tyiuq1BpMOlK9-orbs.jpeg)
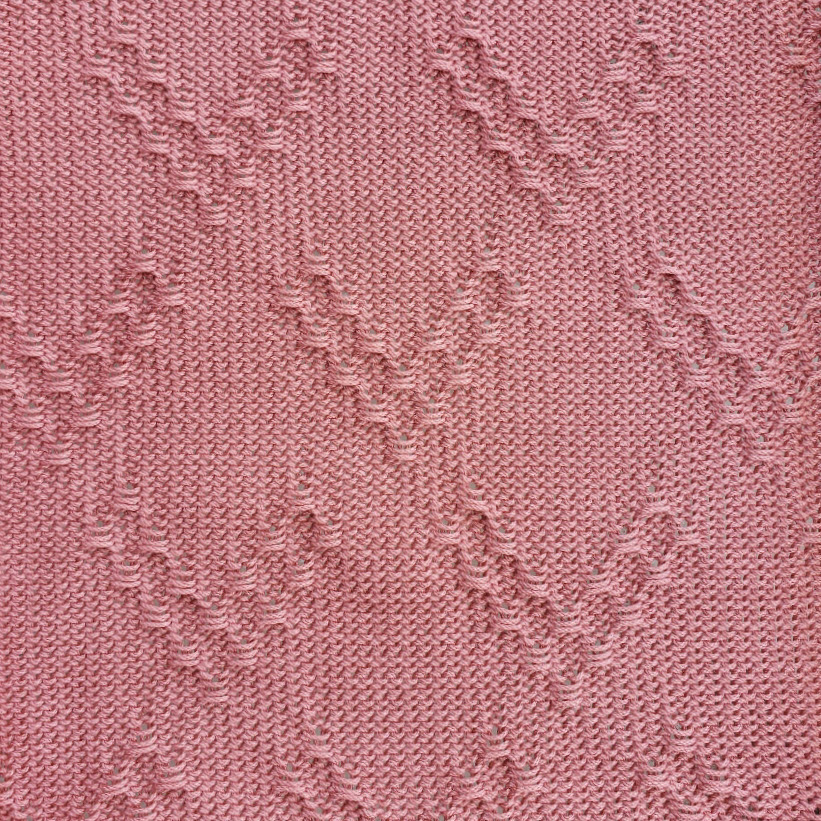
### Slip Stitch
Slip stitch is a knitting technique where a stitch is skipped (or 'slipped'), that can be used to add texture to knitted fabrics either manually or automatically (using the SilverLink). Skipping stitches creates patterns in the strands of un-knitted yarn, and is often used alongside other texturing techniques.
[](https://wiki.cci.arts.ac.uk/uploads/images/gallery/2022-08/r0OnDdzz0oQOlfo7-image-1660130409893.png)
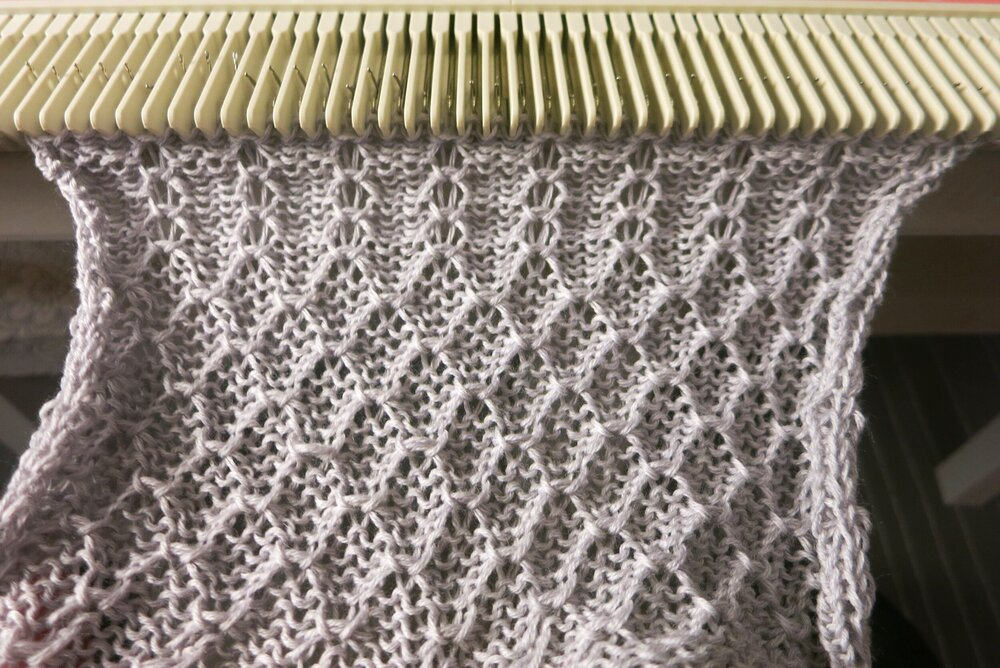
### Tuck Stitch
Tuck stitch is a knitting technique that involves tucking a stitch from one row into a row above. Like slip stitch, tuck stitch can manipulate the texture of the knitted fabric, though somewhat more dramatically, as depending on the depth of the tuck the fabric can be structured in all sorts of interesting ways. Stitches may be tucked automatically using the SilverLink.
[](https://wiki.cci.arts.ac.uk/uploads/images/gallery/2022-08/LJng0kvWL3B2Ojsx-image-1660130149654.png)
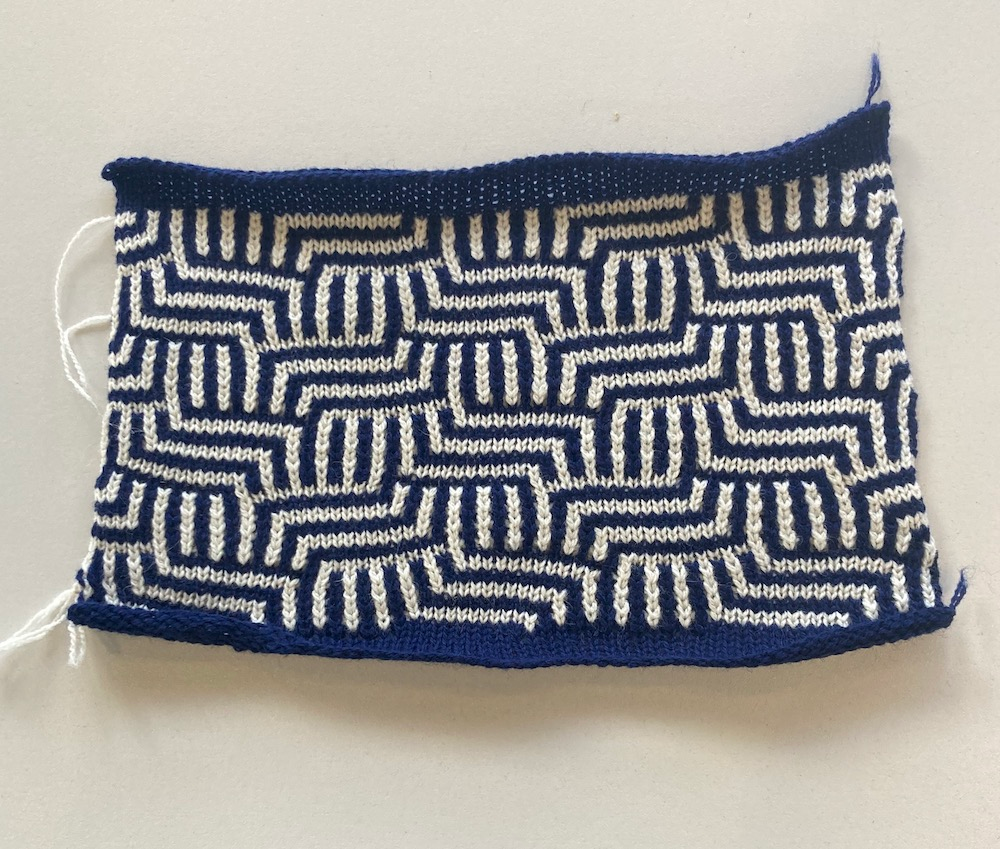
#### Tuck Mosaic
The 2 colours here are knitted in horizontal stripes, but with a regular pattern of stitches 'tucked' into the stitch above, manipulating the structure to resemble vertical lines. The result looks very beautiful, but it's time-consuming to change the colour every 2 rows.
[](https://wiki.cci.arts.ac.uk/uploads/images/gallery/2022-08/XAskVEphGKcccqH0-image-1660129599440.png)
What's interesting about tuck patterns is that they look nothing like the patterns that produce them. There's a great and incredibly detailed [blog post](https://alessandrina.com/2019/06/29/mosaics-and-mazes-charting-meet-numbers-and-gimp/) on [Alessandrina](https://alessandrina.com) (very helpful knitting blog) which explains in great detail.
### Mock Rib
Many knitted garments are hemmed with a stretchier 'rib' edge (think cuffs, collar and bottom of a sweater, for example). This adds structural stability to the fabric and also looks great. Typically this is done using a 'ribber', or a double bed machine, which we _don't_ have in the CCI. However, it's perfectly possible to make a mock rib using a single bed machine that's functionally very similar.
I watched [this video](https://www.youtube.com/watch?v=GOq0rZ-JcMo) for guidance, which was pretty good (it's in Norwegian, but English subtitles), which gives a good guide to creating a 'mock' rib on a single bed machine.
### Knitting with every other needle
This is used to knit yarns like mohair, or chunkier yarns. [This video](https://www.youtube.com/watch?v=Joy6M5sOGRo) (it's in Norwegian, but has English subtitles) gives a good demonstration of the cast-on technique required: after casting on, knit as normal, but with only half the needles engaged.
## Special tools and carriages
### Intarsia
The Intarsia Carriage is an alternate carriage for the machine that allows multiple colours to be used in a single row, without having runners along the back like in Fair Isle. It produces large blocks of colour (if you want to use fine detail, Fair Isle is normally a better bet), though requires considerably more manual effort than
[](https://wiki.cci.arts.ac.uk/uploads/images/gallery/2022-08/GssEUSdtFswRyLQW-image-1660127988359.png)
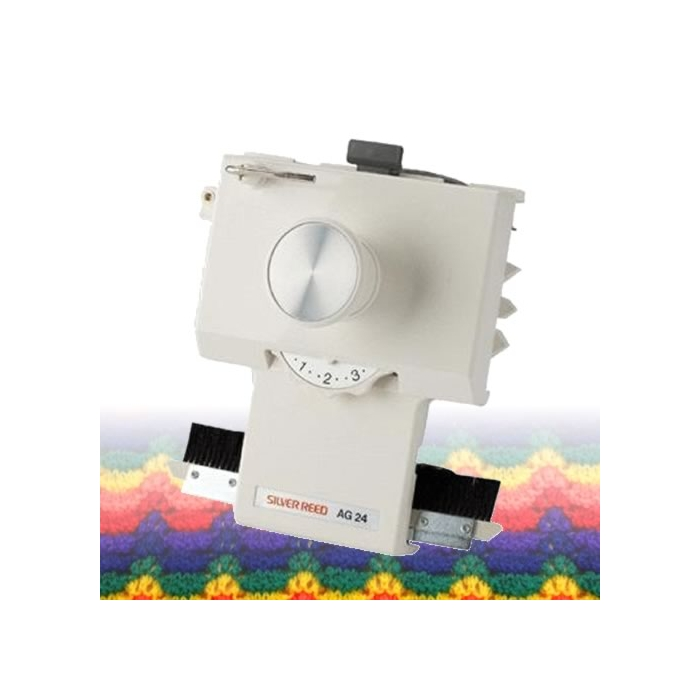
### Automatic Colour Changer
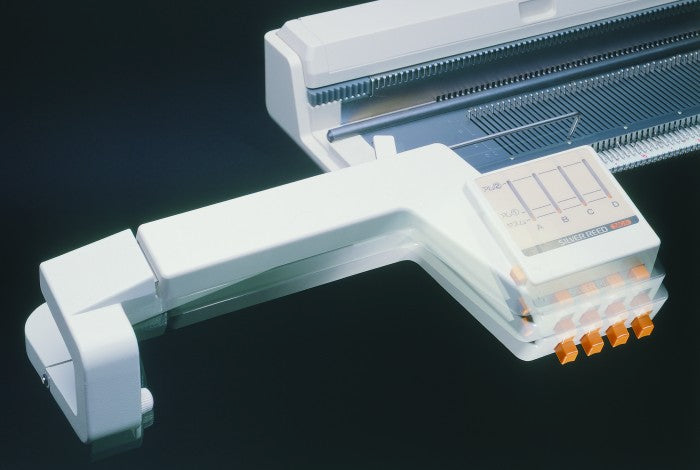
We have an automatic colour changer in the CCI, that makes changing colour between rows considerably faster, and also allows selection between 4 yarns, rather than 2. It cannot change colours _within_ a row (for that, you want either fair isle or intarisa) -- instead think of it as a way of making stripes a lot more efficient. It's particularly useful when knitting tuck mosaic patterns that require regular colour change. The automatic colour changer may also be used with fair-isle or other patterning techniques (see example below), though when using 2 yarns (as in Fair Isle) only one may be changed automatically.
Please talk to Agnes before using the automatic colour changer for the first time.
[](https://wiki.cci.arts.ac.uk/uploads/images/gallery/2022-08/iY2JpRlLF9nYXw8A-image-1660127899803.png)
[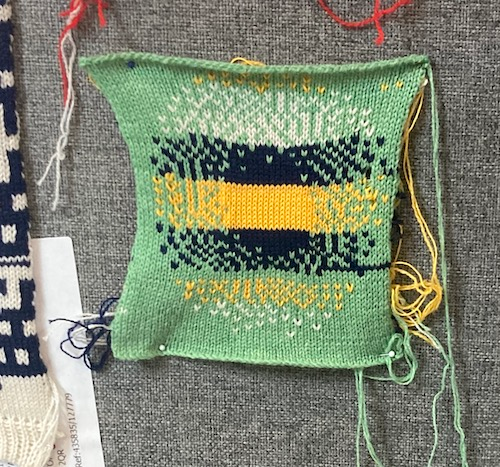](https://wiki.cci.arts.ac.uk/uploads/images/gallery/2022-08/zcf7YqcWYBOm9iVN-image-1660128047843.png)
# E-textiles and technical knits
The knitting machine can also be used to create textiles with electronic properties, including conductive and stretch sensors, and even radio components. Please see [this guide](https://wiki.cci.arts.ac.uk/books/textiles-area/page/knitting-with-conductive-yarn) to knitting with conductive yarn for more information.
# Resources
* [learnmachineknitting.com](http://www.learnmachineknitting.com/)
* [alessandrina.com](https://alessandrina.com/) -- really useful knitting documentation site
# Choosing Yarns
We provide a range of yarns at the CCI that are compatible for use with the machine. It is strongly suggested that when starting to use the machine, you make use of the 2-ply lambswool we provide (and that will be used during tutorials). 2 strands of the lambswool are threaded through the tensioner together to create a 4-ply yarn.
If you are planning to create larger projects (e.g. bigger than a standard sample swatch), we ask that you source your own yarns. Finding yarns suitable for machine knitting is a different task than for hand knit: [this guide](https://www.mkc.community/machine-knitting-blog/where-to-find-machine-knitting-yarn) offers a good overview of considerations. In general, you will have more luck with yarns intended for machine knitting -- talk to Agnes if you would like more advice.
At the CCI, our main yarn supplier is [Uppingham Yarns](https://wools.co.uk), who have a wide range and high quality. Other recommended suppliers include:
* [Knit Works](http://knitworkslondon.com/) in Bethnal Green -- this place is worth a visit, they also have machine knitting classes + sell a very wide range of machine yarns.
* [Denier Studio](https://denier.studio/) in Tottenham -- they sell deadstock yarns, good on both a sustainability front and tend to be a lot cheaper.
### Machine Knit Inspiration
#### electronic textiles
* [Irene Posch (knitted radio!)](http://www.ireneposch.net/)
* [Irmandy Wicaksono (knitted keyboard)](https://www.irmandyw.com/research/knittedkeyboard)
#### machine knitting for actuation/active textiles
* [CMU morphing matter lab](https://www.morphingmatter.cs.cmu.edu/projects/3d-knitted-actuators)
* [MIT Self-Assembly Lab](https://selfassemblylab.mit.edu/active-textile-tailoring)
### textbooks
* [A Complete Guide To Machine Knitting](https://www.amazon.co.uk/Complete-Guide-Machine-Knitting-Finished/dp/8417412867) (ask Agnes to borrow her copy)
# Creating Digital Knitting Patterns with DesignaKnit
DesignaKnit is a pattern drafting, garment design and interactive machine control software. It is compatible with multiple different kinds of knitting machines, including the Silver Reed SK840, which is the machine we use at the CCI.
[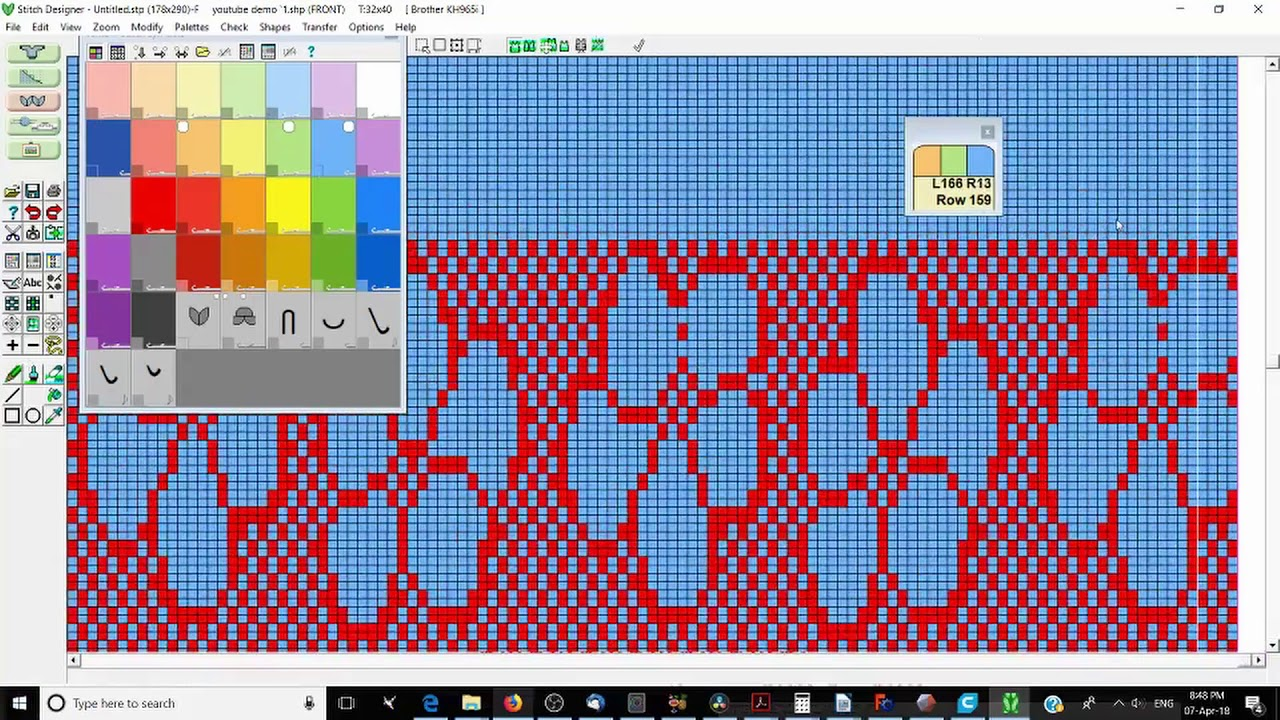](https://wiki.cci.arts.ac.uk/uploads/images/gallery/2022-01/NdaAwsCnFKdNcGio-image-1641480774989.png)
DesignaKnit includes multiple different features, which may be used separately or together. The main ones to know about are:
* Garment styling (creating shapes)
* Stitch designer (creating patterns)
* Interactive knitting (computer control)
Video tutorials from Prism's Creations are a great resource. They go through different features of the software one-at-a-time, eventually creating an asymmetric patterned jumper. To get into patterns, I would start with the second video: [Stitch Designer Basics](https://www.youtube.com/watch?v=zjN3A3AuxCs).
# Knitting With Conductive Yarn
Knitting is a really versatile and flexible way to integrate sensors and other conductive material directly into fabric. Depending on the kind of pattern, and the type of yarn that you use, knitted textiles can be used to integrate directly into stretchable, conformable fabric:
* stretch sensors
* switches
* pressure sensors
* capacitive touch sensors
At the CCI we have a range of conductive yarns and threads that can be used that have variable conductive and textural properties. We have a Silver Reed knitting machine that is suitable for knitting 2-3ply yarn, and can be used programatically with the DesignaKnit software.
Typically, the conductive yarn is used along with a carrier yarn, that adds structural stability, colour, and texture to the knit.
In general, knitted textiles should not be used to conduct any currrent greater than 100mA or so, as they can risk getting hot, and because of their form (and the potential for shorts) in general my advice would be to consider them primarily as sensing rather than conductive material.
This page isn't a tutorial on the Silver Reed (please email Agnes if you would like one), but an overview of options for making conductive knitted textiles at the CCI.
## Knitted Stretch Sensor
Knitted fabrics that integrate conductive yarn typically have some in-built resistance, which will change depending on
# Digital and e-textile design at the CCI
This page is a guide to different techniques that can be used in digital and e-textile design, resources we have at the CCI, places to source materials, and possible sources of inspiration/research references.
Here, 'digital design' refers to textile equipment that works with CAD, and e-textiles specifically to the integration of electronic components within textiles. Both of these things are well-supported at the CCI and can also be done in combination.
## Equipment
At the CCI we have two main pieces of digital textiles equipment:
- the [Silver Reed SK840 Digital Knitting Machine](https://wiki.cci.arts.ac.uk/books/textiles-area/page/using-the-silver-reed-sk840-knitting-machine), which may be used either manually, or programmed using the [DesignaKnit](https://wiki.cci.arts.ac.uk/books/textiles-area/page/creating-digital-knitting-patterns-with-designaknit) software. It's also possible to knit with [conductive yarn](https://wiki.cci.arts.ac.uk/books/textiles-area/page/knitting-with-conductive-yarn) on the machine, to create sensors and other electronic components.
- The [Brother Innov-is V3 Embroidery Machine](https://wiki.cci.arts.ac.uk/books/textiles-area/page/using-the-brother-innov-is-v3-embroidery-machine), a digital embroidery machine which may be programmed using either Brother's [PE Design](https://wiki.cci.arts.ac.uk/books/textiles-area/page/creating-digital-embroidery-designs-with-pe-design-11) software (think: MS Paint but for sewing), or the Processing plugin [PEMbroider](https://wiki.cci.arts.ac.uk/books/textiles-area/page/creating-digital-embroidery-designs-with-pembroider).
Both of these machines require training to use. Please check [Orb](https://orb.arts.ac.uk/) for upcoming tutorials, or contact Agnes for more information. Additionally, we have a Brother sewing machine that can also be used for student projects. If you have used a sewing machine before you may use this without training, otherwise ask the technicians.
Programmable knit sample:
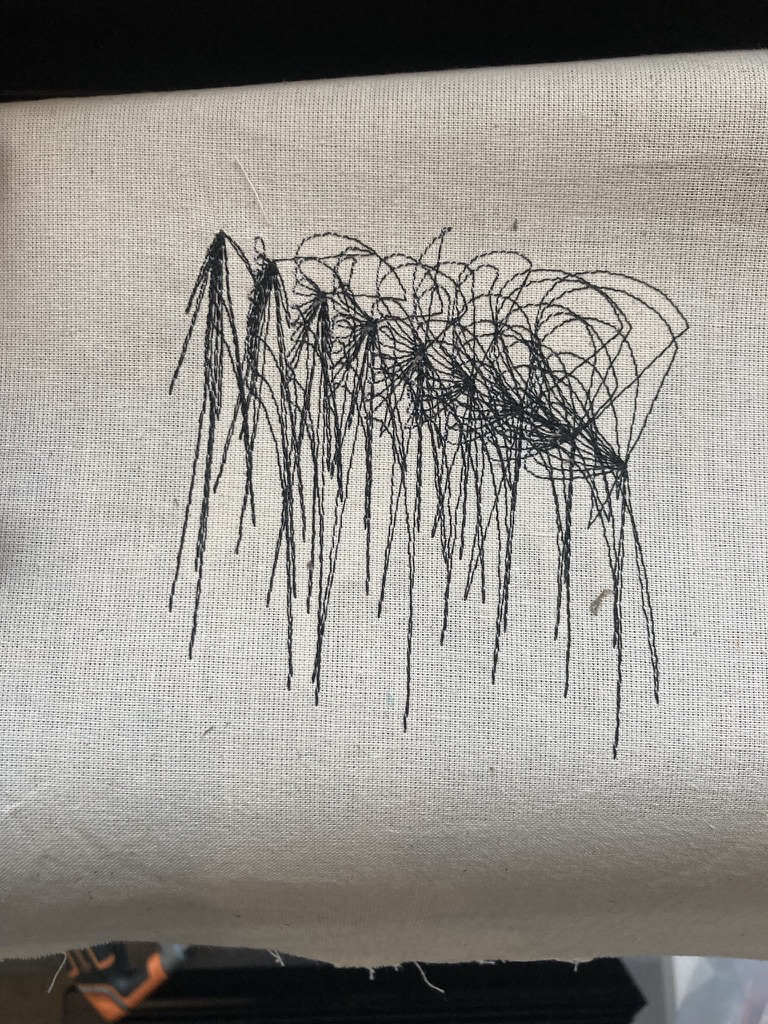
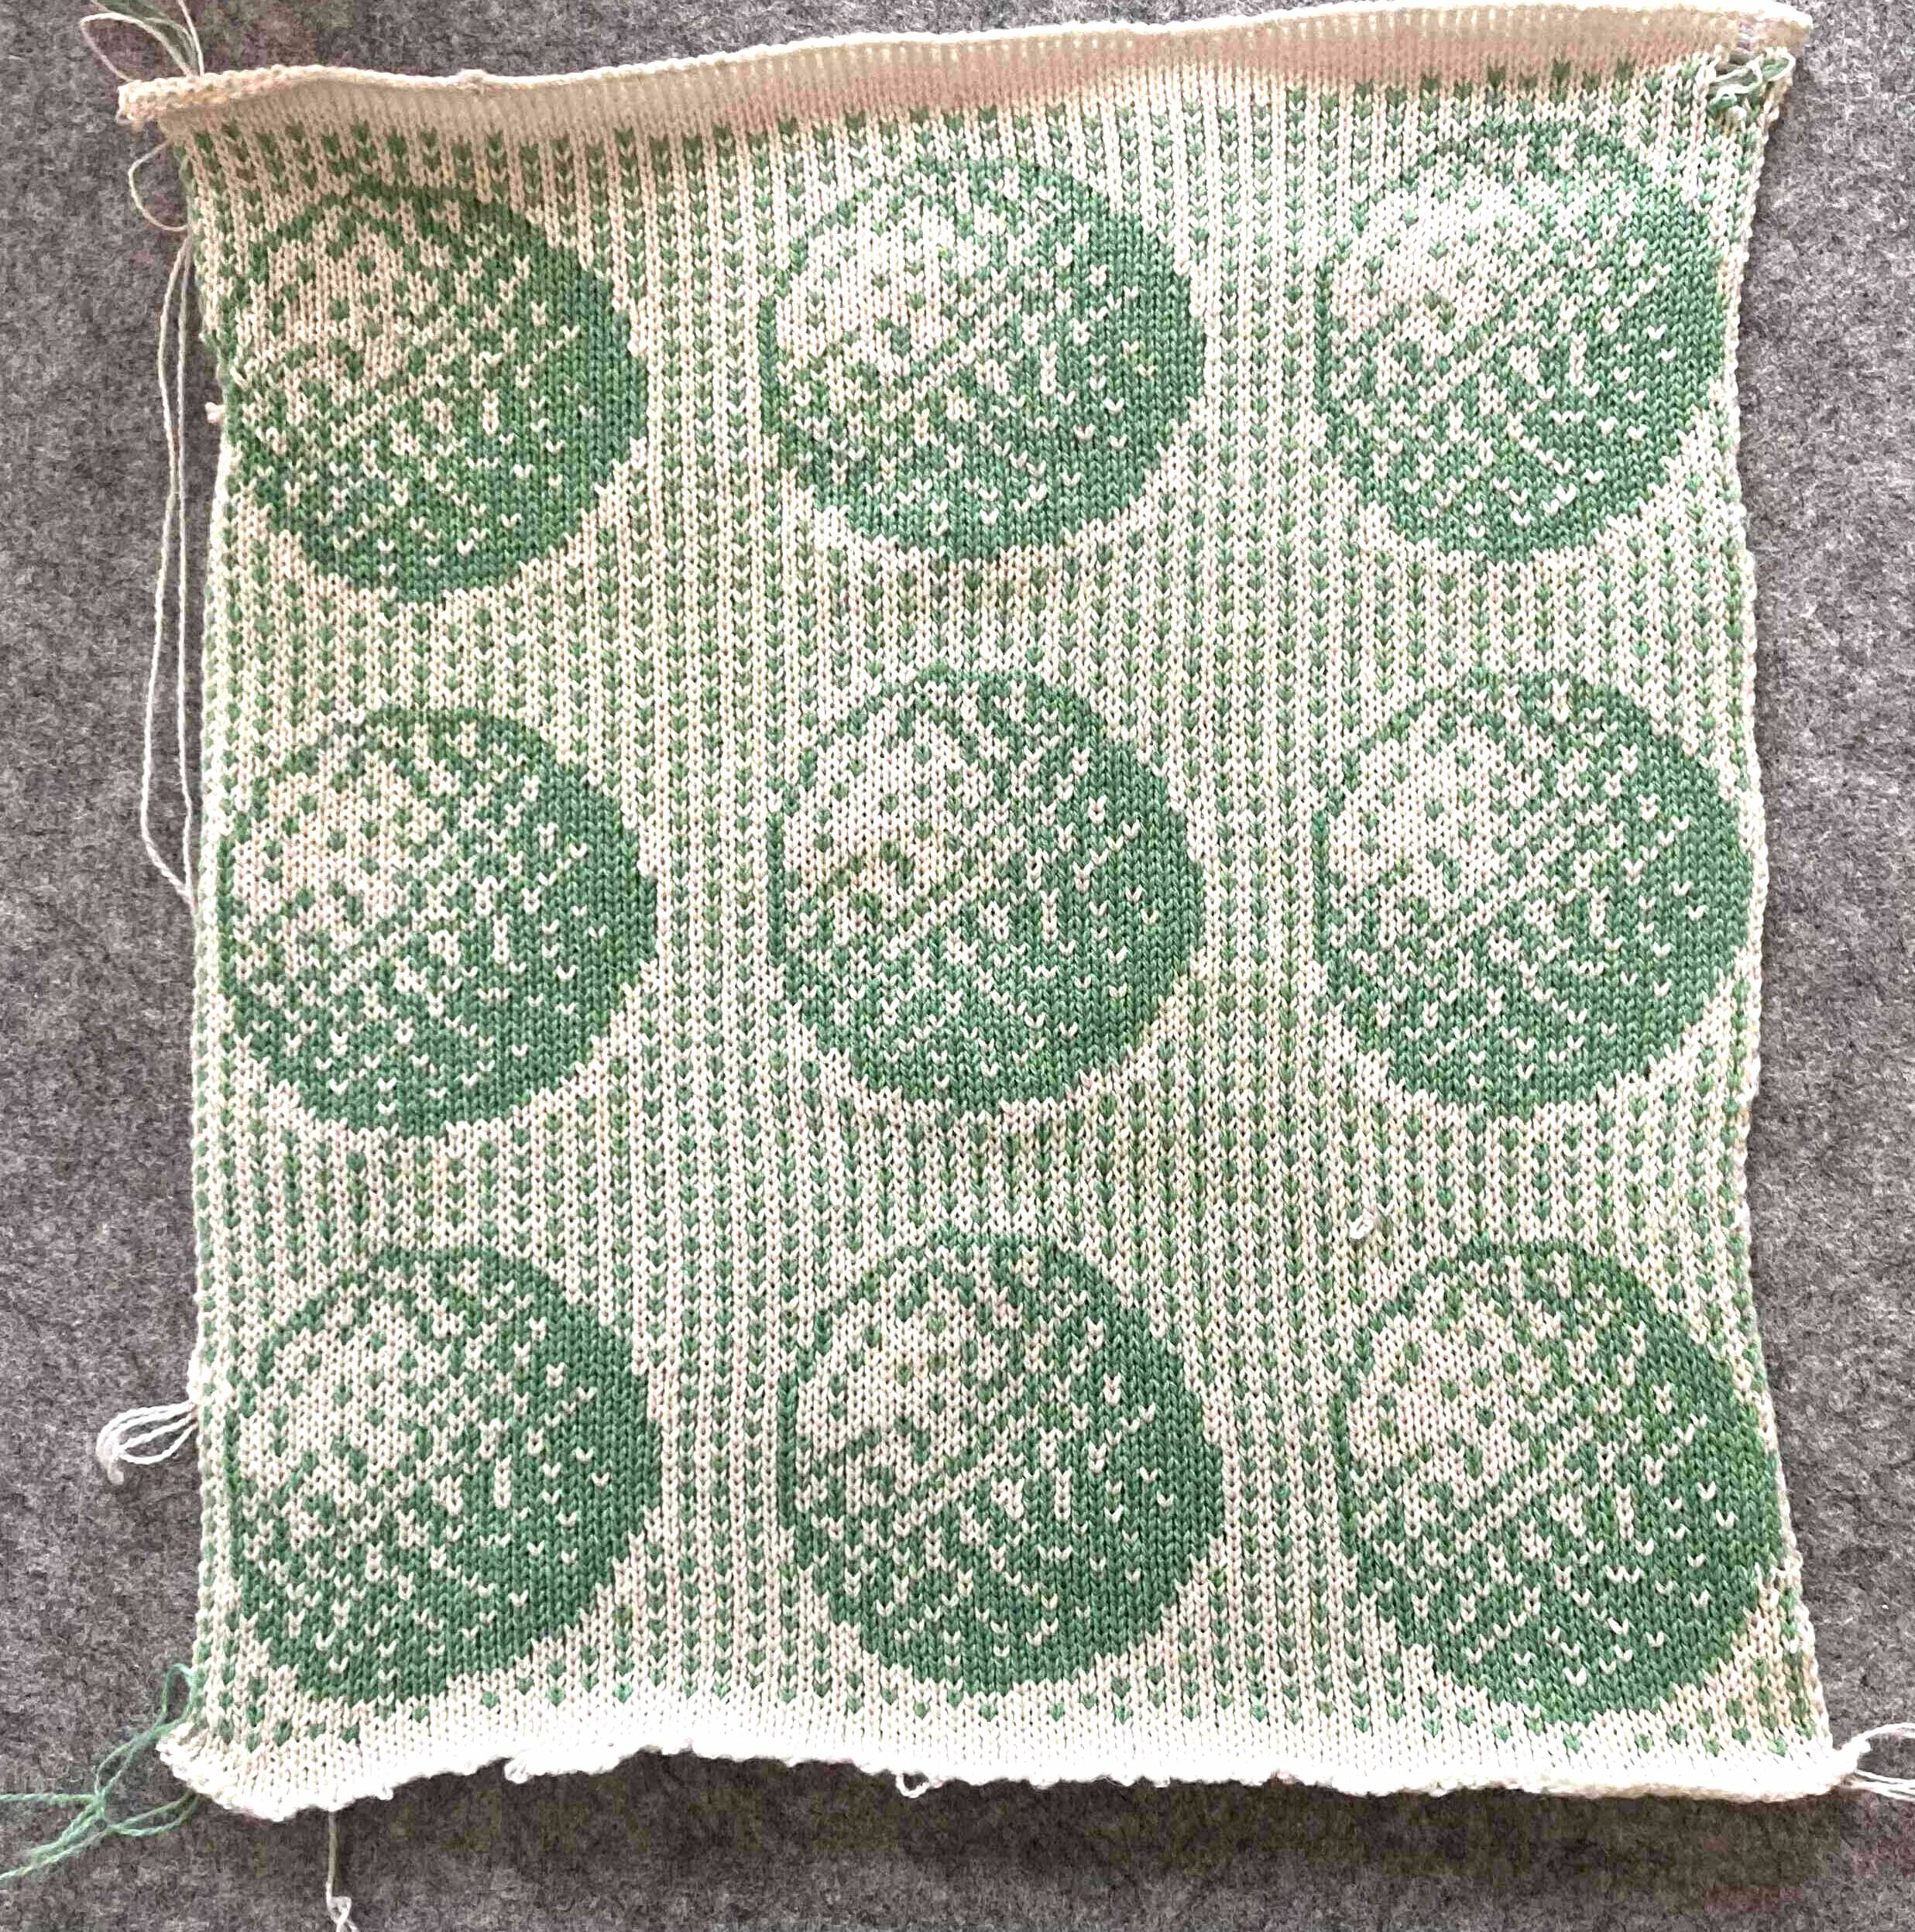Digital embroidery sample:
## Online Resources
### e-textiles
A fantastic resource for most e-textile related ideas and tutorials is [How To Get What You Want](https://www.kobakant.at/DIY/?p=7057), aka the [KOBAKANT](https://www.kobakant.at/?category_name=work) art collective DIY wearable technology documentation site. I'd strongly recommend just browsing around the site -- they have some great detailed guides, including [knitted sensors](https://www.kobakant.at/DIY/?p=1762), [robust hard/soft connections](https://www.kobakant.at/DIY/?p=1272), [textile speakers](https://www.kobakant.at/DIY/?p=2936), and [using conductive velcro as a switch](https://www.kobakant.at/DIY/?p=362).
## Materials
### Non-electronic materials
At the CCI we have embroidery thread, sewing thread, lambswool and cotton yarn, and limited amounts of calico, cotton drill and backing fabric to experiment with on the machines. If you are planning a larger project, we ask that you purchase your own materials, and can give you advice on doing so.
### Conductive Thread
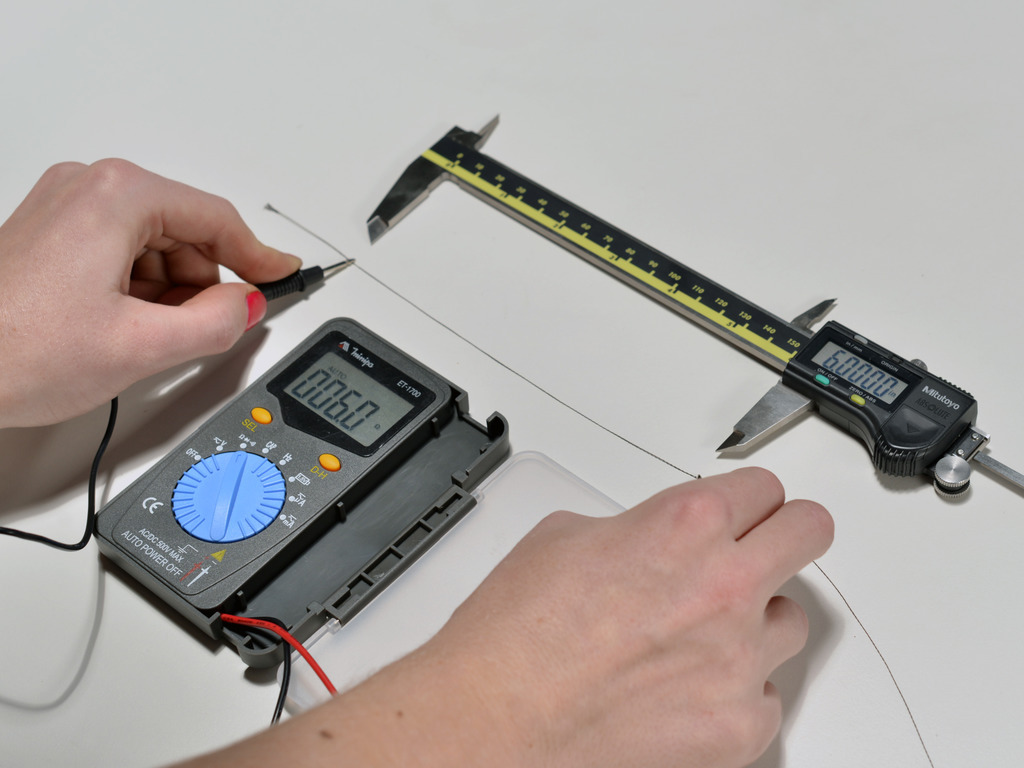
It's better to think of conductive thread as a long resistor than a traditional cable. All conductive threads come with an associated resistance per unit length, and this can vary a lot between different brands and thicknesses. For a ballpark figure, Adafruit's [2 ply conductive thread](https://proto-pic.co.uk/product/stainless-thin-conductive-thread-2-ply-23-meter-76-ft/) is made of stainless steel, and has a resistance of 16 ohms/foot. If you're unsure of which brand you're using, you can always use a multimeter to measure it.
[](https://wiki.cci.arts.ac.uk/uploads/images/gallery/2022-01/pWd7KVzmGSZmk8xX-image-1641486529230.png)
Adafruit have a short [conductive thread tutorial](https://learn.adafruit.com/conductive-thread) that covers basics like hand- and machine-stitching, and steps to prevent short circuits.
### Conductive Yarn
Conductive yarn is different to conductive thread: it has much higher resistance, which makes it inadequate to directly connect components unless they are very close together or the knitted yarn is stretched, but it is well-suited to pressure sensing.
When a knitted sample is held loosely, it has a high resistance as the steel fibres in the yarn do not make contact with one another, but when the sample is stretched, the steel fibres are pulled into closer contact, reducing the resistance and allowing the flow of an electric current.
### Conformable Connections
Conformability (using soft and flexible components) is key to making robust e-textile projects, and is particularly relevant to projects using conductive thread. We have a stock of conductive velcro and poppers that can be used to integrate wires into projects, as well as super-flexible silicone wire.
### Sourcing Materials
- [How To Get What You Want](https://www.kobakant.at/DIY/?p=7057) has a really good, long list of 'Basic E-textile Materials', as well as detailed reviews for materials such as [Conductive Yarn](https://www.kobakant.at/DIY/?p=1978), [Conductive Paint/Ink](https://www.kobakant.at/DIY/?p=634), and [Piezoresistive Fabrics](https://www.kobakant.at/DIY/?p=913)
- [Sparkfun](https://www.sparkfun.com/categories/204) has an e-textiles section that includes conductive thread, Lilypad and Chibitronics kits, pressure sensors and conformable data busses.
The [User Manual]("https://download.brother.com/welcome/doch000972/882_d80_d82_om03en.pdf") has more diagrams of this process on page 45.
Once the needle is replaced, re-thread the top thread and bobbin thread before starting again. If you break a needle more than once in quick succession, there is probably an issue with your design.
__If you don't feel confident replacing a needle, grab one of us (or if out of hours, leave the hoop in the machine, put a note on it, send us an email and turn the machine off).__
# Creating Digital Embroidery Designs with PEmbroider
[PEmbroider](https://github.com/CreativeInquiry/PEmbroider) is an open-source library for embroidery design, maintained by CMU's [Studio for Creative Enquiry](http://studioforcreativeinquiry.org/). Designs are created using Processing code, particularly the Processing Drawing API which can be used to generate embroidery designs computationally. PEmbroider is well-documented online -- this tutorial page is here to point you to existing resources, and explain a couple of foibles with the software.
[](https://wiki.cci.arts.ac.uk/uploads/images/gallery/2022-01/D26wI1CnCDPEOnZi-image-1641469122783.png)
### Setup
Setup instructions are [here](https://github.com/CreativeInquiry/PEmbroider#getting-started-with-pembroider-in-processing). When running an example sketch, if you would like to use the design, make sure that it exports in the .PES file format, as this is the form used by the machine.
In the PEmbroider example files, the file format is always declared in the variable `outputFilePath`, normally in the `setup()` section of the code. So, to change this (e.g. in the example file PEmbroider_shape_hatching_experimental), from:
```
...
E = new PEmbroiderGraphics(this, width, height);
String outputFilePath = sketchPath("PEmbroider_shapes_hatching_experimental.vp3");
...
```
to:
```
...
E = new PEmbroiderGraphics(this, width, height);
String outputFilePath = sketchPath("PEmbroider_shapes_hatching_experimental.pes");
...
```
If you create a file in the wrong format, you can always re-run the code, but it is also possible to convert between different embroidery file formats online [here](https://htmtopdf.herokuapp.com/embroidery/).
## Using PEmbroider
The full API for PEmbroider is documented [here](https://github.com/CreativeInquiry/PEmbroider/blob/master/API.md).
#### Stitch size and spacing
Because of how Processing generates images, measurements are in _pixels_, not in _mm_ -- this can make it a bit trickier to compare with other pieces of software.
In my experience, the default stitches used in PEmbroider are very small and very dense, much moreso than the defaults used by Brother software. Partly, this is a matter of taste, however, when using finer or stretchier fabrics, such tight and dense stitches can cause puckering (and these designs also take a lot longer).
This is something that's best to test out yourself and adjust, but I have included the presets I use below as a guide:
```
PEmbroiderGraphics E;
...
void setup() {
...
E.strokeSpacing(2.0) // this spaces the stroke (outline) stitches by 2 pixels
E.hatchSpacing(3.0); // this spaces hatch (fill) stitches by 3 pixels
E.setStitch(5, 15, 0.0) // this sets minimum stitch to be 5px
// desirable stitch length to be 15px
// resample noise to be 0.0
...
}
```
(note: you set both the minimum and desired stitch length, as when embroidering curved shapes not all stitches will be the same length).
## Examples
PEmbroider comes with a wide range of [examples](https://github.com/CreativeInquiry/PEmbroider/tree/master/examples), that give a good idea of a number of different features of the machine. These are also good things to modify if you want to test out different stitch lengths and densities. Once you have installed PEmbroider, these may be accessed through the Processing examples menu. Many of these have already been stitched on the Brother machine as demos, and can be found behind the machine.
[](https://wiki.cci.arts.ac.uk/uploads/images/gallery/2022-01/RxIvPoAGORqcdxXK-image-1641472397830-32-38.png)
I've included some additional examples below that make use of some of the affordances of programmatic stitch generation.
#### Creating pixellated designs
One thing that programs like PEmbroider are particularly well adapted for is designs where the stitches need to be very precisely laid-out. It's much harder to get stitches to do what you want in software like PE Design, where you can control the parameters but not the actual stitch placement.
One such use-case is creating pixellated designs -- below is an example image and code that I have used in the past, that demonstrates how to manipulate stitches on a grid basis.
```java
// PEmbroider script to stitch pixellated images
// author: Agnes Cameron
import processing.embroider.*;
PEmbroiderGraphics E;
void setup() {
size(1000, 1000);
noLoop();
// Load the bitmap image to embroider.
// Should consist of white shapes on a black background.
PImage myImage = loadImage("ken.gif");
// Create and configure the PEmbroider object, E
E = new PEmbroiderGraphics(this, 1000, 1000);
String outputFilePath = sketchPath("ken.pes");
E.setPath(outputFilePath);
// Initial setup of PEmbroider object.
E.beginDraw();
E.clear();
E.fill(0, 0, 0); // start the design at 0
E.noStroke();
// Parallel hatch
E.setStitch(5, 30, 0); //set the stitch to be the same size as the 'pixels'
E.hatchMode(PEmbroiderGraphics.PARALLEL);
E.hatchAngleDeg(0); // you want to set this to 0 for a 'pixel' effect -- default is angled
E.hatchSpacing(3.0); // this is nice and not overly dense
E.image(myImage, 0, 0);
// finishes the file and shows
E.optimize();
E.visualize(); // show the file
E.endDraw(); // write out the embroidery file
}
```
This code is created to run with a 1000x1000 .gif image, with a 'pixel' size (e.g. white squares) of
To run this code, create a folder called 'data' in the same folder as the processing file, and then save this image as 'ken.gif'. You can test this out with your own images, too.
[](https://wiki.cci.arts.ac.uk/uploads/images/gallery/2022-01/WHpWjg0t4bJvs03D-image-1641471293163.gif)
The output should look something like this:
[](https://wiki.cci.arts.ac.uk/uploads/images/gallery/2022-01/dNZUbPPqH6poFvdf-image-1641471283217-14-38.png)
## Warnings and errors
#### Stitches are out of bounds
A common warning is this one: it occurs when you have a design that goes right to the edge of the canvas. In my experience, so long as the design looks OK to you, this is normally fine to ignore, but it's worth making sure that the the design looks right before embroidering.
[](https://wiki.cci.arts.ac.uk/uploads/images/gallery/2022-01/GPiKQHgYDPnsBMS4-image-1641471375105-16-11.png)
#### Designs don't display on the Brother embroidery machine selection menu
This only applies to the selection menu: if you click into the file, the design should show up, and the information the machine gives you about the design's size (and corresponding hoops) should be correct. If this is an issue, you can use the machine to save a copy of the file, which will be recognisable: if you are embroidering multiple designs in one session, I would recommend either doing this or giving your files distinctive names to prevent confusion.
# Creating Digital Embroidery Designs with PE Design 11
coming soon :)
[](https://wiki.cci.arts.ac.uk/uploads/images/gallery/2022-01/8qttbBfDxvzvy09k-image-1641473069947.png)
# Workshop: Generative Embroidery with PEmbroider
This is the written version of an embroidery workshop in the CCI, and can either accompany the live workshop or be worked through by itself. As we go through the exercises, it's a good idea to have the [PEmbroider Cheat Sheet](https://github.com/CreativeInquiry/PEmbroider/blob/master/PEmbroider_Cheat_Sheet.md) open in a tab for reference. These notes are also heavily adapted from the cheat sheet. This workshop is based on [Carpentries](https://carpentries.org/) format, which means that participants should code alongside whoever is running it.
Copies of the files used for each of the exercises that can be downloaded [here](https://github.com/agnescameron/pembroider-workshop), but I'd recommend trying to generate the files yourself where possible.
## 1. Hello World: Drawing a Line
Follow the instructions [here](https://github.com/CreativeInquiry/PEmbroider#getting-started-with-pembroider-in-processing) to set up PEmbroider on your computer. You will need Processing 4. The first thing we will do in PEMbroider is draw a single line, which we can also use to test everything is working correctly.
### Template File
All files in PEmbroider have a similar structure, and the [cheat sheet](https://github.com/CreativeInquiry/PEmbroider/blob/master/PEmbroider_Cheat_Sheet.md) helpfully provides a template, which I've adapted slightly to match the file format we use in the CCI. We'll be using this as the basis for all the files in the workshop. This file draws a single line, but we can change that to anything we like.
```java
// Example PEmbroider program
import processing.embroider.*;
PEmbroiderGraphics E;
void setup() {
// Starting up:
noLoop();
size(600, 600);
E = new PEmbroiderGraphics(this, width, height);
// change this line you want a different file type
String outputFilePath = sketchPath("filename.pes");
E.setPath(outputFilePath);
E.beginDraw();
E.clear();
//-------
// Content goes here:
E.line(0, 0, 600, 600);
//----------
// Visualization and export:
// NOTE: Leave optimize() and endDraw() commented out,
// until you are ready to export the embroidery file!
// Don't forget to un-comment them when you want to export!
//
// E.optimize(); // VERY SLOW, but essential for file output!
E.visualize(true, true, false); // Display the embroidery path on-screen.
// E.endDraw(); // Actually writes out the embroidery file.
}
```
In order, this file:
* sets up a new canvas, of size 600x600 pixels
* tells the computer that it's an embroidery canvas, and sets an output file path
* draws a line on the canvas
* shows it to us (visualize) -- the `true, true, false` part tells the computer whether to draw colours, stitches and the routes taken by the machine. I prefer these settings but they can all be helpful
There are some other lines that are 'commented out' (have slashes in front of them) and don't run. These we might use later but for now we don't need to use them.
When you run this file, you should see an output that looks like this (if you *don't* see this, you will want to check over the setup steps again):
[](https://wiki.cci.arts.ac.uk/uploads/images/gallery/2022-08/oNeiDiDCFCcp0wjG-image-1660208322307-58-38.png)
The pink dots represent the ends of stitches, where the needle enters the fabric. Shortly we will experiment with different stitch types and lengths, but for now we are using the default settings.
The first thing we will look at is the structure of the canvas. If you like, you can also try 'commenting out' the content line, to just see a plain canvas.
#### Exercise 1.1
* Can you make the canvas larger?
* Can you make the canvas rectangular rather than square?
### Drawing lines
The PEmbroider code for drawing a line is:
```
E.line(x1, y1, x2, y2);
```
This means that (x1, y1) is the coordinates of the point where the line starts, and (x2, y2) is the point where the line ends. The `E.line()` part means "use the line function that belongs to PEmbroider, which is represented in our code by the letter E". We call this a 'method' In our code, we get a diagonal line because we draw from the point (0, 0) to the point (600, 600) (the edge of the canvas).
#### Exercise 1.2
* Can you make the line draw only halfway across the original canvas?
* Are you able to draw a vertical line? What about drawing 2 lines?
You might find these notes on [coordinate grids in Processing](https://py.processing.org/tutorials/drawing/) helpful here!
## 2. Playing with shapes
From now on, unless we're changing more of the file, I'm going to list just the 'content' code that we're changing, using `...` to represent the rest of the file. In our last exercise, the content was a single line -- the `E.line()` method -- but it can be more -- the important part is that it goes in the same place in the file each time.
Try changing out the line for a circle:
```
...
E.circle(200, 200, 200);
...
```
You should see a slightly off-center circle. In the documentation, the `E.circle()` method is listed as:
```
E.circle(x, y, r);
```
#### Exercise 2.1
* What do you think `r` represents in this method?
* Can you place the circle in the center of the canvas? What about a circle that fills the whole canvas?
* The PEmbroider method for drawing a rectangle is `E.rect(x, y, w, h);`. Can you replace the circle-drawing line with a line that draws a rectangle instead? What do you think `w` and `h` represent?
### Composite Shapes
PEmbroider also allows us to merge outlines to make composite shapes. This can quickly allow us to create more complex drawings. In this example, we merge together 2 circles:
```java
...
E.beginComposite();
E.composite.circle(320, 250, 200);
E.composite.circle(420, 250, 200);
E.endComposite();
...
```
#### Exercise 2.2
* Experiment with changing the size and the position of the circles. What happens when you make one of the circles very large?
* Try adding a third circle. Can you make a clover shape? What about a snowman?
* What happens when you move the line `E.composite.circle(420, 250, 200);` to after the line `E.endComposite();`? Why do you think that happened?
* Can you make a composite from a rectangle and a circle? Do you need to add anything to the original rectangle-drawing method?
* The PEmbroider method for drawing a triangle is `E.triangle(x1, y1, x2, y2, x3, y3);`. Can you make a composite shape from a triangle and a circle?
* Can you draw 2 separate composite shapes on the same canvas?
here's one I made earlier:
[](https://wiki.cci.arts.ac.uk/uploads/images/gallery/2022-08/B1zLemlZt1Dddj9O-image-1660213006241-16-43.png)
## 3. Fills and Hatching
Up until now, all the shapes we've been drawing have been outlines. PEmbroider supports several kinds of fills, which we will experiment with now. The way settings work in PEmbroider (and in Processing!) is that you set a bunch of settings, then draw the thing you want the settings to apply to, and then if you want to draw something with *different* settings, you change the settings and then draw the thing. For example, the order you'd do things if you wanted to draw a red square and a blue square would be:
```
> set fill to red
> draw square
> set fill to blue
> draw square
```
In our case, what this means is that if we add some code that adjusts the fill settings, this needs to go *before* the part where we draw our shape. Let's try drawing a filled circle:
```
...
E.hatchMode(E.PARALLEL);
E.fill(0,0,0);
E.circle(300, 300, 200);
...
```
### Fill Types
There are 6 different fill types in total in PEmbroider. These can each be set using the following lines of code:
```
E.hatchMode(E.CONCENTRIC);
E.hatchMode(E.PARALLEL);
E.hatchMode(E.SATIN);
E.hatchMode(E.SPIRAL);
E.hatchMode(E.PERLIN);
E.hatchMode(E.CROSS);
```
#### Exercise 3.1
* Instead of drawing a circle, try and fill one of the shapes you made in the last exercise
* One at a time, try out the different fill types on your shape. Which is your favourite?
### Fill Settings
As well as being able to change the type of fill, it's also possible to change the fill settings, namely the spacing of the fill lines, the colour of the fill, and the angle of the fill lines (for satin and parallel fills, where the lines have a prevailing angle).
We can do this using the same principles as before (e.g. putting the settings before the thing we want them to apply to). The methods to adjust the settings are listed below (note that we *always* need to specify a fill colour, even if it's just black):
```
E.hatchSpacing(spacing); // sets the density of adjacent runs (in machine units)
E.hatchAngleDeg(angle); // sets the orientation for SATIN & PARALLEL (in degrees)
E.fill(R, G, B); // sets your thread color (numbers between 0-255)
```
#### Exercise 3.2
* Try making one shape with a diagonal hatch fill, and another with a vertical fill. What happens when you place them on top of each other?
* What happens when you adjust spacing on concentric mode? What about Perlin mode?
* To un-set fill settings, you can use the line `E.noFill()`. Can you use this line to make some code that draws a filled shape, and then draws an outline shape afterward?
Another really important line is the `setStitch()` property. This sets the length of the stitch. Unlike hatch spacing, setStitch takes 3 arguments:
```
E.setStitch(minLength, desiredLength, noise);
```
* minLength: the shortest the stitch can possibly be
* desiredLength: what length most stitches should be
* noise: how much this should vary (e.g. should the stitches be very even). The noise property changes the texture of fills significantly.
#### Exercise 3.3
* experiment with modifying the stitch lengths in your fills
## 4. Stroke and Stitch Settings
The final group of settings we're going to look at is modifying the stroke (line) style. Similarly to fills, you need to modify the settings before drawing your line.
There are 2 stroke types in PEmbroider; tangent is the one we've been using by default, but perpendicular can be used to get a thicker, more defined outline.
```
E.strokeMode(E.PERPENDICULAR); // Stitches are perpendicular to the stroke
E.strokeMode(E.TANGENT); // Stitches go in the same direction as stroke
```
As before, stroke color can be set using RGB values. The other settings are the thickness of the line (stroke weight) and the stroke spacing (e.g. for perpendicular strokes).
```
E.stroke(R, G, B); // sets the stroke color, just like Processing.
E.strokeWeight(width); // sets the thickness of the stroke (in machine units)
E.strokeSpacing(spacing); // sets the density of the hatching within the stroke
```
#### Exercise 4.1
* create a file with 4 different lines, each with different stroke settings. How much variation can you get?
## 5. Loops and Randomness
Now we have a good idea of what you can do with PEmbroider's API, we can try out some generative code.
### For loops
For loops are structures that allow the same piece of code to be repeated multiple times with different inputs. We will have a go with them here, but for a full tutorial it's worth going through this page on [for loops in Processing](https://happycoding.io/tutorials/processing/for-loops).
We're going to try out a for loop that repeatedly draws lines on the canvas, changing the position of the line each time it draws.
```
...
for (int i = 1; i < 10; i++) {
E.line(50, i*50, 550, i*50);
}
...
```
In this code, we create a number, `i`, that will go from 1 to 10, increasing every time. The first time the code runs, `i` is equal to 1, and so `i*50=50`. The next time, `i=2`, so `i*50=100`, and so on, up till `i` reaches 9. `i` cannot reach 10 (as the code will only run for i<10) and so the for loop ends.
#### Exercise 5.1
* What happens when the number multiplying `i` is different for `y1` and `y2`?
* Can you make a series of vertical lines instead of horizontal lines by changing where `i` is used?
* Can you draw a grid?
* What happens when you increase and decrease the number of repeats (e.g. the number 10 in the example)
* Experiment with using `i` in different positions. What happens when you add or subtract it (or multiples of it)? Can you make a radial pattern?
### Random numbers
Another very useful tool for making generative patterns is randomness. Unlike the code we were using before (which used scaled variations where we could predict what the outcome would be), randomness adds an element of chance. In Processing, the function `random(50)` will return a random number between 0-50. This number will be a decimal (float) rather than a whole number (int), so if we want to use it like a whole number we also need to use the `int()` method.
```
...
for (int i = 1; i < 10; i++) {
E.circle(50 + i*50, 100, int(random(50)));
}
...
```
#### Exercise 5.2
* Run this code a few times. What do you notice? What is being randomly varied?
* What happens when you add a number to the random number? What if you multiply it by something?
* Can you make the randomness affect the y position?
### Nesting for loops
The last thing we will look at is using 2 nested for loops to create 2D designs. This isn't the only way to achieve this -- remember the grids from exercise 5.1 -- but this will help us a lot.
Before we get there, we could also look at what happens when we nest for loops *inside other things*, in this case, the composite shapes code from before.
```
...
E.beginComposite();
for (int i = 1; i < 10; i++) {
E.composite.circle(50 + i*50, 100, 50 + int(random(50)));
}
E.endComposite();
...
```
By putting the for loop *inside* `E.beginComposite();` and `E.endComposite();`, it's the same (from the point of view of the computer) as writing 10 separate composite circle lines, but for us it's a whole lot quicker.
and look! A beautiful worm:
[](https://wiki.cci.arts.ac.uk/uploads/images/gallery/2022-08/9BYuJanjgl31Njzx-image-1660229200690-46-37.png)
We can use the same principle to put one for loop inside another:
```
for (int i = 1; i < 10; i++) {
for (int j = 1; j < 10; j++) {
E.circle(i*50, j*50, 50 + int(random(50)));
}
}
```
Now we get a whole grid of circles!
#### Exercise 5.3
* You can also use `random(-60, 60)` to generate a number that can be positive or negative. Try using this in one of the position values.
* Have a go at making these circles into a composite shape. What happens when you change the numbers that are multiplied and added? Have a go at playing with these till you get an image that you like.
* Can you do this with a different shape? What about triangles?
Here's one I made earlier:
[](https://wiki.cci.arts.ac.uk/uploads/images/gallery/2022-08/EFBLrrMZUYEnEysD-image-1660230369677-06-05.png)
## 6. Polylines and curves
As well as having preset shapes, PEmbroider (like Processing) supports making custom shapes by defining a set of points along a line. To start one of these shapes, you need to bookend the line with:
```
E.beginShape();
// ...points
E.endShape();
```
If the final co-ordinate matches the first co-ordinate, we can also fill the shape: if not, it's just a stroke. Polylines are also great as within the line the machine doesn't need to make a jump; this is helpful for avoiding too many floats later on.
Each point on the line is given by `E.vertex(x, y)`, a single point in space. To draw a spiky shape, we can draw a bunch of points:
```
E.beginShape();
E.vertex(10,10);
E.vertex(500,50);
E.vertex(450,250);
E.vertex(350,140);
E.vertex(200,300);
E.vertex(10,10);
E.endShape();
```
#### Exercise 6.1
* Have a go at making a shape of your own: can you make a 5-pointed star? Can you add a fill?
### Curves
There are a number of different ways to render curves in Processing, which inherit from the different curve-drawing techniques in computer graphics. These are: arcs, splines and Bézier curves. The Processing [curves tutorial](https://processing.org/tutorials/curves) has a good summary of this:
* Use `arc()` when you need a segment of a circle or an ellipse. You can't make continuous arcs or use them as part of a shape.
* Use `curve()` (the spline function) when you need a small curve between two points. Use `curveVertex()` to make a continuous series of curves as part of a shape.
* Use `bezier()` when you need long, smooth curves. Use `bezierVertex()` to make a continuous series of Bézier curves as part of a shape.
The [tutorial](https://processing.org/tutorials/curves) gives a great overview of the different types and I'd recommend experimenting with all of them.
## 7. Generating embroidery from data
Processing allows data to be loaded in CSV and JSON formats. For this exercise, we're going to use NASA's [Land Ocean Surface Temperature](https://data.giss.nasa.gov/gistemp/graphs/graph_data/Global_Mean_Estimates_based_on_Land_and_Ocean_Data/graph.txt) dataset, which gives the mean global temperature since 1880 till present-day. To do this task, I have created a folder called `datasets` within the processing sketch folder, and created a file inside that called `temp.csv`.
First, make an empty sketch and try to read in the data from the .csv file:
```
Table table;
void setup() {
table = loadTable("datasets/temp.csv", "header");
println(table.getRowCount() + " total rows in table");
for (TableRow row : table.rows()) {
int year = row.getInt("year");
float temp = row.getFloat("unsmoothed");
println("year " + year + " temp " + temp);
}
}
```
You should see the data from the csv printed to the terminal.
The for loop that starts `for (TableRow row : table.rows()) ` is where we're going to use our values. First, we can try a simple example of drawing circles for each entry in the table, with the radius proportional to the temperature. As some temperature values are negative, we will need to adjust these up.
We want to add the embroidery template setup before the table is created (and also `E.optimize()`) after! To draw our circle, we can add directly to the for loop:
```
...
for (TableRow row : table.rows()) {
int year = row.getInt("year");
float temp = row.getFloat("unsmoothed");
float radius = (temp + 1.0)*45;
E.circle(100, 100, radius);
}
...
```
This code will create all the circles drawn in the same place. Ideally we'd like to space them out! We can do this by adding a counter:
```
...
int counter = 0;
for (TableRow row : table.rows()) {
int year = row.getInt("year");
float temp = row.getFloat("unsmoothed");
float radius = (temp + 1.0)*45;
E.circle(100, counter*20, radius);
counter = counter + 1;
}
...
```
### 7.1 Creating a grid from linear data
An issue we have here is that the data comes as one long list, which makes it hard to generate a tractable embroidery file. There are a number of ways around this, one of which is to use the modulo operator. This gives you the remainder when a number is divided by another number. This means, we can define a row length and count along our dataset in rows.
```
...
int counter=0;
int rowLength = 13;
int spacing = round(900/(rowLength));
for (TableRow row : table.rows()) {
int i = counter % rowLength;
int j = floor(num/rowLength);
int year = row.getInt("year");
float temp = row.getFloat("unsmoothed");
float radius = (temp + 1.0)*45;
E.circle((i+1)*spacing, (j+1)*spacing, radius);
counter=counter+1;
}
...
```
## 8. Tips, notes, further reading and extension exercises
We've scratched the surface of PEmbroider's [full capabilities](https://github.com/CreativeInquiry/PEmbroider/blob/master/API.md), which include things like image imports, interpolation, clipping and more.
### 8.1 Saving files + naming
To save the file as an embroidery file, you need to
```
String outputFilePath = sketchPath("triangles" + str(int(random(0, 100))) + ".pes");
```
### 8.2 Scale, density and stitch sizing
I personally find PEmbroider's presets a bit dense, and think they make for quite tough-feeling embroidery. My main recommendation is to make a sample sheet where you experiment with different fill densities, stitch lengths and stroke widths till you find some you like, but failing that, my defaults are:
```
E.strokeSpacing(2.0) // this spaces the stroke (outline) stitches by 2 pixels
E.hatchSpacing(3.0); // this spaces hatch (fill) stitches by 3 pixels
E.setStitch(5, 30, 0.0) // this sets minimum stitch to be 5px
```
If you want to use these throughout, just stick this above the 'content' section of your file.
### Extension exercises
* Have a go at using randomness to control the fill, colour, and spacing properties of different shapes.
* Take a look at the `shape_culling` example in the PEmbroider examples folder. Have a go at using your favourite of the culling options on different overlapping shapes. Can you add composite shapes to their code? How do they compare?
* Take a look at the `hatchangle_auto` demo. What lines are they using to follow the mouse? Could you use those numbers to generate other things?
# Digital Knitting Machine
We have a Silver Reed SK840 Knitting Machine which can be programmed to create custom knitted pieces. Students must complete an induction (or demonstrate existing ability to use a knit machine) in order to use this machine. Inductions last 3 hours, and give a full overview of basic technique.
These are bookable on ORB here. Please only book an induction if you are definitely want to use the machine, you are available to attend for the entire time, and you can commit to practicing using the machine for at least 3 hours in the week following. If you have questions about the machine and are not sure whether you want to use it for a project, you can book a technical tutorial with Agnes to discuss.
# Using the Silver Reed SK840 Knitting Machine
## Overview
The Silver Reed SK840 knitting machine is a 4.5mm standard-gague knitting machine that is intended for use with 3- and 4-ply yarns. The Silver Reed manual is available online [here](https://arena-attachments.s3.amazonaws.com/14590318/cd3b44ac53cd77ecfe1e746a095bc902.pdf?1641463478), and we have a paper copy in the workshop (as the online copy is poorly digitised, we will also make a better copy soon). You must be trained by a member of staff (currently, ask Agnes) before using the machine -- this guide is here for reference and troubleshooting.
[](https://wiki.cci.arts.ac.uk/uploads/images/gallery/2022-01/J8OydtGuPPpT5DpR-image-1641402097682.png)
The SK840 is a domestic knitting machine, and requires some manual input to operate. Fully-automated machines are normally referred to as 'industrial' knitting machines, to differentiate them from their domestic equivalents. Despite the lack of full automation, domestic knitting machines are often used in fashion for prototyping and designing new textiles. To learn more about industrial machines, [this video](https://www.youtube.com/watch?v=H0pxhgNPgU0) gives an overview of common types, and [this video](https://www.youtube.com/watch?v=U1bk4ZI0Qvc) is a good intro guide to knitting in general. If you want to look deeper into industrial knitting principles, the Indian Institute of Technology's textile technology department has a [whole lecture series](https://www.youtube.com/watch?v=tbpYiWEWuLo) online that's very clear and gives a great amount of detail.
# Learning Machine Knitting
This post is _not_ a detailed tutorial, but instead should serve as an introduction to the capabilities of our machine, an idea of different avenues to explore, and an overview of the steps involved in creating knitted textiles in the CCI. Machine knitting is detailed and complex, and requires time to learn and develop technique.
### How to search for knitting tutorials
When looking for guides online, you will notice many variations in machine make and type, including machines with plastic beds, doubled beds, different needle gagues and tools, and a variety of carriages. While there are details particular to the Silver Reed, a lot of technique can also be learned from general 'knitting machine' tutorials on any machine as the core operation of the needles and carriage is very similar. The caveats to this are when someone is using a carriage we don't have (e.g. a lace carriage), or using both beds of a double-bed machine (if they're using one bed, it's totally fine). If you're unsure, just ask (more likely than not, we can do it on our machine).
## Steps to Create Knitted Textile
[](https://wiki.cci.arts.ac.uk/uploads/images/gallery/2022-01/UHvoAvKFXPx0Xplk-image-1641463976457-12-53.png)
In machine knitting, knitted fabric is created by manually sliding the carriage back and forth over the needle bed, which loops a single strand of yarn a row at a time. Knitting is distinct from weaving: in weaving, fabric is created by interlacing 2 sets of threads at right angles to one another, while knitting involves taking a single thread and looping it around itself, one row at a time. (we currently don't have any weaving capabilities in the CCI).
[](https://wiki.cci.arts.ac.uk/uploads/images/gallery/2022-08/82uY08MCYgv1OvmE-image-1660127607380.png)
### Casting on and off
Because of the structure of knitted fabric, the top and bottom edges of the textile need to be made using a special stitch, to prevent the fabric from unravelling. At the start of the piece this is called 'casting on'; at the end it's called 'casting off'. Depending on the yarn, if you are just experimenting with samples then you can get away without casting off (the fabric will still be vulnerable to unravelling), though there is no way to knit without casting on.
#### Casting on
There are a few different cast-on techniques that can be used on the Silver Reed, 2 of which are enumerated in the manual:
* weaving cast on -- this is the easiest method on the Silver Reed, though has the downside of leaving a slightly scrappy-looking edge. It's great for quick sampling, though. The manual contains a good guide, as does this [video](https://www.youtube.com/watch?v=tHxdYDUifcM)
* e-wrap cast on -- this is a cast on technique common to all knitting machines, and is the "official" method that will give you a neat edge. There is a detailed guide [here](https://wickedwoollies.co.uk/ewrap-caston/)
* ravel-cord cast on; similar to the e-wrap technique but involves knitting with waste yarn (cast on with a quick method like weave) for a few rows, then knitting in a silk thread (called a 'ravel cord'), then doing an e-wrap cast on. When the piece is finished, the silk thread is pulled out, leaving a clean cast on edge that's been given structural support by the waste yarn. The manual has a good guide to this, also a video [here](https://creativetien.com/machine-knitting-basics-cast-on-with-waste-yarn-ravel-cord-and-e-wrap/)
#### Casting/binding off
Casting off is an important technique to learn, and while slow at first will get much faster over time. The general idea is to bind off one stitch at a time by looping it into the next stitch along, working your way across the fabric until there is a single stitch left to tie off.
There are 2 main techniques: latch tool cast-off and transfer tool cast-off. Transfer tool is a little slower, but considerably easier to learn (and the one I'd recommend starting with). [This video](https://www.youtube.com/watch?v=dKFwrsKhmbo) does a good job of demonstrating both techniques.
[](https://wiki.cci.arts.ac.uk/uploads/images/gallery/2022-08/VU2UTNel9sH8NFAZ-image-1660127674725.png)
## Different Types of Stitch
The SK840 supports a range of options for different kinds of stitch, which can be selected by changing the dial on the top of the carriage. Many of these stitches may also be used alongside the
The SK840 may be computer-controlled using the DesignaKnit software and SilverLink module, that connects to the knitting carriage. Currently at CCI we _do not_ have either a lace carriage or a ribber. A key to the core machine parts is pictured below:
The simplest knitting style on the machine is called 'Stockinet' -- this is a style of knitting that will result in a smooth 'knit' side on one side of the fabric, and a rougher 'purl' side on the other.
### Stockinet
This is the simplest form of knitting, and equivalent to a 'knit-purl' alternating stitch in hand knitting. It produces a flat, smooth side (the 'right side') and a rougher side ('wrong side'). To knit stockinet, select the 'O' stitch setting on the carriage.
All stitch varieties listed here still require a stockinet cast-on.
### Fair Isle and Patterning
Fair Isle knitting is a common way of creating patterns in knitted textiles, by alternating between 2 colours within each row. On the SK840, this is also one of the three stitches (the others being slip and tuck stitches) that may be automatically controlled using the SilverLink controller; it's quite low-effort to produce some really beautiful, impressive things that it would be very hard to knit by hand.
To knit Fair Isle, the machine should be connected to the computer via the SilverLink, and DesignaKnit should be in interactive knitting mode. The carriage should be turned to 'F' for Fair Isle, and the arm should be threaded with 2 yarns (the first in position 1, the second in position 2).
[This video](https://www.youtube.com/watch?v=Scyx_8A83tQ) shows the technique using punch-cards rather than the computer, but the core ideas are the same. For more guidance on creating patterns using DesignaKnit, see the wiki page on [Creating Digital Knitting Patterns with DesignaKnit](https://wiki.cci.arts.ac.uk/books/textiles-area/page/creating-digital-knitting-patterns-with-designaknit).
[](https://wiki.cci.arts.ac.uk/uploads/images/gallery/2022-08/331tyiuq1BpMOlK9-orbs.jpeg)
### Slip Stitch
Slip stitch is a knitting technique where a stitch is skipped (or 'slipped'), that can be used to add texture to knitted fabrics either manually or automatically (using the SilverLink). Skipping stitches creates patterns in the strands of un-knitted yarn, and is often used alongside other texturing techniques.
[](https://wiki.cci.arts.ac.uk/uploads/images/gallery/2022-08/r0OnDdzz0oQOlfo7-image-1660130409893.png)
### Tuck Stitch
Tuck stitch is a knitting technique that involves tucking a stitch from one row into a row above. Like slip stitch, tuck stitch can manipulate the texture of the knitted fabric, though somewhat more dramatically, as depending on the depth of the tuck the fabric can be structured in all sorts of interesting ways. Stitches may be tucked automatically using the SilverLink.
[](https://wiki.cci.arts.ac.uk/uploads/images/gallery/2022-08/LJng0kvWL3B2Ojsx-image-1660130149654.png)
#### Tuck Mosaic
The 2 colours here are knitted in horizontal stripes, but with a regular pattern of stitches 'tucked' into the stitch above, manipulating the structure to resemble vertical lines. The result looks very beautiful, but it's time-consuming to change the colour every 2 rows.
[](https://wiki.cci.arts.ac.uk/uploads/images/gallery/2022-08/XAskVEphGKcccqH0-image-1660129599440.png)
What's interesting about tuck patterns is that they look nothing like the patterns that produce them. There's a great and incredibly detailed [blog post](https://alessandrina.com/2019/06/29/mosaics-and-mazes-charting-meet-numbers-and-gimp/) on [Alessandrina](https://alessandrina.com) (very helpful knitting blog) which explains in great detail.
### Mock Rib
Many knitted garments are hemmed with a stretchier 'rib' edge (think cuffs, collar and bottom of a sweater, for example). This adds structural stability to the fabric and also looks great. Typically this is done using a 'ribber', or a double bed machine, which we _don't_ have in the CCI. However, it's perfectly possible to make a mock rib using a single bed machine that's functionally very similar.
I watched [this video](https://www.youtube.com/watch?v=GOq0rZ-JcMo) for guidance, which was pretty good (it's in Norwegian, but English subtitles), which gives a good guide to creating a 'mock' rib on a single bed machine.
### Knitting with every other needle
This is used to knit yarns like mohair, or chunkier yarns. [This video](https://www.youtube.com/watch?v=Joy6M5sOGRo) (it's in Norwegian, but has English subtitles) gives a good demonstration of the cast-on technique required: after casting on, knit as normal, but with only half the needles engaged.
## Special tools and carriages
### Intarsia
The Intarsia Carriage is an alternate carriage for the machine that allows multiple colours to be used in a single row, without having runners along the back like in Fair Isle. It produces large blocks of colour (if you want to use fine detail, Fair Isle is normally a better bet), though requires considerably more manual effort than
[](https://wiki.cci.arts.ac.uk/uploads/images/gallery/2022-08/GssEUSdtFswRyLQW-image-1660127988359.png)
### Automatic Colour Changer
We have an automatic colour changer in the CCI, that makes changing colour between rows considerably faster, and also allows selection between 4 yarns, rather than 2. It cannot change colours _within_ a row (for that, you want either fair isle or intarisa) -- instead think of it as a way of making stripes a lot more efficient. It's particularly useful when knitting tuck mosaic patterns that require regular colour change. The automatic colour changer may also be used with fair-isle or other patterning techniques (see example below), though when using 2 yarns (as in Fair Isle) only one may be changed automatically.
Please talk to Agnes before using the automatic colour changer for the first time.
[](https://wiki.cci.arts.ac.uk/uploads/images/gallery/2022-08/iY2JpRlLF9nYXw8A-image-1660127899803.png)
[](https://wiki.cci.arts.ac.uk/uploads/images/gallery/2022-08/zcf7YqcWYBOm9iVN-image-1660128047843.png)
# E-textiles and technical knits
The knitting machine can also be used to create textiles with electronic properties, including conductive and stretch sensors, and even radio components. Please see [this guide](https://wiki.cci.arts.ac.uk/books/textiles-area/page/knitting-with-conductive-yarn) to knitting with conductive yarn for more information.
# Resources
* [learnmachineknitting.com](http://www.learnmachineknitting.com/)
* [alessandrina.com](https://alessandrina.com/) -- really useful knitting documentation site
# Choosing Yarns
We provide a range of yarns at the CCI that are compatible for use with the machine. It is strongly suggested that when starting to use the machine, you make use of the 2-ply lambswool we provide (and that will be used during tutorials). 2 strands of the lambswool are threaded through the tensioner together to create a 4-ply yarn.
If you are planning to create larger projects (e.g. bigger than a standard sample swatch), we ask that you source your own yarns. Finding yarns suitable for machine knitting is a different task than for hand knit: [this guide](https://www.mkc.community/machine-knitting-blog/where-to-find-machine-knitting-yarn) offers a good overview of considerations. In general, you will have more luck with yarns intended for machine knitting -- talk to Agnes if you would like more advice.
At the CCI, our main yarn supplier is [Uppingham Yarns](https://wools.co.uk), who have a wide range and high quality. Other recommended suppliers include:
* [Knit Works](http://knitworkslondon.com/) in Bethnal Green -- this place is worth a visit, they also have machine knitting classes + sell a very wide range of machine yarns.
* [Denier Studio](https://denier.studio/) in Tottenham -- they sell deadstock yarns, good on both a sustainability front and tend to be a lot cheaper.
### Machine Knit Inspiration
#### electronic textiles
* [Irene Posch (knitted radio!)](http://www.ireneposch.net/)
* [Irmandy Wicaksono (knitted keyboard)](https://www.irmandyw.com/research/knittedkeyboard)
#### machine knitting for actuation/active textiles
* [CMU morphing matter lab](https://www.morphingmatter.cs.cmu.edu/projects/3d-knitted-actuators)
* [MIT Self-Assembly Lab](https://selfassemblylab.mit.edu/active-textile-tailoring)
### textbooks
* [A Complete Guide To Machine Knitting](https://www.amazon.co.uk/Complete-Guide-Machine-Knitting-Finished/dp/8417412867) (ask Agnes to borrow her copy)
# Creating Digital Knitting Patterns with DesignaKnit
DesignaKnit is a pattern drafting, garment design and interactive machine control software. It is compatible with multiple different kinds of knitting machines, including the Silver Reed SK840, which is the machine we use at the CCI.
[](https://wiki.cci.arts.ac.uk/uploads/images/gallery/2022-01/NdaAwsCnFKdNcGio-image-1641480774989.png)
DesignaKnit includes multiple different features, which may be used separately or together. The main ones to know about are:
* Garment styling (creating shapes)
* Stitch designer (creating patterns)
* Interactive knitting (computer control)
Video tutorials from Prism's Creations are a great resource. They go through different features of the software one-at-a-time, eventually creating an asymmetric patterned jumper. To get into patterns, I would start with the second video: [Stitch Designer Basics](https://www.youtube.com/watch?v=zjN3A3AuxCs).
# Knitting With Conductive Yarn
Knitting is a really versatile and flexible way to integrate sensors and other conductive material directly into fabric. Depending on the kind of pattern, and the type of yarn that you use, knitted textiles can be used to integrate directly into stretchable, conformable fabric:
* stretch sensors
* switches
* pressure sensors
* capacitive touch sensors
At the CCI we have a range of conductive yarns and threads that can be used that have variable conductive and textural properties. We have a Silver Reed knitting machine that is suitable for knitting 2-3ply yarn, and can be used programatically with the DesignaKnit software.
Typically, the conductive yarn is used along with a carrier yarn, that adds structural stability, colour, and texture to the knit.
In general, knitted textiles should not be used to conduct any currrent greater than 100mA or so, as they can risk getting hot, and because of their form (and the potential for shorts) in general my advice would be to consider them primarily as sensing rather than conductive material.
This page isn't a tutorial on the Silver Reed (please email Agnes if you would like one), but an overview of options for making conductive knitted textiles at the CCI.
## Knitted Stretch Sensor
Knitted fabrics that integrate conductive yarn typically have some in-built resistance, which will change depending on
# Digital and e-textile design at the CCI
This page is a guide to different techniques that can be used in digital and e-textile design, resources we have at the CCI, places to source materials, and possible sources of inspiration/research references.
Here, 'digital design' refers to textile equipment that works with CAD, and e-textiles specifically to the integration of electronic components within textiles. Both of these things are well-supported at the CCI and can also be done in combination.
## Equipment
At the CCI we have two main pieces of digital textiles equipment:
- the [Silver Reed SK840 Digital Knitting Machine](https://wiki.cci.arts.ac.uk/books/textiles-area/page/using-the-silver-reed-sk840-knitting-machine), which may be used either manually, or programmed using the [DesignaKnit](https://wiki.cci.arts.ac.uk/books/textiles-area/page/creating-digital-knitting-patterns-with-designaknit) software. It's also possible to knit with [conductive yarn](https://wiki.cci.arts.ac.uk/books/textiles-area/page/knitting-with-conductive-yarn) on the machine, to create sensors and other electronic components.
- The [Brother Innov-is V3 Embroidery Machine](https://wiki.cci.arts.ac.uk/books/textiles-area/page/using-the-brother-innov-is-v3-embroidery-machine), a digital embroidery machine which may be programmed using either Brother's [PE Design](https://wiki.cci.arts.ac.uk/books/textiles-area/page/creating-digital-embroidery-designs-with-pe-design-11) software (think: MS Paint but for sewing), or the Processing plugin [PEMbroider](https://wiki.cci.arts.ac.uk/books/textiles-area/page/creating-digital-embroidery-designs-with-pembroider).
Both of these machines require training to use. Please check [Orb](https://orb.arts.ac.uk/) for upcoming tutorials, or contact Agnes for more information. Additionally, we have a Brother sewing machine that can also be used for student projects. If you have used a sewing machine before you may use this without training, otherwise ask the technicians.
Programmable knit sample:
Digital embroidery sample:
## Online Resources
### e-textiles
A fantastic resource for most e-textile related ideas and tutorials is [How To Get What You Want](https://www.kobakant.at/DIY/?p=7057), aka the [KOBAKANT](https://www.kobakant.at/?category_name=work) art collective DIY wearable technology documentation site. I'd strongly recommend just browsing around the site -- they have some great detailed guides, including [knitted sensors](https://www.kobakant.at/DIY/?p=1762), [robust hard/soft connections](https://www.kobakant.at/DIY/?p=1272), [textile speakers](https://www.kobakant.at/DIY/?p=2936), and [using conductive velcro as a switch](https://www.kobakant.at/DIY/?p=362).
## Materials
### Non-electronic materials
At the CCI we have embroidery thread, sewing thread, lambswool and cotton yarn, and limited amounts of calico, cotton drill and backing fabric to experiment with on the machines. If you are planning a larger project, we ask that you purchase your own materials, and can give you advice on doing so.
### Conductive Thread
It's better to think of conductive thread as a long resistor than a traditional cable. All conductive threads come with an associated resistance per unit length, and this can vary a lot between different brands and thicknesses. For a ballpark figure, Adafruit's [2 ply conductive thread](https://proto-pic.co.uk/product/stainless-thin-conductive-thread-2-ply-23-meter-76-ft/) is made of stainless steel, and has a resistance of 16 ohms/foot. If you're unsure of which brand you're using, you can always use a multimeter to measure it.
[](https://wiki.cci.arts.ac.uk/uploads/images/gallery/2022-01/pWd7KVzmGSZmk8xX-image-1641486529230.png)
Adafruit have a short [conductive thread tutorial](https://learn.adafruit.com/conductive-thread) that covers basics like hand- and machine-stitching, and steps to prevent short circuits.
### Conductive Yarn
Conductive yarn is different to conductive thread: it has much higher resistance, which makes it inadequate to directly connect components unless they are very close together or the knitted yarn is stretched, but it is well-suited to pressure sensing.
When a knitted sample is held loosely, it has a high resistance as the steel fibres in the yarn do not make contact with one another, but when the sample is stretched, the steel fibres are pulled into closer contact, reducing the resistance and allowing the flow of an electric current.
### Conformable Connections
Conformability (using soft and flexible components) is key to making robust e-textile projects, and is particularly relevant to projects using conductive thread. We have a stock of conductive velcro and poppers that can be used to integrate wires into projects, as well as super-flexible silicone wire.
### Sourcing Materials
- [How To Get What You Want](https://www.kobakant.at/DIY/?p=7057) has a really good, long list of 'Basic E-textile Materials', as well as detailed reviews for materials such as [Conductive Yarn](https://www.kobakant.at/DIY/?p=1978), [Conductive Paint/Ink](https://www.kobakant.at/DIY/?p=634), and [Piezoresistive Fabrics](https://www.kobakant.at/DIY/?p=913)
- [Sparkfun](https://www.sparkfun.com/categories/204) has an e-textiles section that includes conductive thread, Lilypad and Chibitronics kits, pressure sensors and conformable data busses.