Workshop: Using Arduino with PEmbroider
comingThis soon...
Ina thiswrite up of part of the PEmbroider tech skills workshop explaining how to use inputs from Arduino to alter a PEmbroider sketch. It shows the example I will beof using an LDR to vary the radius of a circle.
There are a few steps to this process:
1. Circuit
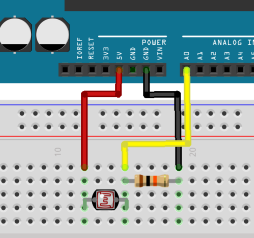
First, you need to build your circuit. This is the same as you would build any Arduino circuit and can use anything that will give you a reading such as potentiometer, LDR, button, switch, etc. Below is the circuit for an LDR.
2. Arduino Code
The setup for the arduino code is nice and simple, we just need to read our value then print it to serial. Make sure you are using println() so each value prints on a new line.
void setup() {
  Serial.begin(9600);
}


void loop() {
  int val = analogRead(A0);
  Serial.println(val);
  delay(100);
}
Once you have uploaded this, make sure that the Serial Monitor is closed. If left open, processing won't be able to read the data. Also take note of the frequency used in Serial.begin() and the COM number when connecting as these both need to be matched in the Processing code.
3. Processing Code
There are a few things that we need to set up in this part of the code.
Import libraries and create objects
First, we need to import the correct libraries and create our Serial object, a variable to store the value from the Arduino (which will be a string), and a file number variable (which we will use later).
import processing.serial.*;
import processing.embroider.*;
PEmbroiderGraphics E;

Serial myPort;  // Create object from Serial class
String val = "0"; //Create variable to hold value from Arduino
int fileNumber = 0;
Setup
Within the setup() function, we will find and connect to the correct serial port.
  println(Serial.list());
  String portName = Serial.list()[0]; //change the 0 to match your port

  myPort = new Serial(this, portName, 9600); //this freq value must match the arduinos
The first line here will print all the available ports. Using this, you can then select the same one that your Arduino is connected to by changing the number in the square brackets on the second line. Also, make sure that the frequency value matches the Arduino's Serial port.
Draw
Inside the draw() function we will then read the data from the Arduino.
if(myPort.available() > 0){
 val = myPort.readStringUntil('\n');
}
This can then be used as a variable within our sketch. For example, as the radius of a circle.
  float r = map(float(val),0,800,0,300);
  E.circle(width/2,height/2,r);
The value is read as a string so we have to cast it to float in order to use it. The map() function is used to take the values given from the Arduino and map them to the range of values you want to be used in the sketch.
Write out file
This sketch is currently not actually producing an embroidery file so we need to add a trigger that will cause the file to write out. You could use a variety of inputs both from the Arduino or computer to do this. Below, we are using the space bar.
void keyPressed() {
  // Export the embroidery file when we press the space bar.
  E.optimize(); //important to include - optimizes the embroidery paths
  if (key == ' ') {
    String outputFilePath = sketchPath("PEmbroider_arduino_demo_" + fileNumber + ".pes");
    save("PEmbroider_interactive_demo_" + fileNumber + ".pes");
    E.setPath(outputFilePath);
    E.endDraw(); // write out the file
    fileNumber += 1;
  }
}
Full Code
So, for this sketch, the full code would be as below:
import processing.serial.*;
import processing.embroider.*;
PEmbroiderGraphics E;

Serial myPort;  // Create object from Serial class
String val = "0";

void setup() {
  size(600, 600);
  E = new PEmbroiderGraphics(this, width, height);

  println(Serial.list());
  String portName = Serial.list()[6]; //change the 0 to a 1 or 2 etc. to match your port


  myPort = new Serial(this, portName, 9600);

}

void draw(){
  background(200);
  E.beginDraw();
  E.clear();
  E.noFill();

  // If data is available, rad and store in val
  if ( myPort.available() > 0) {
    val = myPort.readStringUntil('\n');
  }


  float r = map(float(val),0,800,0,300);
  E.circle(width/2,height/2,r);


  E.visualize(true, true, false);   // Display the embroidery path on-screen.
}
-->