DFPlayer Mini
The DFPlayer Mini is a small (cheap!) and flexible mp3 player unit that can be controlled via an Arduino. Unless you have a specific need for a 'trigger' function (where individual tracks are tripped using specific linked buttons) it's a nifty alternative to the larger and more expensive Sparkfun mp3 trigger.
Full details here: https://wiki.dfrobot.com/DFPlayer_Mini_SKU_DFR0299
Preparing files
Like the Sparkfun Mp3 trigger, some preparatory steps are required to have files play reliably from the SD card. The files you use should be in mp3 format, and their names should be numbered from 1 (e.g. 1.mp3, 2.mp3, 3.mp3... and so on).
Macs do a weird thing where every time you use a SD card or memory stick, it creates a bunch of hidden files, which can cause some strange errors.
Once you have finished copying your .mp3 files to the SD card, open up a mac terminal and type in the following (change '<SDVolumeName>' with the name of your SD card):
dot_clean /Volumes/<SDVolumeName>
If that doesn't work, IE your MP3s don't play, we will have to do it manually like so:
$ cd /Volumes/<name-of-volume>	# this navigates to the correct volume
$ ls -a				# verify what's in the output of this
$ rm ._*.mp3			# this removes all of the thumbnails
$ rm -r .Spotlight-V100 	# deletes the .Spotlight-V100 folder
$ rm -r .fseventsd   		# deletes the .fseventsd folder
$ rm -r .Trashes     		# deletes the .Trashes folder
$ ls -a				# this shows all the files you have left
Warning
Be very careful when you are running the rm -r command: this will recursively delete files and is NOT reversible. Only run it when you know you are in the correct folder, and make sure you know which folder you are deleting)
Operation not Permitted error
Sometimes on a mac you might get an error "operation not permitted". If you have this, follow these instructions to allow your Terminal to change files
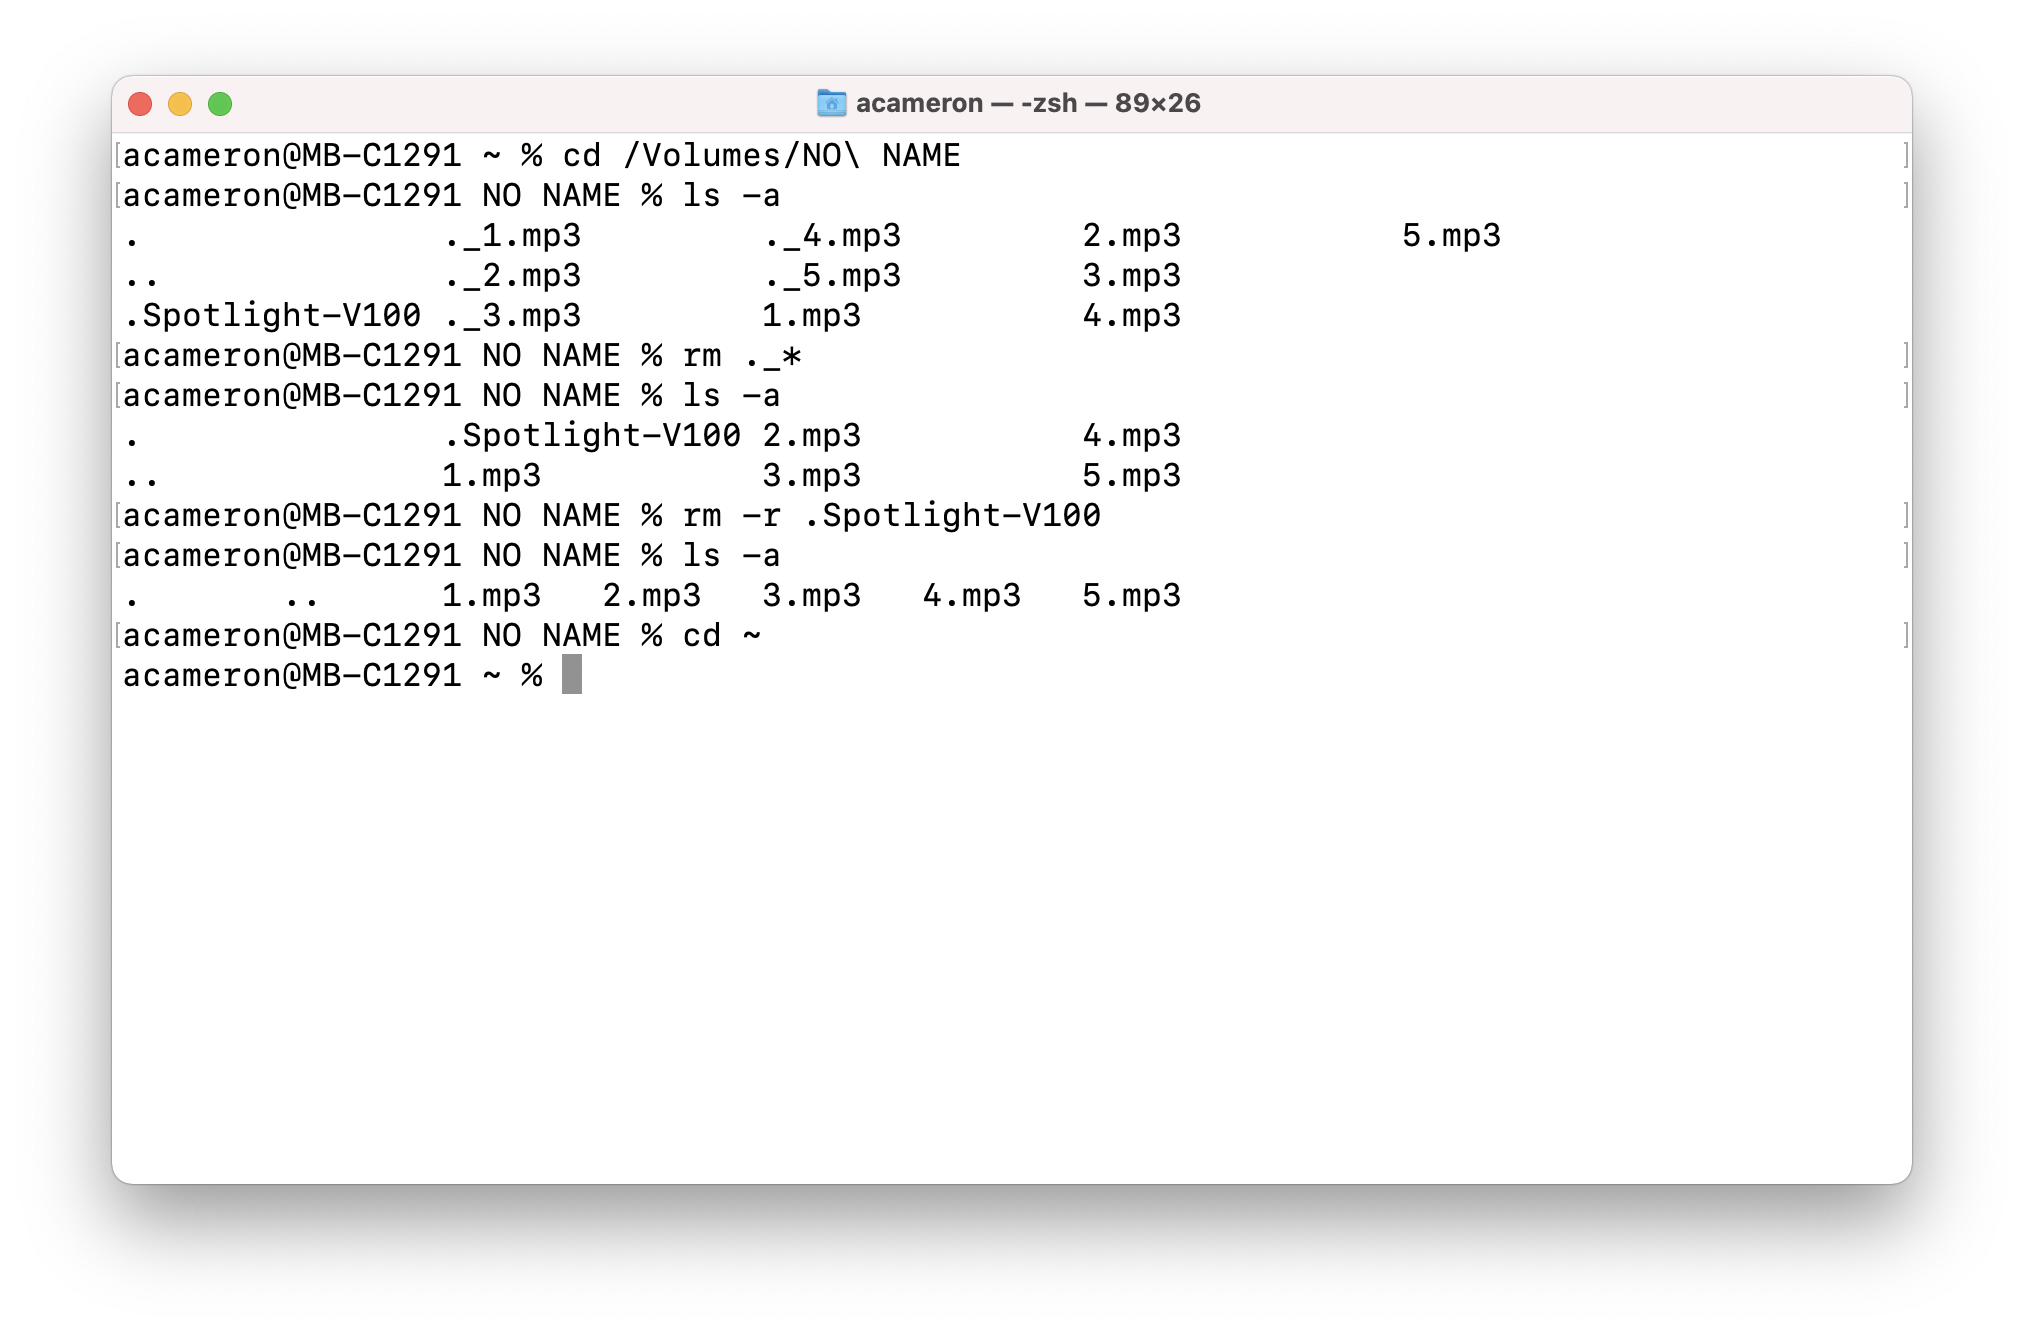
e.g. see below: I use ls -a multiple times to check what I still need to delete. At the end, all that's left is the .mp3s and the . and .. shortcuts (these aren't file and can be ignored).
Wiring the DFPlayer
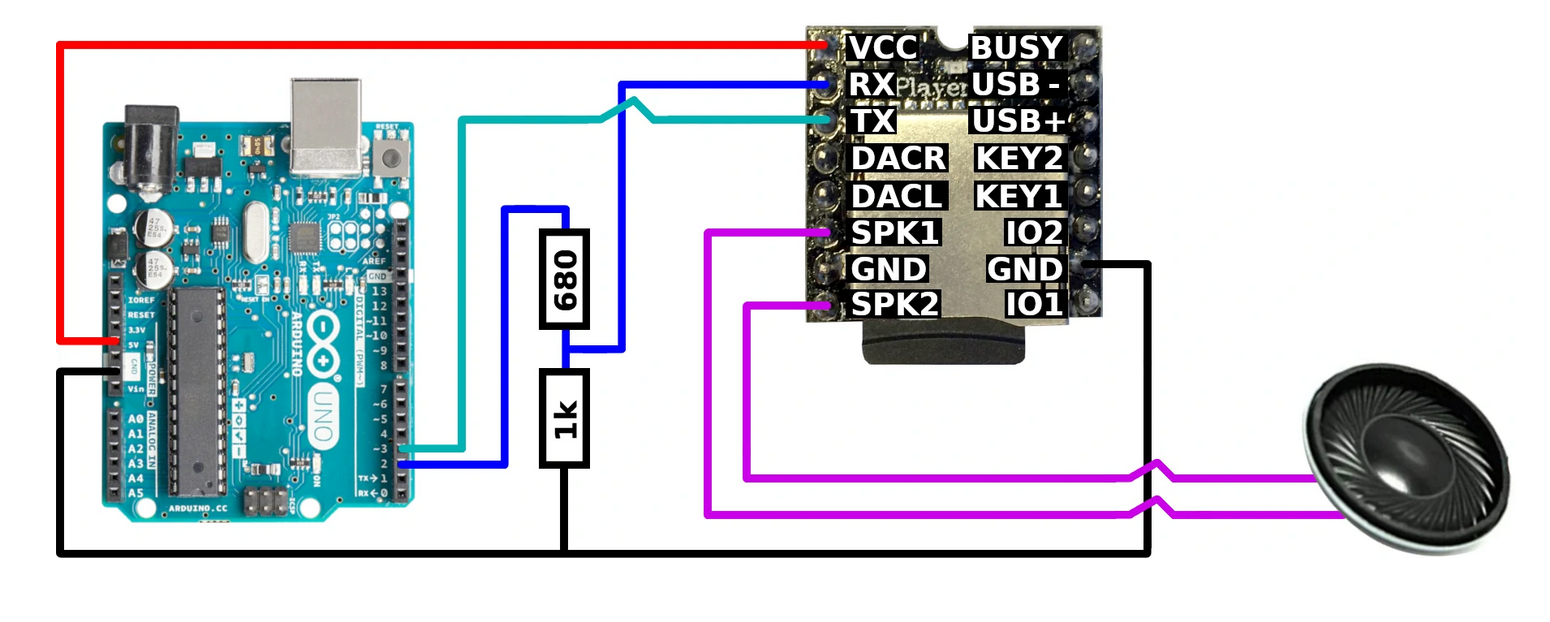
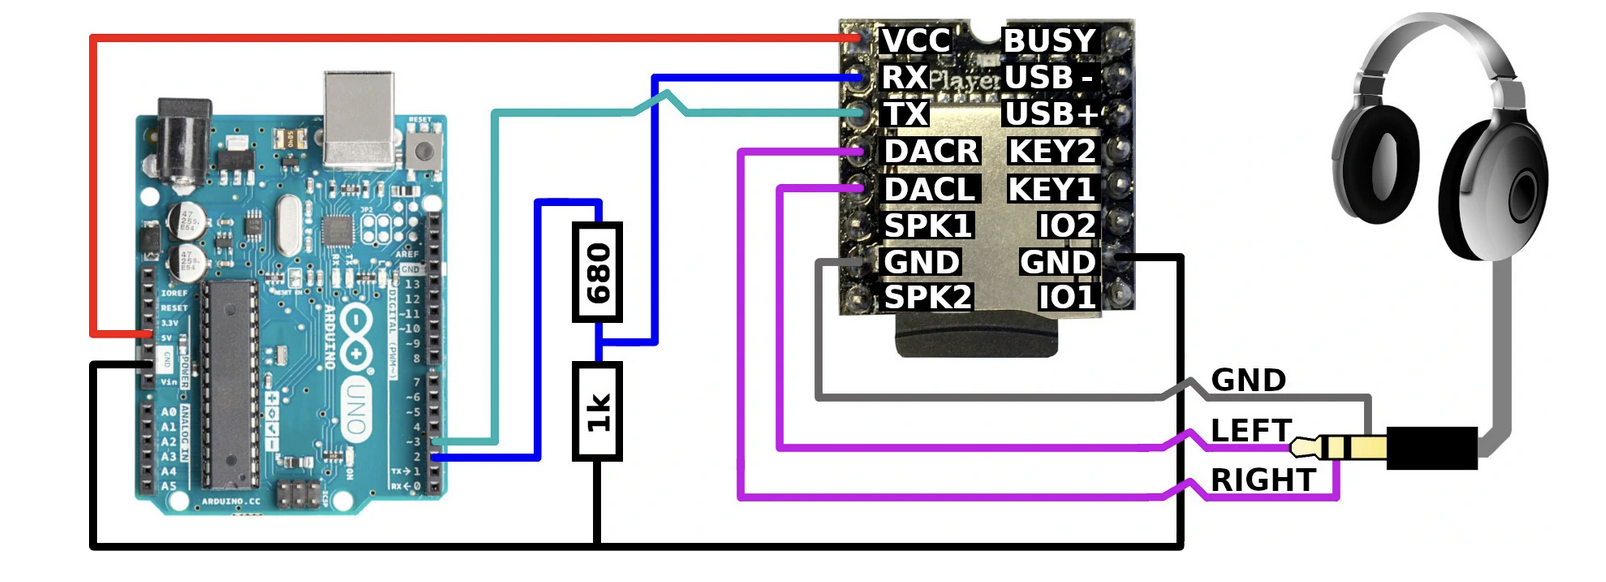
These diagrams are taken from the thorough tutorial on DFPlayer wiring found here. In both instances, the two resistors on the RX pin protect the input.
Mono audio (speaker)
Ensure you have the board the right way around. Wire either side of the speaker into SPK1 and SPK2.
Wiring for stereo
The DFPlayer also supports stereo audio; in order to use this feature, you need to use the DAC L and R channels instead of SPK1 and SPK2, as below:
Arduino Leonardo
If you are using an Arduino Leonardo, these come with a secondary serial port readily enabled, and you don't need to add any code.
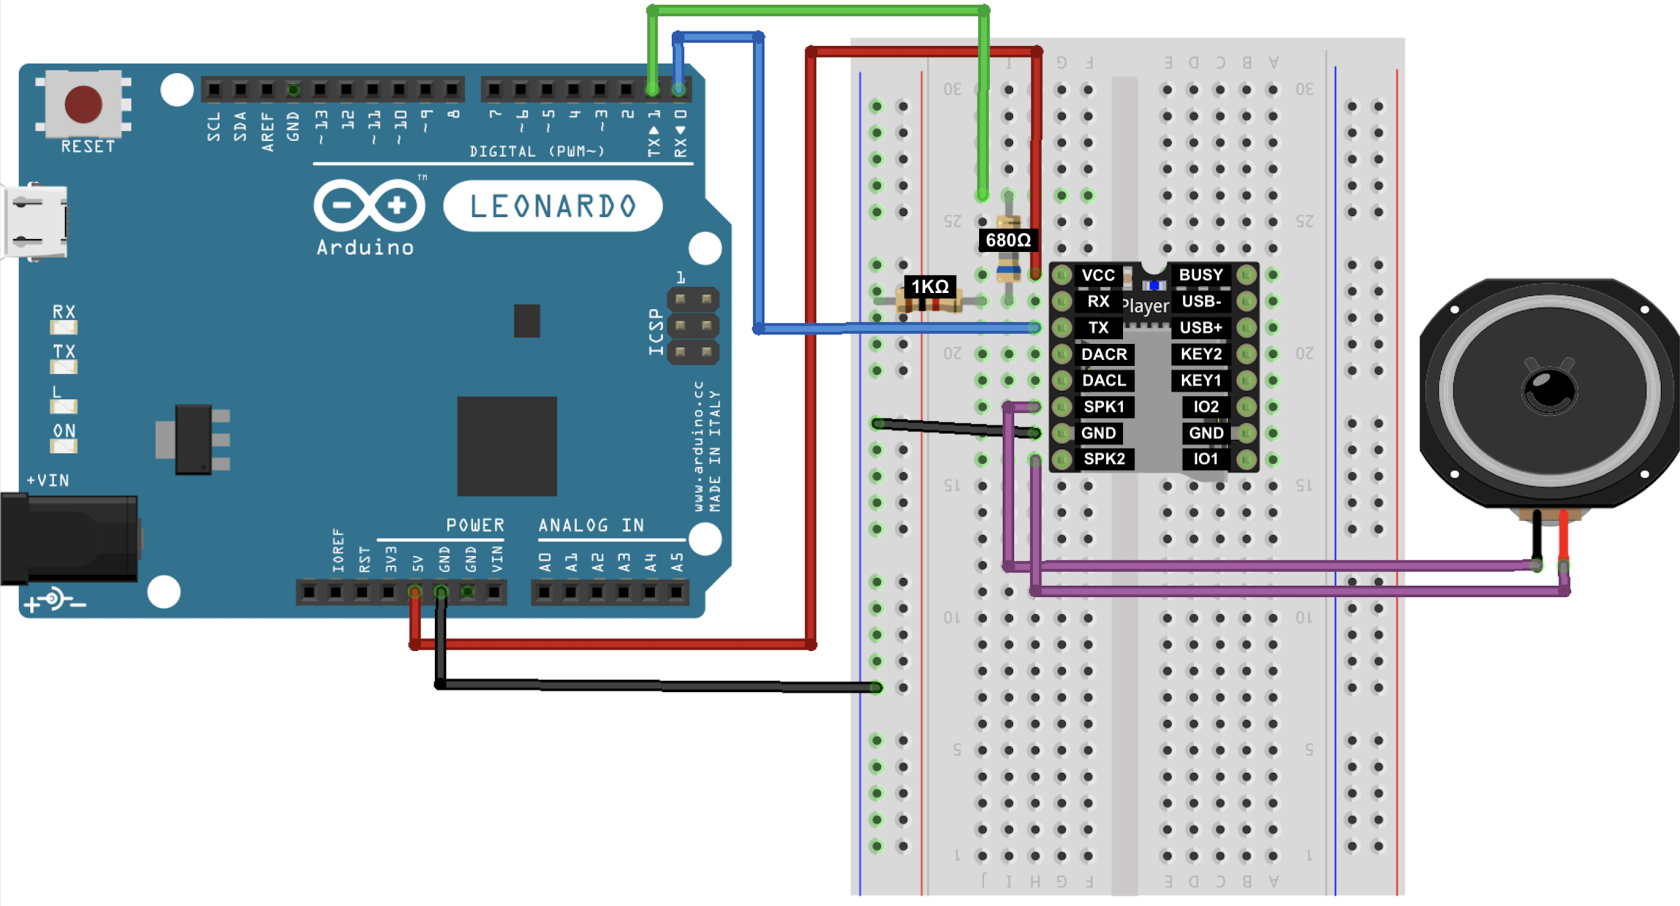
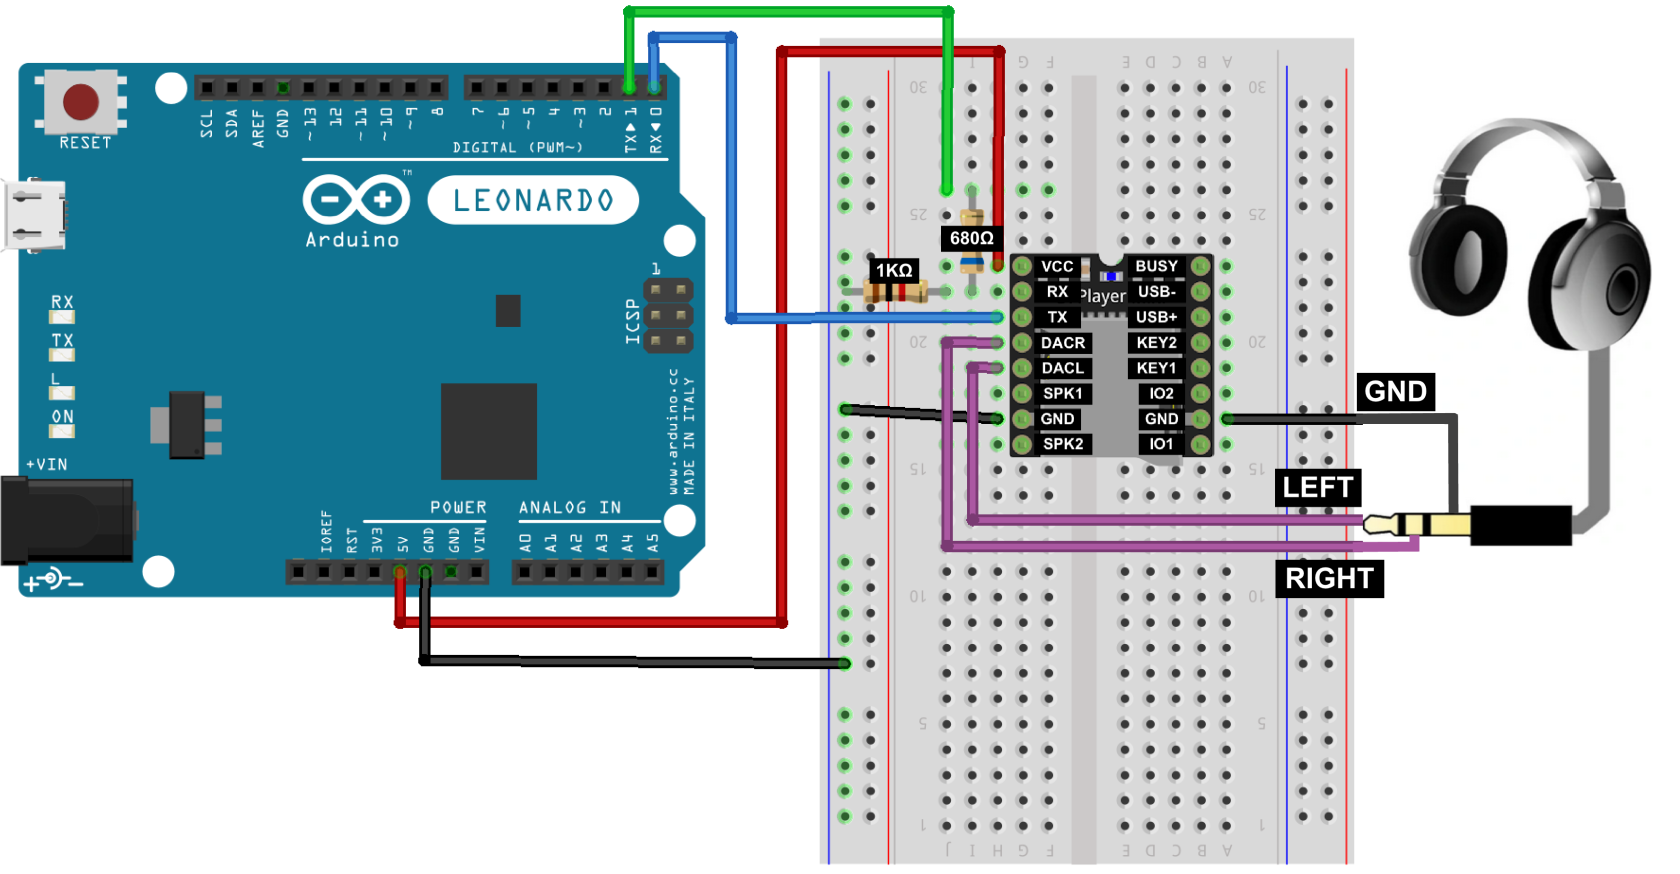
Connections: RX and TX on the DFPlayer connected to 0 and 1 of the Arduino, connect DFPlayer RX through a 1k resistor). RX stands for 'receiver' and TX stands for 'transmitter' -- so you need to connect the pin marked RX on the DFPlayer to the pin marked TX on the Arduino, and vice versa.
Mono audio (speaker with Leonardo)
Ensure you have the board the right way around. Wire either side of the speaker into SPK1 and SPK2.
Wiring for stereo (Leonardo)
The DFPlayer also supports stereo audio; in order to use this feature, you need to use the DAC L and R channels instead of SPK1 and SPK2, as below:
Arduino Uno
If you are using an Arduino Uno, you need to enable software serial, to configure pins 102 and 113 to be serial pins. You will also need to uncomment the lines of code labelled 'Uno' below.
Connections: RX and TX on the DFPlayer connected to 102 and 103 of the Arduino, connect DFPlayer RX through a 1k resistor). As before, RX stands for 'receiver' and TX stands for 'transmitter' -- so you need to connect the pin marked RX on the DFPlayer to the pin marked TX on the Arduino, and vice versa.
Mono audio (speaker with UNO)
Ensure you have the board the right way around. Wire either side of the speaker into SPK1 and SPK2.
Wiring for stereo (UNO)
The DFPlayer also supports stereo audio; in order to use this feature, you need to use the DAC L and R channels instead of SPK1 and SPK2, as below:
DFPlayer Code
There's a number of different Arduino libraries for communicating with the DFPlayer on line, though the simplest is probably the one made by the manufacturers, DFRobotDFPlayerMini. Install it using the Arduino library manager, instructions here.
This sample code is adapted from the library's 'Getting Started' example, and will play tracks while also showing any error messages over the serial monitor.
#include "DFRobotDFPlayerMini.h"

//Uncomment next 2 lines if you're using an Uno ->
//#include "SoftwareSerial.h"
//SoftwareSerial Serial1(10, 11); //RX, TX

DFRobotDFPlayerMini myDFPlayer;

void setup()
{
  Serial.begin(115200);
  Serial1.begin(9600);

  Serial.println();
  Serial.println(F("DFRobot DFPlayer Mini"));
  Serial.println(F("Initializing DFPlayer ... (May take 3~5 seconds)"));

  //Use softwareSerial to communicate with board
  if (!myDFPlayer.begin(Serial1)) {
    Serial.println(F("Unable to begin:"));
    Serial.println(F("1.Please recheck the connection!"));
    Serial.println(F("2.Please insert the SD card!"));
    while(true);
  }

  Serial.println(F("DFPlayer Mini online."));

  myDFPlayer.volume(0);
  delay(100);

  myDFPlayer.volume(15);  //Set volume value. From 0 to 30
  myDFPlayer.play(1);  //Play the first mp3. to loop, exchange 'play' for 'loop'
}

void loop()
{
  if (myDFPlayer.available()) {
    printDetail(myDFPlayer.readType(), myDFPlayer.read());
  }
}

void printDetail(uint8_t type, int value){
  switch (type) {
    case TimeOut:
      Serial.println(F("Time Out!"));
      break;
    case WrongStack:
      Serial.println(F("Stack Wrong!"));
      break;
    case DFPlayerCardInserted:
      Serial.println(F("Card Inserted!"));
      break;
    case DFPlayerCardRemoved:
      Serial.println(F("Card Removed!"));
      break;
    case DFPlayerCardOnline:
      Serial.println(F("Card Online!"));
      break;
    case DFPlayerPlayFinished:
      Serial.print(F("Number:"));
      Serial.print(value);
      Serial.println(F(" Play Finished!"));
      break;
    case DFPlayerError:
      Serial.print(F("DFPlayerError:"));
      switch (value) {
        case Busy:
          Serial.println(F("Card not found"));
          break;
        case Sleeping:
          Serial.println(F("Sleeping"));
          break;
        case SerialWrongStack:
          Serial.println(F("Get Wrong Stack"));
          break;
        case CheckSumNotMatch:
          Serial.println(F("Check Sum Not Match"));
          break;
        case FileIndexOut:
          Serial.println(F("File Index Out of Bound"));
          break;
        case FileMismatch:
          Serial.println(F("Cannot Find File"));
          break;
        case Advertise:
          Serial.println(F("In Advertise"));
          break;
        default:
          break;
      }
      break;
    default:
      break;
  }
}
See the DFRobot documention for more commands: https://wiki.dfrobot.com/DFPlayer_Mini_SKU_DFR0299

