How to connect to the CCI server
We run the CCI server as a resource to host websites and projects for students and staff at CCI, the server currently hosts:
- Apache 2 (Web Server)
- PHP
- Node.js
- Python
- MySQL
- PostgreSQL
- MQTT
For security reasons access to the server is via SSH (Secure SHell) using key authentication. To connect to the server you'll need to:
- Request access via Slack #technical for a username and password
- Create a public/private key pair on your computer
- Upload the public key to the server
- Login using SSH or SFTP
Creating an SSH key requires some basic SSH commands on your computer, it's also really important that you keep the private key secret and that you revoke it immediately if you ever loose it or suspect illegal access to your computer.
Check for an existing key
- Open the Terminal / Command Prompt
- View the contents of the
.sshfolder in your home directory
macOS/*nix: ls .ssh and press enter
Windows: dir .ssh and press enter
- Check for 2 files
id_rsaandid_rsa.pub
If these files exist then you have existing keys, otherwise follow the instructions to create a key
Create a key
- Open the Terminal / Command Prompt
- Type
ssh-keygenand press enter. The computer will hold onGenerating public/private rsa key pair.for a short time. - Press enter when you see
Enter file in which to save the key (/Users/username/.ssh/id_rsa): - Press enter when you see
Enter passphrase (empty for no passphrase):unless you want to be prompted for a password when you connect to the server, in which case you should type this now (when typing passwords in the Terminal it will not be visible. - When you see
Enter same passphrase again:either retype the passphrase or press enter for no password. - You'll see a number of lines output:
Your identification has been saved in id_rsa.
Your public key has been saved in id_rsa.pub.
The key fingerprint is:
SHA256:wS+TjYgAeQftejsnZOE4b7SQJ+iRAPAd6FwA1/ykCcY username@computername
The key's randomart image is:
+---[RSA 3072]----+
|=++B.            |
|o+E.*...         |
|.=o=.=  o        |
|. o.=... *       |
|...=... S o      |
|.oB B    o       |
|. .@ o           |
| .  B .          |
|   . +           |
+----[SHA256]-----+
After this is complete you should check the key using the previous instructions.
Upload the key
- Open the Terminal / Command Prompt
- Copy the contents of
id_rsa.pub
macOS: Type pbcopy < ~/.ssh/id_rsa.pub and press enter, this will copy the key to your clipboard.
Windows/Linux users go to your file browser and find the folder .ssh in your home directory and then open id_rsa.pub in your plain text editor and copy the text.
Tip
Your username is the one for the CCI server, not your UAL login.
- Open a web browser and login using your username and password a https://cci.arts.ac.uk:20000
- Select SSH Configuration
- On your first login you need to select Key Type as
RSA (for SSH v2)and then pressSetup SSH Keys - Select "Authorised Keys"
- Click "Add a new SSH 2 authorised key"
- Type a key name as one word i.e. "MyKey"
- Set the type to "RSA"
- Paste the key into the large text box, and remove the suffix (
ssh-rsa) and prefix (username@computer) as highlighted...
ssh-rsa AAAAB3NzaC1yc2EAAAADAQABAAABgQCvYsTJEu5YabS5sXnquAh7Cxn+UK9Rmcf2iM+qsObyOp4VWcSCGHUHgsgUPnSeOijtwgRDGQI8M7ZcXKuUFSOV2FCHTFzTiG7F/lrFWt/PpgPUajCF3WXmH19baCBO6ymTV3wUWXg7xHsSc83k+cb9af5QT+ml315vqSF45oO935DadaOJnKTZkMHLBydmIVSkxDFWHLkNURw7jmDNwZ2yNCru6y2iamgdQFwGxoNIVewhG+k2jUKURN7JeGP/4dOD8u+ajeY57wp3+GxQKcp/JvtDhFUx92TO+1SlYk1ZcKiIxActc3L6j2U3TIk3LOCRyBmwPNeeHuhLgD4ePsR4PsHz5zdOsmTLvjfM4n6B5K+Y52Re+gOE3dG5gjkvY/bhQdKGes1hBP2p3NW8/vJdZ08/auCswEFWoCnDKT9h8OQUTEjtywDzius6LYIHZFsLTnedEf54CfePzVcDNhdSuKc2SD6dfgE+Jk/zzqpBNmLJwCb0jxrWU0xyQDGbQFk= username@computer
- Press Create
Verify SSH key
Tip
Remember to replace username with your CCI server username, not your UAL username!
- Open the Terminal / Command Prompt
- Type
ssh username@cci.arts.ac.uk -p 2020and press enter - You will the UAL CCI logo if you've logged in correctly:
██╗    ██╗_
█████╗| ██╗||_||   ██████╗o
██████╗██╗|_|| ██║||__ ██║██╔══██╗██║o
 ██╔════╝██╔════╝██║__
██║/   ██║███████║██║__ ██║_  ██║_ ██║_|_ ██║o     ██║██╔══██║██║_
██║\__ ██║| ██║(/_(_| ╚██████╔╝██║|_ ██║███████╗| ╚██████╗╚██████╗██║\_/(/_
 ╚═════╝__       ╚═╝_              ╚═╝╚══════╝_
╚═════╝/   ╚═════╝╚═╝_ __ |_)   _|_ o __ (_|
\__(_)||||  |_| |_ | | |__|
___
 | __  _ _|_ o _|_   _|_ _
_|_| |_>  |_ |  |_|_| |_(/_

Welcome to the CCI server

Ada Lovelace
cci.arts.ac.uk

❤️
- Type
exitand press enter to disconnect.
If you've seen the UAL CCI logo it means everything is working, otherwise you'll need to check your steps, or contact support in Slack #technical sharing a screenshot of the issue you're trying.
Using SFTP with CyberDuck
Tip: Don't type your password as it may not work.
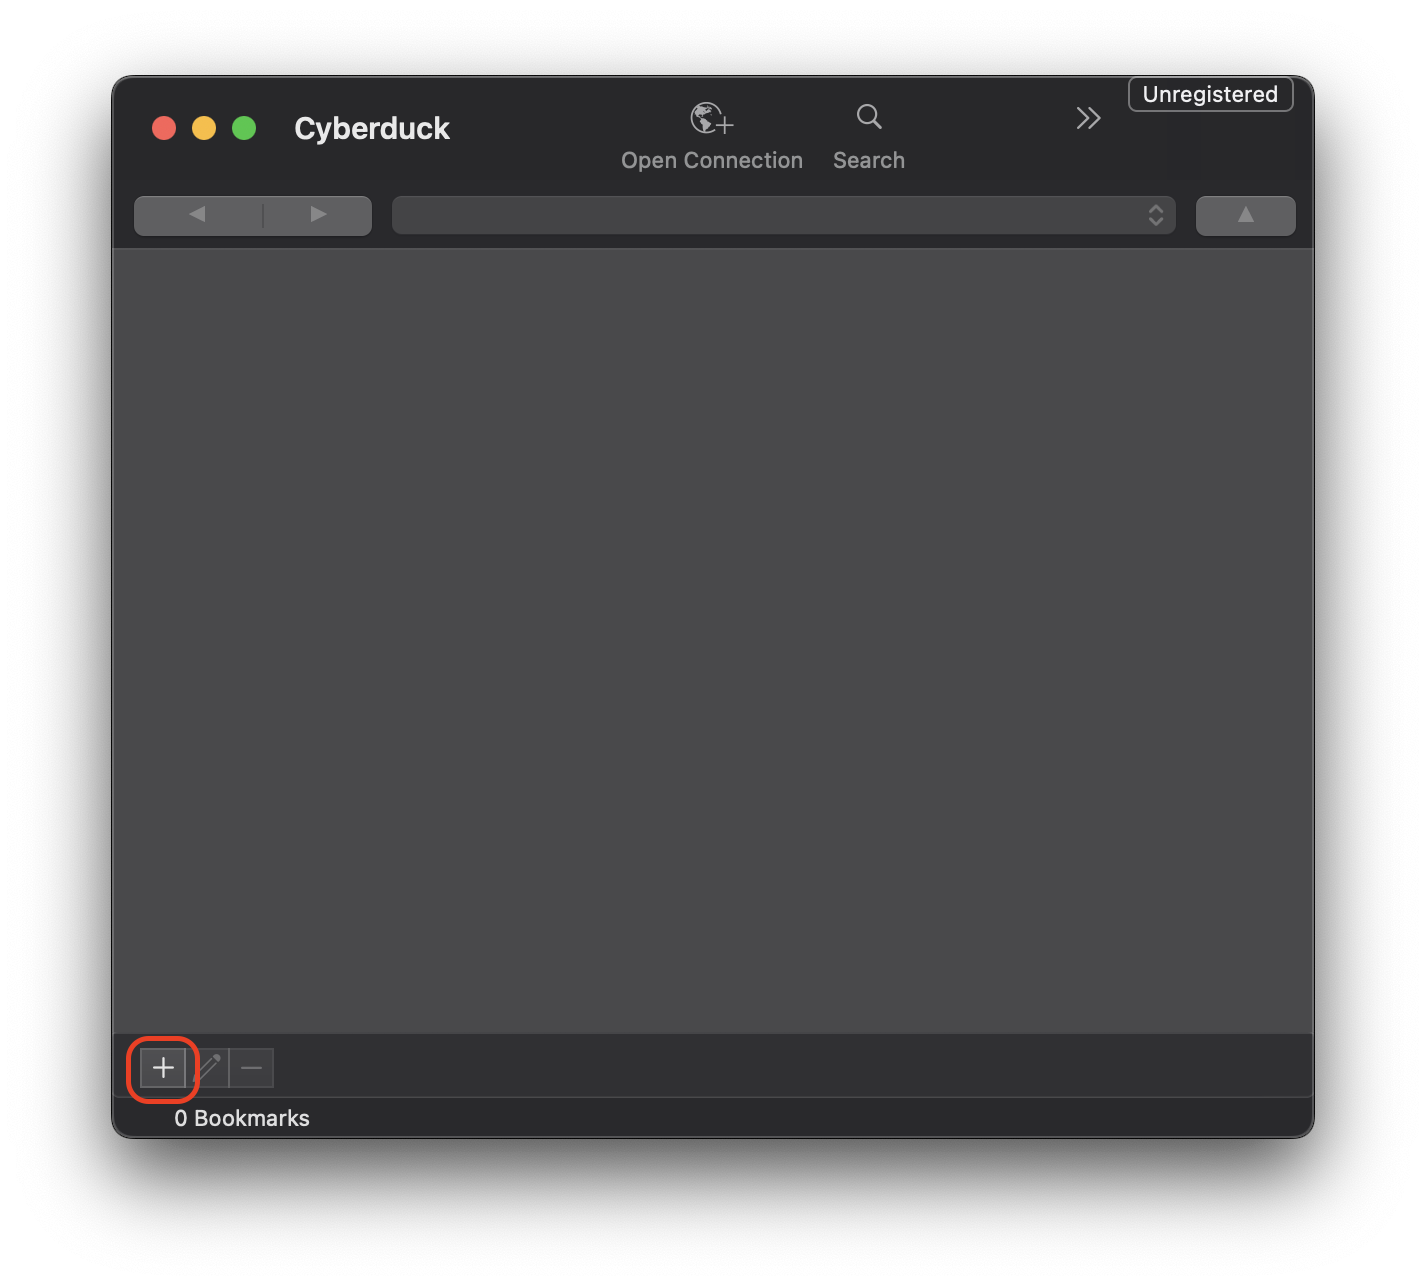
- Open CyberDuck
- Click the
+button in the bottom left corner of the main window

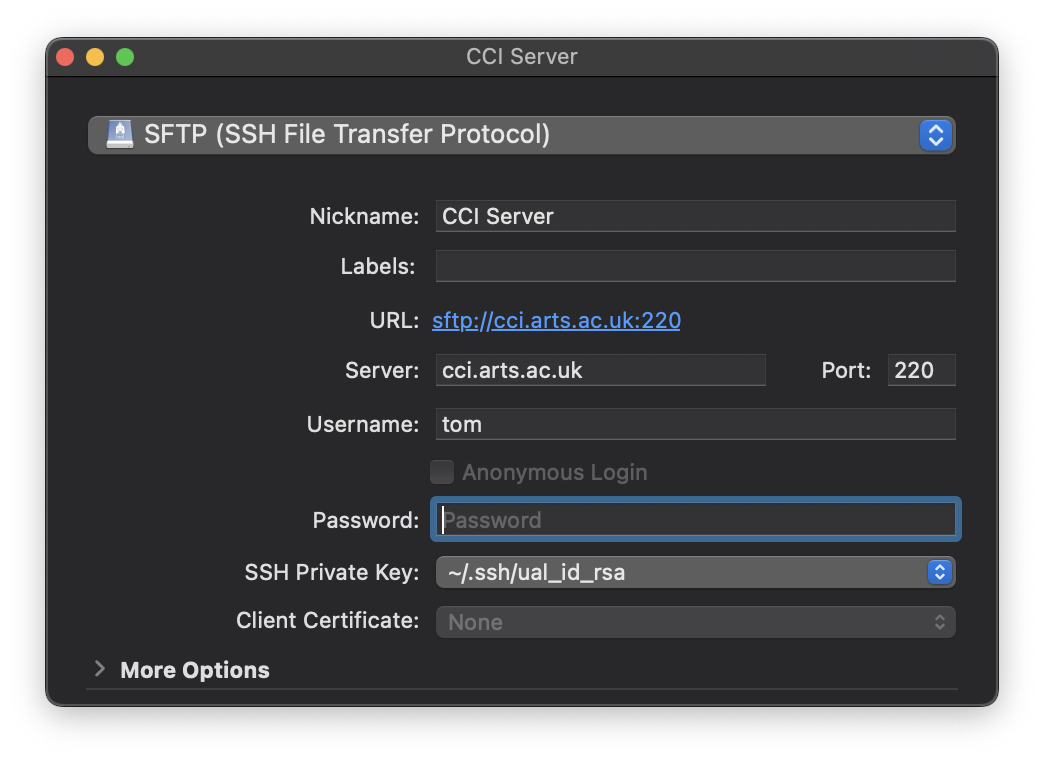
- Choose "SFTP" from the dropdown list at the top
- Pick a nickname like "CCI"
- Enter the server details:
-
Server:
cci.arts.ac.uk -
Port:
2020 - Username: your cci server username
- Password: leave blank
-
SSH Private Key: Pick from the list, there will probably only be one option ending...
/.ssh/id_rsa
- Close the window, no need to save!

- Double click on the blue drive icon that appeared with your nickname "CCI" in the main window.
You should now be connected, if you experience issues please screenshot and share in Slack #technical.
