Ribber
YOU MUST HAVE COMPLETED BOTH THE SINGLE BED AND DOUBLE BED INDUCTIONS BEFORE USING THE RIBBER. THIS PAGE IS A GUIDE FOR THOSE WHO HAVE ALREADY USED THE RIBBER, IT IS NOT TO BE USED TO LEARN HOW TO USE IT.
The ribber is an attachment for the knitting machine that adds a second bed of needle. This allows you to create both knit and purl stitches meaning there are many more techniques that you can do!
Knit and Purl
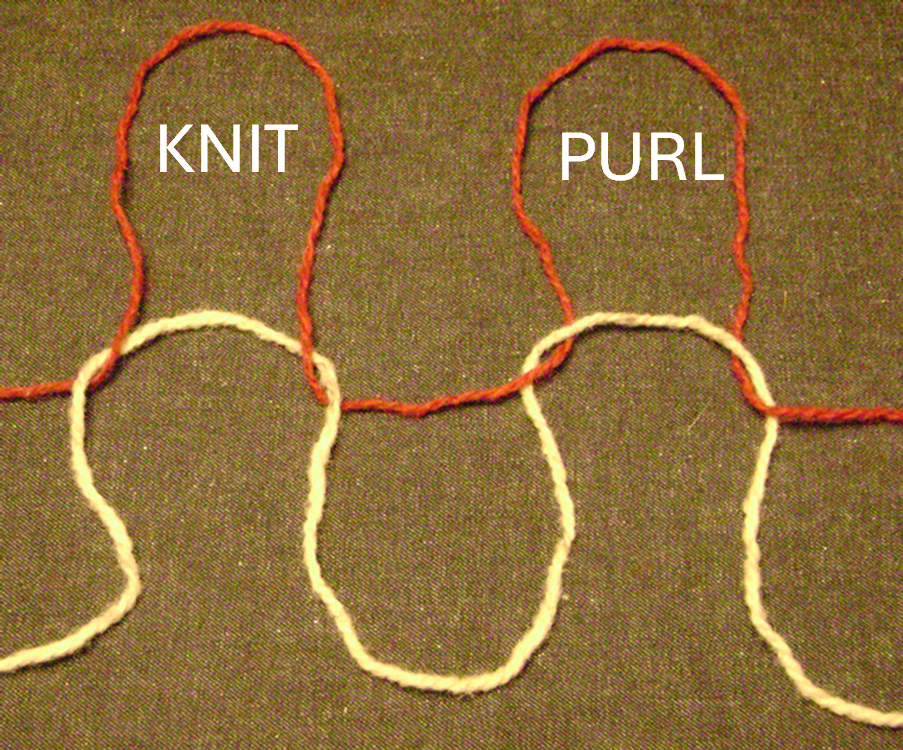
The two main building blocks of knitting are a knit stitch and a purl stitch. Understanding the difference between these is vital when using the ribber.
To create a new stitch when knitting, a loop of yarn is pulled through a stitch from the previous row. Knit and purl stitches are the reverse of each other meaning that to create a knit stitch you pull the yarn from behind towards the front, and for a purl, from the front towards the back.
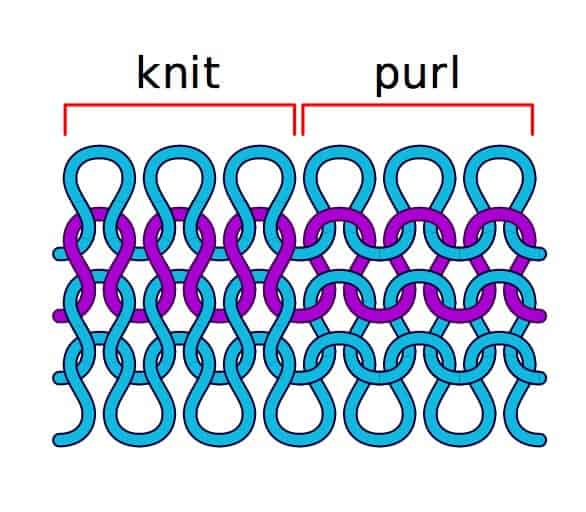
These two stitches can be used to create different types of rib by swapping between knit and purl stitches at different intervals. You can find rib most commonly on the cuffs and necklines of knitwear as it pulls the fabric together more, creating a tighter fit around the wrists and neck.
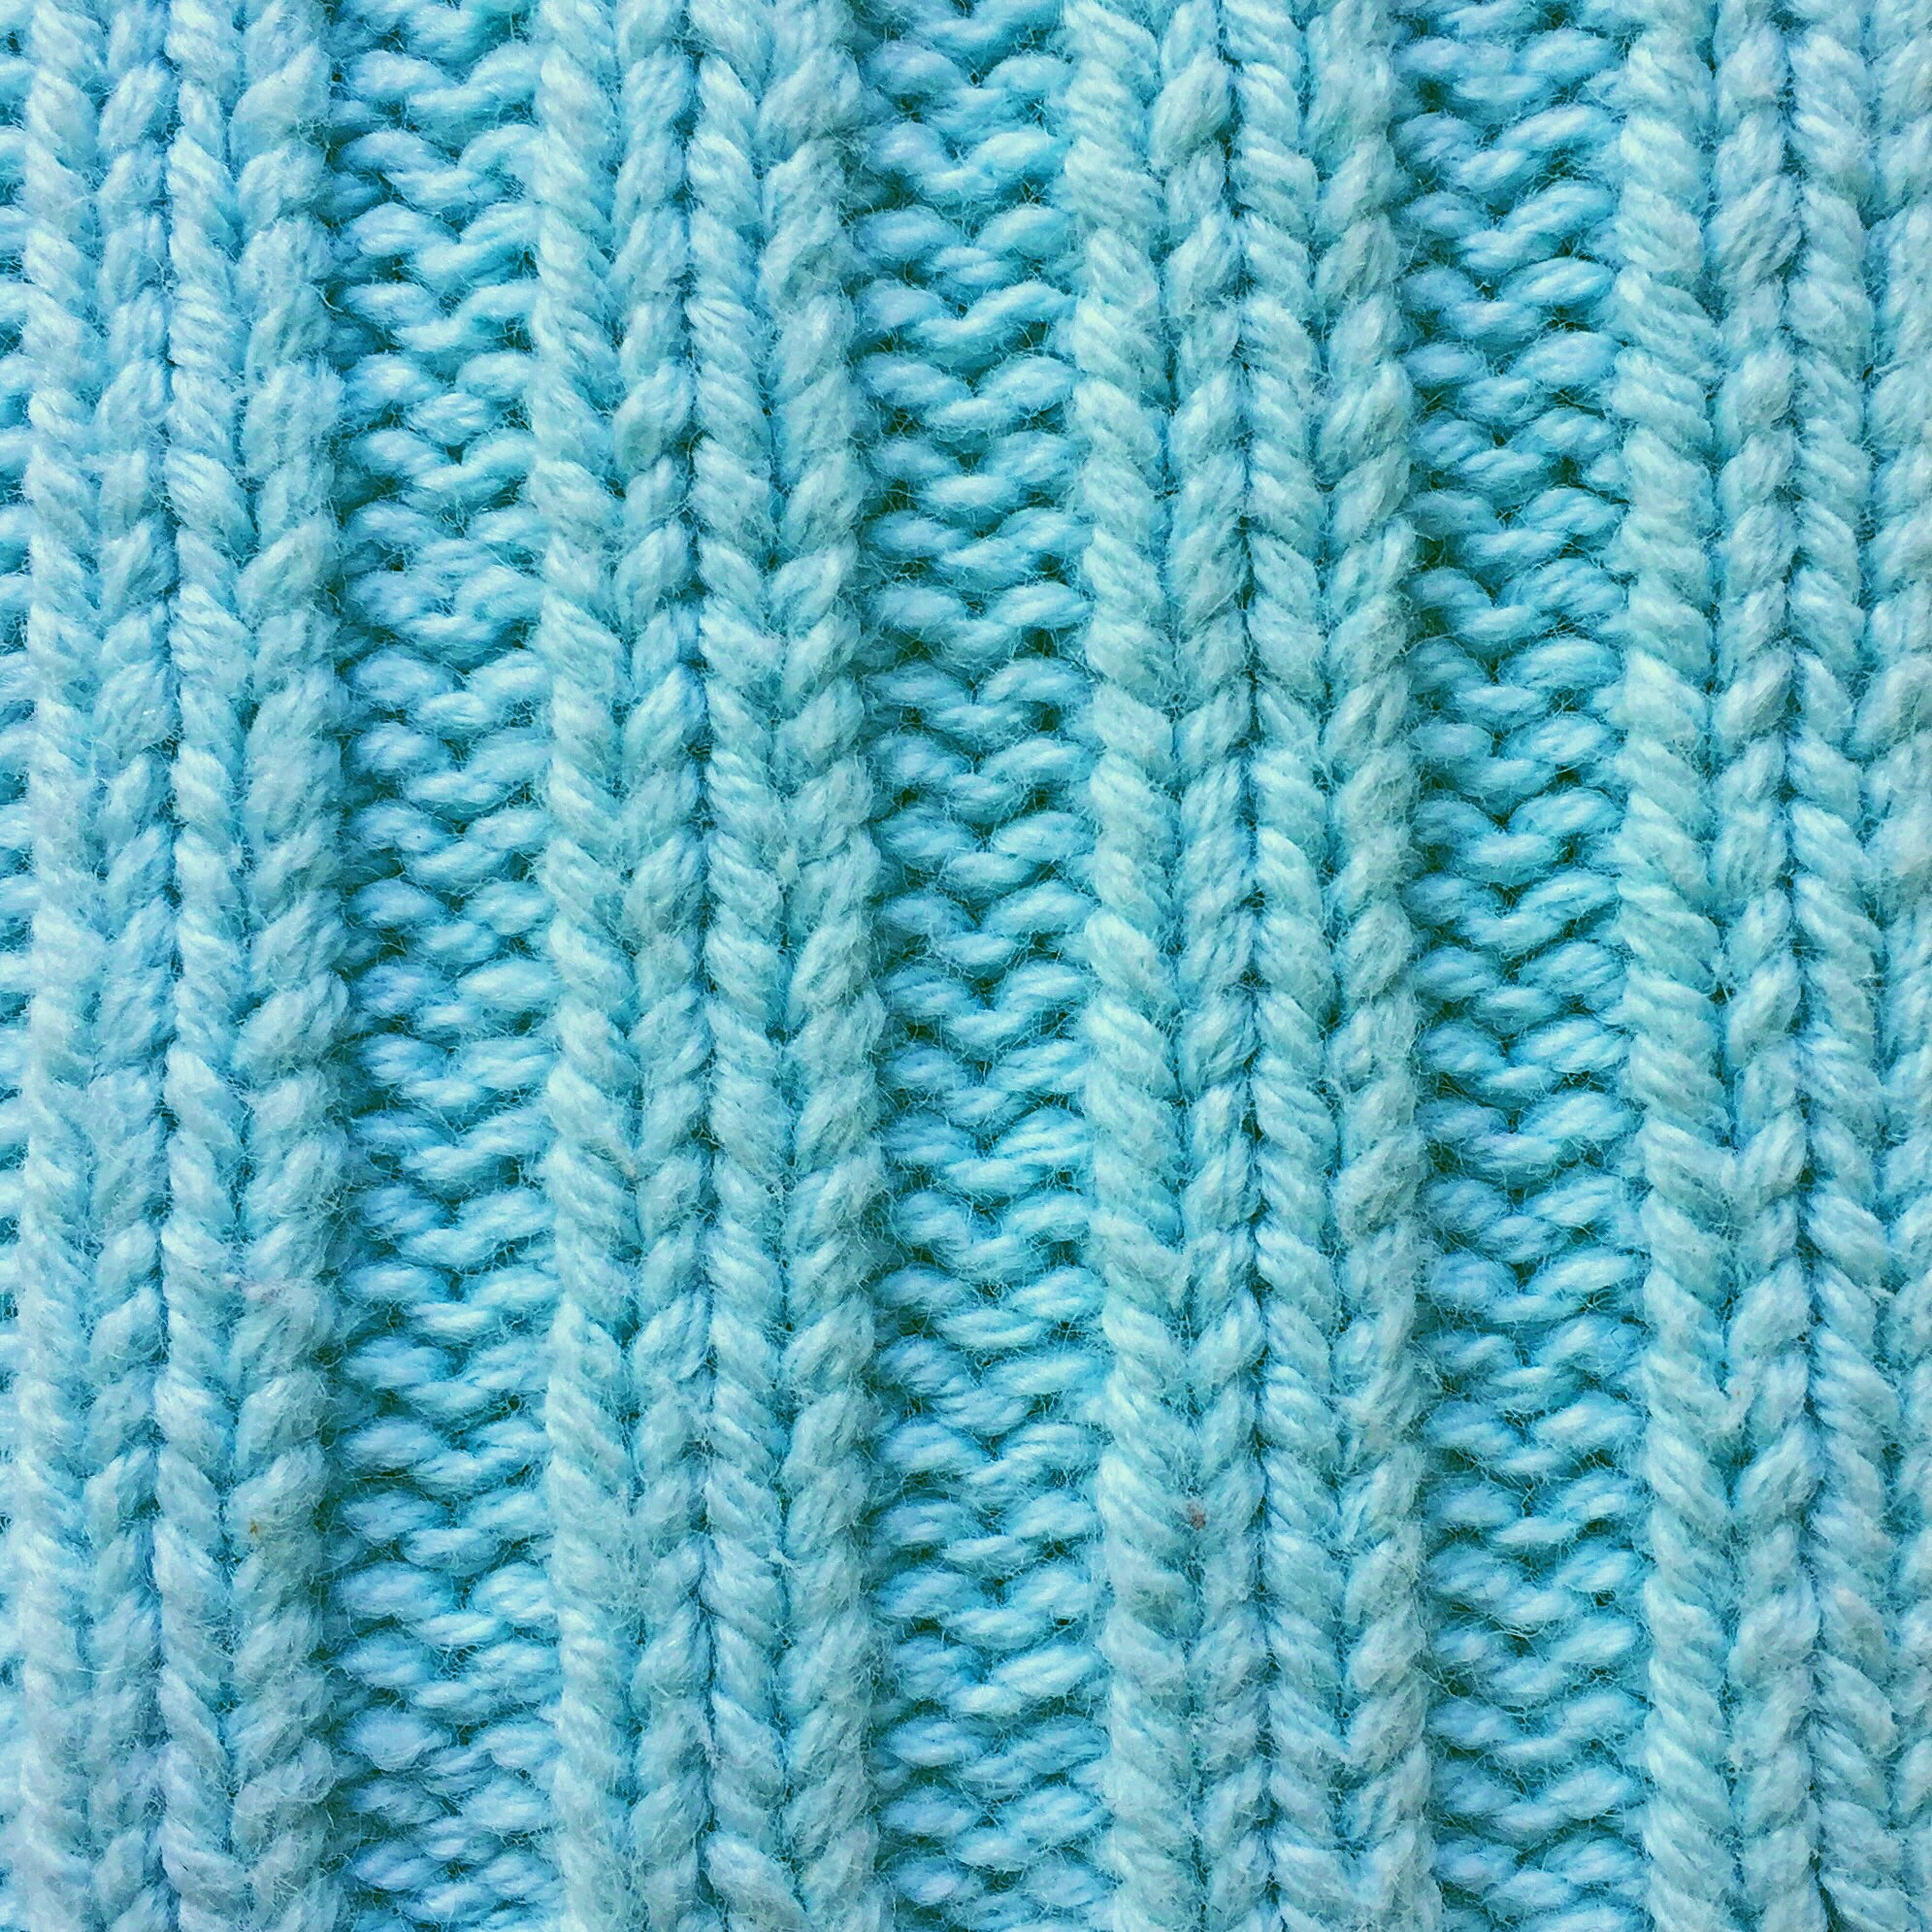
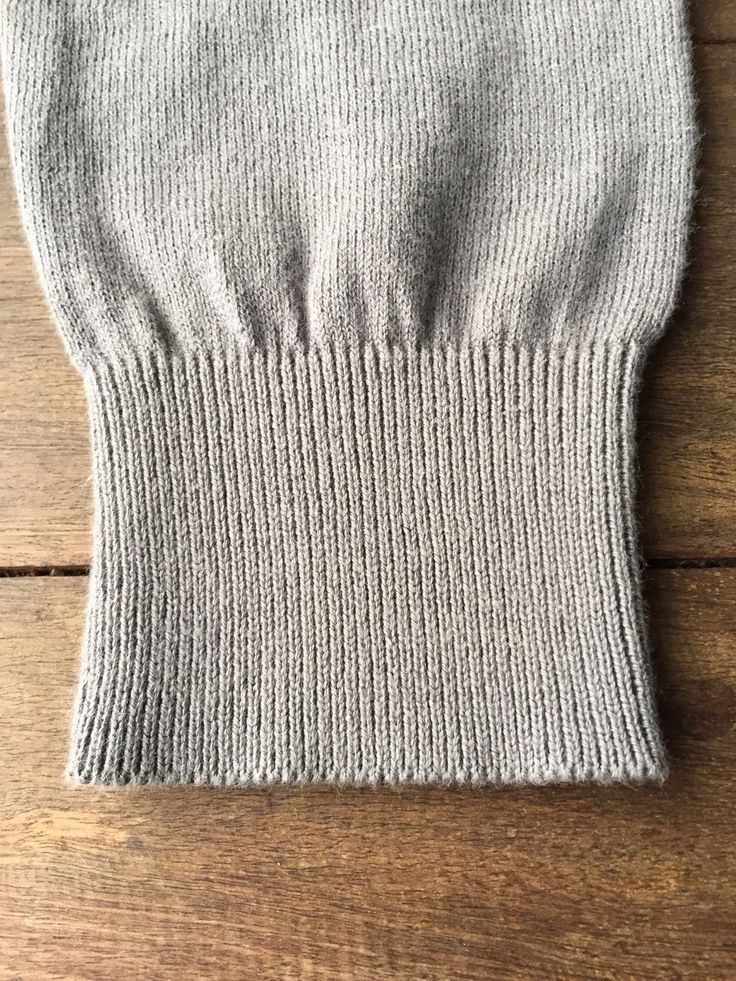
2x2 rib
Ribber
When using a single bed machine, you are only able to create knit stitches, as the needles can only move in one direction. In order to create purl stitches, we need as second bed of needles that can move in the opposite direction. This is the ribber!
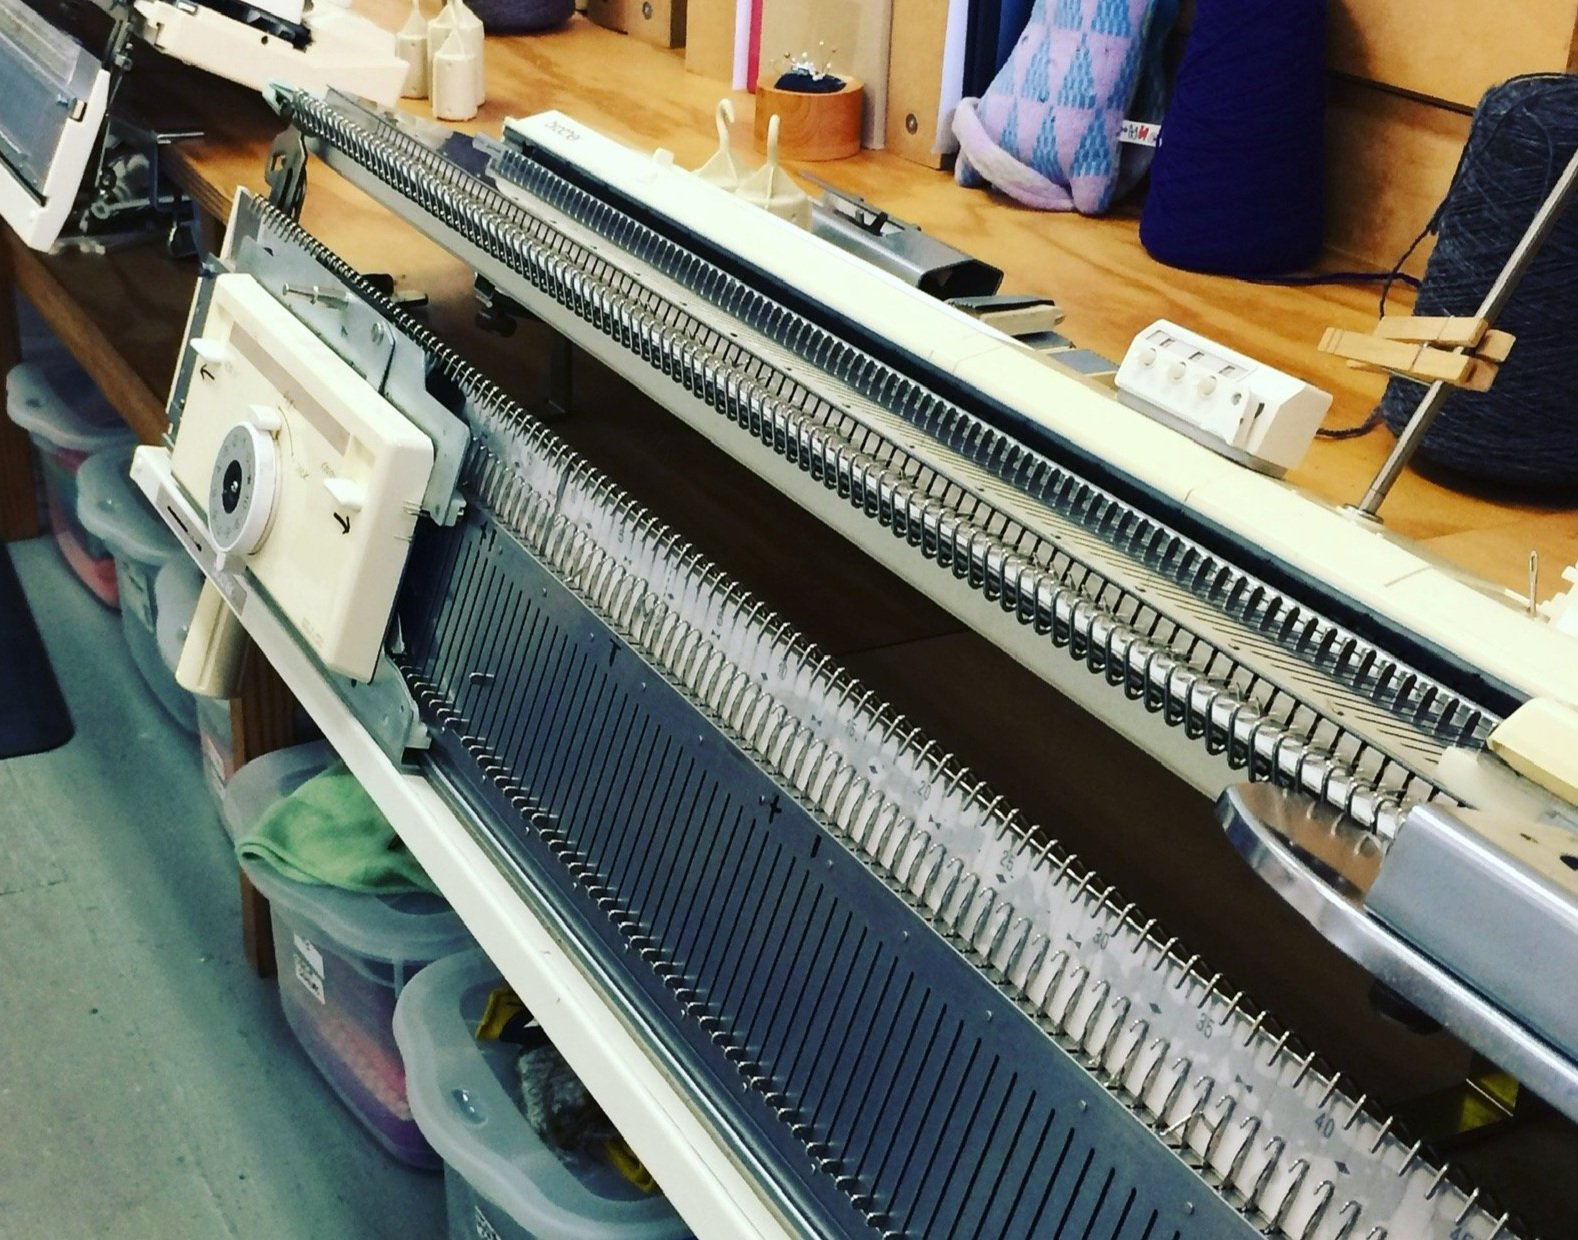
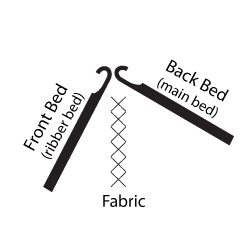
The ribber is a second bed of needles that attaches below the main bed. (If you have used the CCI knitting machine you will have already seen it attached there). As you can see in the below diagram, the ribber needles are on the opposide side of the fabric to the main bed, allowing us to created purl stitches.
Ribber Carriage Settings
The ribber carriage adds quite a few new buttons and settings to the equation which can be confusing to start off with. However, most of these have the same function as the settings on the main carriage, they just look a little different.
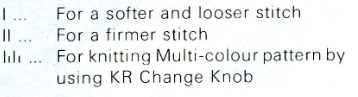
1. Tension Dial
The ribber carriage has it's own separate tension dial that controls the size of the ribber bed stitches. The numbers work the same as with the main carriage meaning that the lower the number, the higher the tension therefore, the smaller the stitches.
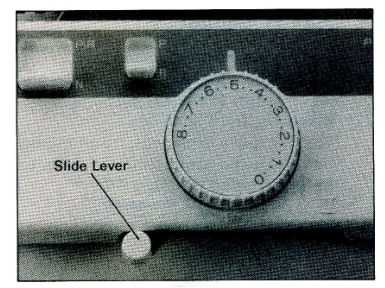
2. Slide Lever
The slide lever also controls the tension and stitch size. Think of it as adding just a bit of extra tension.
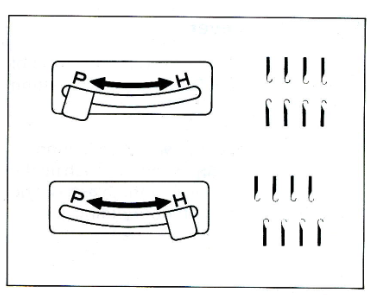
3. Pitch Lever
This lever on the bottom left of the ribber bed control the pitch of the needles.
Pitch (P) - The back and front bed needles are aligned
Half Pitch (H) - The back and front bed needles are offset by half the pitch (the distance between two needles).
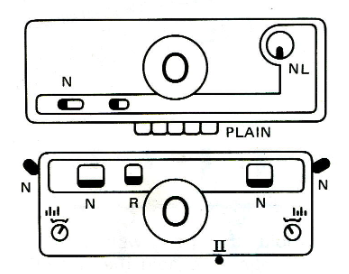
4. Carriage Levers
The carriage has three types of different levers that can be seen in the image below.
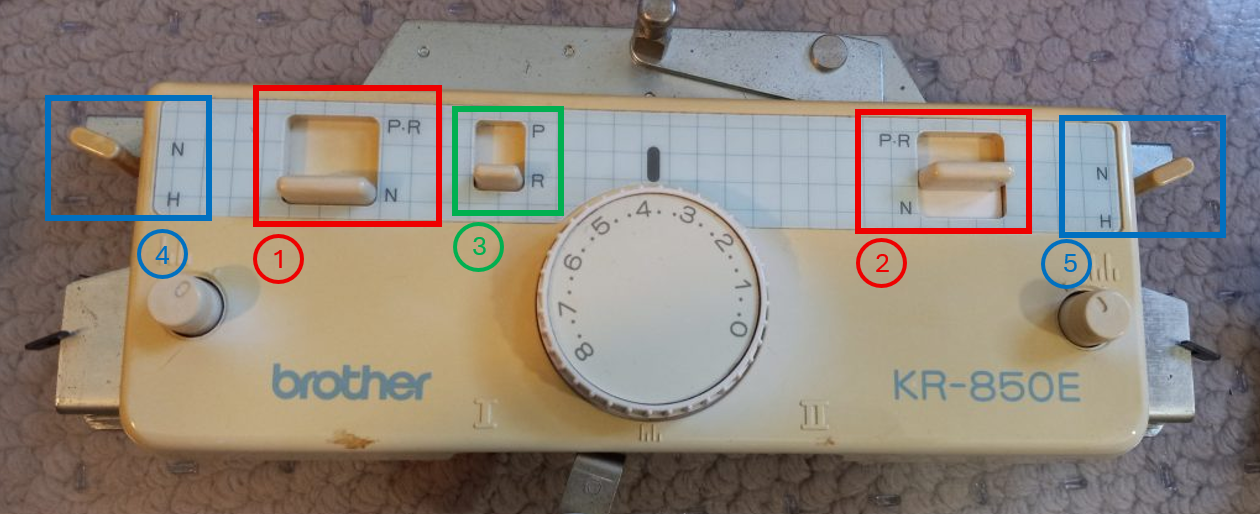
Cam Levers (1 & 2)
These levers control whether the ribber needles will be knit when the carriage moves across. They have two settings:
- P.R. - the needles will NOT be knit
- N - the needles will be knit
The two different levers control the two different directions that the carriage moves in. The left-hand lever controls when the carriage is moving to the left (so from the right-hand side to the left-hand side) and the right-hand lever controls when the carriage is moving to the right.
For example, if the carriage is set as in the below image (with the left-hand cam lever set to N and the right-hand set to P.R.) the ribber needles will be knit when the carriage moves left but not when it moves right.
The P.R. setting is used when creating the selvedge but also for circular knitting and both English and Fisherman's rib.
Tucking Lever (3)
This lever is pretty self-explanitory, it is used when knitting with a tuck stitch.
- P - for making tuck stitch patterns
- R - for normal and circular knitting
Holding Cam Levers (4 & 5)
These levers are used when doing short rowing (also known as Partial Knitting), which you can read more about here.
- N - needles in E position will be knit as normal
- H - needles in E position will NOT be knit
The same rule as the cam levers applies that the side of the carriage the lever is on indicates which direction of the carriage movement it controls.
Casting on
Casting on with the ribber is quite different to the single bed.
We must do what is sometimes called "separating the stitches". The rule is that on the cast on row, you cannot have two adjacent needles on the same bed knit consecutively. This is why when knitting a rib more than 2x2, we must cast on with 1x1 then transfer the stitches afterwards.
On the single bed we
There are three different sections to the cast on which each require different settings on the carriages.
- Cast on row - The very first row knit. Used to hang the weights.
- Selvedge ("self-finished" edge) - Three rows of circular kntting. Used to separate the stitches.
- Knitting - The main body of the knit.
For this example, we will look at a 1x1 rib.
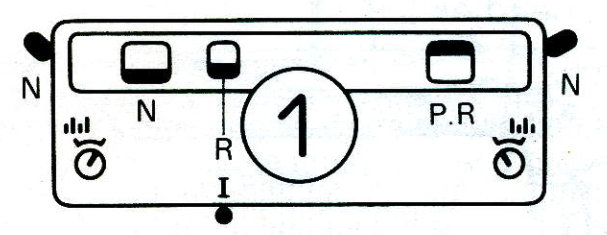
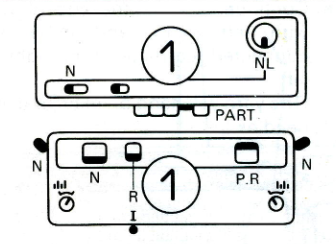
1. Cast on row
(a) Set the carriage as below (this is the same for every type of rib cast on)
(b) Set your needle arrangement. This will differ depending on the type of cast on you are doing. Please refer to the manual for specifics for each type. For example, below is the needle arrangement for a 1x1 rib cast on.
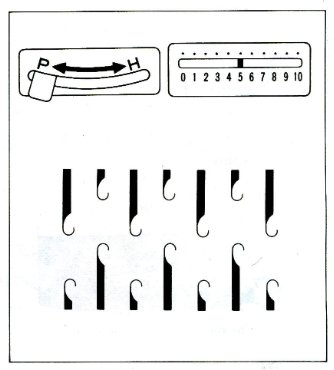
- Note: It is very important that you are in the correct pitch when casting on! If the settings are incorrect, some needles could collide with each other and will most likely get bent and damaged. Please take care when doing this.
(c) Run the empty carriage across the needles a few times to align them into B position, ending with the carriage on the right-hand side.
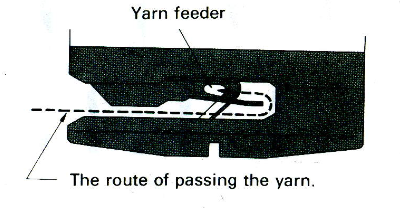
(d) Pass the yarn between the two beds and hold it in your right hand.
(e) Thread the yarn into the yarn feeder as below.
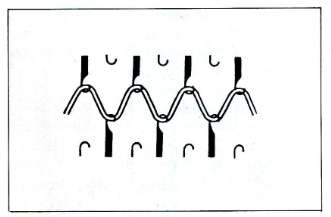
(f) Move the carriage across the needles, it should look like below.
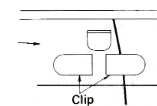
(g) Hang the cast on comb and add weights. The comb should hang like below.

(h) Either wrap the yarn around the post or clip it into the cast on comb.
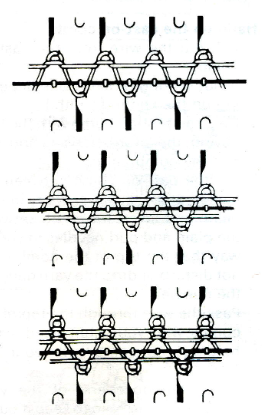
2. Selvedge
(a) Set the carriage as below. As we are going to knit three rows in circular, you must have the right-hand cam lever on the ribber carriage set to P.R. and the left-hand part button on the main carriage pushed in. The tension setting will change depending on the type of cast on and the weight of the yarn. Refer to the tension table for specifics.
(b) Knit three rows. They will knit as follows:
- Only main bed knits
- Only ribber bed knits
- Only main bed knits
3. Knitting
(a) Set the carriage as below, cancelling the part settings on both carriages. Again, the specific tensions will differ depending on your set up.
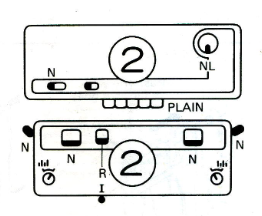
(b) Start knitting!
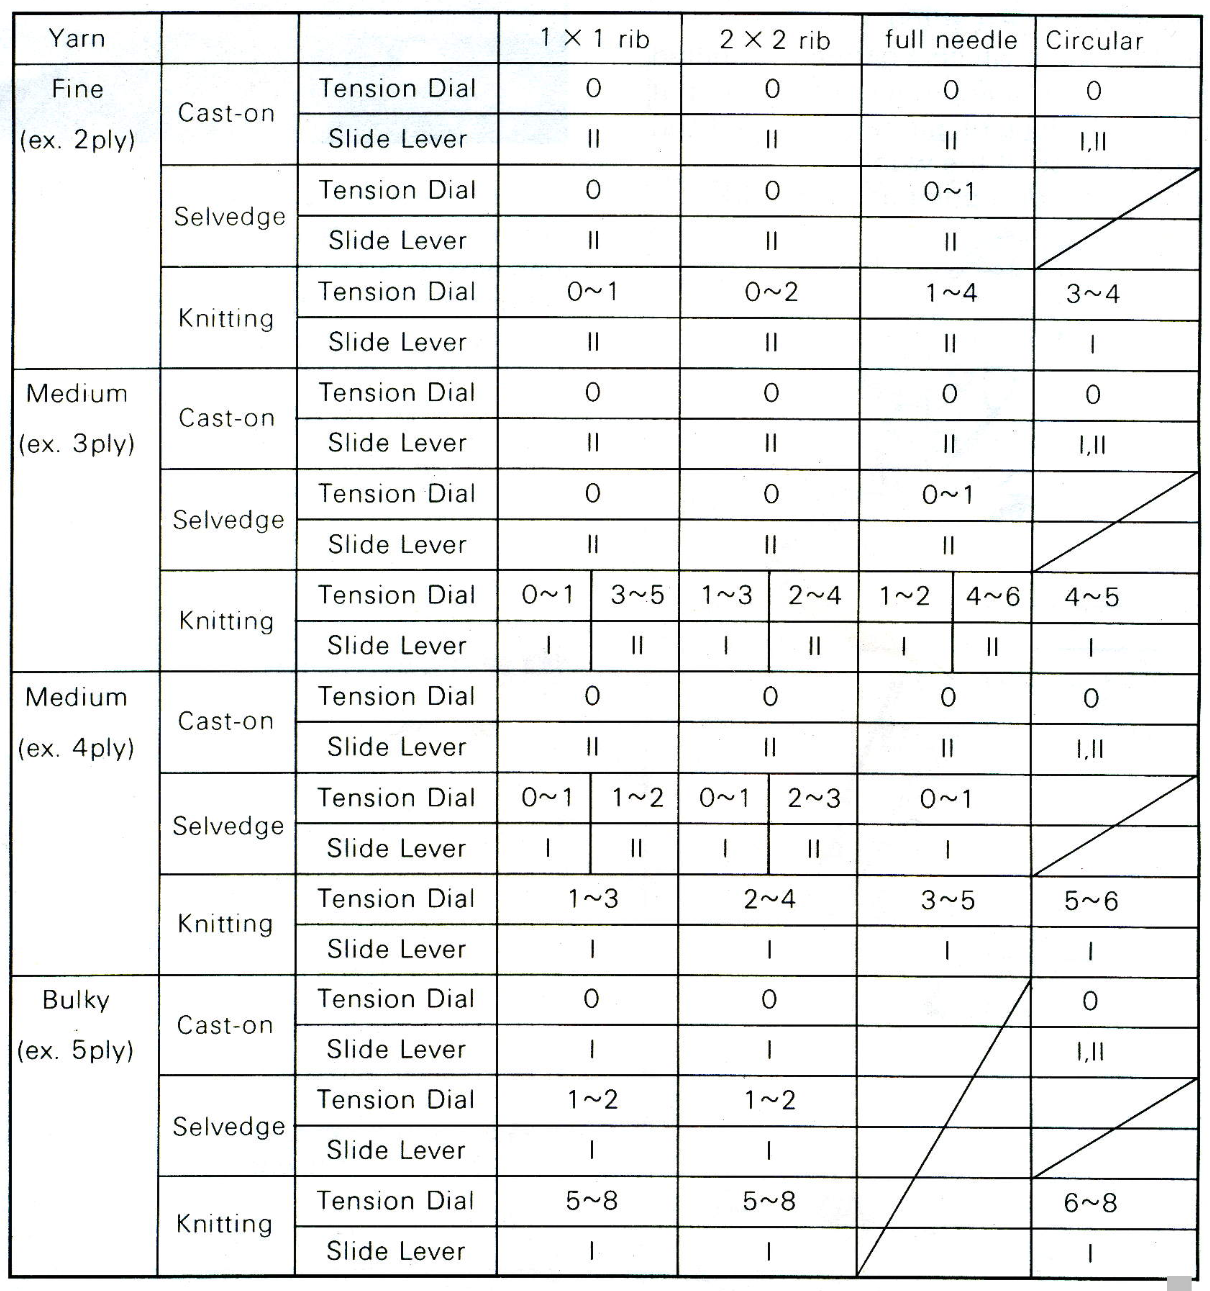
Tesnsion Table
Below is the tension table from the KR-850 ribber manual. This table indicates which settings for the tension dial and slide lever should be used at each stage of the cast-on knitting for different yarn weights.
Use this as a guide when getting started but have a play around as it can also depend on aesthetic preferences for your piece.