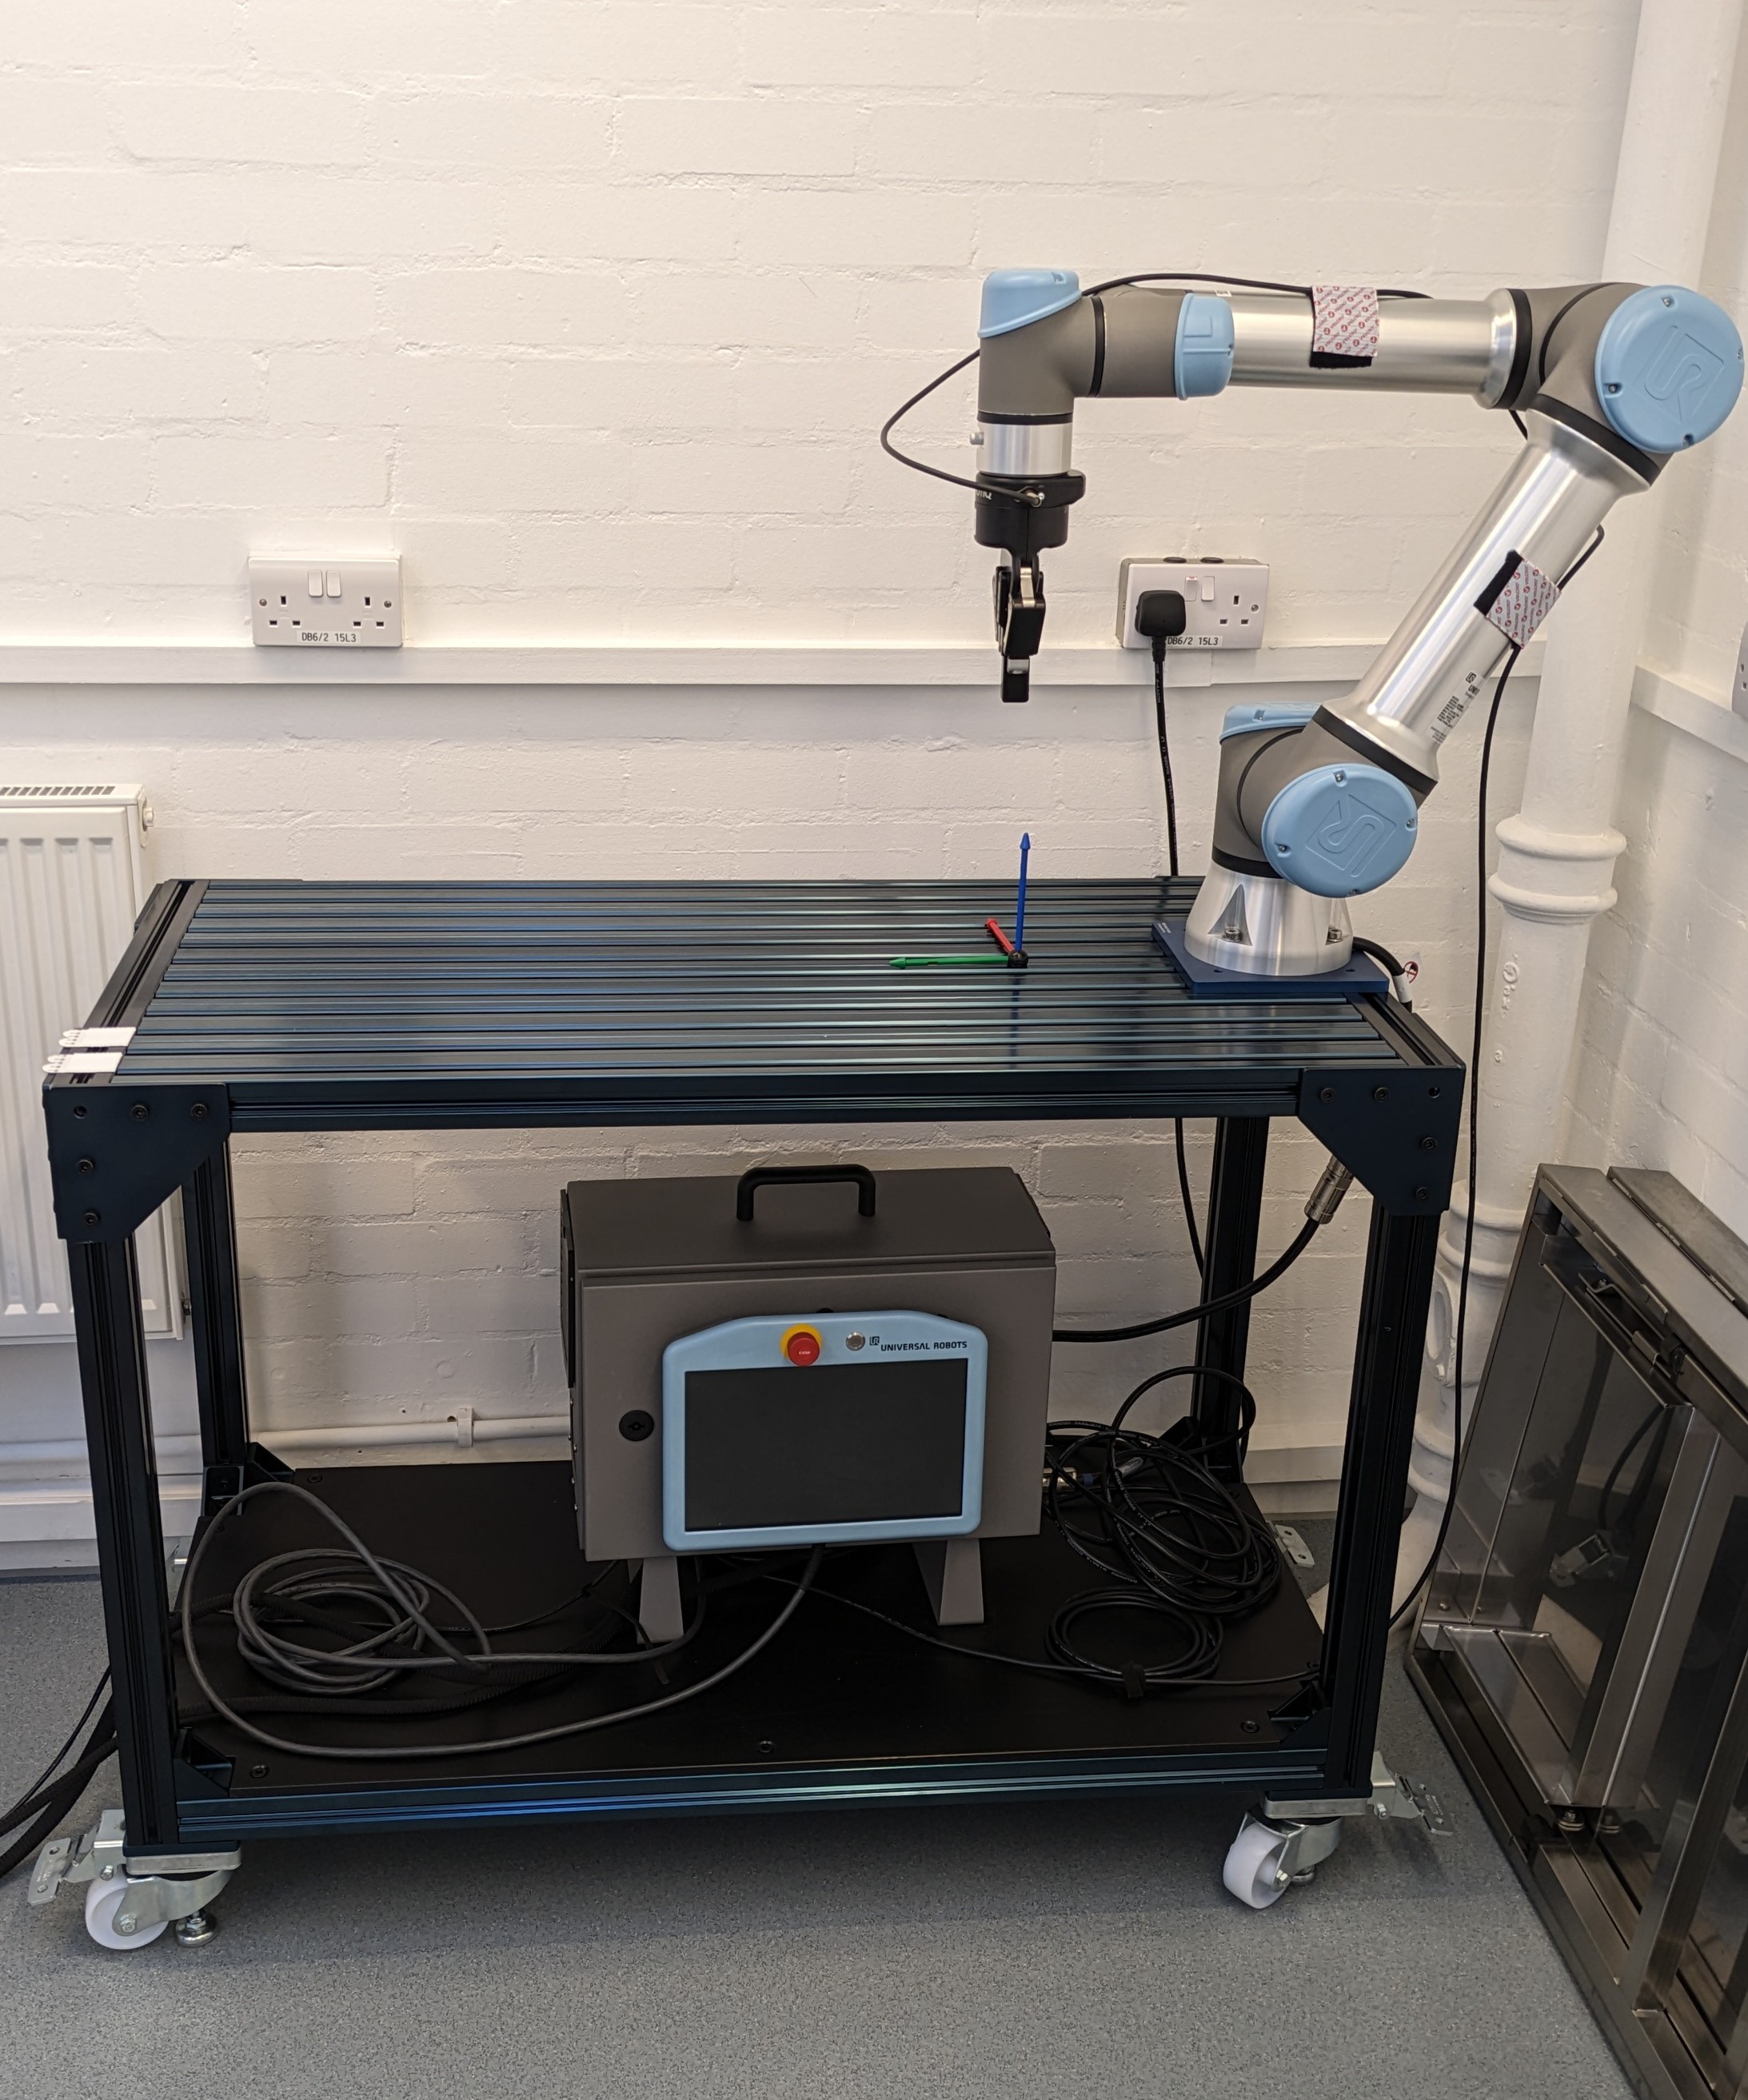
Using UR5e with 2F-85 adaptive gripper
Safety guidelines
Important: This robot requires an induction before you use it for the first time. If you have not completed this induction, please contact Rohit Ramesh Thampy on Slack.
- Please remove any loose jewellery or clothing before working with this robot.
- If you have long hair, please secure it using a hair tie.
- Do not place your hands or fingers on the joints of the robot or in between the robotiq gripper.
- When testing your program, switch the robot into reduced mode and decrease your speed to 50% and run it. If the robot is running without any collisions, increase the speed by 10%. Repeat this process till you reach 80% speed without any collisions. Once you have reached 80% you can switch the robot back to Normal mode and run it at 90% and 100% speed.
- If you make any significant changes to your robot program, such as adding a new waypoint, move command, velocity or acceleration change, follow
4.. - When a robot program is running, ensure that you are outside region marked with red tape.
What is it?
UR5e
The UR5e by Universal Robots is a 6 Degree of freedom robotic arm. It is the gold standard for collaborative robots in the industry as it is designed to work alongside humans.
Robotiq 2F-85 adaptive gripper
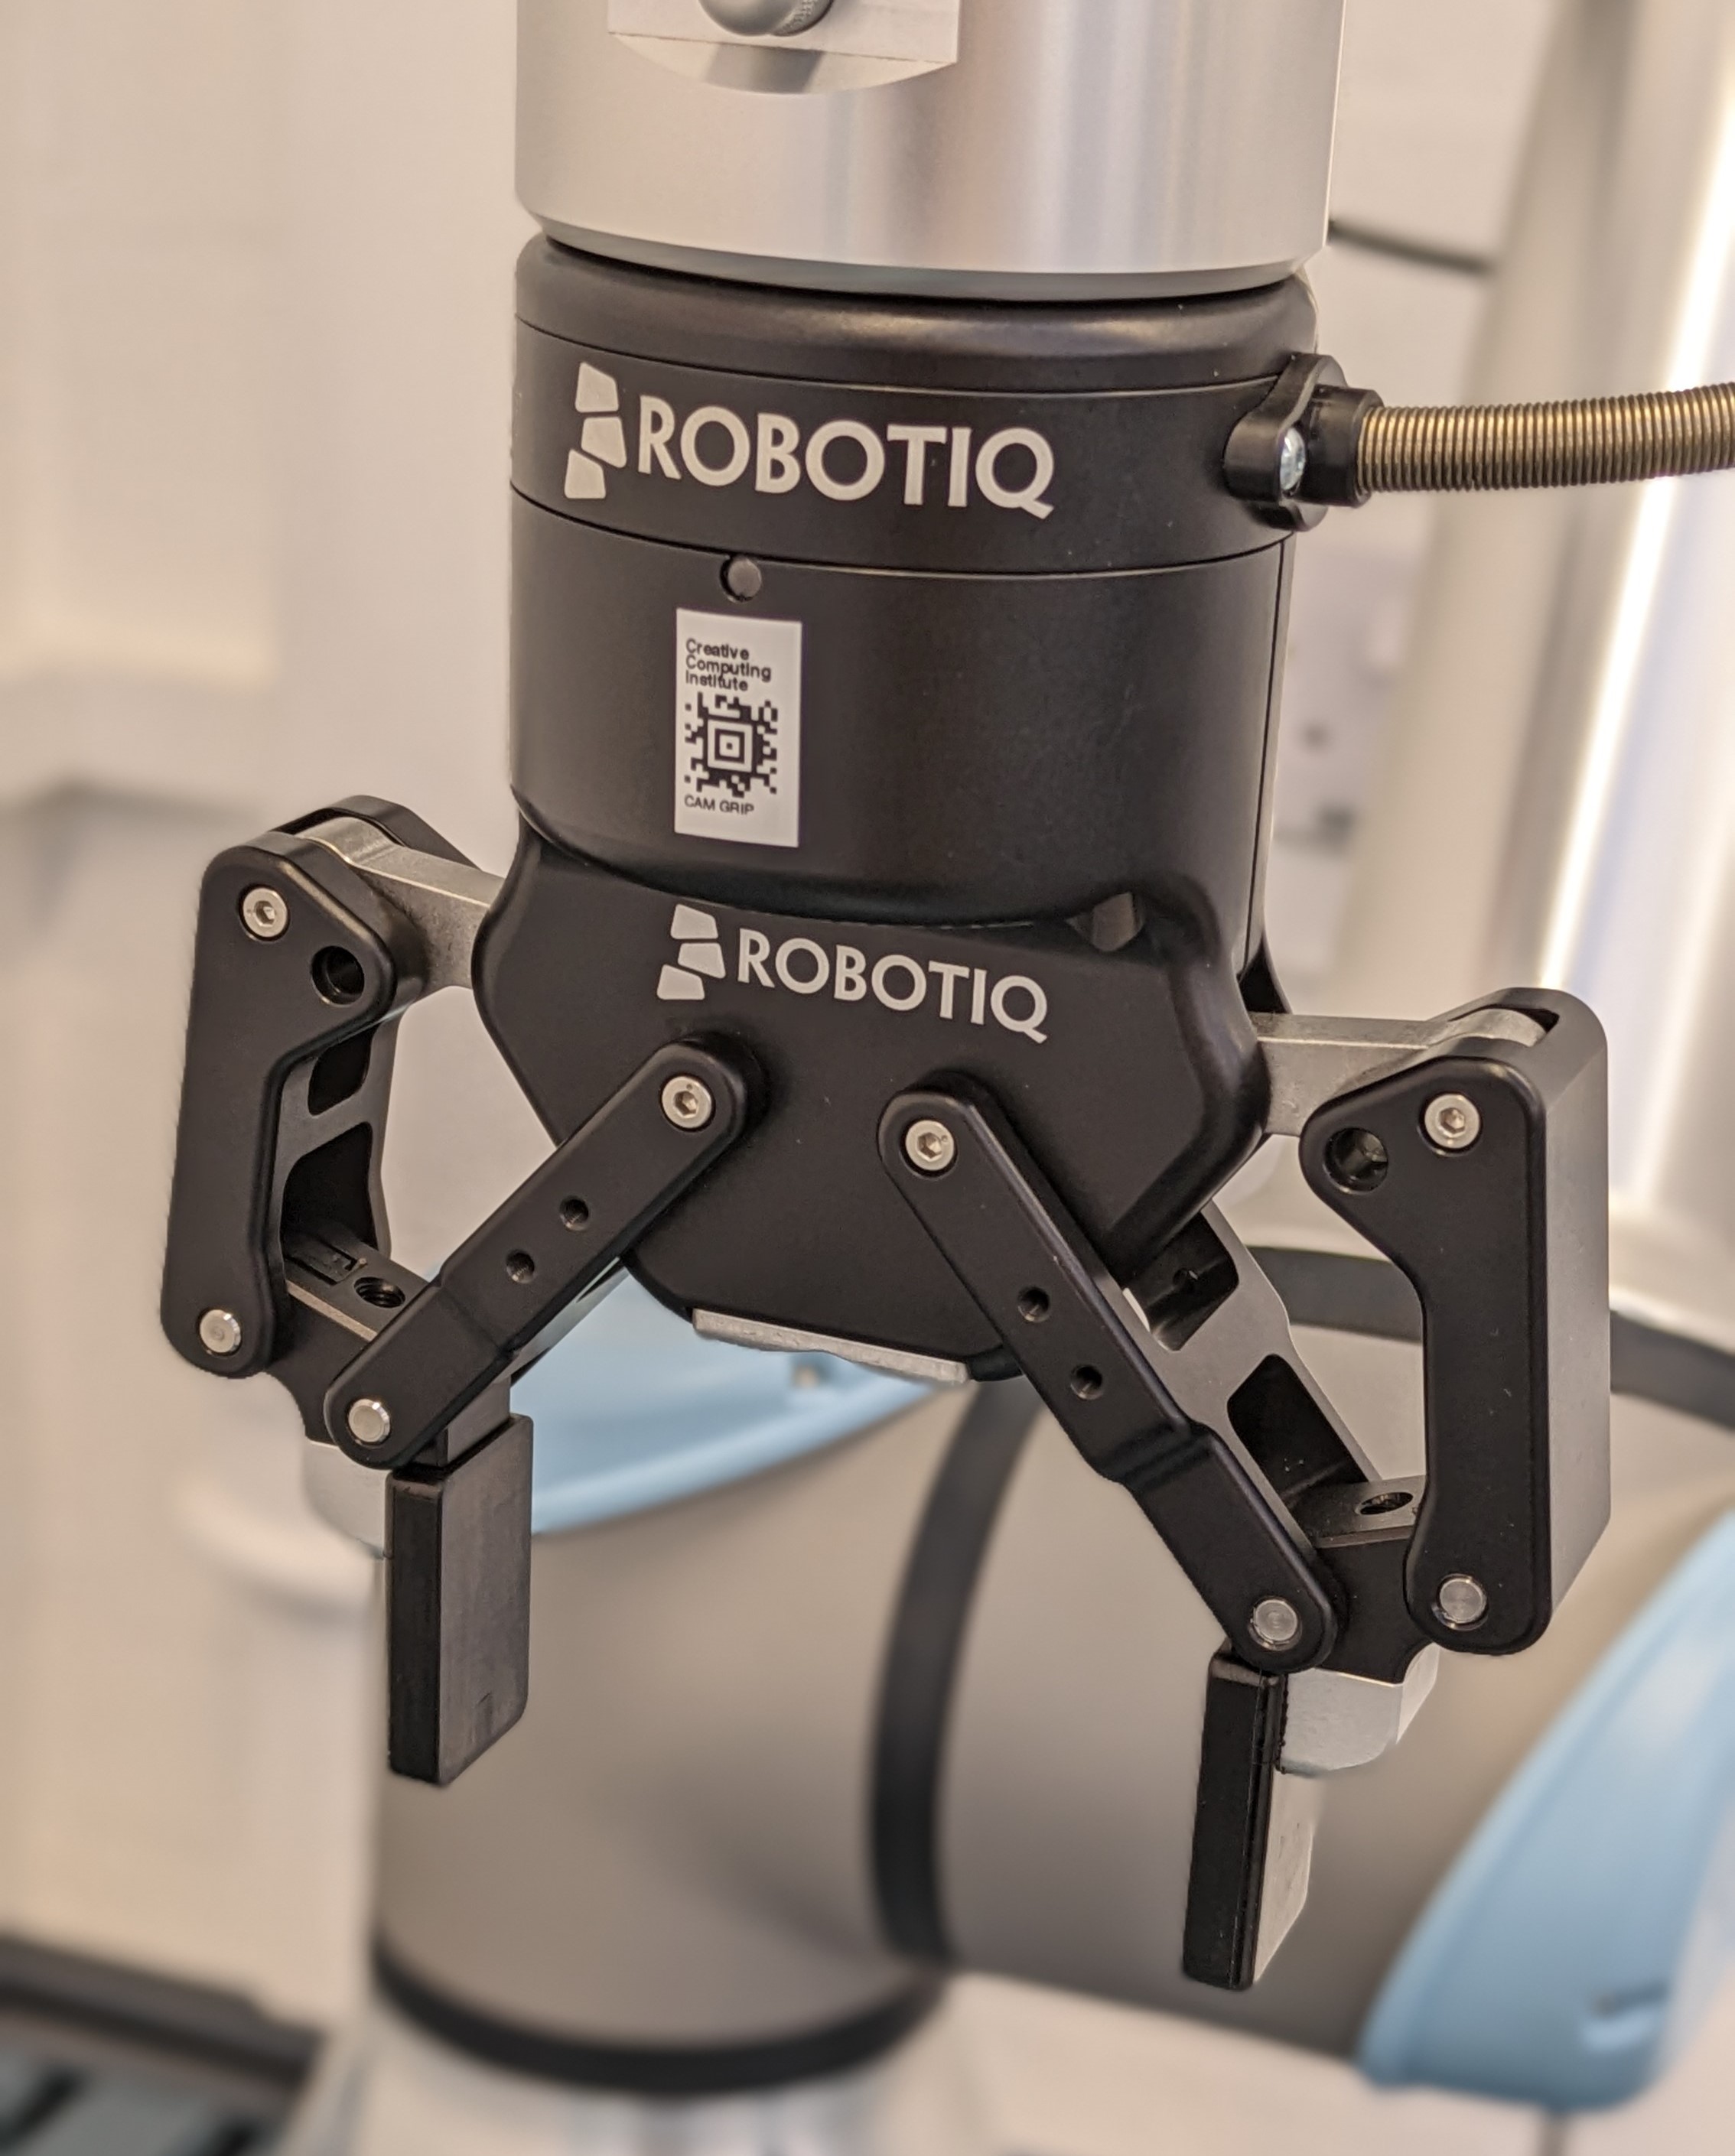
The 2F-85 adaptive gripper by Robotiq is an end-effector that is commonly used with robotic arms such as the UR5e. But the 2F-85 that we have at the robotics lab is rather special as it comes with a camera module as well.
What can it do?
The UR5e on its own is not of much use as it is a robotics platform and we as the user need to define an application to make it useful.
For example, since we have the 2F-85 gripper attached and setup on the robot arm we can now program it to carry on applications such moving objects around the workspace of the robot or carry out a repetitive process such as pick and place.
If you'd like, you can also design and attach your own end-effector to the robot which could give it a new capability!
The bottom line is, if you need to do something which requires repeatability, precision and accuracy, this robot might be able to to help you out.
Getting started
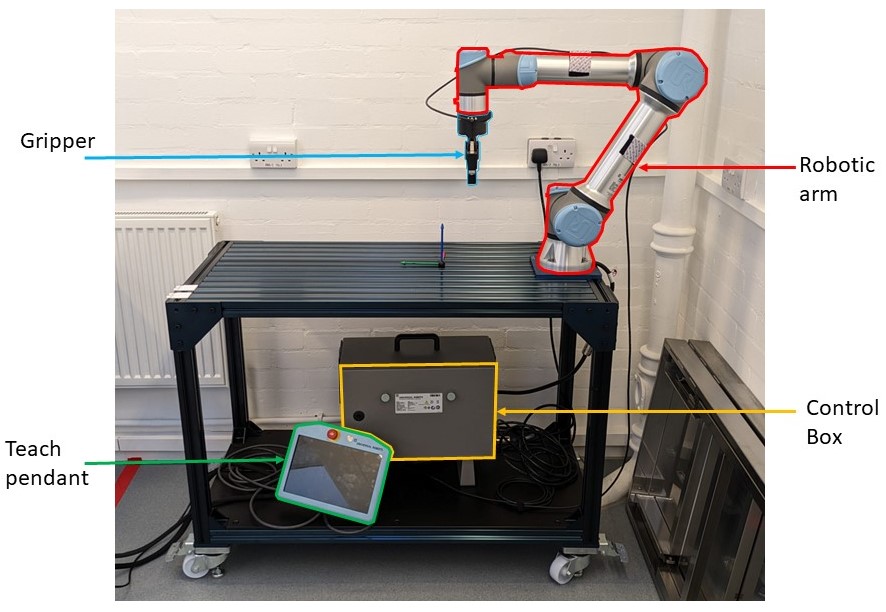
Core components of the UR5e
- The robotic arm
- The control box
- The teach pendant
- The gripper
Power on/off
Power on
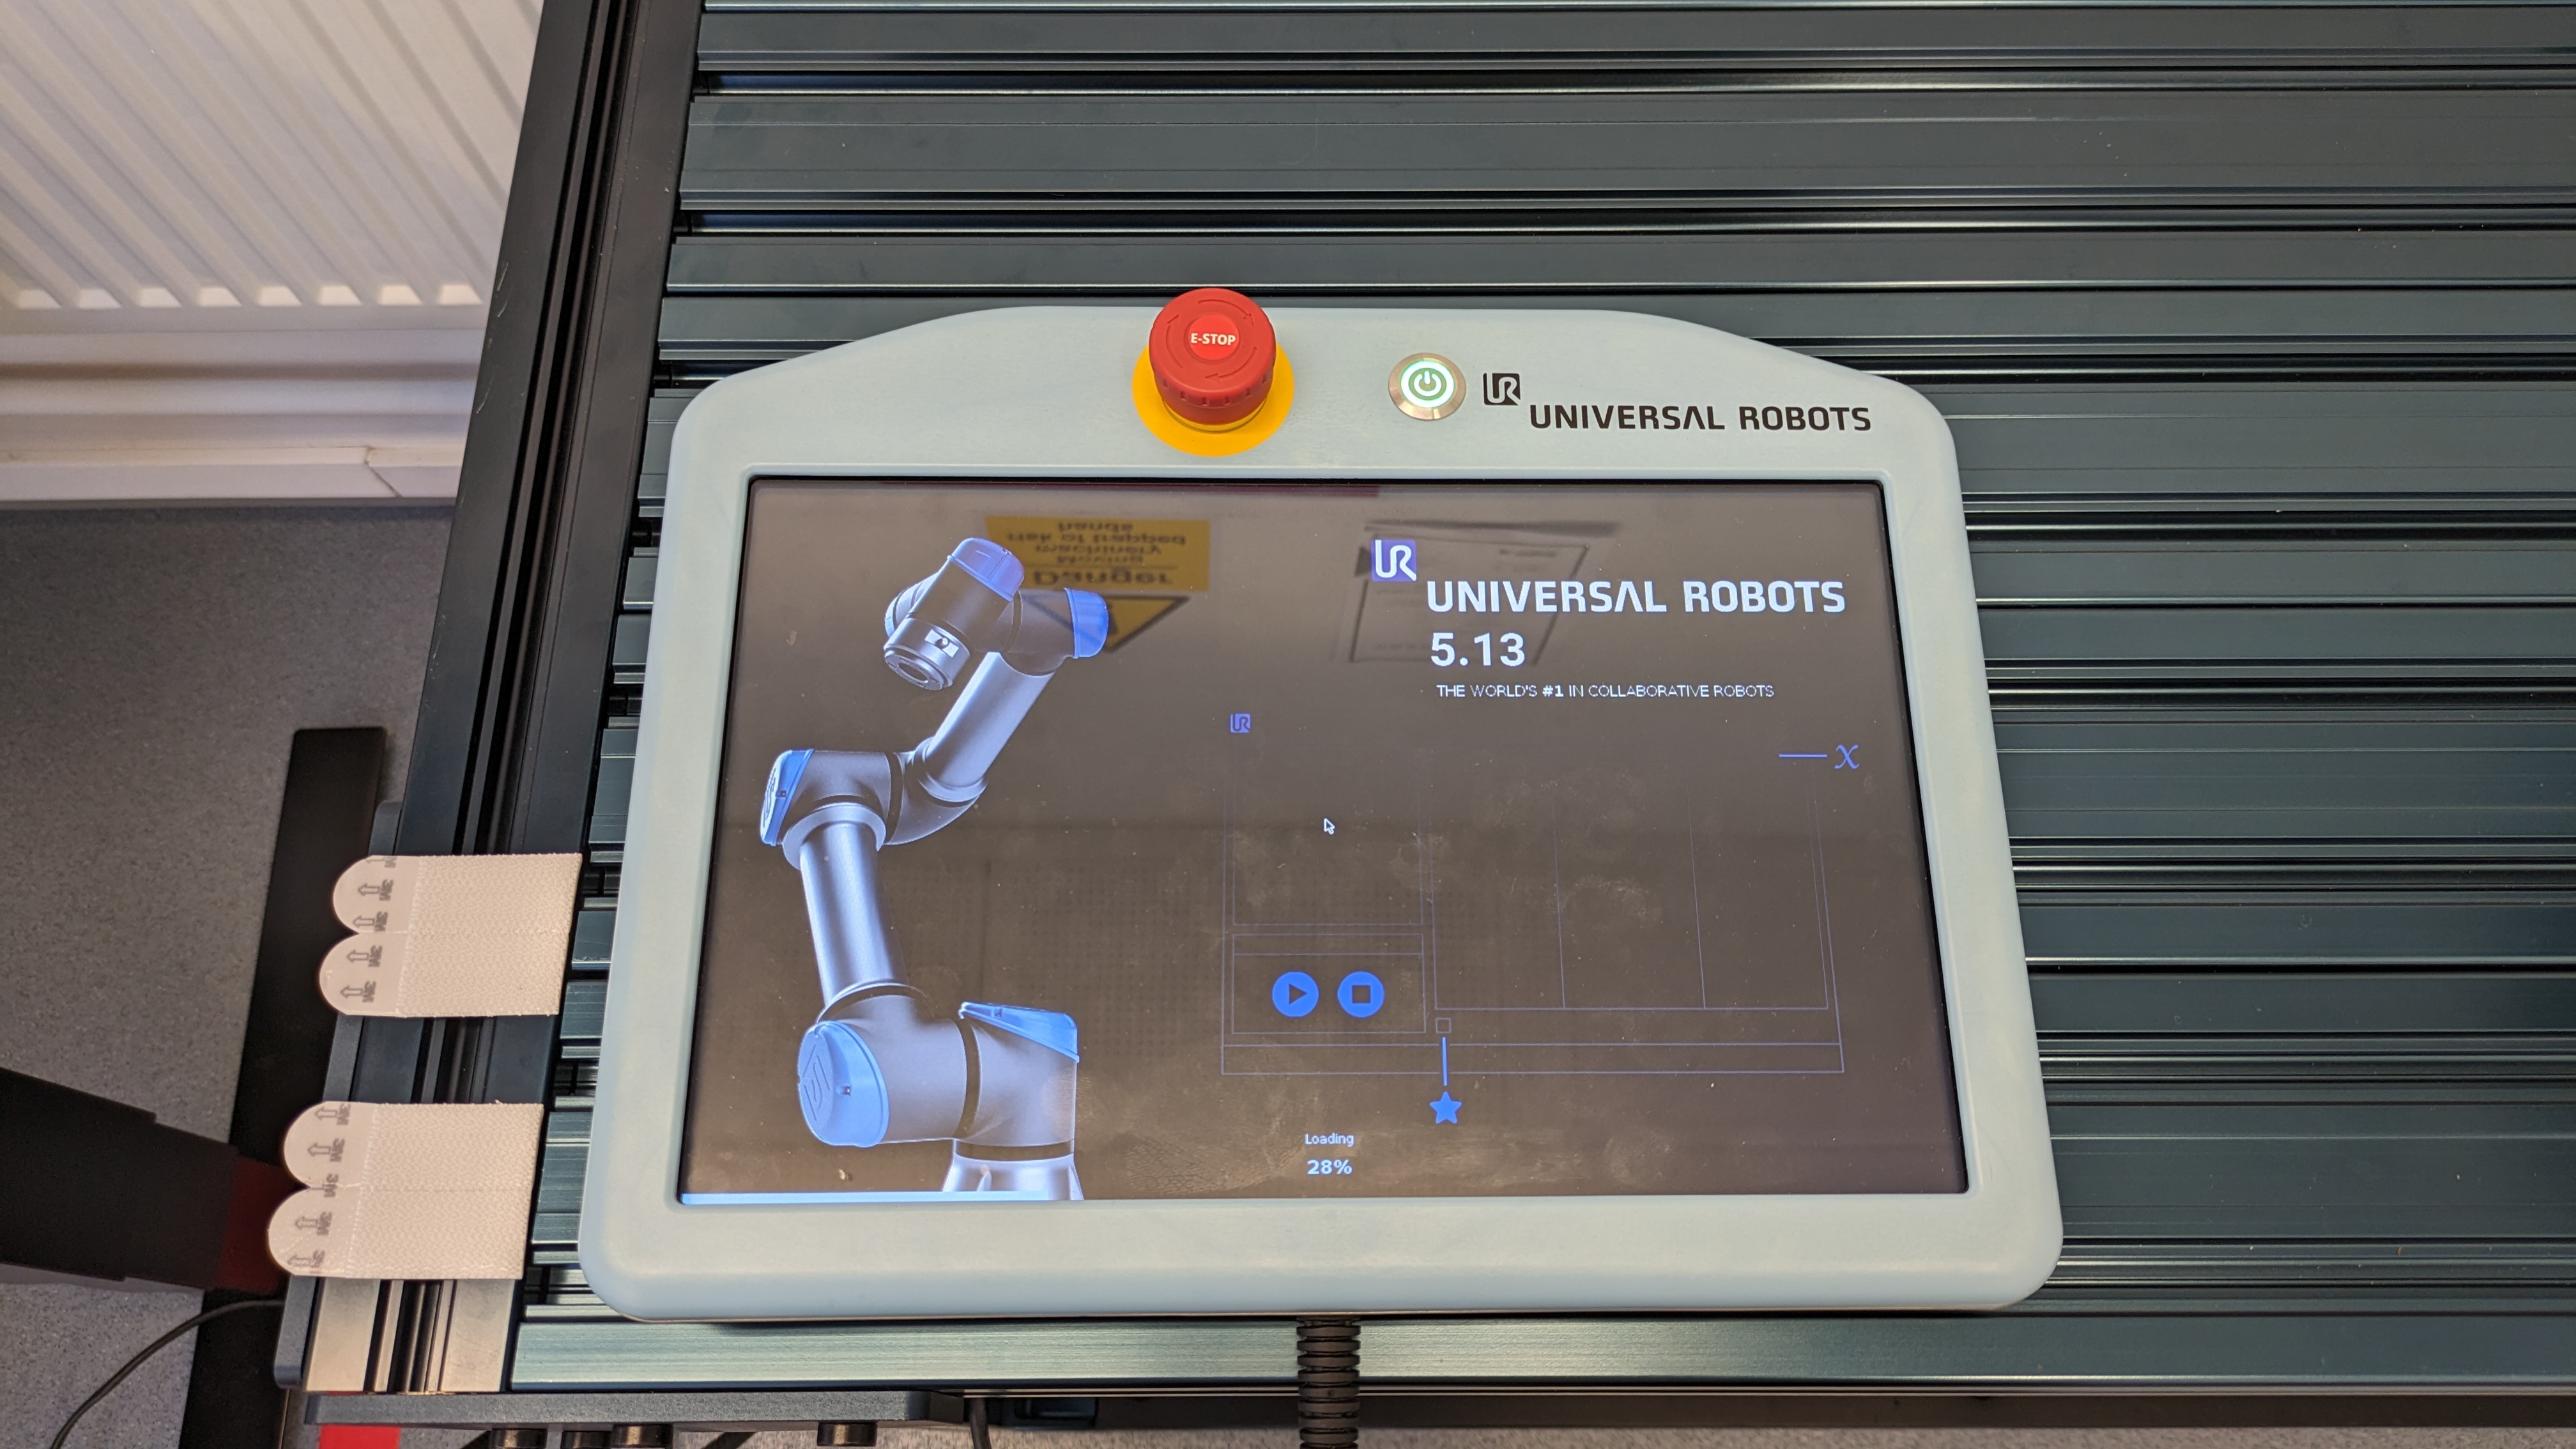
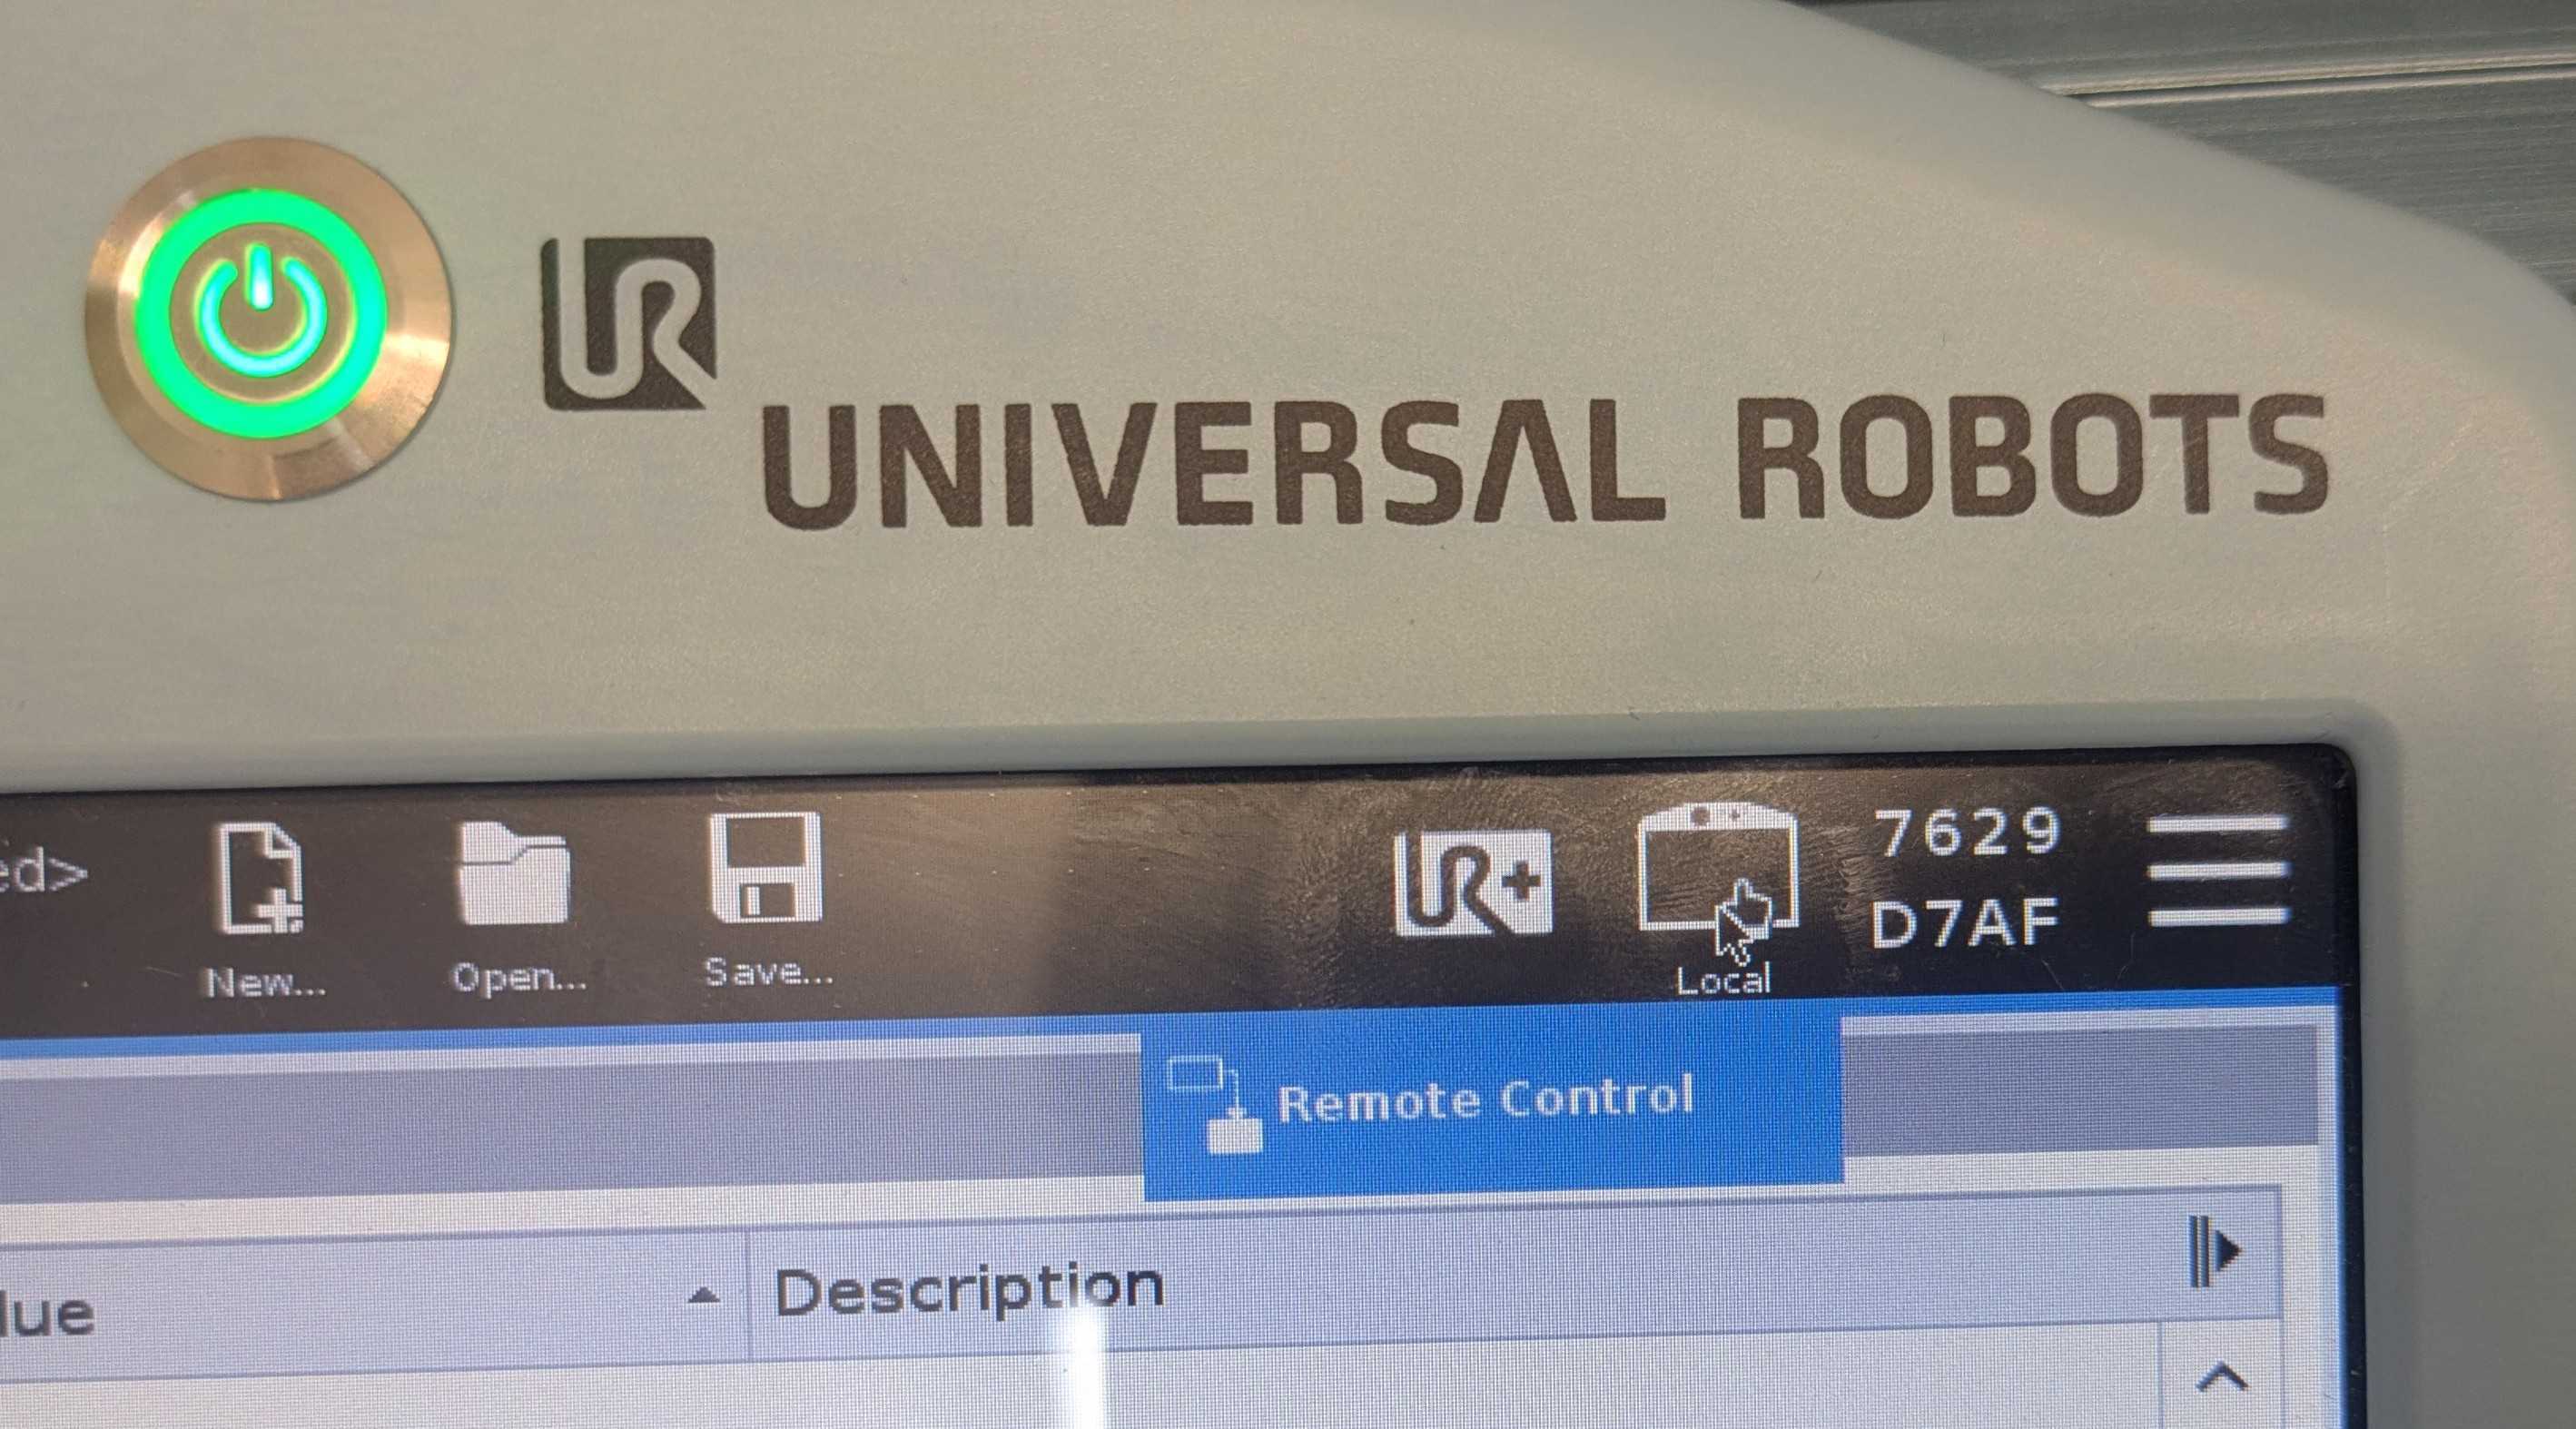
- To power on the robot press down on the power button located at the top of the teach pendant. You will notice that the LED within the power button turns green and after a couple of seconds you will see the Universal Robots logo as shown below.
![]()
- The screen will then change to a loading screen as shown below and it will take a couple of minutes to load completely.
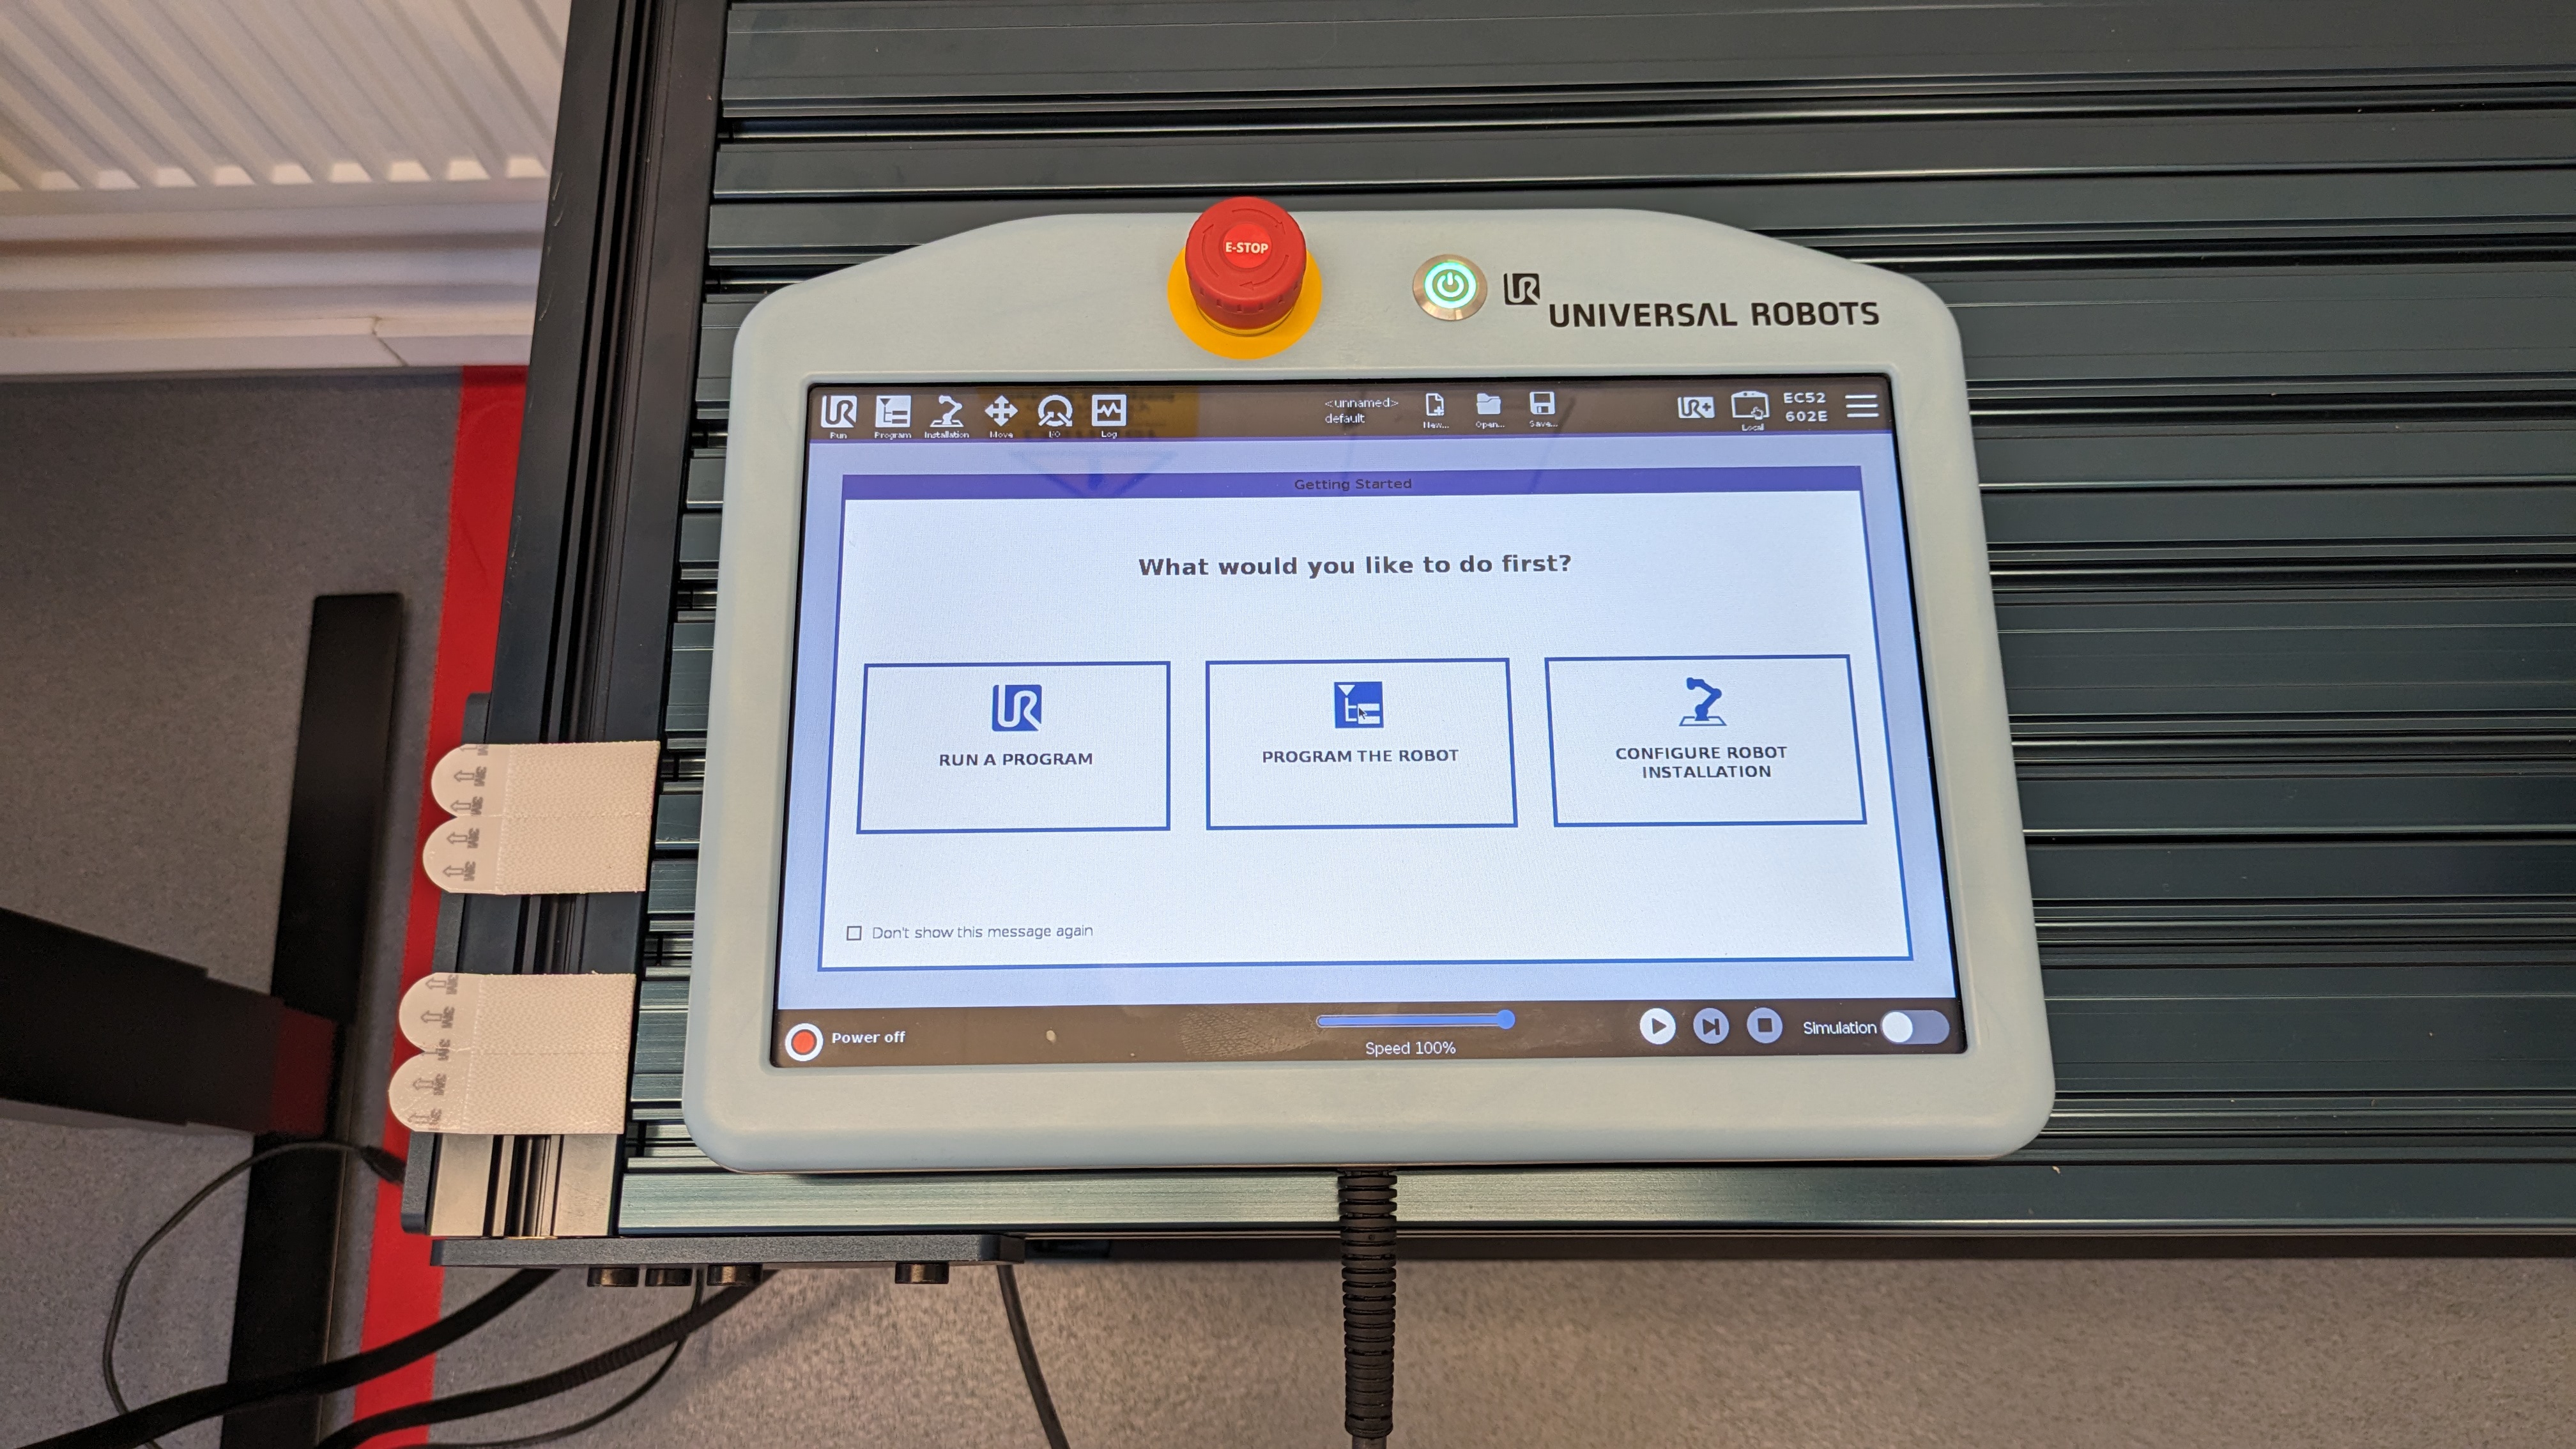
- Once the loading in complete you will see a getting started screen as shown below. At this stage only the control box has booted up but robot arm itself is not powered on.
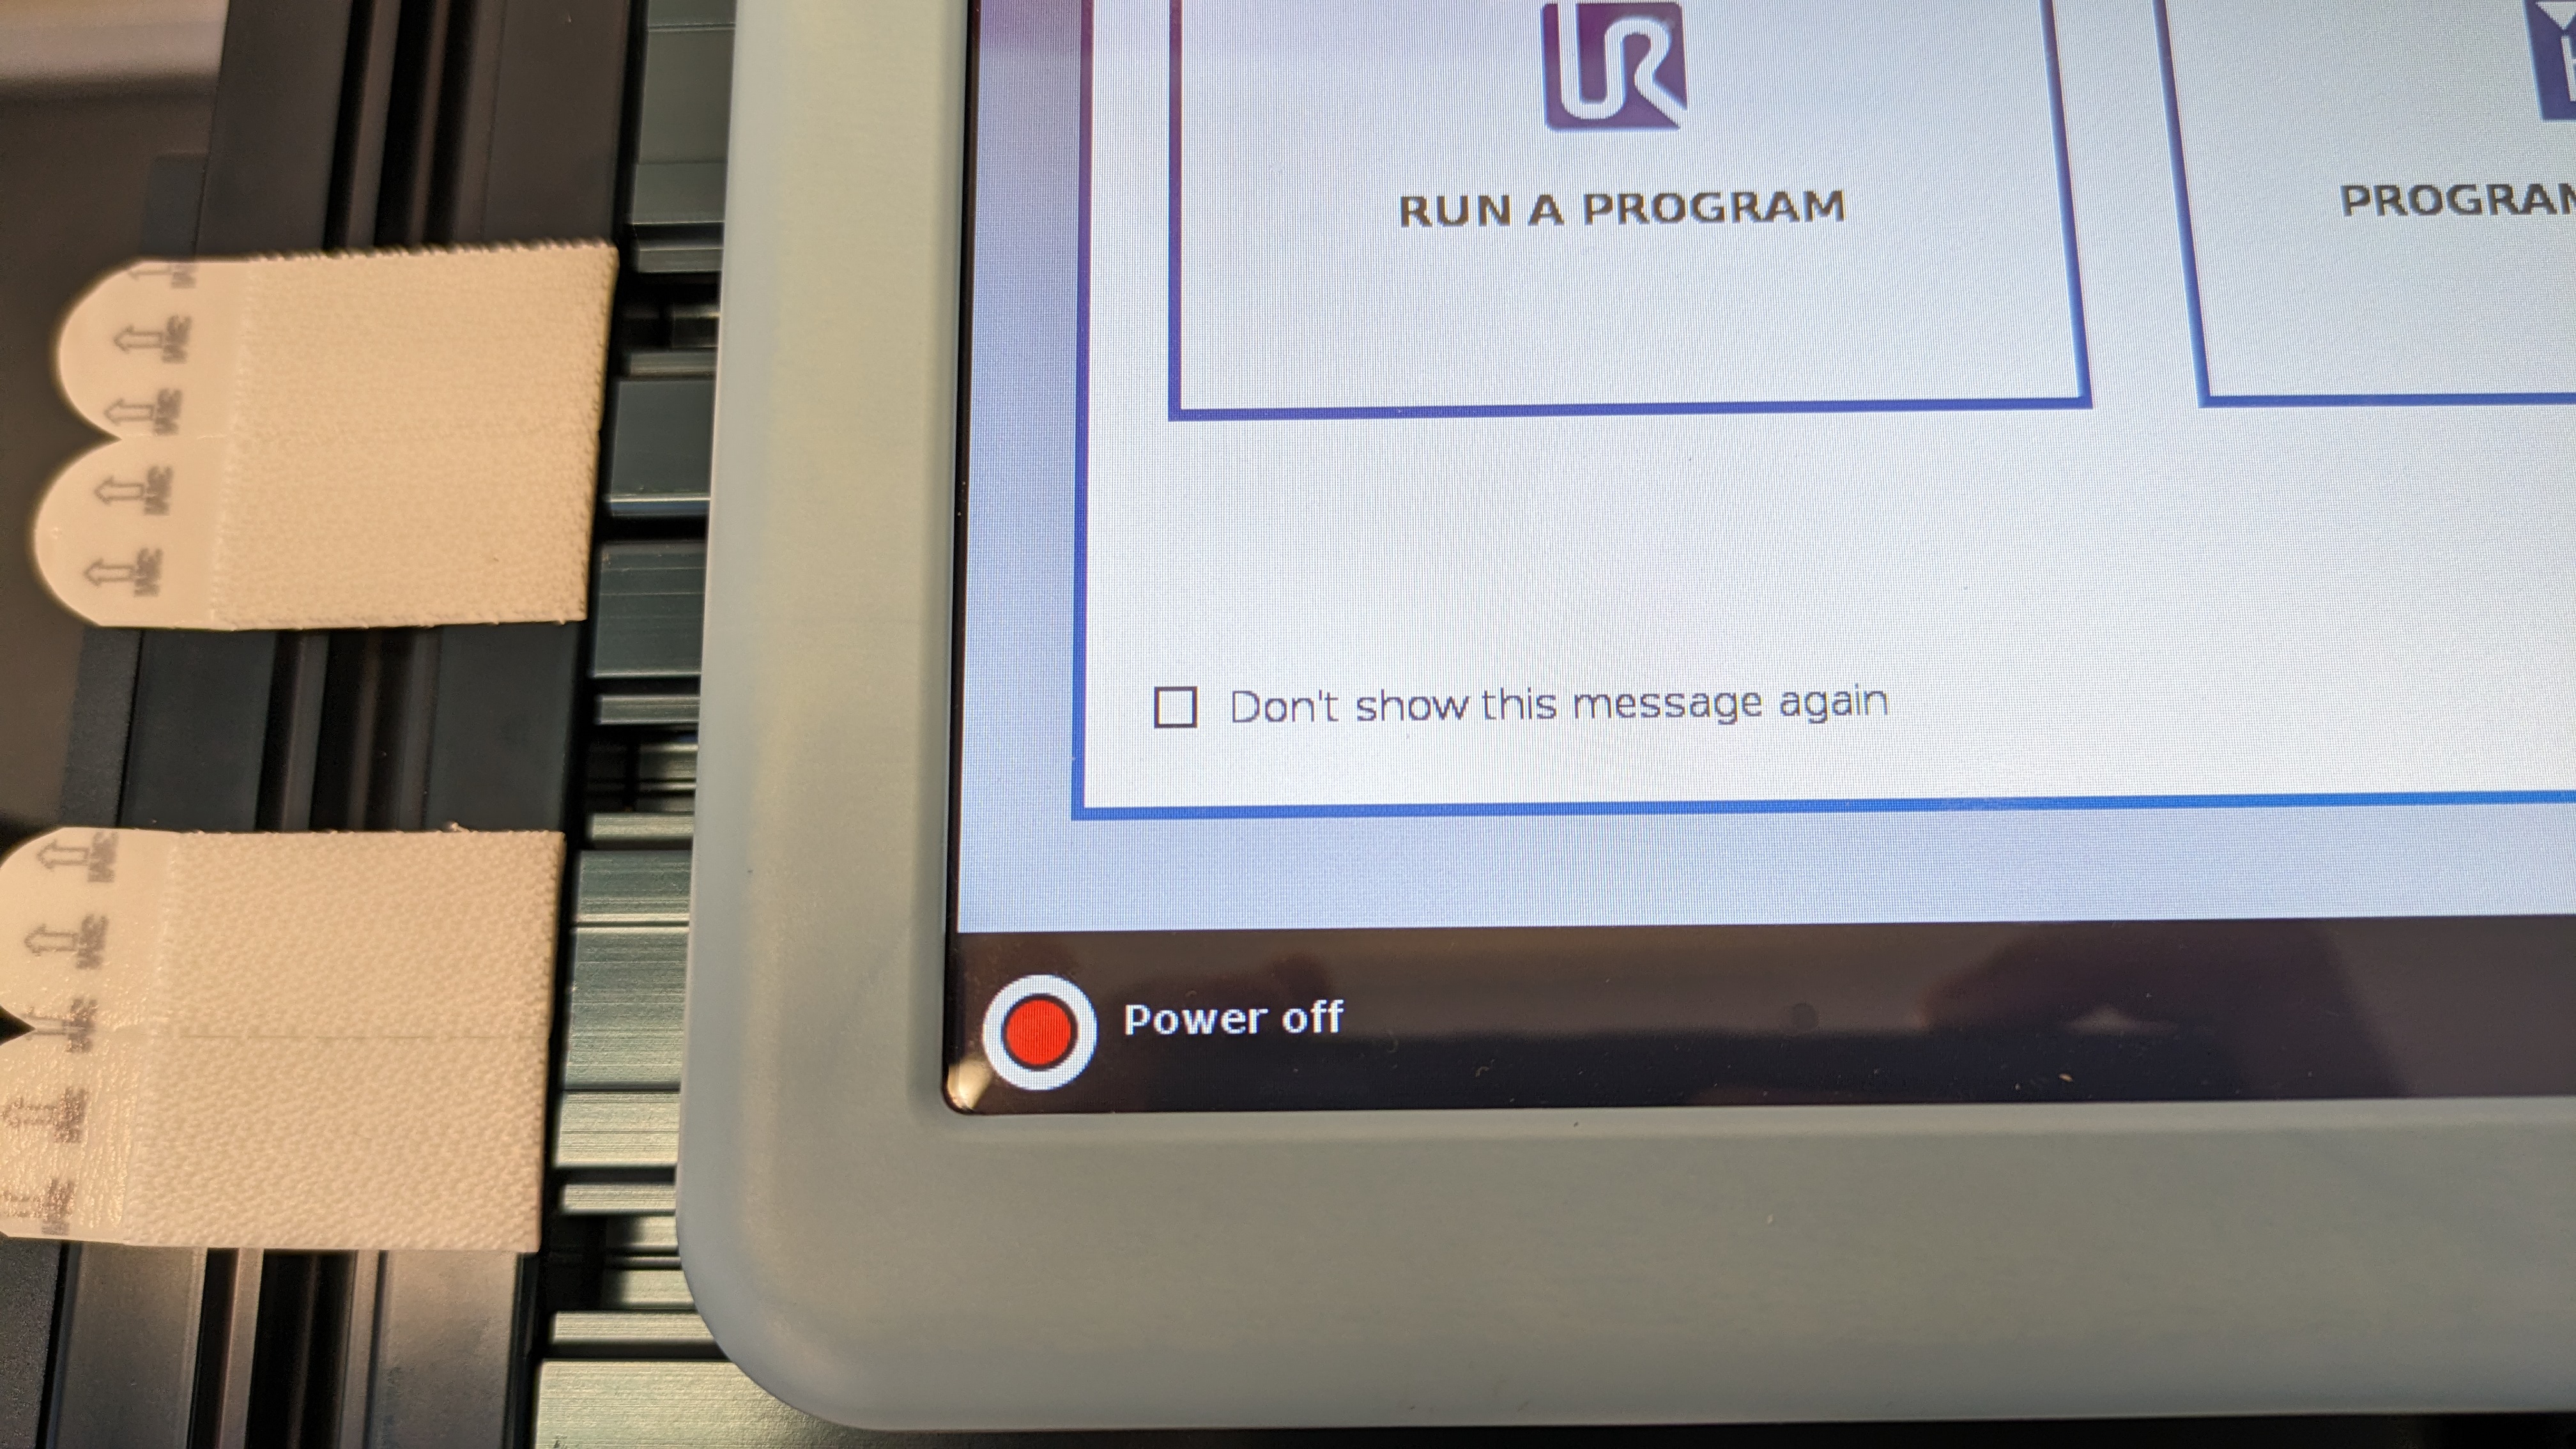
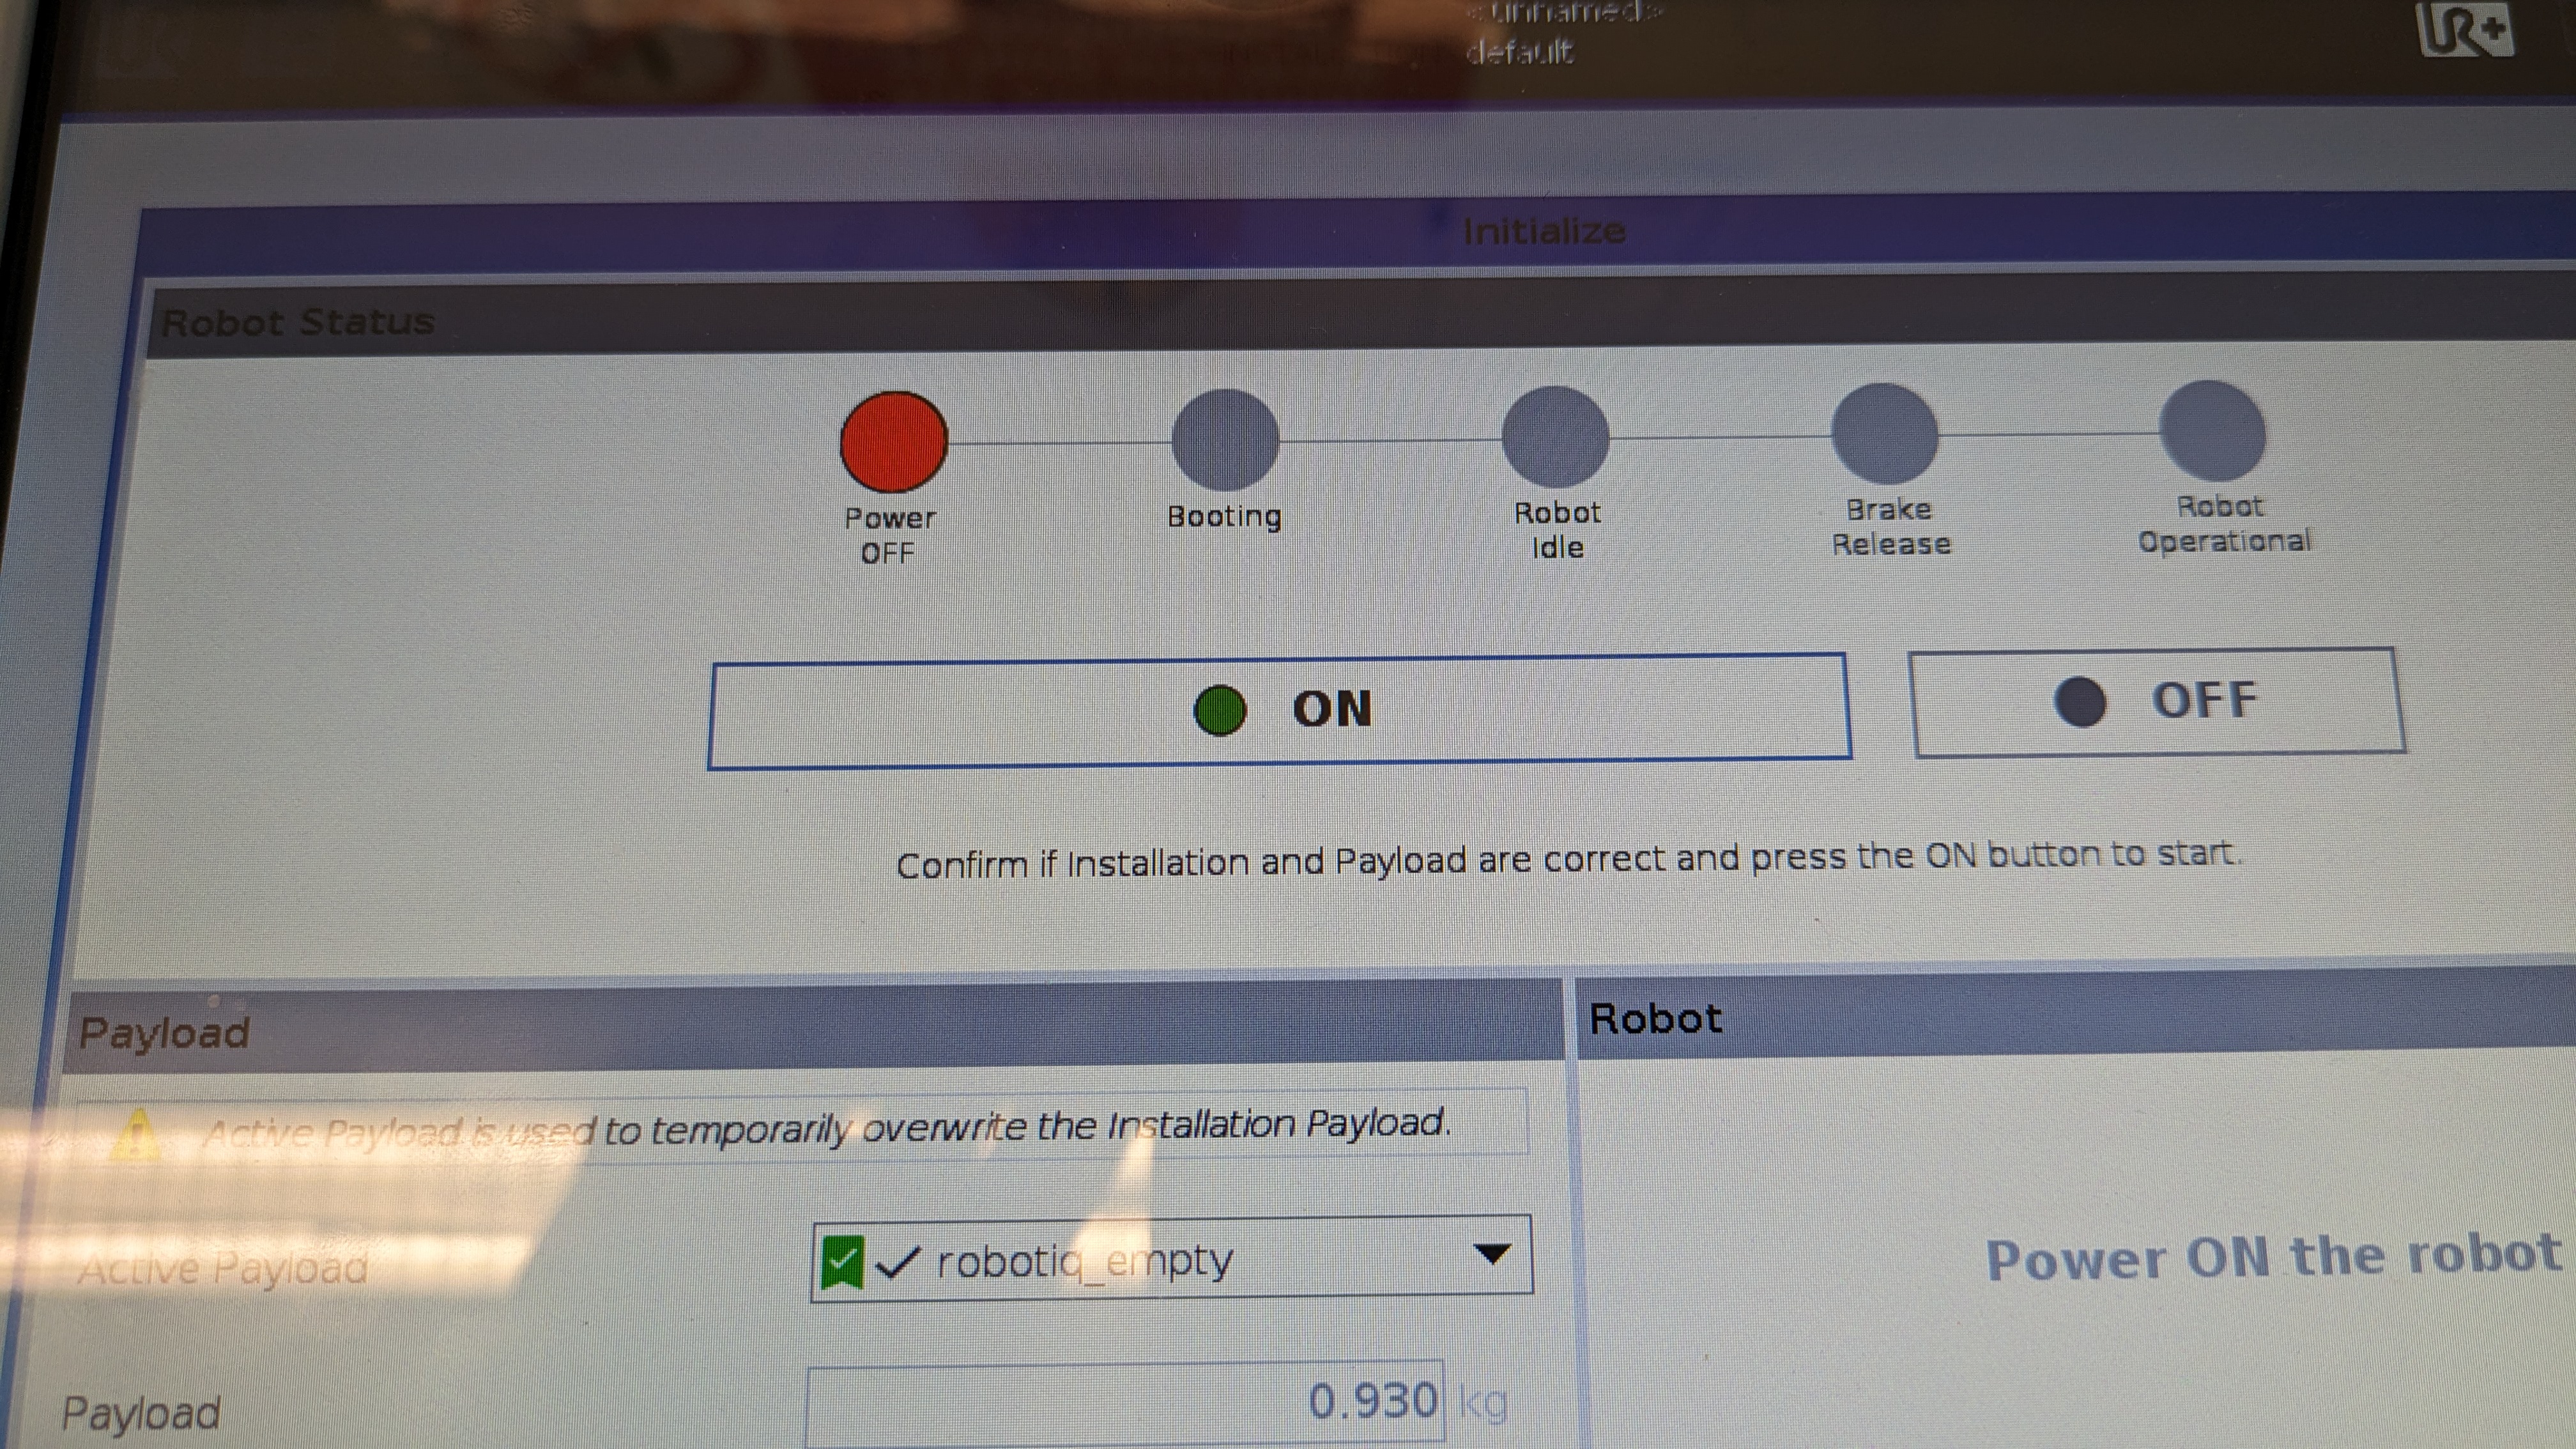
- To power on the robot arm, click on the red button that is located at the bottom left corner of the screen.
- You will get a pop up screen as shown below and within the pop up screen, click on the "ON" button. You will notice that the circles with the status will change to green and the status will change as well.
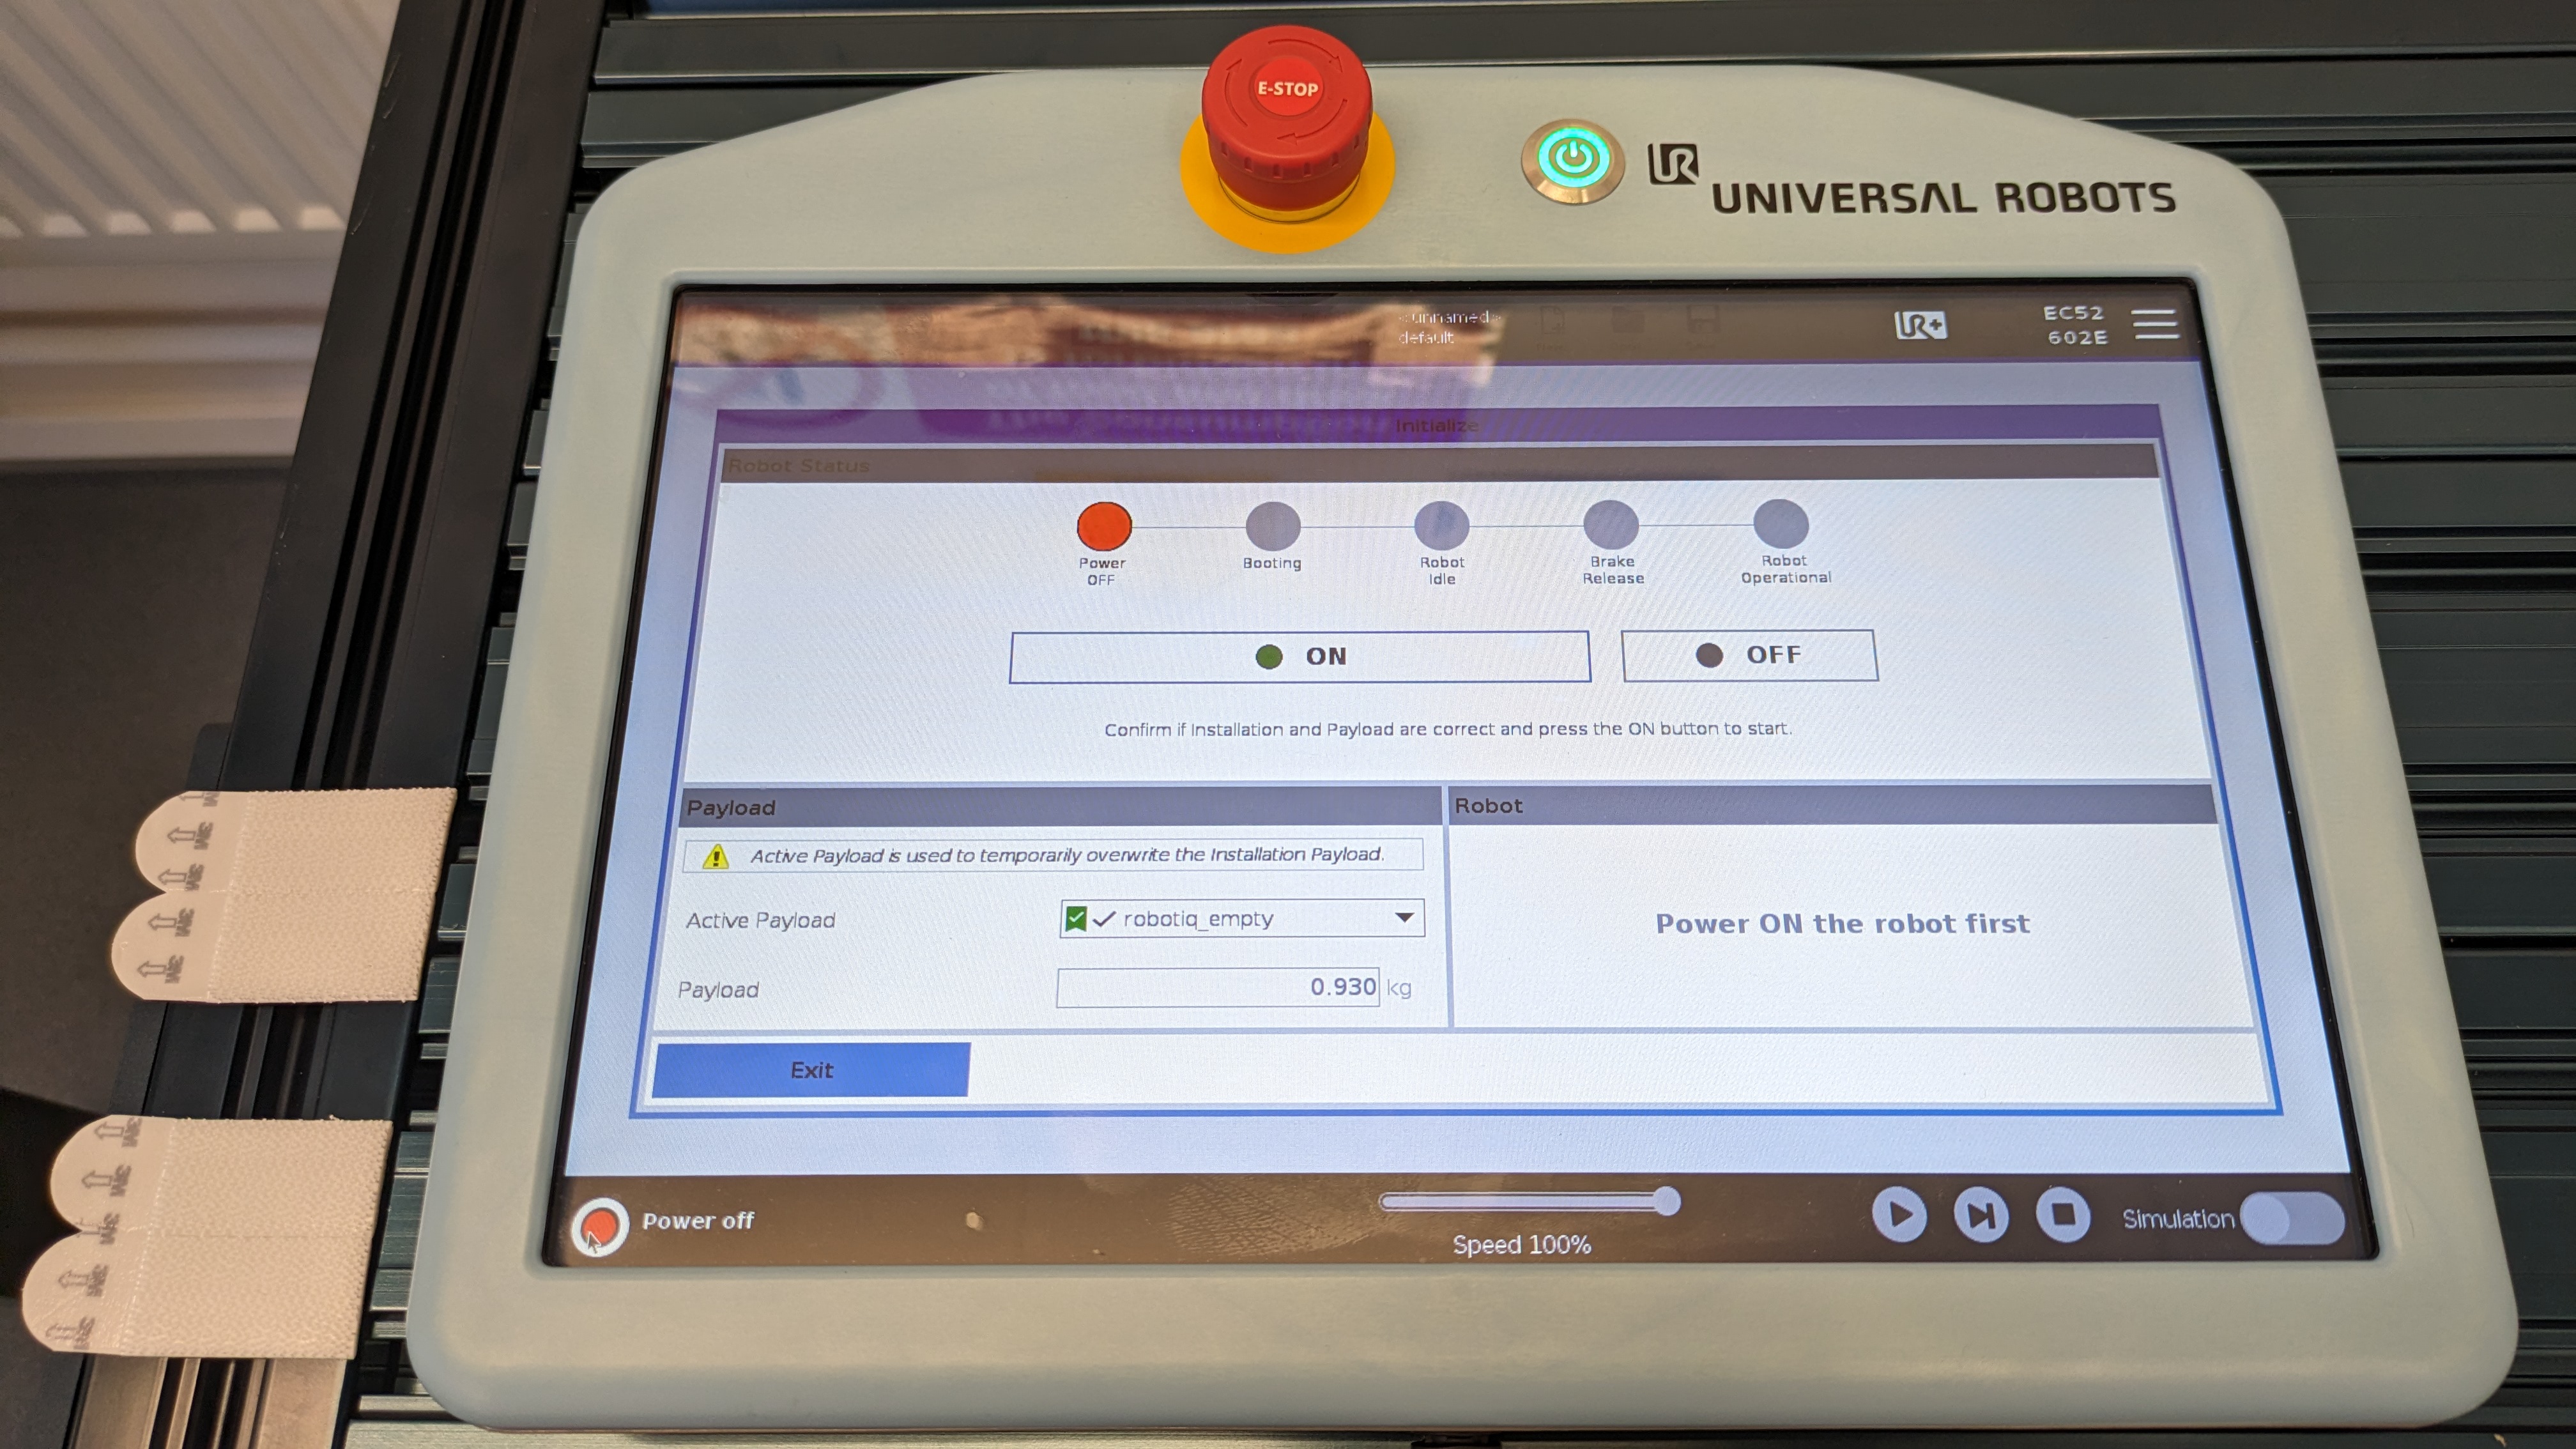
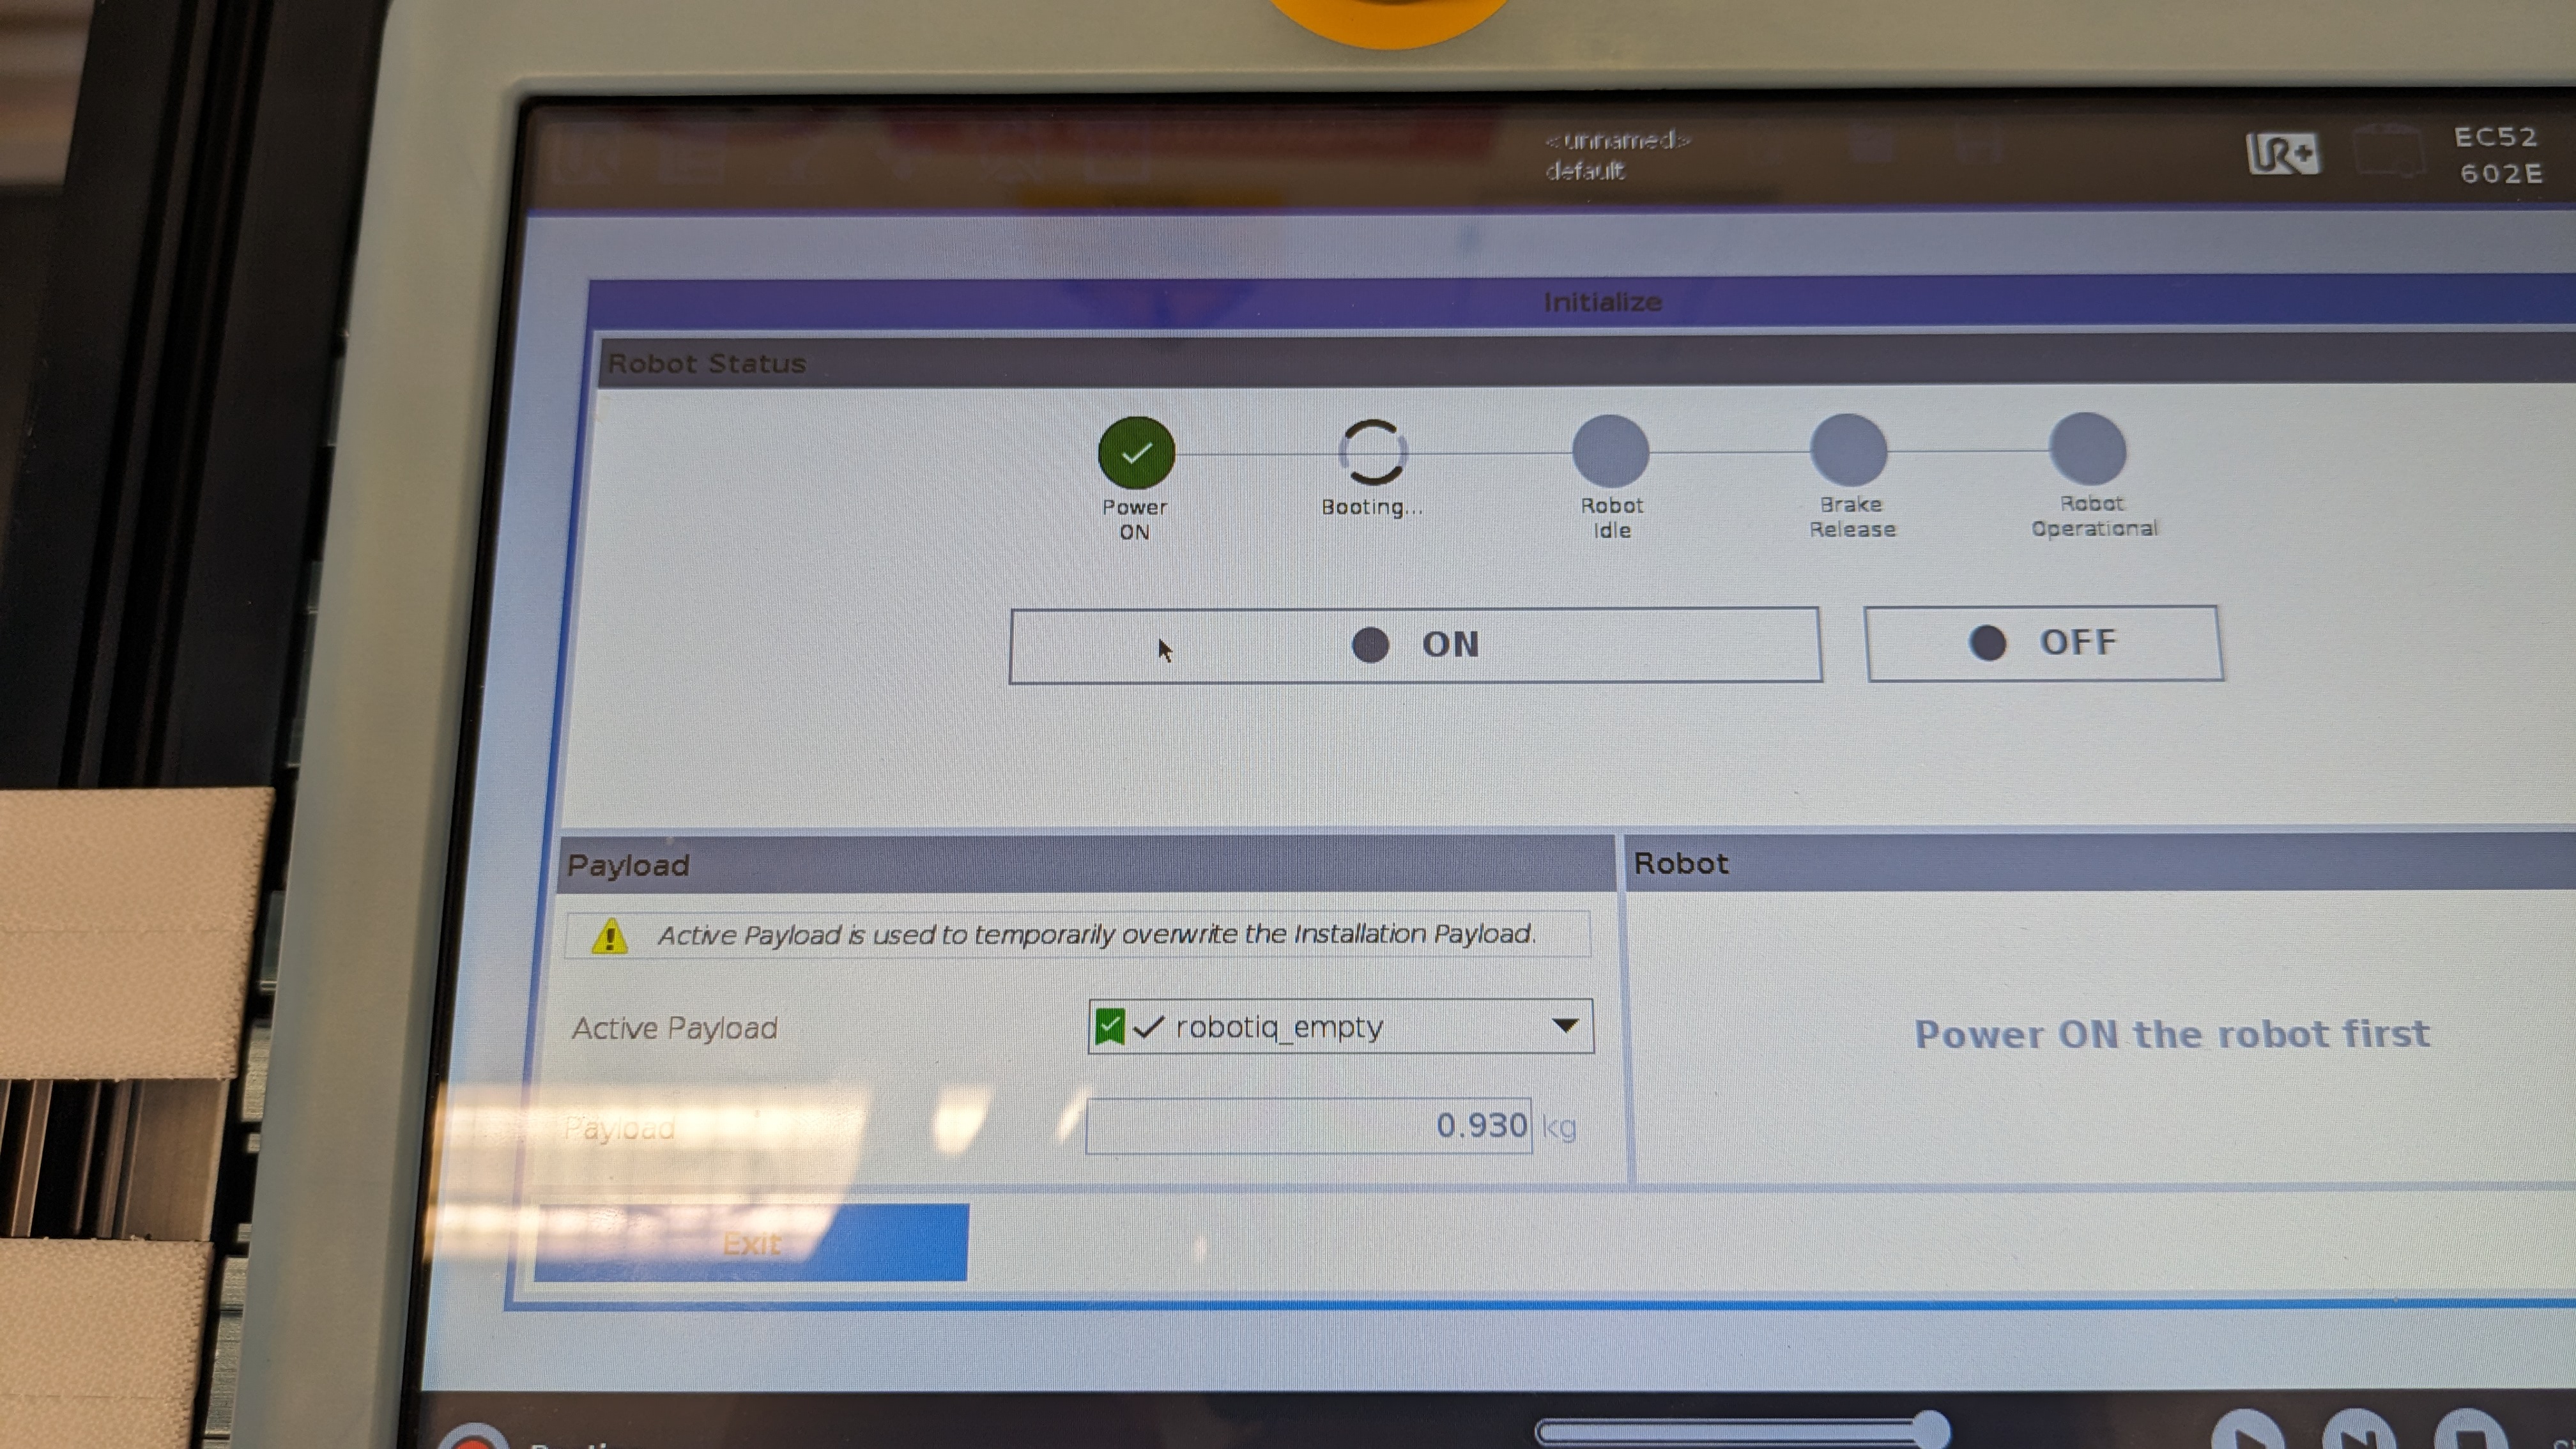
- After a couple of seconds, you should see that the "ON" button would have been replaced with the "START" button. Now, click on the "START" button, you will hear some clicking noises coming from the robot arm, which indicates the breaks of the robot arm are being released.
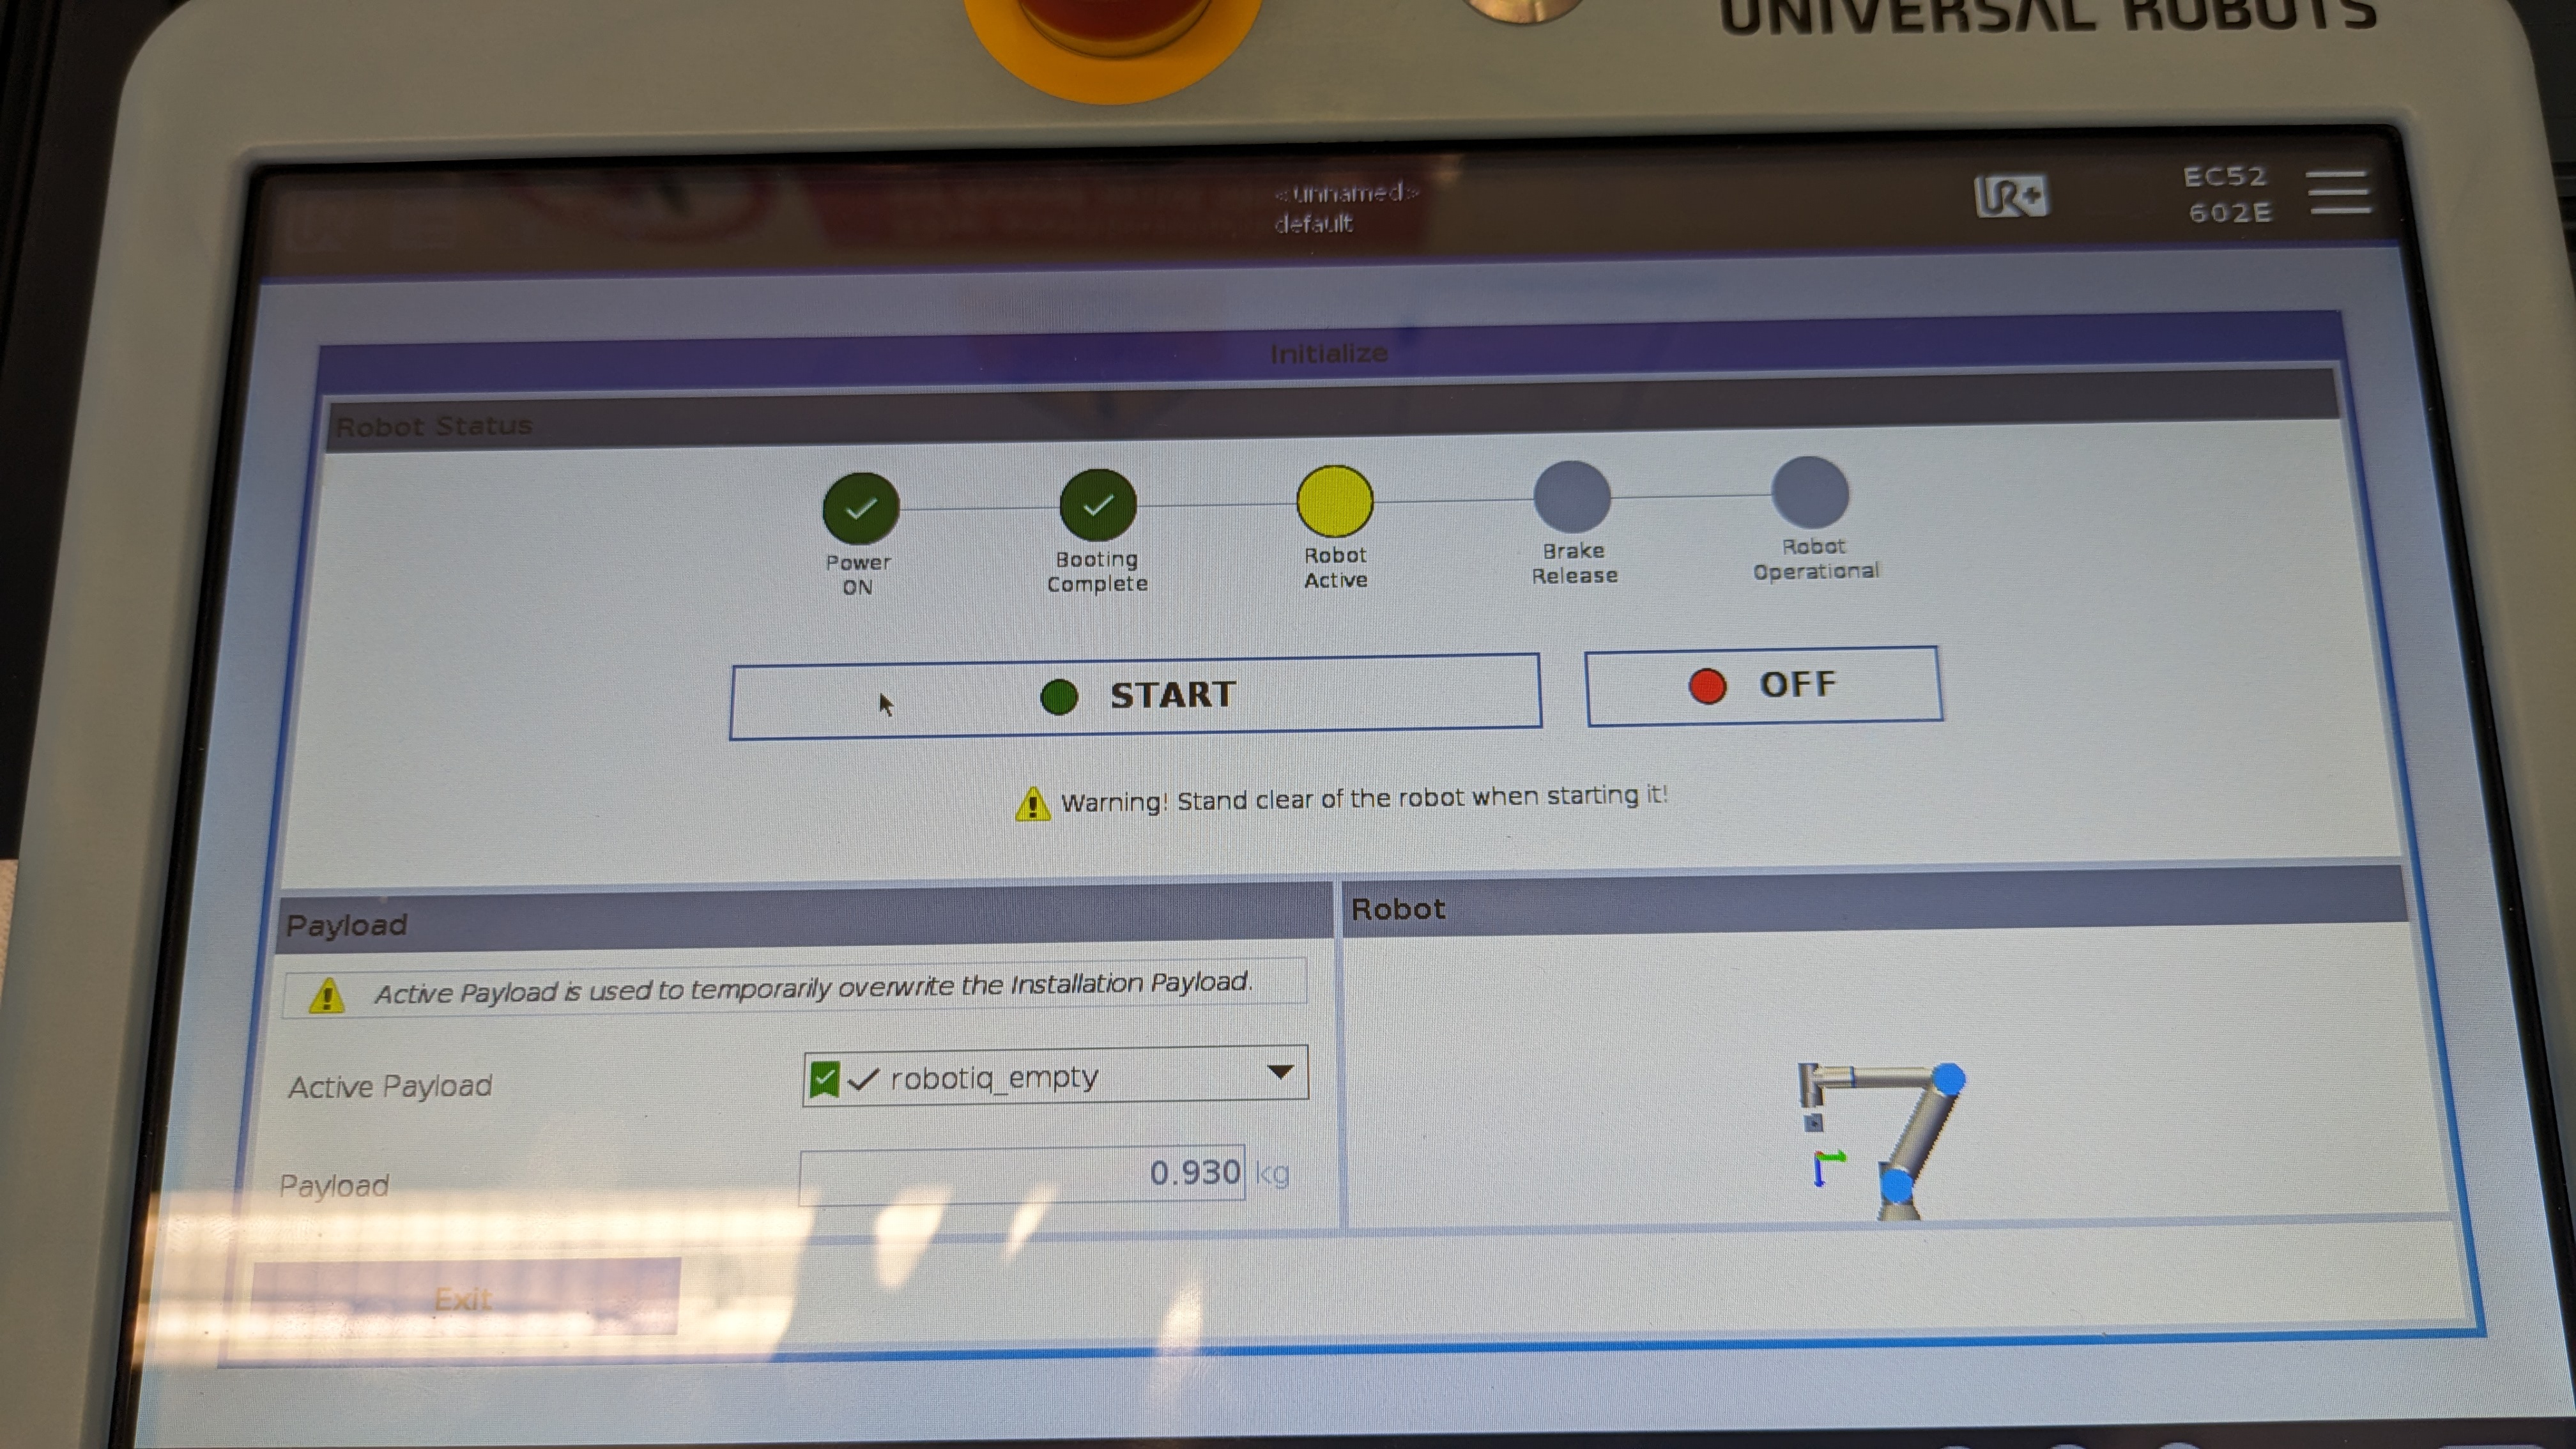

- If everything goes well, you will see that all the circles will be green and if you look over to the bottom left corner of the teach pendant, the red button we initially clicked is now green and it will also say "Normal" next to it.
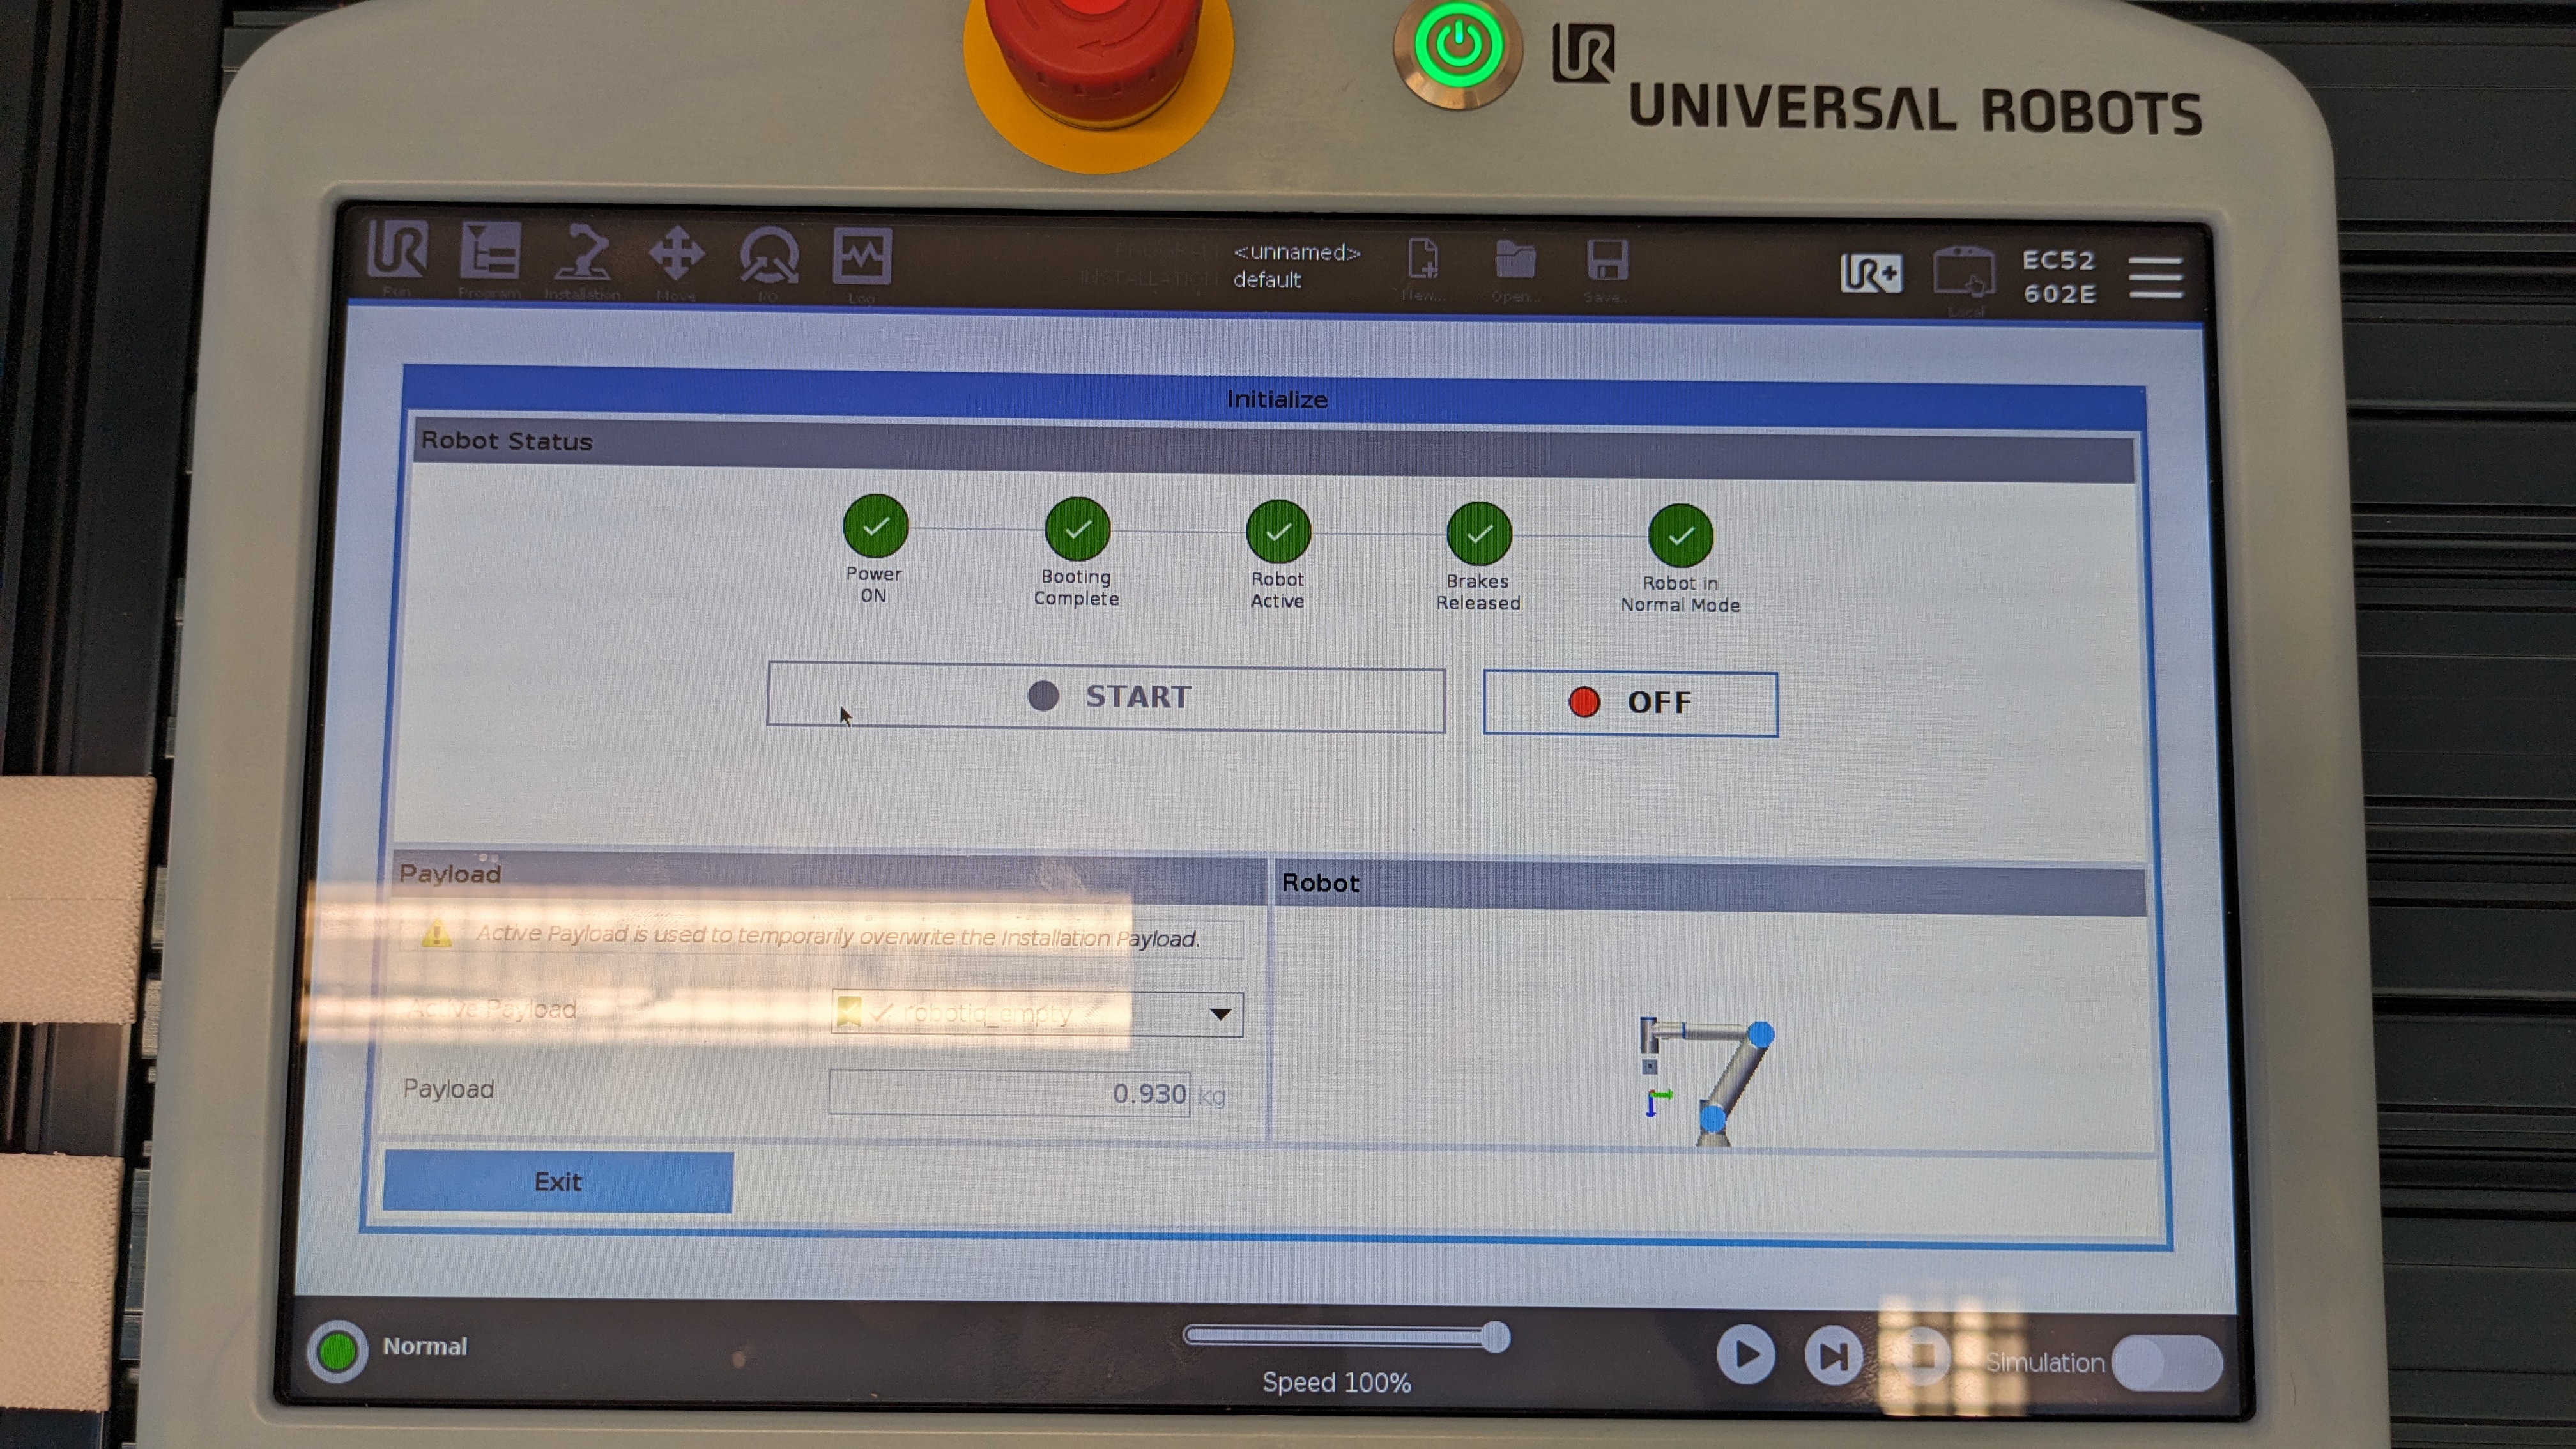
- Now you can exit this screen by clicking on the "EXIT" button located at the bottom left of the screen.
Power off
To power off the robot, press down on the power button that is located at the top of the teach pendant and then select "Power off" on the pop up. If you were working on a program and want to save it click on "save program" otherwise click "Discard".
Controlling the UR5e using the teach pendant
There are 2 ways to control the UR5e robotic arm.
- Using the teach pendant.
- External control using RTDE, URscript or ROS2.
Moving the UR5e
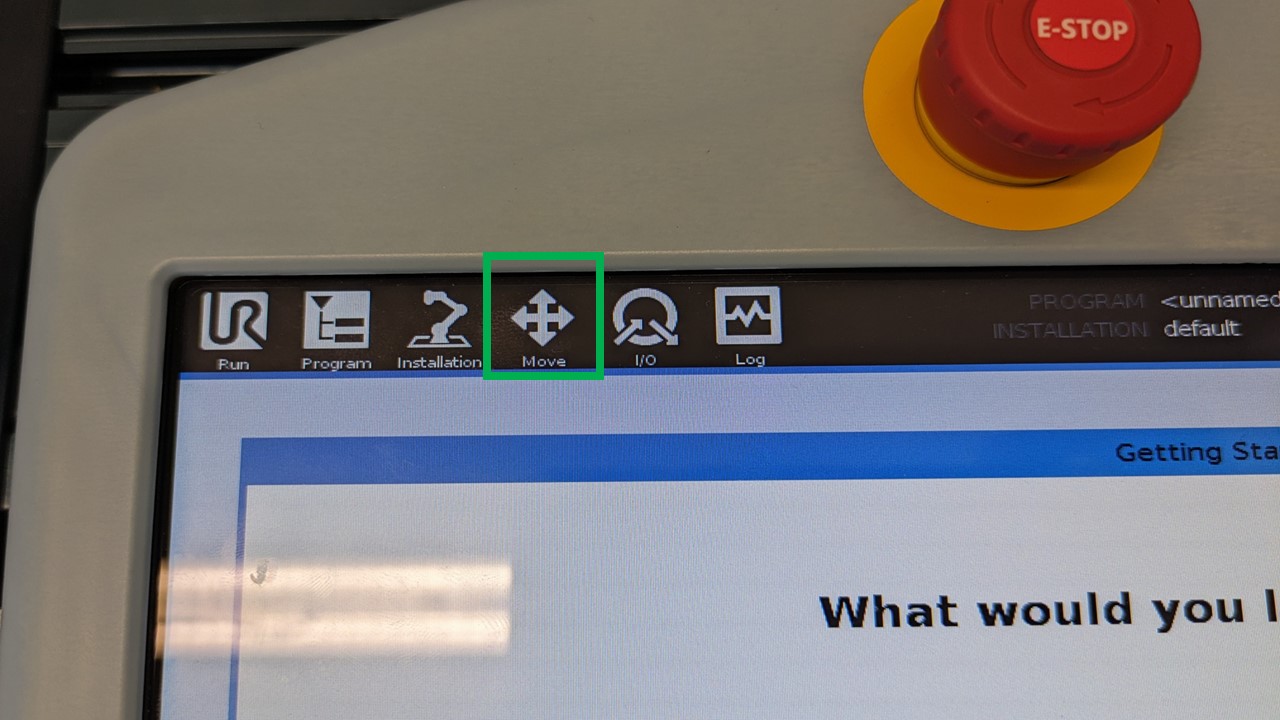
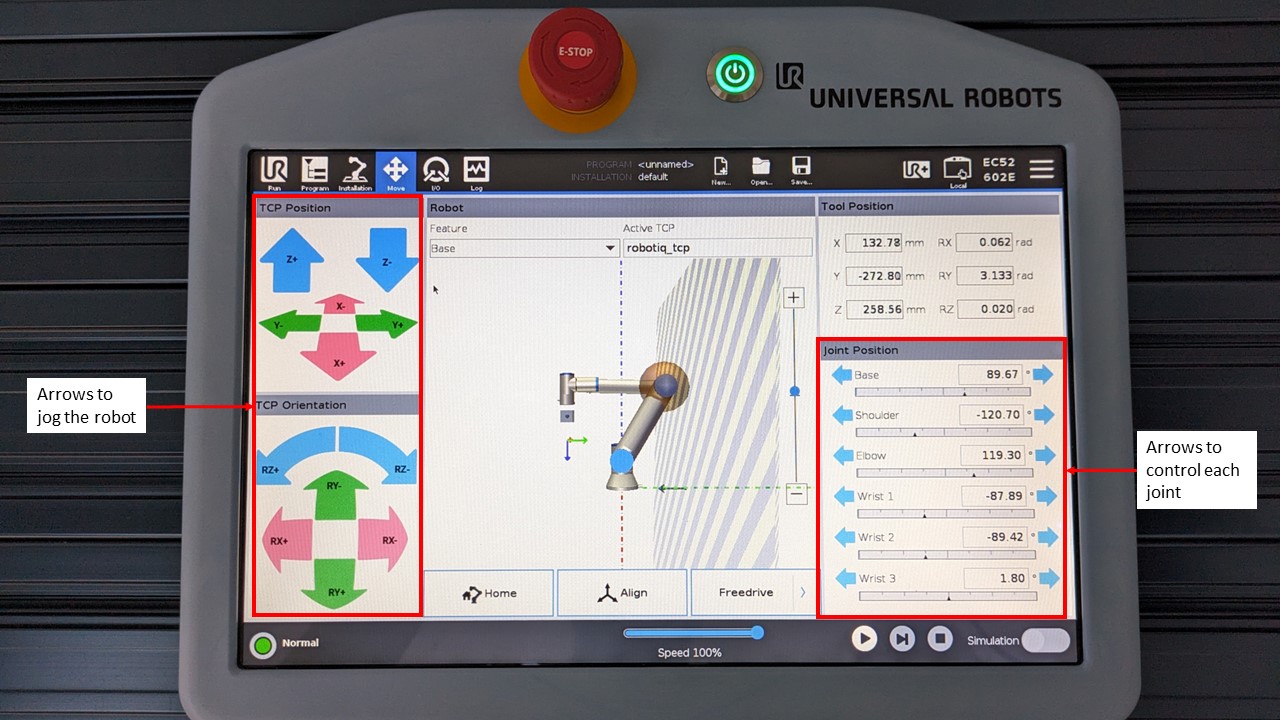
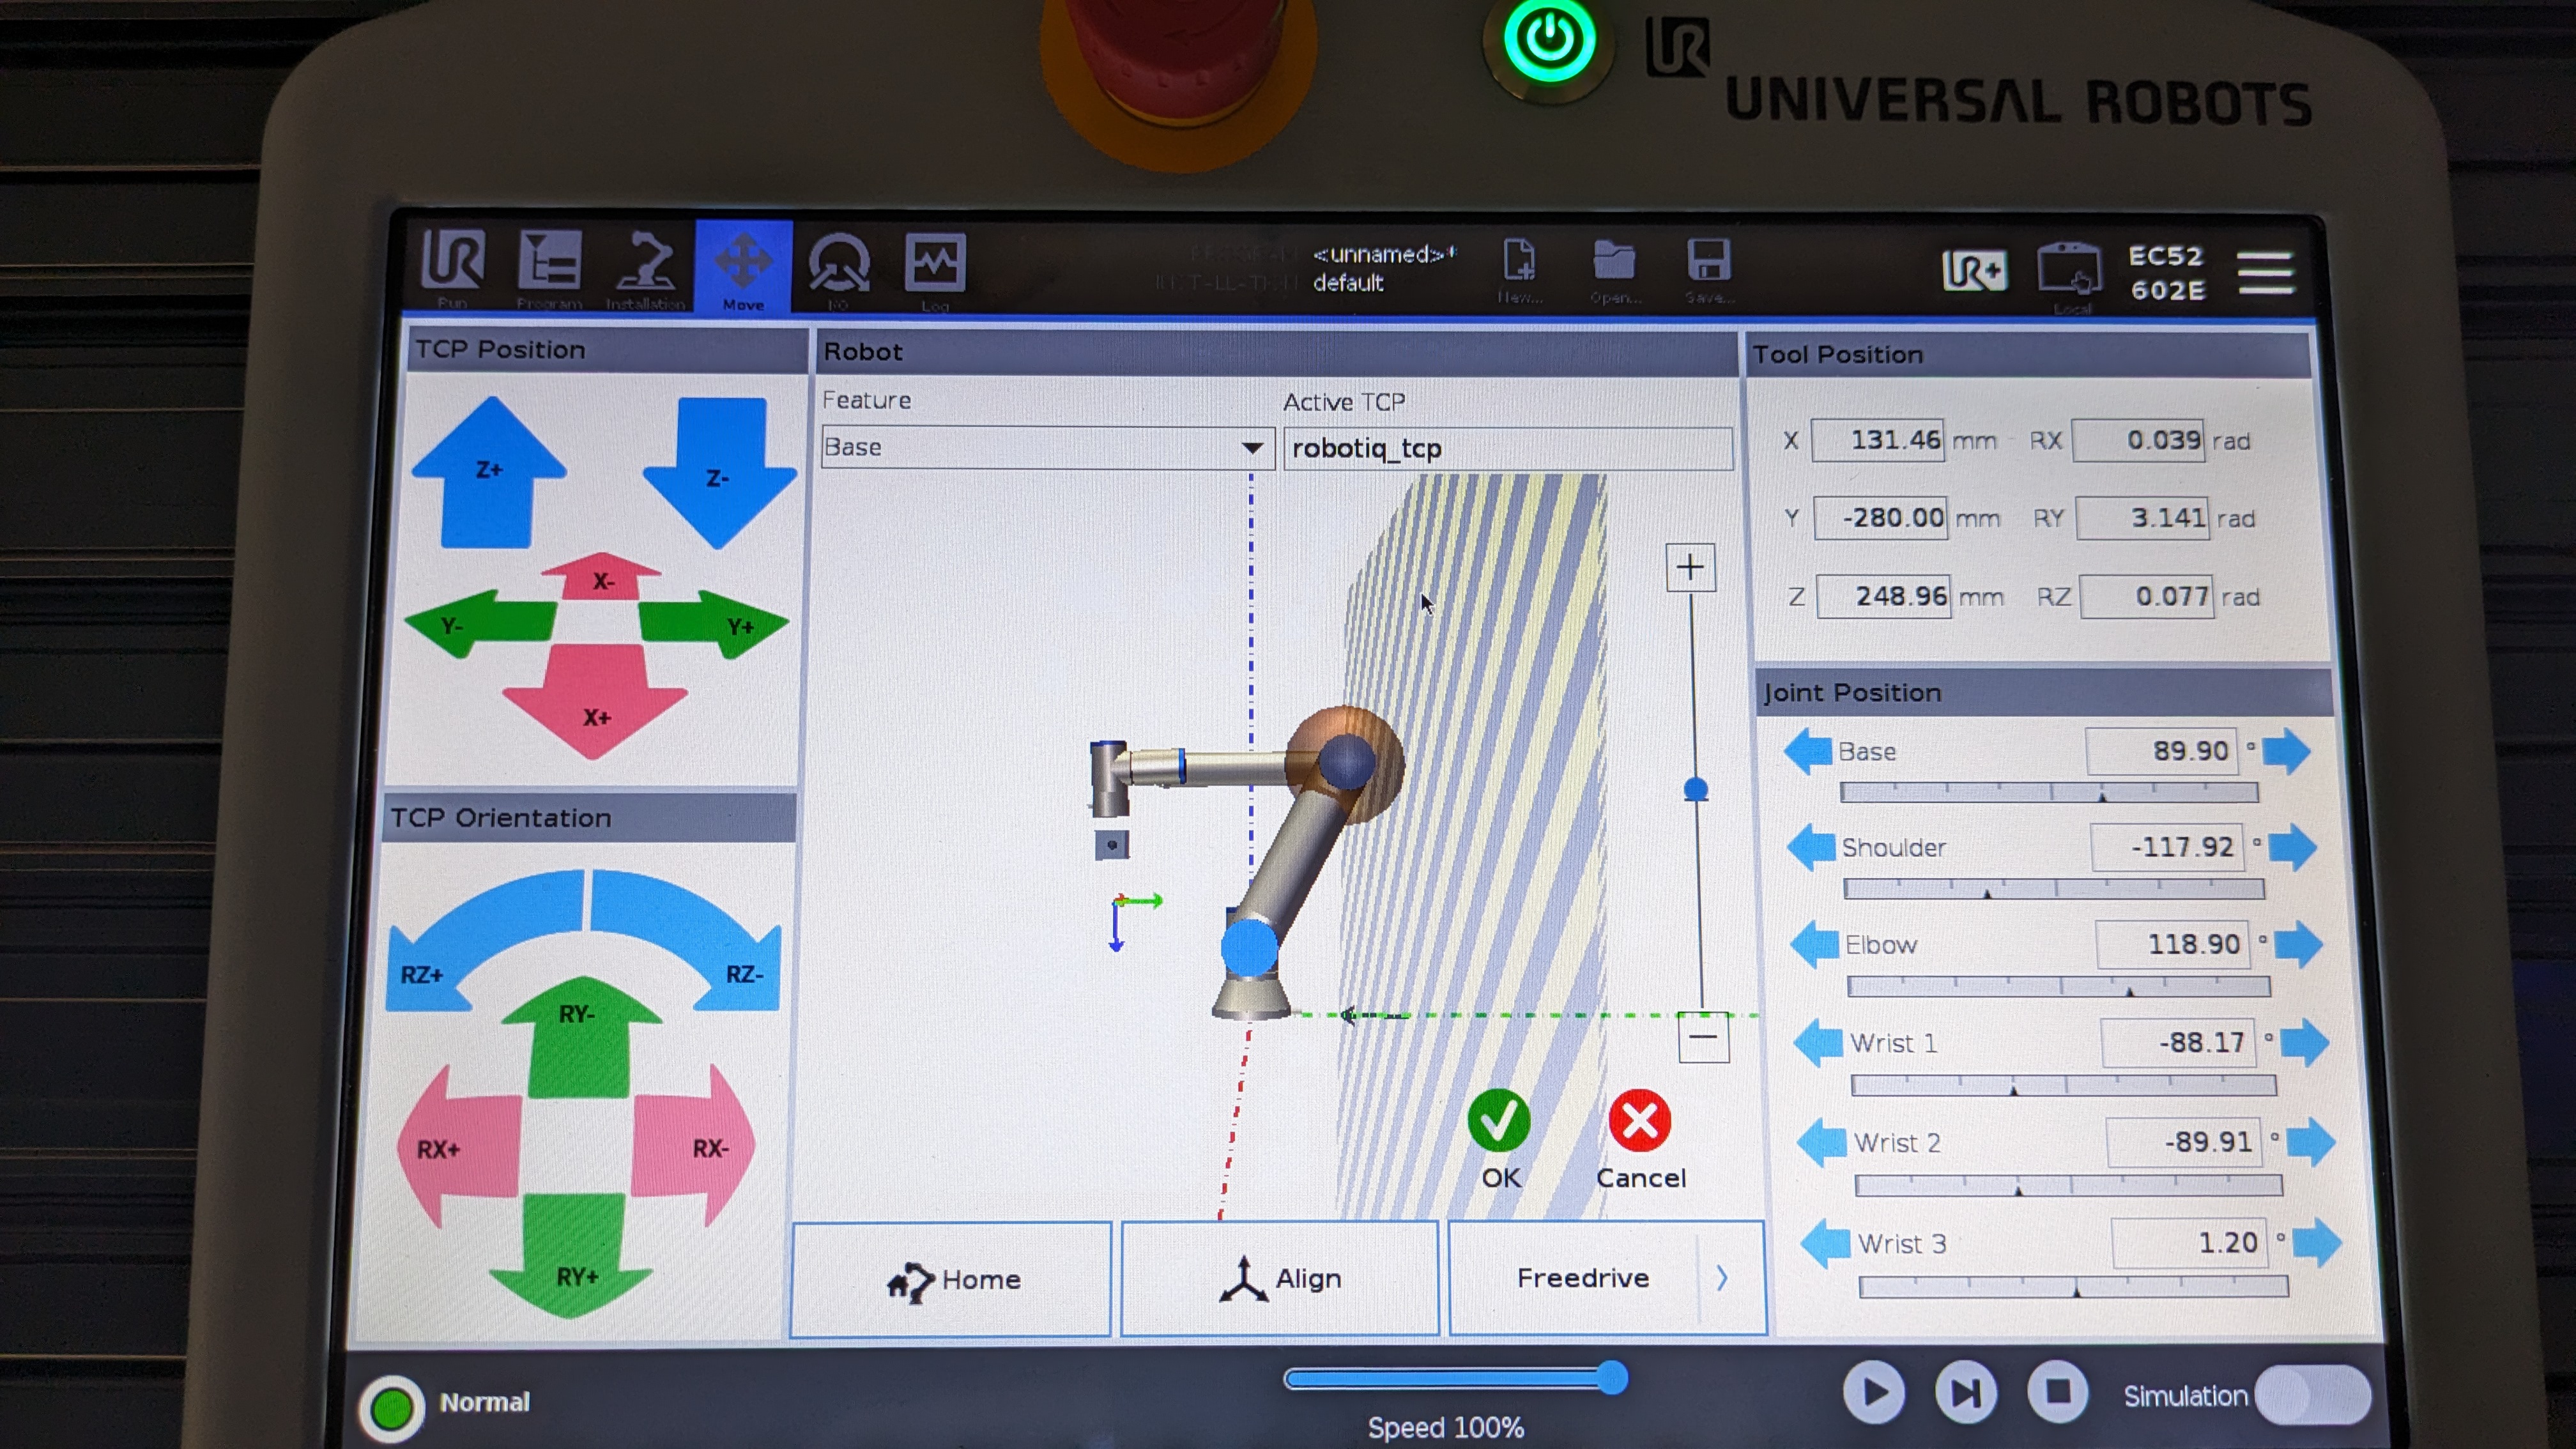
You can move the robot using different methods but to do that, you must first be in the move menu or setting a way point in a program. To navigate to the move button, click on the button that says "Move" which is located at the top left of the screen. It looks like the image below.
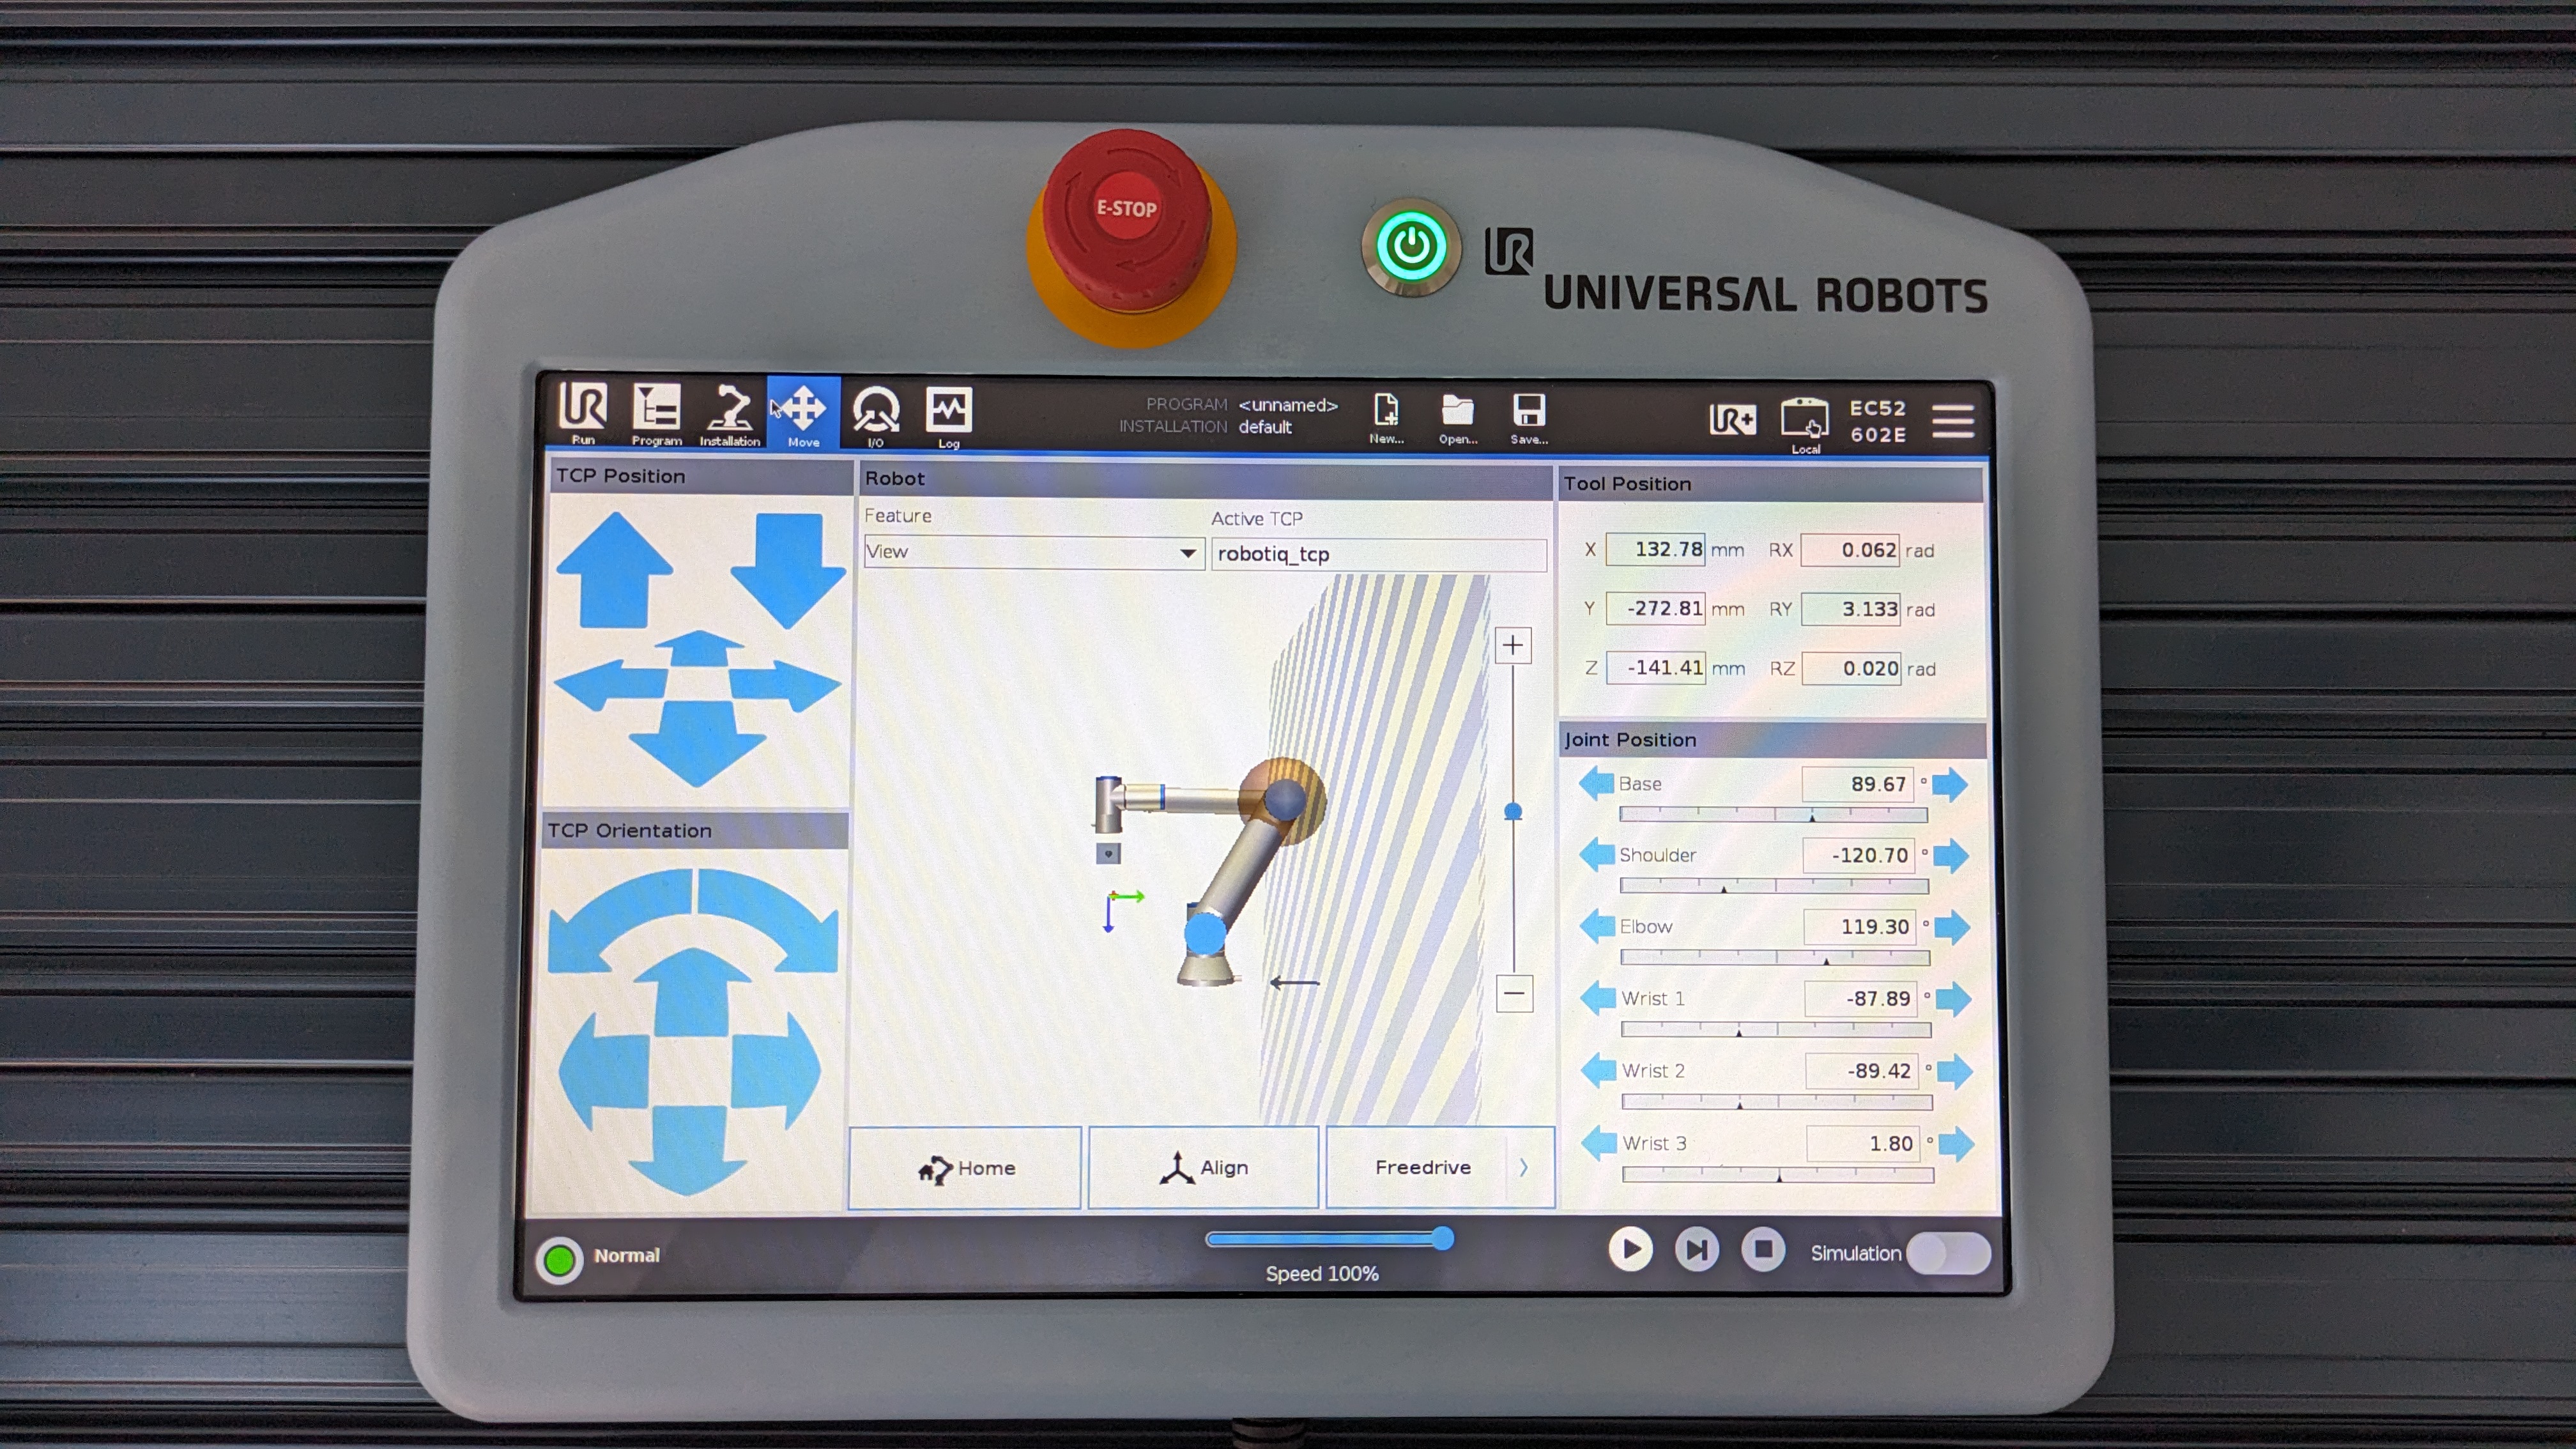
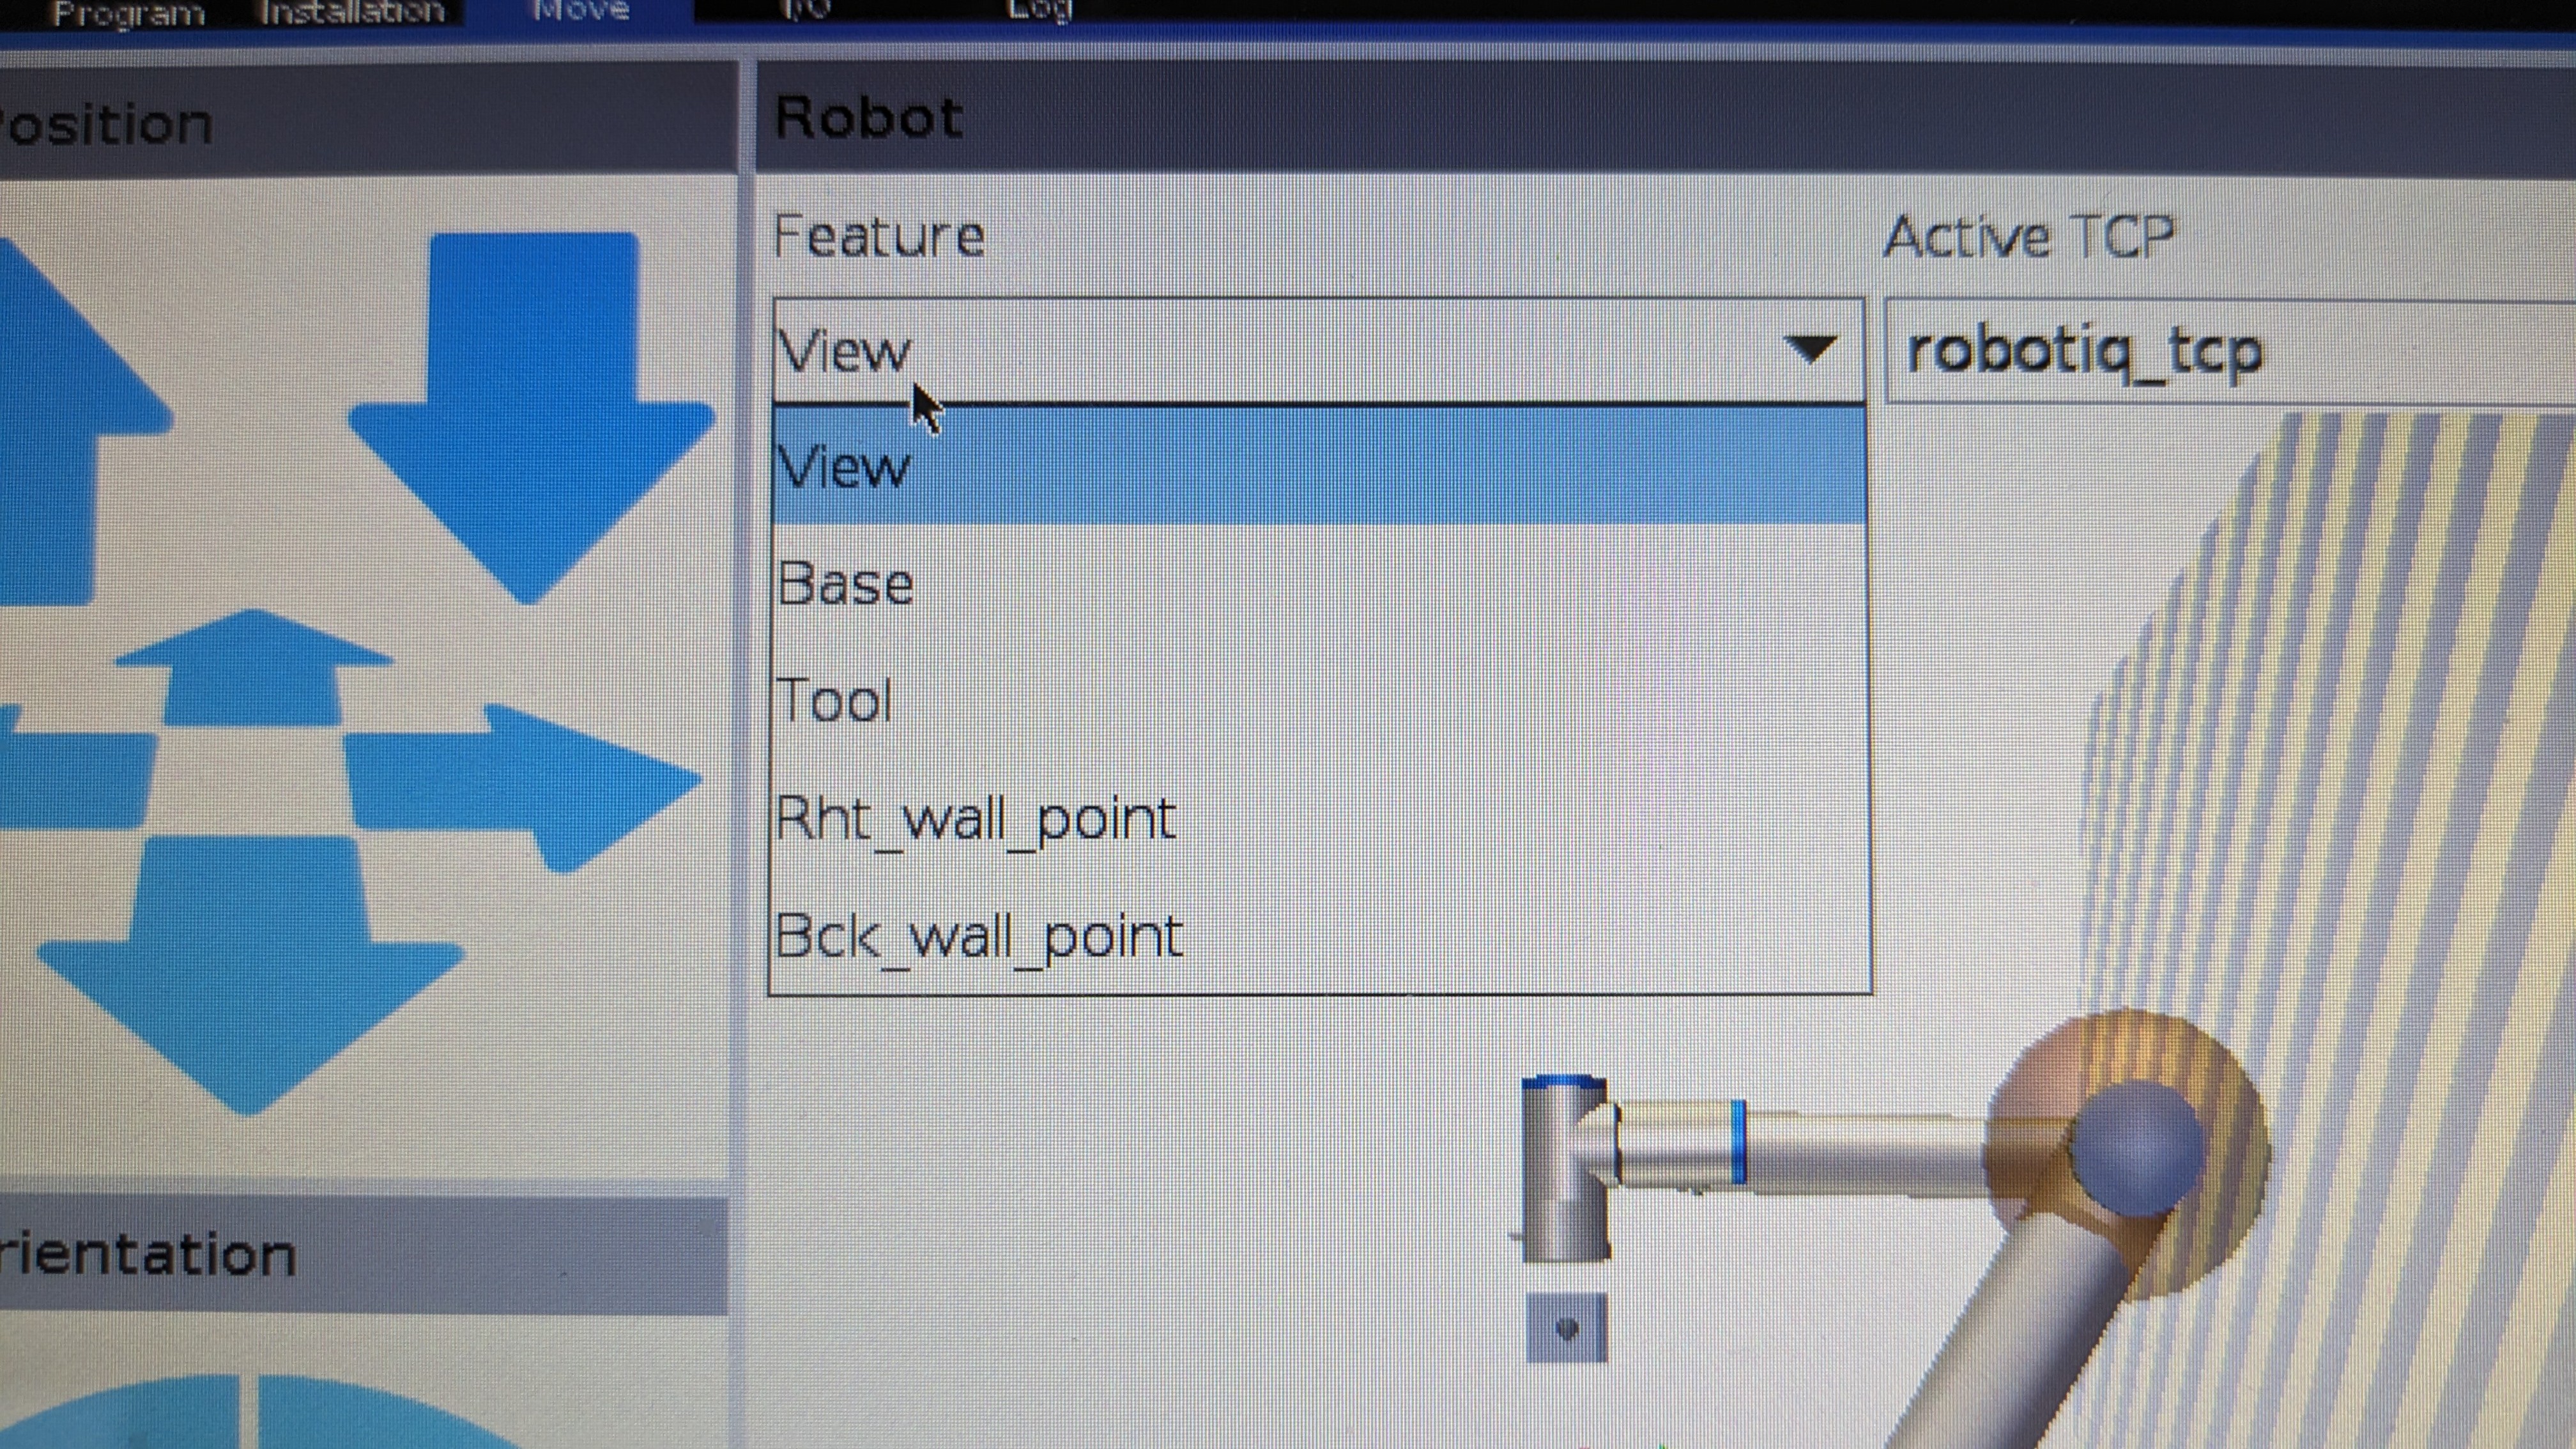
Once you are in the move menu, make sure to change the option in Feature to "Base" instead of "View", so that your reference point is from the base of the robot arm instead of the virtual camera. To do that click on the drop down that is below feature and select "Base". You should see that the arrow keys on the left have changed in colour.
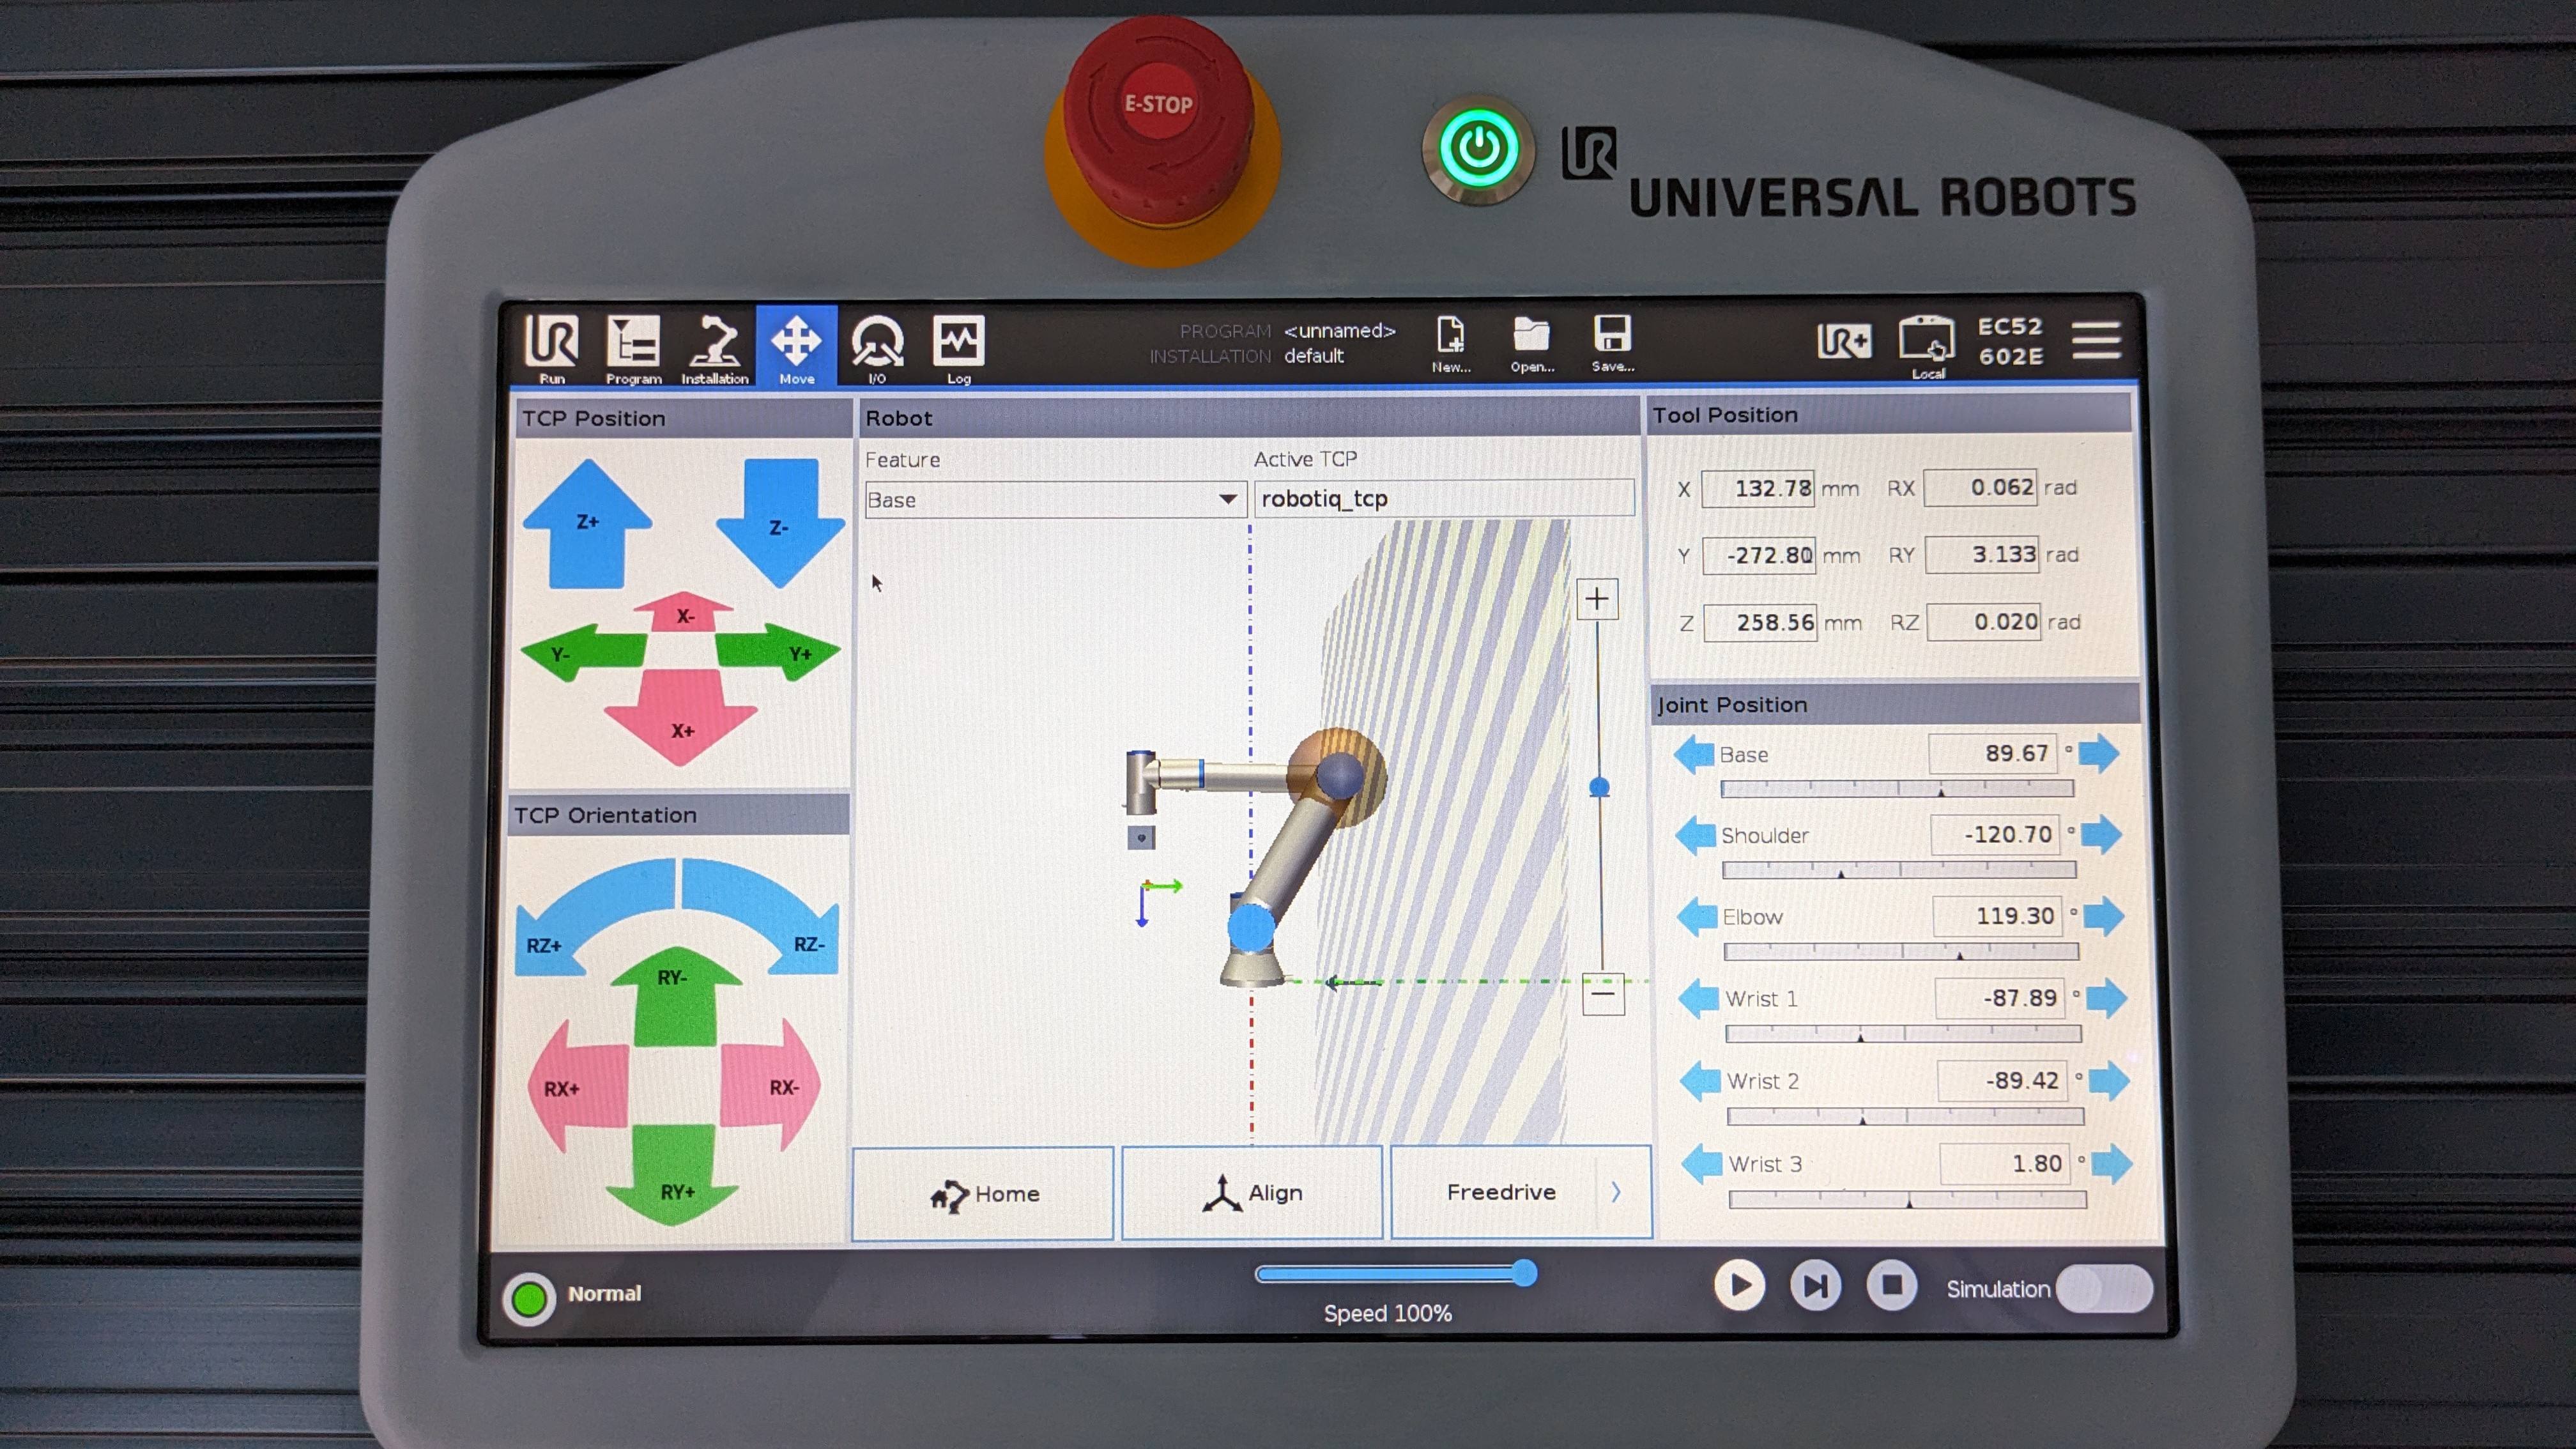
- Jogging the robot - To jog the robot, press and hold one of the arrow keys on the left hand side of the screen as shown below.
-
Move each joint - To move each joint of the robot individually press and hold the arrows on the right hand side of the screen as shown above.
-
Freedrive mode
- To move the robot using Freedrive, with one hand press and hold the black button that is on top of the teach pendant. You will see a pop on the teach pendant that says "Freedrive Active".
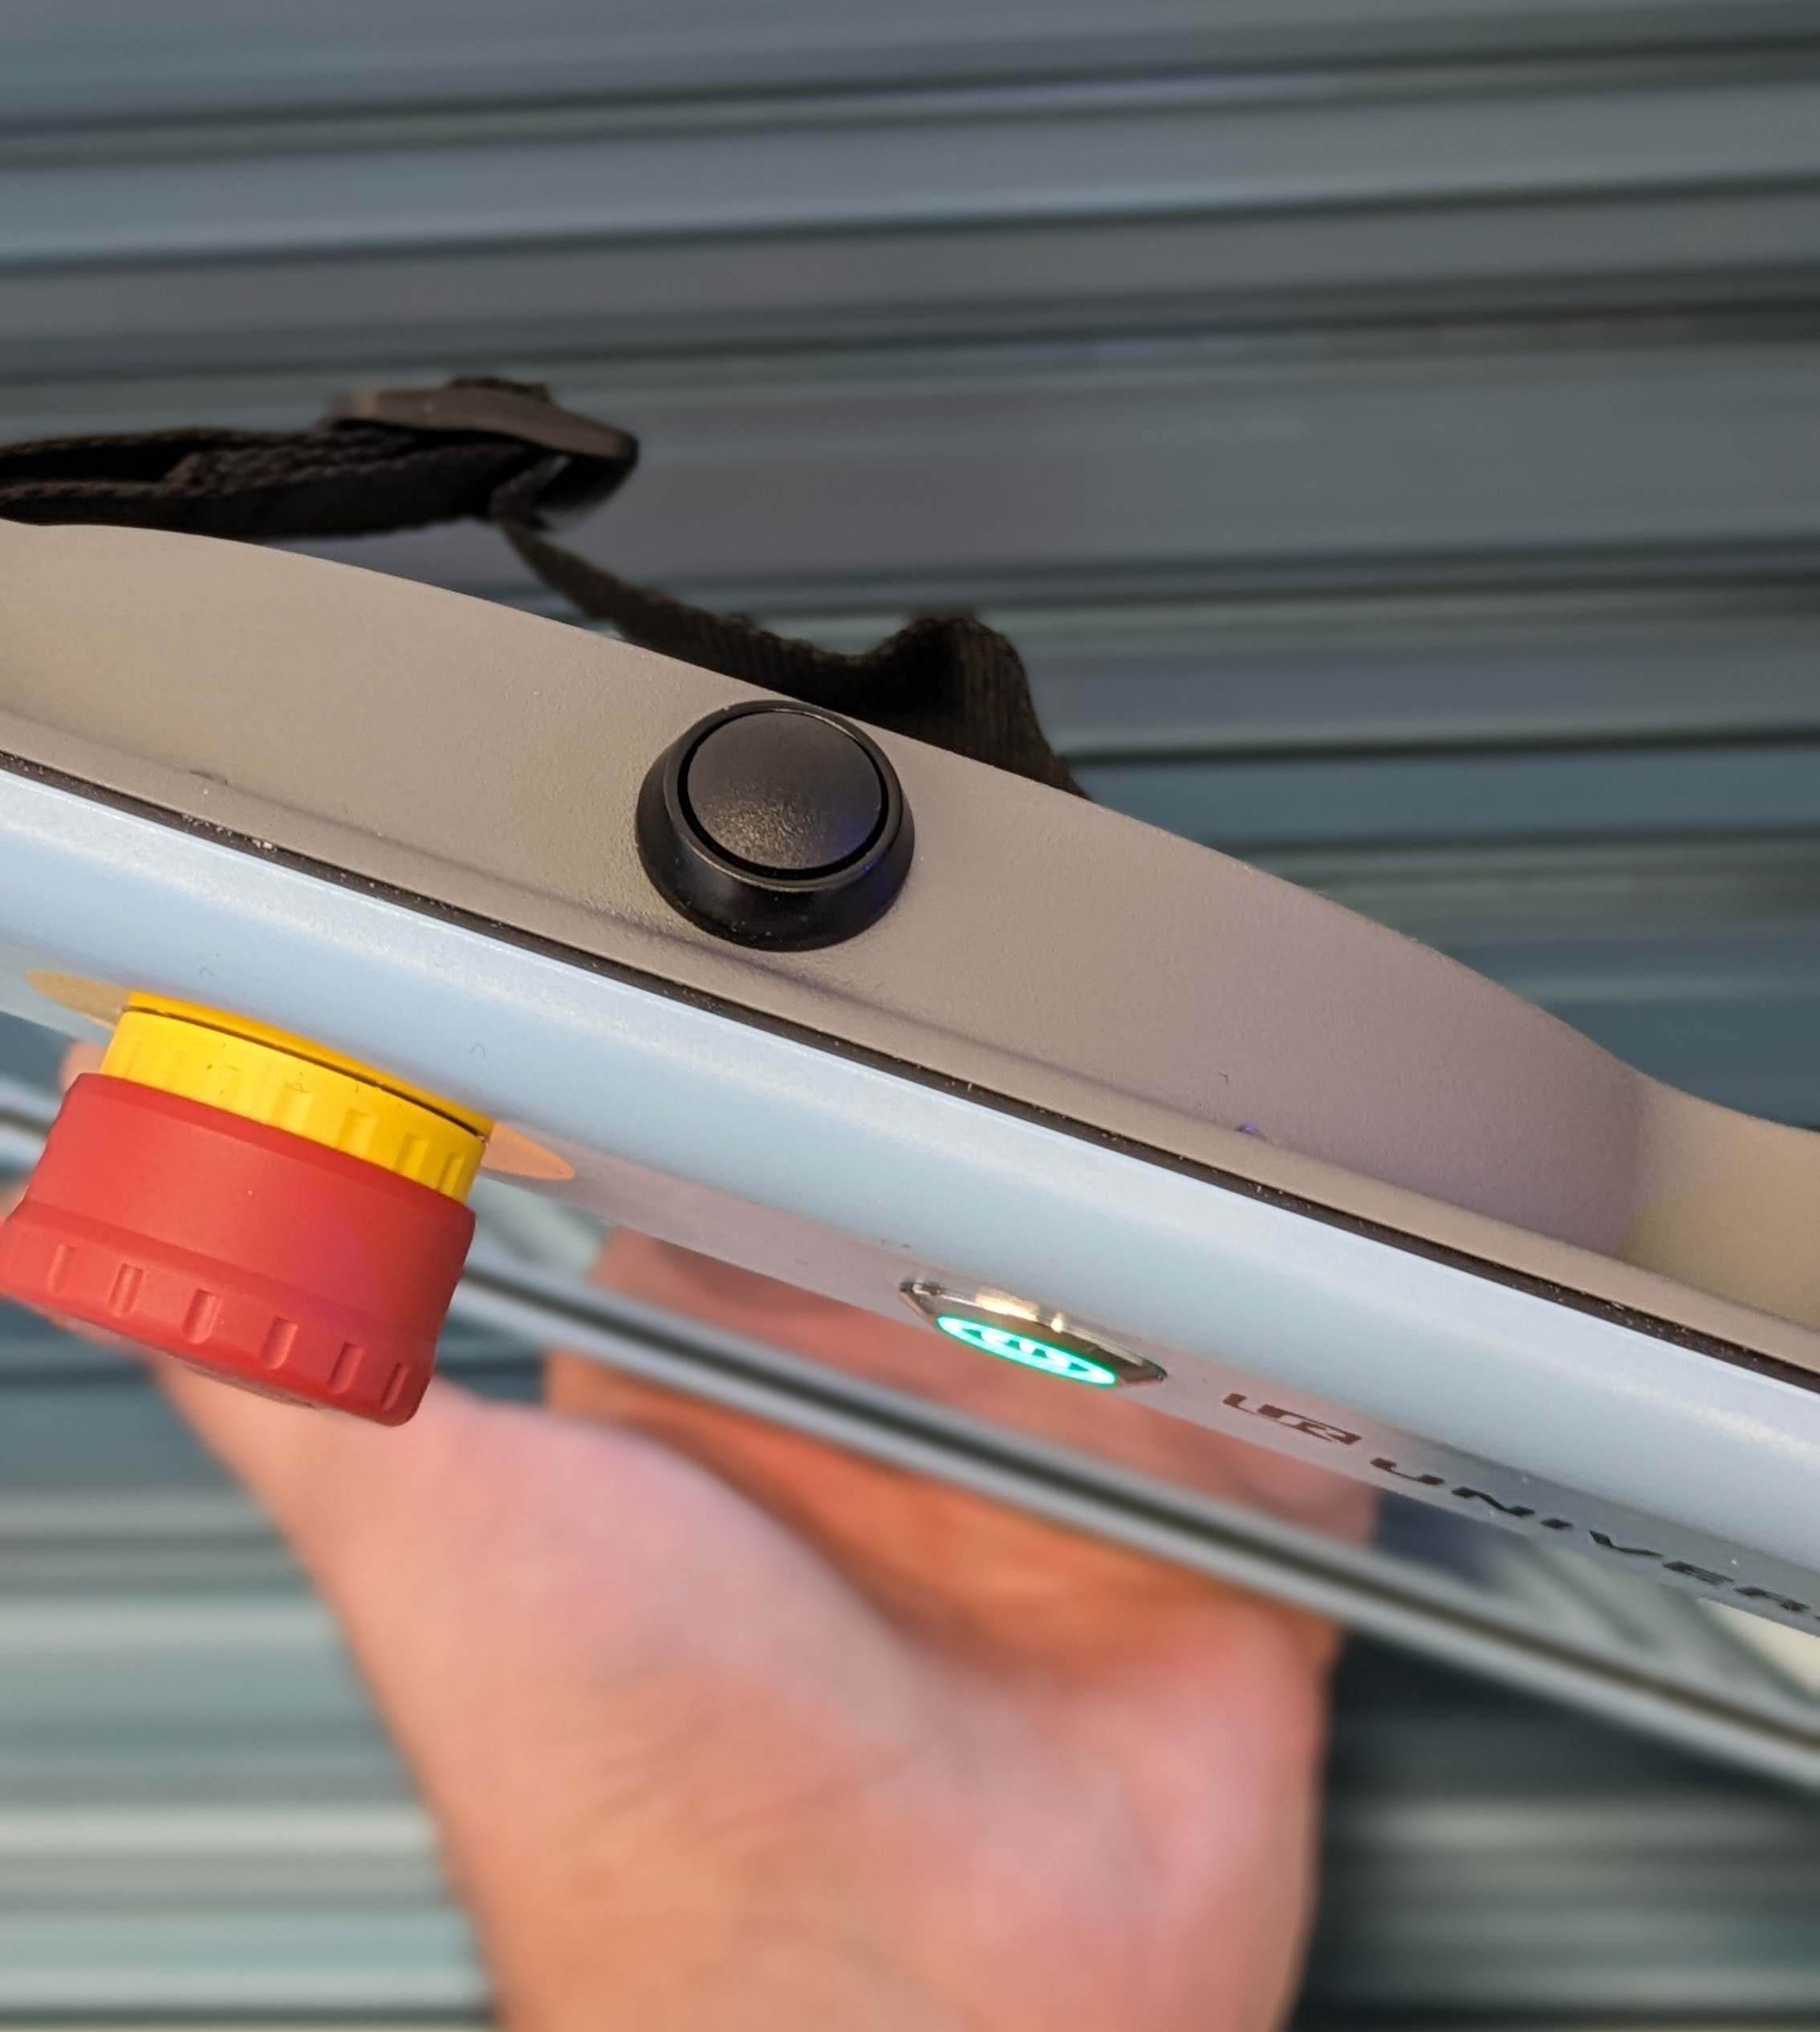
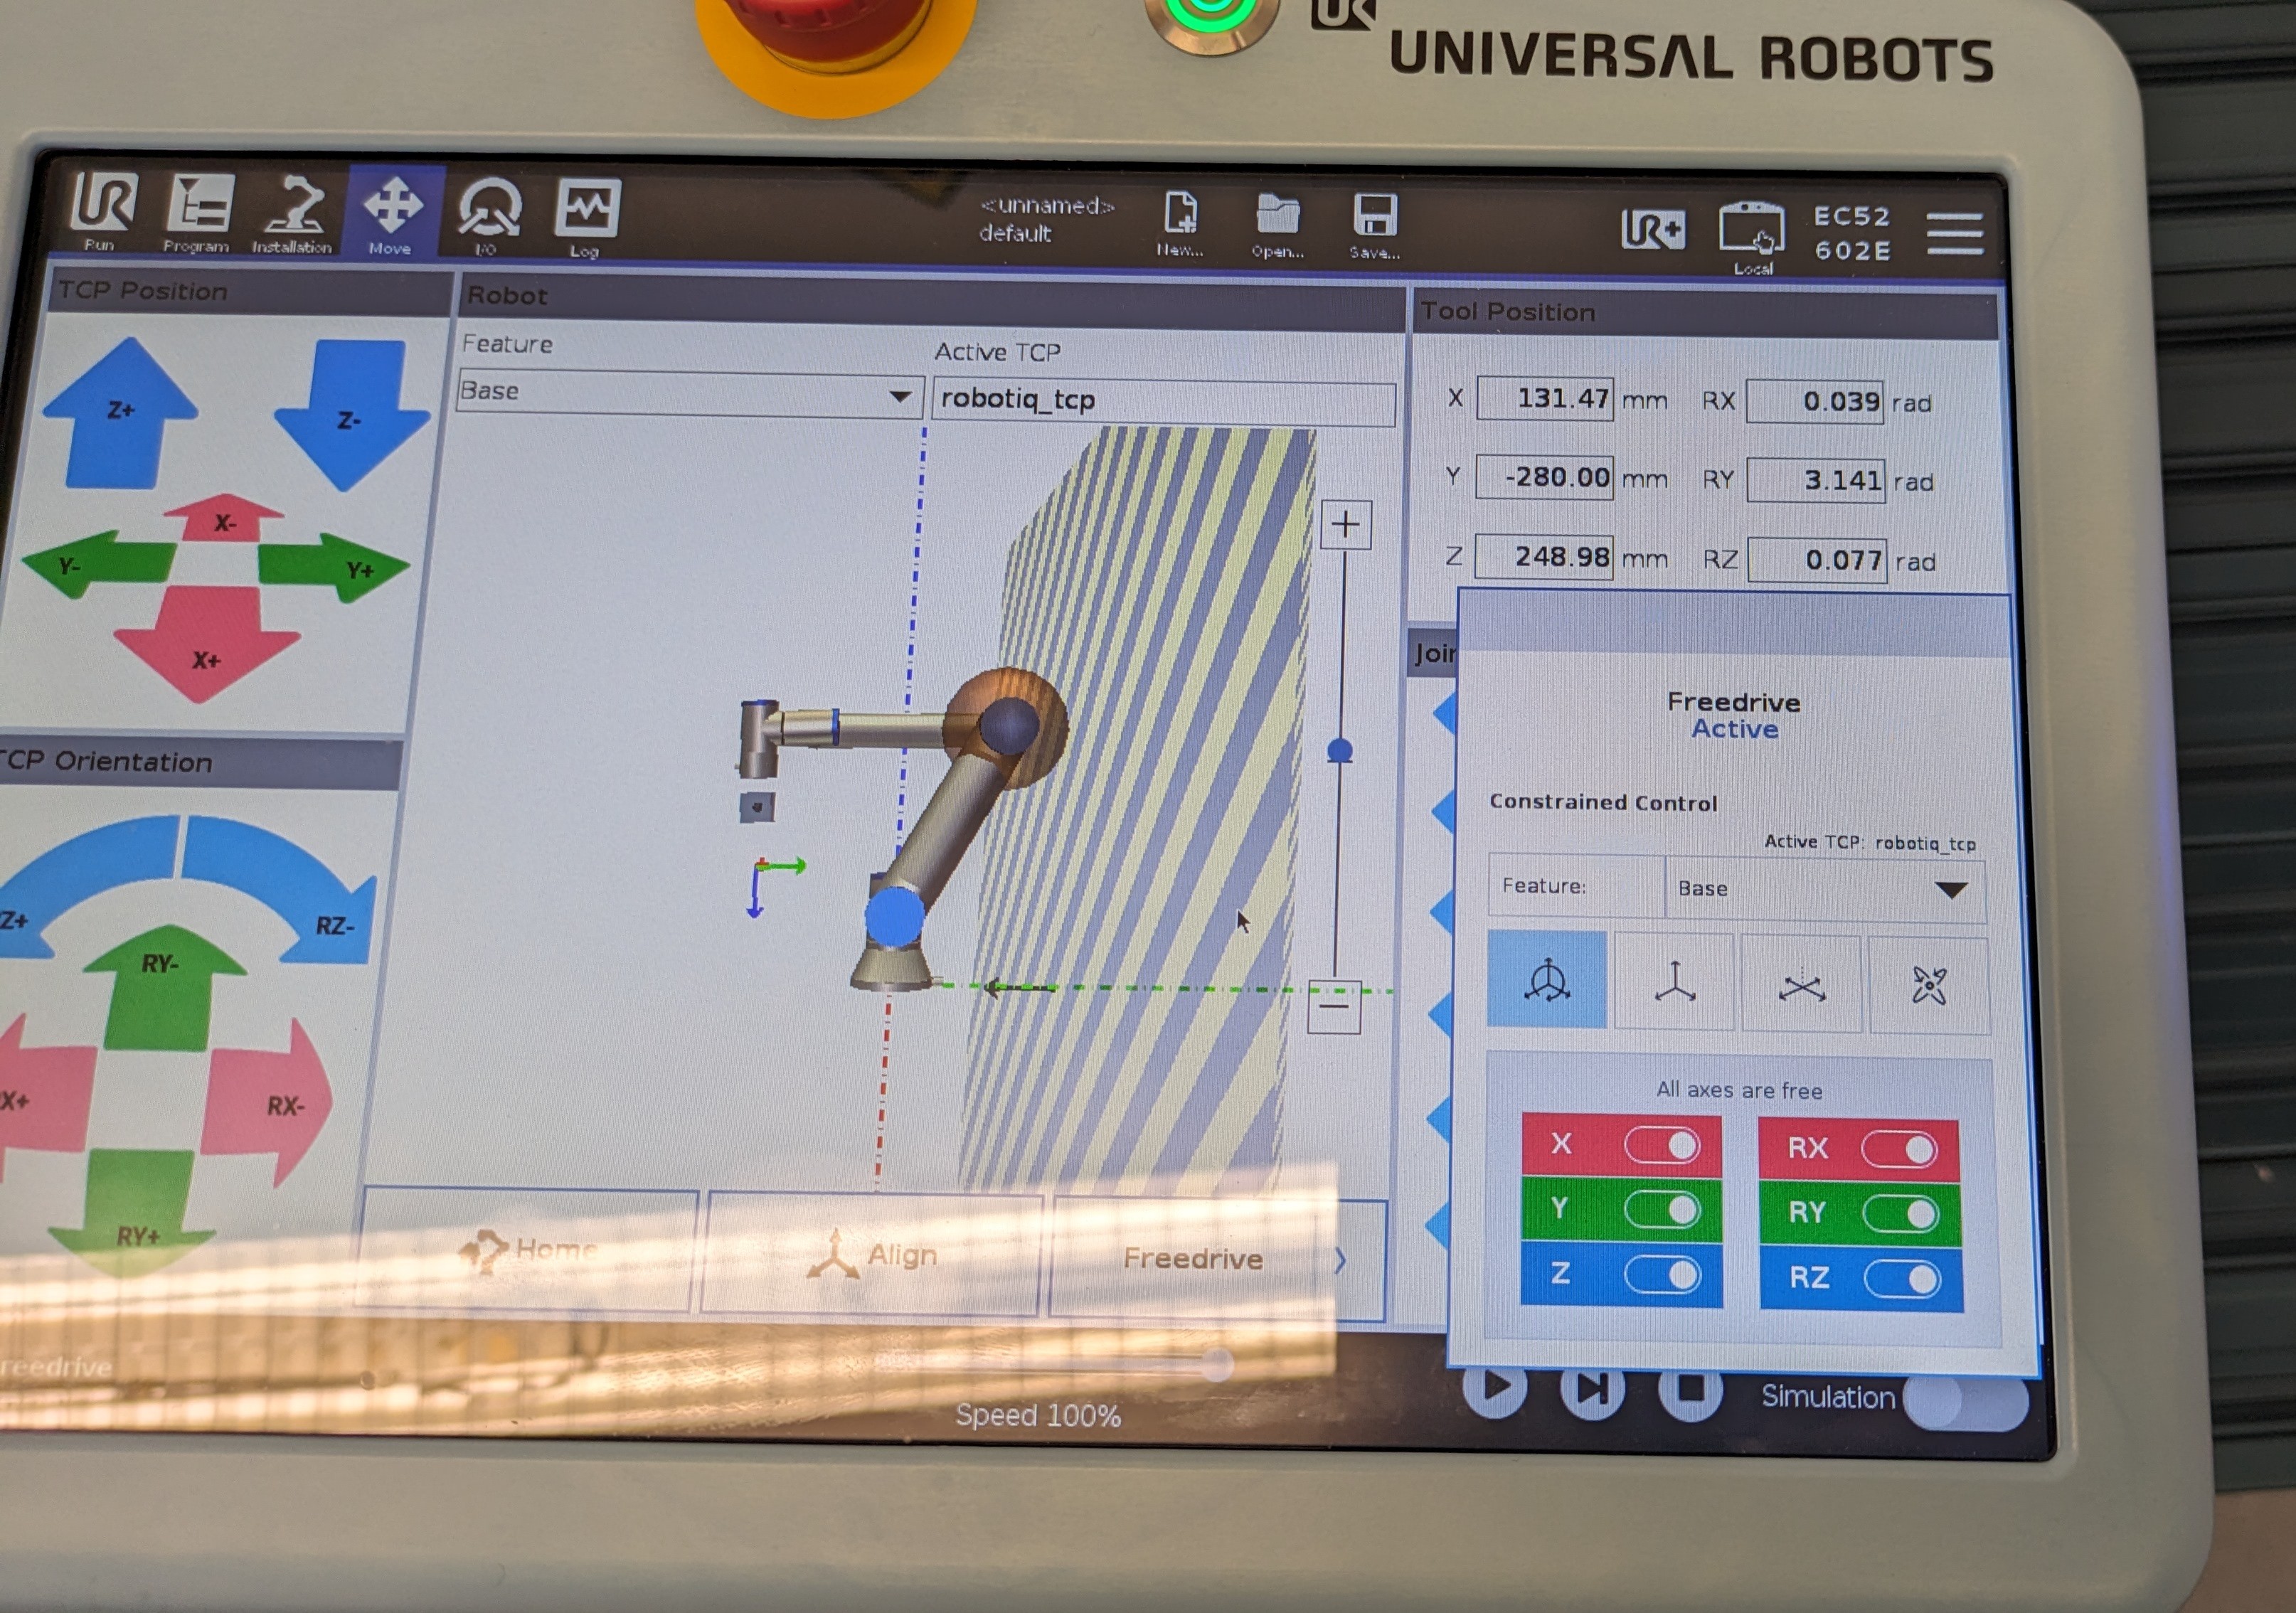
- Place your other hand on the flange of the robot. Now drag the robot with your arm to a desired position.
Basic motion programming for UR5e with 2F-85 gripper
The main concepts behind programming the UR5e are move commands and waypoints.
Move command
Move commands define how you would like the robot to move in order to reach a certain waypoint.
There are 3 move commands you can choose from:
- MoveJ - Stands for Move Joint. This means, given two distant waypoints A & B, the robot will take the fastest and easiest route from A to B and vice versa.
- MoveL - Stand for Move Linear. This means, given two distant waypoints A & B, the robot will move in a straight line from A to B or vice versa.
- MoveP - Stands for Move Process. With this move command, the robot will move through multiple waypoints with a constant speed. You can also make circles using this move command.
Waypoints
Waypoints are 3D coordinates within the robot's workspace set by the user.
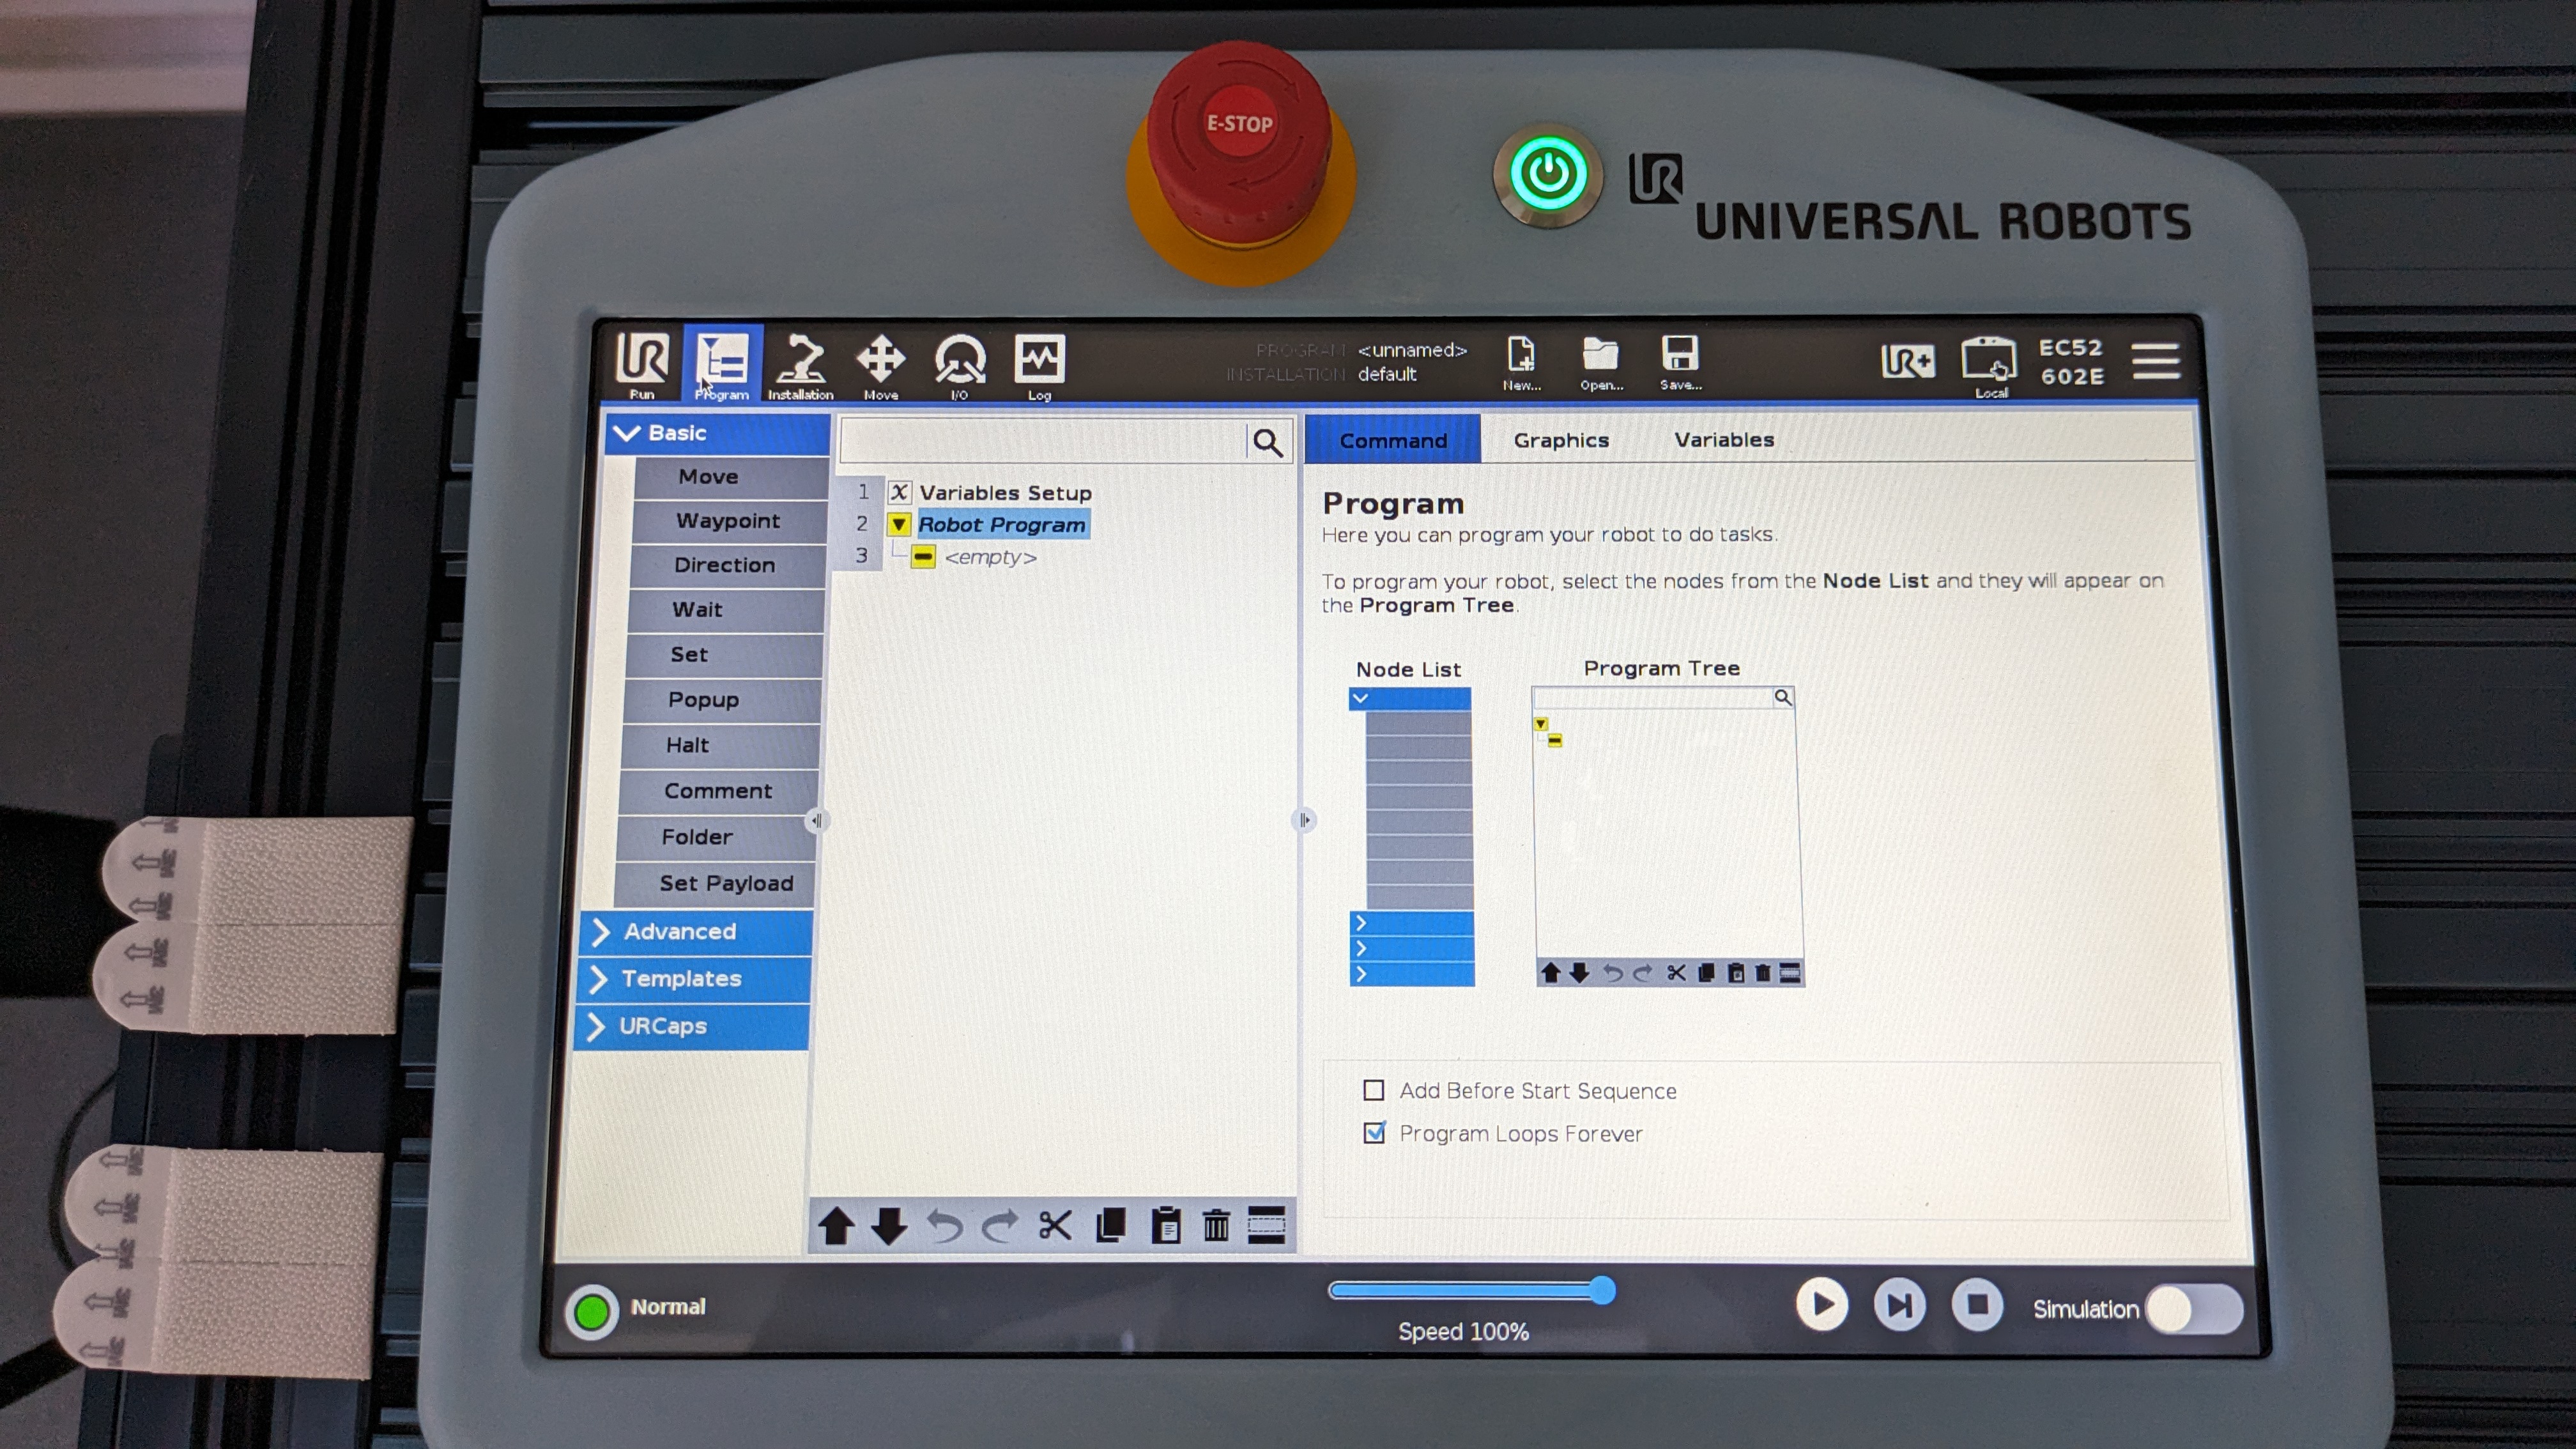
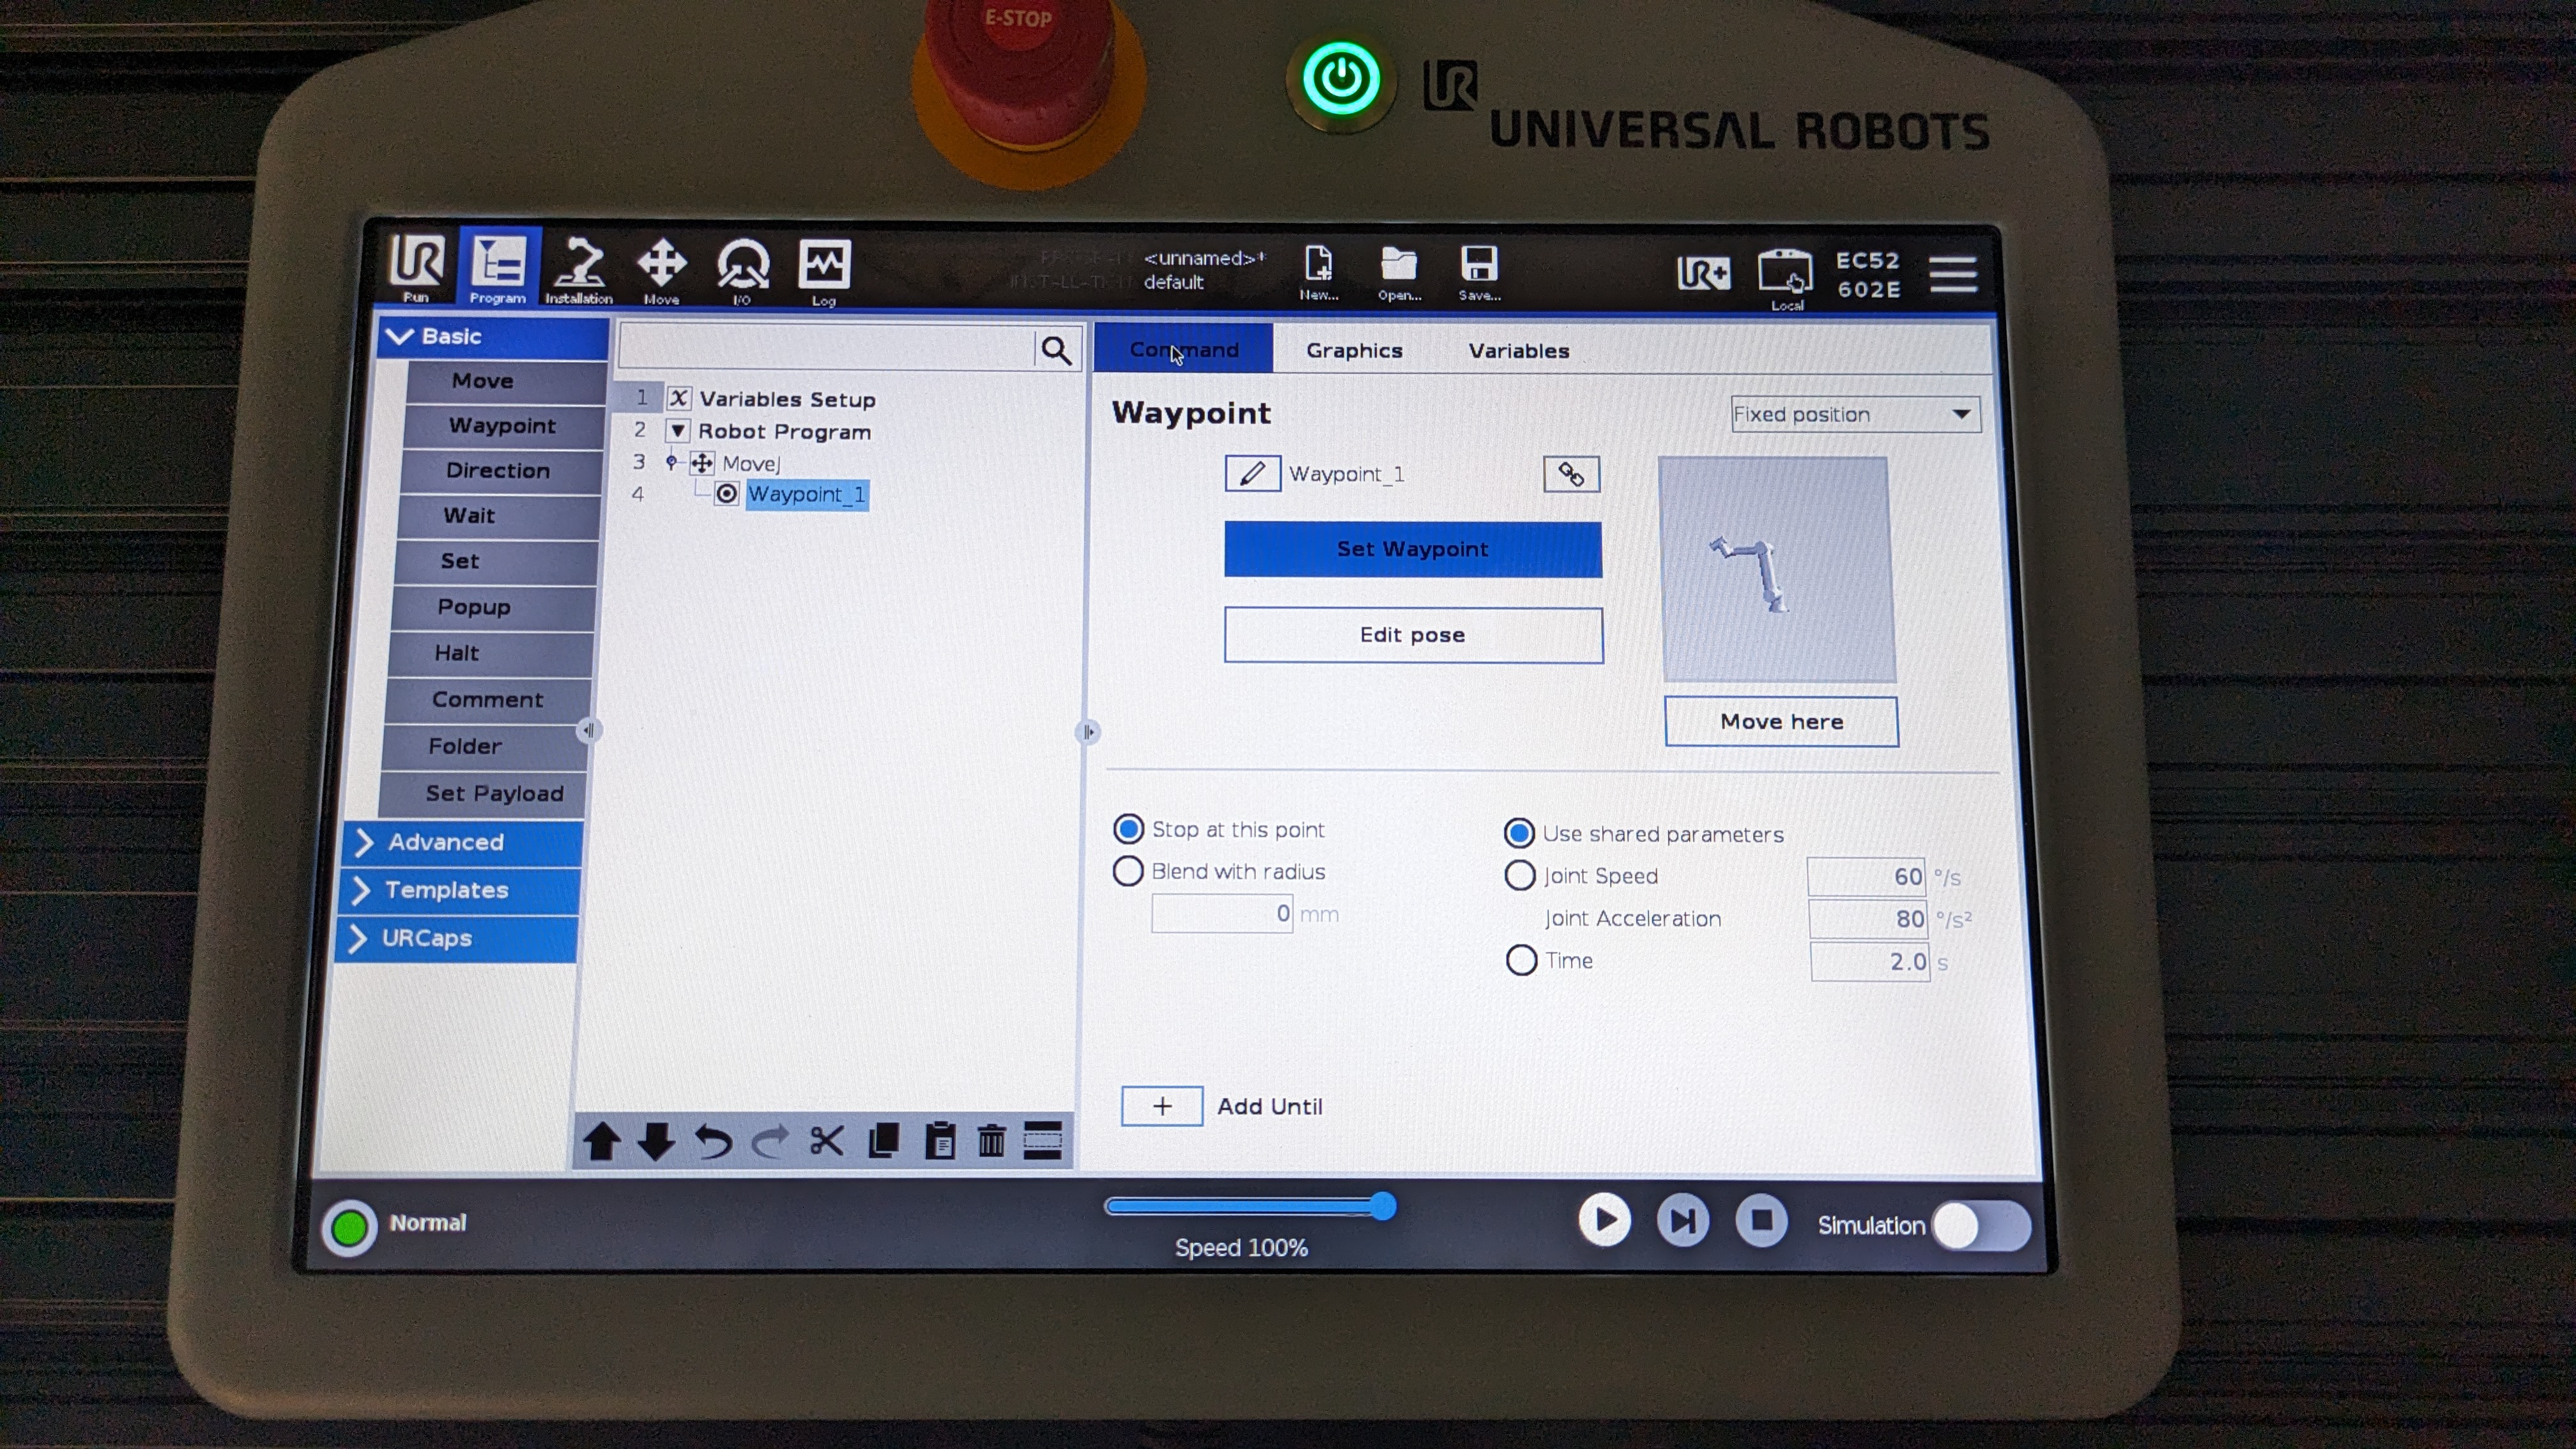
Creating a simple program
In order to create a program, ensure that you are in the programming menu.

Now, your screen should look something like the one below.
- To add a move command, select "move" which is within the "Basic" dropdown list. You should see that a move command with
Waypoint_1has been inserted beneath Robot Program as shown below.
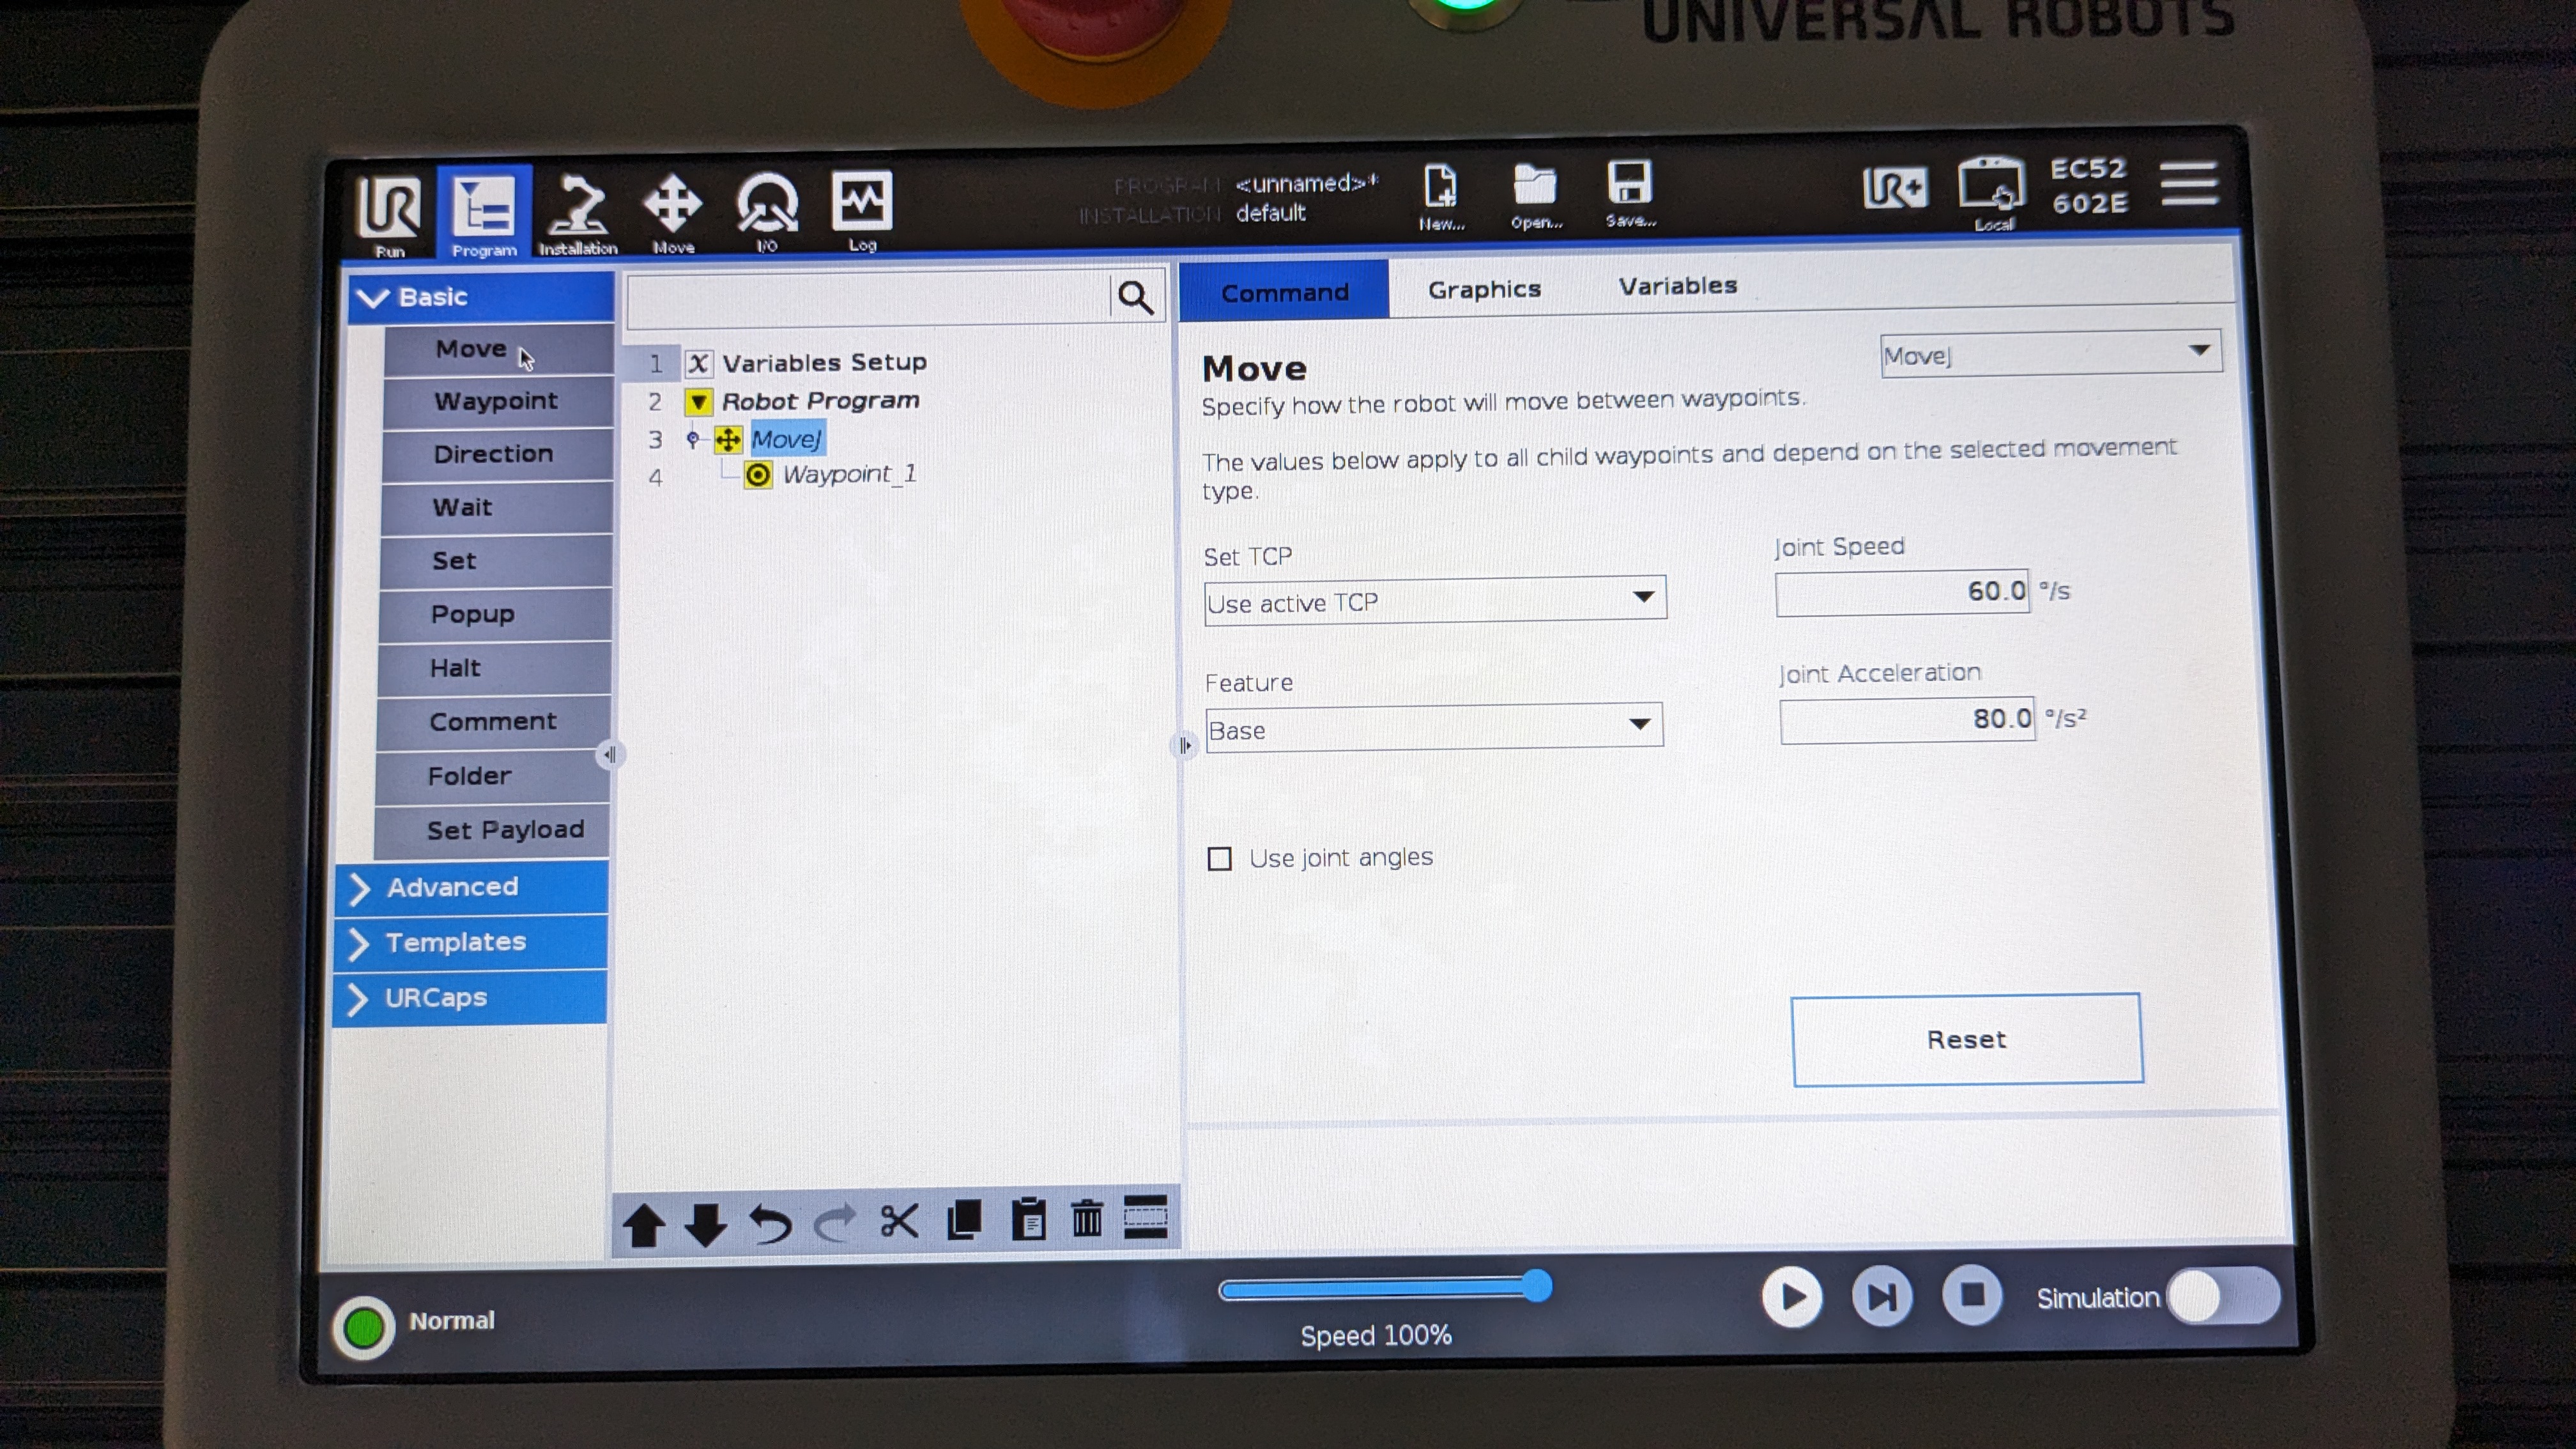
The default move command is MoveJ but if you want to change it, click on the drop down to the left for the screen which says MoveJ and select another move command from the dropdown list.
- Click on
Waypoint_1and you should see the right side of the screen change to the image below.
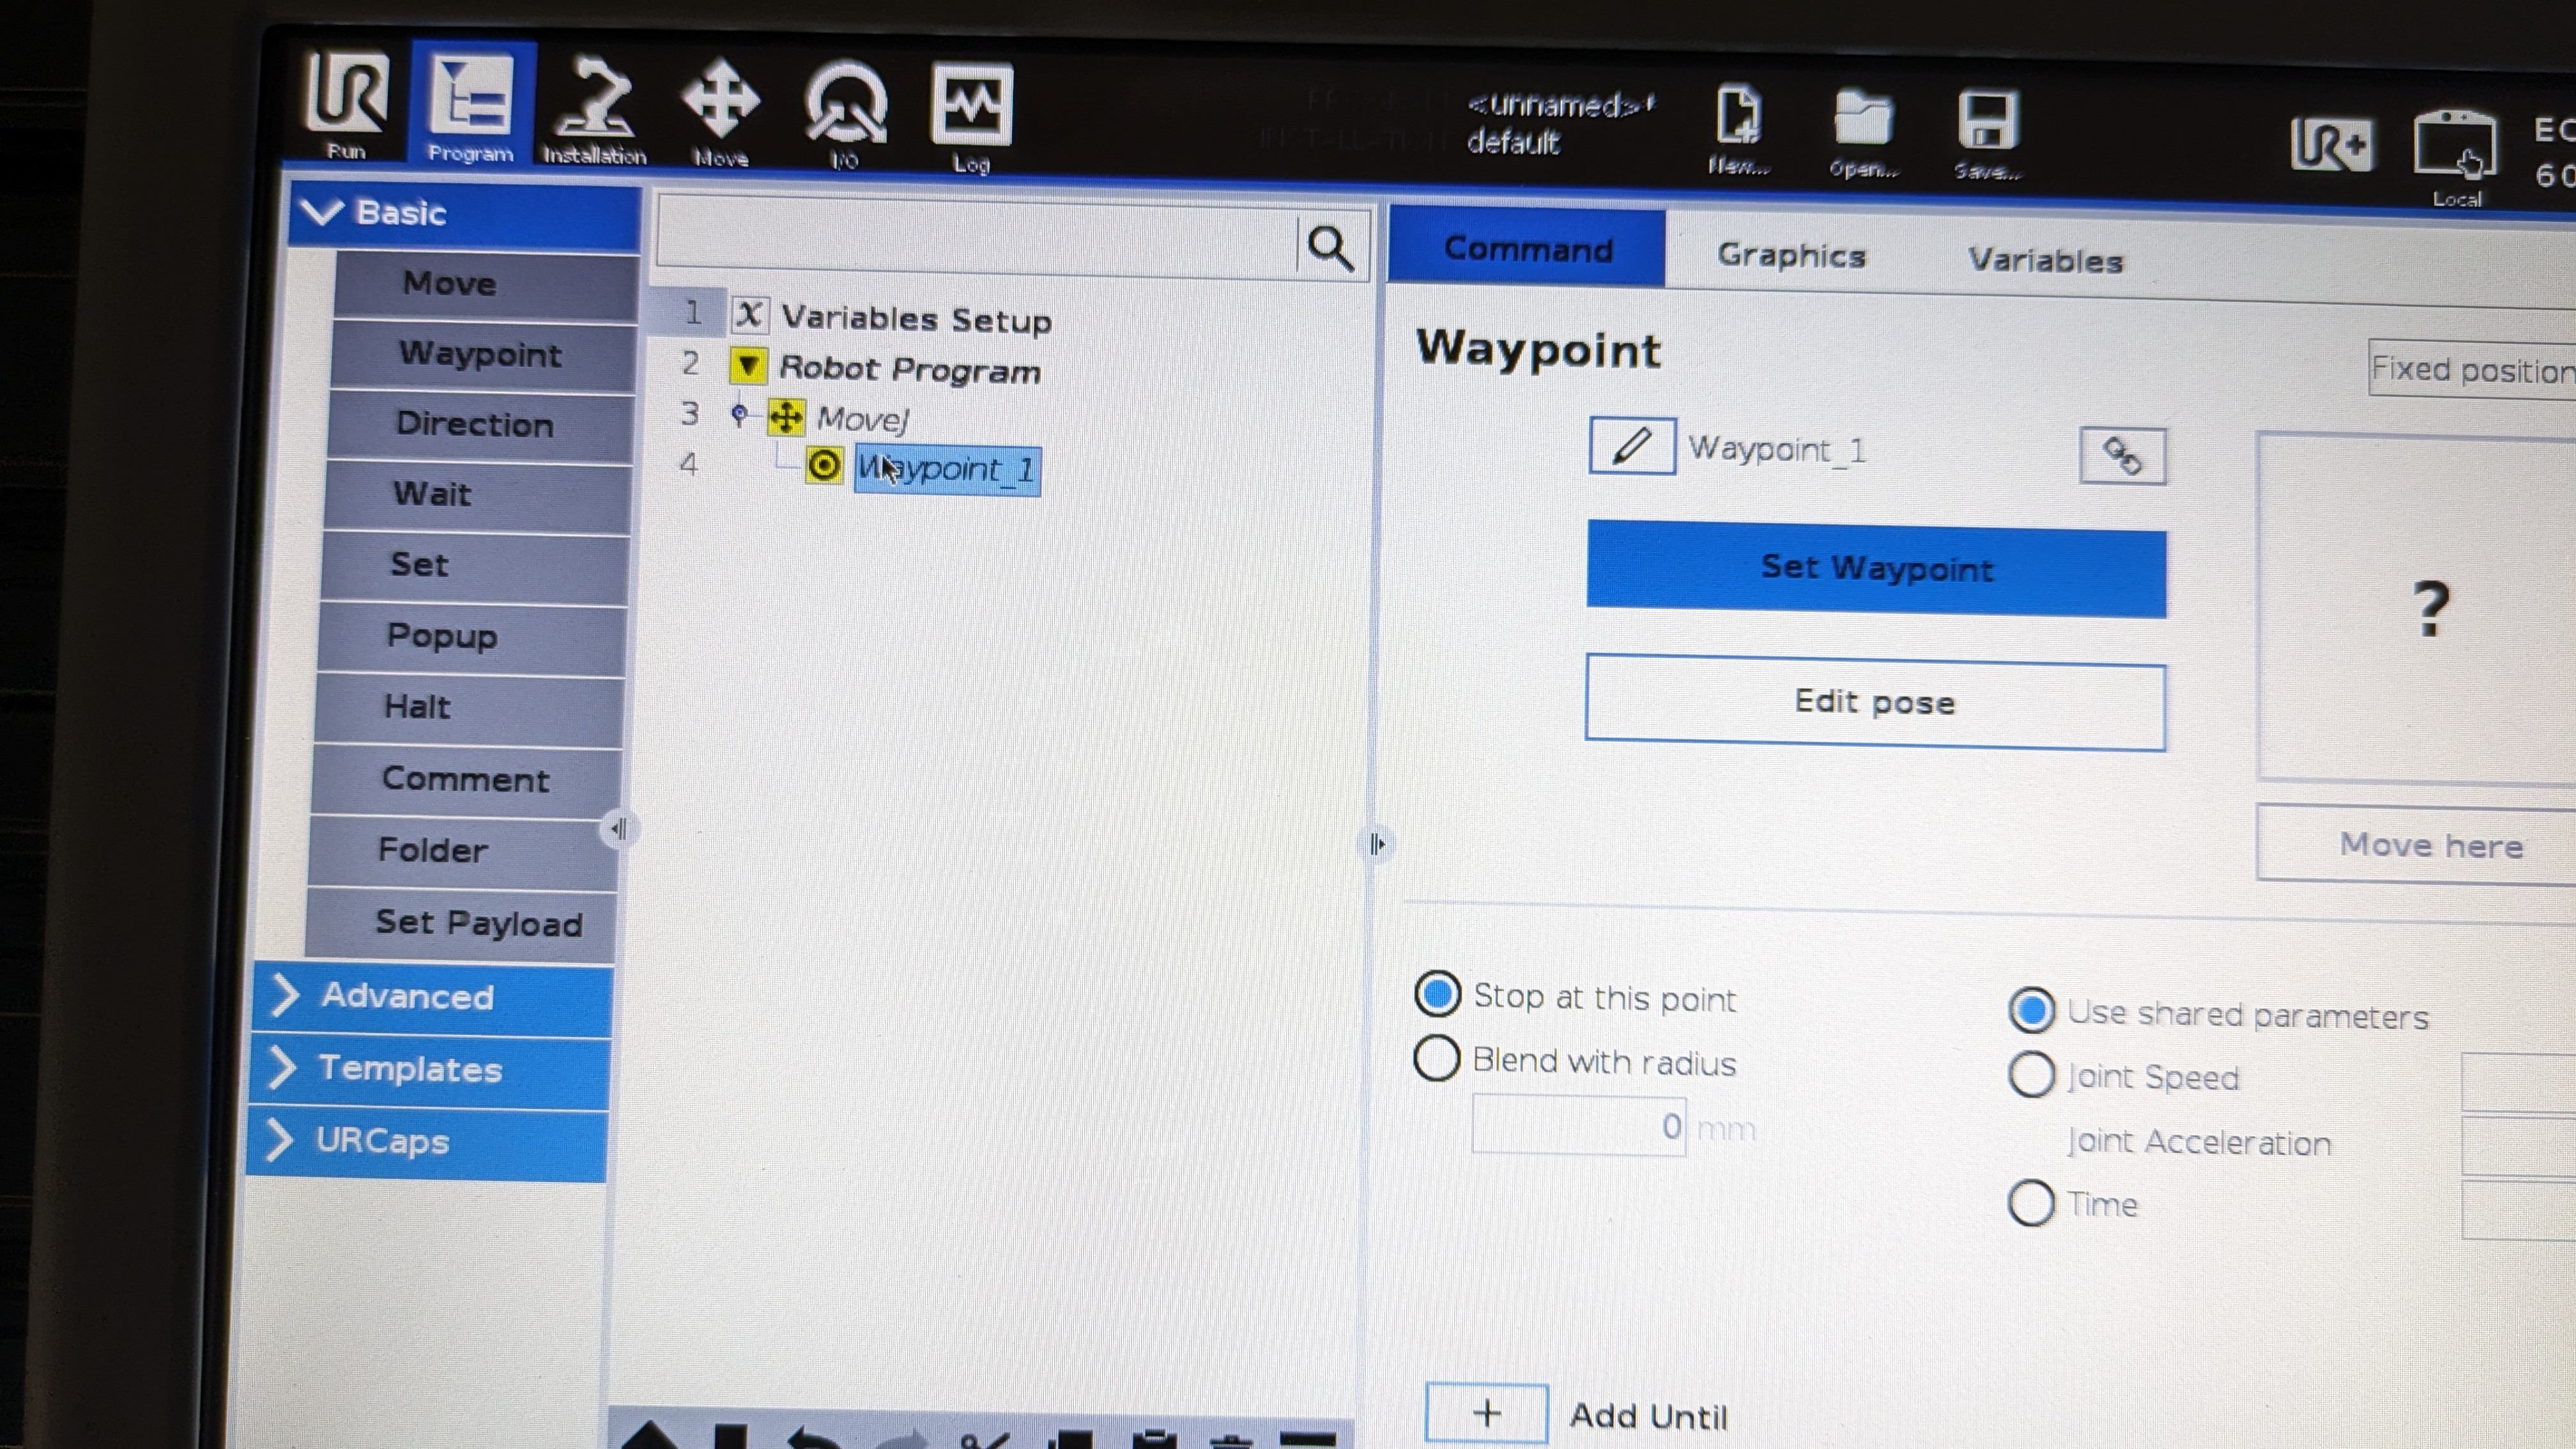
- Click on the "Set Waypoint" button. This will change the screen to a similar screen from the move menu as shown below. But the main difference is that you now have an "OK" and "Cancel" button to set or cancel a waypoint.
- If you want to set the current location of the robot as a waypoint then click on "OK". If you want to set a new location as a waypoint, then jog, drive or Freedrive the robot to a desired location within the workspace and click "OK". You will see that
Waypoint_1is no longer highlighted in yellow, meaning the waypoint has been set successfully.
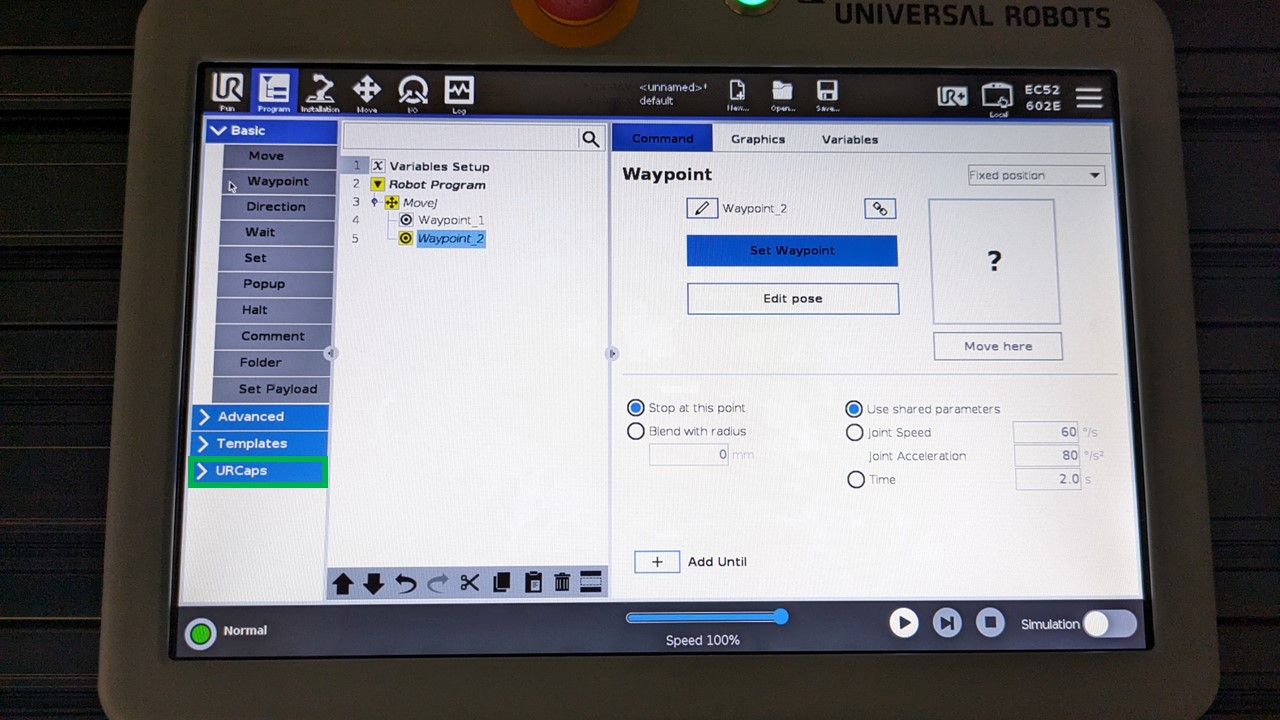
- If you would like to add another waypoint, click on "Waypoint" which is within Basic drop down list. Another waypoint called
Waypoint_2will be added into your move command.

- To set your newly added waypoint, repeat steps 4 and 5.
Good practices
- Do not nest move commands, i.e. do not create a move command within a move command.
- Name your move commands and waypoints so that you know what is happening when the robot is about to execute it.
Controlling the Robotiq 2F-85 adaptive gripper
To control the robotiq gripper using the teach pendant, click on the "UR+" button located on the top right of the screen as shown below.
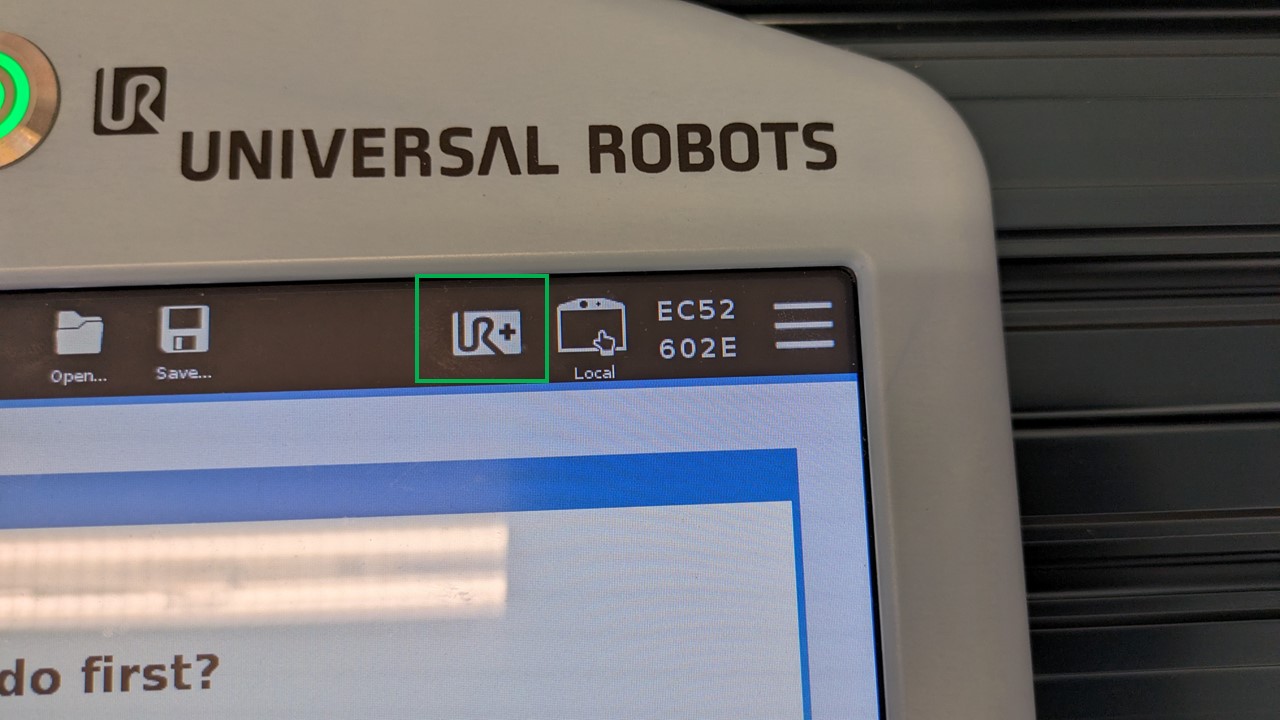
This will show a pop up screen as shown below.
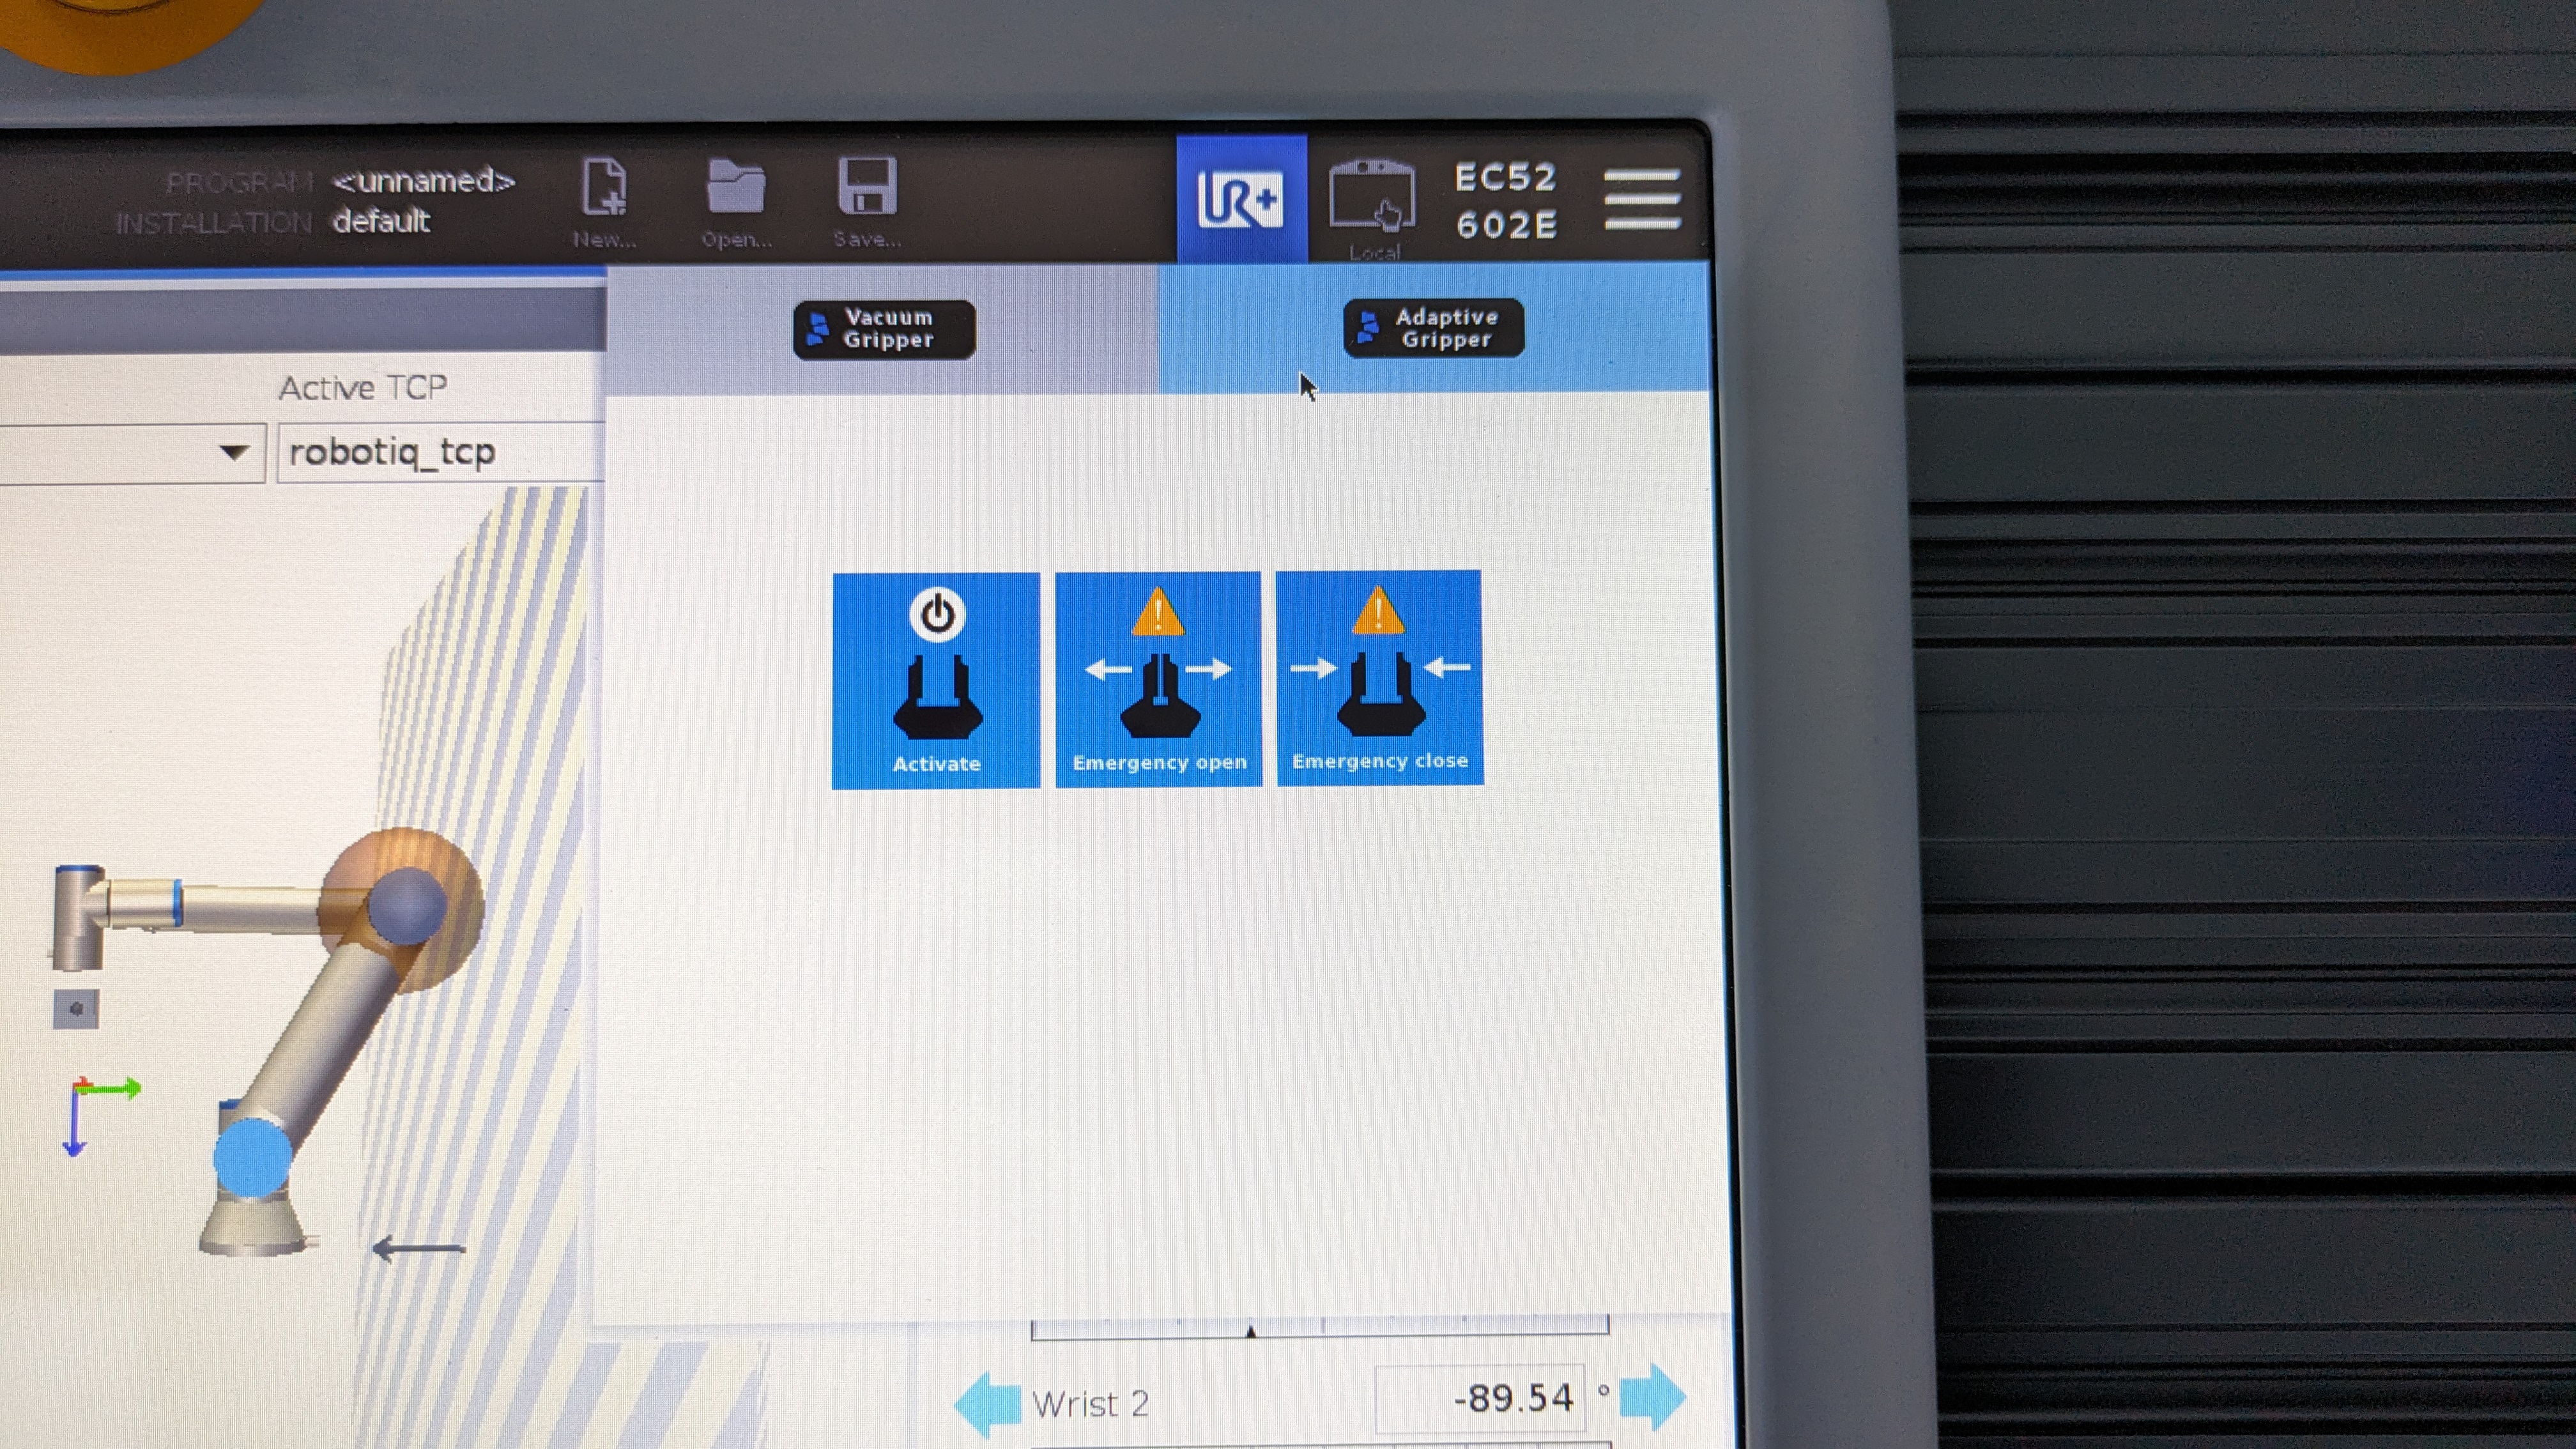
Select "Adaptive Gripper" as that is the gripper we have and then click on "Activate". You will see the robotiq gripper will close and open.
Once the gripper is active you will see that the pop up will change and give you some options to control the gripper as shown below.
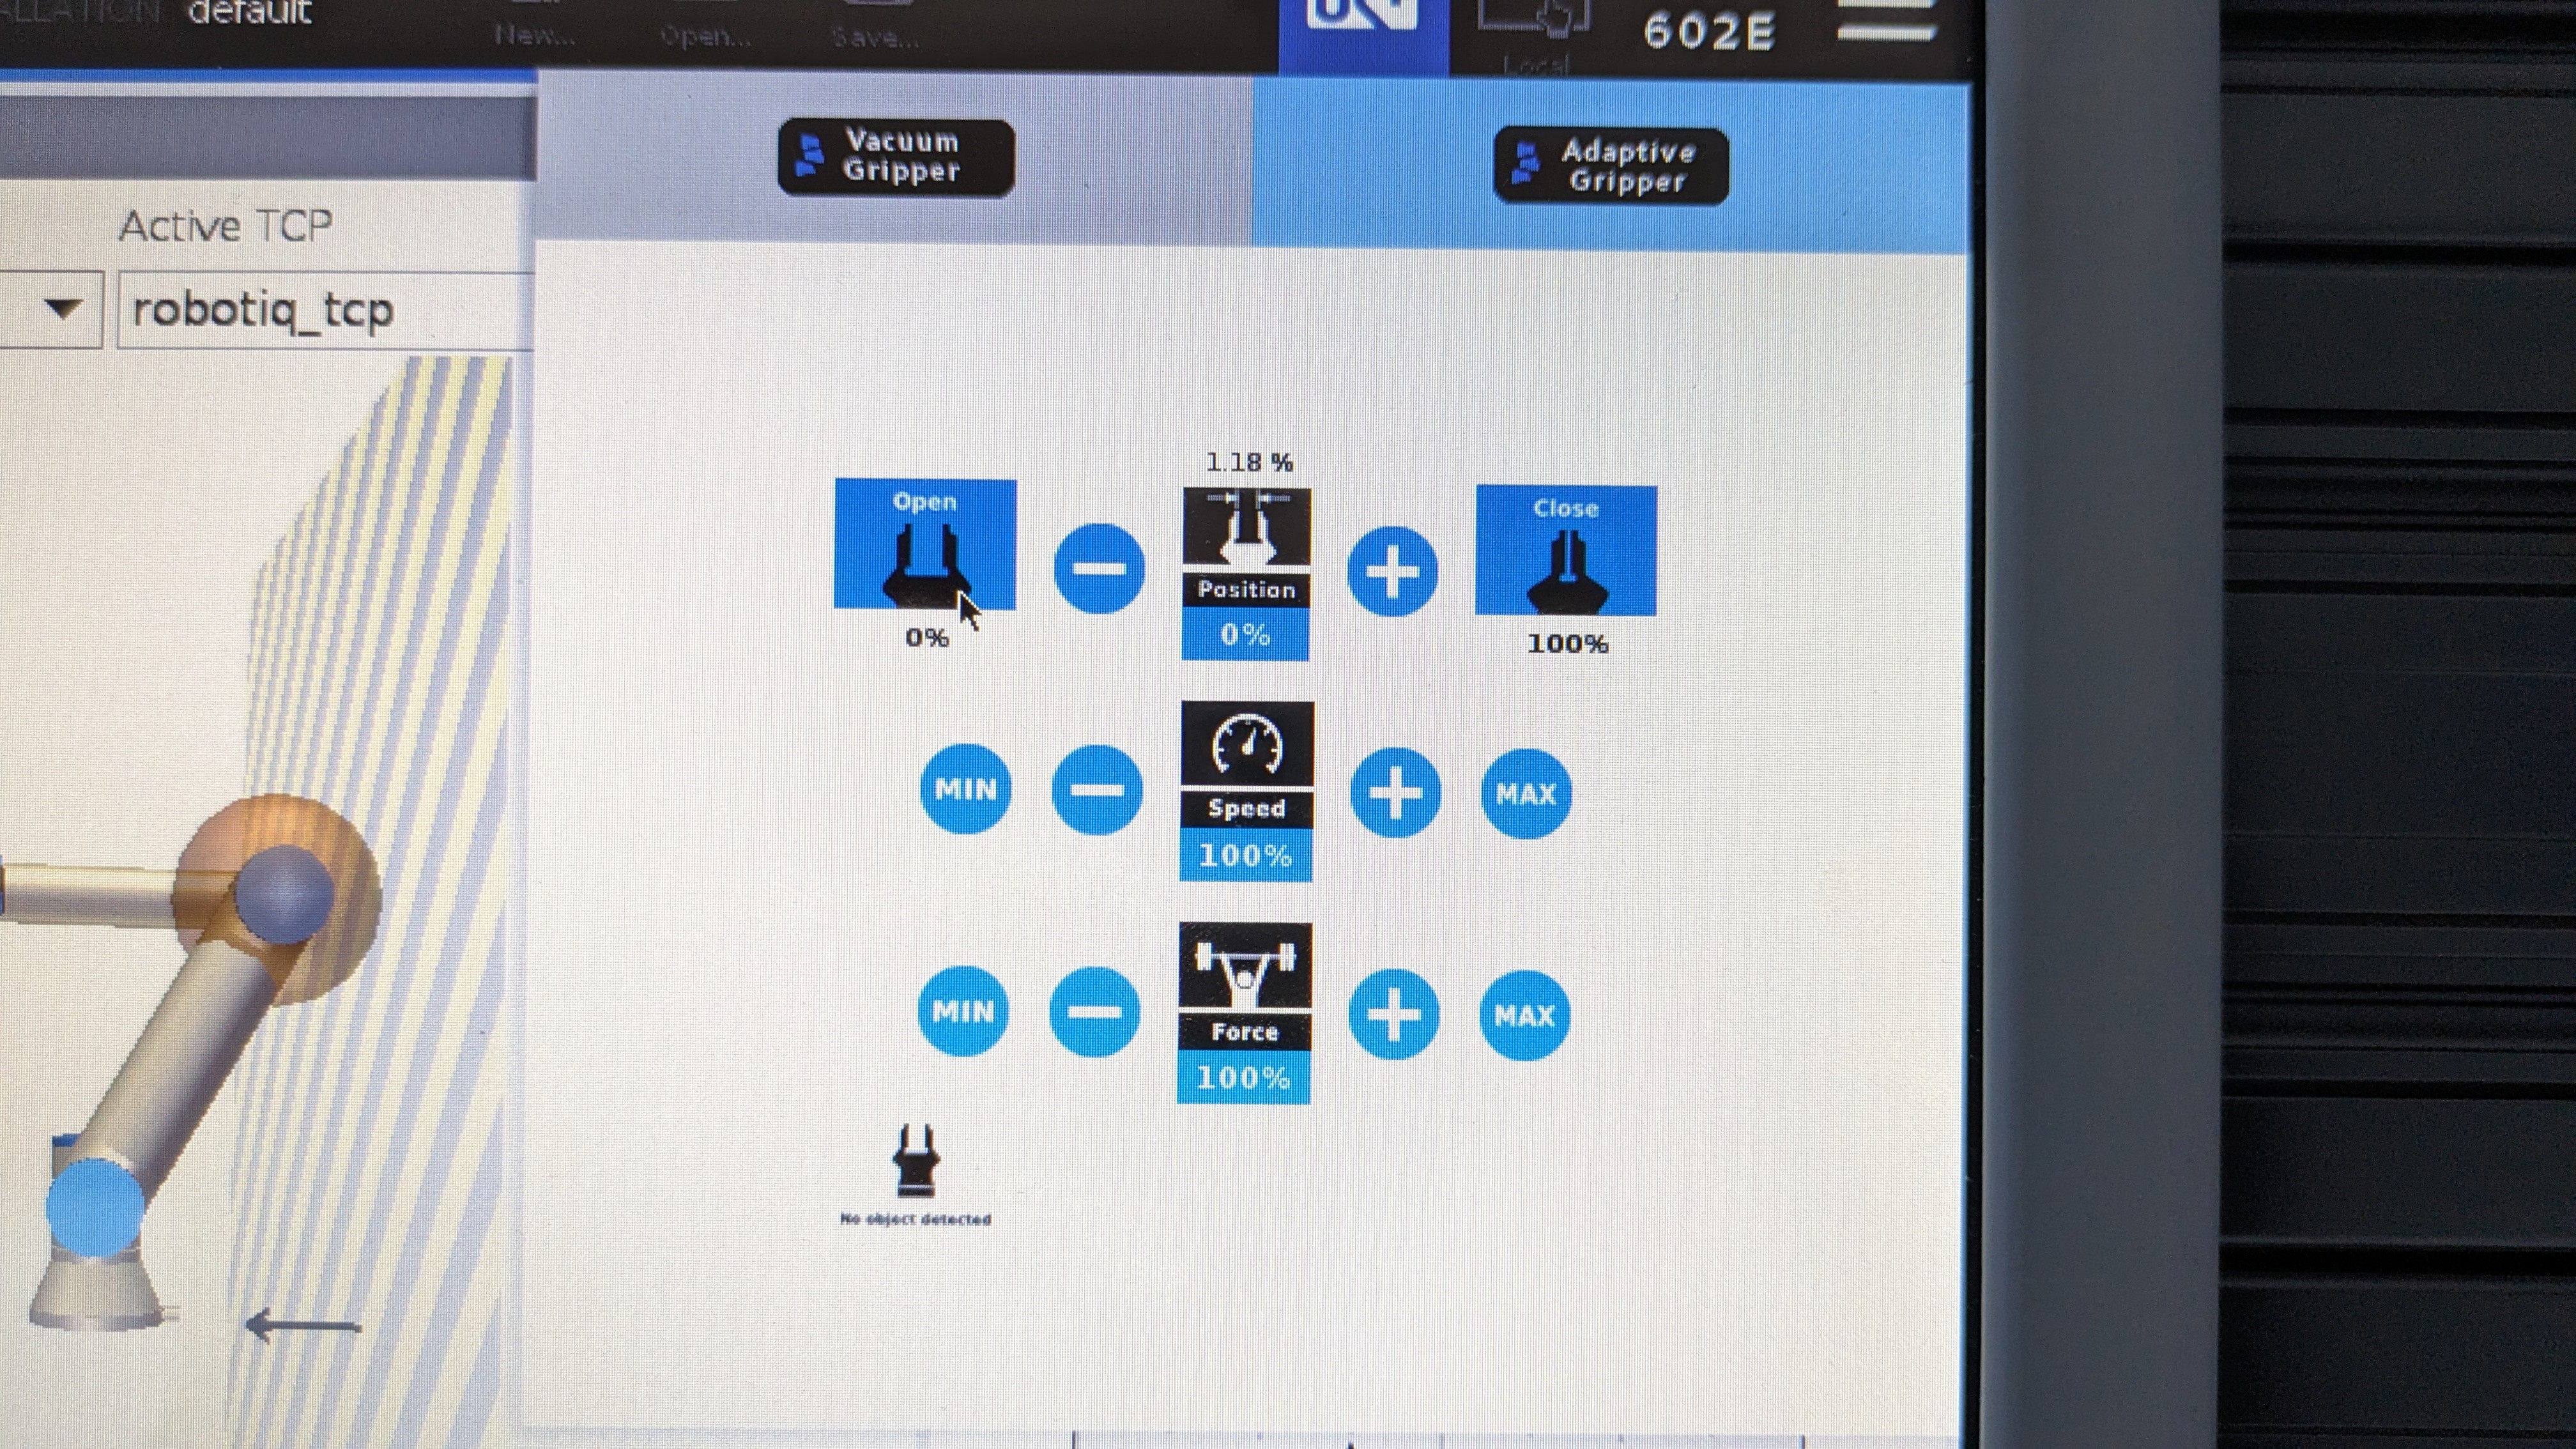
Now, you can open or close the gripper, control the speed at which it opens or closes and the force / grip strength of the gripper.
Adding gripper command to your program
To program the gripper so that it opens or closes when the robot has reached a point, navigate to the program menu and ensure you have set your waypoints by following the instructions in the previous section.
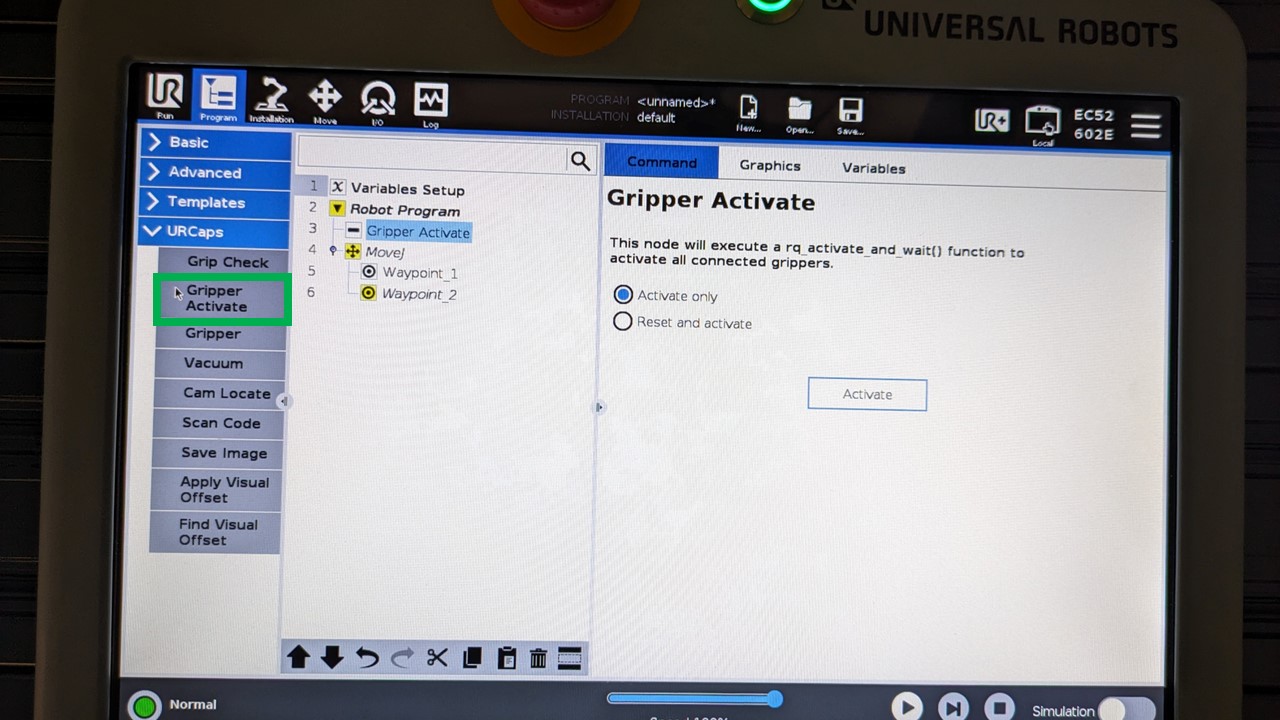
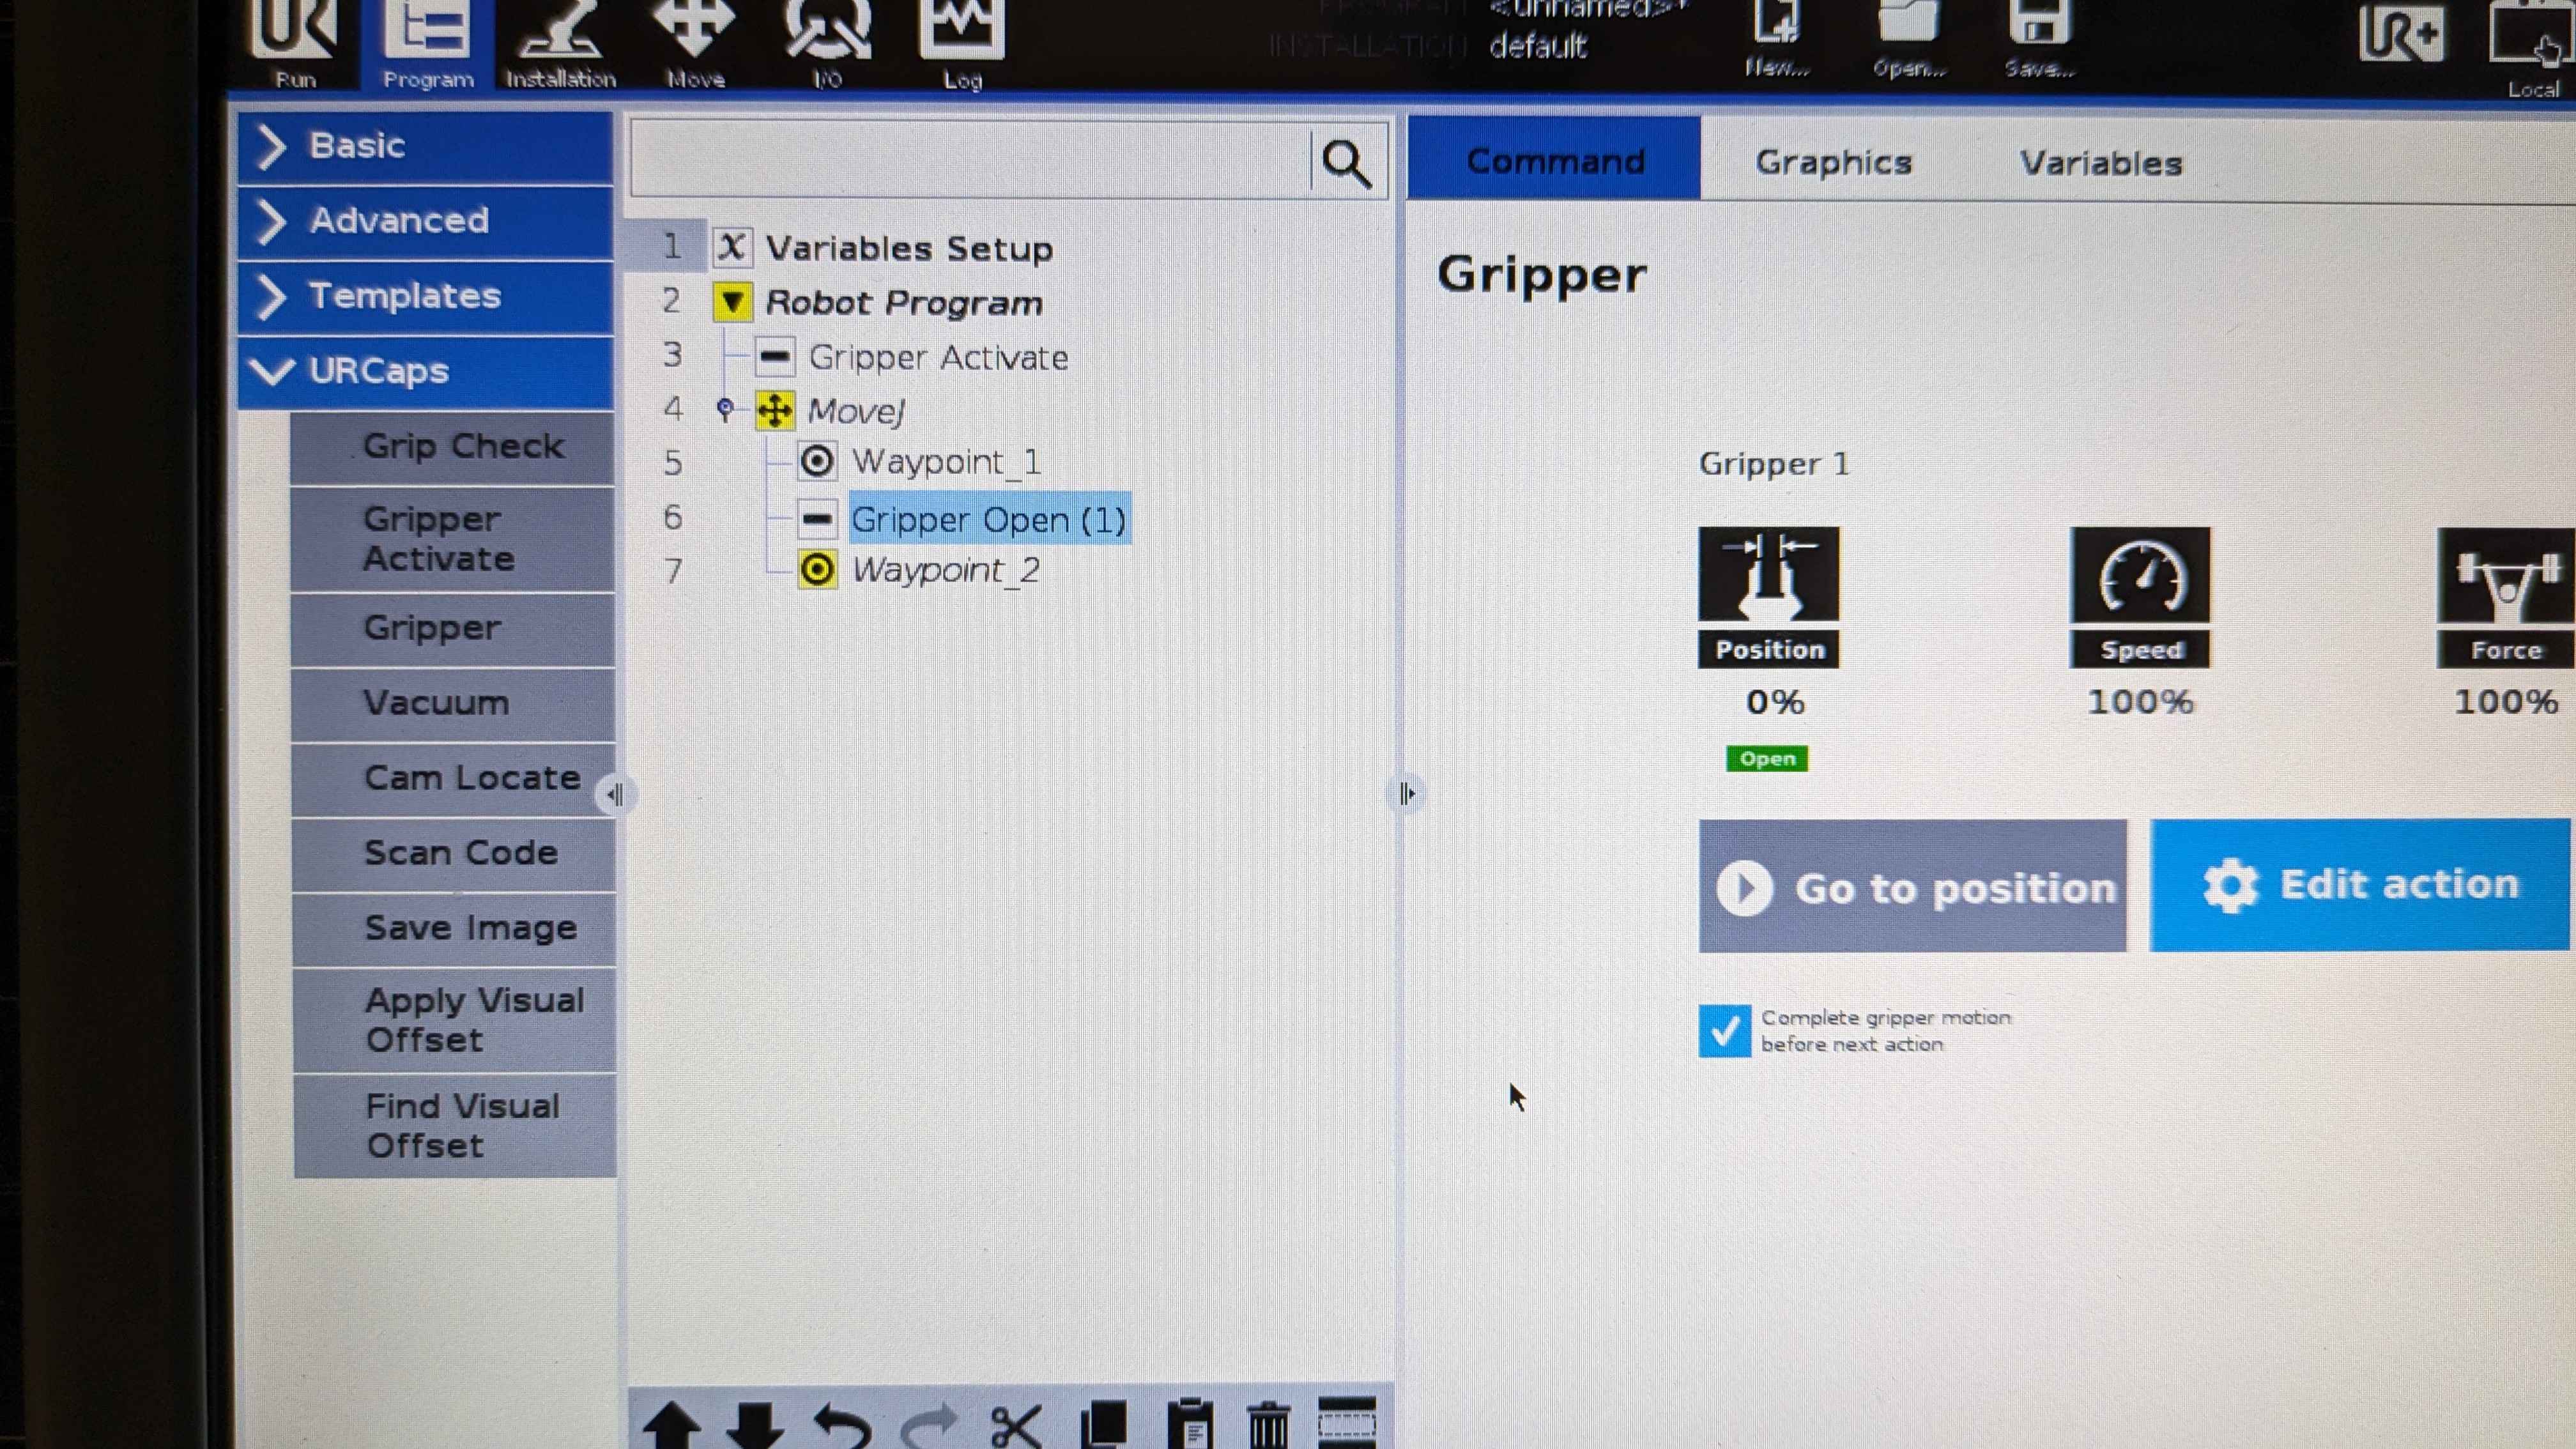
- Select "URCaps" drop down which is on the left side of the screen within the program menu. It is also shown in the image below with a green box.
- Select "Gripper Activate" and make sure this is placed at the beginning of your program.
- Select the waypoint where you want to add the gripper command.
If you place a gripper command after a waypoint, then it will be executed once the waypoint is reached, if the gripper command is placed before a waypoint, it will be executed before the robot starts moving to the waypoint.
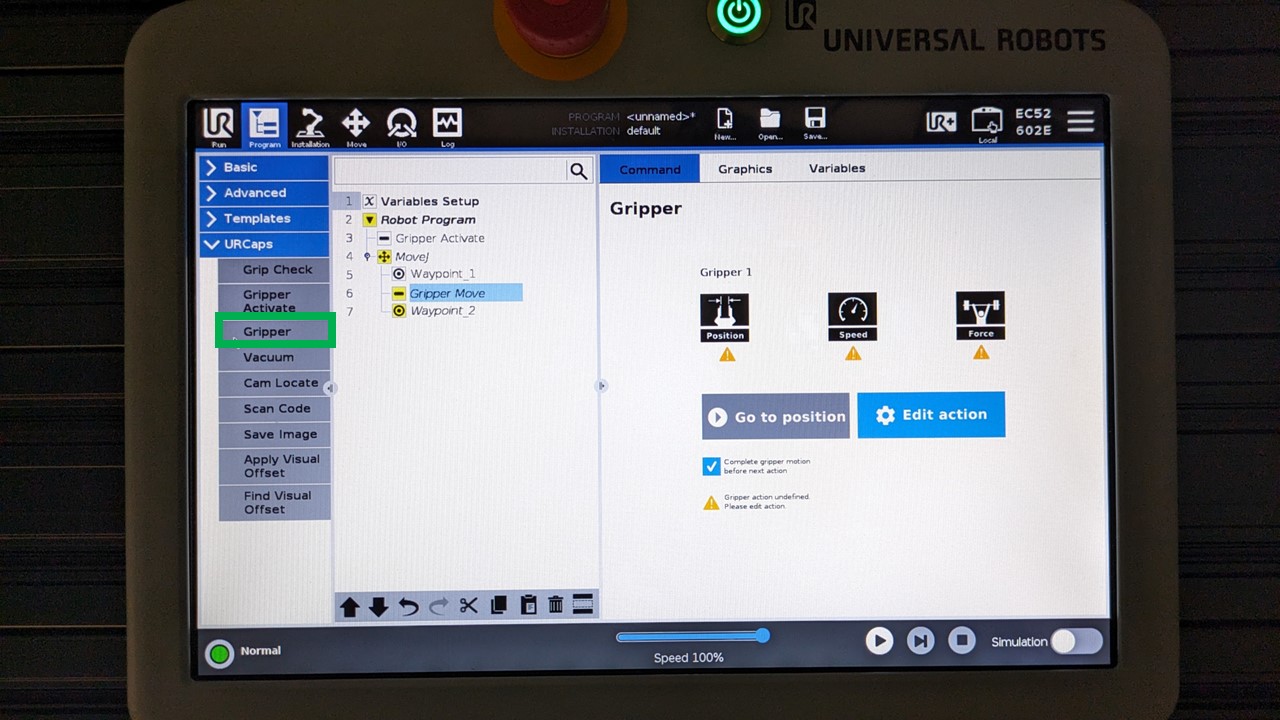
- To add a gripper command, select "Gripper" from the URCaps dropdown.
-
One the right side of the screen, you should now see some options related to the gripper.
-
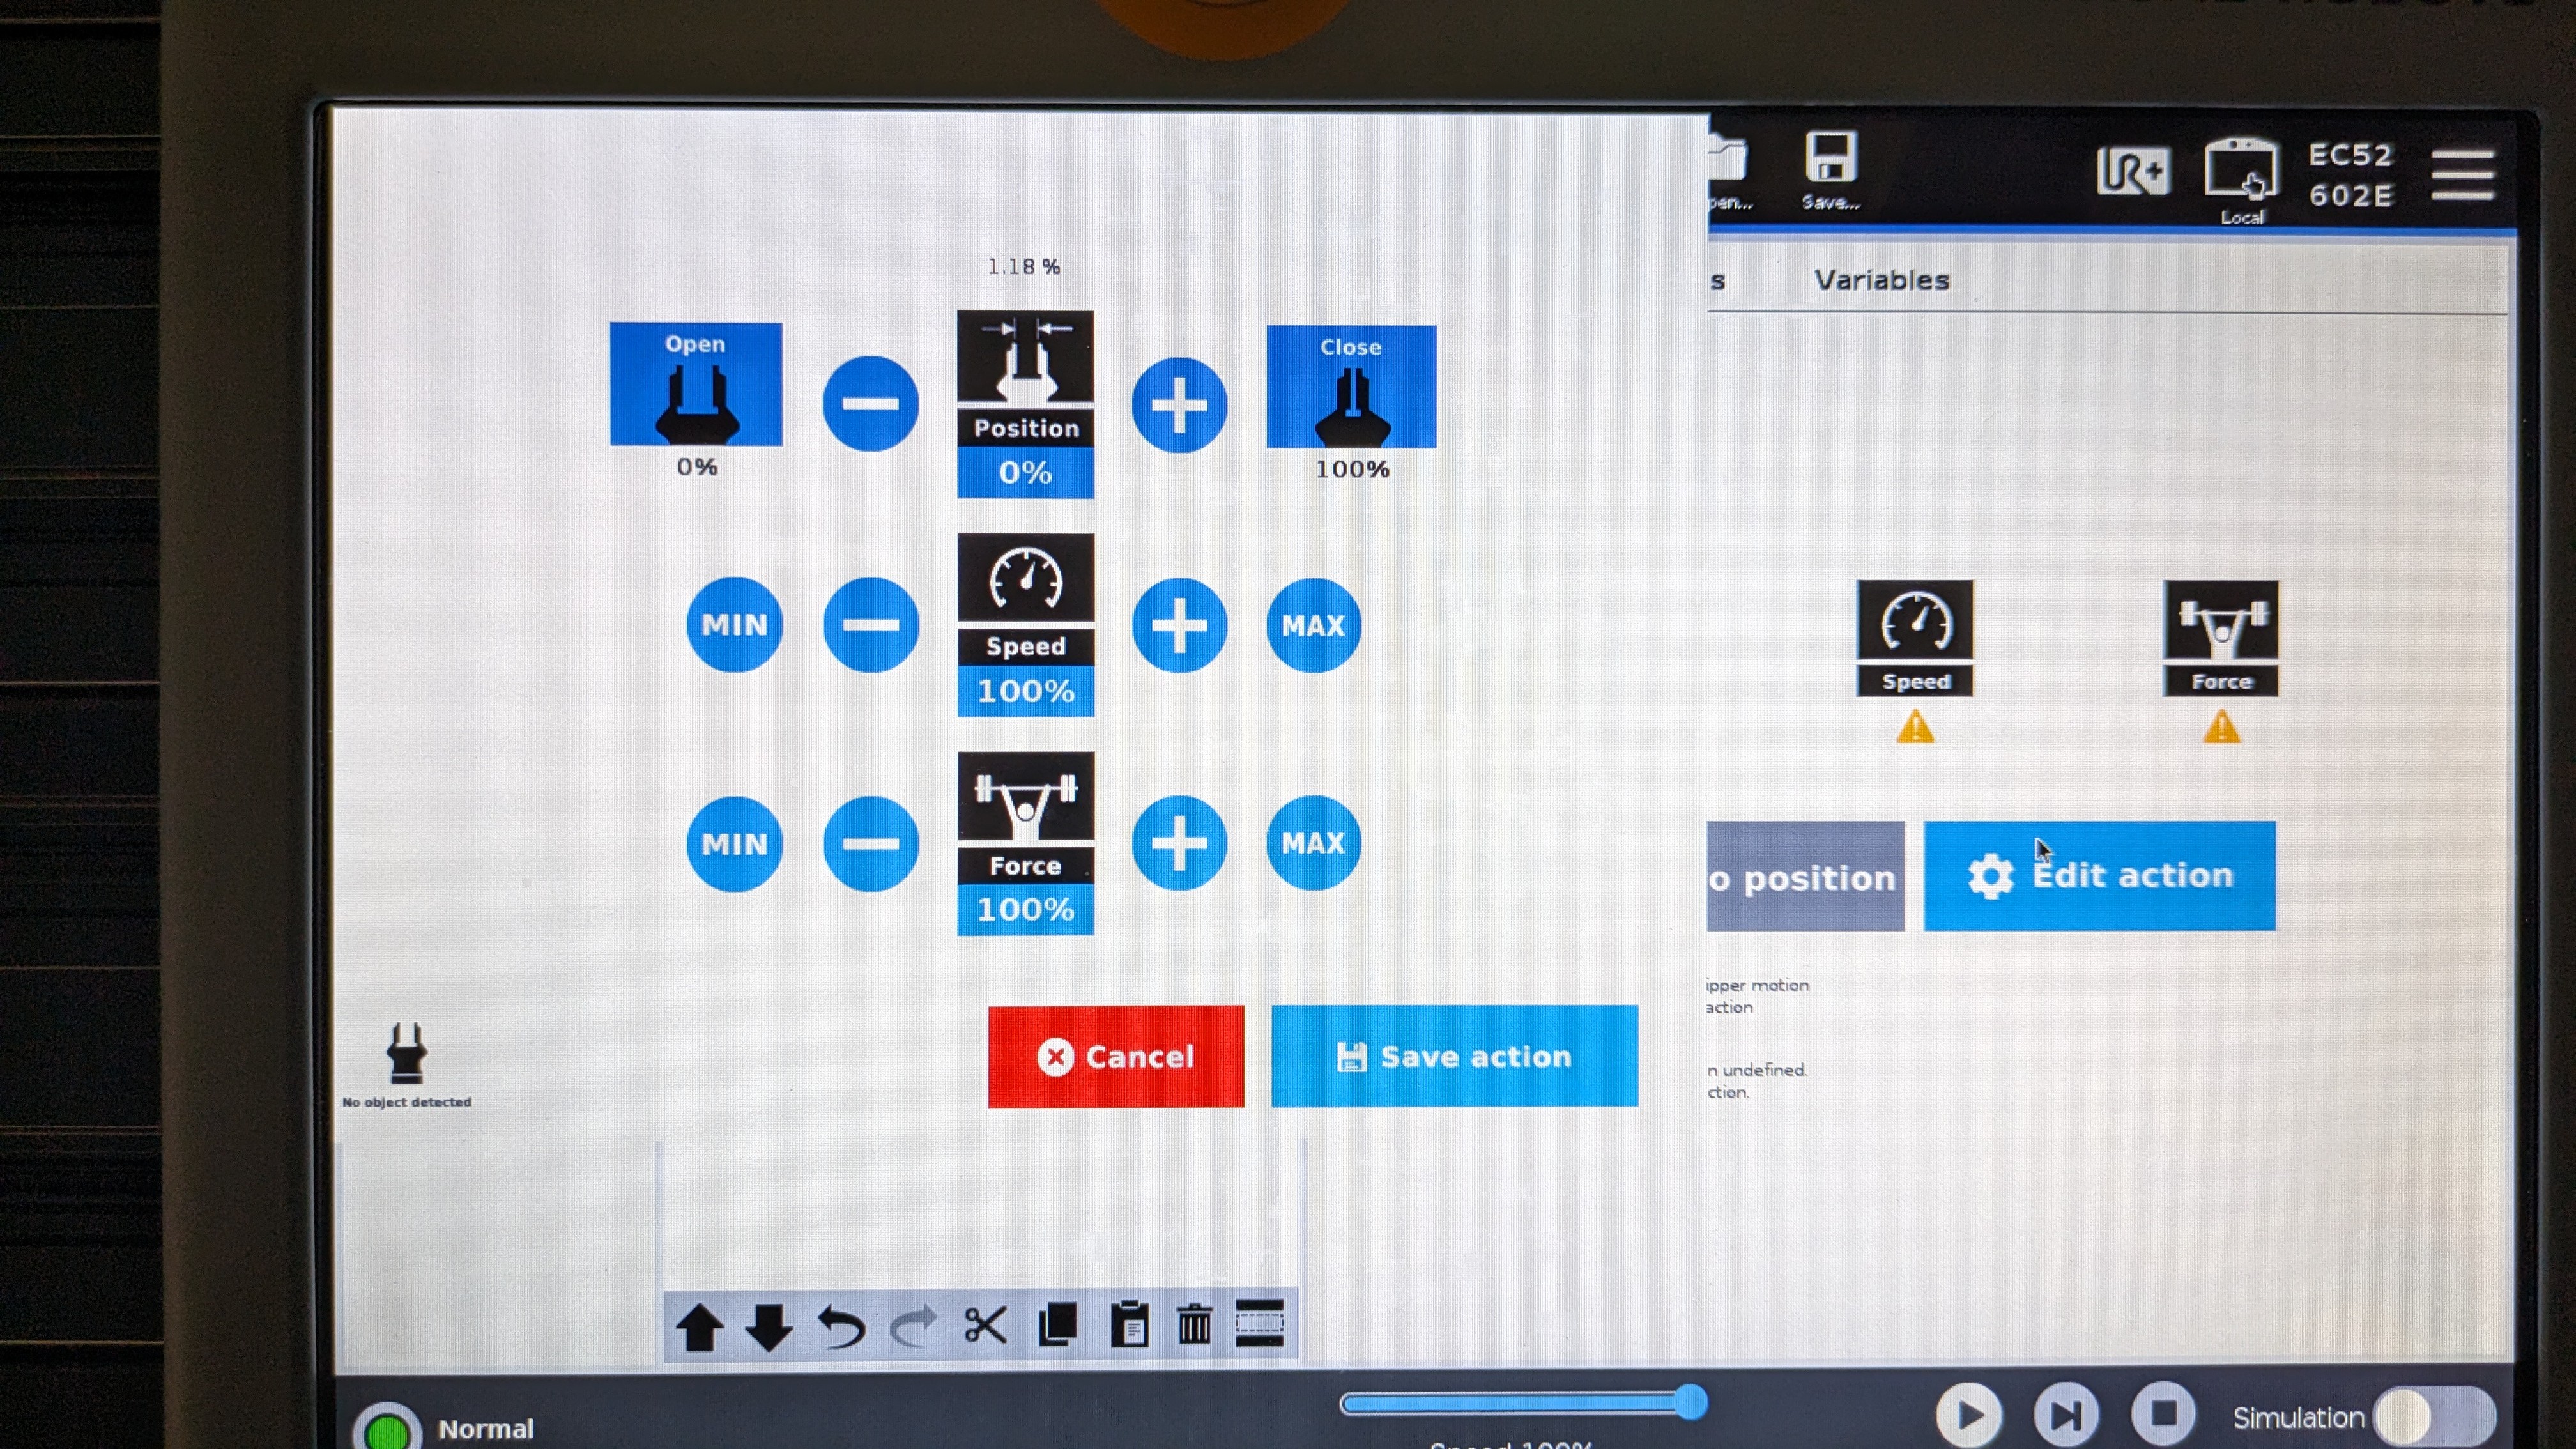
Click on "Edit action" and then choose whether you would like to open or close the gripper.
Do not choose a percentage for opening or closing the gripper as this could cause issues. The gripper should either be open (0%) or close (100%).
-
Adjust the speed and force of the gripper according to your need. Click on "Save action" when you are happy with your settings.
-
If all goes well, you should see the gripper command "Gripper Open" or "Gripper Close" based on which action you have chosen.
Controllling the UR5e through software
There are many ways of controlling the UR5e through your own software or code but the easiest and most straight forward way is through the ur_rtde library.
Detailed documentation about the library is given here.
Establishing connection between your machine and the robot
Before we get started with the library, we must first establish a connection between our machine and the robot. Since the robot has no wireless interface, this will be done through a wired connection via an ethernet cable. Please follow the steps below to connect your machine to the robot.
Locate the ethernet cable attached to the robot and connect it to your machine's ethernet port (mac users will need an adapeter such as a usb to ethernet port adapter).
The next step is a bit different based on the operating system you are using therefore I have broken them to subsections that are give below. We are updating our IPv4 settings to point to the robot's IP. When changing the settings, please use the parameters given below.
| Address | Netmask | Gateway |
|---|---|---|
| 192.168.56.4 | 255.255.255.0 | 192.168.56.5 |
-
For Linux (ubuntu): Open
Settings>Network> in the wired section click on the settings button > selectIPv4on the pop-up and select manual. In the addresses section enter the parameters given above. -
For Windows: Please have a look this video and when you are in the IPv4 settings, enter the parameters given above.
-
For Mac: (instrructions coming soon..)
Once you have entered these parameters, please check if you can communicate with the robot. This is done using the ping command. Open up your terminal or command prompt and run the command ping 192.168.56.5.
If successful you should get something like this as your output:
Reply from 192.168.56.5 bytes=32 time=378ms TTL=64
if not, please double check if you have entered the parameters correctly in their respective sections.
If that doesn't work, please consult with a technician.
Installing ur_rtde
Quick Install
For python usage: python -m pip install ur-rtde or python3 -m pip install r-rtde
Note for mac users, the pip instal might not work in some cases and if that happens please follows the instructions for source install given below.
For cpp usage:
sudo add-apt-repository ppa:sdurobotics/ur-rtdesudo apt-get updatesudo apt install librtde librtde-dev
Source Install
git clone https://gitlab.com/sdurobotics/ur_rtde.git
cd ur_rtde
git submodule update --init --recursive
mkdir build
cd build
cmake ..
make
sudo make install
Run Example Scripts
Before running the example scripts, please make sure to change from local to remote control mode in the teach pendant.
Once you have successfuly installed ur_rtde and have switched to remote control mode on the teach pendant, please try out some these example scips given here
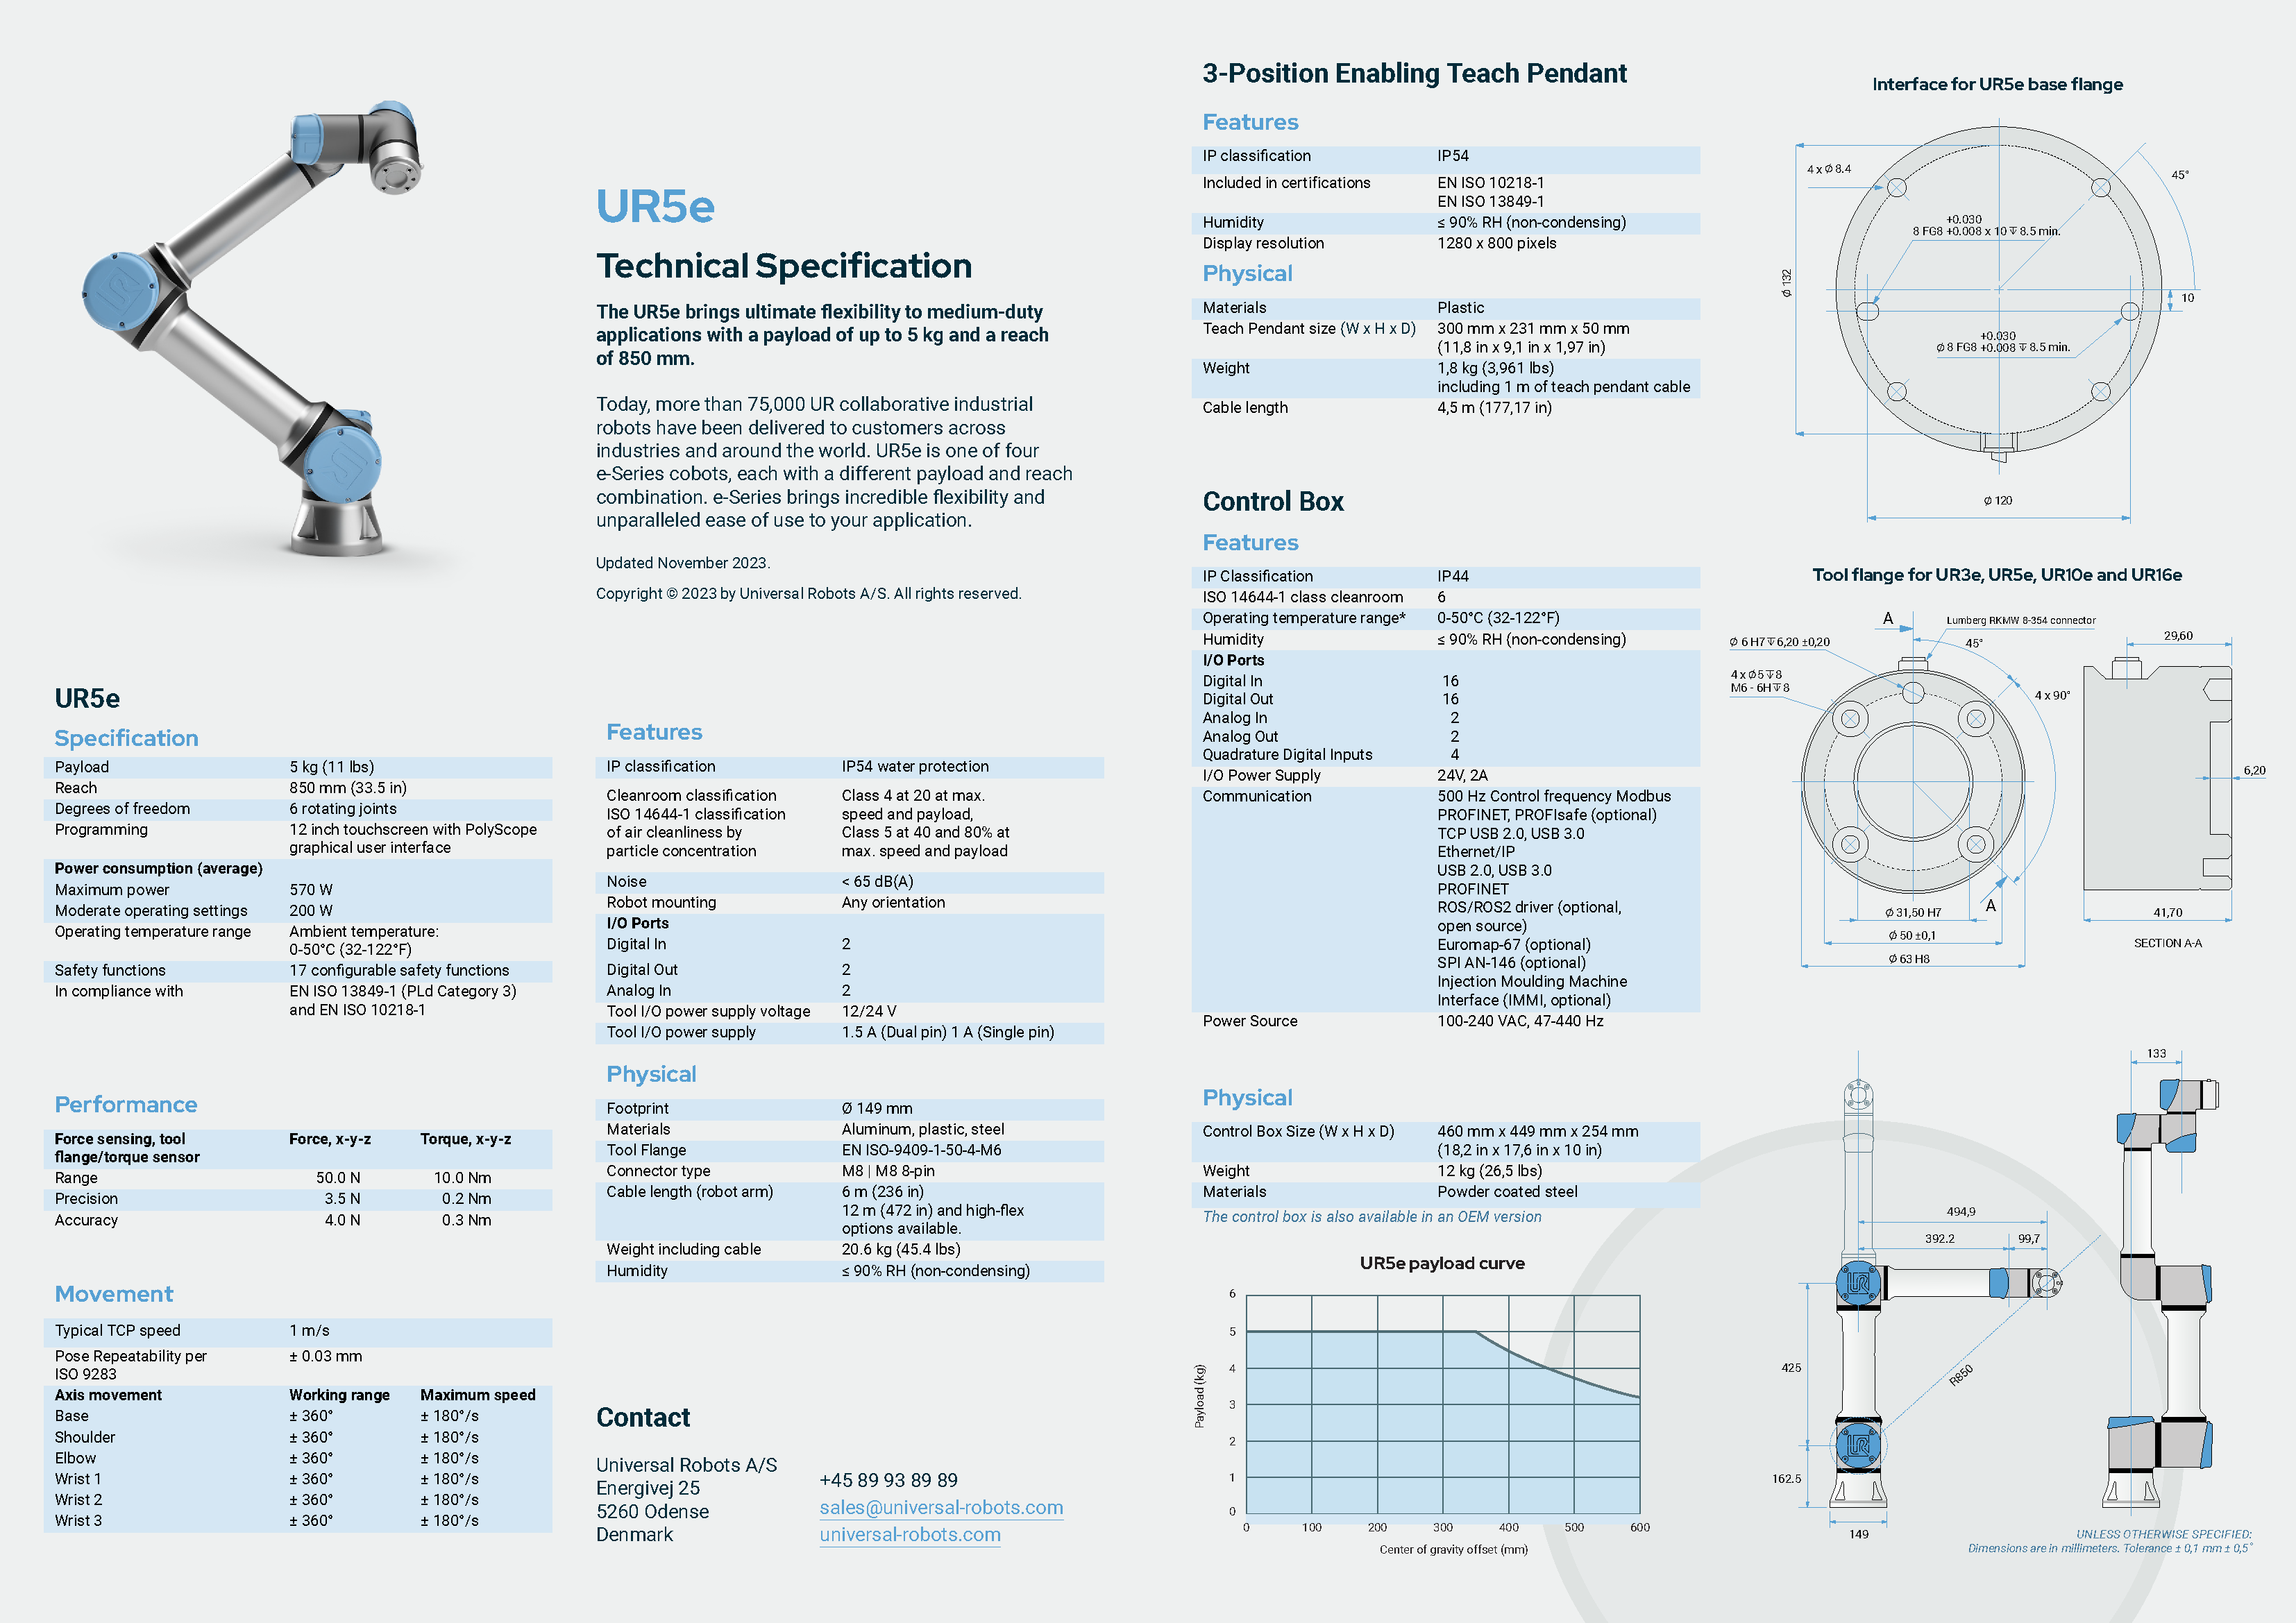
Specification