How to install CUDA Toolkit on your personal Windows PC
What is CUDA Toolkit and why do you need it?
In simple words CUDA Toolkit allows you to develop software capable of utilising GPUs. CUDA Toolkit allows you to use CUDA runtime library for your C/C++ projects. CUDA Toolkit allows you to enable GPU acceleration for some useful Python libraries like Tensorflow, Numba, CuPy.
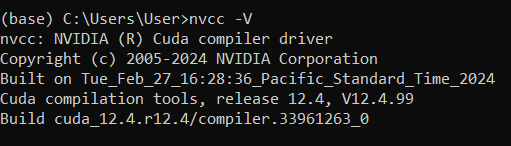
Checking if you already have CUDA Toolkit installed.
Open CLI and run nvcc -V command. If you get a similar output you already have CUDA Toolkit version installed. You might need to install additional software like cuDNN for Tensorflow.
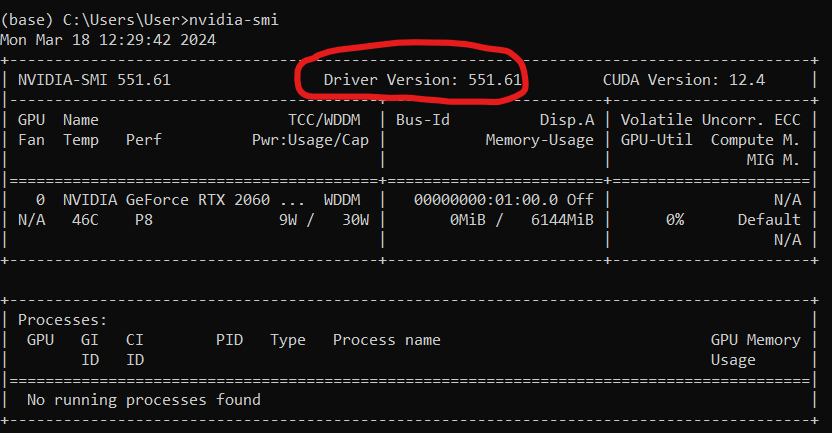
Checking your NVIDIA Driver version
Open CLI and run nvidia-smi command. If the command returns an error, you don't have an NVIDIA Driver installed. The highlighted number is your exact NVIDIA Driver version.
Note: CUDA version number in the table represents the latest CUDA Toolkit version your current NVIDIA Driver supports. It does not represent your currently installed CUDA Toolkit version, or even if you have it installed.
Installing NVIDIA Driver
Even if you have an NVIDIA Driver installed, you might need to upgrade your current version, to access the newest CUDA version.
- Open following link in your browser: https://www.nvidia.co.uk/Download/index.aspx?lang=en-uk
- Fill out the dropdown list on the website.
- In case you don’t know exact name of your GPU:
- In the Windows search bar enter “Device Manager”.
- Click the arrow next to Display adapters.
- Find the GPU starting with NVIDIA, this is your GPU.
Installing CUDA Toolkit
- Open following link in your browser: https://developer.nvidia.com/cuda-downloads
- Follow the instructions
- Select exe (network or local) and click the download button
- Follow the installer instructions
- Installer will try to install GeForce Experience software. To disable it, use the custom install option.
Installing cuDNN library
This is an additional library you need to install to enable GPU computation in tensorflow.
- Open following link in your browser: https://developer.nvidia.com/rdp/cudnn-archive
- Select the desired cuDNN version.
- Follow the instructions
- Select exe(network) and click the download button
- Follow the installer instructions
Installing a different version of CUDA Toolkit
Please complete the whole reading before proceding, uninstalling Nvidia Driver can negativly affect your PC. Please be sure to do additional reseach on how to correctly uninstall graphics drivers.
Example: Repository for StyleGAN 2 requires you to have tensorflow 1.15. This version of tensorflow does not support newer versions of CUDA Toolkit.
- Before proceeding, be sure that the configuration you want to install is supported. To do this consult CUDA Toolkit and cuDNN compatibility matrices: https://docs.nvidia.com/deploy/cuda-compatibility/index.html#binary-compatibility__table-toolkit-driver
- Completely uninstall CUDA Toolkit. They can be found in
Windows Settings > Apps > Apps & features - If your current NVIDIA Driver version supports the desired CUDA Toolkit version, proceed to step 5.
- This step is very risky! If your current NVIDIA Driver version does not support the desired CUDA version, you would have to uninstall your current Nvidia Driver and install the appropriate version.
- Install the desired CUDA Toolkit from here https://developer.nvidia.com/cuda-toolkit-archive.
- Install the desired cuDNN version.
https://docs.nvidia.com/deeplearning/cudnn/archives/cudnn-801-preview/cudnn-support-matrix/index.html
https://docs.nvidia.com/deeplearning/cudnn/reference/support-matrix.html
This can be done in:
Windows Settings > Apps > Apps & features