Workshop: Generative Embroidery with p5.embroider
This is the written version of the e-textiles embroidery workshop, and can either accompany the live workshop or be worked through by itself. Copies of the files used for each of the exercises that can be downloaded here, but I'd recommend trying to generate the files yourself where possible.
1. Hello World: Drawing a Line
We are using a template JS and HTML file in the Github Repository, but this will also work in the p5.js web editor if you prefer.
Template File
All files in p5.embroider have a similar structure. We'll be using this as the basis for all the files in the workshop. The specific code here draws a single line, but we can change that to anything we like.
<script src="https://unpkg.com/p5.embroider/lib/p5.embroider.js"></script>
function setup() {
  //10cm by 10cm canvas
  createCanvas(mmToPixel(100), mmToPixel(100));

  let exportPesButton = createButton("Export PES");
  exportPesButton.mousePressed(() => {
    exportEmbroidery("template.pes");
  });
  exportPesButton.position(0, height + 30);
}

function draw() {
  background("lightgrey");

  setStitch(0.5, 5, 0);
  beginRecord(this);

  // commands go here
  stroke(255);
  line(0, 0, 100, 100);

  trimThread();
  endRecord();
}
In order, this file:
- sets up a new canvas, of size 100 by 100mm (which gets translated into pixels)
- adds a button to let us export the file we create
- sets some properties of the canvas and the line
- draws a line on the canvas
There are some other lines that are 'commented out' (have slashes in front of them) and don't run. These we might use later but for now we don't need to use them.
When you run this file, you should see an output that looks like this (if you don't see this, you will want to check over the setup steps again):
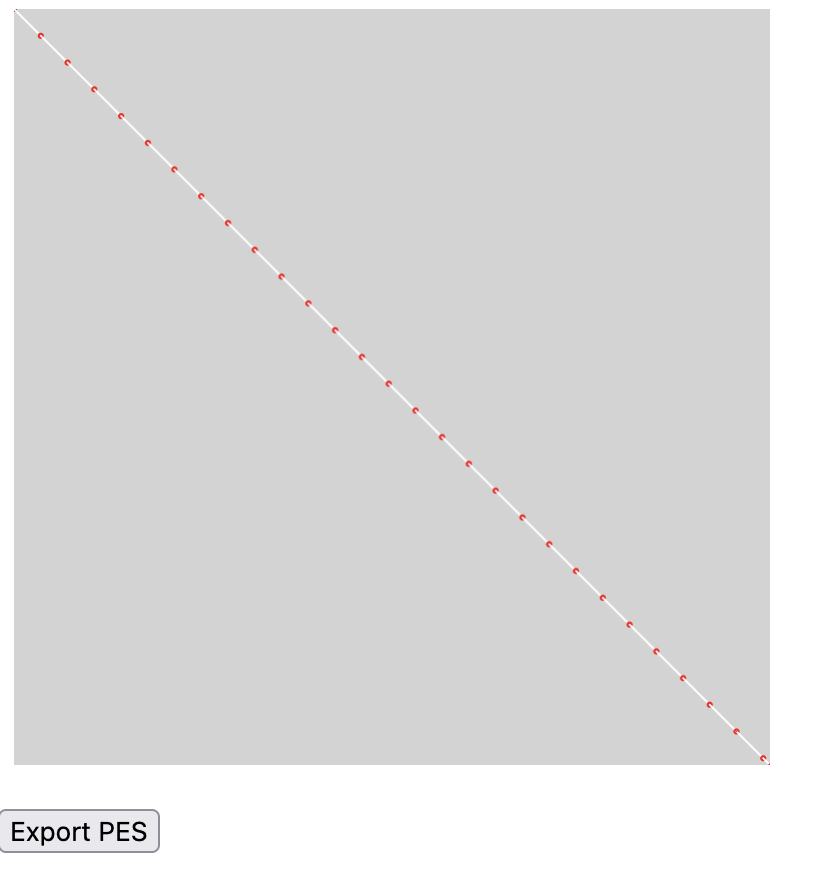
The red dots represent the ends of stitches, where the needle enters the fabric. Shortly we will experiment with different stitch types and lengths, but for now we are using the default settings.
Exercise 1.1
- Can you make the canvas larger?
- Can you make the canvas rectangular rather than square?
Drawing lines
The p5.embroider code for drawing a line is:
line(x1, y1, x2, y2);
This means that (x1, y1) is the coordinates of the point where the line starts, and (x2, y2) is the point where the line ends. In our code, we get a diagonal line because we draw from the point (0, 0) to the point (100, 100) (the edge of the canvas).
Exercise 1.2
- Can you make the line draw only halfway across the original canvas?
- Are you able to draw a vertical line? What about drawing 2 lines?
2. Playing with shapes
From now on, unless we're changing more of the file, I'm going to list just the 'content' code that we're changing, using ... to represent the rest of the file. In our last exercise, the content was a single line, but it can be more -- the important part is that it goes in the same place in the file each time.
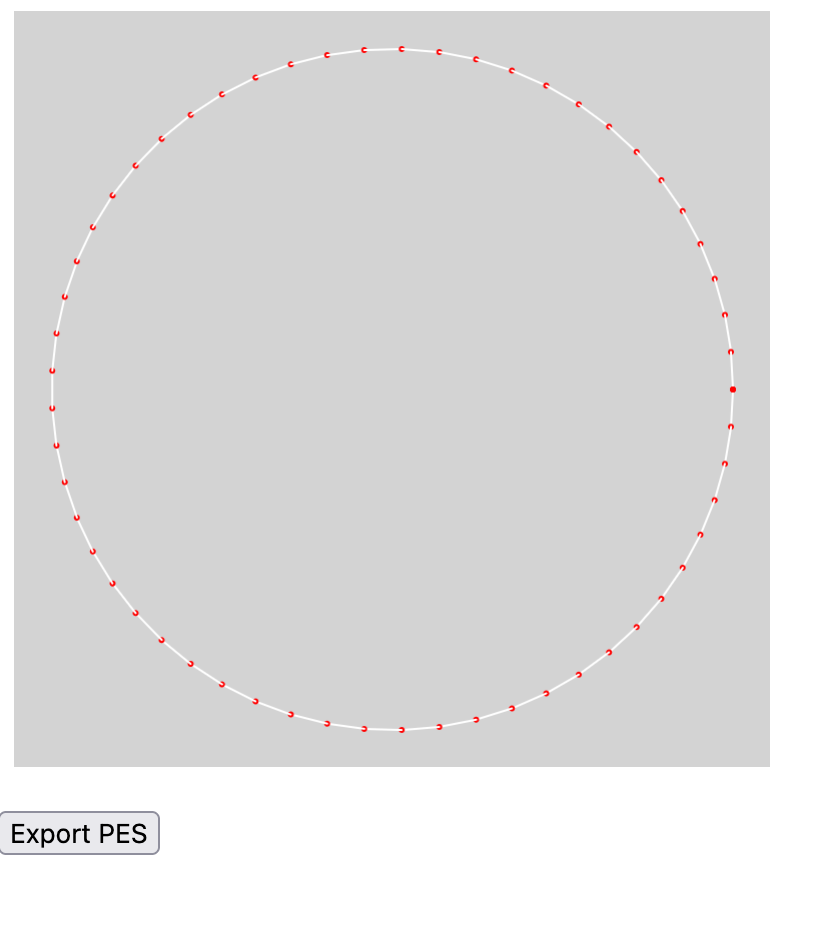
Try changing out the line for a circle:
...
circle(50, 50, 90);
...
You should see a centered circle that fills most of the canvas. In the documentation, the circle() method is listed as:
circle(x, y, r);
Exercise 2.1
- What do you think
rrepresents in this method? - Can you place the circle in the center of the canvas? What about a circle that fills the whole canvas?
- The p5.embroider method for drawing a rectangle is
rect(x, y, w, h);. Can you replace the circle-drawing line with a line that draws a rectangle instead? What do you thinkwandhrepresent?
3. Fills and Hatching
Up until now, all the shapes we've been drawing have been outlines. p5.embroider supports some different kinds of fills, which we will experiment with now. The way settings work in p5.embroider (and in p5 generally!) is that you set a bunch of settings, then draw the thing you want the settings to apply to, and then if you want to draw something with different settings, you change the settings and then draw the thing. For example, the order you'd do things if you wanted to draw a red square and a blue square would be:
> set fill to red
> draw square
> set fill to blue
> draw square
In our case, what this means is that if we add some code that adjusts the fill settings, this needs to go before the part where we draw our shape. Let's try drawing a filled circle:
...
fill(255, 155, 0);
setFillMode("tatami");
circle(50, 50, 90);
...
Fill Types
There are 3 different fill types in total in p5.embroider. These can each be set using the following lines of code:
setFillMode("tatami");
setFillMode("satin");
setFillMode("spiral");
Exercise 3.1
- One at a time, try out the different fill types on your shape. Which is your favourite?
Fill Settings
As well as being able to change the type of fill, it's also possible to change the fill settings, namely the spacing of the fill lines, the colour of the fill, and the angle of the fill lines (for satin and parallel fills, where the lines have a prevailing angle).
We can do this using the same principles as before (e.g. putting the settings before the thing we want them to apply to). The fill settings are adjusted using a method called setFillSettings.
  setFillSettings({
    angle: 0, // number between 0-360
    stitchLength: 3, // average stitch length in mm
    stitchWidth: 0.2, // number between 0-1
    rowSpacing: 0.8, // space between rows in mm
    minStitchLength: 0.5, // minimum stitch length in mm
    resampleNoise: 0.2, // space between rows in mm
    alternateAngle: true,
  });
Exercise 3.2
- Try making one shape with a diagonal hatch fill, and another with a vertical fill. What happens when you place them on top of each other?
- To un-set fill settings, you can use the line
noFill(). Can you use this line to make some code that draws a filled shape, and then draws an outline shape afterward?
4. Stroke and Stitch Settings
The final group of settings we're going to look at is modifying the stroke (line) style. Similarly to fills, you need to modify the settings before drawing your line.
There are 2 stroke types in PEmbroider; tangent is the one we've been using by default, but perpendicular can be used to get a thicker, more defined outline.
setStrokeMode("line");
setStrokeMode("parallel"); // parallel lines
setStrokeMode("zigzag");
setStrokeMode("ramp");
setStrokeMode("square"); // thick line in squares
setStrokeMode("sashiko"); // repeating blocks of stitches
As before, stroke color can be set using RGB values. The other settings are the thickness of the line (stroke weight) and the stroke spacing (e.g. for perpendicular strokes).
stroke(R, G, B);         // sets the stroke color
setStitch(0.5, 5, 0); // min stitch length, stitch length, noise
strokeWeight(2);     // sets the thickness of the stroke in mm
Exercise 4.1
- create a file with 4 different lines, each with different stroke settings. How much variation can you get?
5. Loops and Randomness
For loops
For loops are structures that allow the same piece of code to be repeated multiple times with different inputs. We're going to try out a for loop that repeatedly draws lines on the canvas, changing the position of the line each time it draws.
...
for (i = 1; i < 10; i++) {
    line(10, i*10, 90, i*10);
}
...
In this code, we create a number, i, that will go from 1 to 10, increasing every time. The first time the code runs, i is equal to 1, and so i*50=50. The next time, i=2, so i*50=100, and so on, up till i reaches 9. i cannot reach 10 (as the code will only run for i<10) and so the for loop ends.
Exercise 5.1
- What happens when the number multiplying
iis different fory1andy2? - Can you make a series of vertical lines instead of horizontal lines by changing where
iis used? - Can you draw a grid?
- What happens when you increase and decrease the number of repeats (e.g. the number 10 in the example)
- Experiment with using
iin different positions. What happens when you add or subtract it (or multiples of it)? Can you make a radial pattern?
Random numbers
Another very useful tool for making generative patterns is randomness. Unlike the code we were using before (which used scaled variations where we could predict what the outcome would be), randomness adds an element of chance. In Processing, the function random(50) will return a random number between 0-50. This number will be a decimal (float) rather than a whole number (int), so if we want to use it like a whole number we also need to use the int() method.
...
  for (i = 1; i < 10; i++) {
      circle(i*10, 50, 5+Math.random()*15);
  }
...
Exercise 5.2
- Run this code a few times. What do you notice? What is being randomly varied?
- What happens when you add a number to the random number? What if you multiply it by something?
- Can you make the randomness affect the y position?
Nesting for loops
The last thing we will look at is using 2 nested for loops to create 2D designs. This isn't the only way to achieve this -- remember the grids from exercise 5.1 -- but this will help us a lot.
Before we get there, we could also look at what happens when we nest for loops inside other loops, in this case, the circle drawing code from before.
  for (i = 1; i < 10; i+=2) {
    for (j = 1; j < 10; j+=2) {
      circle(i*10, j*10, 5 + Math.random()*30);
    }
  }
Now we get a whole grid of circles!
Exercise 5.3
- Experiment with randomness in different nested for loops -- can you use randomness to make the positioning less square?
6. Polylines and curves
As well as having preset shapes, PEmbroider (like Processing) supports making custom shapes by defining a set of points along a line. To start one of these shapes, you need to bookend the line with:
beginShape();
	// ...points
endShape();
If the final co-ordinate matches the first co-ordinate, we can also fill the shape: if not, it's just a stroke. Polylines are also great as within the line the machine doesn't need to make a jump; this is helpful for avoiding too many floats later on.
Each point on the line is given by vertex(x, y), a single point in space. To draw a spiky shape, we can draw a bunch of points:
beginShape();
  vertex(10,10);
  vertex(90,50);
  vertex(95,70);
  vertex(30,50);
  vertex(20,30);
  vertex(10,10);
endShape();
Exercise 6.1
- Have a go at making a shape of your own: can you make a 5-pointed star? Can you add a fill?
Curves
There are a number of different ways to render curves in p5, which inherit from the different curve-drawing techniques in computer graphics. These are: arcs, splines and Bézier curves.
- Use
arc()when you need a segment of a circle or an ellipse. You can't make continuous arcs or use them as part of a shape. - Use
curve()(the spline function) when you need a small curve between two points. UsecurveVertex()to make a continuous series of curves as part of a shape. - Use
bezier()when you need long, smooth curves. UsebezierVertex()to make a continuous series of Bézier curves as part of a shape.
The tutorial gives a great overview of the different types and I'd recommend experimenting with all of them.
The simplest kind of curve is called a curve spline -- this will fit the line to curve around a series of x, y points:
  for (i = 1; i < 10; i++) {
    beginShape();
      for (j = 1; j < 10; j++) {
        curveVertex(i*10 + Math.random()*10 -5, j*10);
      }
    endShape();
  }
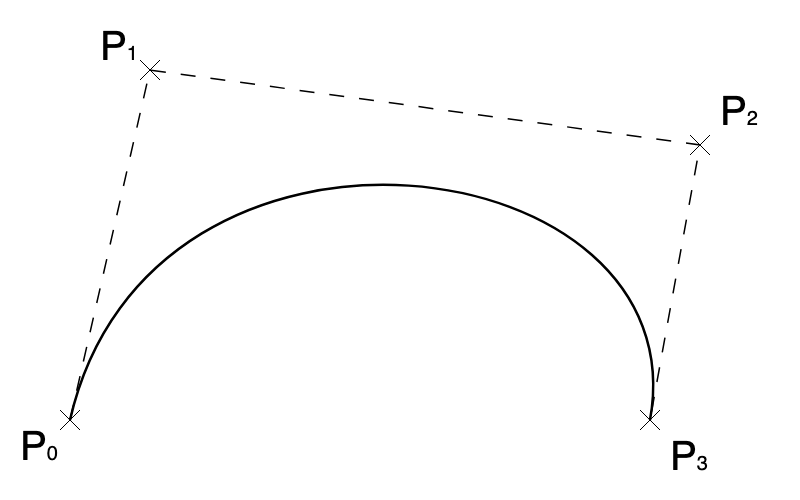
But there are also some other kinds of curve we can use! One very popular type is a bézier curve, which is used in computer graphics. In these curves, points aren't defined directly -- instead, a 'hull' of 4 control points is defined that a curve passes through.
These can produce some really beautiful shapes:
  beginShape();
  vertex(10, 10);
  for (i = 1; i < 10; i++) {
    for (j = 1; j < 10; j++) {
      bezierVertex(i*i + (10-i), 0, i*10, j*10 + (15-j), i*5 - 1, i*5);
    }
  }
  endShape();