Using the Brother PR1055X Embroidery Machine
To use this machine, you must have had an induction from one of the technical staff. This guide is to serve as a resource for students who have already had this induction, as a reminder of setup steps and as a troubleshooting guide.
Overview
The Brother PR1055X is a top-end commercial embroidery machine that can be used to produce high-quality digital embroidery on a range of fabrics.
Embroidery machines work by moving a piece of fabric (fixed within a hoop) in the x-y direction, beneath a needle that stitches by moving up and down. In this sense, they have a lot in common with many other 2-axis CAD machines (like laser cutters, routers, plotters), though because of the paticular qualities of working with stitches as opposed to straight toolpaths, embroidery software weirdness, and working with different fabrics, there's some practice involved in getting consistent results.
This guide is a condensed overview of the machine operation -- if you'd like a more detailed reference, see the Brother PR1055X User Manual.
Producing embroidery files
In order to embroider your design, you must first create a file in the .PES format (there are other embroidery file formats, but they are not typically compatible with Brother machines). These are then loaded onto the machine via memory stick. At CCI, there are 2 main ways that this can be done:
- using the open-source PEmbroider package with Processing -> tutorial
- using Brother's PE Design 11 software
Both approaches have their advantages and disadvantages depending on the kind of design you want to make. In general, PEmbroider gives you a huge amount of control over how the design is stitched, whereas PE Design auto-generates stitches for you, allowing you to choose from a few different presets, and has a lot of features. As such, the learning curve with PEmbroider is a bit steeper, and generally requires a bit more tinkering to achieve a result, but is programmable, so can make generative designs, and can produce things that can't be made using PE Design.
As PEmbroider is just an extension of Processing, it can be run on your computer. PE Design is a piece of proprietary Windows software, for which we have one license, so it must be used on the dedicated Windows machine next to the embroidery machine. There is a Windows-only trial version available here.
Machine Setup
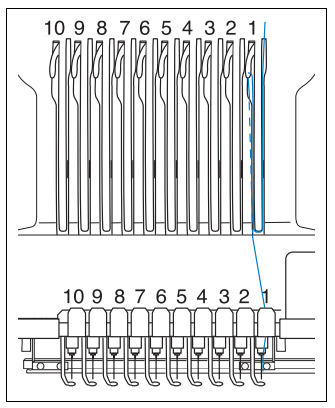
Threading the machine
This machine can be threaded with 10 different colours at the same time meaning that you shouldn't have to change the threads very often. If you do want to change a colour, the manual has a detailed description of this process which you can find here. You can, for the most part, just copy the path of a different thread to show you where to go.
Here are some main points to remember (these are not necessarily in order):
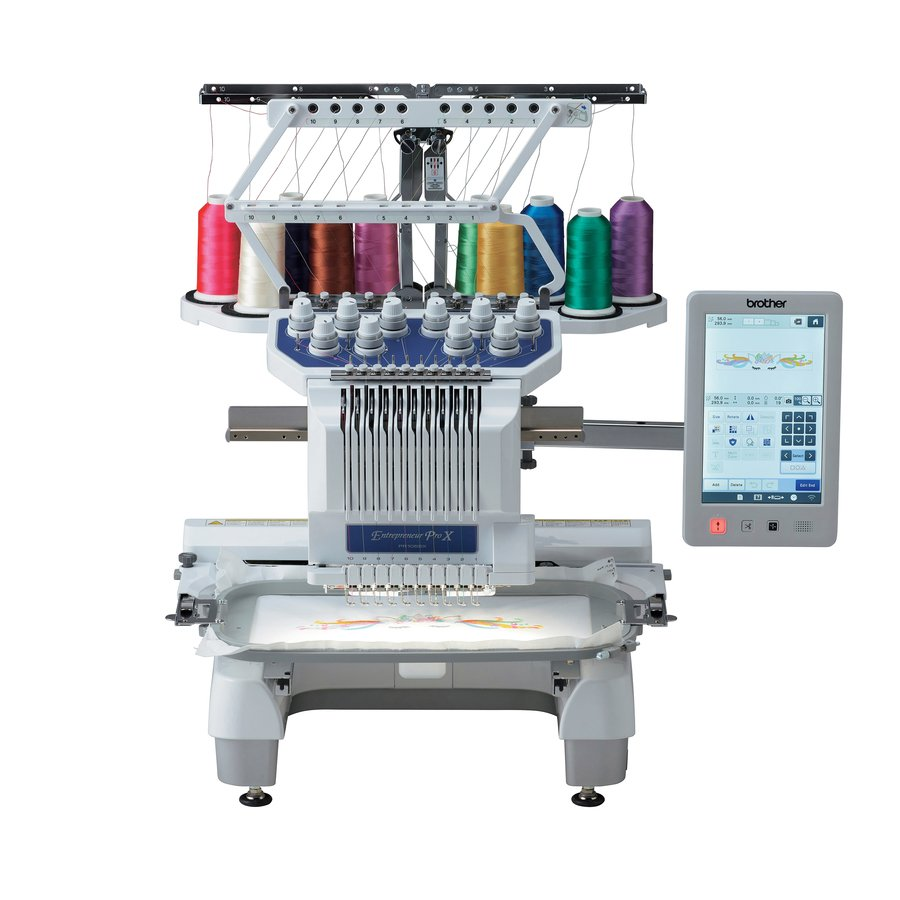
Thread tension guide
The thread tension guide has a sliding part that helps control the tension. To thread the machine you must slide this to the left to reveal the holes but remember to slide it back once you have finished threading!
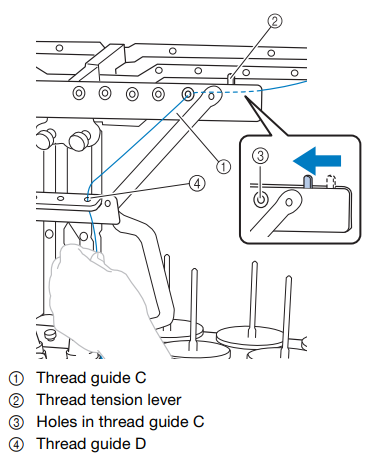
Guide Plates
Twice along the threading mechanism, there are these guide plates.

To feed the thread underneath, hold it with both hands and slide it under the guide plates from the right.
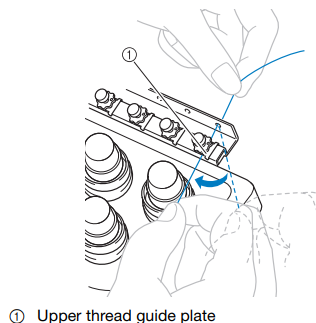
Tension Disks
Each thread has its own tension disk to be able to individually adjust the tensions. To thread it, wrap around once in a clockwise direction as shown by the arrows.
Thread guide pins
This part is very similar to a traditional sewing machine. The thread follows a path as below, going down the right hand side, scooping under and back up to feed through the take-up lever hole and back down again.
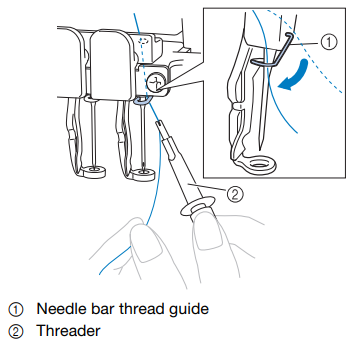
Needle Bar Thread Guide
This is definitely the most fiddly part. Using the threader tool (which should be on the magnetic strip on the wall to the left of the machine), hook the thread around the needle bar thread guide. It helps to hold the end of the thread and pull gently to get it to properly slot in.
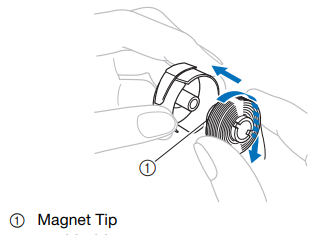
Threading the needle
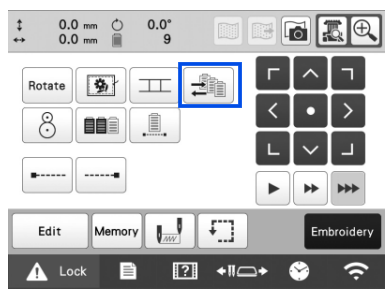
- To thread the needle, the machine must have the correct one selected. To do this, touch
 from the bottom bar menu and select the needle that you want to thread.


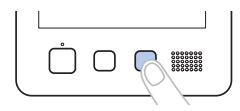
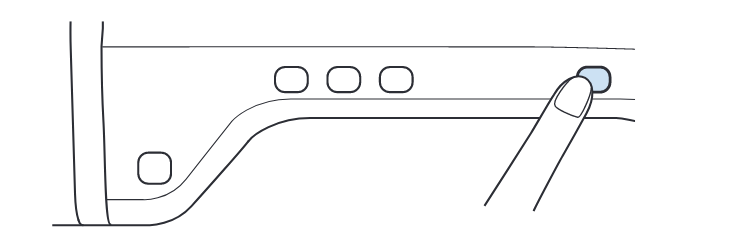
- Press the automatic threader button.
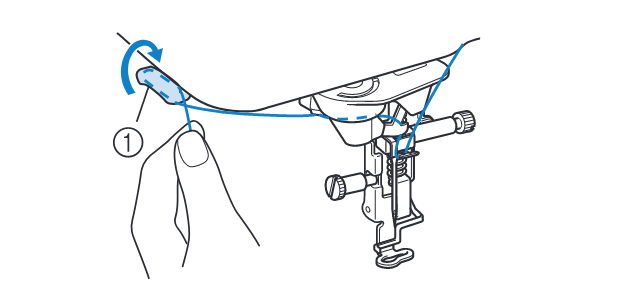
- As seen in the illustration below, pass the thread under the fork of the automatic needle threading mechanism from the right, and then catch the thread with the hook that passes through the eye of the needle.

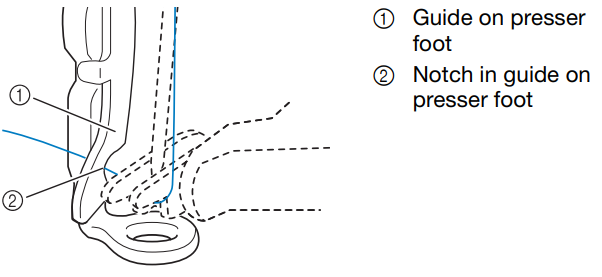
- Pass the thread under the guide on the presser foot, as seen below.
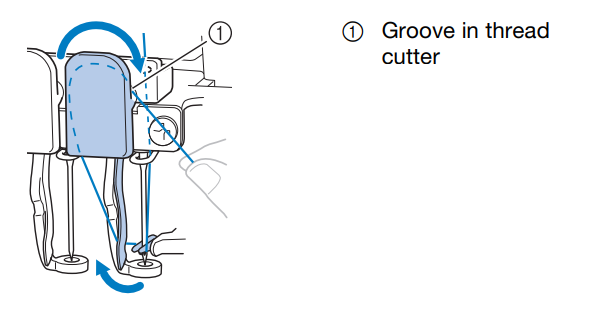
- Securely pass the thread through the groove in the thread cutter, then lightly pull the thread to cut it.
- Press the automatic needle threading button again to thread the needle!
Changing and selecting the thread colours
After you have changed the thread colour on a needle, you should also change the colour on that needle in the embroidery machine settings by 'anchoring' it. To do this:
-
Select
 then
then 
-
Select the needle you want to change the colour of.
-
If it already has a colour anchored to it, click
 to first unanchor.
 -
Select the new colour you have just threaded onto that needle (if you are using a Brother thread, you can type in the colour code on the reel, if not just choose one that looks similar).
-
Press
 again to anchor the new colour to the needle.


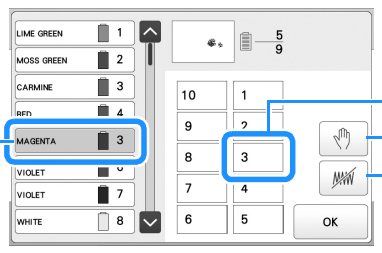
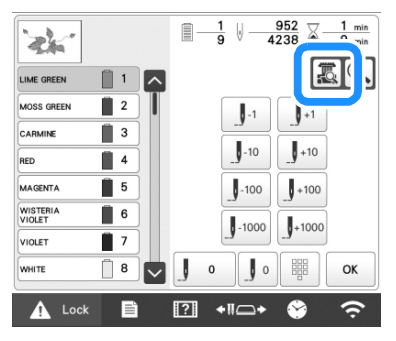
Selecting the colours for your design.
You now need to manually select which needles you want to embroider the different colours in your design. This is done at the 'embroidery settings' part of the process.
- From the embroidery settings page select


- The machine will automatically number each section starting at 1. Select each section and then choose the colour/needle you want it to be. This is where having the correct colours anchored to each needle is important as it will make this process a lot easier.
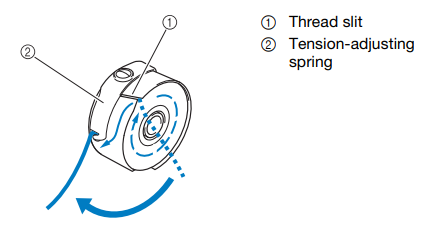
Changing the bobbin thread
The bobbin thread is what binds the top thread to the fabric, and sits on what's known as the 'wrong side'. This part can be slow the first time you do it, but precision is important -- if your bobbin is not set up properly you will spend a lot longer trying to figure out why your design hasn't come out right!
This machine uses pre-wound bobbins which makes this process easier that some other machines. For a full step-by-step instruction, the guide in the manual is very thorough, though if you are unsure then please ask for a refresher.
- Open the hook cover and pull the thread picker towards you.
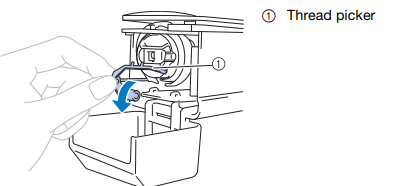
- Grab the bobbin latch and remove the bobbin case.
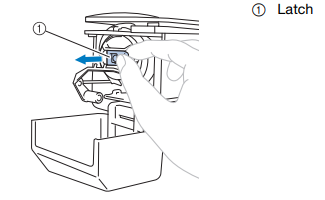
- Insert the prewound bobbin into the case, making sure it is the correct way round. (if you are looking at the open side of the bobbin case, the thread on the bobbin should be wound in a clockwise direction).
- Pass the thread through the thread slit and under the tension adjust spring and pull so that the tail is about 50mm.
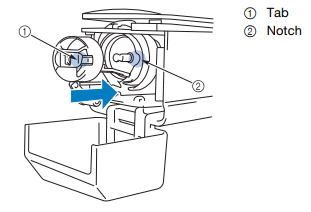
- Insert back into the machine, aligning the tab with the notch, and pushing until it snaps into place.
- Close the hook cover and you are ready to go!
Tip: When about to embroider a large design, it's worth checking that there's a fair amount of thread left on the bobbin, to avoid having to change it midway (it's not an issue, just annoying).
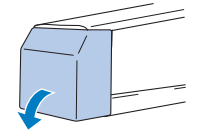
Hoops, fabric, and backing
In order to embroider fabric, it must be stretched taut in an embroidery hoop, which is tightened using one or two adjustable screws, then mounted onto the machine. It then moves the fabric relative to the needle. This is low-key one of the most crucial bits of getting a design to work, and if you're having issues with distortion it's probably going to be here.
There are currently 4 flat hoop sizes and a cylinder hoop available to use at CCI. In general, try and use the smallest possible hoop that will fit your design -- the larger the hoop, the less supported the fabric is, and the more likely you are to encounter distortion. This is particularly relevant if you are using a thin or stretchy fabric. The largest hoop is not a challenge!!
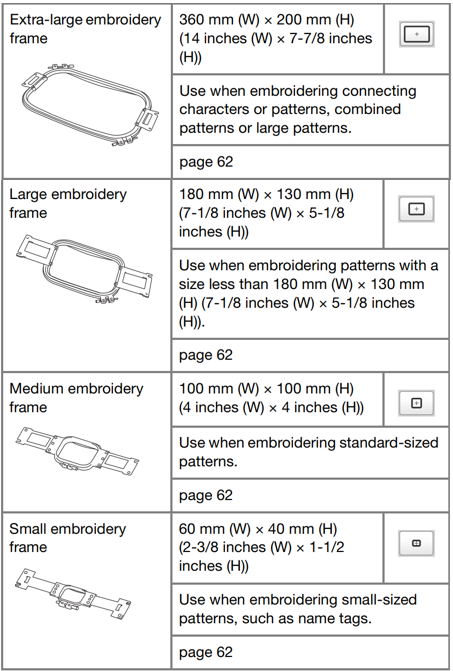
If you don't know what hoops you can use, the machine will tell you -- just look for the hoop icon in the top while browsing designs. Designs too big for the hoop will be greyed out and you will not be able to stitch with them. The machine knows what hoop you have mounted and will adjust this accordingly.
We have both iron-on and tear-away embroidery backing. For delicate or stretchy fabric, iron-on keeps it more stable so is recommended. Iron this onto the fabric before putting it into the hoop. For other fabrics, either is fine.
Place the fabric and backing right side up on top of the outer part of the hoop. Press the inner part down and pull the edges of the fabric to make sure it is taut with no wrinkles.
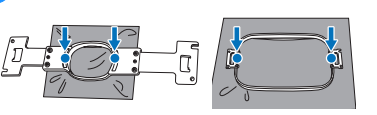
Then use the 3 way screwdriver to tighten the screws of the frame.

Tip: If you are using a stretchy or delicate fabric, take care not to over-stretch when putting the fabric into the hoop (or the design will pucker when you come to remove the fabric from the hoop). I would strongly suggest using the stock canvas we have at the CCI to test designs, especially when you are learning to use the machine.
You can also use the iron on stabiliser to 'float' very small pieces of fabric, ribbons or corners.
Embroidering designs
If you are using PE Design on the lab computer, you can directly upload designs to the machine within the program. Otherwise, use a memory stick to transfer your design over.
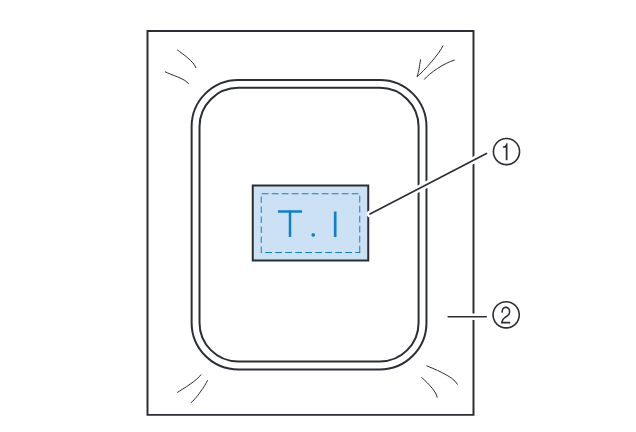
Aligning the design on your fabric properly is really important. This machine has a camera built in that can help you align your designs. On the edit page, press the camera button. This will take a scan of the fabric in the hoop and display an image of it underneath the design you have uploaded. You can then position your design precisely.

All the hoops also come with special alignment sheets that can help you line things up. This is by far the most annoying part of the whole process, but it's worth getting right.
Within the edit window (shown above), you can also rotate and resize your design along with a few other modification. When you resize it, this will just take the existing stitches and stretch them (so you might not get the desired density). It is therefore recommended that the design is the correct size in the program you have created it in.
Running the machine
Before you start, check that you have enough time to finish the design. The machine's time estimates are normally pretty accurate (if anything, it normally takes a bit longer). You MUST be next to the machine throughout, it CANNOT be left unattended.
While embroidering:
- pay attention to the sounds the machine is making, and to whether any messages appear on the screen (e.g. telling you to re-thread the top or bottom thread).
- if at any point the machine seems unhappy, press the stop button, and check each part of the machine to see what is wrong. If in doubt, ask one of us to help.
If the top thread breaks during embroidery
This is not uncommon, and can cause some stitches to be skipped. Luckily, it's also easy to resolve. If this happens multiple times in the same design, however, there might be something wrong (see 'my top thread keeps breaking' in the troubleshooting section).
Enter the stitch counting menu (indicated below), then modify the stitch number using the needle icons. The machine's needle will move as you adjust, allowing you to see what's going on. Press the -/+ stitch button at the bottom to open up the menu.
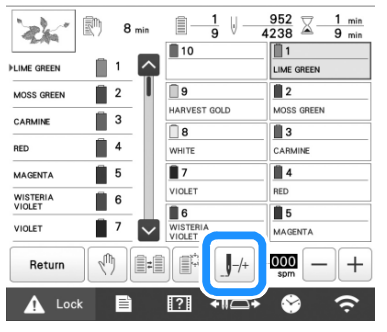
You can then press this below button to check the needle drop point and then the numbered buttons to adjust the stitch number.
For most cases (unless a lot of stitches were skipped), I'd recommend going back 10 at a time, then using +-1 stitch to line up the needle with the last proper stitches (go a couple in to ensure they can't come loose).
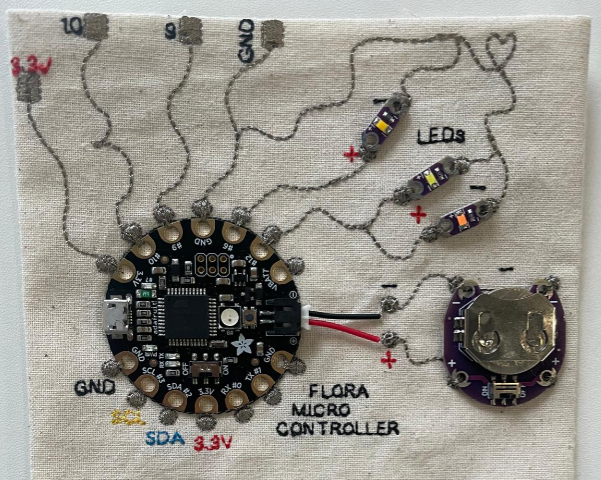
Using conductive thread
We have two thicknesses of Madiera silver plated thread. Use the thinner one (it should normally be threaded onto the machine already) as the thicker one is too thick for this machine and will not work properly.
You can use this to make embroidered circuits, like the example below, or touch sensors.
Troubleshooting
My design is distorted/puckered
This issue is almost certainly to do with hooping. If you're trying larger and more complex designs, I would recommend watching this hooping tutorial which gives a lot of detail on proper technique.
Before you change anything in your design, check:
- is the fabric properly stretched on the hoop
- have you ironed on stabiliser to the back of the fabric (and is it properly bonded).
If the answer to both these questions is yes, this is likely not down to a single issue, and instead part of a set of different trade-offs:
- thin or stretchy fabric -> thin/stretchy fabric is easily distorted by embroidery. The first thing to try here is adjusting the tension of the thread (loosen a little for stretchy fabrics), and also to ensure that the fabric isn't being over-stretched in your hoop.
- size of design/hoop -> if your design is anywhere near the border between 2 hoop sizes, try rounding down the size to fit the smaller hoop. This will make the fabric much more stable.
- complexity/density of design -> dense and detailed stitch fills can easily distort fabrics. You could try reducing the stitch density, increasing the stitch size, or even not filling in particular areas to try and combat this
Tip: Before you tear up your design, try ironing it: sometimes even pretty bumpy designs look a lot better after a bit of ironing.

The bobbin thread is coming through the top of the fabric
This is a really common and very annoying issue, and may have a few root causes. A very common mistake when starting to use the machine is putting in the bobbin thread the wrong way round: if you have anything more than 1mm thread showing on top I would suggest addressing that first.
-
adjust the tension:
If the pull-through effect is quite slight, you might just need to correct the tension for the fabric you are using. Try lowering the tension if you have bobbin thread showing. This can be done without needing to remove anything from the machine. Press the needle button to move it out of the way of the fabric, then
-
re-thread the bobbin
Thread pull-through is very often associated with an incorrectly threaded or otherwise unhappy bobbin. You can correct this without restarting the design. Raise up the needle and presser foot, and gently remove the hoop. Open up the bobbin case, and remove the bobbin. You will want to check 3 things:
- is the bobbin the correct kind of bobbin? -> please only use the pre-wound bobbins that are provided. They should either be in the clear plastic box next to the machine or component draws.
- is there thread/dirt/fluff in the bobbin case? -> if there are small amounts of thread or dust, gently clean around the bobbin area. If there is a large amount, or anything is caught, please get a member of staff and we can help. Don't unscrew anything!
- IMPORTANT: is the bobbin the correct way round? -> when you replace the bobbin in the case, ensure that it matches the direction in the picture below. This is the root of almost all beginner problems, and gladly easily resolved.
-
re-thread the top thread
This is less usually an issue, but worth checking if you've tried the other steps already.
-
test out a different design
If there are still issues, use a design you know works to verify it's a machine issue, and not an issue with the specific file you are using.
-
turn the machine off and on again
If none of the above approaches work, try restarting the machine. Before you do this, note down the position and stitch number in your design (if you want to continue to stitch your design) as restarting will start sewing from scratch. If this approach is effective, that's great, but let us know as it might indicate that the machine needs a service. (nb: I only added this step because I am used to using less reliable machines, it shouldn't be needed here)
The machine says my design will take over an hour to stitch
In my experience, the machine is rarely lying here, and what you probably have is a large, complex design with a lot of filled areas, that will genuinely take that long. This kind of design will also use a lot of thread. If this is your first or second time using the machine, or you don't have 2 hours, I'd advise trying out a different design for now.
The design is blank in the machine's selection menu
This is a bug with patterns made using PEmbroider, and only applies to the first menu -> if you click into it, the design should show up. You can use the machine to save a copy of the file, which will be recognisable: I would recommend either doing this or giving your files distinctive names to prevent confusion.
The top thread keeps breaking
Firstly, check that you are using the correct thread (you cannot use this machine with regular sewing thread). All of the CCI embroidery threads are Brother brand, which will appear on the top of the spool.
If you have brought your own embroidery thread, that does not necessarily mean that it will work well on this machine. Check first that the thread is suitable for machine embroidery. Cheap embroidery threads (even if they are the correct type) can sometimes be poor quality and break easily on the machine. To test this, if you can fairly easily break the thread with your hands, it's probably too weak to avoid this issue. If you do want to buy your own thread, I would personally recommend Madeira thread (it's a bit more economical than Brother, and they have a great range).
If you are using the CCI Brother thread, then check that the top thread is threaded correctly, either by referring to the manual, or asking one of the technical staff. Check in particular that thread is unwinding in the correct direction, and that the 'notch' on the spool points away from the unwinding direction (or it can get caught).
I broke a needle
Alas. First of all, make sure you remove all the loose bits of needle and put them in the sharps bin. It's also worth checking at this point that the top thread isn't caught on anything, and that the bobbin thread isn't caught/bunched. If you're unsure about this, try to gently remove the hoop and loosen any caught threads.
Replacing the needle on this machine is quite a tricky process. It is no trouble as we have loads of replacements but please talk to either Agnes or Rosie to put a new one in!