Basic Skills and Techniques
This page gives an overview and step-by-step instructions for some basic skills and techniques from the knitting machine induction. It is not a detailed tutorial, but instead should serve as an introduction to the capabilities of our machine, an idea of different avenues to explore, and an overview of the steps involved in creating knitted textiles in the CCI. Machine knitting is detailed and complex, and requires time to learn and develop technique.
If you have not completed the induction, do not use this page to try to use the machine, you must have been inducted first.
These methods are all also described in the manual which you can find in the eTextiles Lab.
Contents
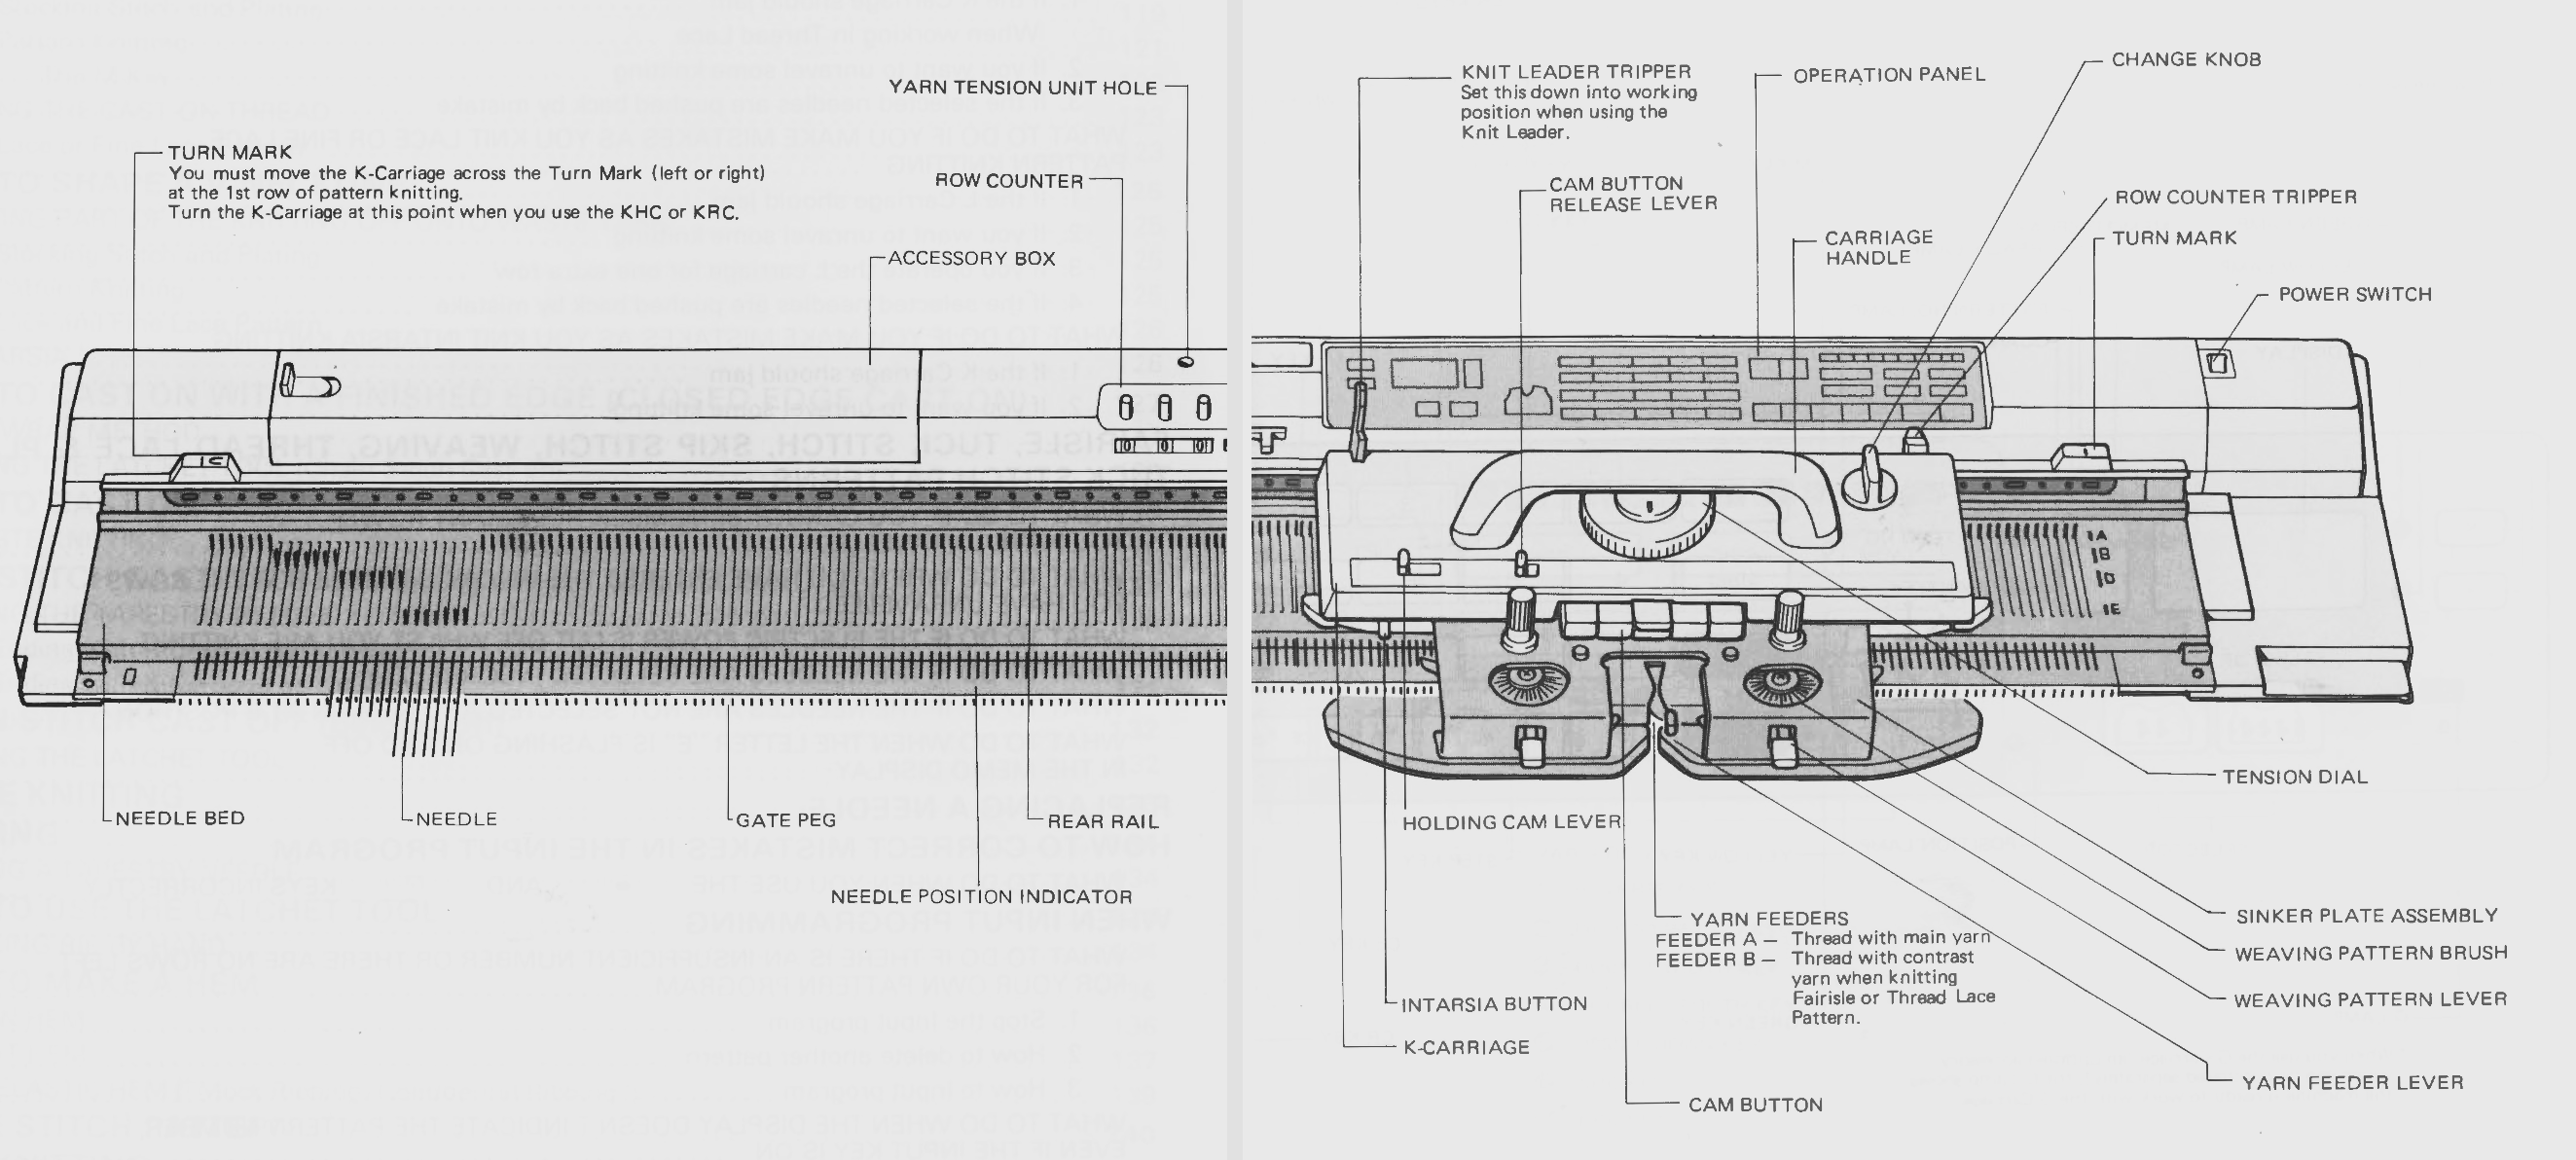
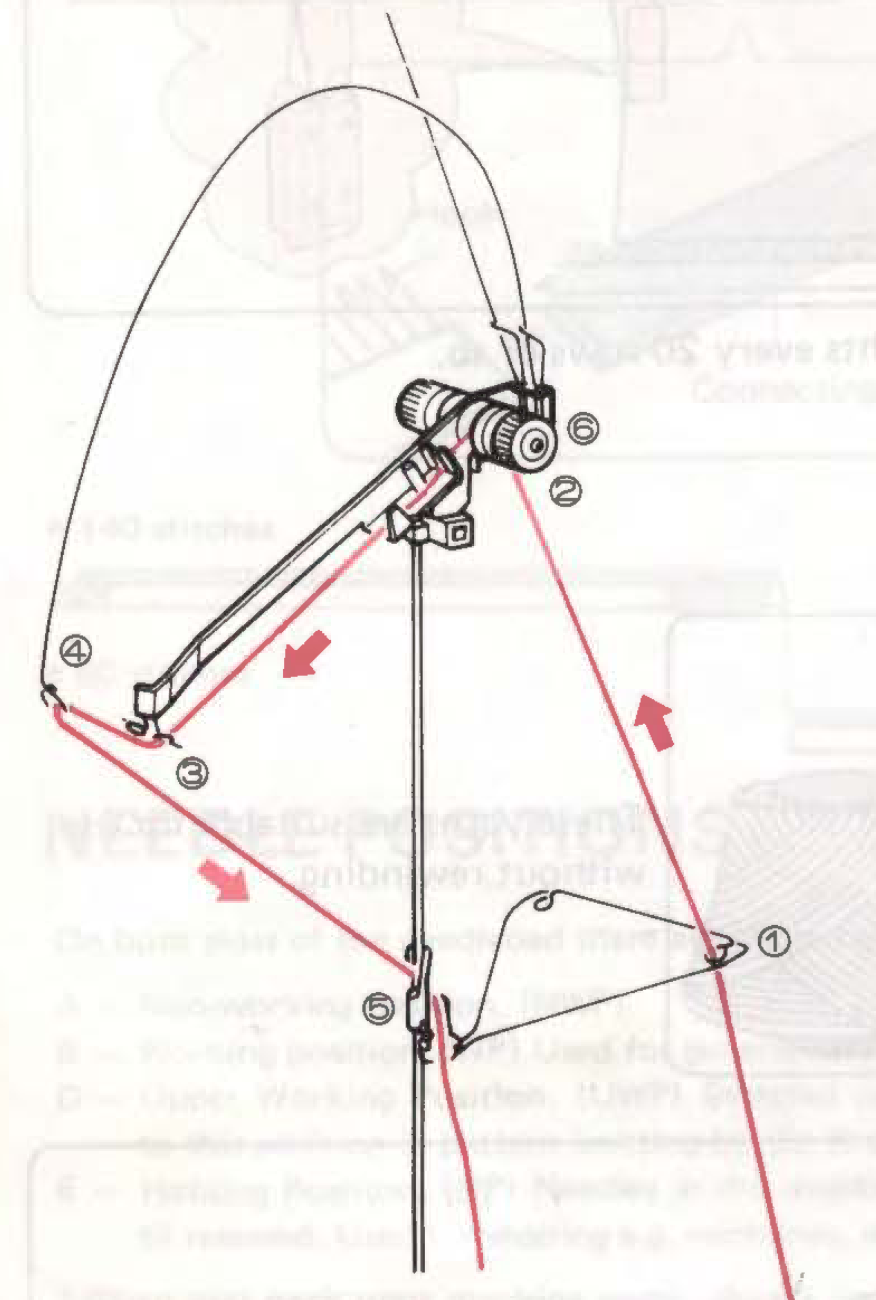
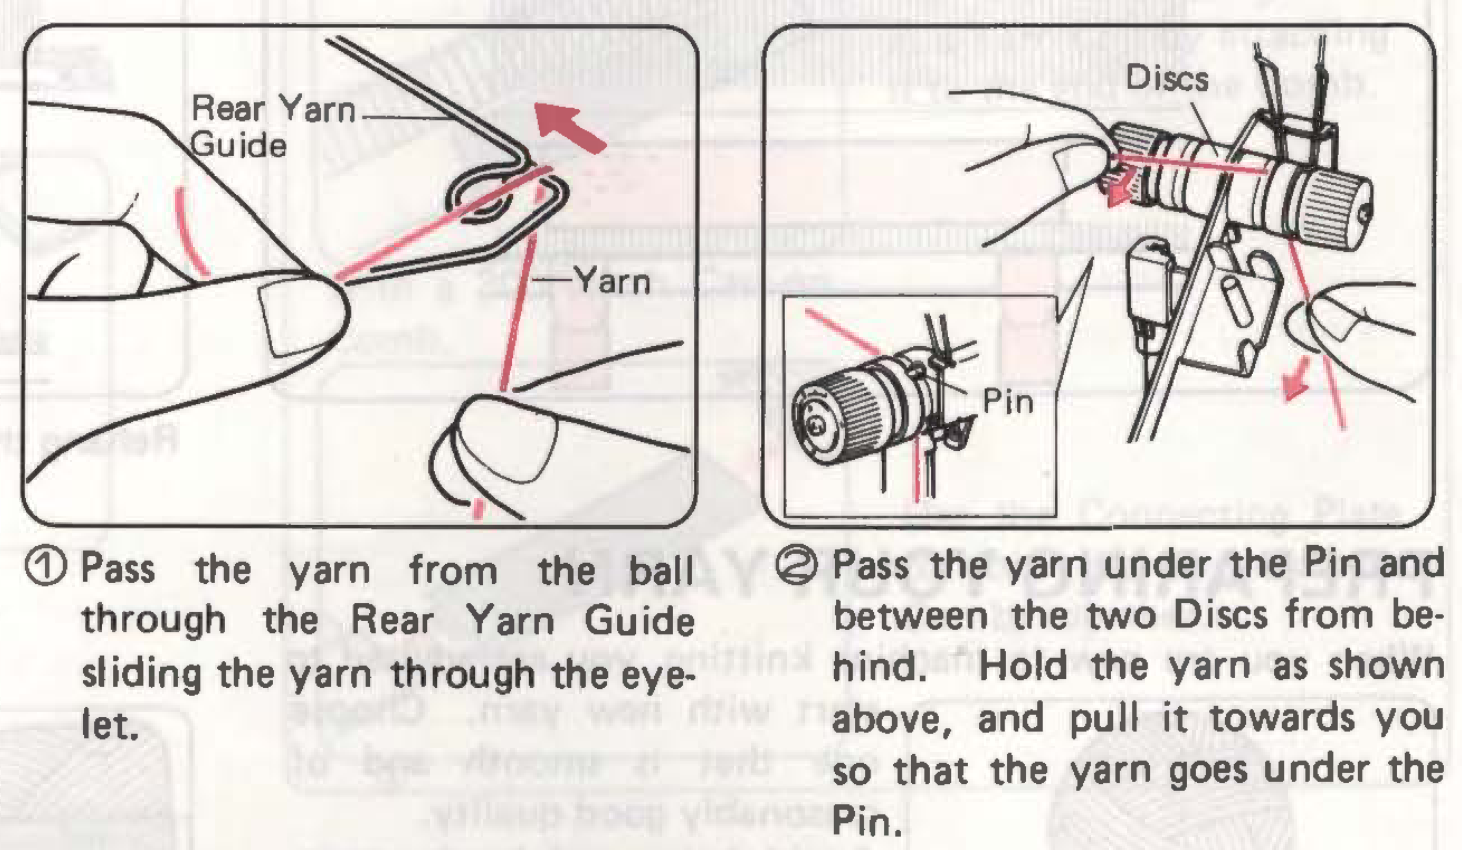
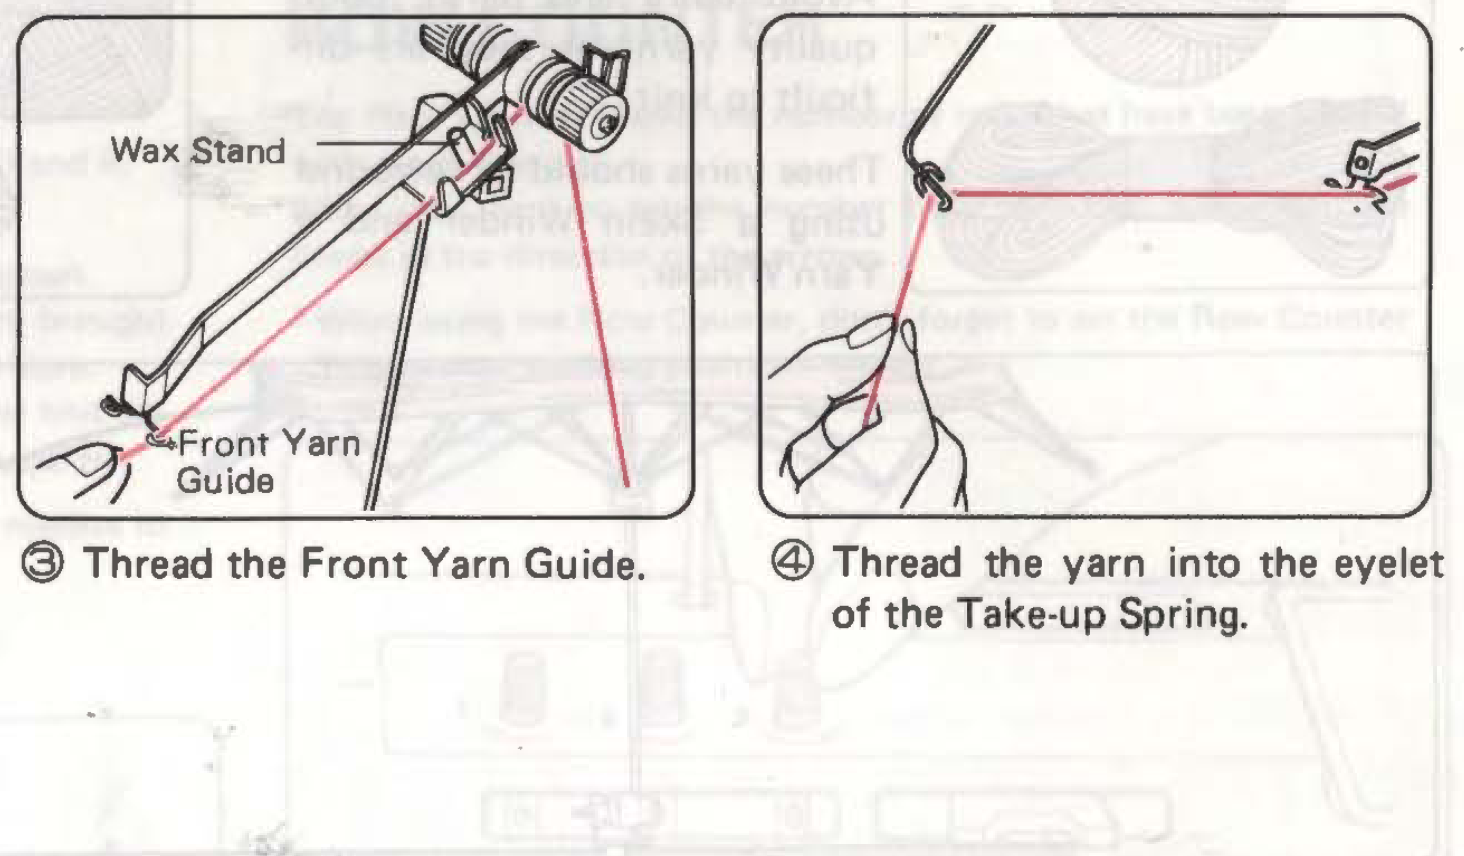
Threading the machine
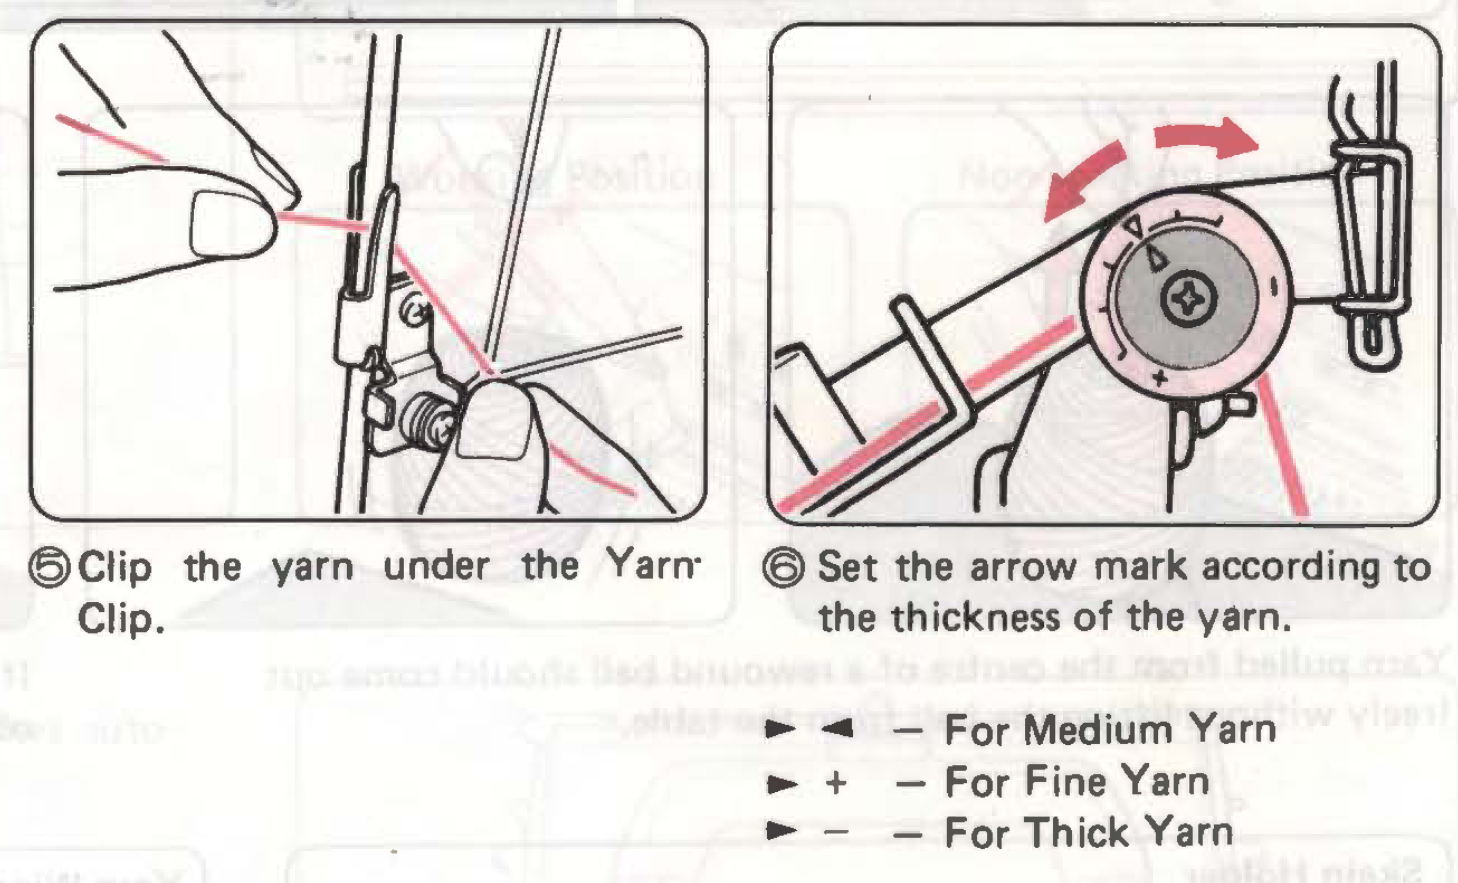
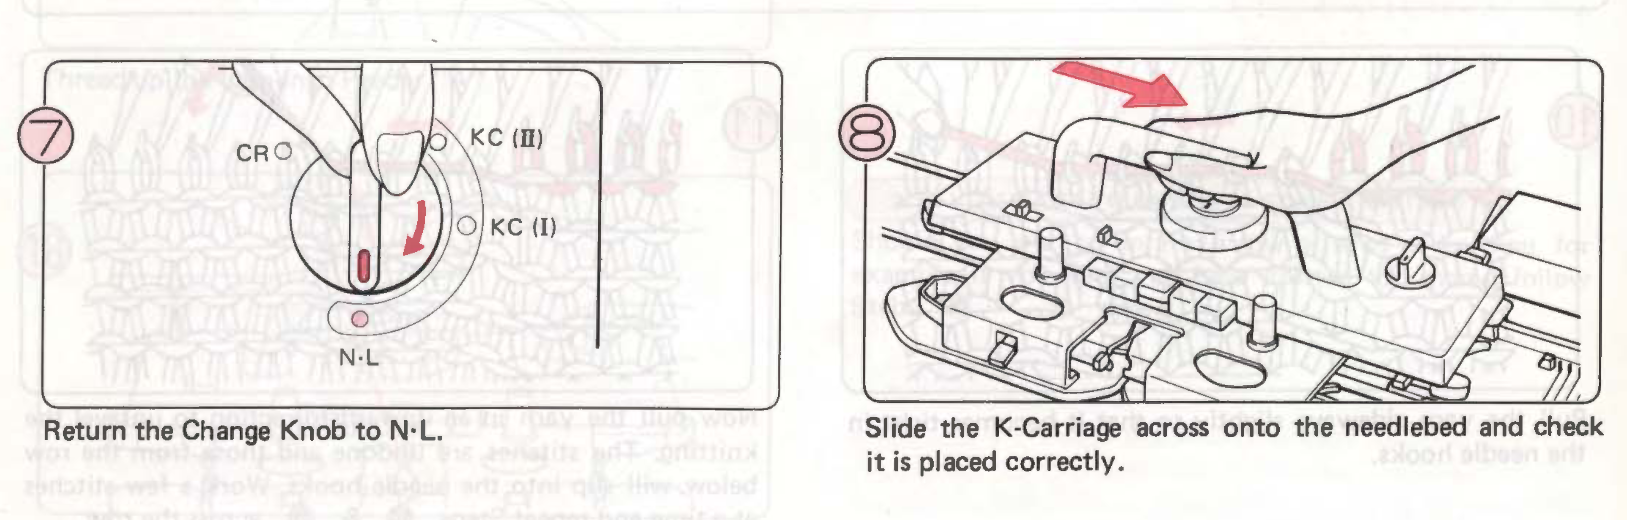
To thread the machine, follow the instructions and diagram below.

Casting on
Before beginning a piece we must first 'cast on' which creates the first row using a special stitch that stops the piece from unravelling.
There are many cast on methods but the main two (and the ones taught in the induction) are:
- Weaving cast on: this is the easiest way to cast on but leaves a messy edge and is recommended only for prototyping and sampling, not for a final project.
- E-wrap cast on: this is slightly more fiddly but leaves a nicer and neater edge.
Whilst knitting the first few rows, there won't be enough material to hang the weights. This means that you must be especially careful that each stitch has fully looped through, and doesn’t slip off. Some way to make sure of this are:
- The brushes MUST be down during casting on. These push the yarn down into the needles, reducing the chance of them slipping off.
- After each row, use you hands to pull down slightly on the knitted rows under each stitch, making sure that there is only one loop of yarn on each needle. If there is two, you can manually move the needle to knit the stitch that has not been fully completed.
- If you only have a few rows knit and encounter a large problem, such as a big loop of yarn has formed or multiple stitches have not threaded properly, you can try to fix it but don’t be scared to just restart and try again. It is not uncommon to have to cast on multiple times before you get it right as this process, and the first few rows, can be the most delicate part of the whole process. If you are repeatedly having problems with your cast on, check in the debugging section of this page for some tips.
It is generally easier to start the cast on with the the carriage on the side of your dominant hand. If you find this difficult, try the other way around and see what feels best to you.
Weaving cast on
This is the easiest method on the Silver Reed, though has the downside of leaving a slightly scrappy-looking edge. It's great for quick sampling, though. For a video explaination, this is a good reference.
- Pull the needles you wish to knit with into D position (all the way forward).
- With no yarn in the carriage and the russel levers set to II, run the carriage across the needles to move them into B position. End with the carriage on the side of your dominant hand.
- Pull every other needle forward into D position.
- With the machine and carriage threaded, hold the end of the yarn in your non-dominant hand and lay it across the top of the needles.
- Knit a row. Make sure that as you run the carriage across the needles you are not pulling on the end of the yarn but just holding it and allowing the carriage to pull it in as it knits.
- Knit a second row to complete the cast on.

E-wrap cast on
This is a cast on technique common to all knitting machines, and is the "official" method that will give you a neat edge. There is a detailed guide here as well as the instructions below.
- Pull the needles you wish to knit with into D position.
- With the machine threaded (but the yarn not through the carriage) and the carriage on the side of your dominant hand, create a slip knot in the yarn and loop it around the first needle on the opposite side to the carriage. Wrap the end of the yarn around the nearest clamp post.
- Starting with the needle furthest from the carriage, hold the end of the yarn in your non-dominant hand and use your dominant hand to wrap the yarn under and around the needle. If you are right-handed, this will be the same motion as drawing a lowercase e (hence the name e-wrap), see the picture below.
- Use your non-dominant hand to push the stitch up to the sinker posts.
- When wrapping the next stitch, use your non-dominant hand to hold the previous stitch to make sure that the wrap is not too tight.
- Continue this, wrapping each needle individually until you reach the last one.
- Run the yarn under the carriage and through the gate.
- Knit a row.

Note: You want to make sure that the stitches are not too tight which can happen as there is tension on the yarn from the threading mechanism. If you are finding this difficult, pull a long length of yarn through then use the white yarn clip to hold it whilst you cast on. This will eliminate the tension and stop the yarn from tugging.
Casting off
After a piece has been completed, we need to cast off to stop it from unravelling.
- Remove the yarn from the carriage and measure a length approximately 4x the width of your project then cut.
- On the side of the carriage, use the transfer tool to pick up the outermost stitch and move it one needle inwards (either moving behind or in front of the sinker posts).

- Push the needle now holding two stitches into D position, making sure both loops are behind the latch.
- Loop the working yarn over the needle, ensuring that it is laying in the needle hook (one way to help with this is to loop it over then hold the end out parallel with the needle).
- Using your hand, manually push the needle back into B position, looping the working yarn through the two stitches.

- Repeat steps 2-5 for every needle until you have only one stitch left.
- Pull on the last loop so that the end of the yarn in brought through, leaving no more loops and a secure piece.


Increases and Decreases
In order to knit a piece that isn't the same width the whole way, we have to be able to increase or decrease the number of needles we are working with. There are two ways to do each of these which are used for increasing different numbers of stitches and leave slightly different edges.
Fully Fashioned
This method is used for increasing/decreasing 1 needle and can be performed at either side of the piece. This will leave a smooth edge (as seen below) as the outer stitch does not change.

Fully fashioned increase
- Use the transfer tool to pick up the outer two stitches on the side that you want to increase.
- Move these stitches one needle outwards, leaving the third needle from the edge empty.
- Use the transfer tool to pick up the horizontal 'bar'/loop from one of the stitches adjacent to the empty needle and hook that on to fill the gap (This step stops small holes from forming due to the empty needle, however it can be quite fiddly so if you are just prototyping/sampling and want to be fast, you can skip it).

- Continue knitting.


Fully fashioned decrease
- Use the transfer tool to pick up the outer two stitches on the side that you want to dencrease.
- Move these stitches one needle inwards, leaving the outermost needle empty.

- Push the empty needle back to A position.
- Continue knitting.

E-wrap increase/cast off decrease
These methods are used for increasing/decreasing by a larger number of stitches and can only be performed on the side closest to the carriage. These will both leave a right-angle like shape (as seen below) as the outer stitch is changing.

E-wrap increase
This is essentially the same as the e-wrap cast on so make sure you are comfortable with that before trying this.
- On the side closest to the carriage, pull the number of needles you want to increase into D position.
- Using the same method as the e-wrap cast on, wrap the yarn under then over each needle in turn.

- Make sure the working yarn is back through the carriage, then continue knitting.

Note: when using this method, treat the new needles as you would a proper cast on, checking each stitch and pulling them down after every row.
Cast off decrease
This is essentially the same as casting off so make sure you are comfortable with that before trying this.
- On the side of the carriage, pick up the outermost stitch and move it one needle inwards.
- Push the needle now holding two stitches into D position, making sure both loops are behind the latch.

- Loop the working yarn over the needle, ensuring that it is laying in the needle hook (one way to help with this is to loop it over then hold the end out parallel with the needle).
- Manually push the needle back into B position, looping the working yarn through the two stitches.

- Continue this for each needle that you want to decrease, pushing each empty needle back into A position.


Changing colour
- Take the current yarn out of the carriage and break it with enough yarn to then wrap the end around the post.
- Take the other end and hook it into the yarn clips to keep it out the way. Make sure to hook it right at the end so that the tail doesn't get tangled in the new colour as you continue to knit.
- Pick up your new colour, put it into the carriage, and wrap it around the post
- Keep knitting!
After You have finished your piece, if you want it to be neat, you will have tie the ends together then weave them in. This page shows a couple of ways you can do that.
Fixing Mistakes
Manually reknitting stitches
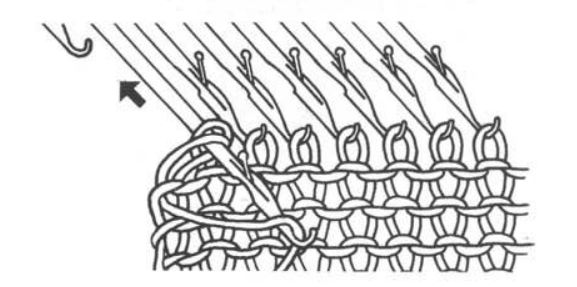
Sometimes, a stitch will not knit properly, leaving it withour a horizontal bar. See below.

This will mean that there are two loops of yarn on that needle, rather than one. If you push the needle out slightly, you will be able to see them both. One of these is the stitch from the previous row, which will be tighter and further back on the needle, and the other is the new stitch, which will be looser and futher forwards.
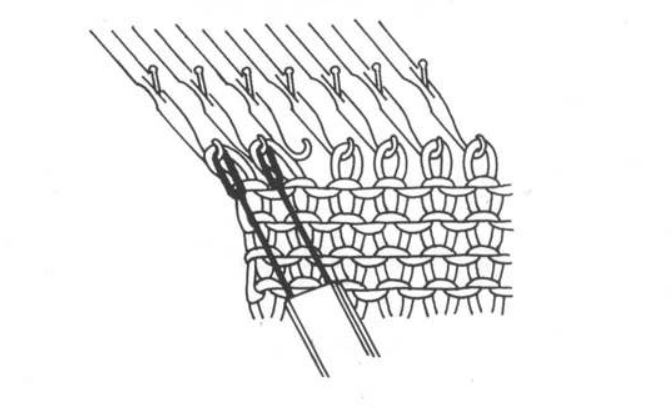
To reknit this stitch:
- Using your hand, slowly push the needle out until the previous stitch goes over the end of the gate. This should leave the new stitch inside of the hook.
- Push the needle back in, making sure that the gate grabs the new stitch. This should pull the new stitch through the previous one.
- Pull down on the knit just below this stitch to help it fully knit.
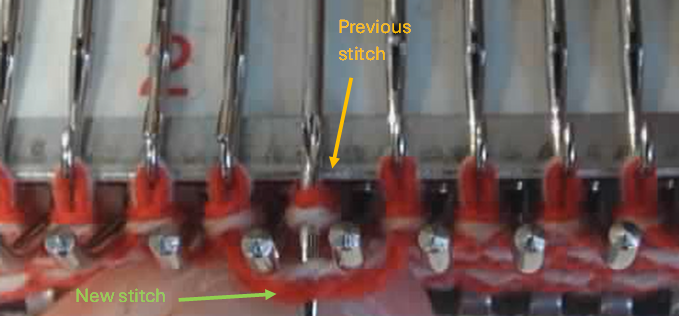
If you accidentally push the needle out two far and both loops end up behind the gate, use the transfer tool to lift the new loop over the gate whilst moving the needle back. See video below.
Unpicking Stitches
Sometimes, you get in a big tangle or a load of the stitches in one row don't knit properly. When this happens, it is a good idea to unpick the row and try again.
- Open all the needle gates
- Holding the working yarn, for each stitch pull the yarn vertically up then away from you. This will flick the stitch from the previous row back onto the needle
If you only unpick one row, you will end up with the carriage on the wrong side. Use the release lever to raise the carriage then move it across the needles without knitting.
General Advice and Debugging
Like with coding, sometimes there is a problem with your knitting and you can't immediately see why. Here is a small list of things to check when you are having issues.
1. Tension
Tension is very important when knitting if we want our swatch to be even and neat. It is mainly controlled by the auto tension mechanism.
Make sure that the yarn has an easy and clean path from the cone to the needles, that there is nothing getting caught and that the cones are placed directly under the yarn feeder.
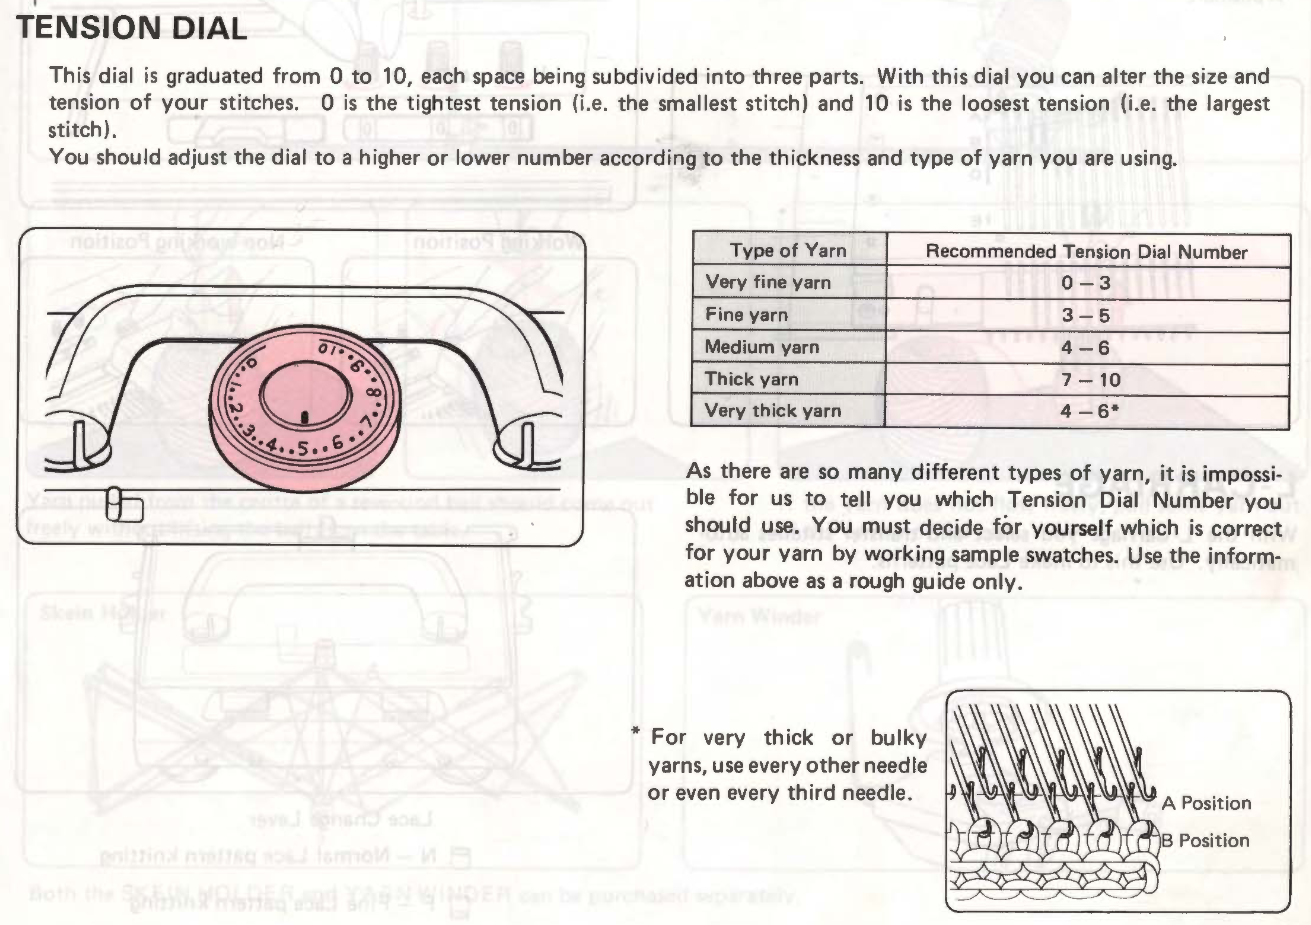
The size of the stitch also has an effect on the tension. If knitting with a smaller stitch size, the tension will be higher and therefore more likely to cause problems, especially when casting on. Use the below guide to choose your stitch size/tension.
2. Weights
The weights should ideally be within the 5-20cm range below the needle bed and placed right at the edge of the piece. To add addition weight, you can pull down gently on the weights as you slide the carriage across.
3. Carriage settings
Are you using the right stitch? Are the russel levers in the correct position? Is there yarn in the carriage?
4. Casting on
For casting on specifically, here are a few things to check:
- Make sure that the brushes are DOWN.
- If you are doing an e-wrap cast on, make sure that your loops are not too tight.
- Check that the tension on the carriage is not too high or low. For a cast on, it is recommended for the tension dial to be set at around 6.
- Check that the needles aren’t bent. This can cause problems generally but especially with the cast on. If this is the case, inform a technician and, if possible, move down the bed and work with a different section of needles.
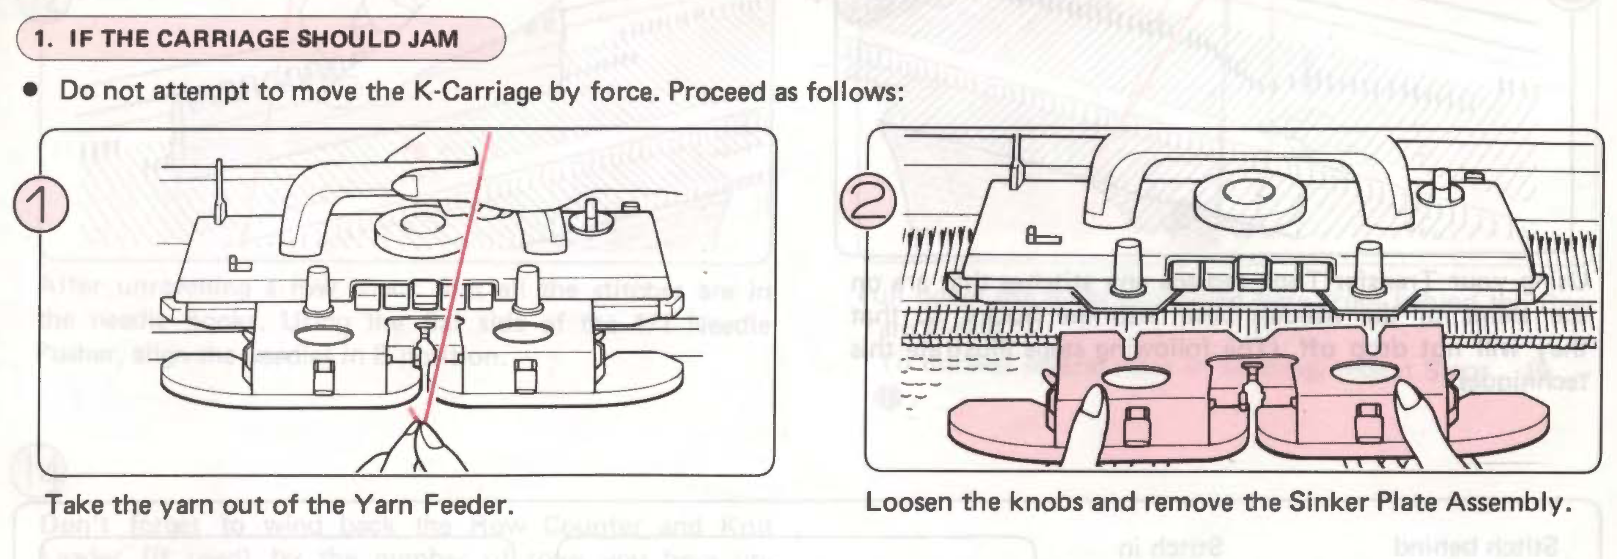
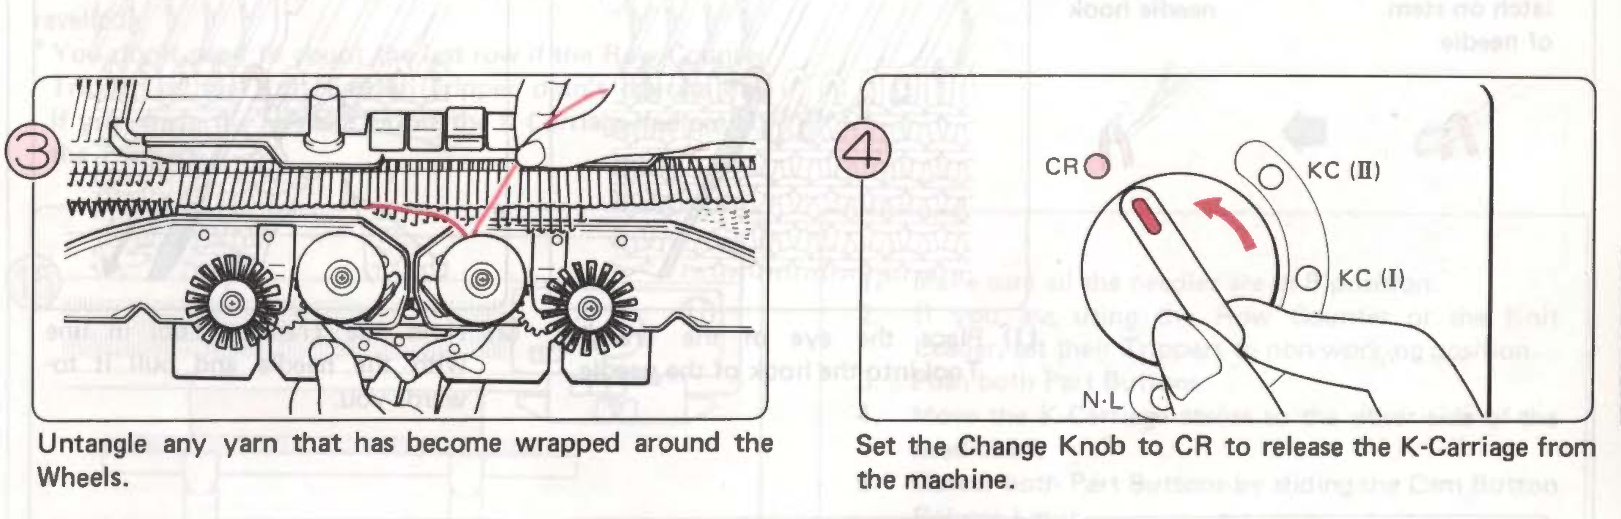
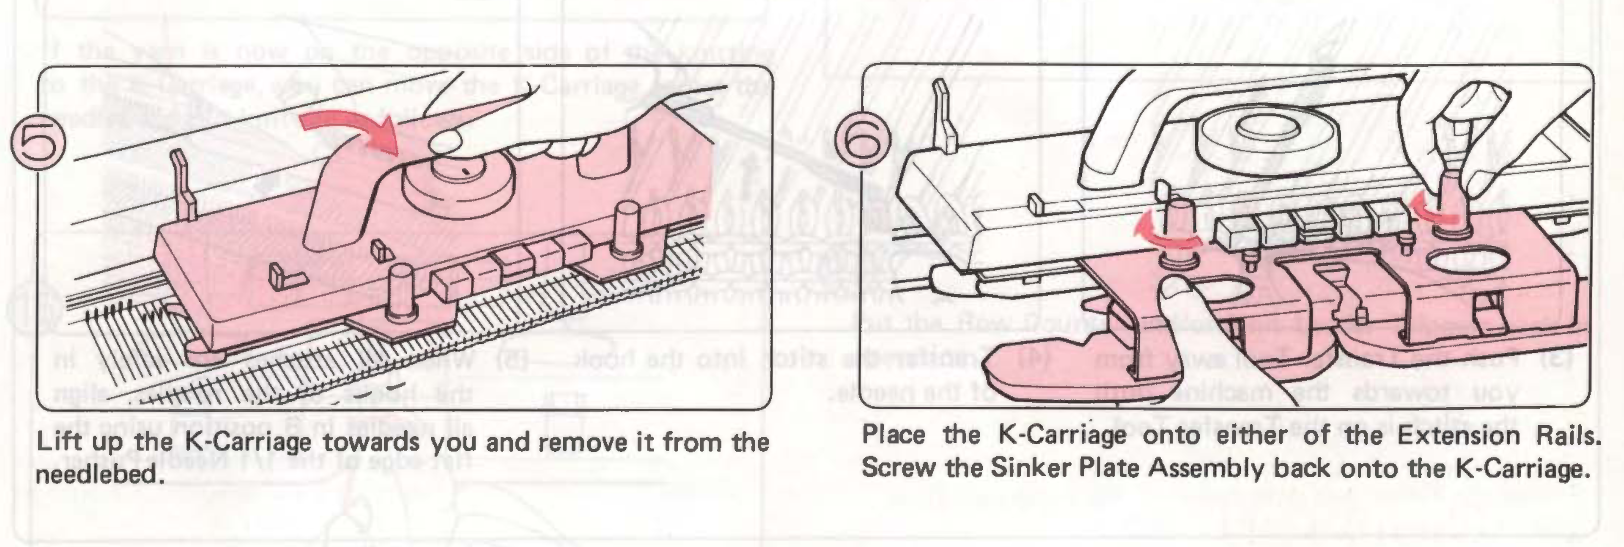
5. Stuck Carriage
The carriage sometimes requires a fair amount of force but it is gets properly stuck, don't try to force it! This can bend or damage the needles. If this happens, follow the below steps.
6. How to search for knitting tutorials
When looking for guides online, you will notice many variations in machine make and type, including machines with plastic beds, doubled beds, different needle gagues and tools, and a variety of carriages. While there are details particular to the Brother, a lot of technique can also be learned from general 'knitting machine' tutorials on any machine as the core operation of the needles and carriage is very similar. If you're unsure, just ask (more likely than not, we can do it on our machine).