
Embroidery Inductions, Workshops, and Exercises
For the embroidery machine there are two inductions and three workshops available to attend.
| Main Induction | Workshops | Advanced Induction |
|---|---|---|
| Embroidery Machine Induction | Generative Embroidery with p5.Embroider | Cylinder and Cap Hoop Induction |
| Better Embroidery with Ink/Stitch | ||
| Embroidered Circuits |
Inductions are safety-focused and are required to use the machine, and specific parts such as the cylinder hoop. They involve a small number of students. workshops are intended to extend and practice skills with the tools that we have and might have more students in attendance.
These are bookable on ORB via these links:
If you have to cancel your booking for any reason, please follow the cancellation policy. If it is:
- more than 24 hours before, cancel your ORB booking
- less than 24 hours before, message Agnes on slack
There are limited slots for these bookings, and quite a lot of students! Please be considerate by cancelling your bookings as far in advance as possible if you cannot attend. Multiple missed booking without messaging beforehand could result in being banned from the etextiles lab!
Qualifying on the Embroidery Machine
Attending the embroidery machine induction does not automatically qualify you to use the machine unsupervised. In order to qualify to you must have:
- Attended the embroidery machine induction
- Completed Exercises A and B and had them signed off by Rosie or Agnes
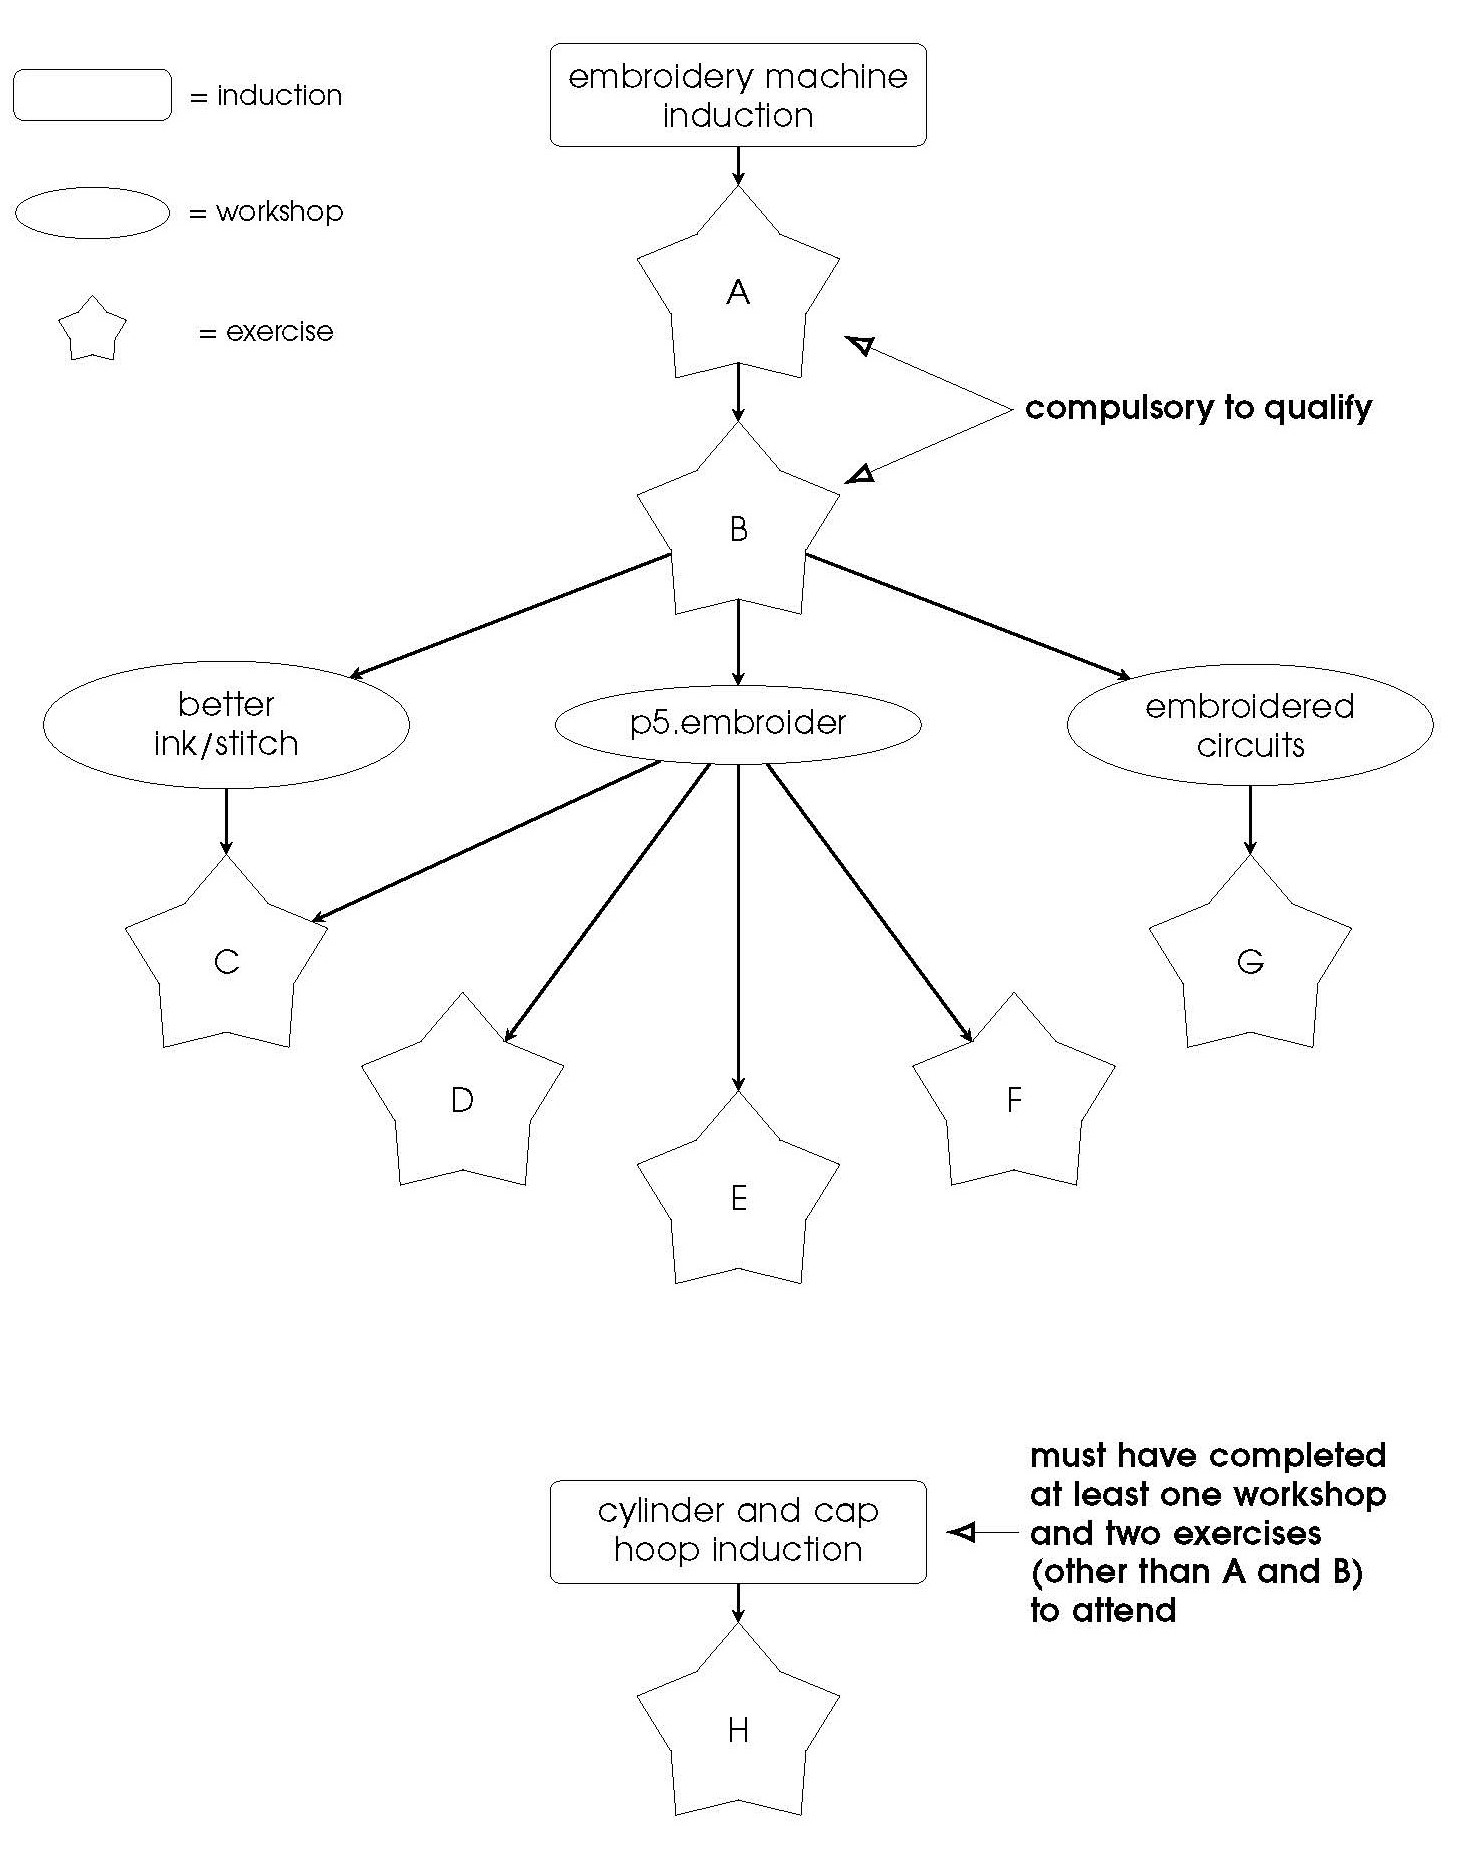
Once you have qualified, you are allowed to use the machine unsupervised (by booking on ORB) and you can now attend some embroidery machine workshops. Please take note of the flowchart below to see which workshops you are able to attend.
Booking the Machine
You must book in order to use the embroidery machine. There are two ways to do this, depending on whether have qualified or not:
- if you if you have not qualified, you must message either Rosie or Agnes (depending on the day) on slack
- if you have qualified, you may book via ORB
Exercises
Below, you will find a list of embroidery machine exercises. Each exercise is designed to follow a particular induction or workshop to help you practice what you have learnt and develop your skills.
They are completely optional with two exceptions:
- Exercises A and B must be completed in order to qualify on the embroidery machine
- You must have completed at least two of the other exercises (alongside attending at least one workshop) to attend the cylinder and cap hoop induction
Inductions, Workshops, and Exercises
Embroidery Machine Induction
This induction is required to use the embroidery machine and covers the basic skills and techniques needed to use it.
| Duration | 1.5 hours |
| Prerequisites | None |
| Content | Threading the machine |
| Hooping fabric and backing fabric | |
| Loading the hoop into the machine | |
| Assigning colours and threads | |
| Starting and stopping a file |
Generative Embroidery with p5.Embroider
This workshop is focussed on developing skills with a flexible open-source tool that uses code to create embroidery files. This is great for data visualisation and generative art projects, and takes a little bit of practice and knowledge to get good results!
| Duration | 1.5 hours |
| Prerequisites | Embroidery Machine Induction |
| Content | Intro to programming with p5.embroider |
| Basic shapes, lines and curves | |
| Using randomness | |
| Data visualisation |
Better Embroidery with Ink/Stitch
Ink/Stitch can be a powerful tool for embroidery, but if it’s used wrong it can produce some poor quality files that can break needles and hurt the machine. In this workshop we learn more about good embroidery technique and improve Ink/Stitch skills
| Duration | 1.5 hours |
| Prerequisites | Embroidery Machine Induction |
| Content | Adjusting stitch length and fill properties |
| Using vector files | |
| Creating a file from an image | |
| Checking run time and density |
Embroidered Circuits
Embroidery with conductive thread can create flexible, conformable and wearable circuits, including structures like fabric speakers, magnets and sensors. In this workshop we will focus on circuit design techniques and how they apply to embroidery, and demonstrate some common techniques and components for safely connecting and powering your work.
| Duration | 2 hours |
| Prerequisites | Embroidery Machine Induction |
| Content | Designing a circuit that works |
| Common interconnect components | |
| Making durable e-textiles | |
| Safety and troubleshooting |
Cylinder and Cap Hoop Induction
The cylinder hoop is an attachment for the embroidery machine that allows you to embroider ’cylindrical’ items such as sleeves, trousers and socks. The cap hoop is n attachment that allows you to embroider caps. These have a separate induction as they require more experience with the machine to use.
| Duration | 1.5 hours |
| Prerequisites | Embroidery Machine Induction, at least 1 other workshop, and at least 2 exercises |
| Content | Safe mounting and removal of the cylinder hoop |
| Safe mounting and removal of the cap hoop | |
| Correct use of cap and cylinder hoops | |
Exercises
A. Induction design – colour changing
Create two versions of the example file used in the induction, threading three new colours for each version. You should have threaded the machine six times in total by the end of the exercise.
To get signed off and move on to exercise B, you must show agnes or rosie:
- a picture of the machine before you change the thread colours
- a picture of the machine after you change the thread colours
- two embroidery samples (these can be on the same fabric) each using three different colours
B. Different softwares
Choose any two of:
- p5.embroider or pembroider
- ink/stitch
- pe design
For each software, make a test swatch that shows at least:
- 3 different fill types
- 3 different fill densities
- 2 different line types
C. Collage
Create a collage using files made with any of the embroidery softwares.
This is an artistic exercise: try layering the designs to produce new and interesting textures, or overlaying different fills in different thread types and seeing what visual effects you can get. The collage can be of files that you’ve made, or ones that you find on the internet or on the machine.
D. Generative embroidery
Using either p5.embroider or PEmbbroider, write code that uses randomness to generate an embroidery file. This can control any aspect of the file, but should produce a different design every time it’s run.
E. Data visualisation
Using any of the embroidery software (but probably p5.embroider), make an embroidery file that visualises a dataset. For ideas on datasets to use, take a look at the ’useful small open datasets’ page on the cci wiki.
F. Arduino
Make an embroidery tool using p5.embroider or pembroider that’s controlled with an arduino and generate a file using it. For a guide on how to do this, go to the wiki.
G. Embroidered circuit
Please attend the circuits workshop or talk to agnes and rosie before using the conductive thread and components!
Make a circuit that uses embroidery to connect different components, or as a component itself. This can be quite open-ended! The circuit should do something, either playing the role of an input (like a button or sensor), an output (like a light), or something self-contained (e.g. A circuit that you complete to make a Sound).
If you want to do something outside of what we’ve shown you, check in with agnes or rosie first to make sure of your design.
H. Clothing
Use the cap or cylinder hoop to make an item of clothing! This could be a cap, a sleeve, a trouser leg, a sock, or any other kind of tubular clothing item you can think of. When using stretchy fabrics like socks and jersey, make sure to use adequate backing and be gentle with your fills. :)