Workshop: File Systems and the Command Line
In this workshop we will get to know our computer better, learn about the idea of the filesystem, and explore it using a tool called the Command Line. We will learn some useful commands, and also learn more about how computers work, which will prepare us for writing code. If you need a reference at any point in the workshop, there is a list of commands included at the end of the page.
To get set up for this workshop, you need to have a suitable Command Line that you can launch installed on your computer. Please follow the instructions in this guide to make sure you have this, especially if you use Windows.
The exercises in this workshop are heavily inspired by Melanie Hoff's Folder Poetry class, which Agnes attended many years ago, and is a great introduction to the computer.
Intro: What are Computers?
Computers are Everywhere!
We have access to a lot of different devices that run code and software. These include systems like a laptop or a desktop computer, but also phones, watches, cars, tablets and e-Readers. Some of these devices, like desktop computers, give us some control over how they operate, and allow us to look inside them. Others, like phones, hide a lot of their inner systems away and make it hard for the average user to look inside.
Your Computer is a Load of Files
Lots of things have changed about computers in the past few decades -- they're a lot faster, there is a lot of emphasis on graphics, and it's much easier to find things than it used to be -- but the way that computers work has not fundamentally changed. All computers use something called an 'operating system' to work: you might use an operating system like Mac or Windows, or maybe one of a family of systems called Linux.
These different operating systems will work on slightly different principles, but at the core there are lots of similarities.
- Your computer handles things on the level of files. Some are files that are made by you, like Word Documents or Images
- Some kinds of files on your computer require special software to open. Microsoft Word and LibreOffice are both examples of software that can open 'Word documents', which are identified by the ending '.docx'
- These pieces of software are also made from files. These are files that you can't normally see, and are wrapped in something called a 'binary' or an 'executable'
- The really big, truly secret thing: all computer software is made by people, and it's not too hard to learn how to write software yourself. That's why you are at the CCI!
What is a file? It's a way that your computer stores a load of information, grouped together in one place, and represented by a specific format. We will explore formats more next week.
Demo: Secret Files
We are going to look inside an application and see all the files that make it up. You are welcome to follow along -- but it's also fine to watch this part! In this demo, I will also show you how to make your file browser a better tool for seeing inside your computer. When I do these steps, have a go at doing them with me.
Activity: Command Line House Tour
In this part of the workshop, we will make an explorable game using the command line. By the end of this activity, you should be more familiar with your file browser
We will use generic names to refer to specific things. So:
- 'file browser' means the graphical interface used to view and change files. On a Mac this is called 'Finder'. On Windows it is called 'Git Bash'
- 'command line' means, the text interface used to view and change files. On a Mac this is called 'Terminal', on Windows this is called the 'Command Line'
Intro: the filesystem
The filesystem is the name given to the system on your computer that manages and looks after files. It's the part of your computer that you navigate in order to open, read and edit different files.
Part 1: Navigating using the File Browser
Step 1: Open
Open the file browser. on your computer. On a Mac, this is called Finder. On Windows, this is called 'File Explorer'
Step 2: Desktop
Click to navigate to the 'Desktop' in the file browser. The desktop is just another folder, but on both Mac and Windows, it behaves like a special folder where you can see the files on your main computer screen.
Step 3: Class Folder
We are going to make a folder to store all the files made in this workshop. In your Desktop, create a new folder called 'computer-friend'. Make sure you use a dash rather than a space! We'll find out later why this is important.
Part 2: Exploring the House
I've made a small game to demonstrate the activity. We're going to download and extract it, put it in our new folder, and then look inside.
Step 1: Download
Download the 'house-tour' folder by clicking on this link.
Step 2: Extract
This is a 'zipped' folder -- it is a way of compressing a bunch of files into a smaller, single object so it can be sent around. We need to extract the files
- On a Mac: double click on the zipped file. It will make a new folder next to it with the same name, with a blue folder icon. This is the folder we will use.
- On Windows: right click the zipped file, and select 'Extract All', and use the default options in the dialog
Step 3: Move
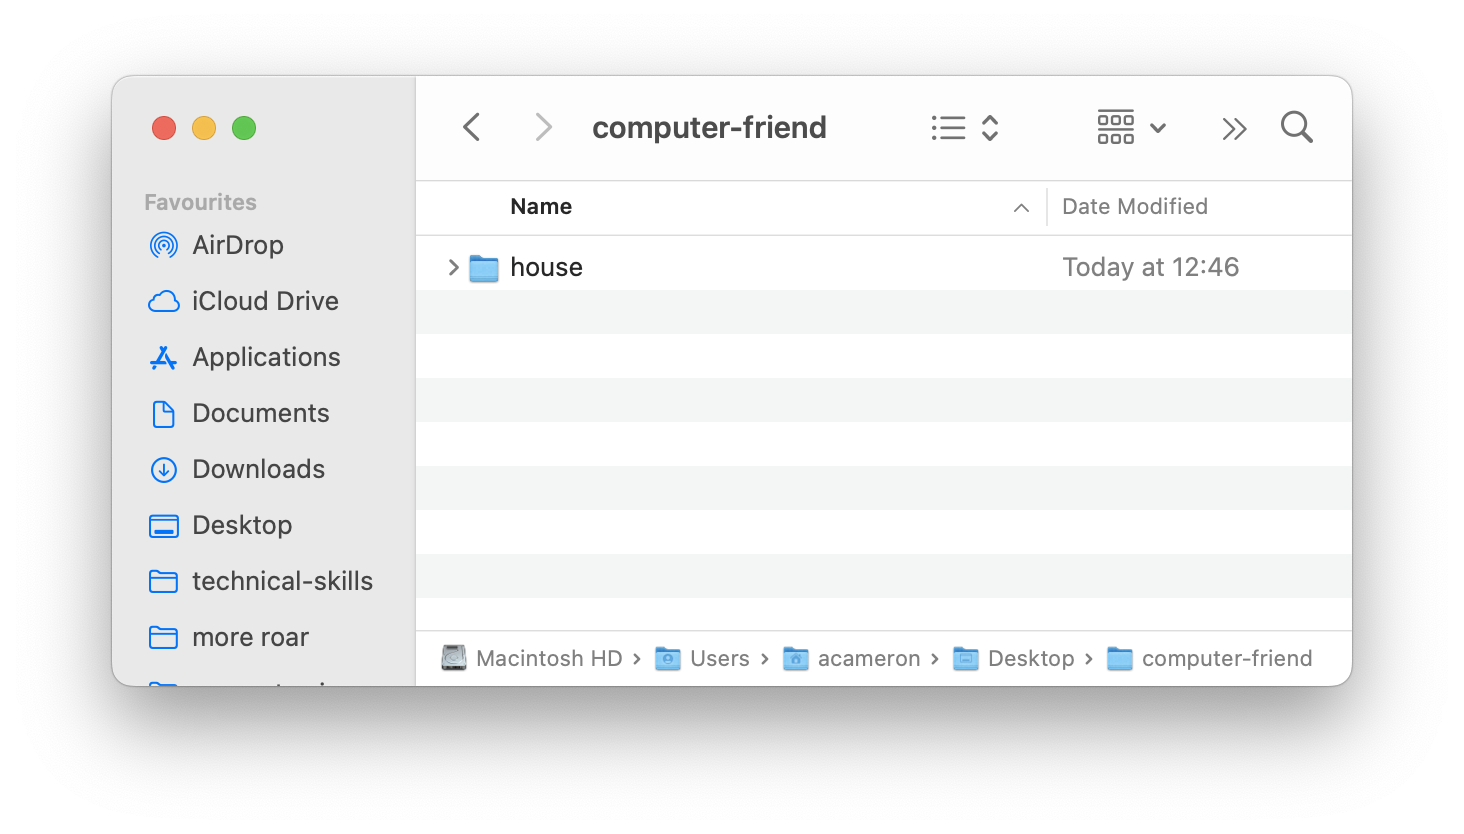
We are going to move the unzipped folder into the 'computer-friend' folder we made in part one. Open a second file browser window, then drag and drop the 'house' folder inside of the 'computer friend' folder. You should end up with a folder layout that looks like this (look at the path bar to see the structure):
Part 3: Navigating using the Command Line
Now we are familiar with our house, we are going to explore it again, but this time using the command line.
Step 1: Launch the Command Line
Open the command line on your computer. Use this guide as a reference if you're not sure how! If you use windows and you haven't done this already, make sure you follow the instructions in that guide to install and open Git Bash.
We are going to use the cd command to navigate. Type out the follwing line, and press enter. To make sure you learn it, type it manually rather than copy pasting!
Challenge: Find the secret room
There's a hidden room in the house! You can modify the ls command with ls -a to show hidden folders and files. Try to locate this secret room and solve the puzzle inside!
Part 4: Making folders and files using the Command Line
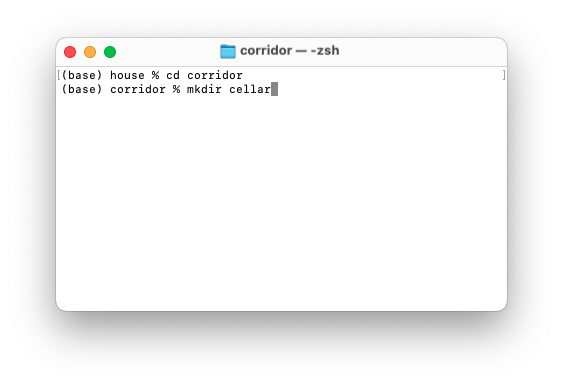
We are going to make an extension for the house! As an example, we are going to make an extra room called cellar, and then fill it with objects that people in the house have thrown away.
Step 2: Making a Folder
We've already made a folder in our file browser. To do the same thing in our command line, we're going to a command called mkdir, which stands for 'Make Directory'. To use the command, type mkdir, then a space, then the name of the folder you want to make (without a space in it). Then press enter.
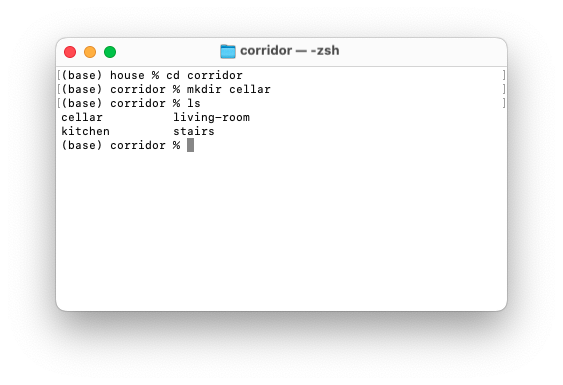
When you type in ls, you should see the new file.
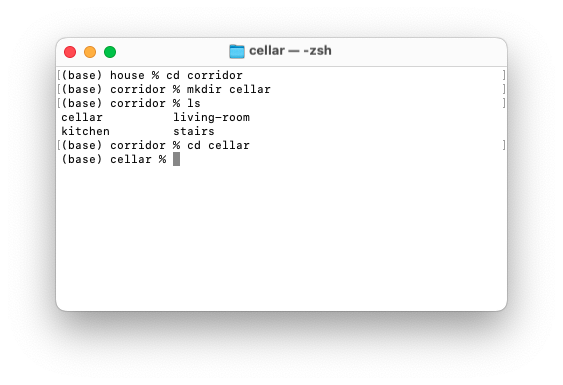
Step 3: Making a File
To make some objects in the cellar, we need to go inside it. Use the cd command to navigate.
The command we use to make a new file is touch. This is a weird name, and refers to an old way of talking about how opening a file could affect computer memory. To create a text file, we will use it like this:
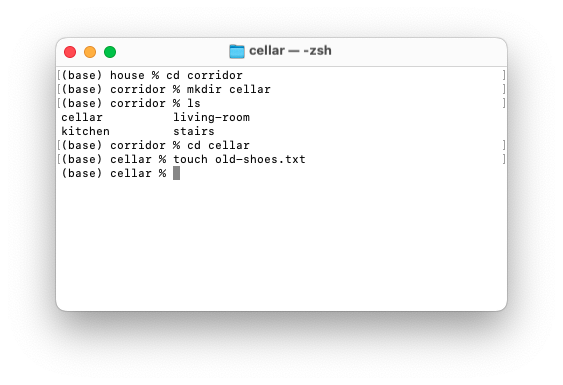
We can now open this file in a text editor.
Challenge: Add another room
Now you have a sense for how these commands work, try adding another room somewhere in the house, using the mkdir command! Try adding some objects using the touch command.
Extra tips
touch and mkdir can be used to make multiple things at once. So, if you type mkdir house garden street, it will make three folders in your current location: one called house, one called garden, one called street
Part 5: Make your Own Adventure
Step 1: space
Think of a space that you'd like to give someone a tour of. It could be real or imaginary, manmade or natural -- maybe it's your house, or a forest near where you grew up, or the top of a skyscraper
Step 2: make it a home
Navigate back to your 'computer-friend' folder in the command line, using the cd .. command. Now, use mkdir your-space-name (replace 'your-space-name' with the name of your space) to make it a folder. You can use the ls command, or the file browser, to check that it was made in the place you thought!
Step 3: add rooms and objects!
Navigate inside it using cd your-space-name (again replacing 'your-space-name' with whatever you called the folder.
Step 4: add rooms and objects!
Still using the command line, and the commands we learned above, try fleshing out your space by adding rooms, folders and objects. Consider using a piece of paper to make a map to help you plan! If you get lost, there's a cheatsheet of commands at the bottom of this page.
Try and make a space that contains at least 4 rooms, and 6 objects.
Part 6: Text Adventure Swap
Step 1: Compress the Files
Using your file browser, navigate to the Desktop, where you should be able to see the 'computer-friend' folder.
- On a Mac:

- On Windows: right clock the file, select 'Send to' and then select 'Compressed (zipped) folder'
Tools and Further Reading
File Browser Commands
- on a Mac: ⌘ + shift + .
- on Windows: "View" > "Hidden Items"
Show path bar:
- on a Mac: "View" > "Show Path Bar"
- on Windows: shown by default
List of Command Line Commands
In this session, we are going to use the following commands:
| command | name | meaning |
|---|---|---|
pwd |
"print working directory" | print out a path to my current location |
ls |
"list" | list the files and folders in the current location |
cd |
"change directory" | move to a different folder |
cd .. |
"change directory" | move UP one folder |
cd ~ |
"change directory" | navigate to the Home directory |
touch file.txt |
"touch" | make a new, empty file called file.txt |
cat file.txt |
"concatenate" | print out the contents of a file called file.txt |
mkdir my-folder |
"make directory" | make a new folder called 'my-folder' |
echo "some text" |
"echo" | write out the text "some text" |
echo "some text" > file.txt |
"write" | overwrite the contents of file.txt with "some text" |
echo "some text" >> file.txt |
"append" | add the text "some text" to the end of file.txt |
Neat tricks:
- Type
cd(cd and then a space), and then drag and drop the folder you want to navigate to onto the command line. Press enter and it will take you there - Use the Tab key to autocomplete folder and file paths
- Use the up and down arrow keys to find and select commands you already ran
- on a Mac: hold down the 'option' key to place your cursor anywhere on the command line
Watch out for:
- make sure you use spaces to separate between a command, and the thing you are using it on. For example,
cd..won't work, butcd ..will! - if you get a message that says 'command not found', double check that it's spelt right and that you used spaces in the correct place!
- for the same reason that spaces are used to separate out commands, they will cause issues if you use them in the names of files and folders! The best way to do this is to avoid it completely -- use a dash or underscore instead!
Further Reading
If you would like to explore more of the ideas covered in the workshop, take a look at one or all of the following readings:
- The Computer Is A Feeling, Tim Hwang and Omar Rizwan: This is a short text which explores our way of thinking about and using computers.
- What is Code, Paul Ford: This is a very long piece that explores in detail lots of aspects of computers and code. It's worth reading in full, but the most relevant part for this workshop is the Introduction, and Section 2, entitled 'Let's Begin'