Using an MPR121 capacitive touch sensor
The MPR121 is a tiny microchip formerly manufactured by NXP, now under Resurgent Semiconductor, it is a tiny surface mount device that provides 12 capacitive touch electrodes through an I2C interface.
What is capacitive touch?
Capacitive touch the the technology used on modern touch sensitive devices such as phone and tablet screens, trackpads and computer mice like Apple's Magic Mouse.
Capacitive touch takes advantage of the human body being electrically conductive, this is why using a pen on a smart phone doesn't work and styluses for these devices are made of metal so they will make an electrical connection.
Capacitive touch is relatively complex to understand but fundamentally the sensor can detect when you are in proximity or actually touching the electrode, or any conductive part between the chip and the end of the wire.
If you extend a wire from the electrode, even if it is shielded with plastic, it will probably detect you touching the wire just the same as the exposed metal part.
Adafruit MPR121
- Power input: 3.3V to 5V
- Address: 0x5A, it is also relatively easy to configure the address to 0x5B, 0x5C or 0x5D allowing up to 48 electrodes (12 x 4).
Wiring
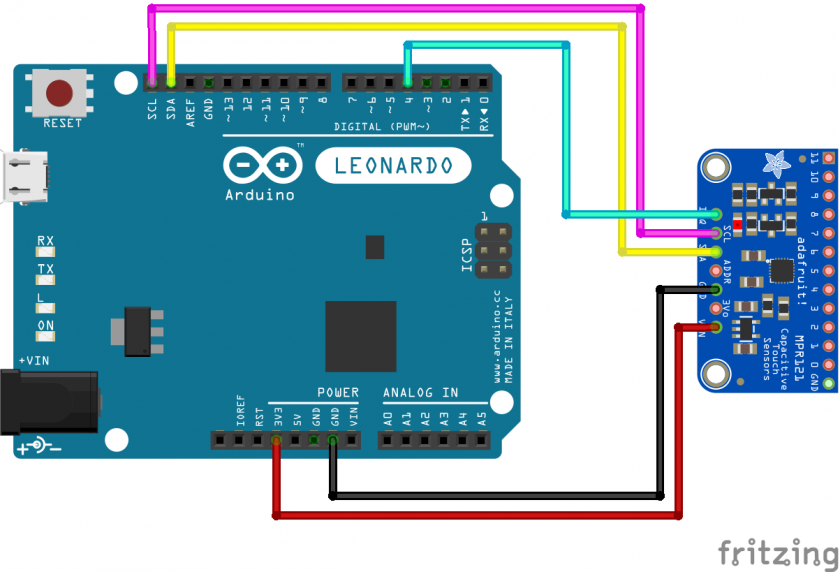
Wiring is pretty simple, it's an I2C component so it's relatively standard.
Older Arduino boards
Some older Arduino boards do not have SDA and SCL pins as shown in the diagrams, in this case you'll need to look it up on the boards documentation, however most Arduino boards used A4 as SDA and A5 as SCL. More info here: https://www.arduino.cc/en/reference/wire
Adafruit MPR121

Library
Adafruit, Sparkfun, Seeedstudio and Bare Conductive all provide Arduino libraries, however by far the best which includes tools for visualising the data is the Bare Conductive Touch Board library and grapher. All libraries should all work interchangeably as long as you get the correct address and IRQ pin.
The key thing to remember when using examples from the Bare Conductive library is that they use the address 0x5C rather than the default 0x5A address used on both the Sparkfun and Adafruit boards, also ensure that you use the correct IRQ pin based on the example you are using.
We have a tutorial on how to install a library here.
Getting started
After installing the library and wiring the board, go ahead and use the examples in the File > Examples menu in Arduino, the Simple Touch example is particularly good as it's simple to check it's working.
Basic Example
This is a basic example of using the MPR121 with the Bare Conductive MPR121 library to get the proximity value and touch status, this can easily be extrapolated into a project.
CSV Example
This is an example using the MPR121 with the Bare Conductive MPR121 library to output each electrode's touch status to the serial port as a comma separated string.
This example can be modified to work with MaxMSP easily by changing the delimiter line to a space instead of a comma:
#define DELIMITER " "
You could also modify this example to output the proximity data, instead of the touch data by modifying the updateTouchData line to:
MPR121.updateFilteredData();
And the getTouchData line to:
Serial.print( MPR121.getFilteredData( i ) );
