
Crimping: How To Make Custom Cables
What is crimping?
Cable crimping is the process of mechanically terminating a wire. It is not the same as soldering or soldered connectors as it uses only pressure to create the electrical connection. In most cases a special tool will be used to compress a metal terminator around the bare wire end. Some can be done with generic pliers, but it rarely works as well :(
There are basically an infinite number of termination types from spade connectors to RJ45 to coaxial...the list goes on. In this article we will explore only 2 types: JST and Dupont connectors.
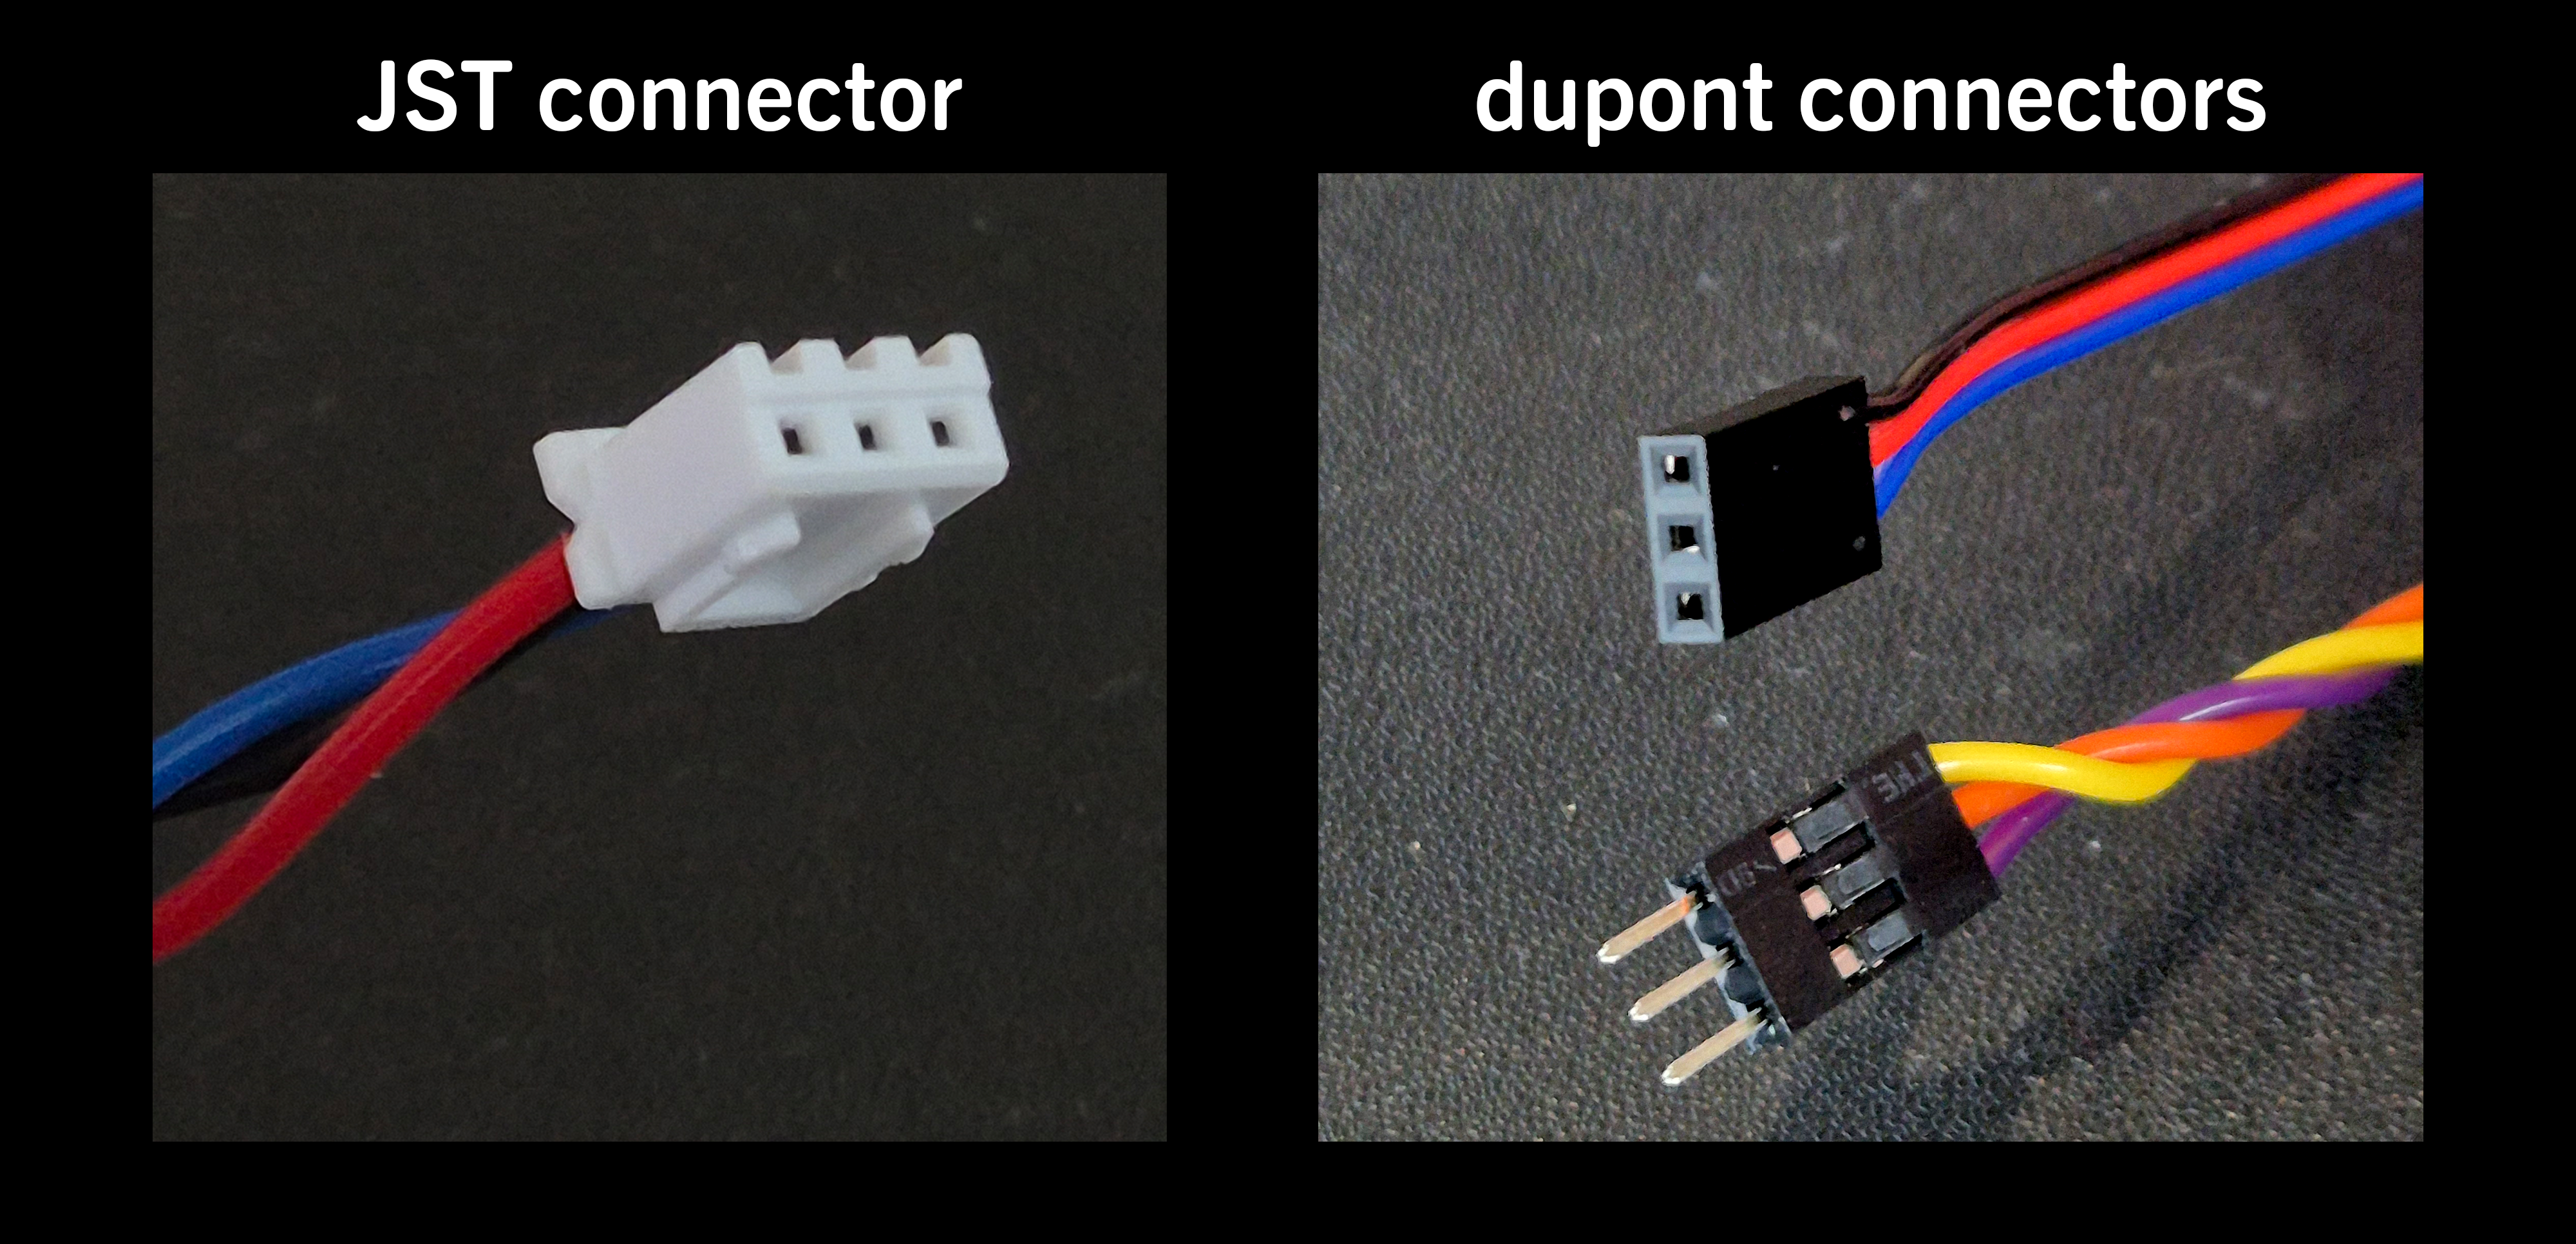
Side note: we highly recommend The Connector Identification Utility if you'd like to explore the wonderful (and infuriating) world of connectors!
Why bother with crimping cables?
Firstly, you don't have to. If you're just tinkering with a breadboard in the lab, solid core wire and jumpers will work just fine!
But, if you're releasing your projects into the wild, crimping cables is often the way to go. There are 3 (and a half) reasons:
- It makes your connections more secure!
- Wires stuffed into breadboards or socket headers have a habit of coming loose over time. If you're lucky, your project will stop working temporarily, if you're unlucky that loose wire shorts something and damages multiple components!
- Loose cables can also be noisy.
- If you are sending audio or digital signals over them this can quickly become a massive problem that you really don't want!
- It looks 'better'...or at least tidier and more professional
- Obviously 'better' is subjective, there may be aesthetic concerns for your project that means you want a messier look. No judgement there!
- However: it certainly helps things to look tidier and more professional. If you find yourself fabricating projects for clients in the future, it is unlikely they will be all that impressed if the project you are charging them £££ for is a big tangle of unlabelled cables!
- Reason 3-and-a-half: tidier projects means easier troubleshooting, collaboration and less connection errors
- From a lot of personal experience it is very easy to connect things up wrong, switch something on, create some blue smoke and potentially give yourself weeks of extra work! If you think you can trust yourself, you can't! You will eventually make a mistake.
- One-way connectors or colour-coded connectors can really help to cut down on the risk of you or somebody else making a bad connection and blowing up your project 10 minutes before your deadline!
- Tidier and clearer cabling helps with communication
- Whether you are trying to chase down a problem or collaborate with multiple people, the more obvious your connections are the easier it is to communicate what your circuits are actually doing to other people!
- This also helps the circuit to 'communicate' to you what is wrong when it isn't working!
- From a lot of personal experience it is very easy to connect things up wrong, switch something on, create some blue smoke and potentially give yourself weeks of extra work! If you think you can trust yourself, you can't! You will eventually make a mistake.
Terminal options we use in the Electronics Lab
JST (Japan Solderless Terminal) XH crimping
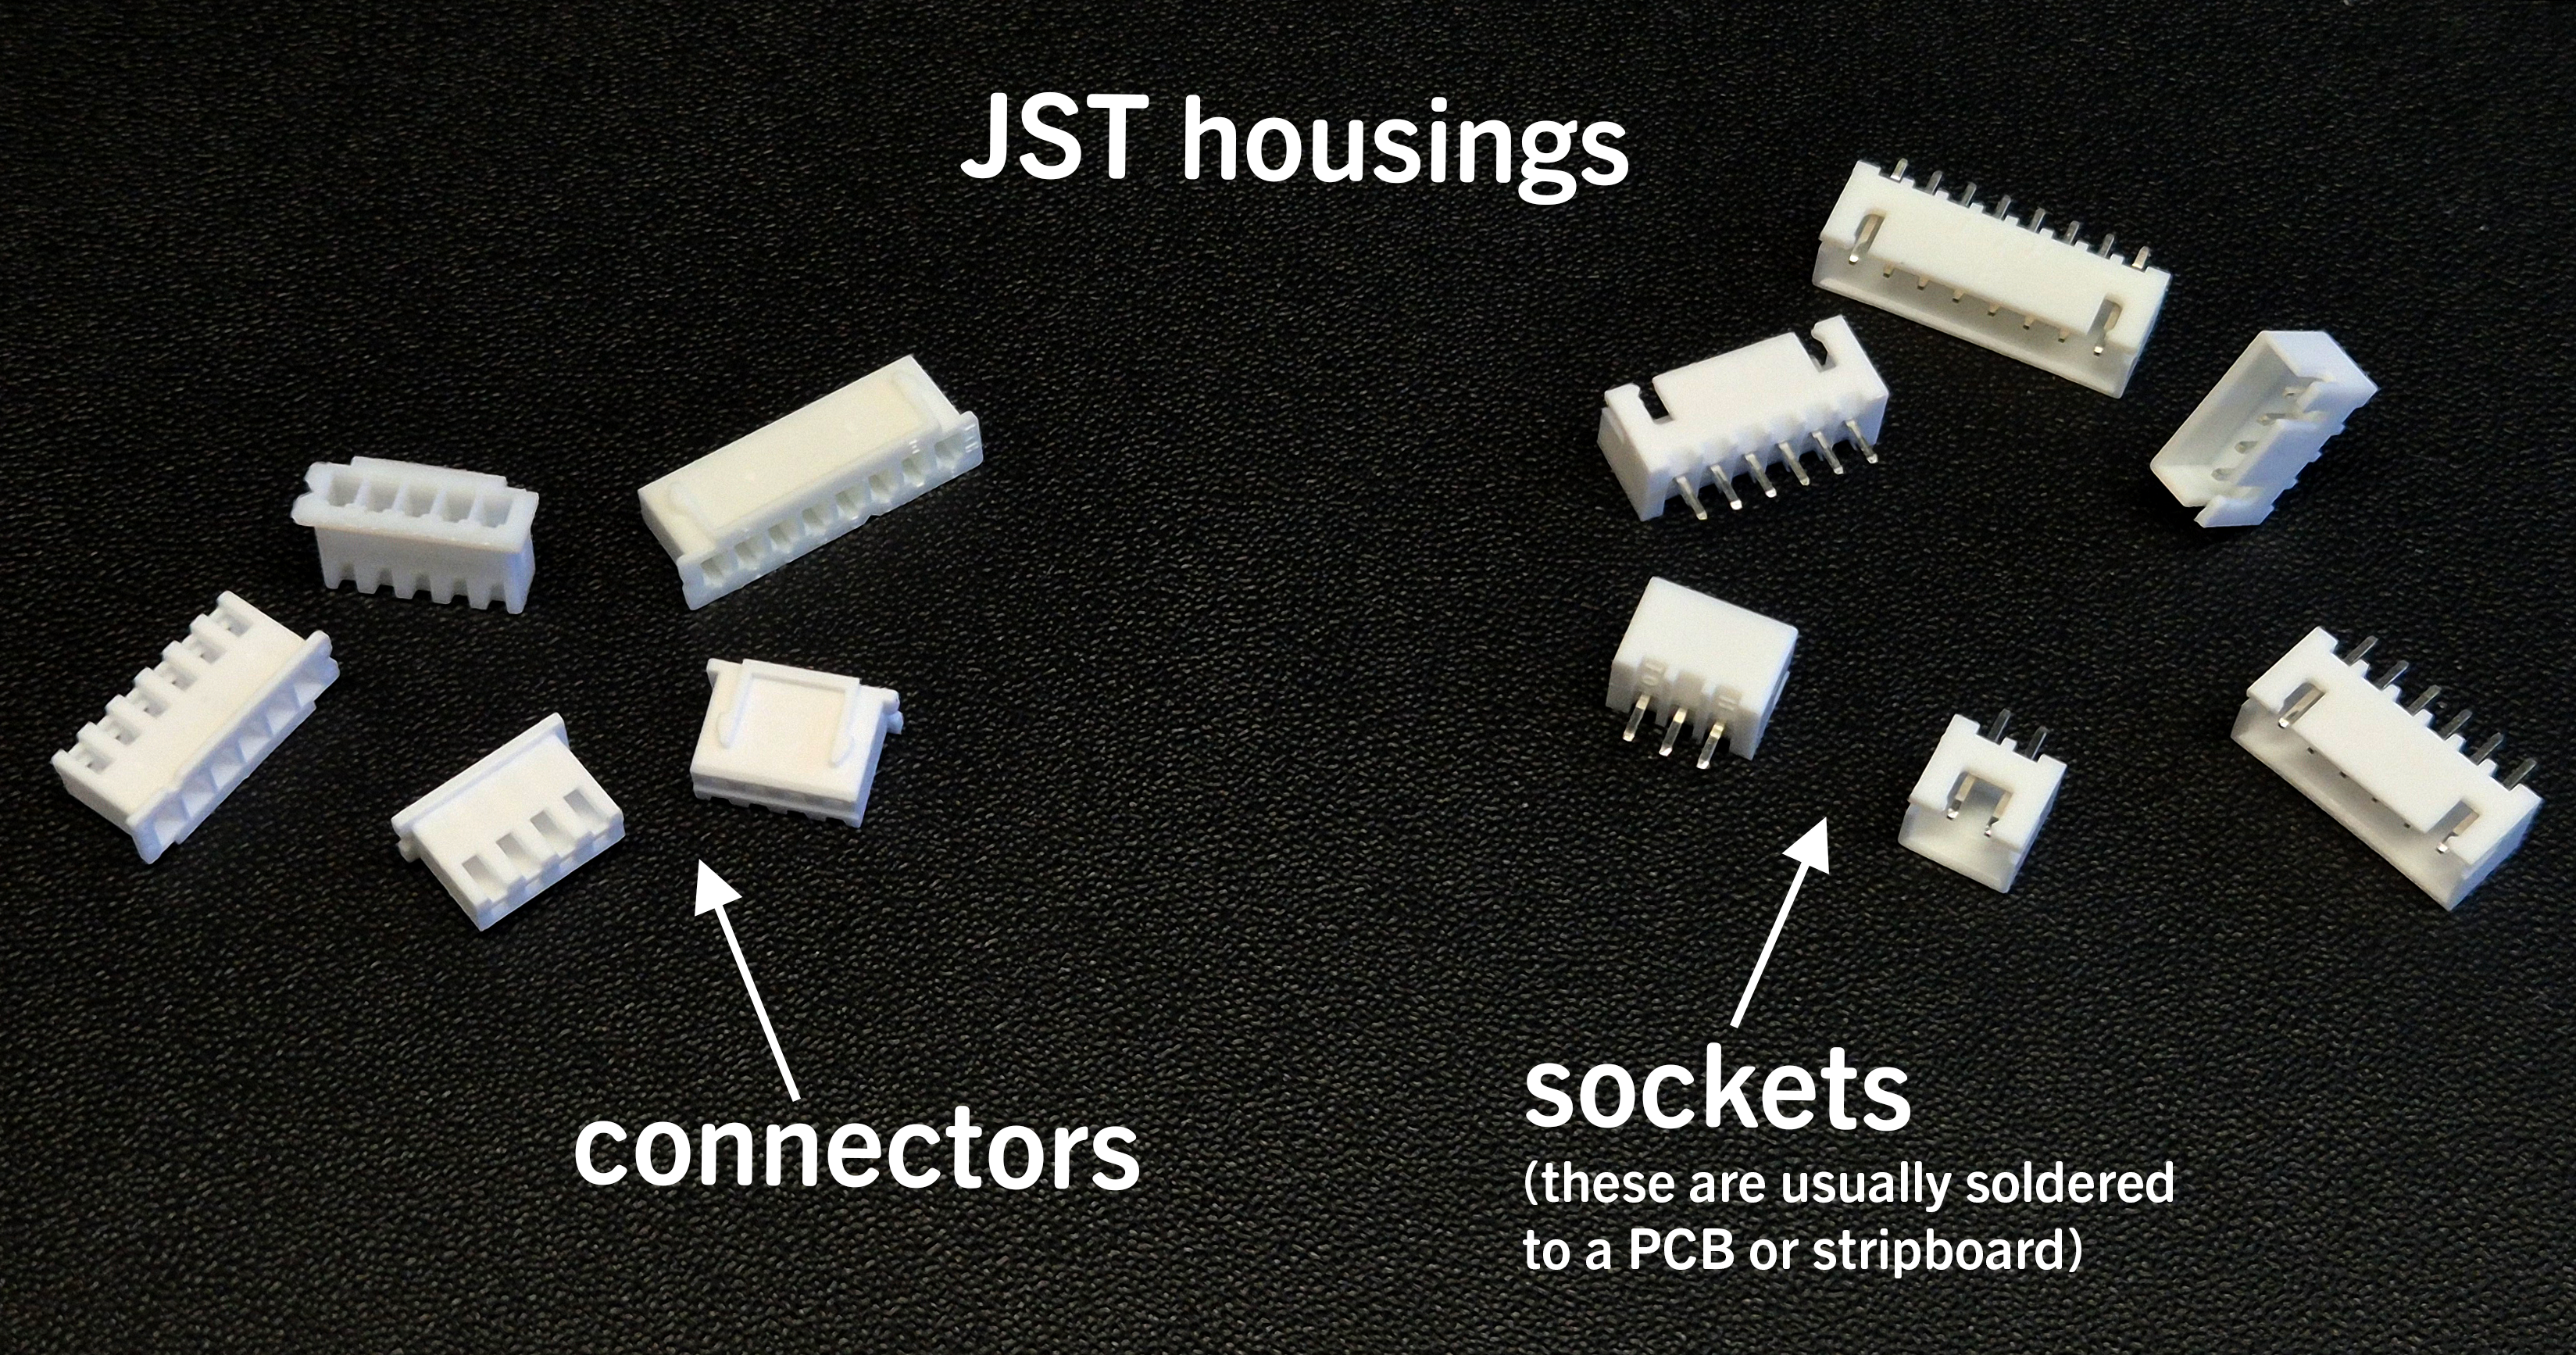
JST is actually a brand name and really refers to many types of connectors. When you hear JST what people are usually talking about is the 'XH series' connectors that they make. They are a little like the jumper wires you have seen about the lab with a few added benefits:
- Their connectors are one-way: you can only connect them in a single orientation which is very helpful for things like power leads where connecting backwards can be a disaster.
- They come with really sturdy sockets which can be soldered to stripboards, perf-boards or PCBs for a solid connection that won't come loose.
- You can get thicker cable into them (I have managed to squeeze up to 20 AWG into XH terminals) which is useful for connections which might be carrying more current than usual.
Dupont crimping
This is the kind of terminal that the jumper cables used on breadboards are formed of. They can be crimped as sockets or pins, have a pitch of 2.54mm (pitch means the spacing between points) and can be fitted into single housings or as rows of several terminals, or even multiple rows! Their benefits are:
- Cheap: they are considerably more affordable than JST XH terminals and kits of them can be obtained for very reasonable prices
- Compact: compared to JST sockets and connectors they are a bit more compact and will take up slightly less room on a stripboard.
- Arduino etc. compatible: many prototyping platforms use 2.54mm header pins or sockets as their connectors and being able to make custom cables to connect different modules together is extremely handy.

Which one should I use?
For most projects here at the lab, Dupont terminals will be the way to go. However, for power connectors and other orientation-critical connections JST will probably be the better option.
Personally, I tend to use Dupont for data or signals and JST for power connections.
That's not a strict rule though, so study the benefits of each and choose what suits your needs best.
What kind of wire should I use?
The thickness of the wire will vary depending on whether you're using JST terminals or Dupont terminals, but if you can crimp it and stuff it in the housing then it is fine! Bear in mind that you will struggle to crimp very thin wires, anything beyond 26AWG tends to be problematic.
The kind of wire, however, is not negotiable in my opinion. Always use strand-core wire (also known as flex-core) for making up cables. Solid core wire is not designed for the repeated stress of being moved around, something which connector cables inevitably do. It will break if you use solid core wire, don't bother!
How to make Dupont connectors
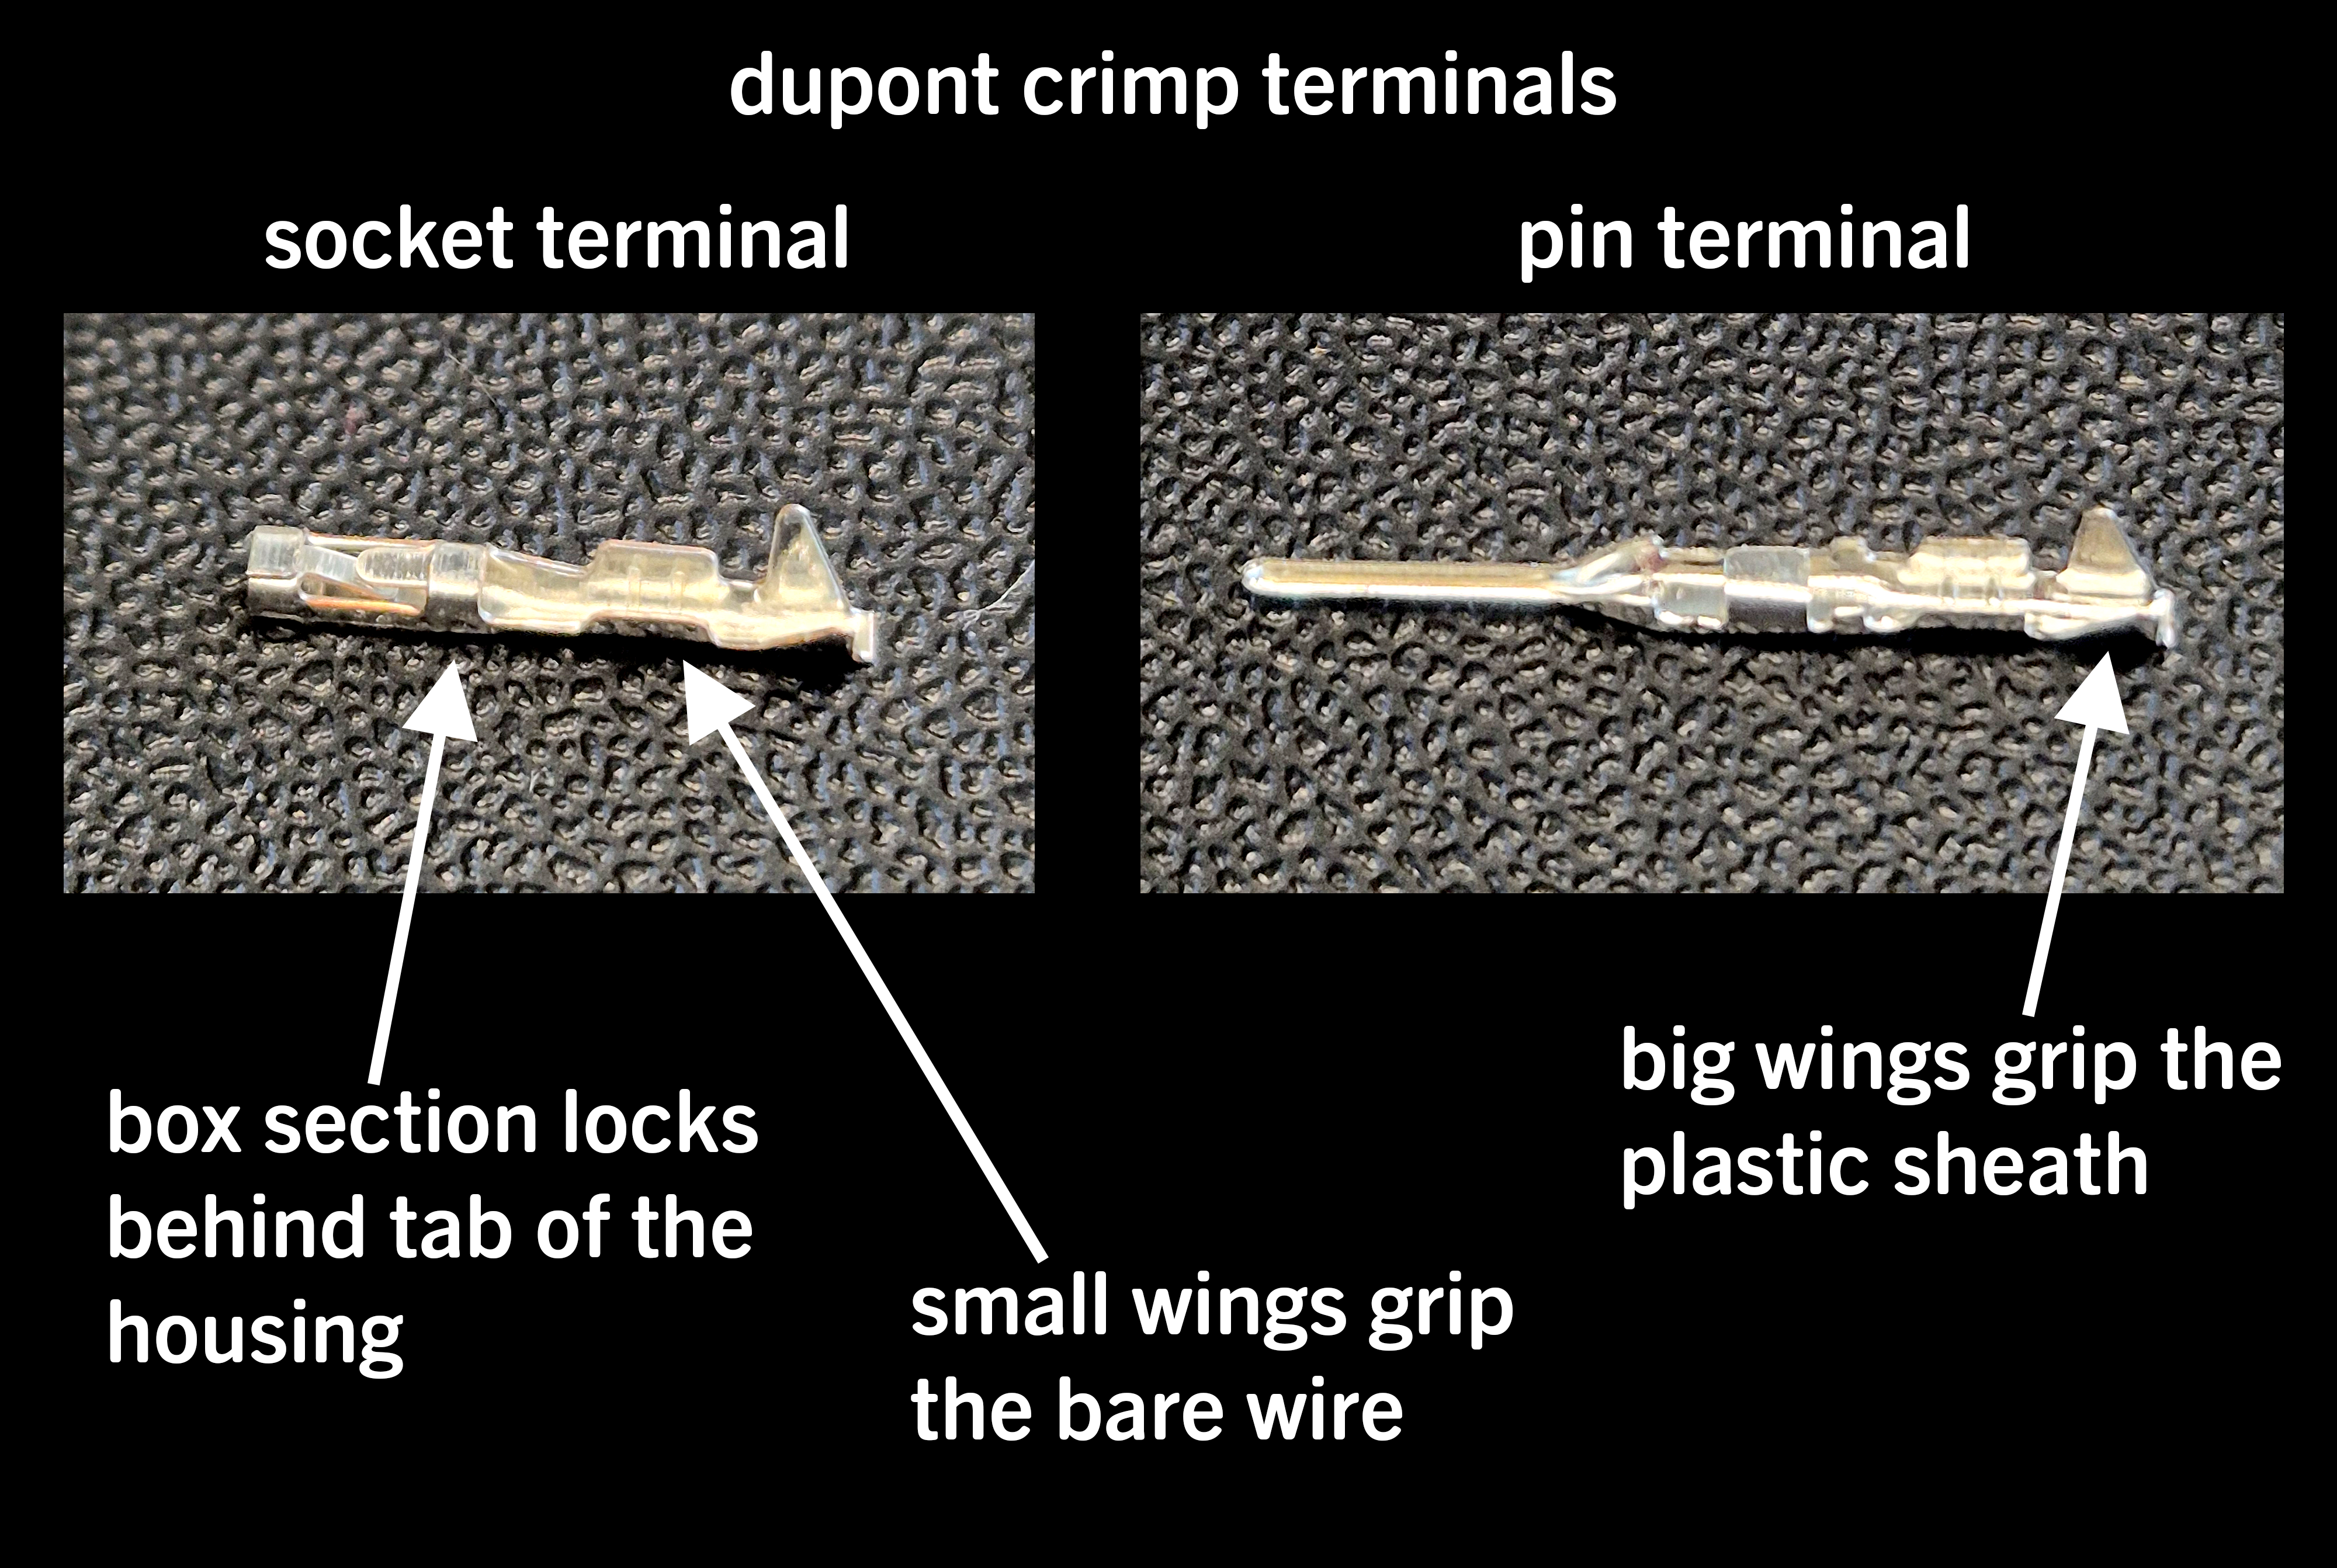
Before starting, familiarise yourself with the terminology in the image below as this will be used throughout this guide:
Preparing the wire
- The key to crimping connectors well is to strip the wire to the right length. This is crucial! If it isn't the right length, don't crimp it!
- Use wire strippers to either expose the right amount of bare wire or strip of more than you need to and trim it to the correct length
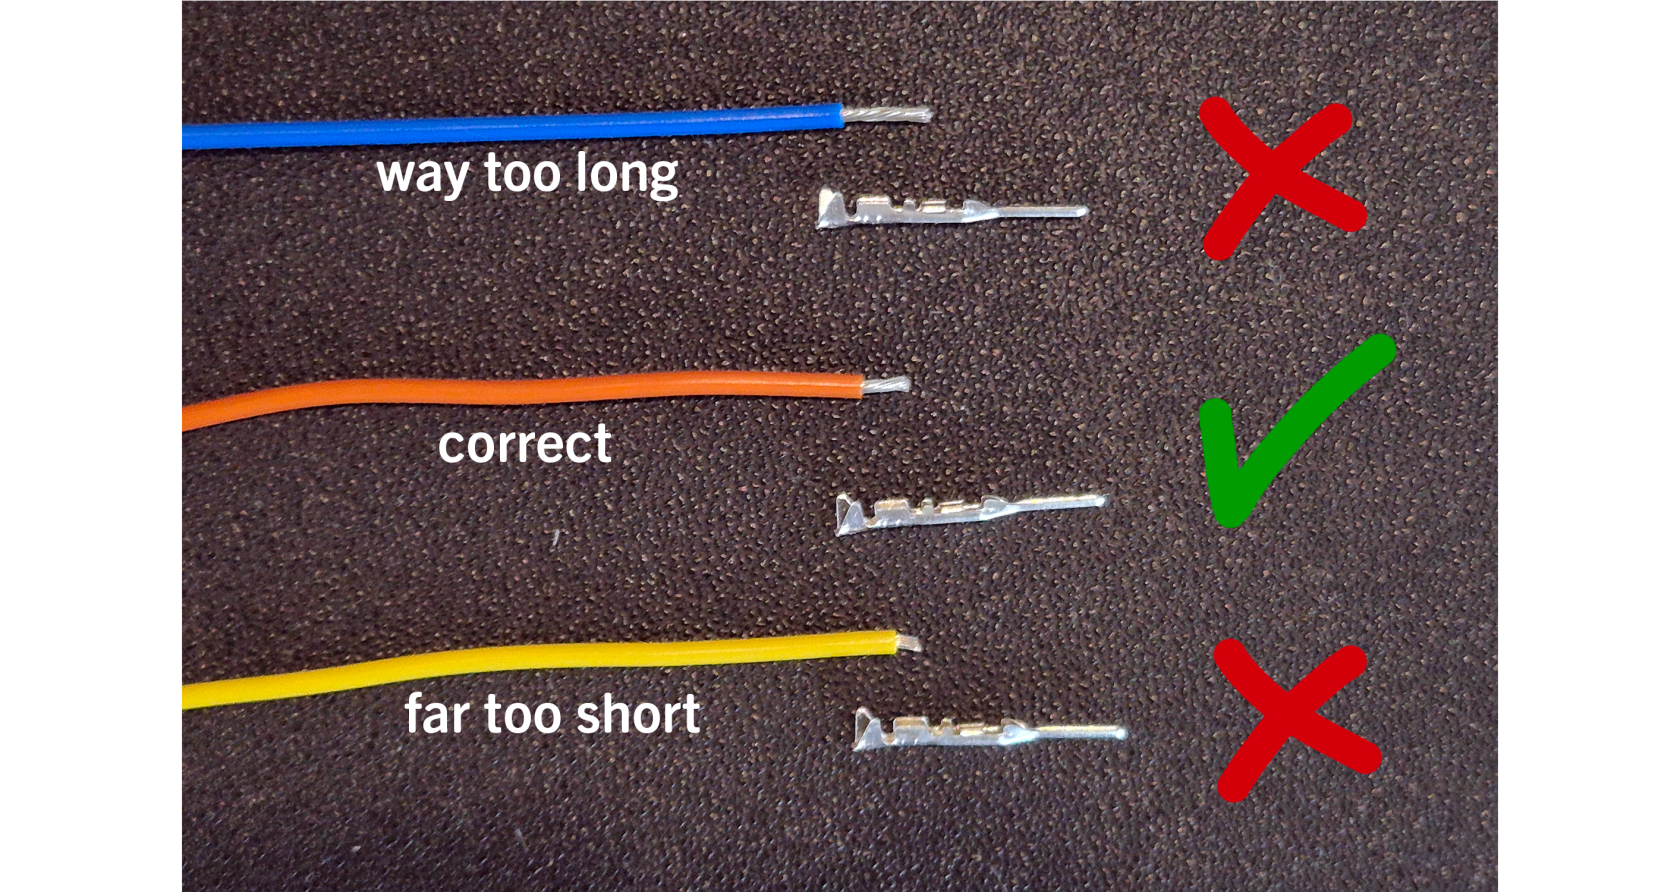
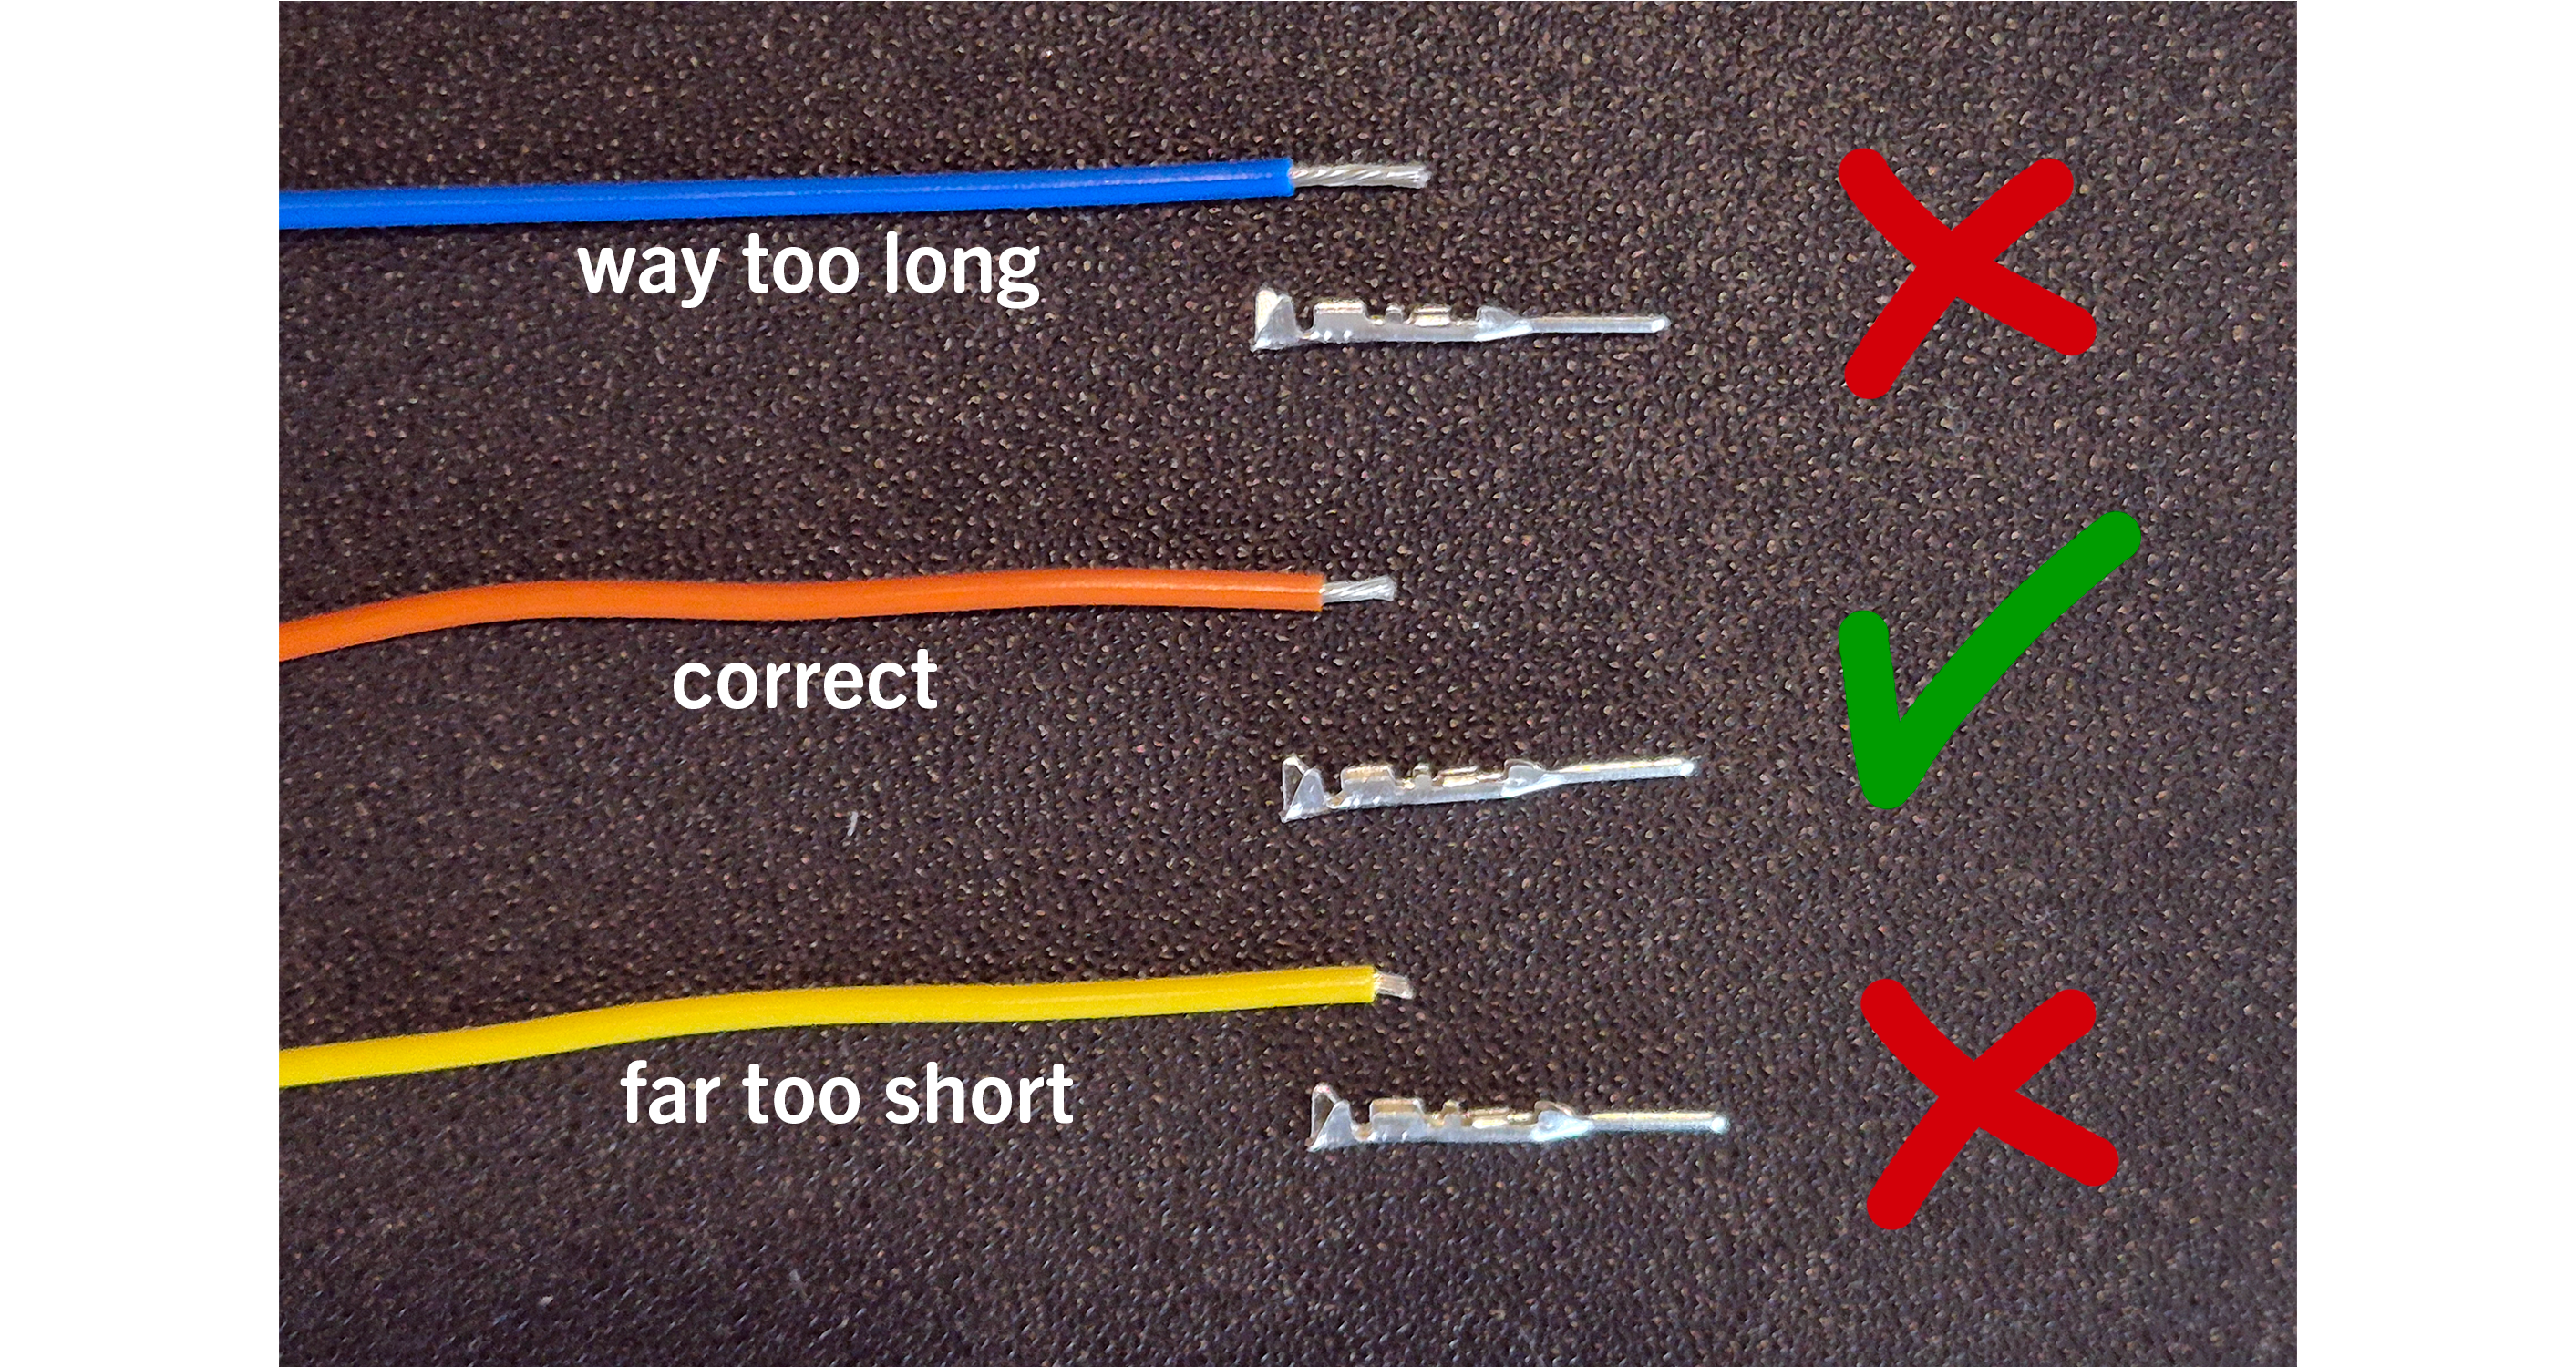
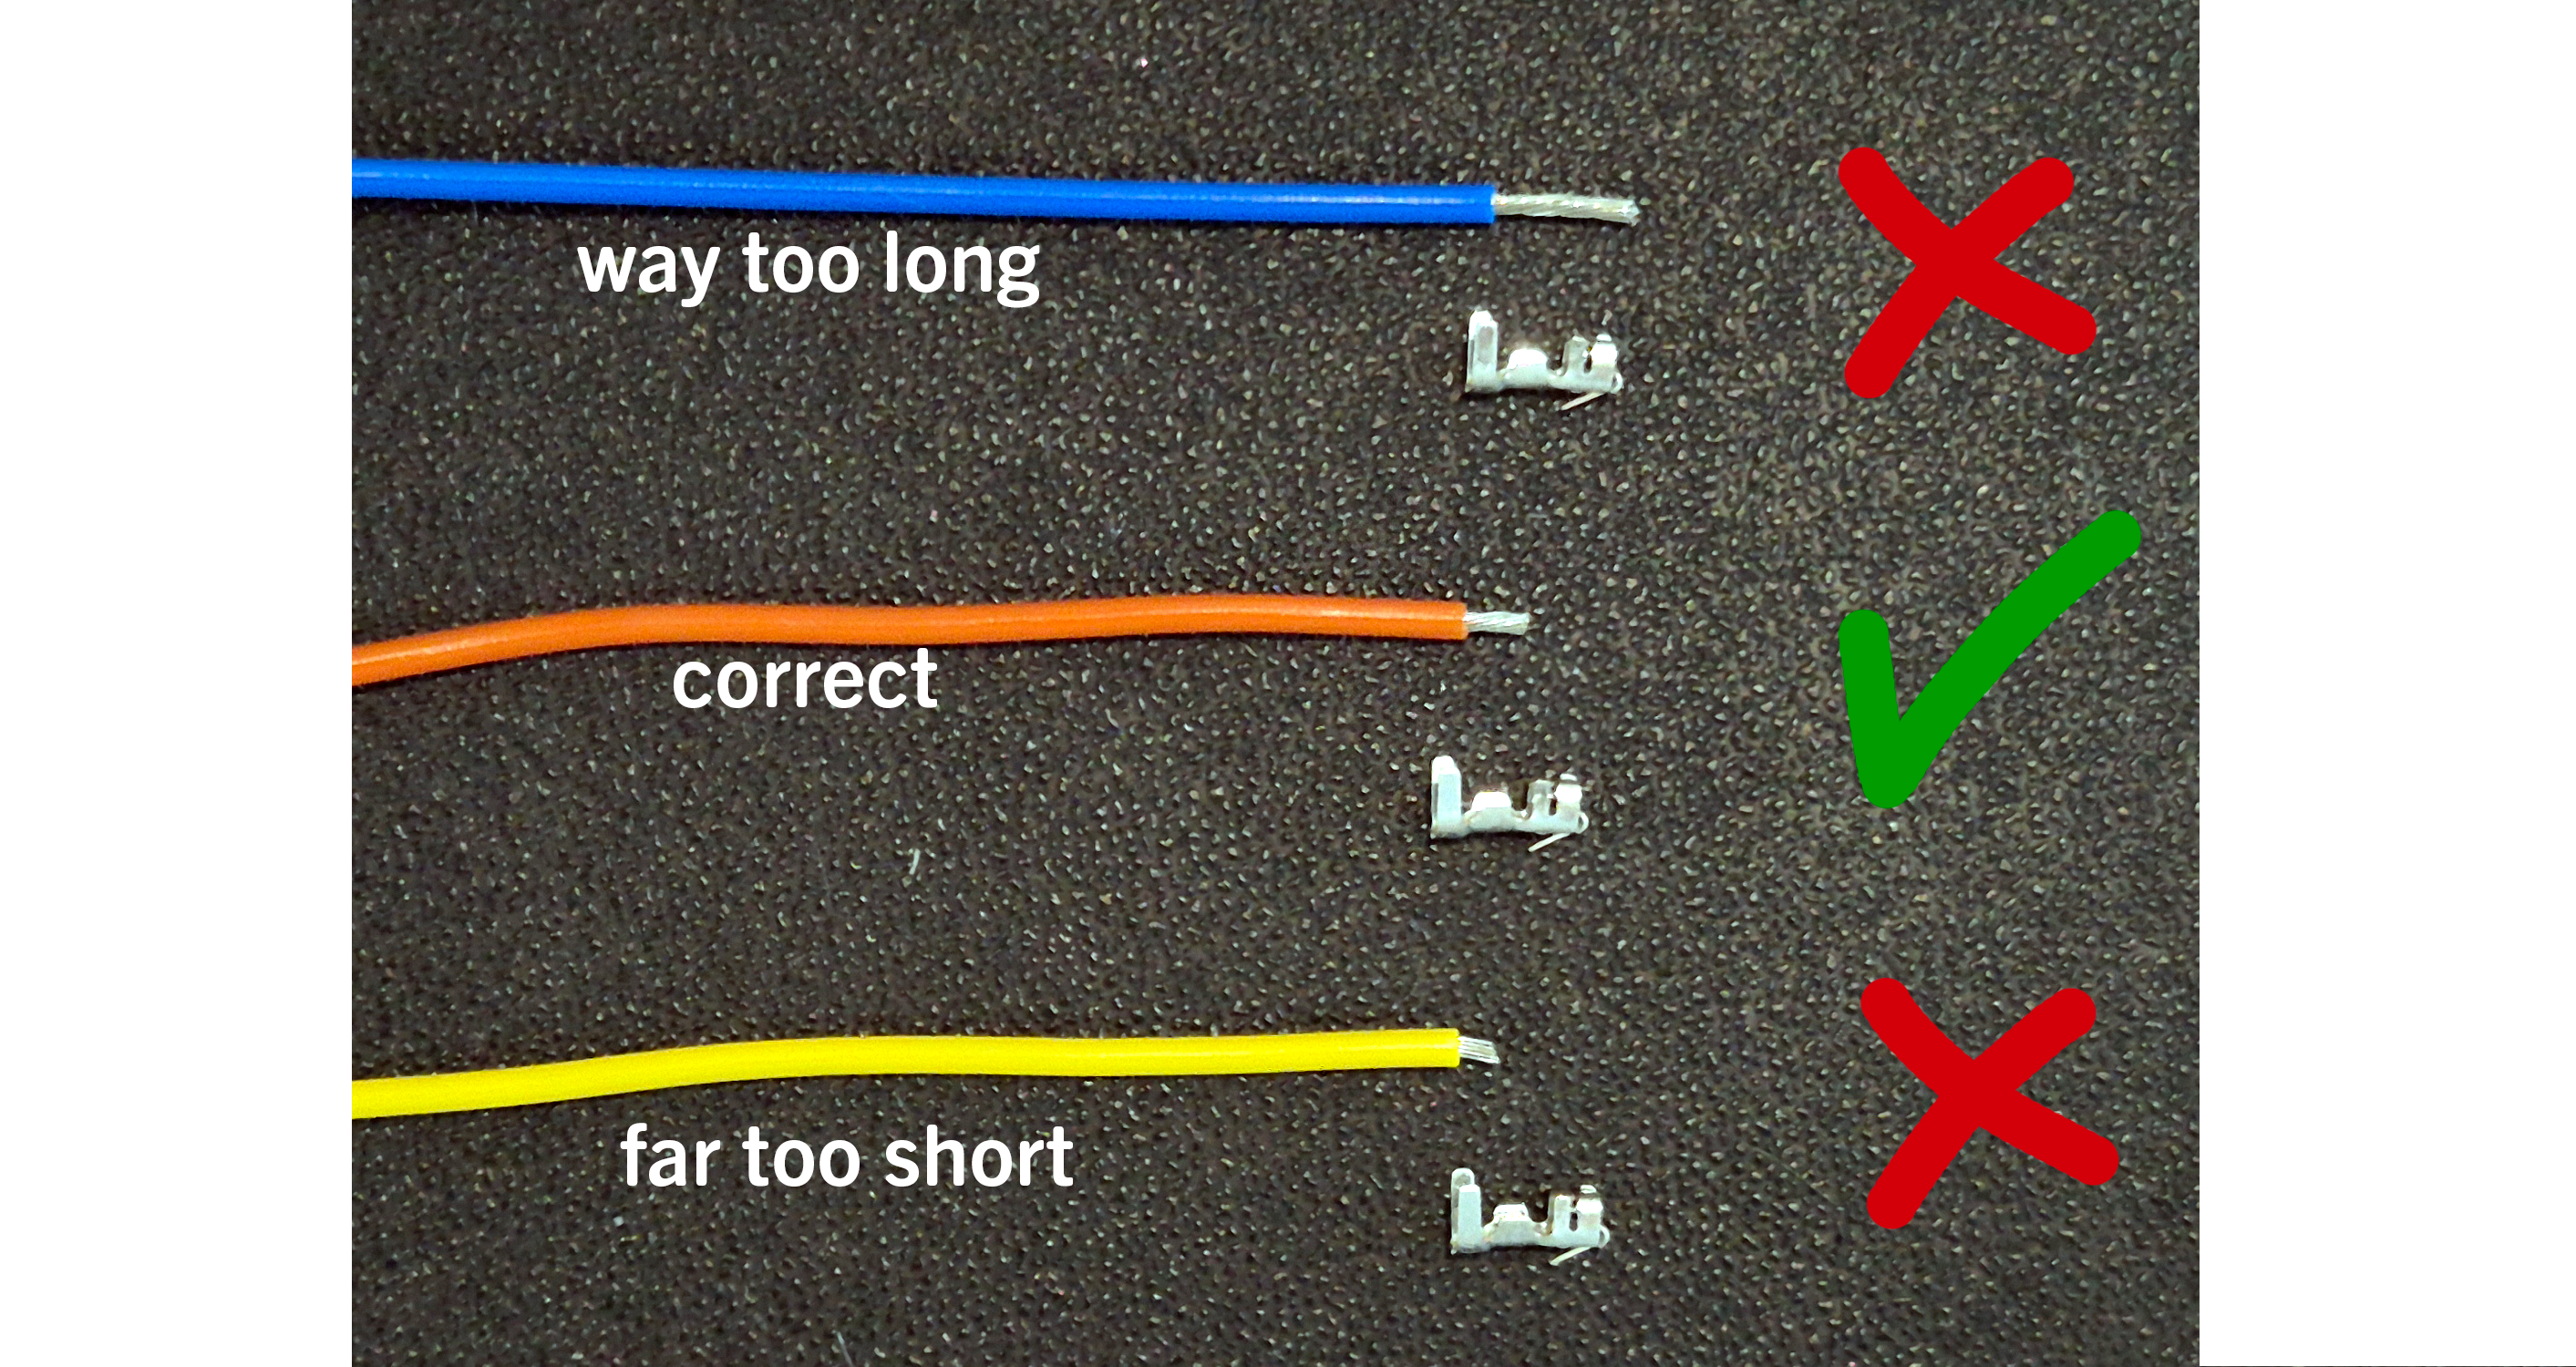
- For Dupont terminals, this is approximately 3mm but it is much easier to hold the bare wire up to the terminal and visually check it is about the same length as the small wings
- See image below for the correct length. If it does not look like the orange wire you must correct it! Either strip a little more off or trim back the wire.
Crimping the wire
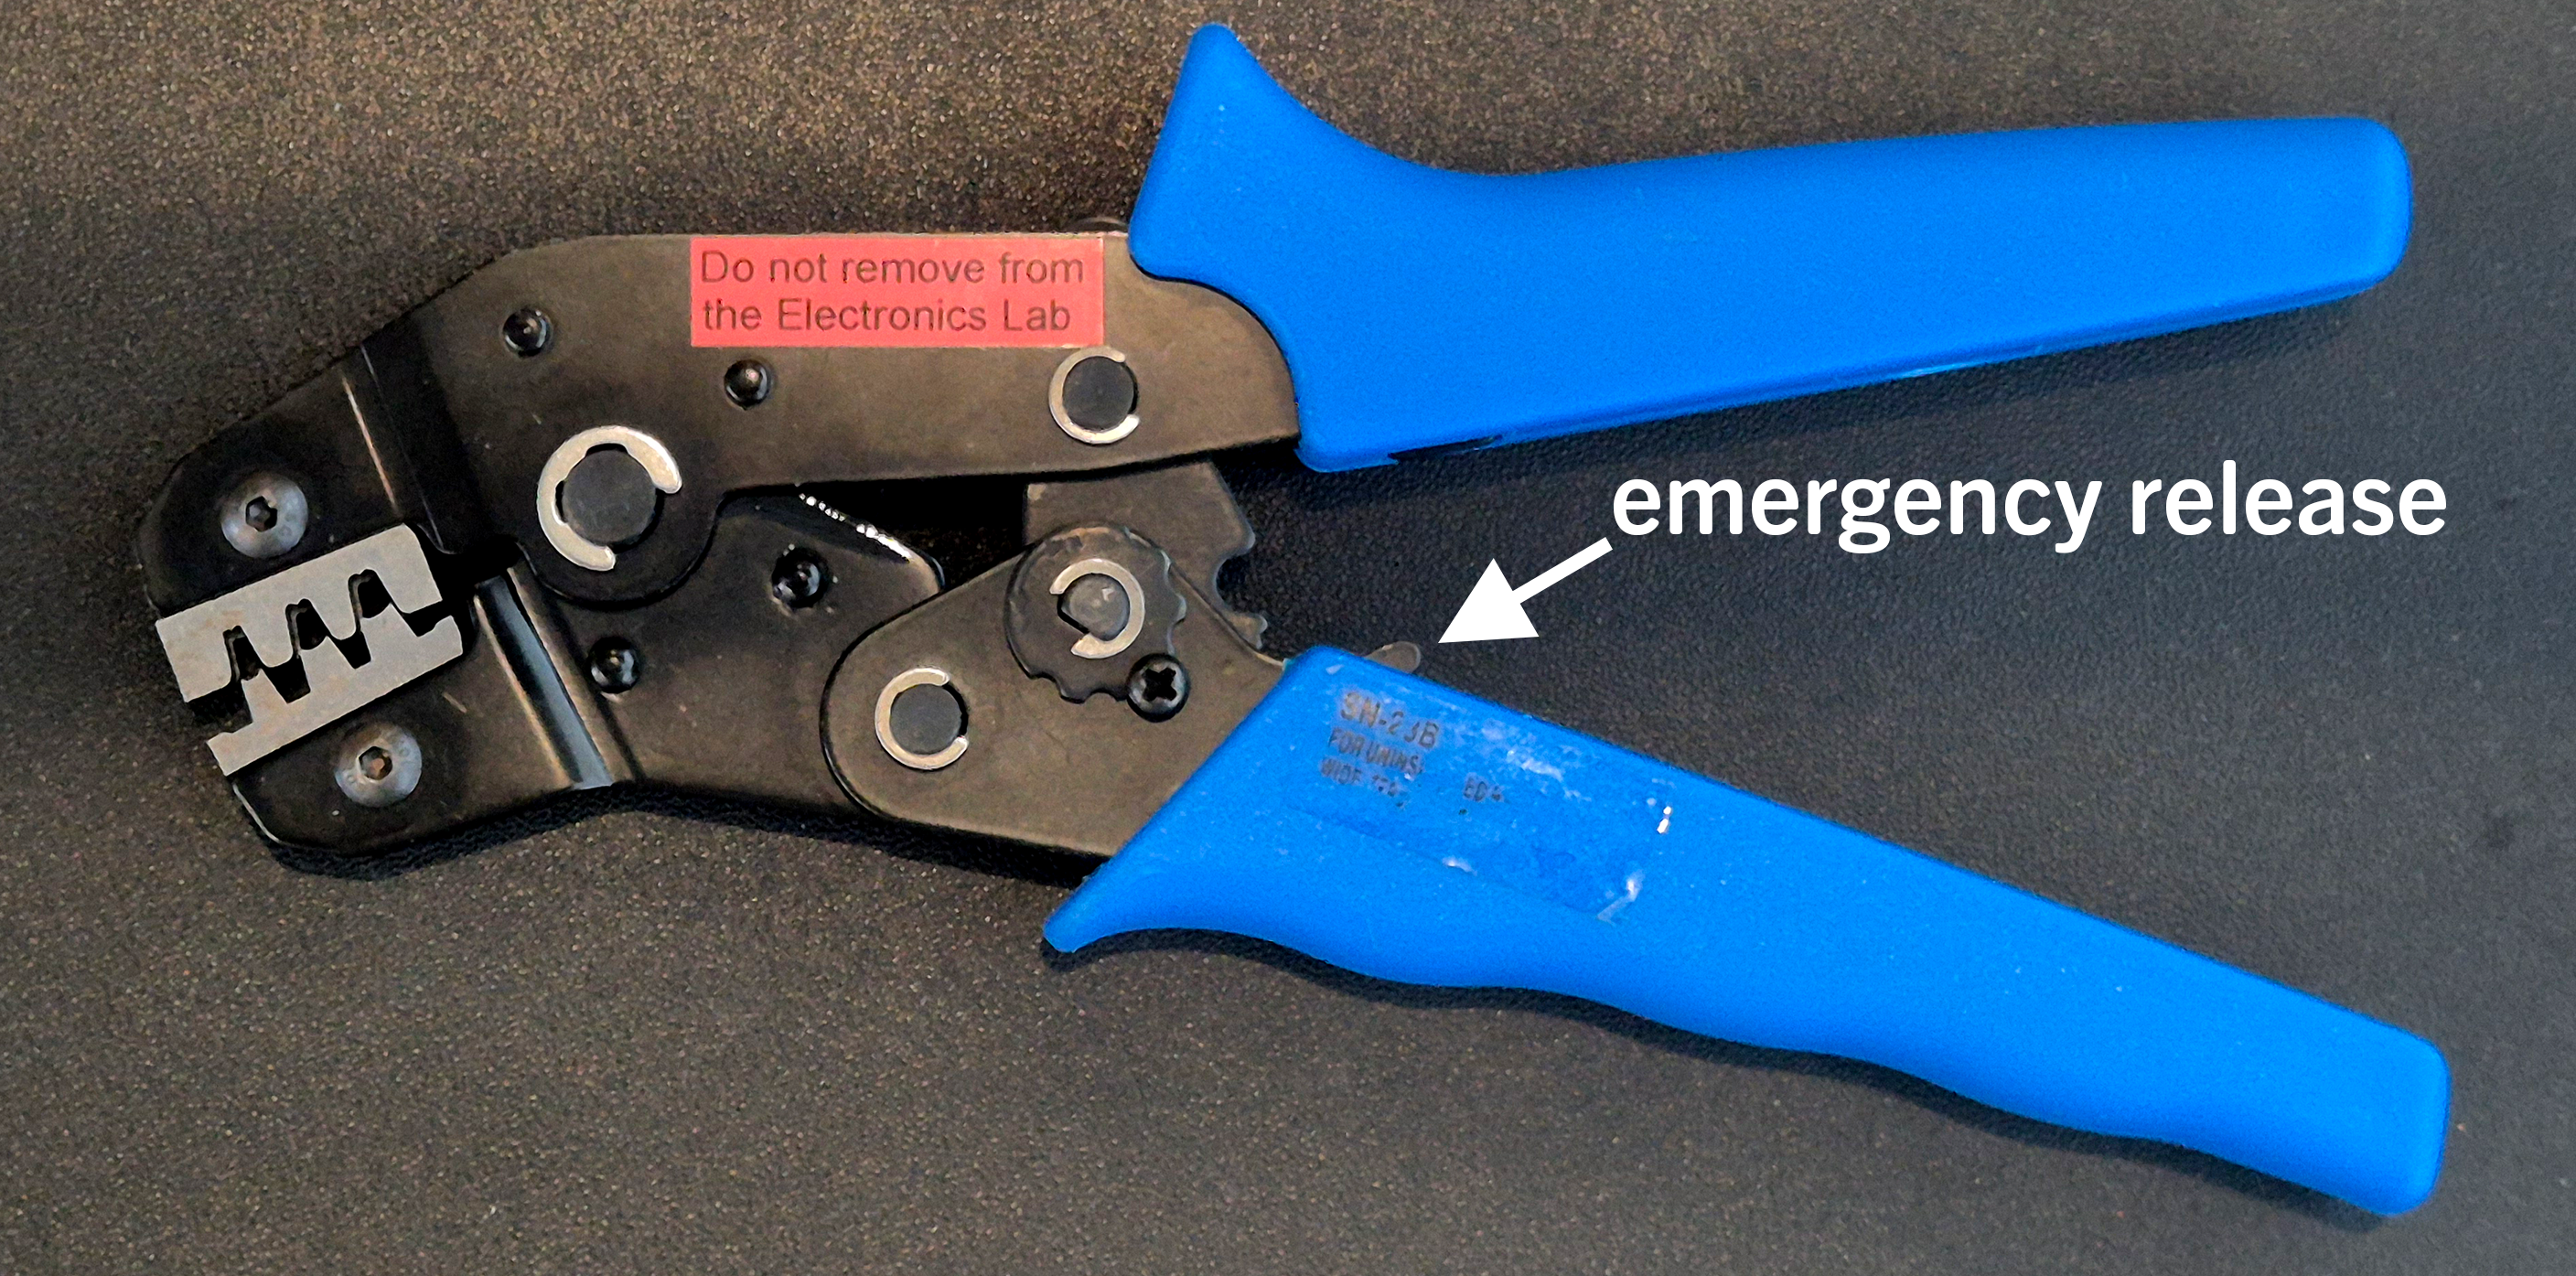
- For crimping Dupont terminals, use the blue-handled crimpers. Note: they are ratcheting, so once you start closing them, you will need to close them all the way for them to release! There is an emergency release inside the handle
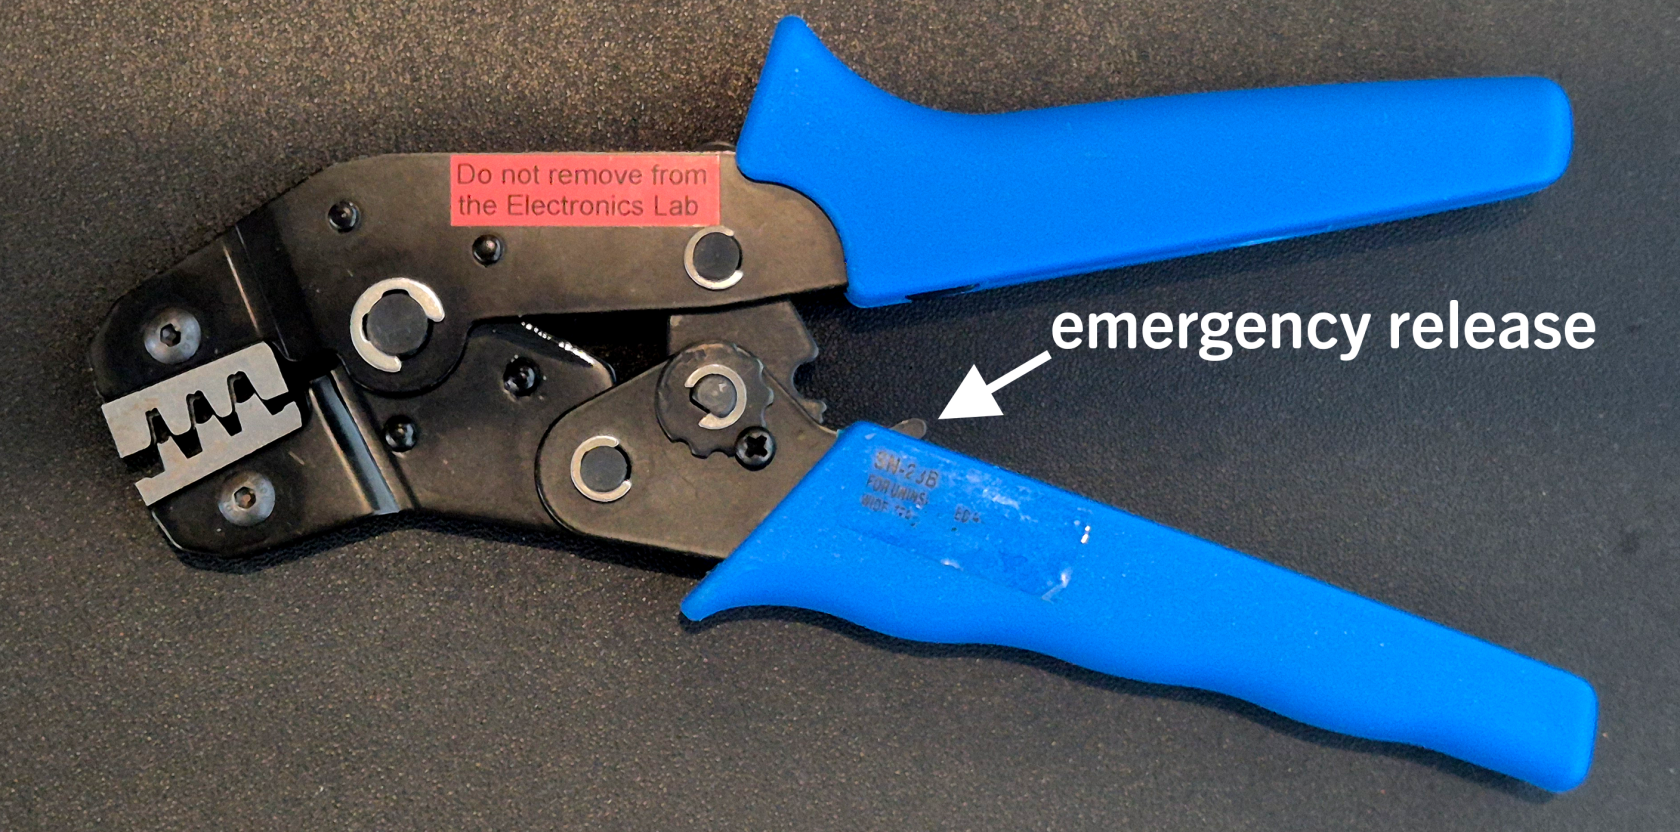
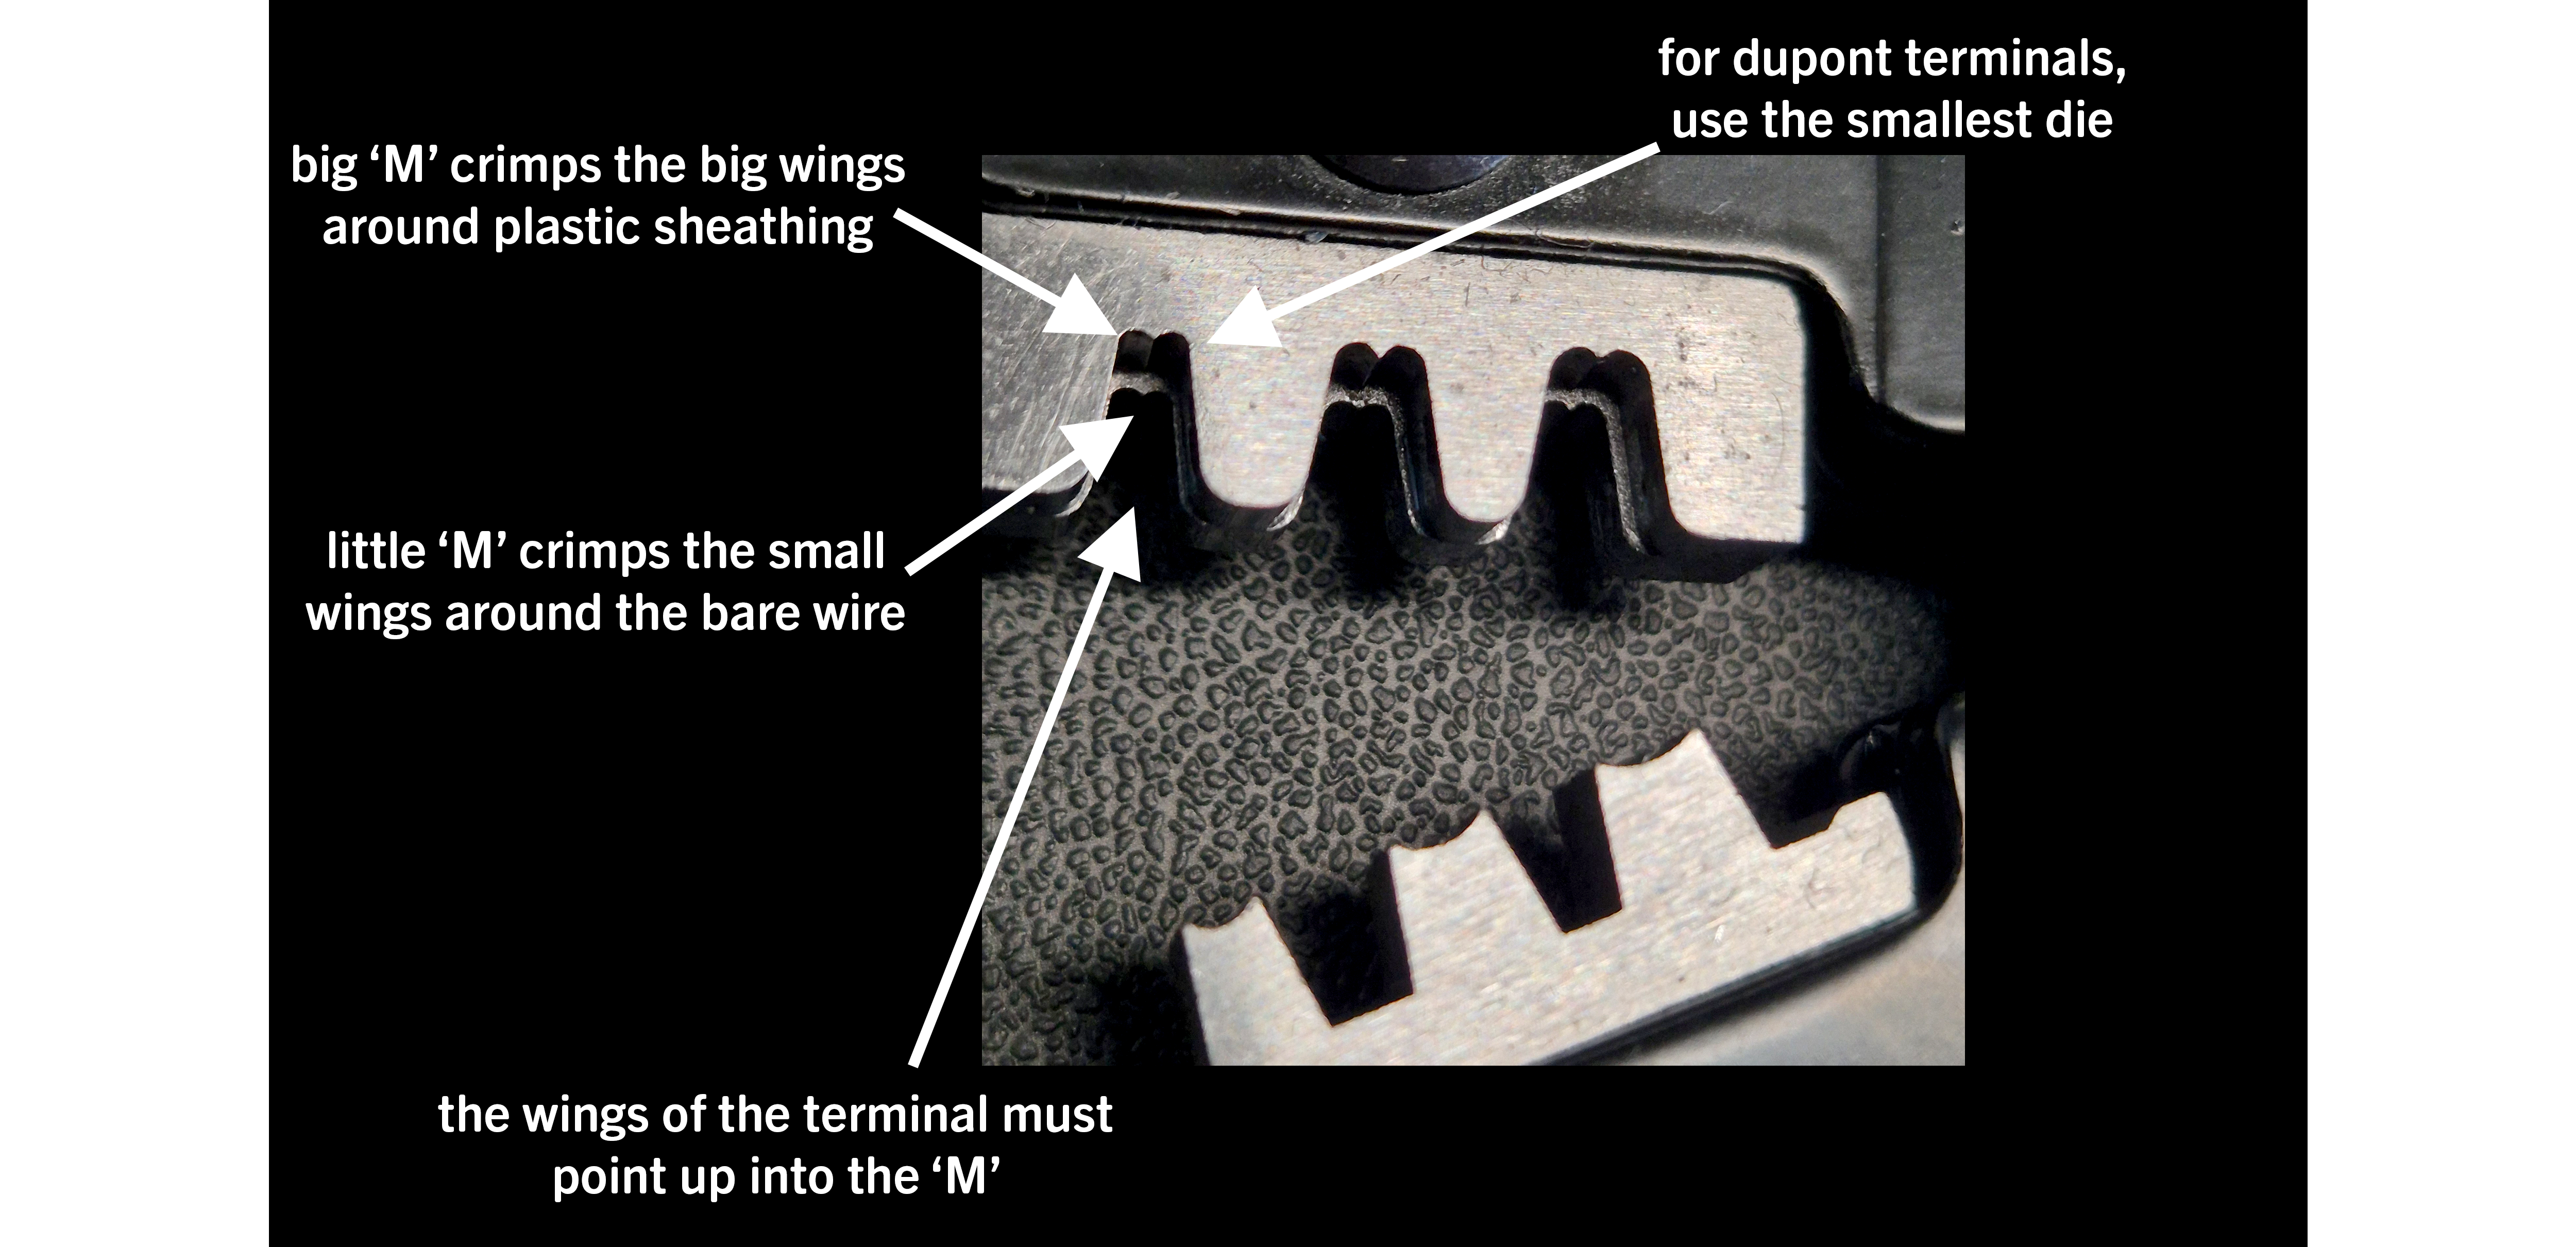
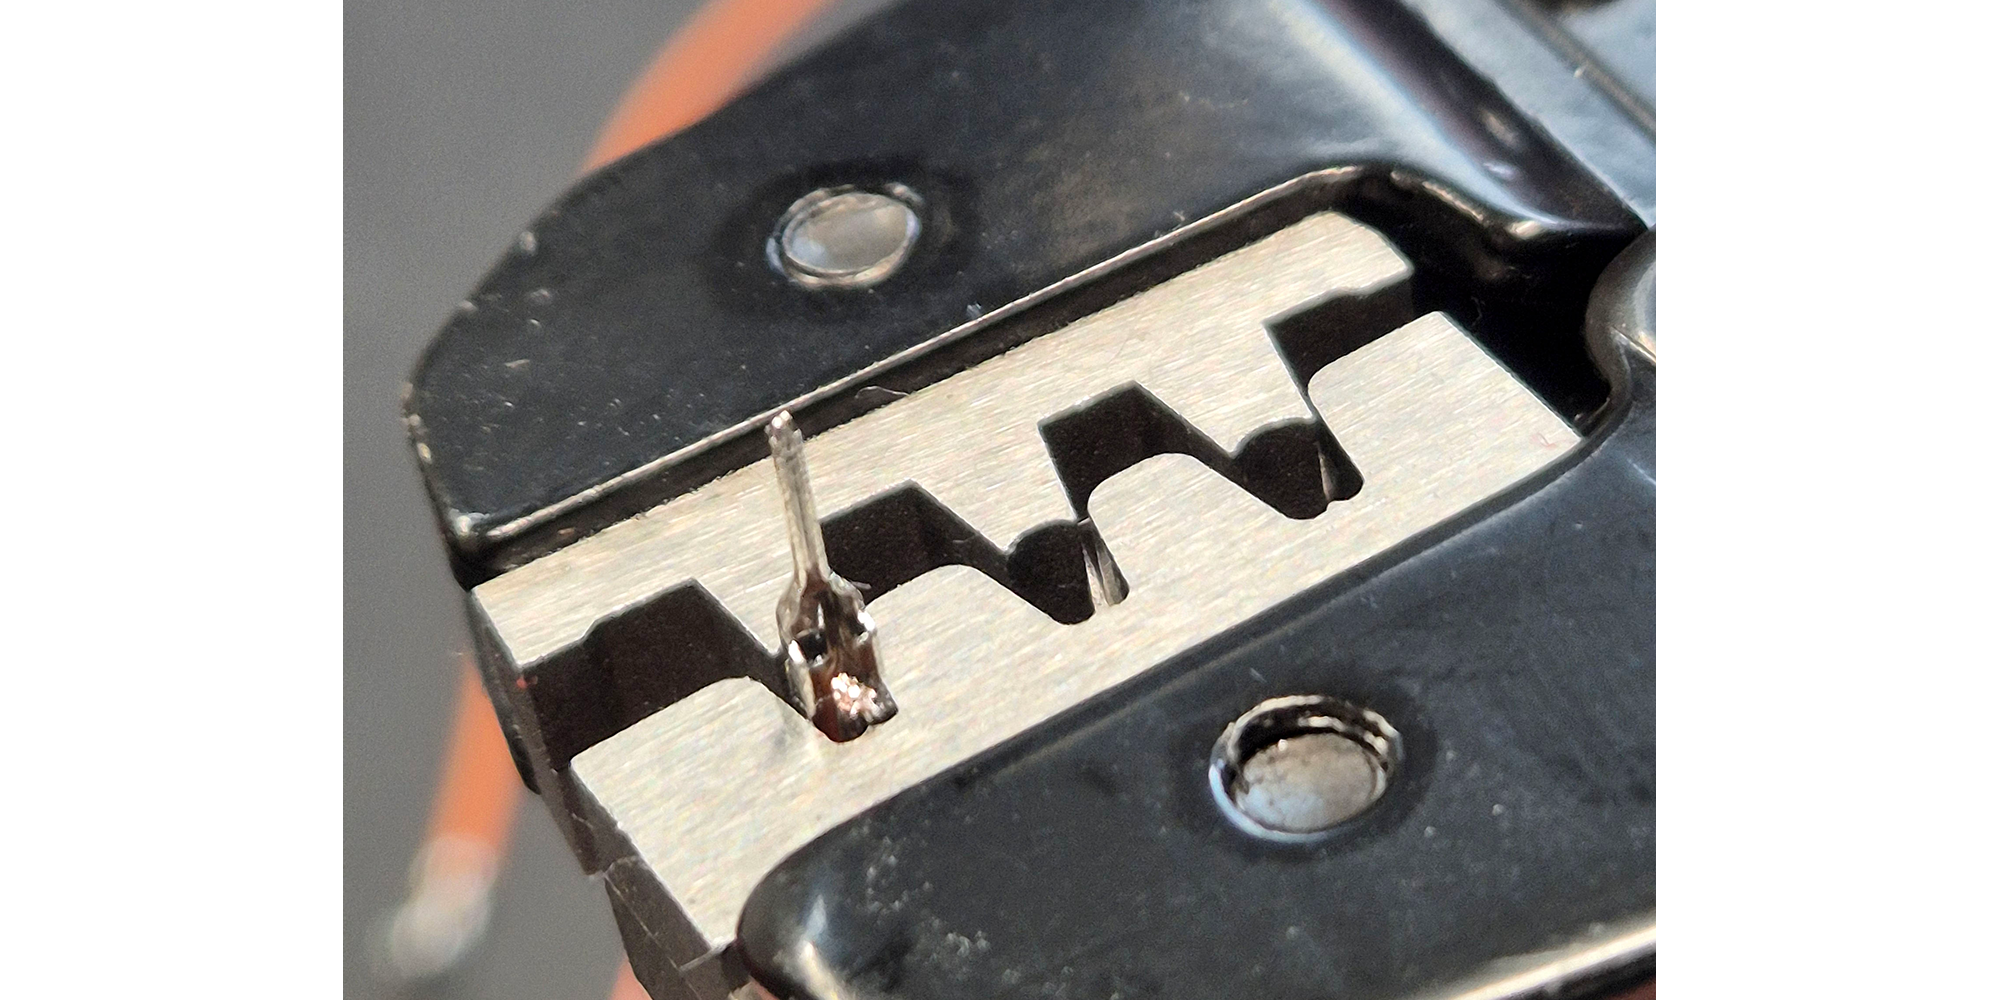
- The crimping tool for both Dupont and JST terminals have an 'M' shaped die, which the tool pushes the wings of the terminal into, folding them over the wire.
- Side note: a 'die' is piece of shaped tooling (usually metal) which is used to press a work piece into a shape
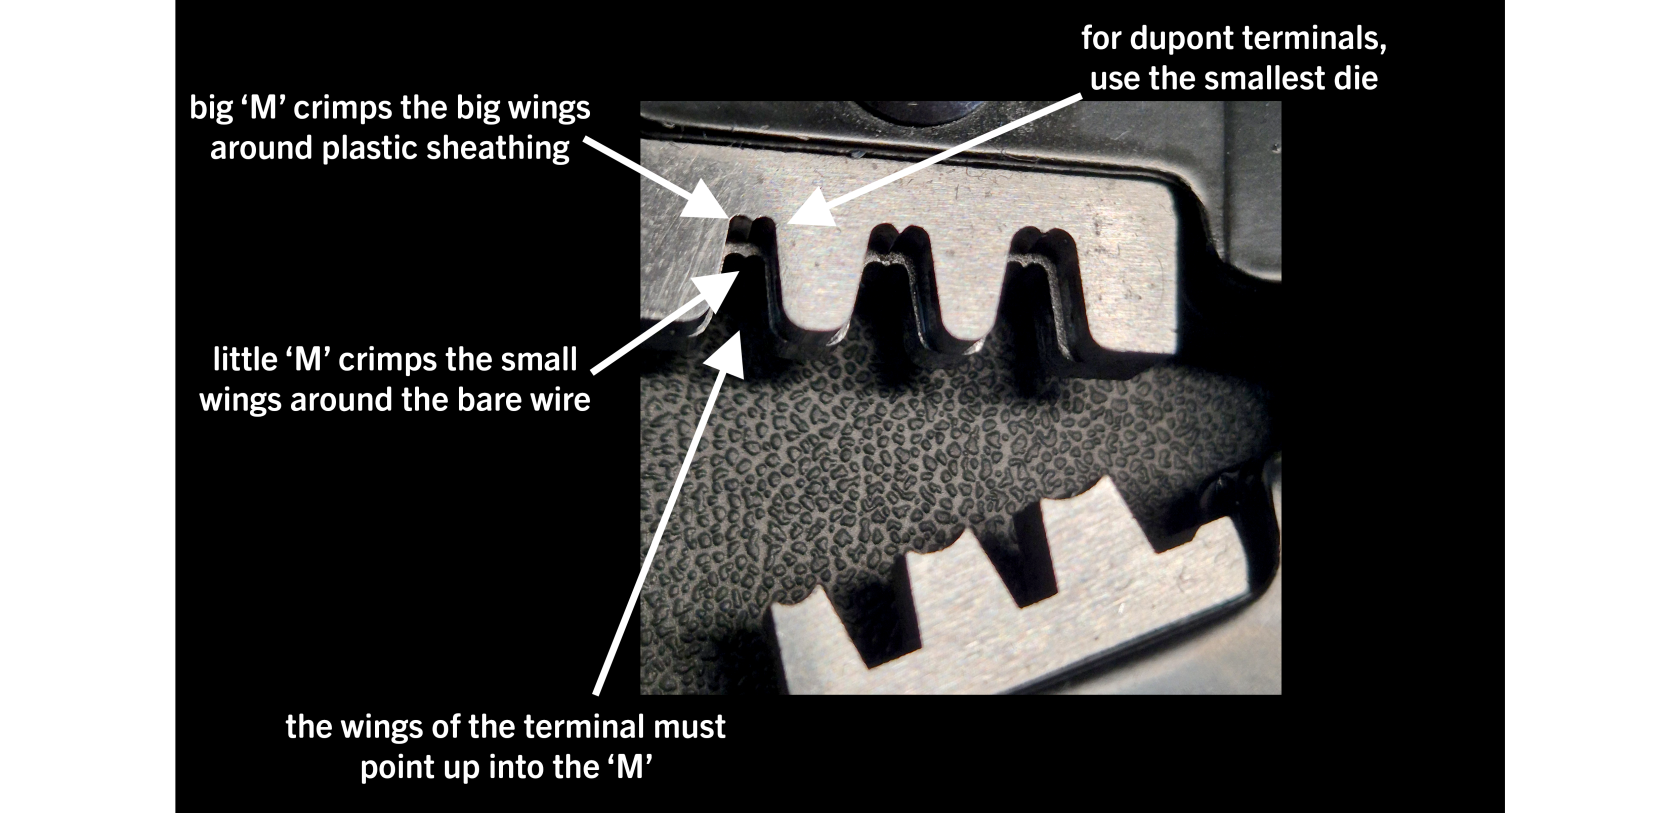
- Side note: a 'die' is piece of shaped tooling (usually metal) which is used to press a work piece into a shape
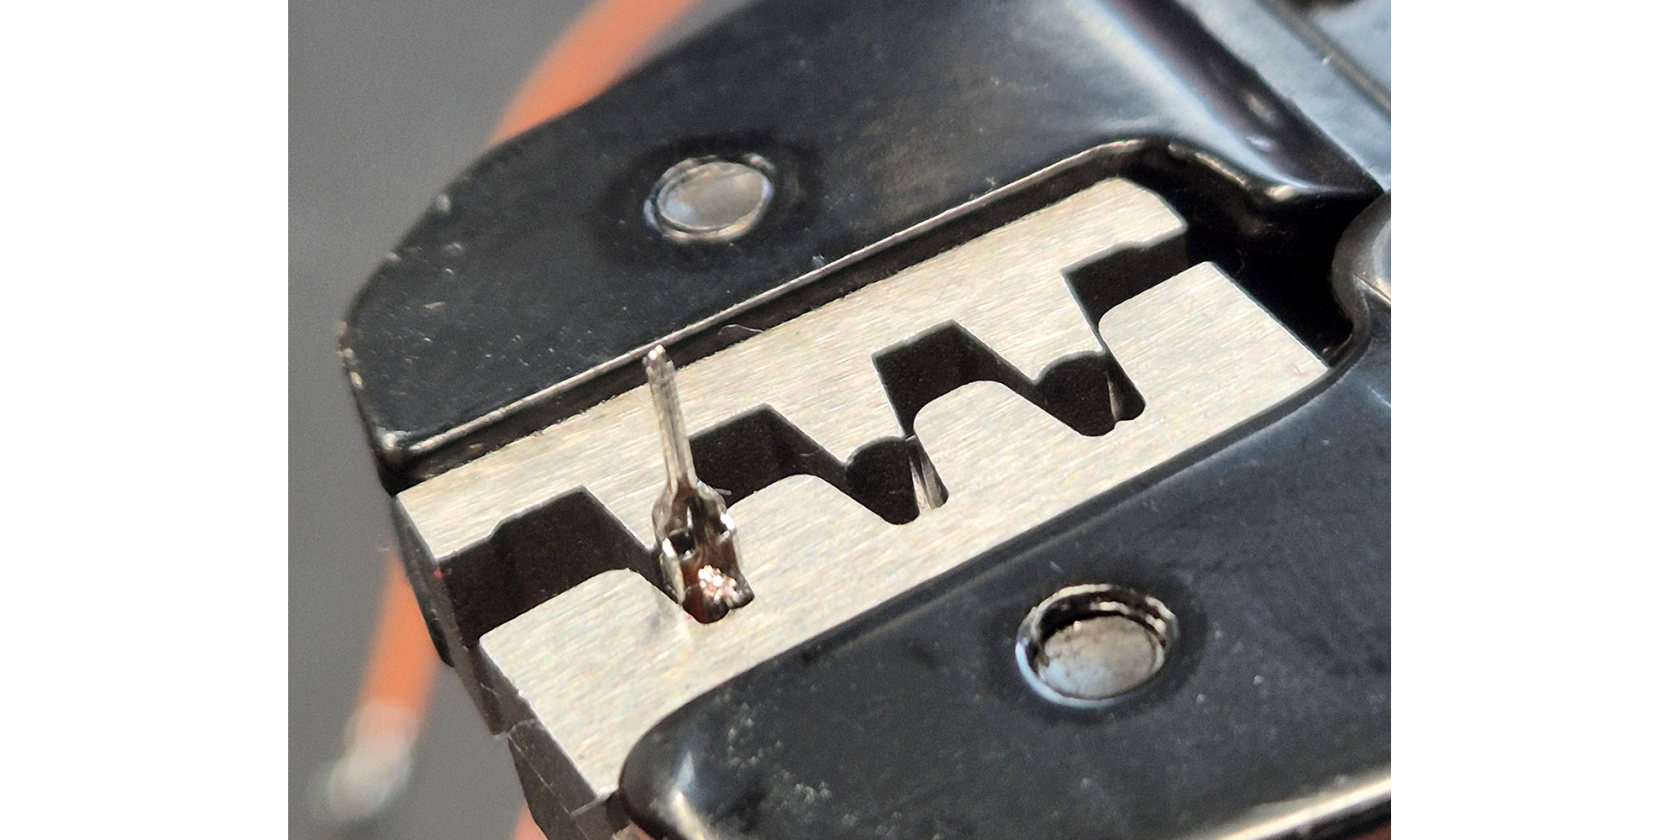
- Insert the terminal (but not the wire) into the tool in the correct orientation
- the wings should be pointing upwards into the 'M' of the tool.
- the big set of wings must be seated in the larger 'M'
- the small set of wings must be seated in the smaller 'M'
- Carefully close the tool 2 clicks of the ratchet to gently hold the terminal in place (you will hear the tool click twice)
- Now pull on the protruding pin or socket end to locate it properly
- You should feel it stop as the big wings hit the side of the smaller 'M' of the tool, this means we are correctly located
- It is time to insert the wire from the side of the tool with the big 'M'
- Carefully guide it in between the 'M' of the tool and the wings of the terminal
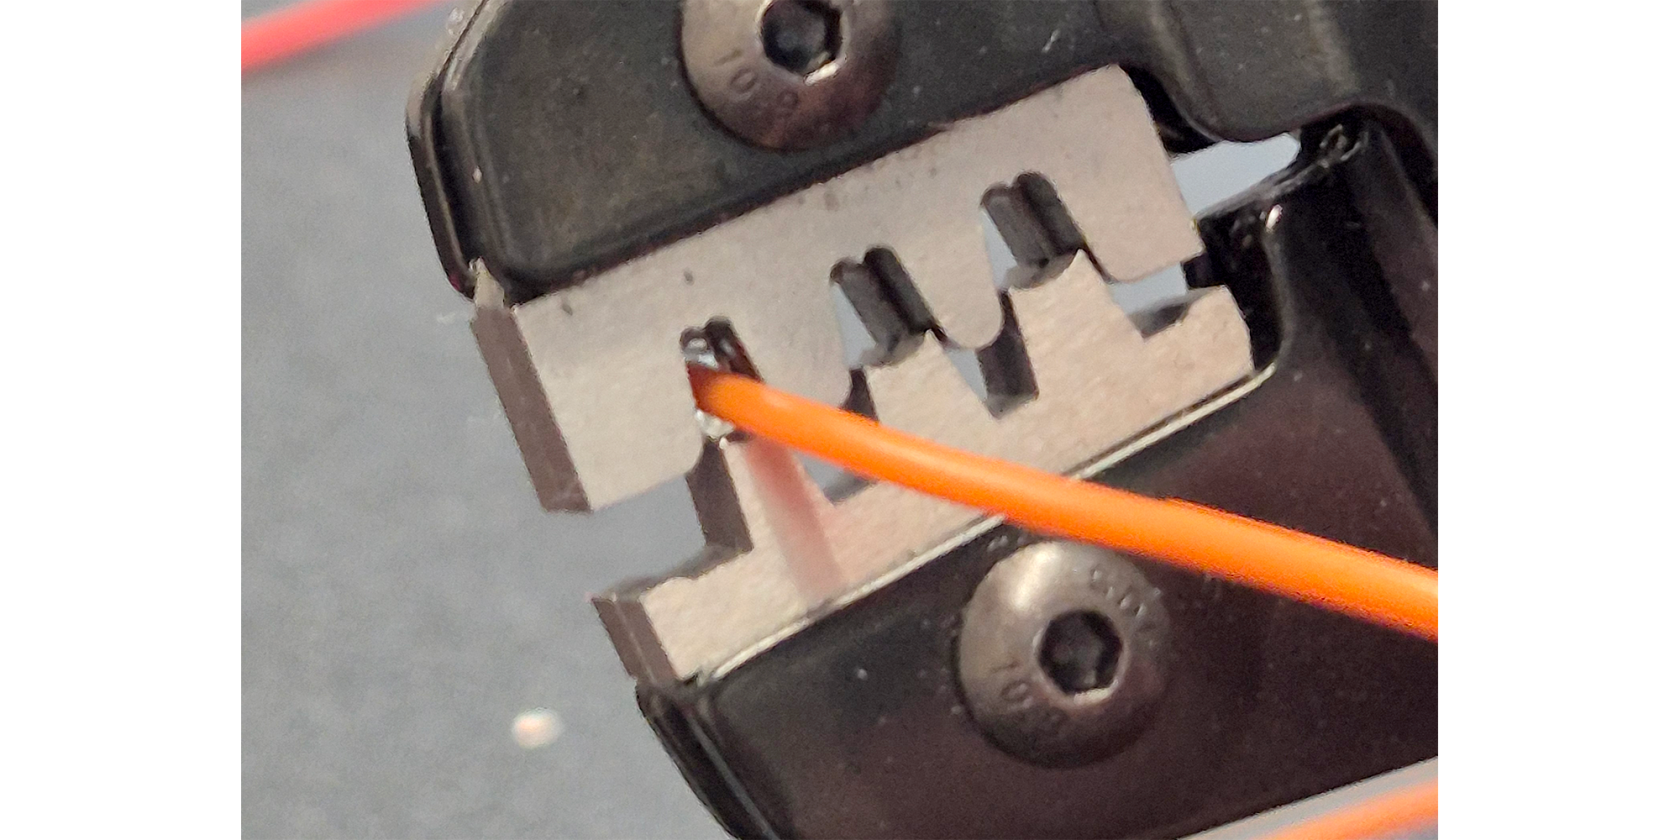
- Carefully guide it in between the 'M' of the tool and the wings of the terminal
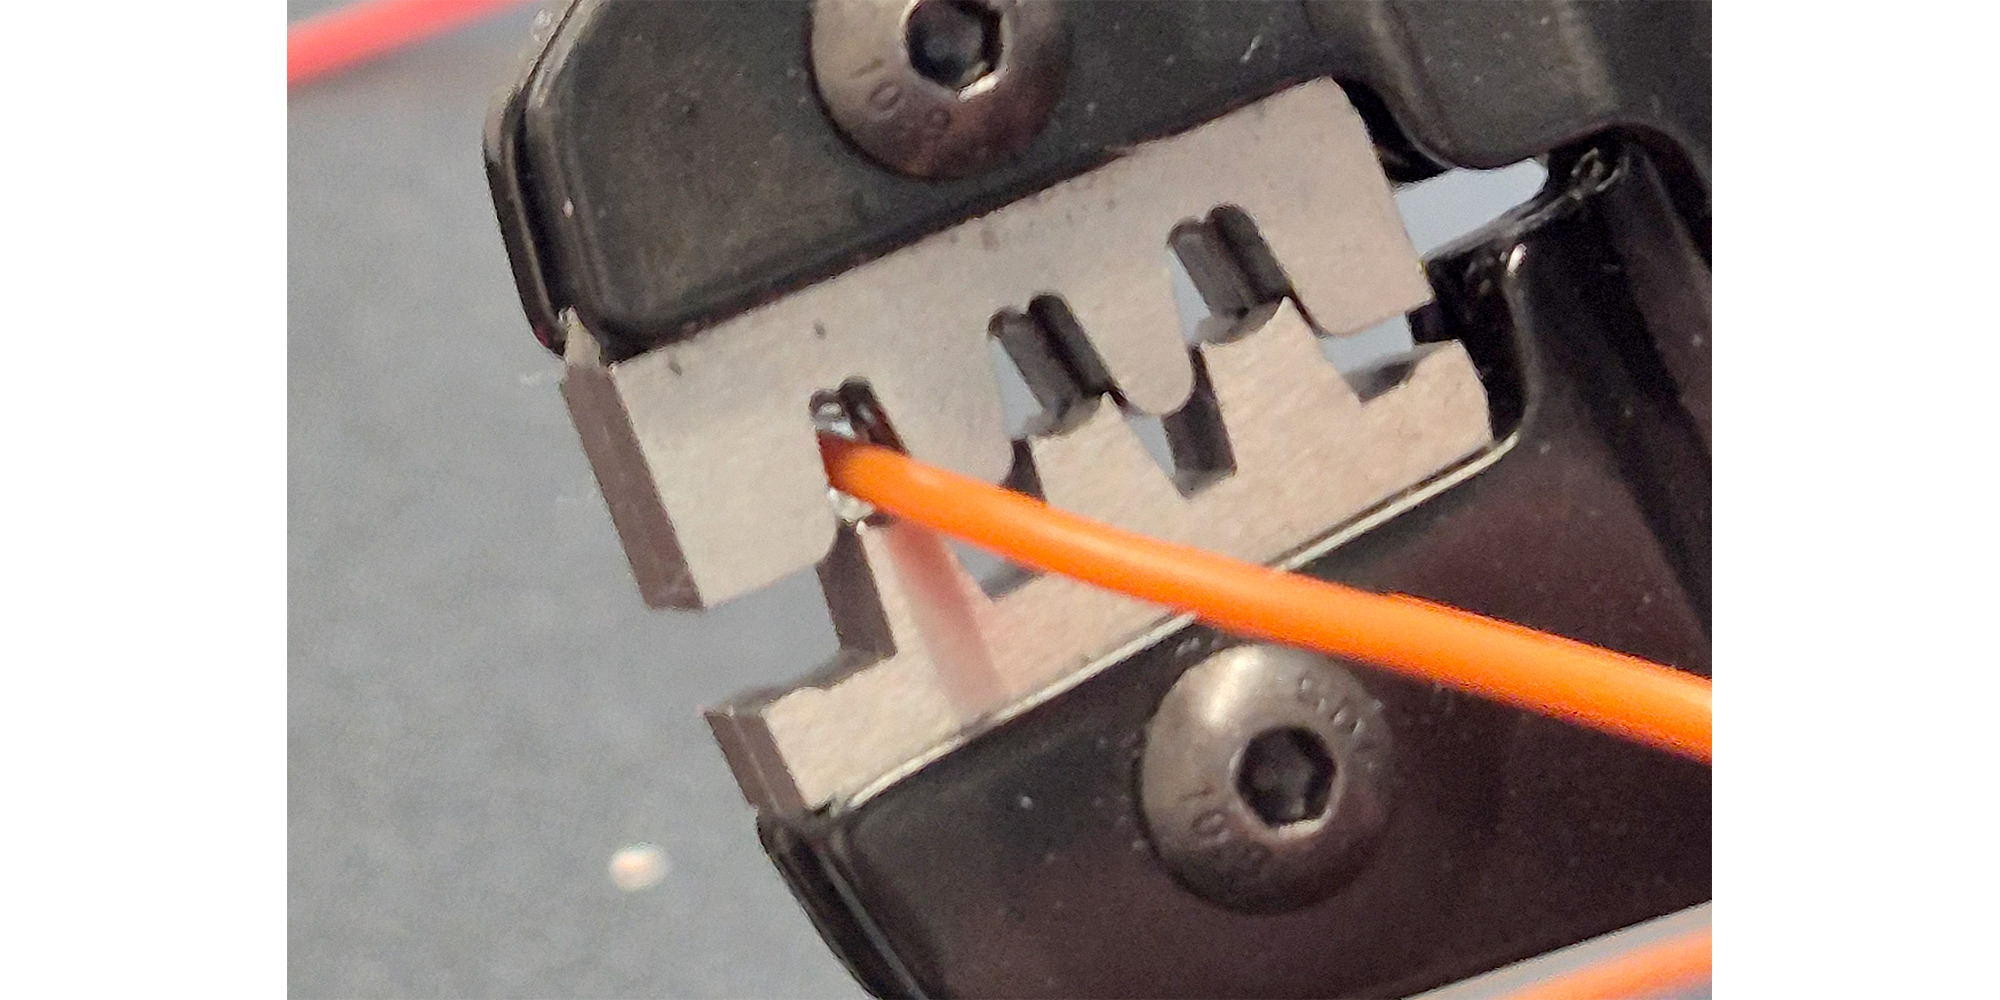
- Now look at the other side of the tool where the pin (or socket) protrudes
- Adjust the position of the wire so that the end of the bare metal is flush with the face of the tool (see the image below)
- If the wire was stripped to the correct length, this means it is in exactly the right place. If the wire is not correctly stripped, go back to the 'Preparing the cable' section
- Okay, everything is aligned! Fully close the crimps as far as they will go until they release!
- This will take a bit of force, so give it a good squeeze!
- If you are struggling to get your hands around both handles of the tool, rest the lower handle on a workbench and push from the top handle
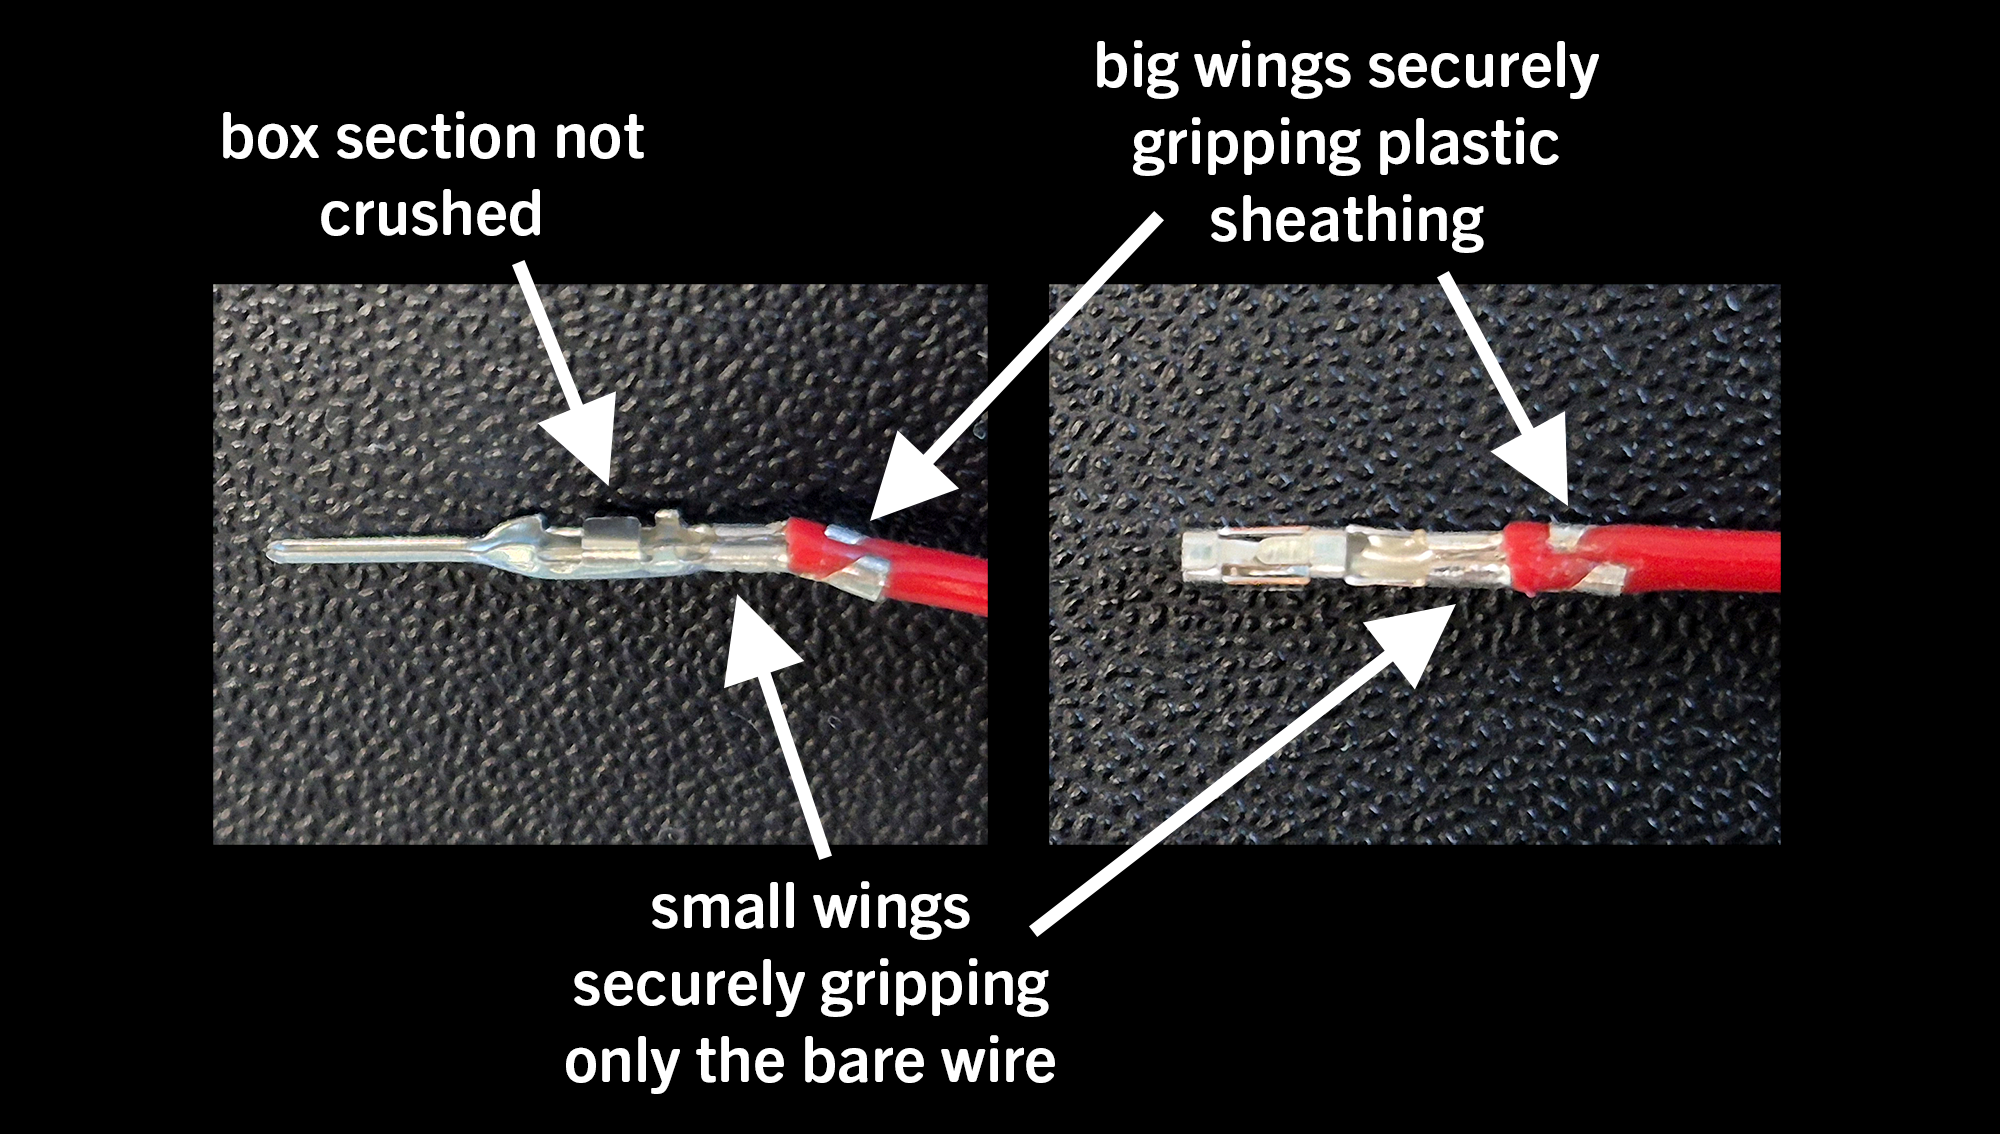
- Remove the wire from the crimps and inspect your work, it should look like the image below:
Inserting into the housing
The hard part is over, now the crimped wire just needs to be inserted into the housing!
- Select the housing with the number of points you need: could be just one, could be 8 or more!
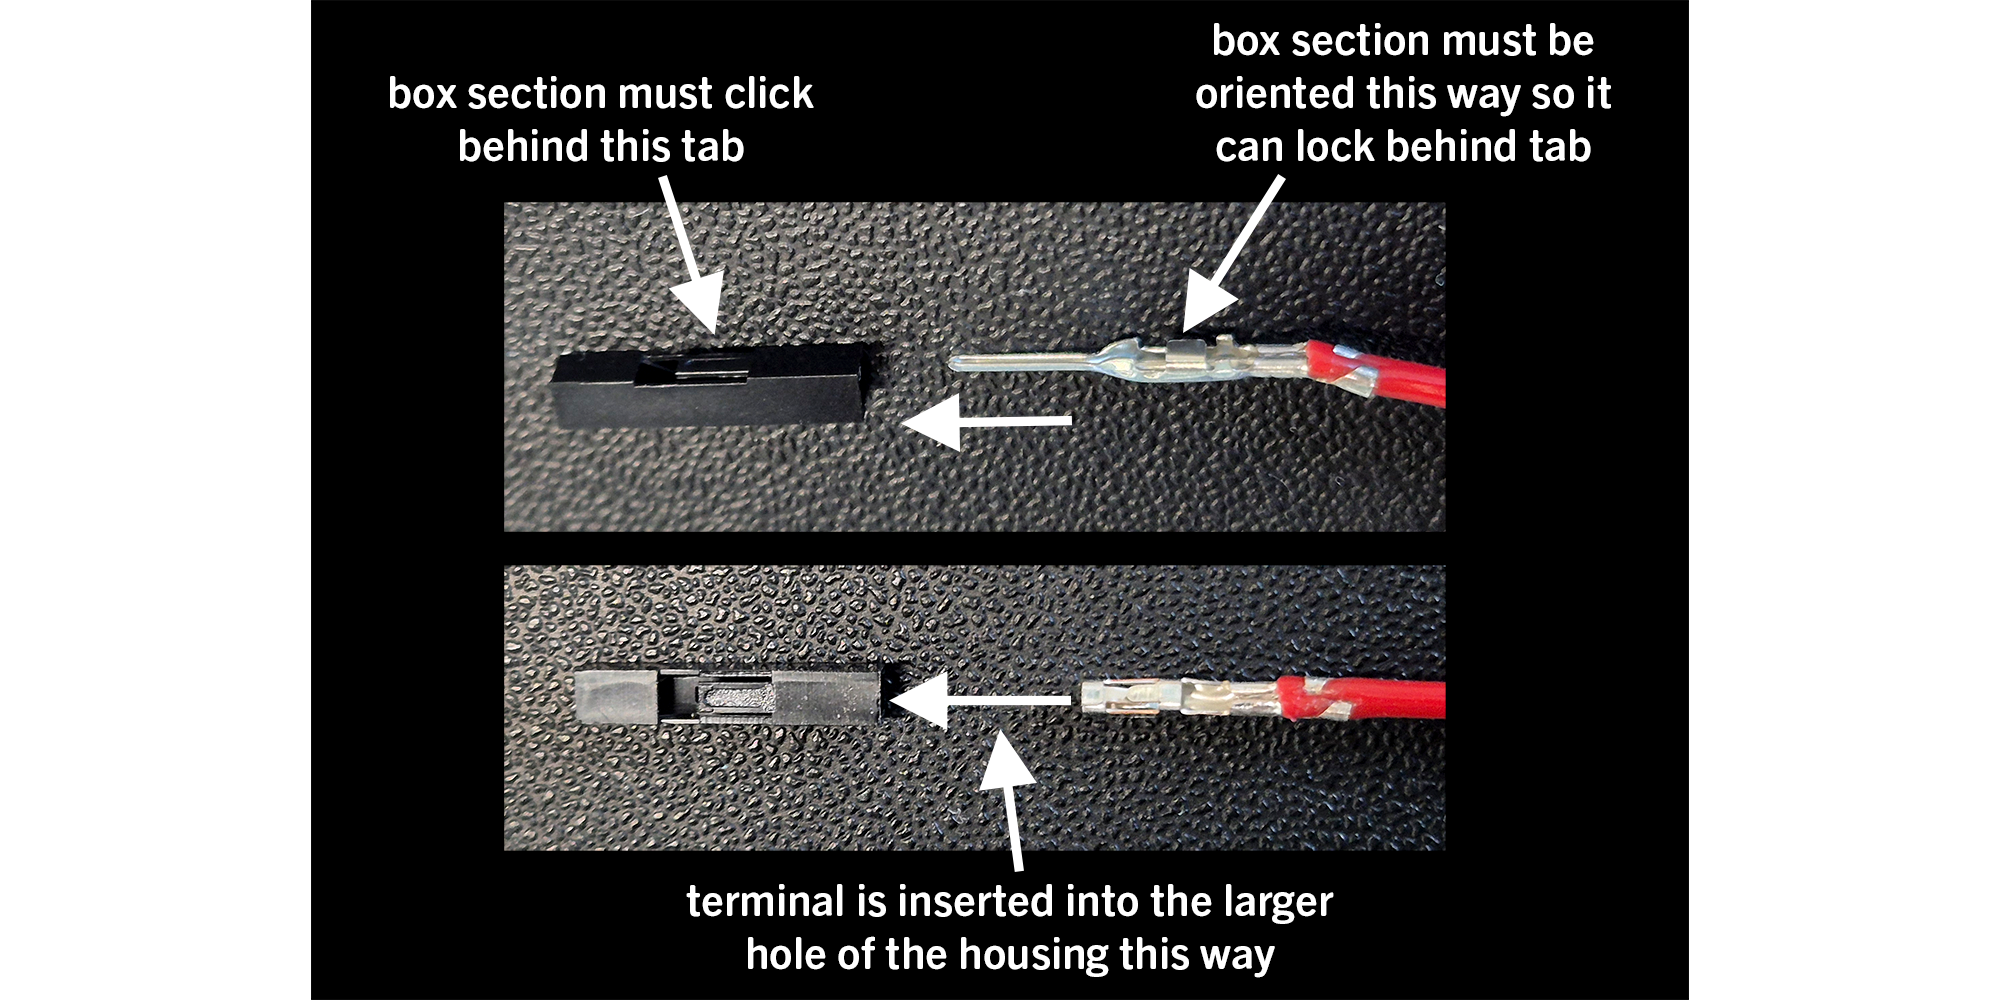
- Align the cable and housing correctly
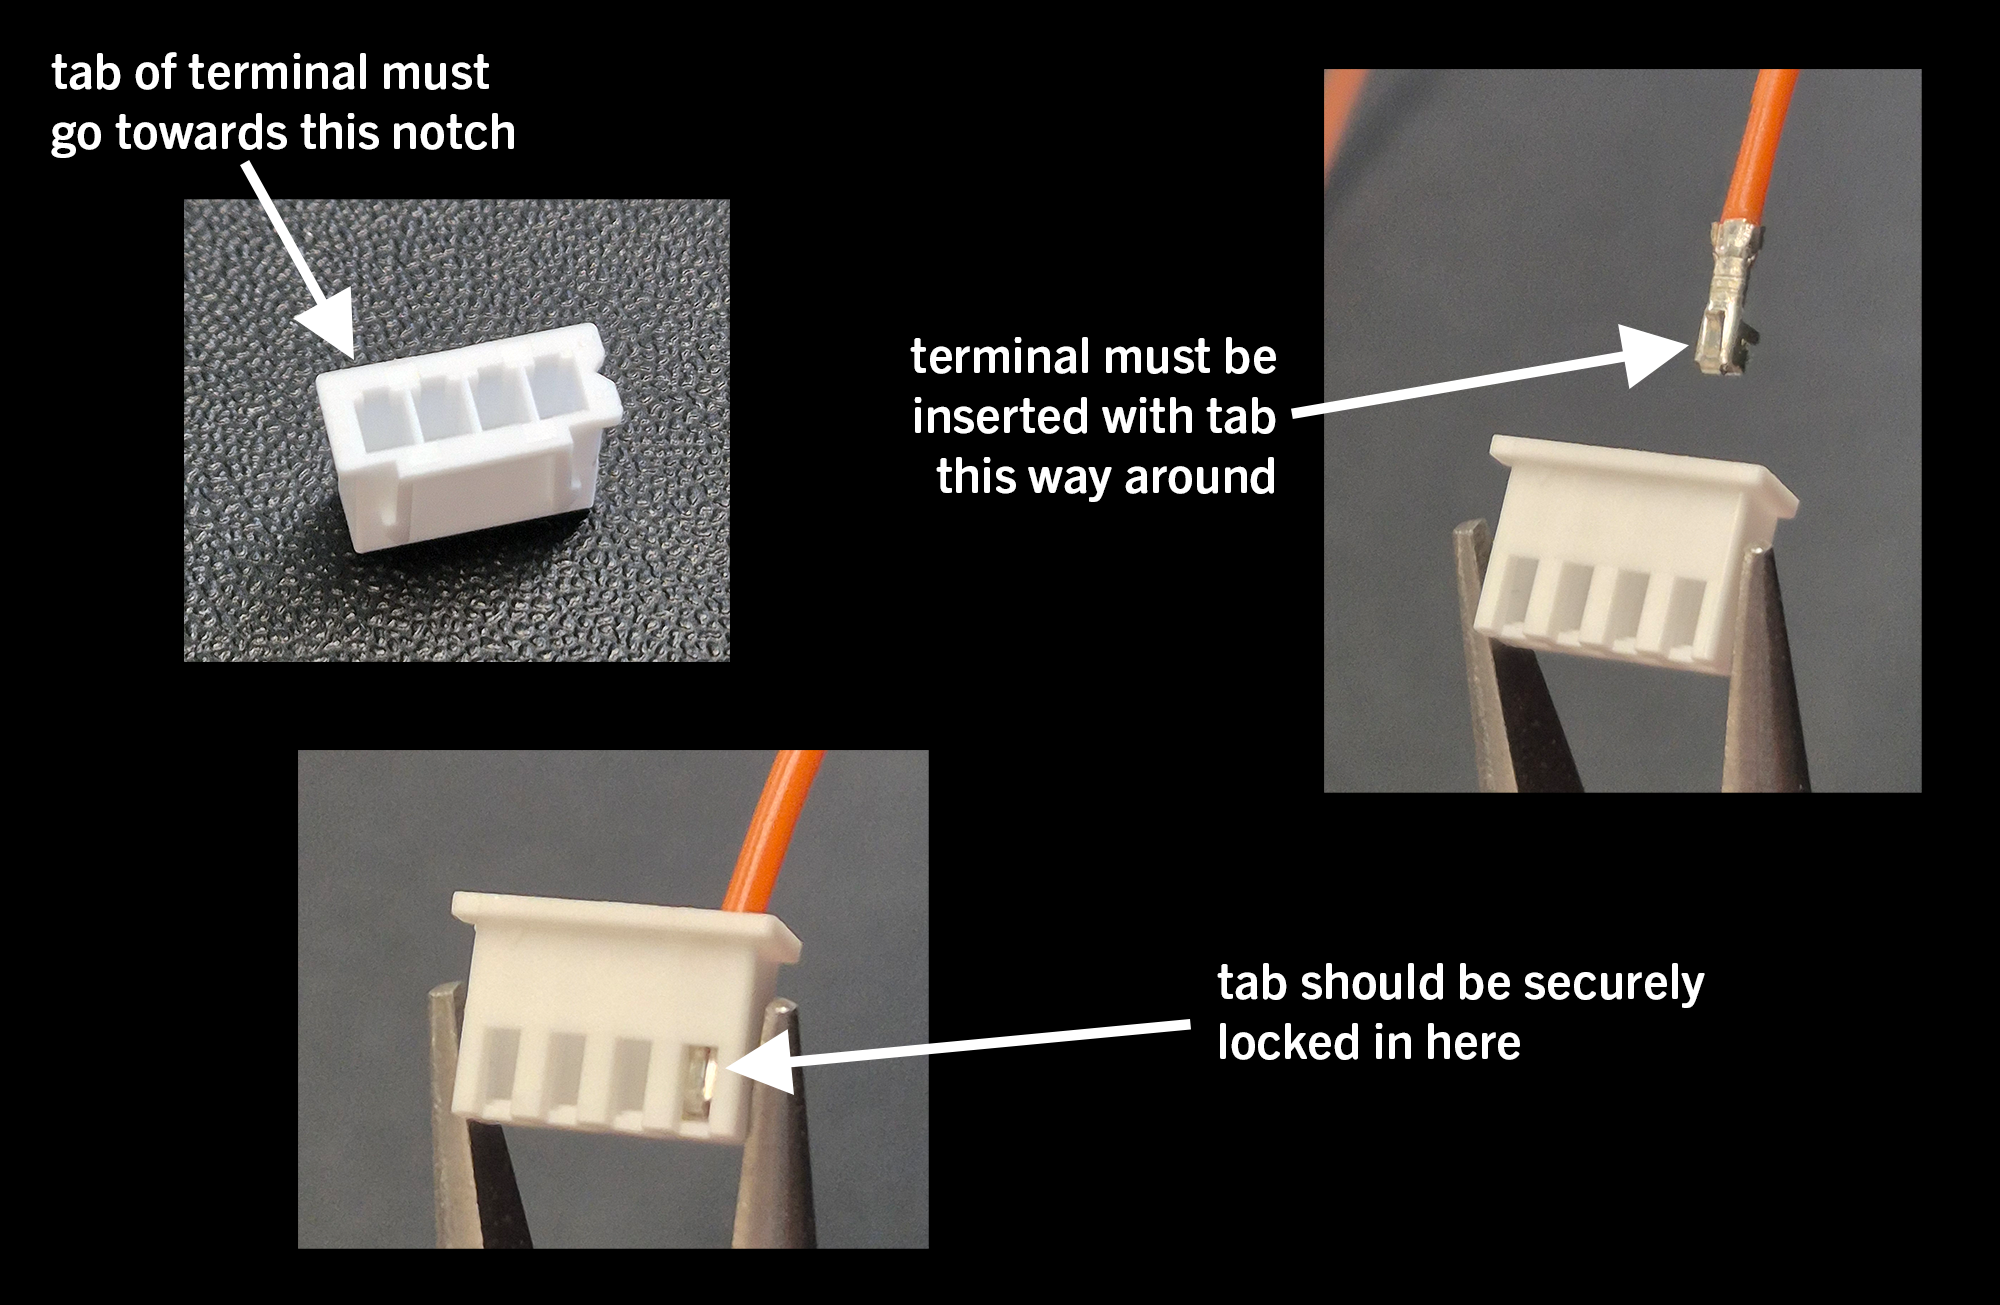
- Align the crimped wire so that the tab of the terminal is oriented to the notch in the hole of the housing (the tab will lock behind that notch to make the cable secure)
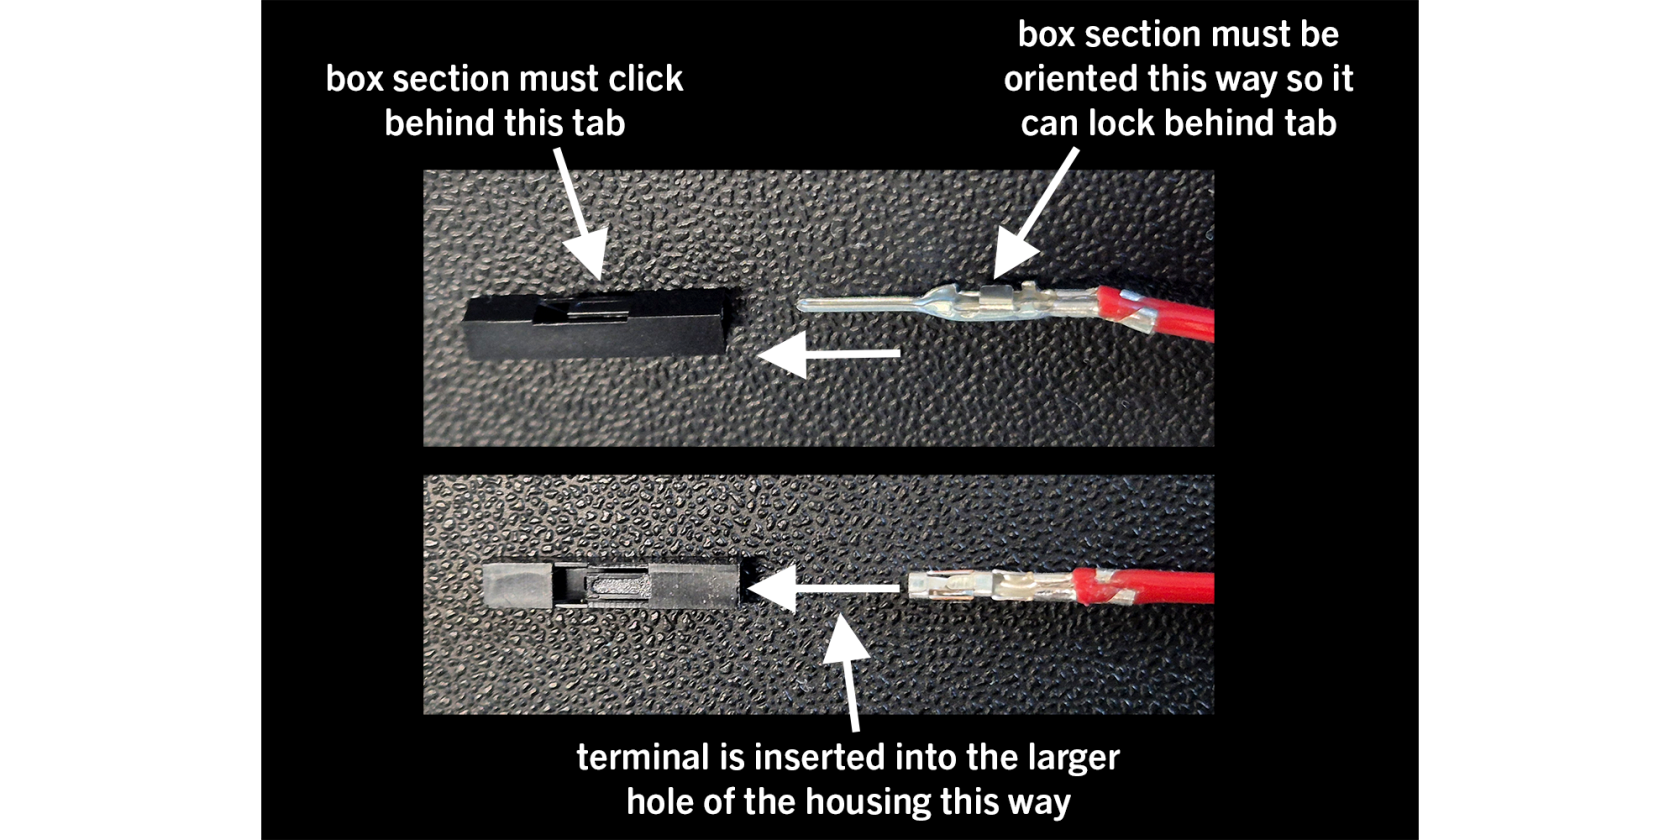
- Align the crimped wire so that the tab of the terminal is oriented to the notch in the hole of the housing (the tab will lock behind that notch to make the cable secure)
- Push the crimped wire into the housing until it clicks (the click is the box section locking behind the tab)
- Tip: if you're having trouble getting it into the housing, I find that the sheathing of the cable we have here is a little large, sometimes it helps to give the crimped wings around the sheath an extra squeeze with some pliers before inserting
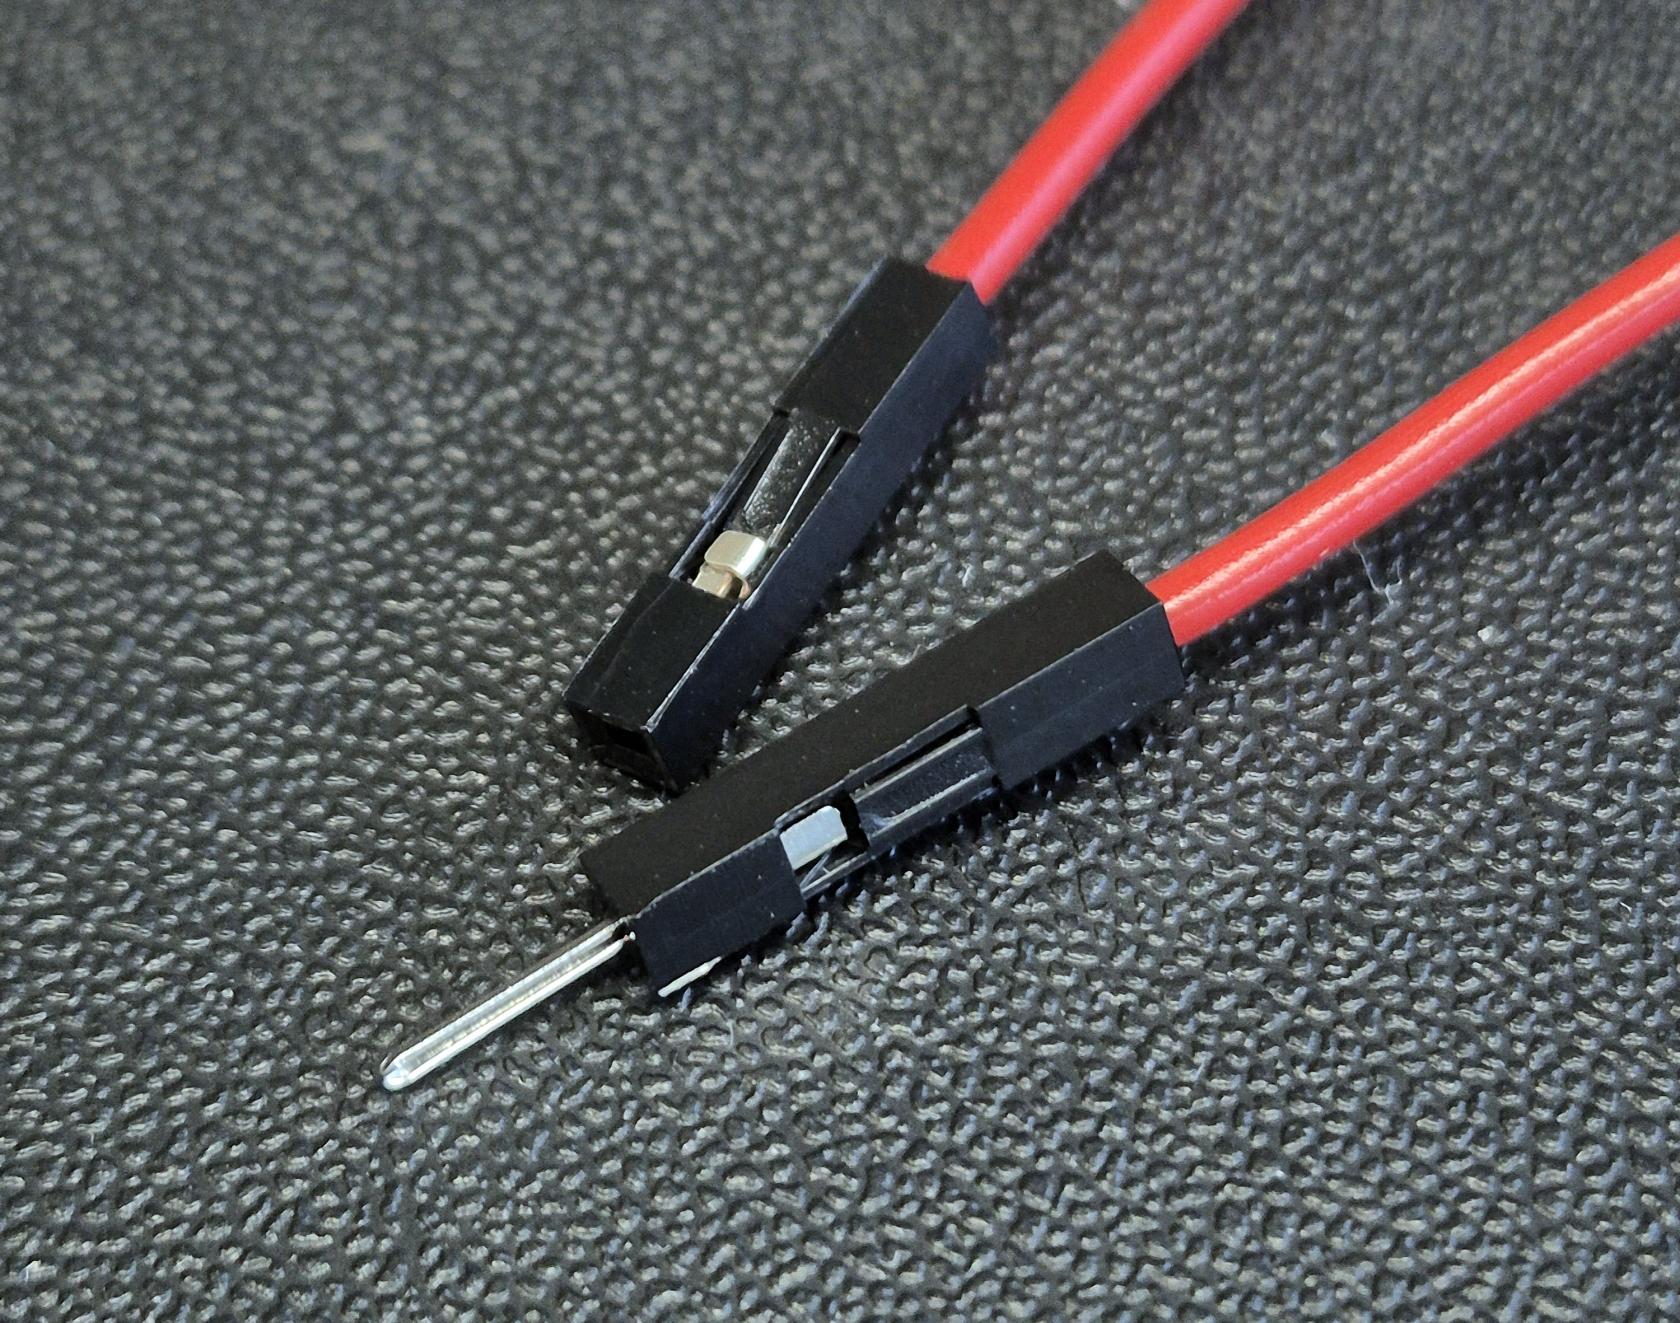
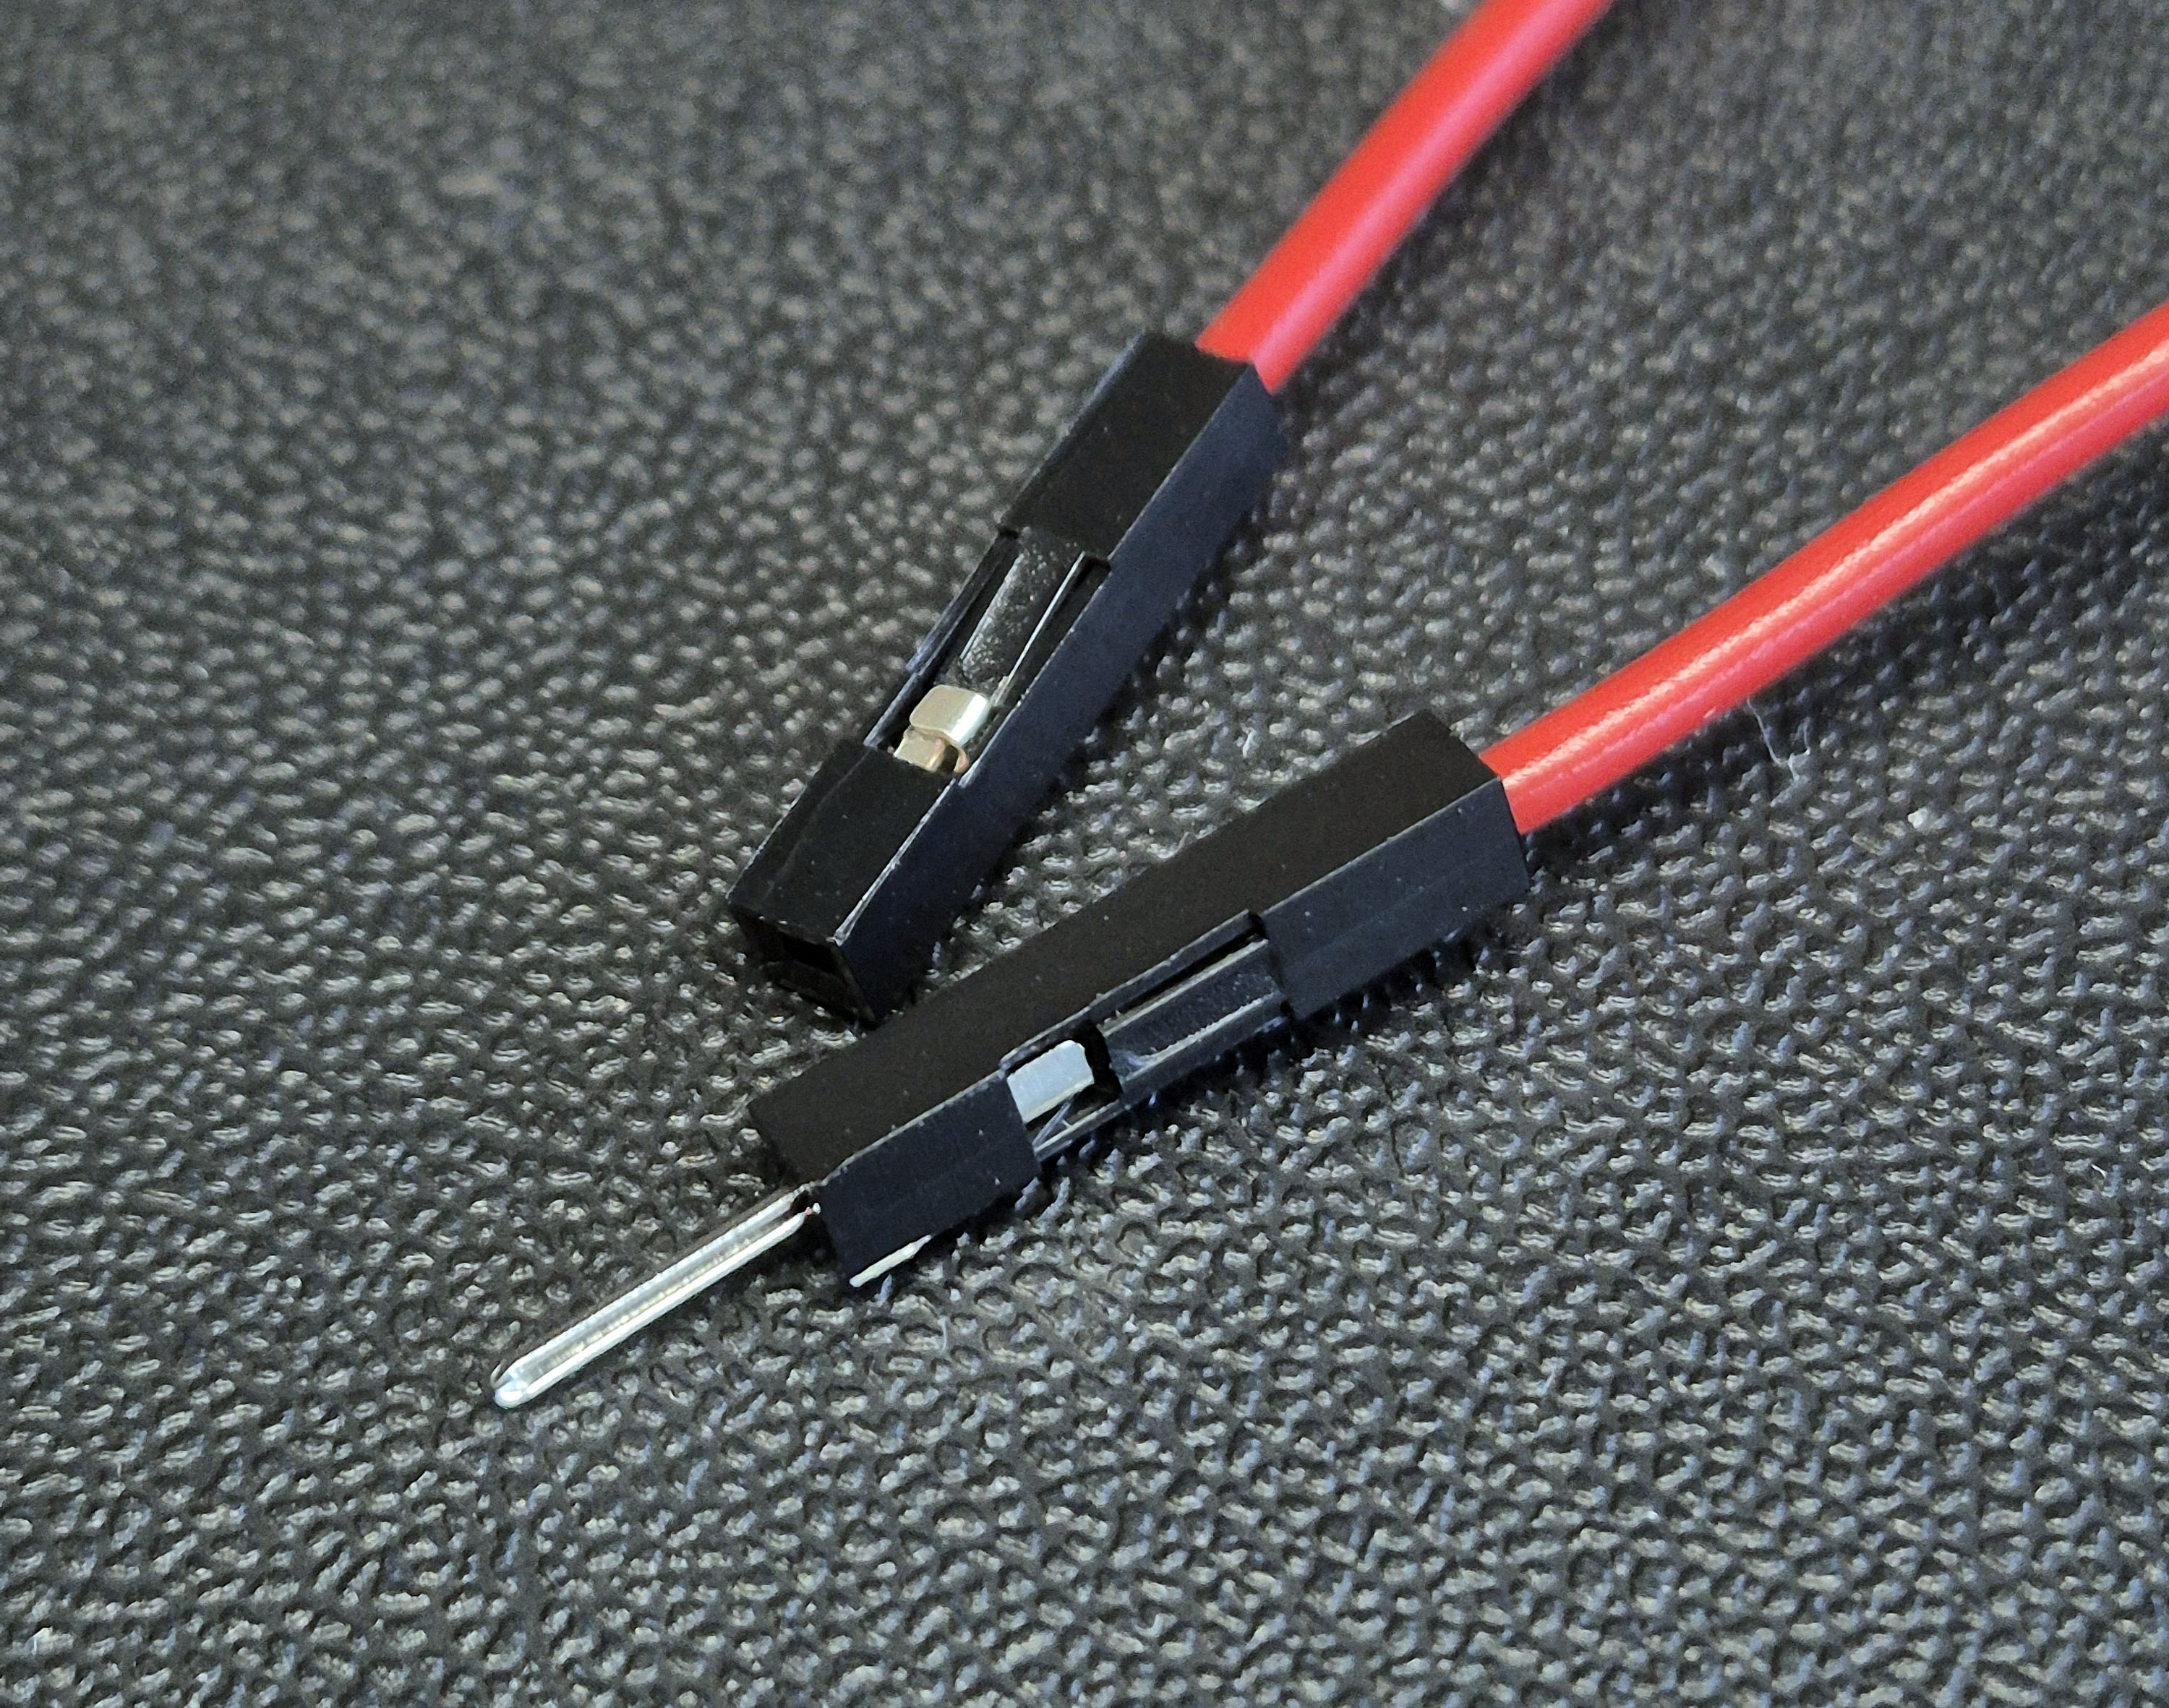
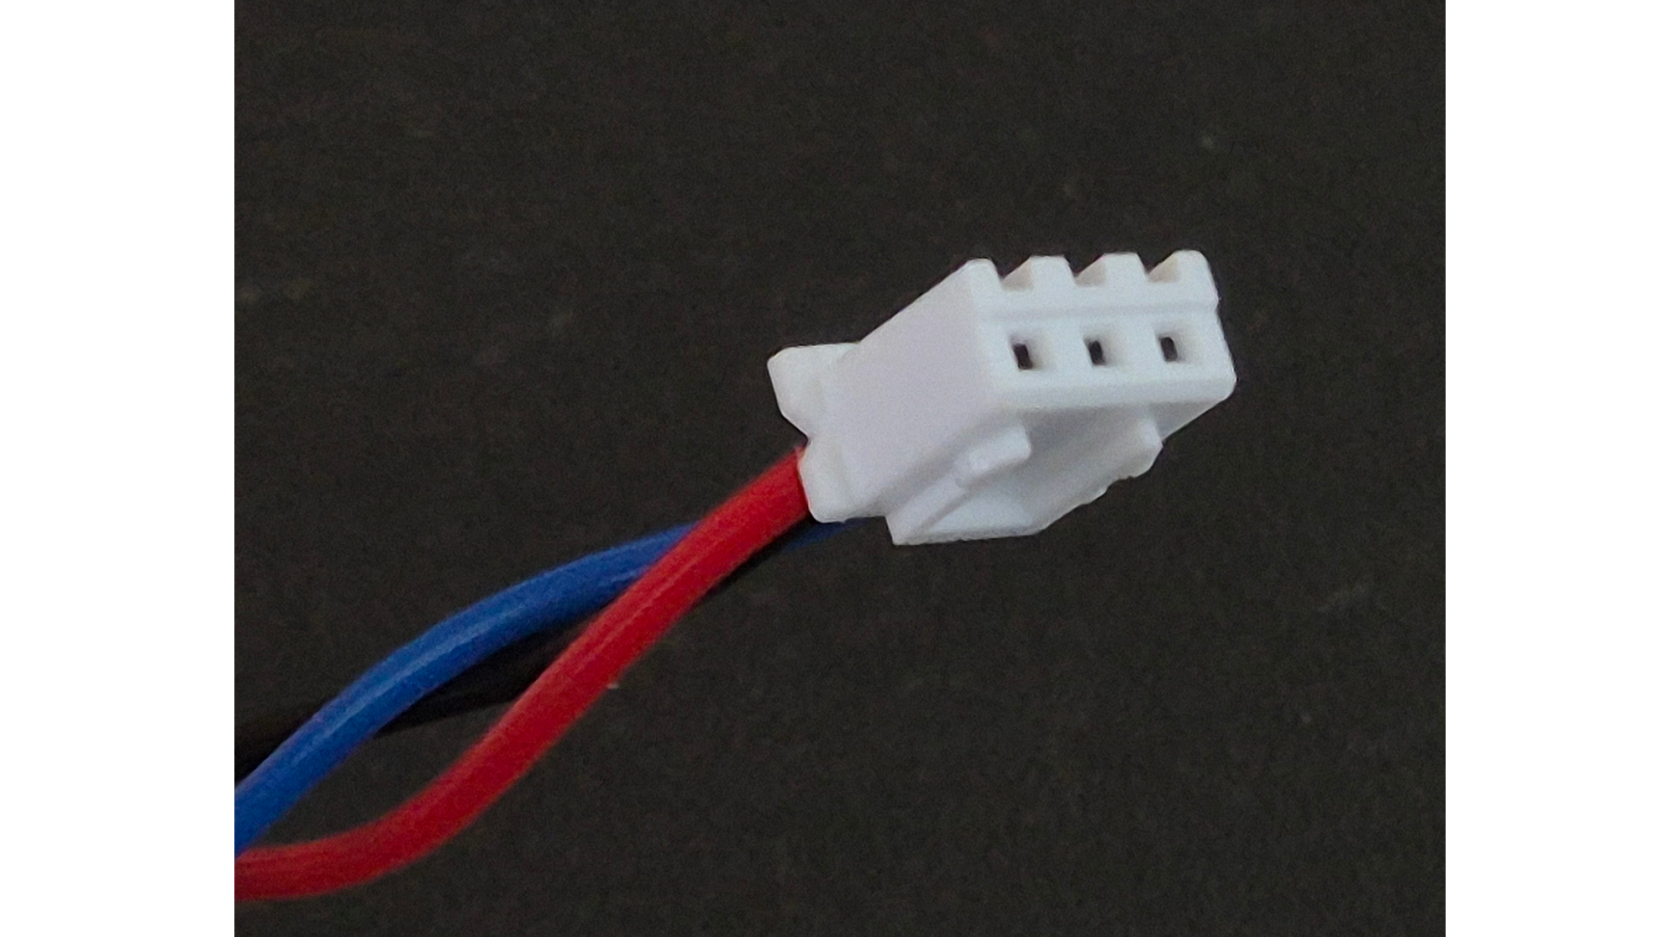
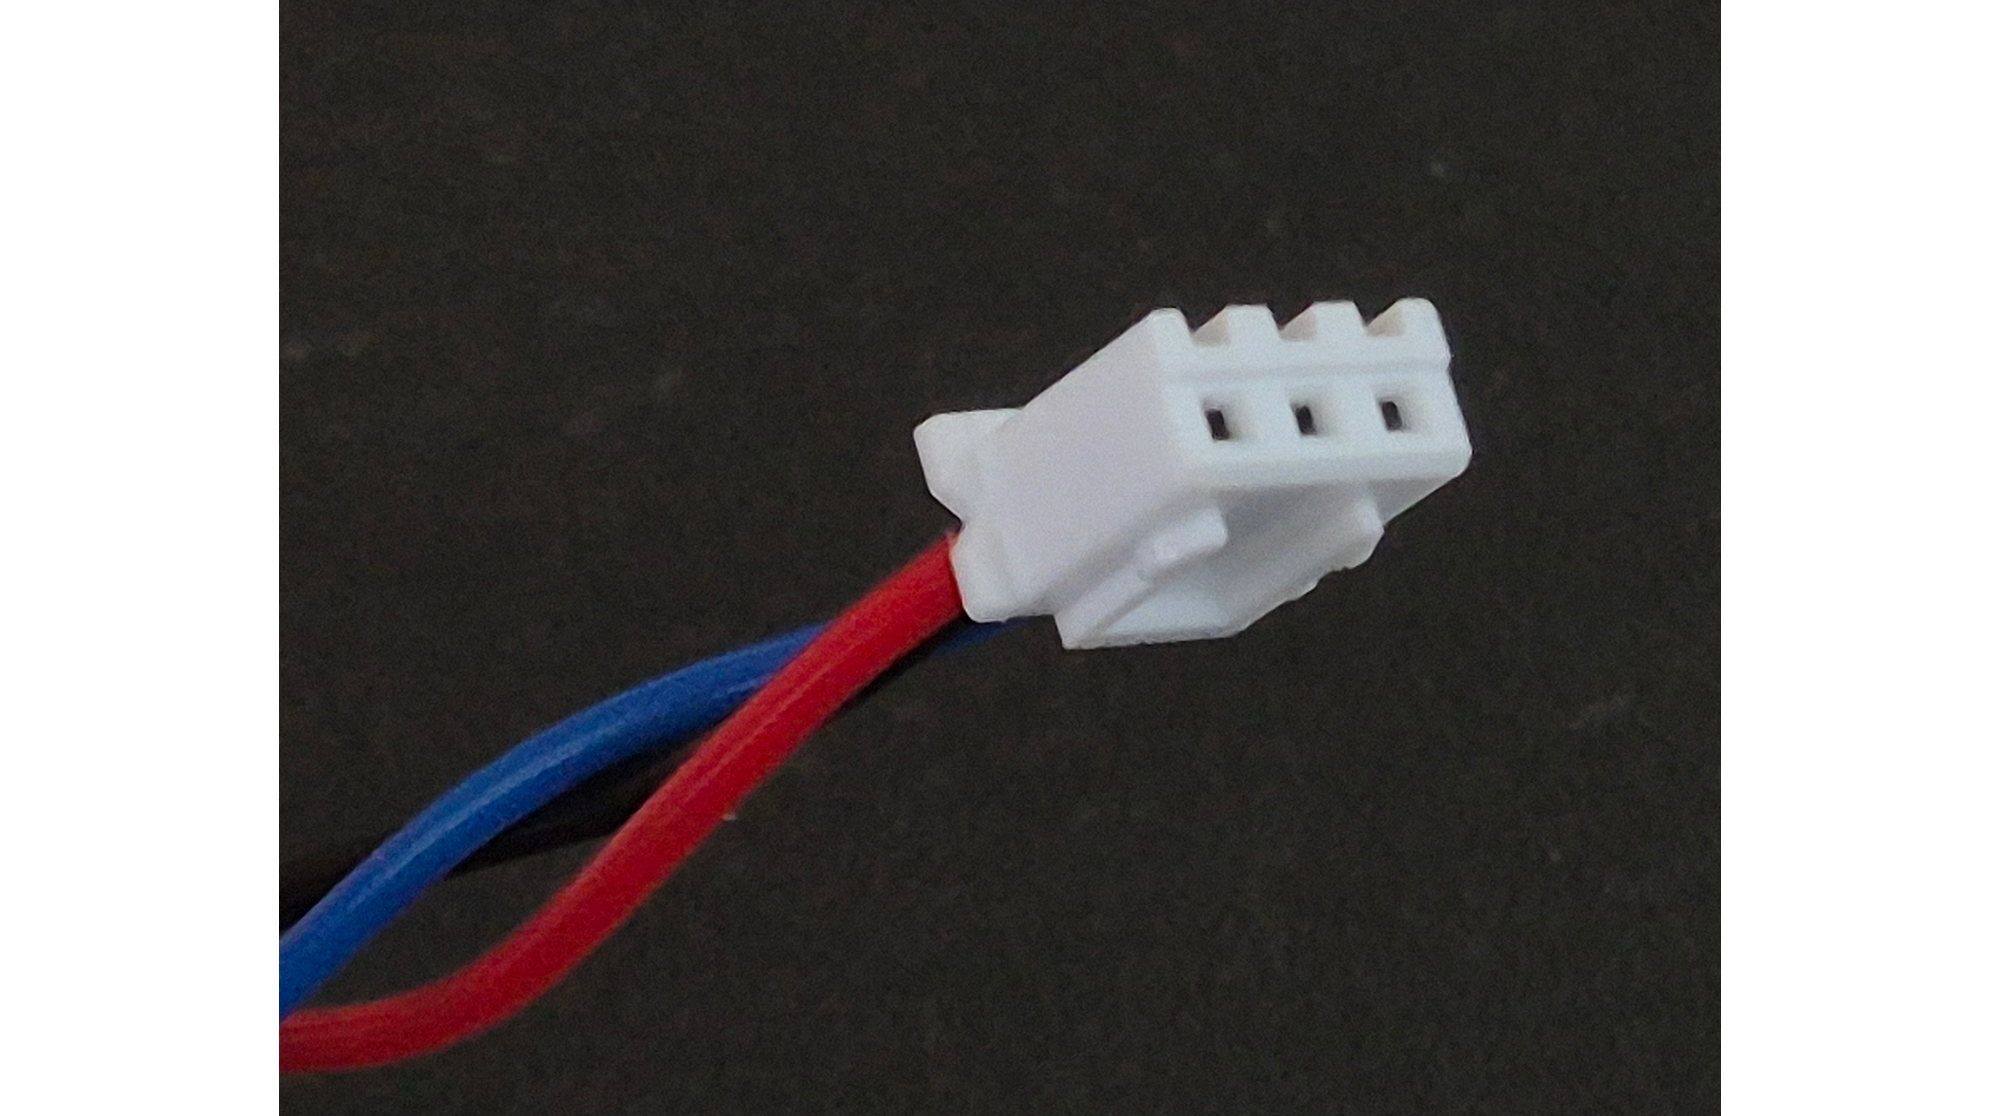
- Now give the wire a tug to make sure it stops against the tab and is secure and that is it! Your cable should look a little like the example below, lovely!
How to make JST connectors
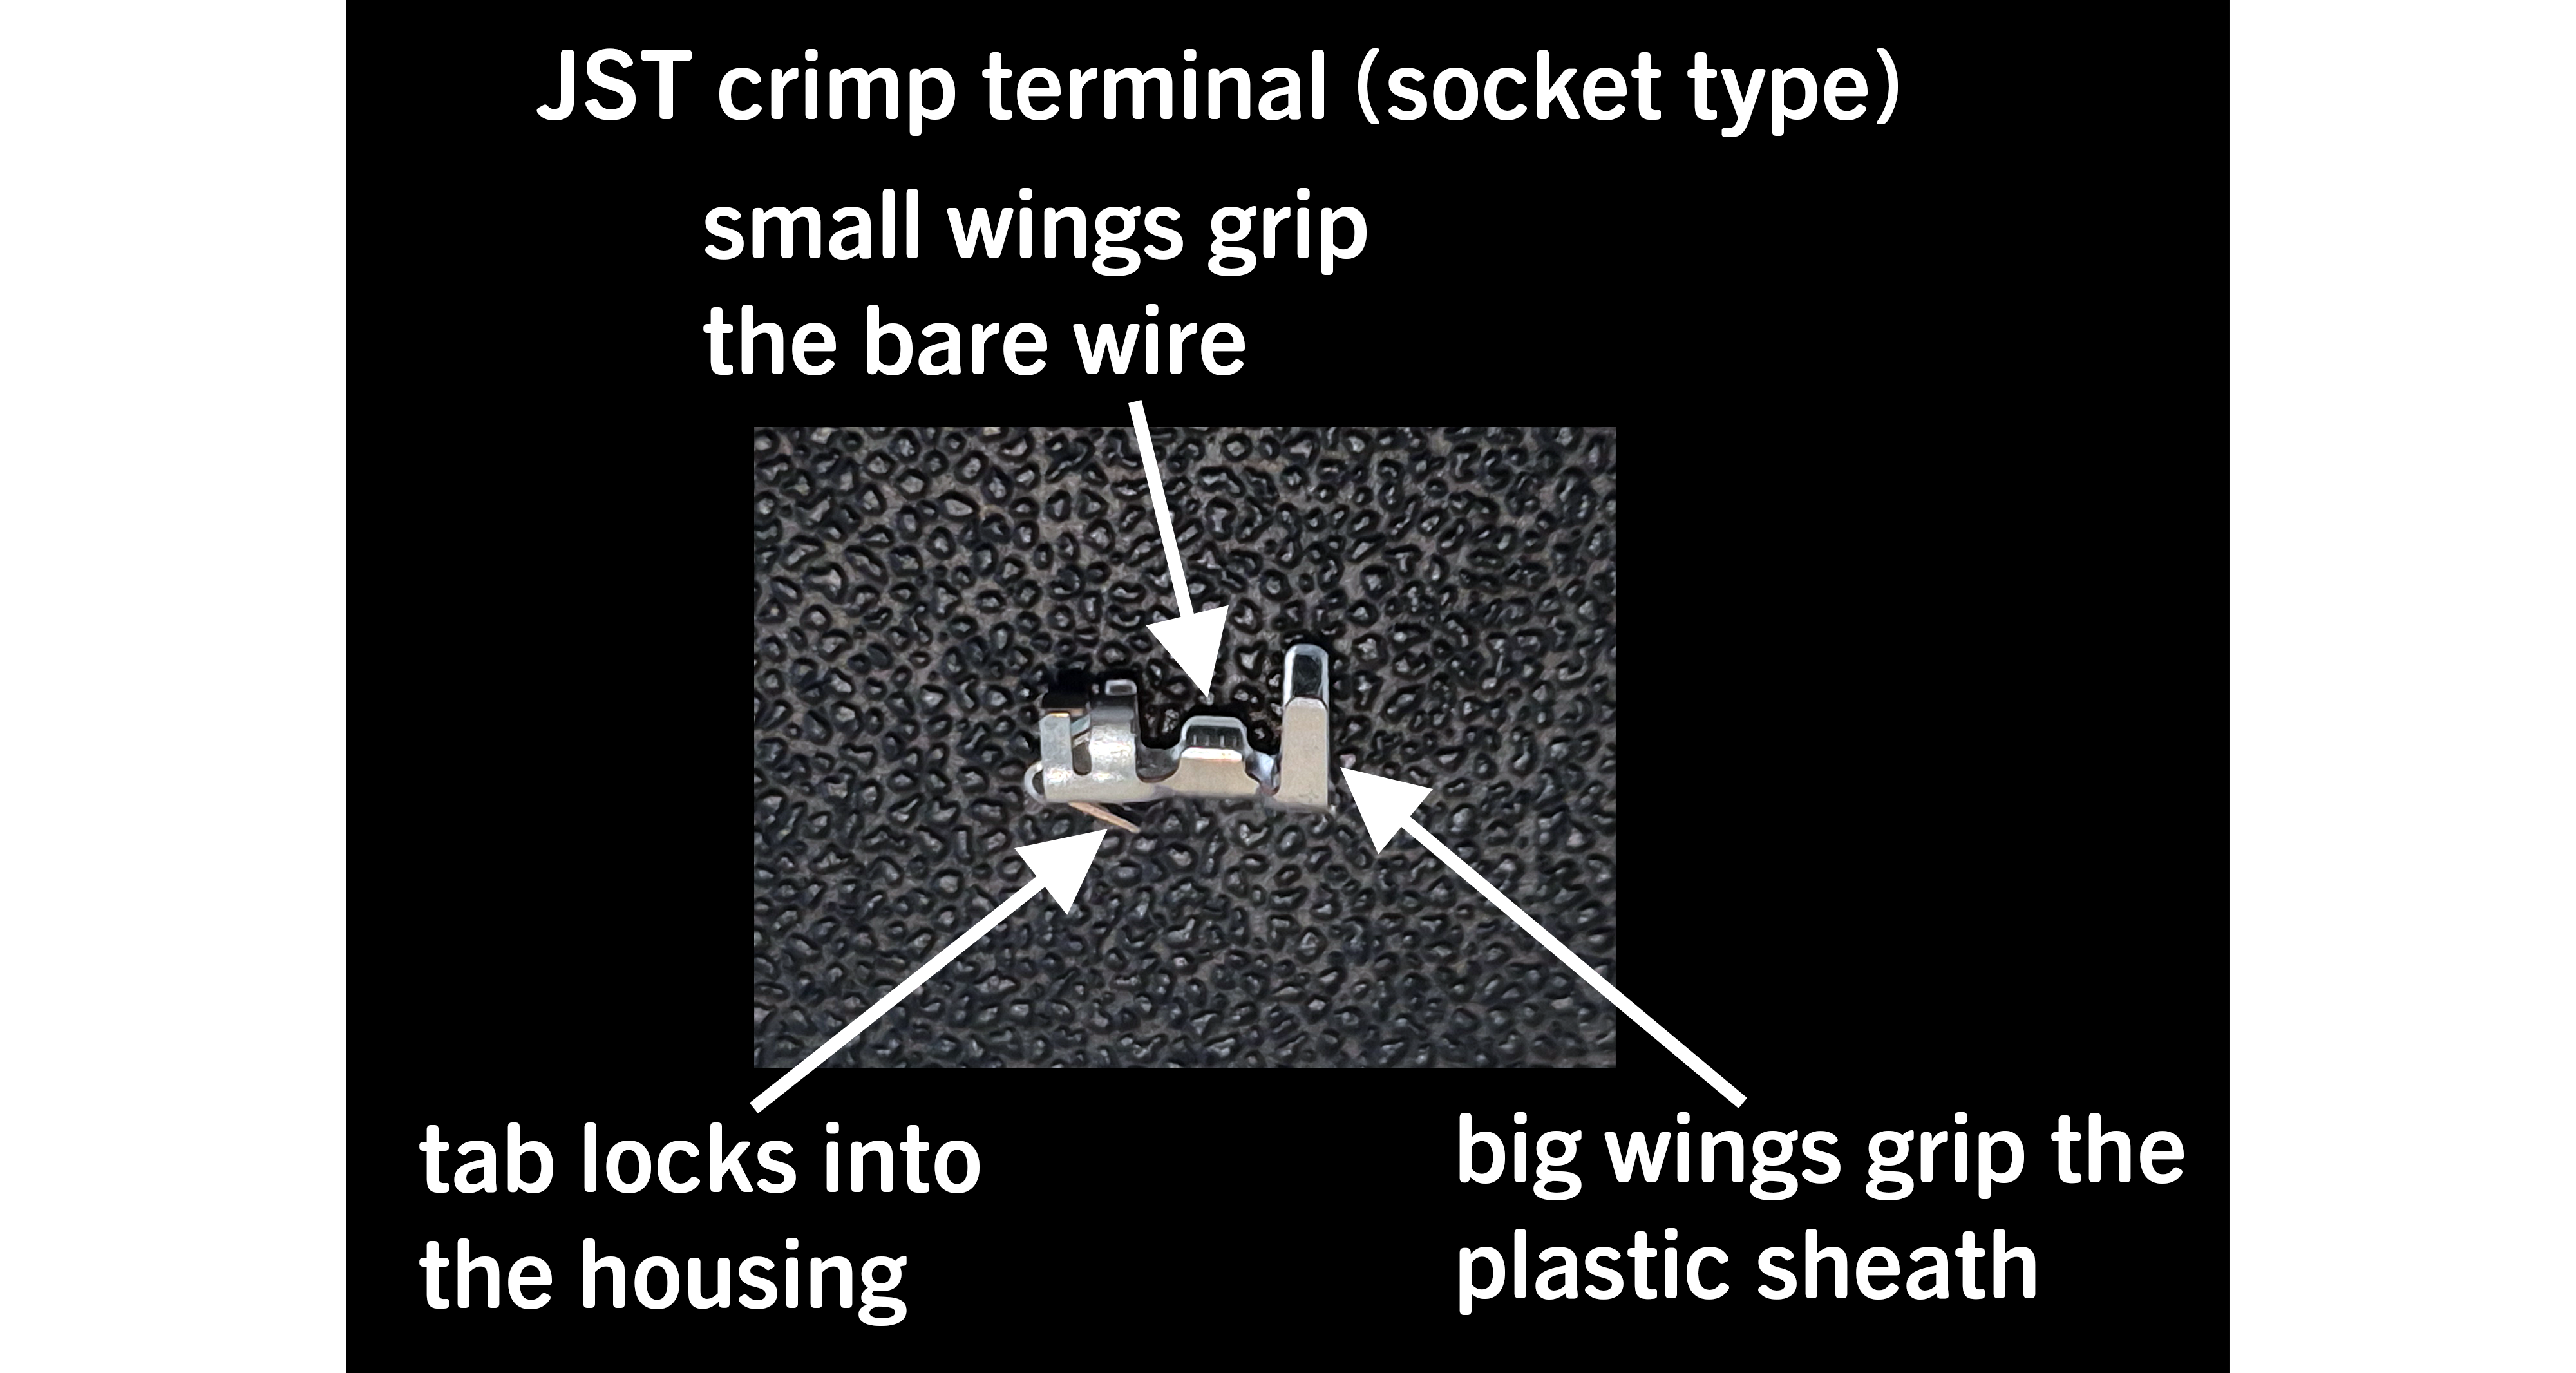
Crimping JST connectors is very similar to Dupont but with a few minor differences. The terminals also look very similar, but with some crucial (and subtle) differences. So don't get them confused! Before starting, familiarise yourself with the terminology in the image below as this will be used throughout this guide:
Preparing the wire
This is the same as preparing the wire for Dupont terminals, but the length is slightly different:
- The key to crimping connectors well is to strip the wire to the right length. This is crucial! If it isn't the right length, don't crimp it!
- Use wire strippers to either expose the right amount of bare wire or strip of more than you need to and trim it to the correct length
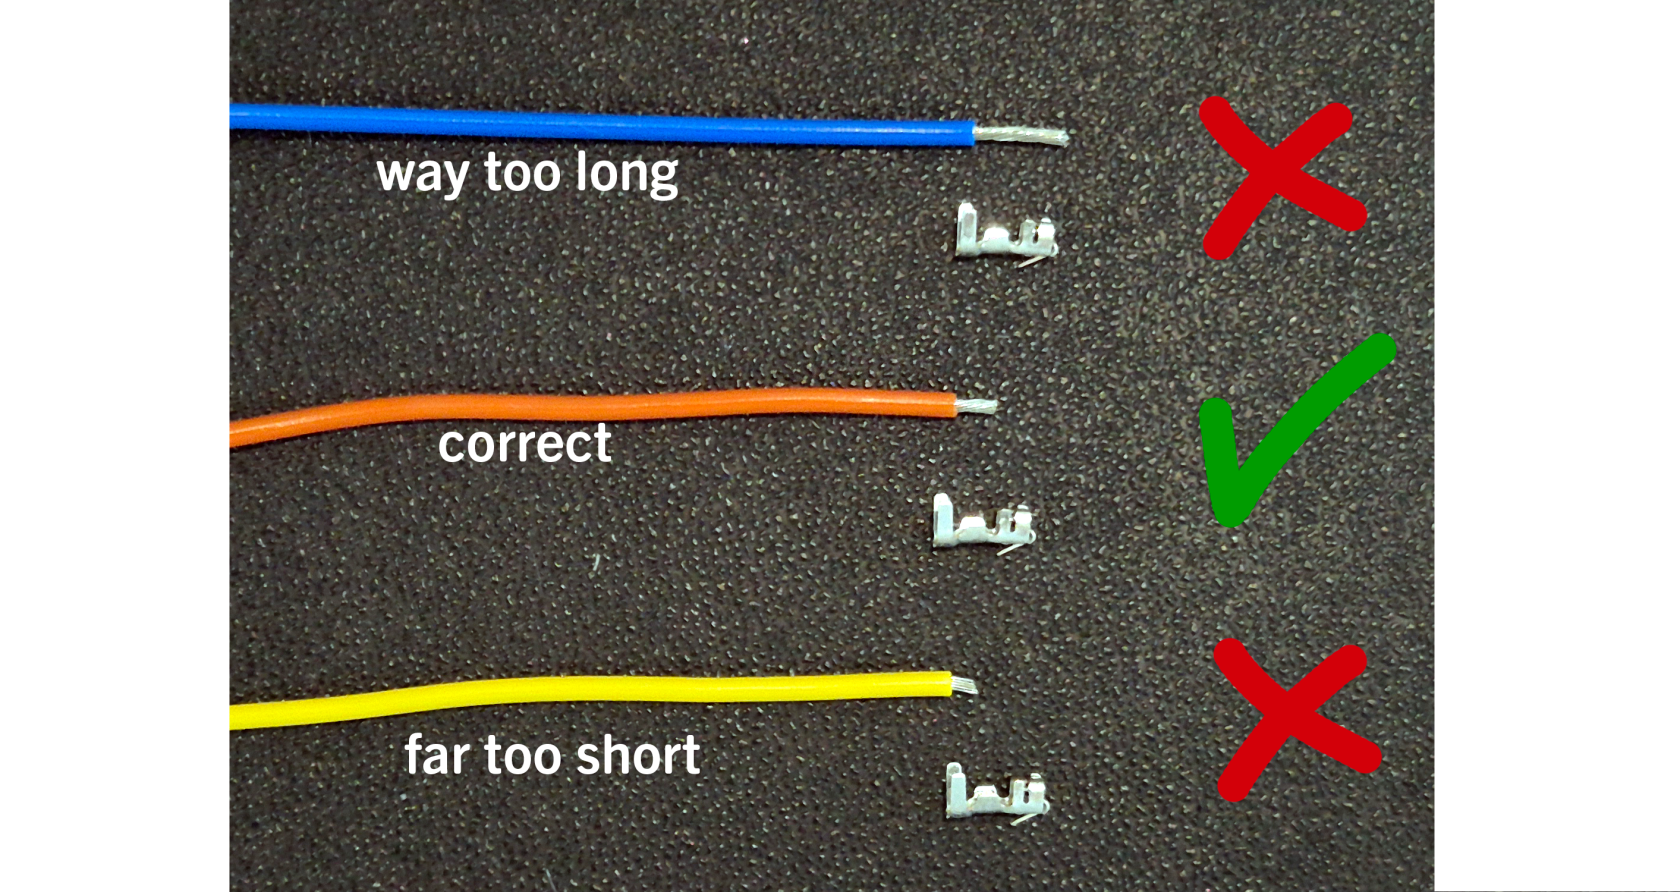
- For JST terminals, this is approximately 3mm but it is much easier to hold the bare wire up to the terminal and visually check it is about the same length as the small wings
- See image below for the correct length. If it does not look like the orange wire you must correct it! Either strip a little more off or trim back the wire.
Crimping the wire
-
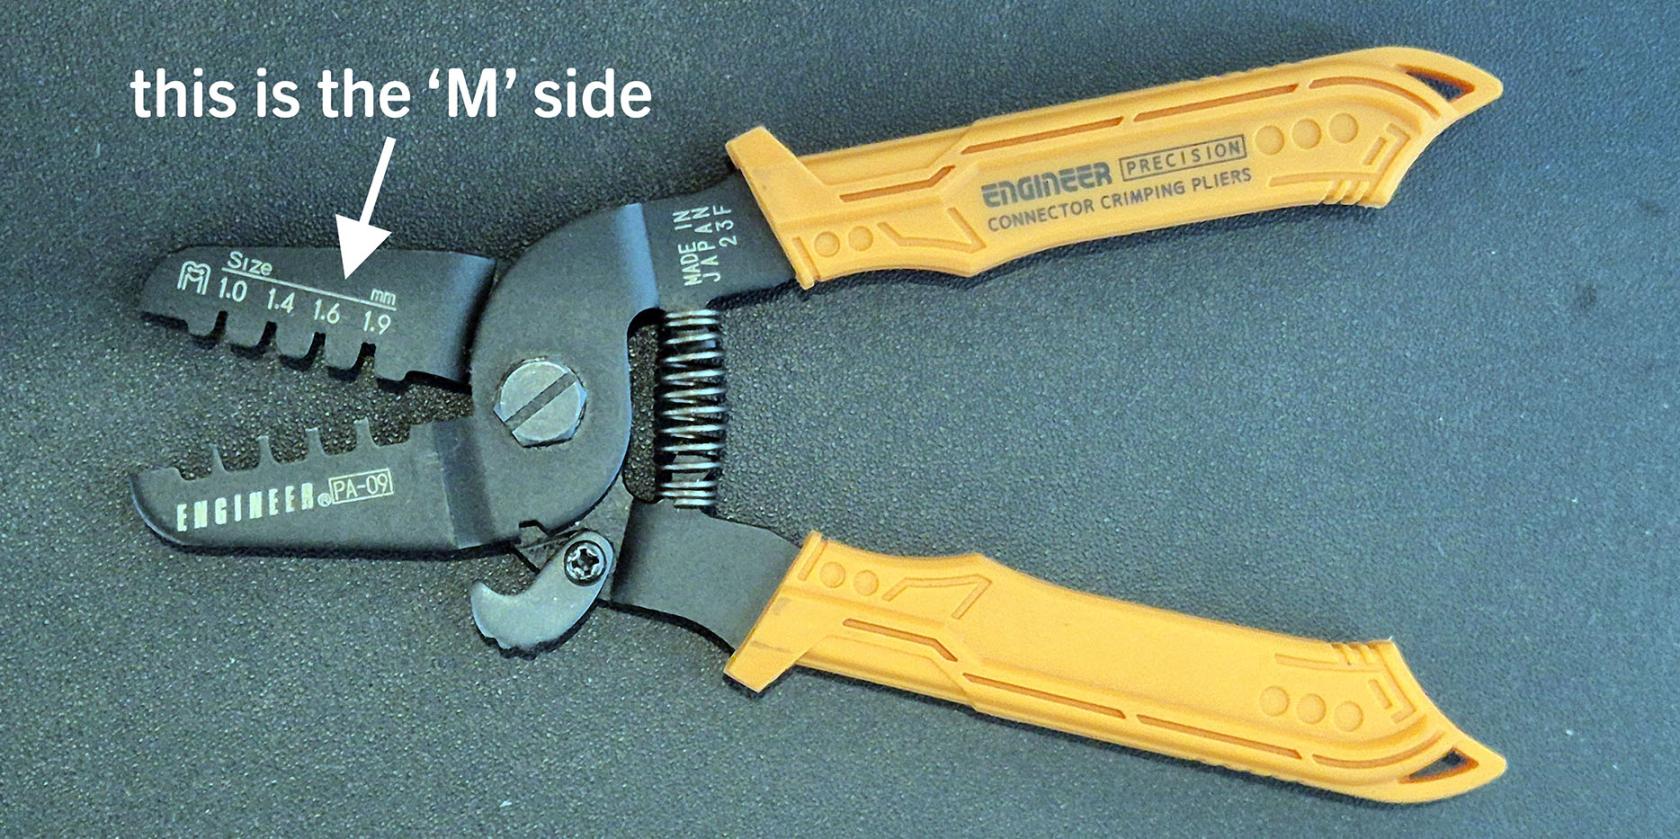
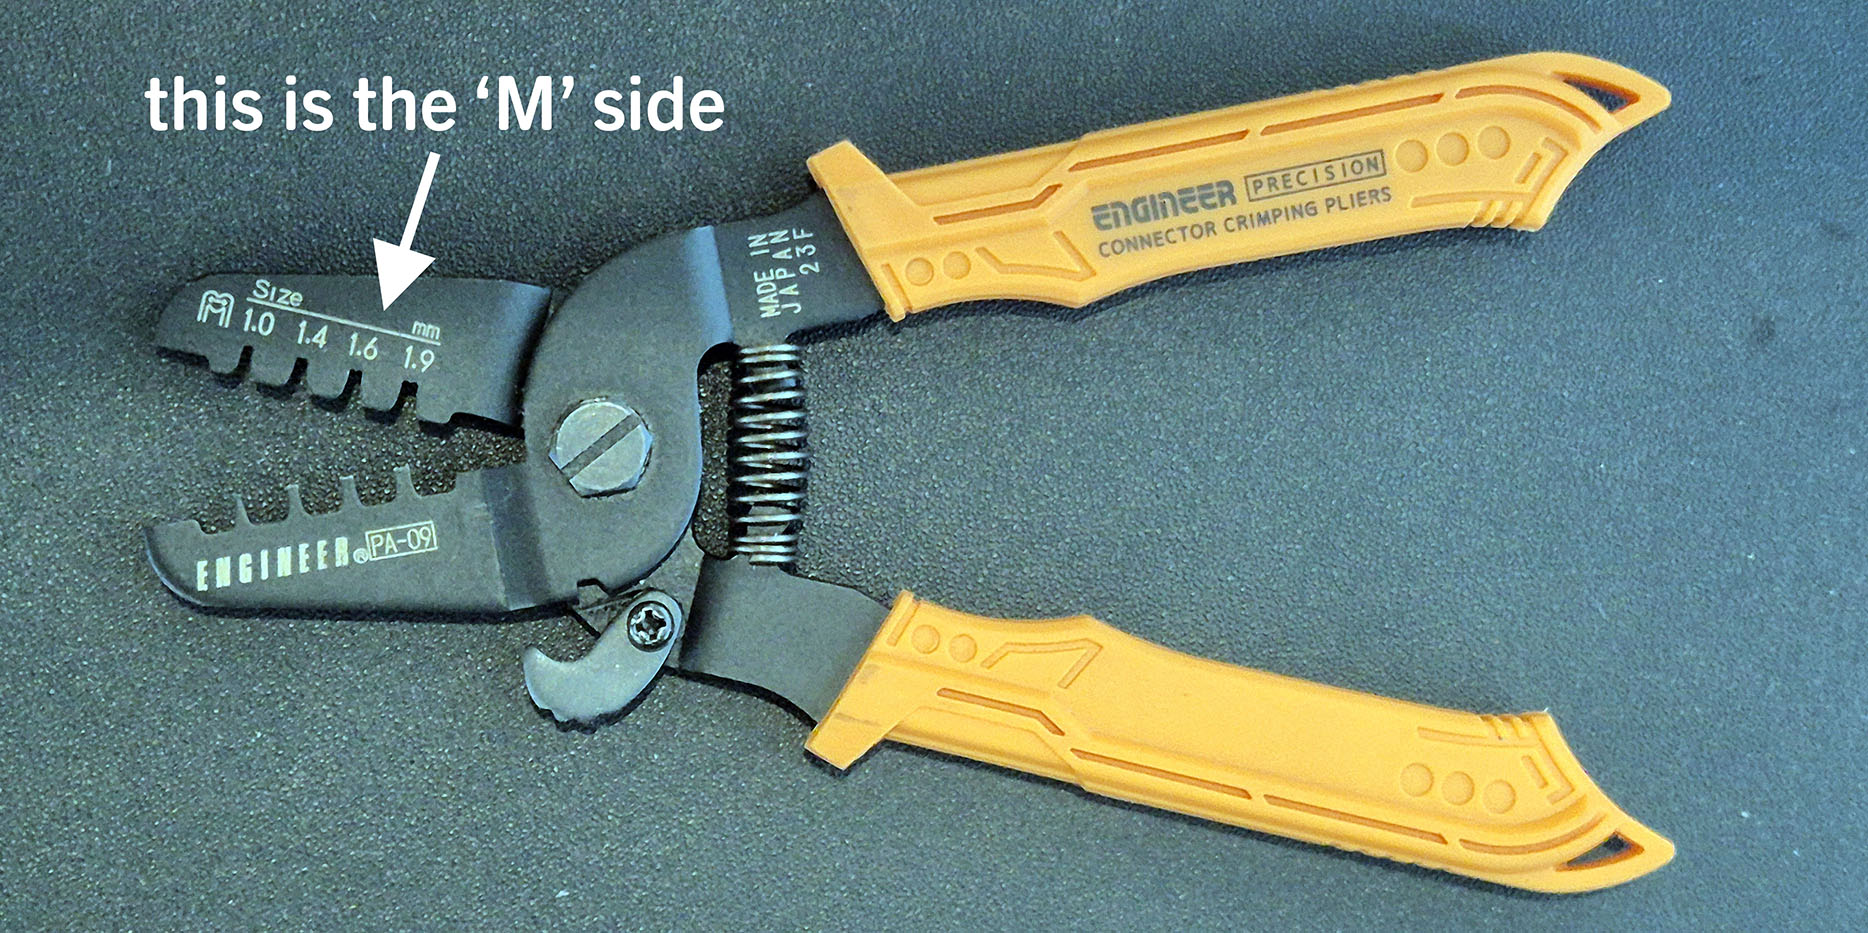
For crimping JST terminals, use the orange-handled crimpers. Note: there is a small locking catch on the side to keep them closed when not in use, you might need to flip this to open them!
-
The crimping tools for both JST and Dupont terminals have an 'M' shaped die, which the tool pushes the wings of the terminal into, folding them over the wire. Whereas the ratcheting crimp tool that is used for Dupont terminals crimps both sets of wings at once, these ones require you to do each set separately.
- Side note: it is possible to use the orange-handled crimpers to also crimp Dupont cables, but it is not possible to use the blue-handled ratcheting crimpers to do JST terminals as it crushes the box section at the end!!
-
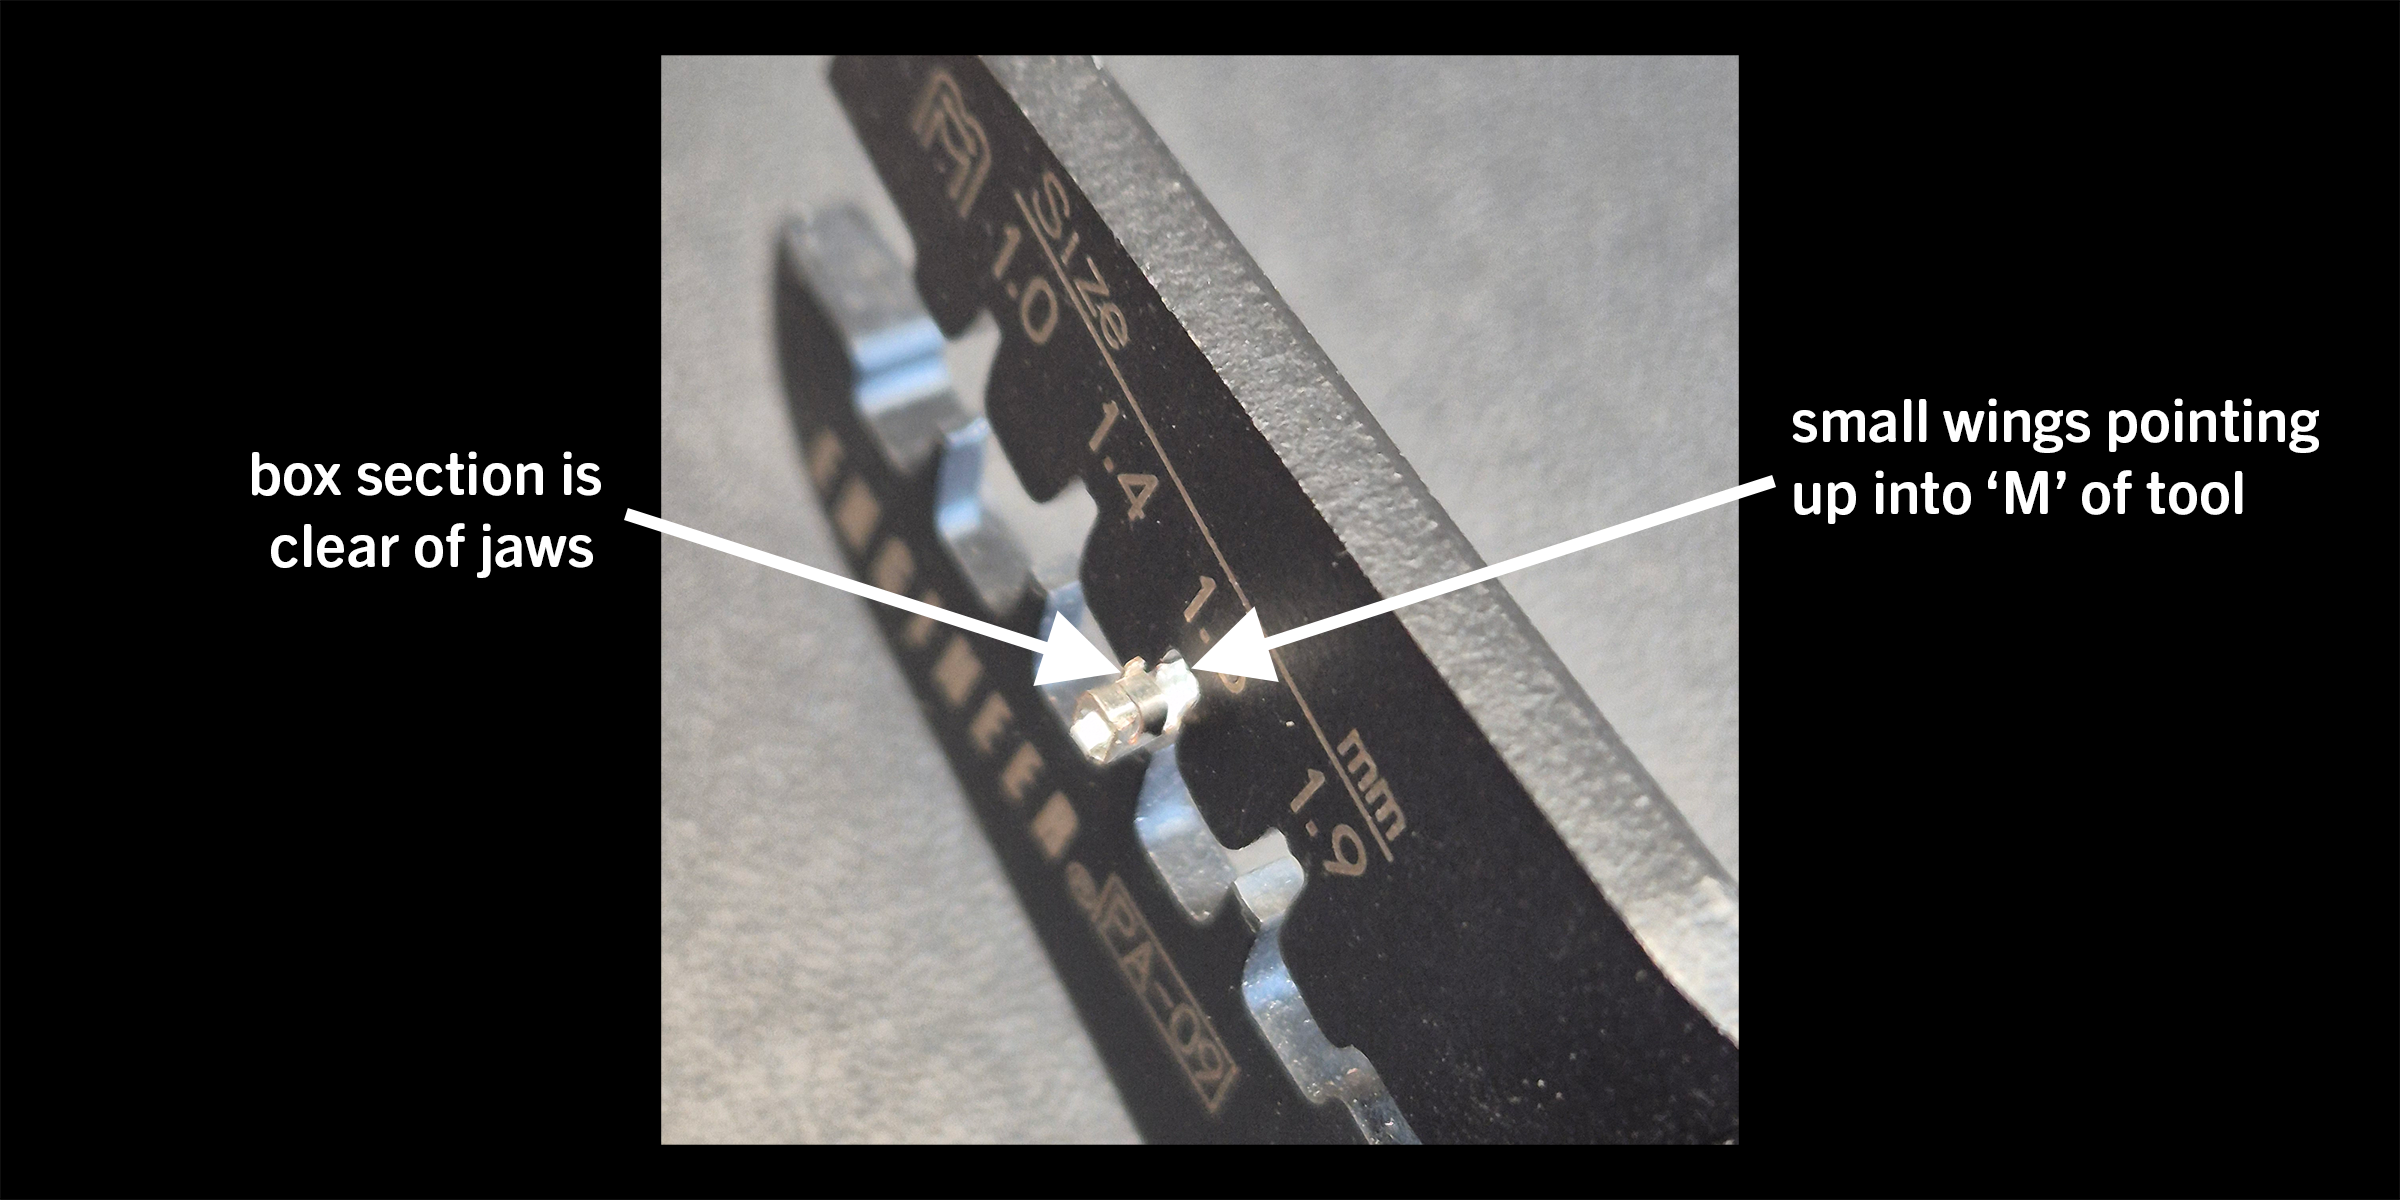
Start by crimping the smaller wings first. Insert the terminal (but not the wire) into the 1.6mm slot of the tool in the correct orientation
- the wings should be pointing upwards into the 'M' of the tool.
- if you are using wire thinner than 24AWG you may need to use a smaller slot
-
Carefully close the tool to gently hold the terminal in place (but don't crush it!)
-
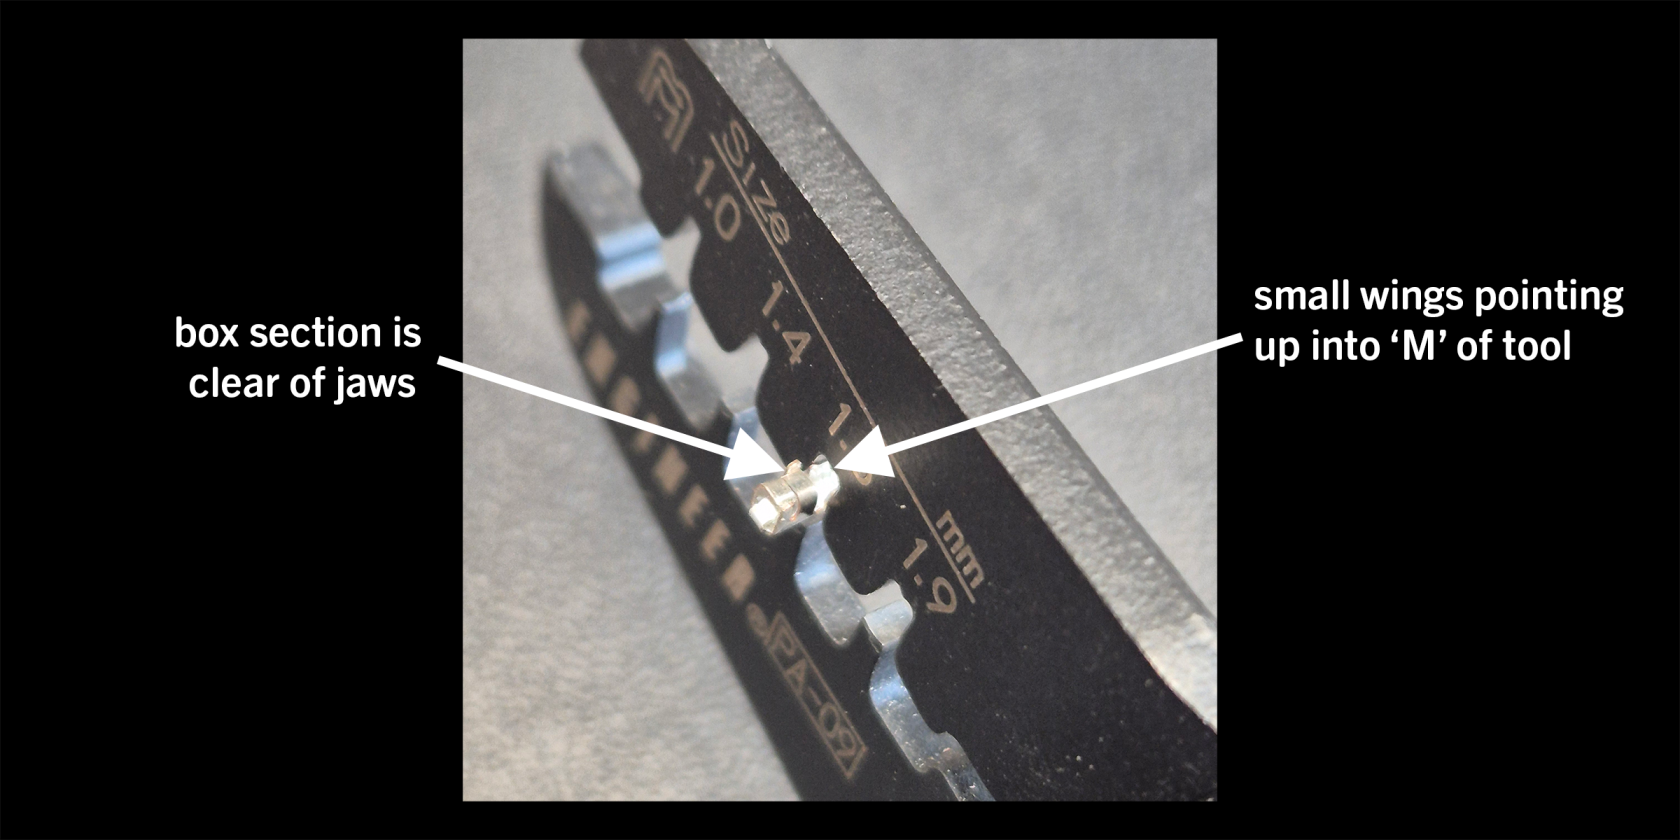
Check the alignment of the terminal:
- It is easy to crush the box section that the pin of a JST board socket inserts into!
- Check that this box section is clear and that only the small wings are in tool
-
It is time to insert the wire from the side of the tool with the big 'M'
- Carefully guide it in between the 'M' of the tool and the wings of the terminal from the other side of the tool
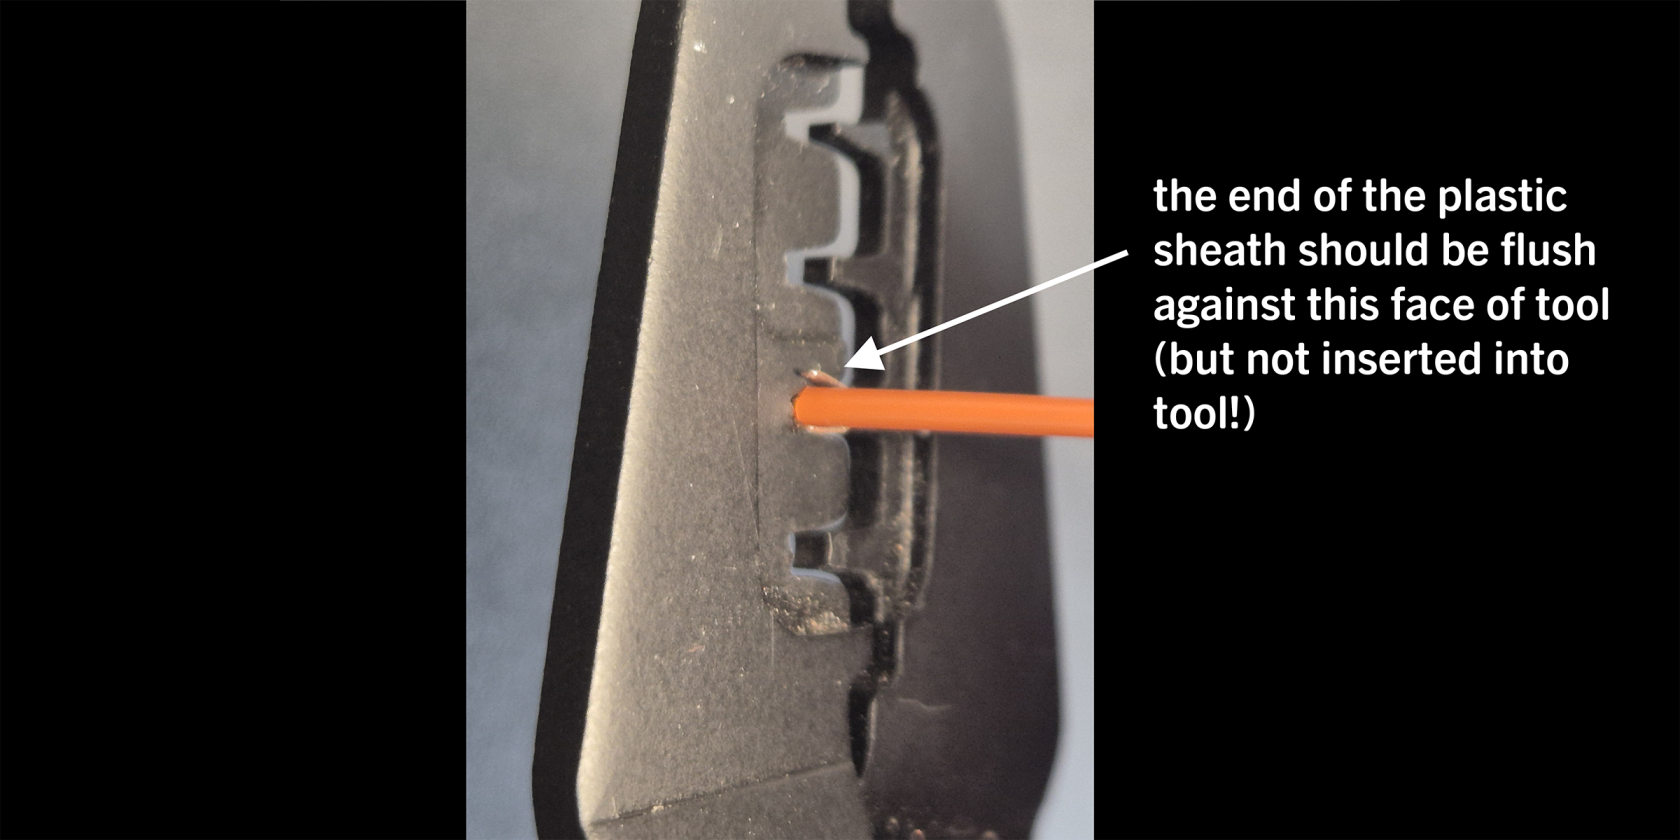
- Carefully guide it in between the 'M' of the tool and the wings of the terminal from the other side of the tool
-
Now check the alignment of the wire:
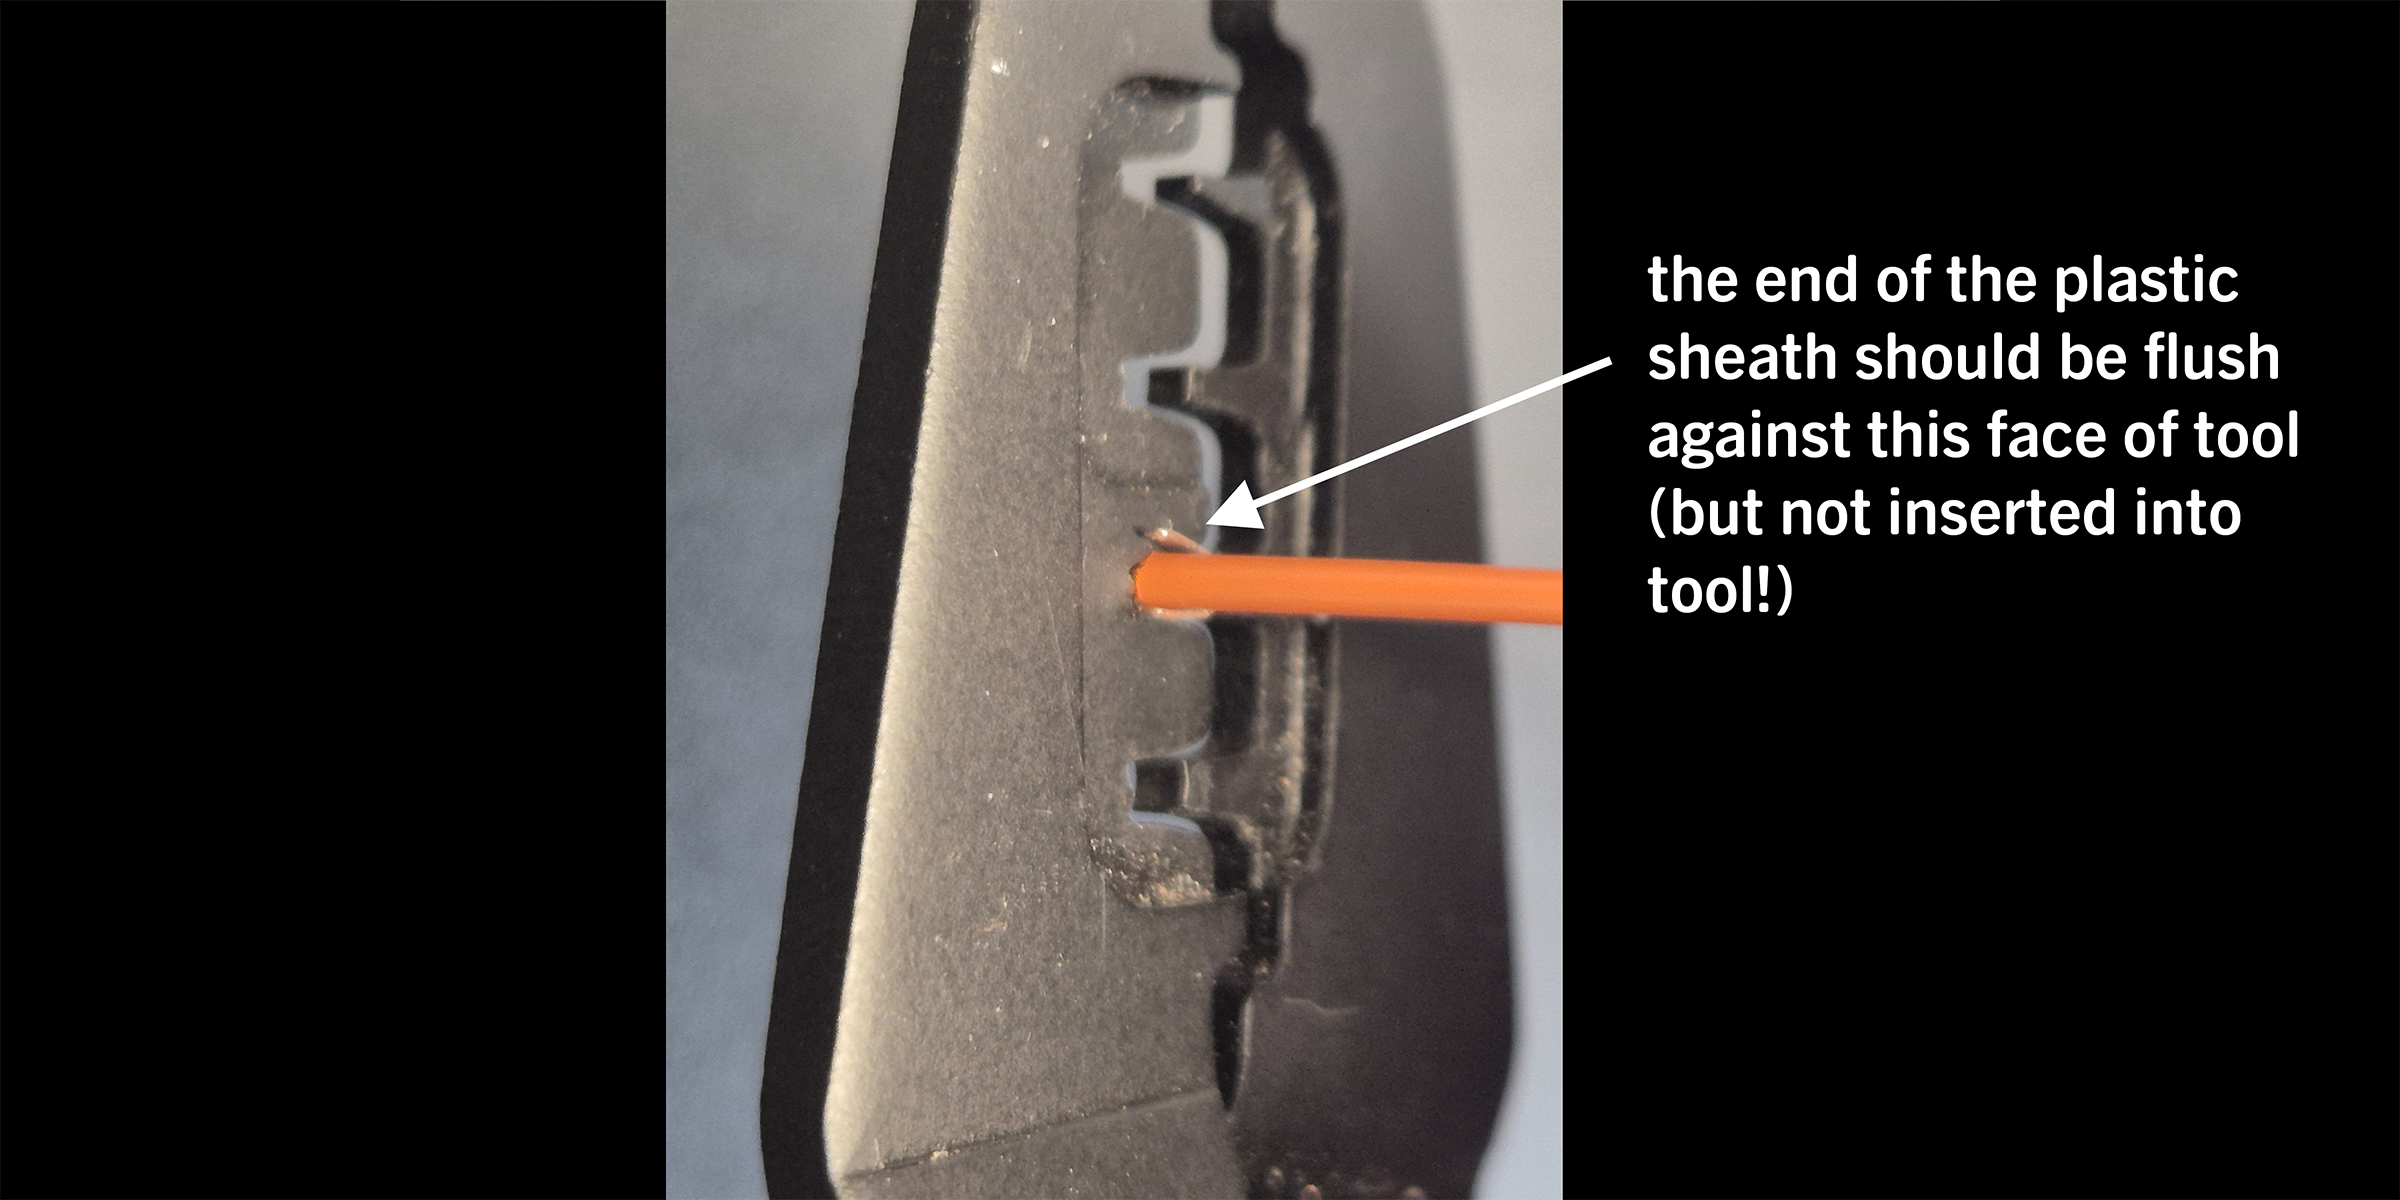
- This is a little trickier than dupont as the cable and terminal tend to obscure your view, ideally strip the wire correctly (see 'Preparing the cable' section)
- Are there strands of wire sticking out of the tool? If not, either the wire was not stripped correctly or the wire was improperly inserted or inserted too far
- Is the plastic sheath flush against the face of the tool? If not, either it is not fully inserted (and therefore bare wire will not get crimped) or the stripped wire is too long (and therefore the sheath will not get crimped in the next step)
- If the wire was stripped to the correct length, this means it is in exactly the right place. If the wire is not correctly stripped, go back to the 'Preparing the cable' section
-
Satisfied with the alignment? Okay! Fully close the crimps as far as they will go to crimp the wire
- This will take a bit of force, so give it a good squeeze!
- If you are struggling to get your hands around both handles of the tool, rest the lower handle on a workbench and push from the top handle
-
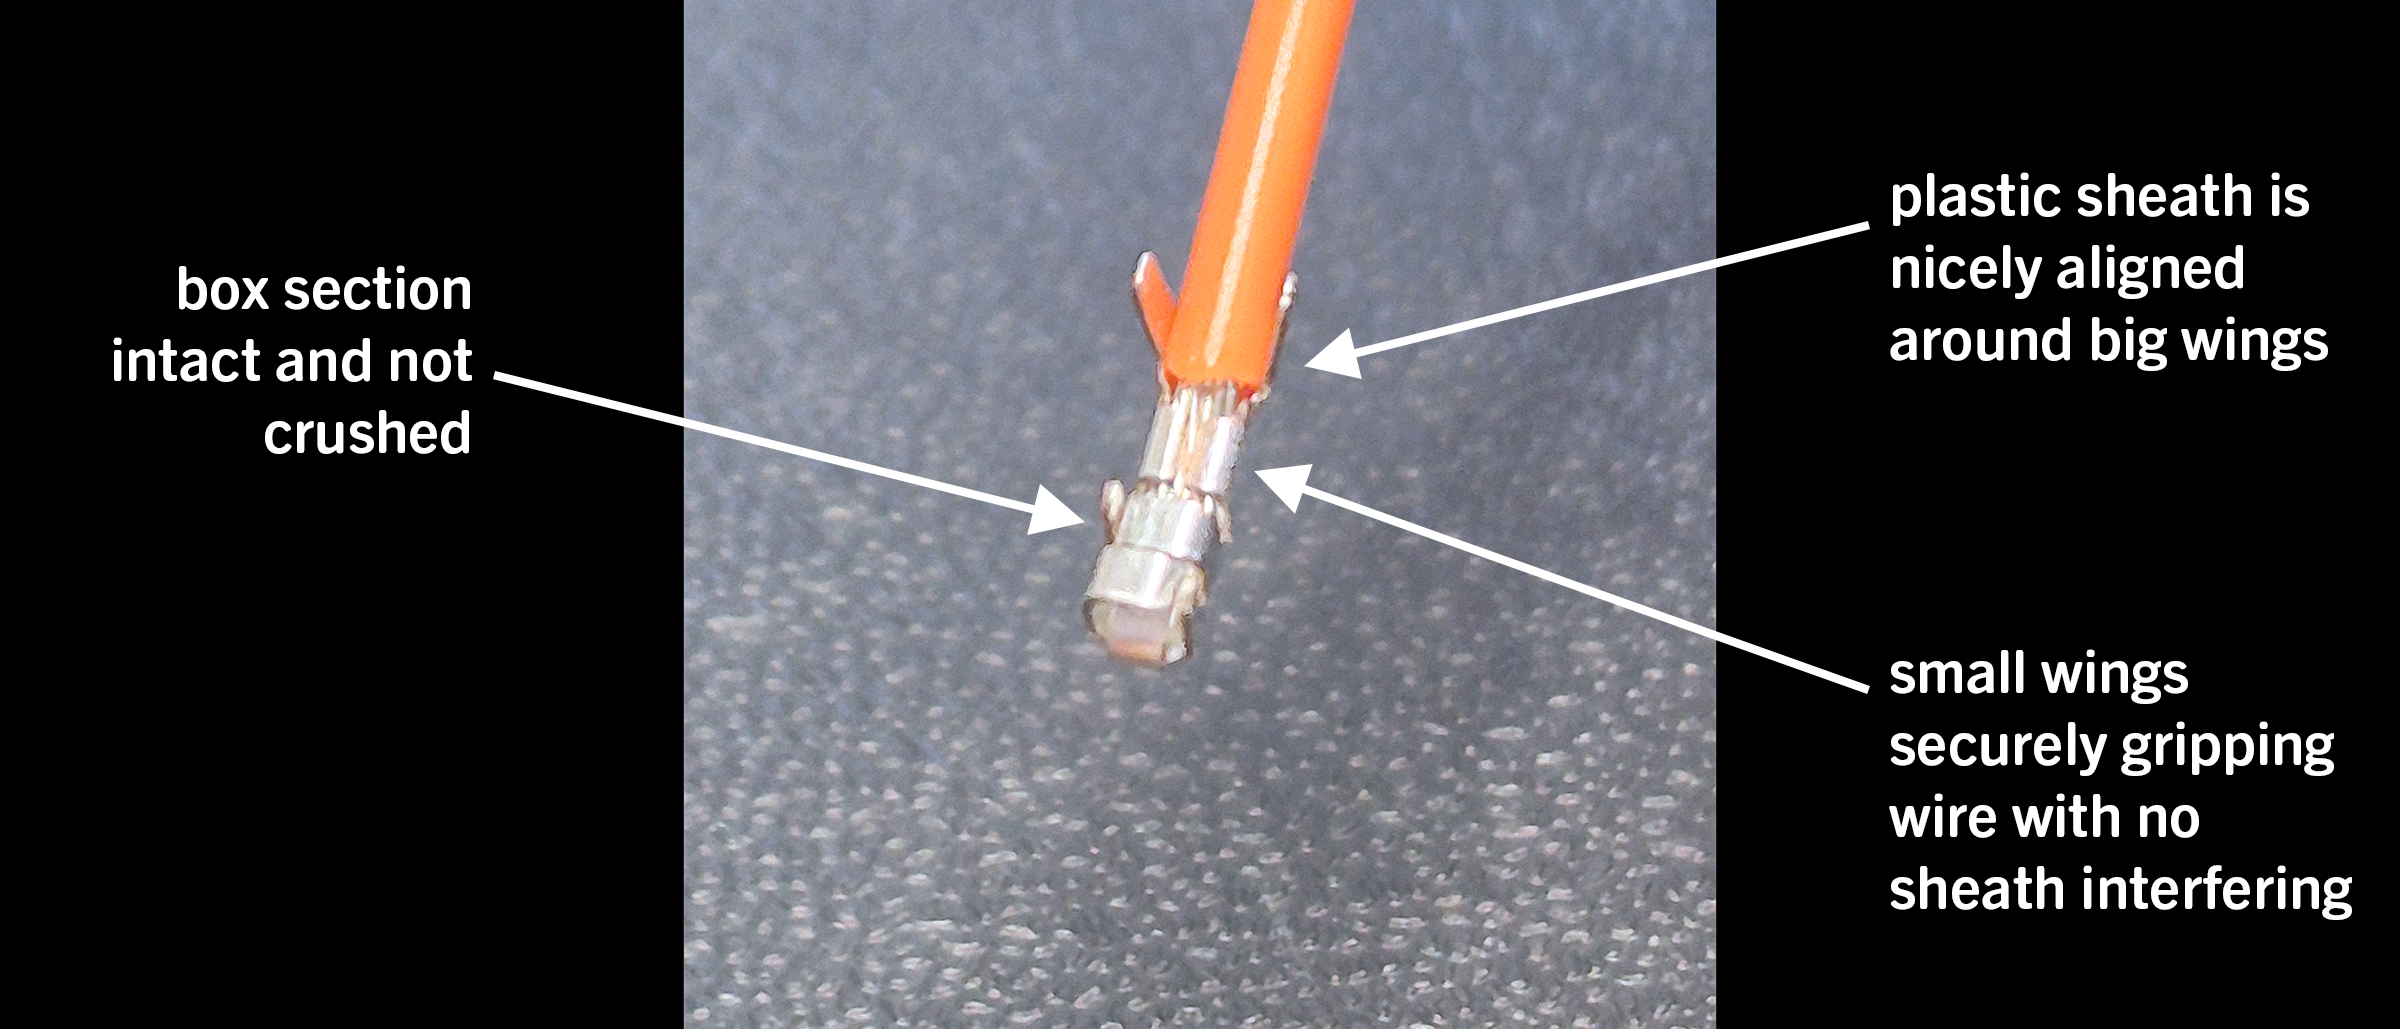
Remove the wire from the crimps and inspect your work, it should look like the image below:
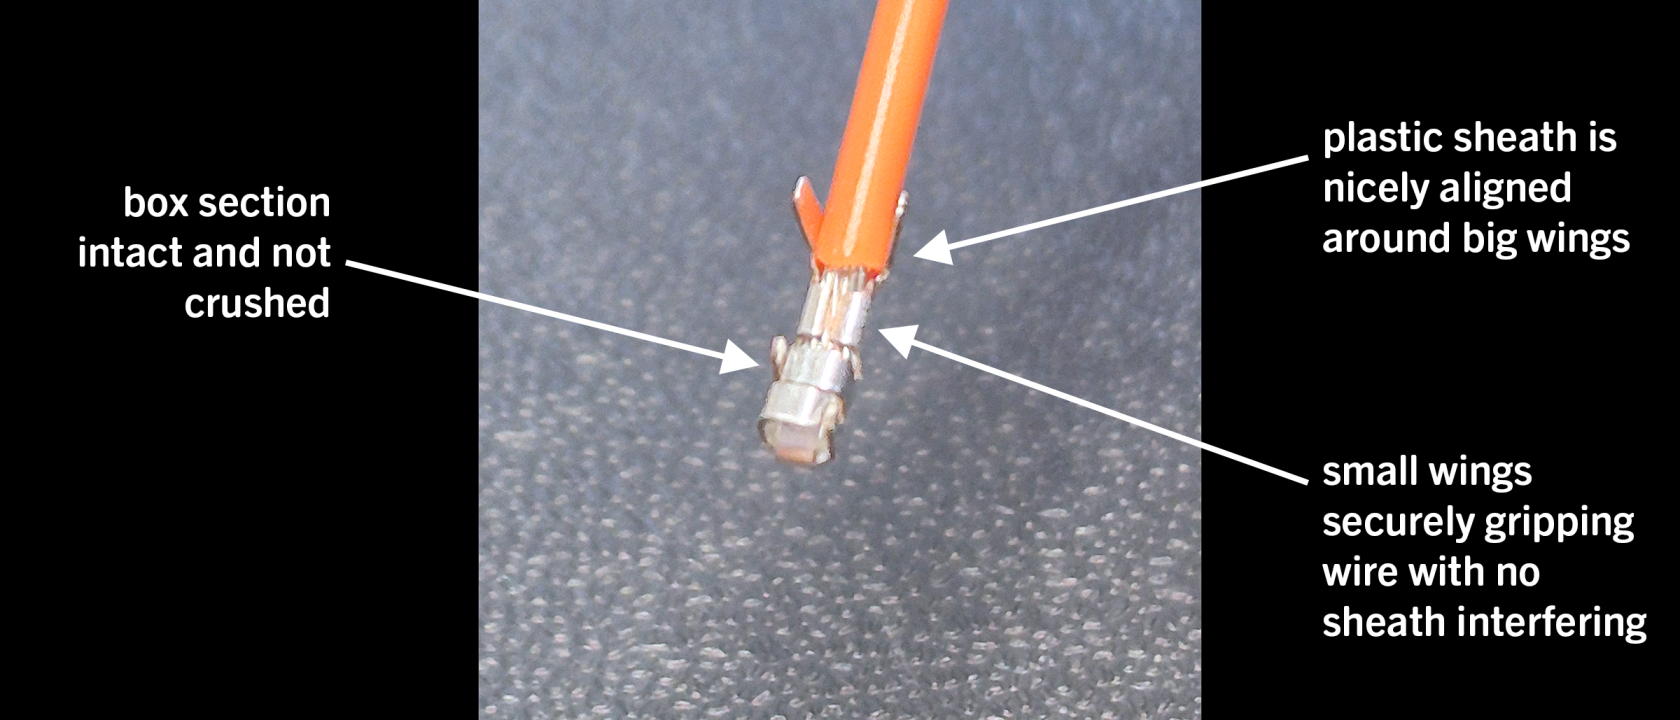
-
Looking good? Now repeat the process but with the big wings
-
Insert the big wings into the 1.9mm slot of the tool, ensuring correct orientation (wings pointing into 'M')
-
Check your alignment:
- there isn't much to check as your position is mostly set by the crimping of the small wings earlier
- just make sure that the big wings are fully inside the jaw of the tool and pointing the correct direction
-
Satisfied? Go for it! Crimp that down!
-
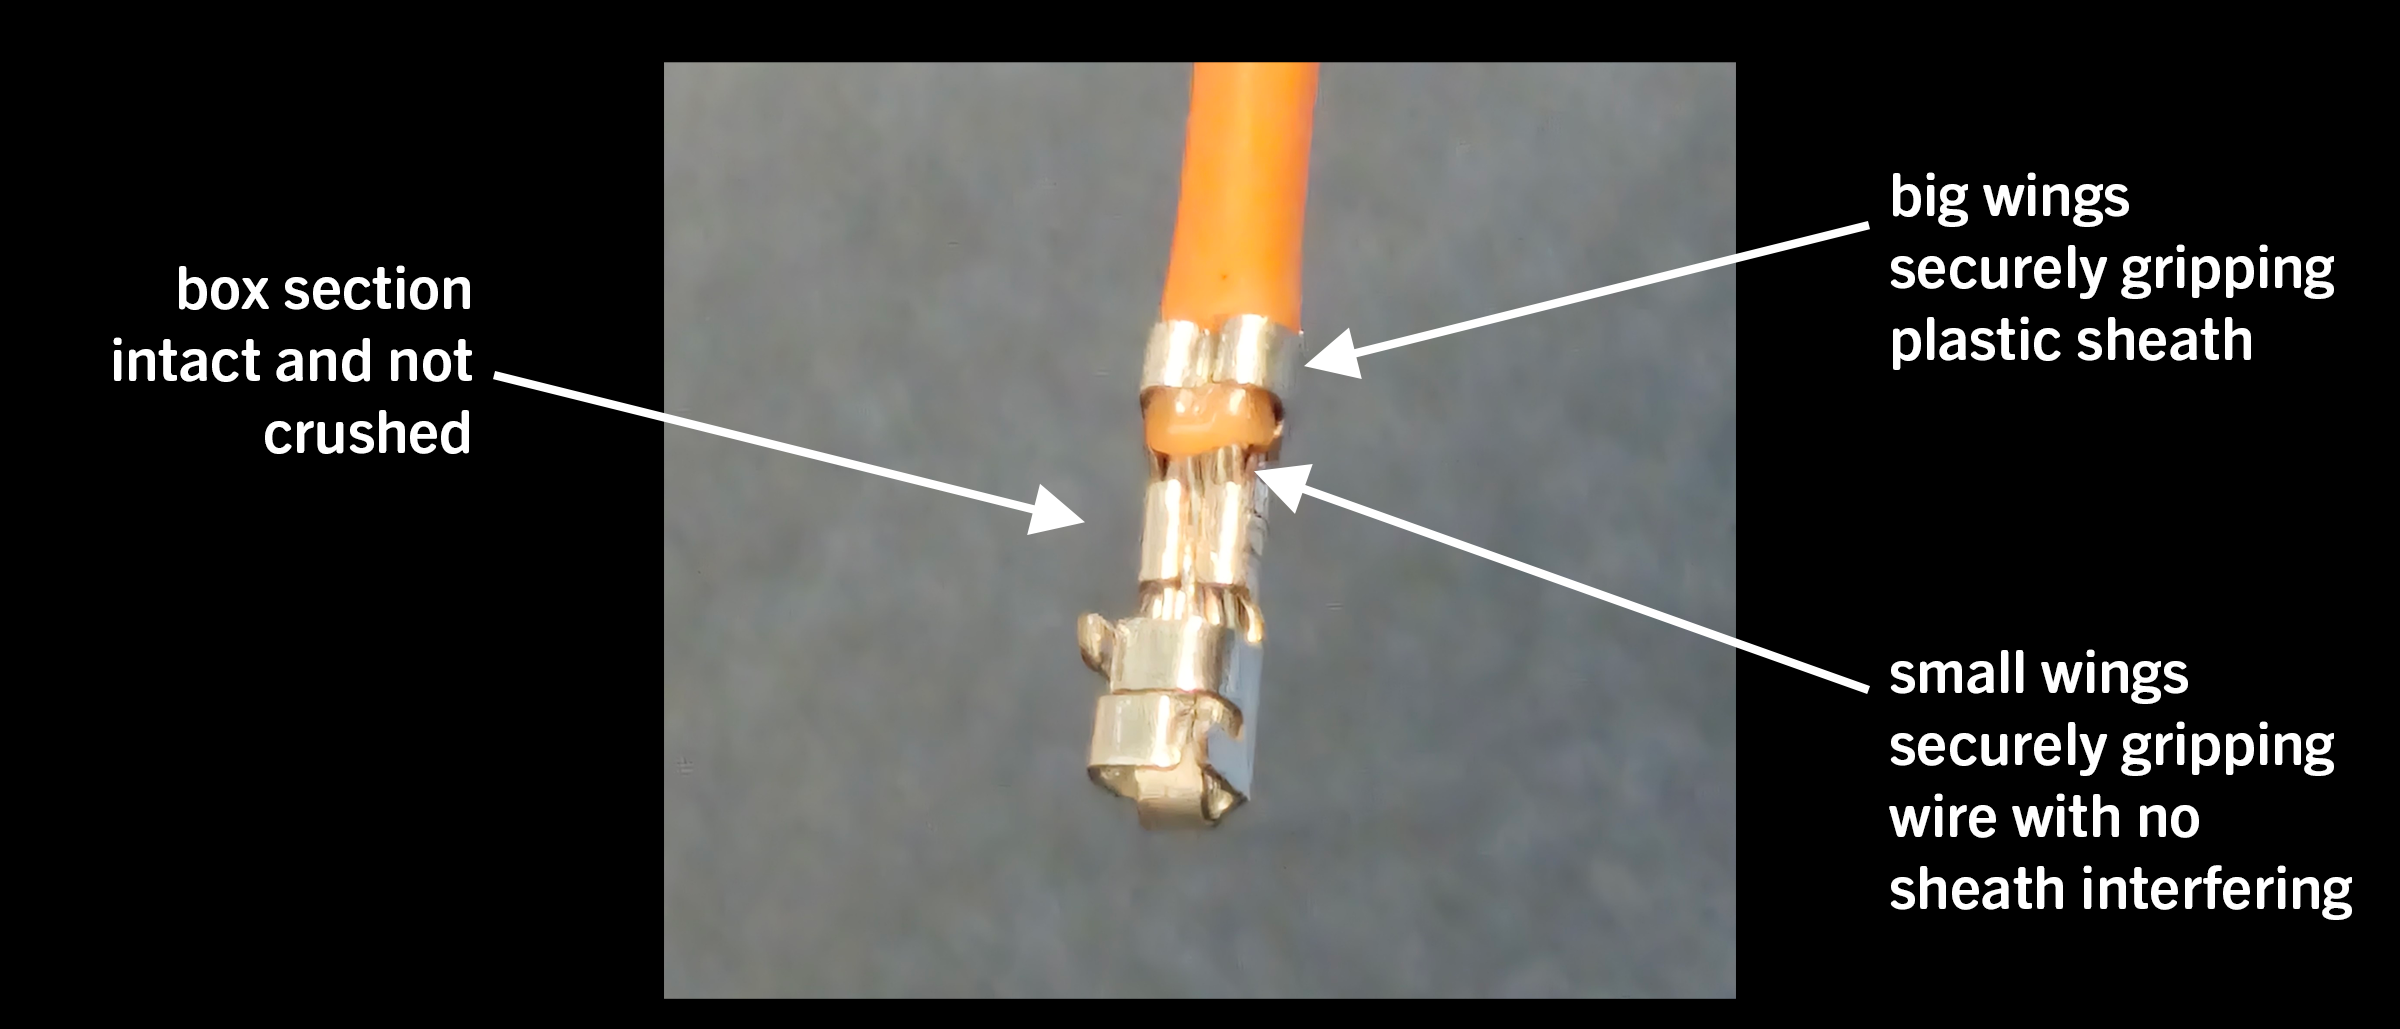
Inspect your work, it should look like the image below
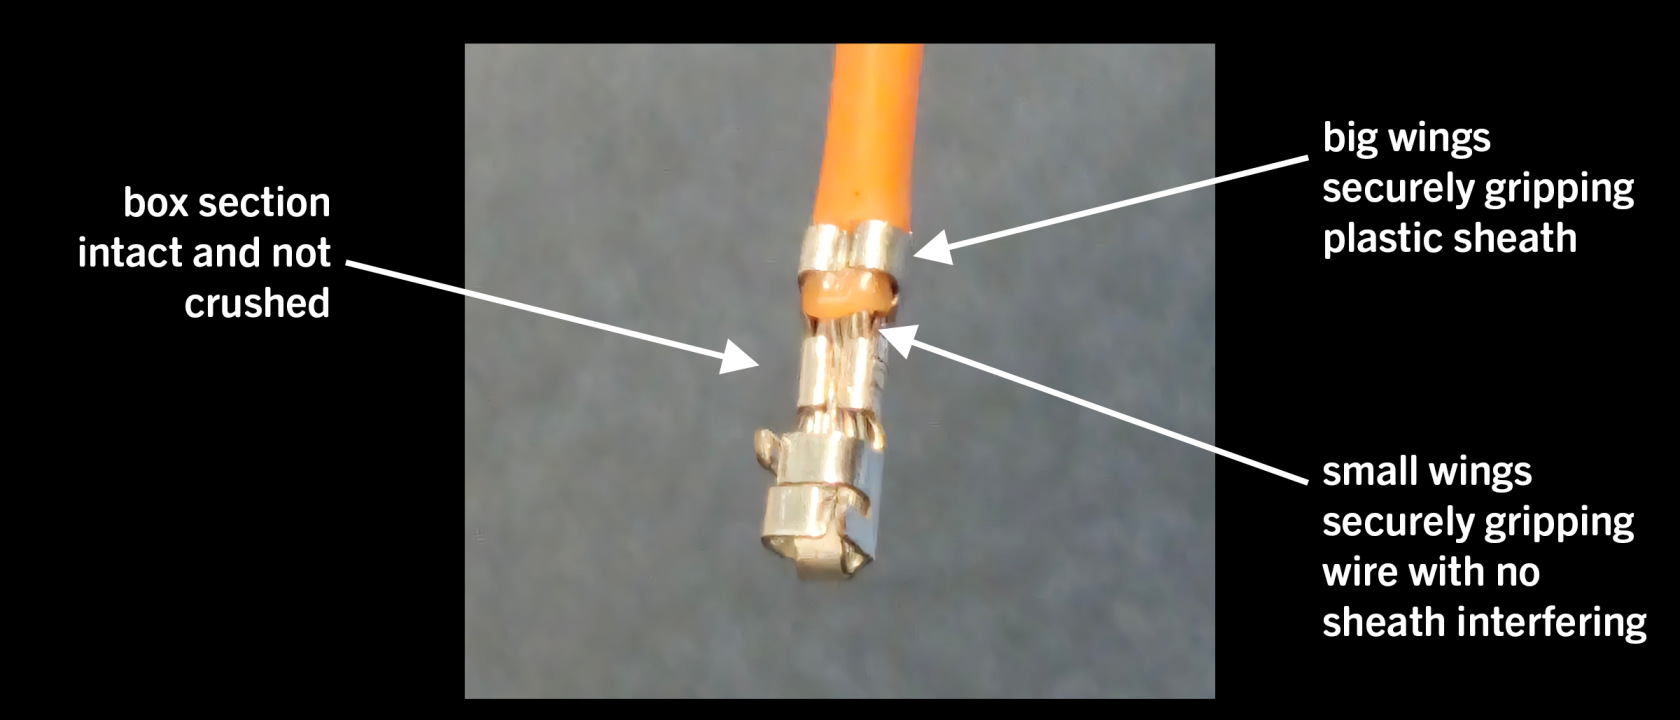
Inserting into the housing
The hard part is over, now the crimped wire just needs to be inserted into the housing!
- Select the housing with the number of points you need: could be just one, could be 8 or more!
- Align the cable and housing correctly
- Align the crimped wire so that the box section is oriented to the same side as the tab on the housing (the box will lock behind that tab to make the cable secure)
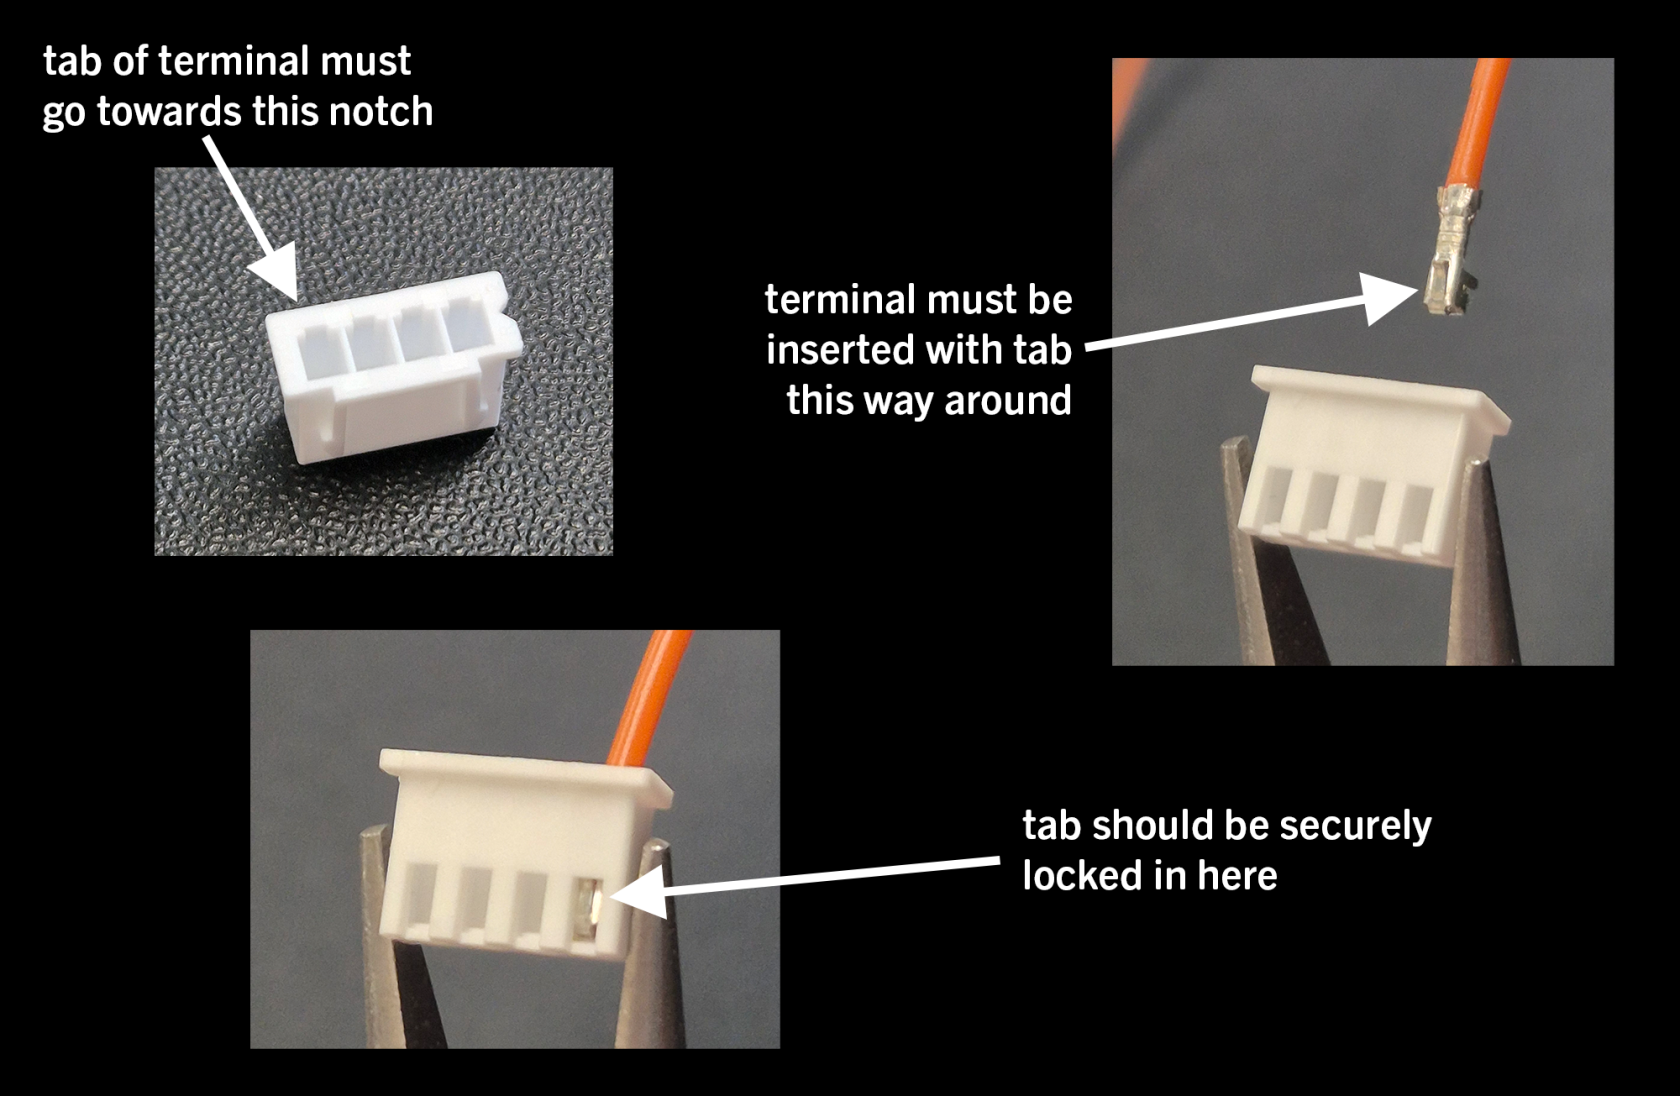
- Align the crimped wire so that the box section is oriented to the same side as the tab on the housing (the box will lock behind that tab to make the cable secure)
- Push the crimped wire into the housing until it clicks (the click is the tab locking behind the notch)
- Now give the wire a tug to make sure it stops against the tab and is secure and that is it! Your cable should look a little like the example below, lovely!
Conclusion
And it's as easy as that! Well, not really. Crimping cables can be fiddly, infuriating and sometimes it just doesn't want to co-operate with you at all. It can be a real pain sometimes.
But, like many things, it's all about practice. The more you do it, the easier it becomes, until you eventually don't need to think about it at all. Plus, the benefits of crimping custom cables for projects far outweighs the initial fiddly frustration. So keep practicing: it gets easier, we promise!
For those who are still having trouble, check out the troubleshooting steps below.
Troubleshooting badly made cables
- Box section is crushed: terminal wasn't correctly located in jaws of tool (see 'Crimping the wire' sections)
- Big wings aren't gripping plastic sheath: wire was stripped too short (see 'Preparing cable' sections) or wasn't inserted far enough into tool (see 'Crimping the wire' sections)
- Small wings are gripping the plastiic sheath not the bare wire or wire strands are sticking out all over the place: wire was stripped too long (see 'Preparing cable' section) or was inserted too far into tool (see 'Crimping the wire' sections)
- The terminal won't grip the wire: wire is too thin for this type of terminal or the terminal wasn't fully crimped down with tool