Using delta time: breaking free of delay() in Arduino programming!
The Limitations Of Arduino's delay() Function
If you've written any code for Arduino, or even just run an example sketch, then you've probably used or seen the delay() function. And it's really useful! But it has one major limitation: it is what is know as 'blocking' code.
What is a blocking function?
A piece of blocking code is any piece of code (or function) which causes execution of all other code following it to be 'blocked' until it has completed. In a way, this is the entire point of delay() but it quickly becomes a problem when you want more than one thing to happen over time. Let's explore this problem with the classic blink sketch:
int LED = 13; // define pin for our LED

void setup() {
  pinMode(LED, OUTPUT);
}

void loop() {
  // turn on LED
  digitalWrite(LED, HIGH);
  delay(500); // wait 500ms

  // turn off LED
  digitalWrite(LED, LOW);
  delay(500); // wait 500ms
}
Nothing special to see here. We set up our pin as an output, the in loop() we send the pin HIGH for 500ms, then LOW for 500ms. But what if we now want to have another LED turning on and off every 250ms? Well that's not that bad:
int LED_A = 13; // define pin for our first LED
int LED_B = 12; // define pin for our second LED

void setup() {
  pinMode(LED_A, OUTPUT);
  pinMode(LED_B, OUTPUT);
}

void loop() {
  // turn on LED A and B
  digitalWrite(LED_A, HIGH);
  digitalWrite(LED_B, HIGH);
  delay(250); // wait 250ms

  // turn off LED B
  digitalWrite(LED_B, LOW);
  delay(250); // wait 250ms

  // now turn off LED A and turn on LED B
  digitalWrite(LED_A, LOW);
  digitalWrite(LED_B, HIGH);
  delay(250); // wait another 250ms *sigh*

  // now turn off LED B
  digitalWrite(LED_B, LOW);
  delay(250; // aaand wait another 250ms...
}
But you can probably already see this is getting a little silly, our code has nearly doubled in length. And what if the timing of the second blinking LED isn't conveniently half the timing of the first? Or what if we want the timing of one blinking LED to change according to a sensor input, how the heck would that work?! Hold on, we probably need to read that sensor pretty quickly, like every few milliseconds, which means our loop needs to run as fast as possible...what are we going to do about that?!?!
Oh no....this isn't good.
The Non-blocking Way: Delta Time!
Don't worry, we can solve all of the problems above using delta time!
What is delta time?
First, let's understand what delta is: In maths a delta value is just the difference between two numbers. So for example, the delta of 2 and 4 is 2, or the delta of 100 and 25 is 75.
When it comes to programming, delta time is the difference between when we started running a loop() and when we completed running a loop(). Why would we want to know this? Well, instead of just stopping the loop completely when we want something to happen for a certain period of time, we can just create a variable and increase it by delta time (this will usually only be a couple of milliseconds) to it every loop() until it reaches the desired time, then do whatever we want to do, set the variable to 0 and start counting up again. This leaves loop() free to run as fast as it likes, whilst preserving our ability to have things happen at different intervals. Perfect!
If it's still not clear what I'm talking about, look at this example:
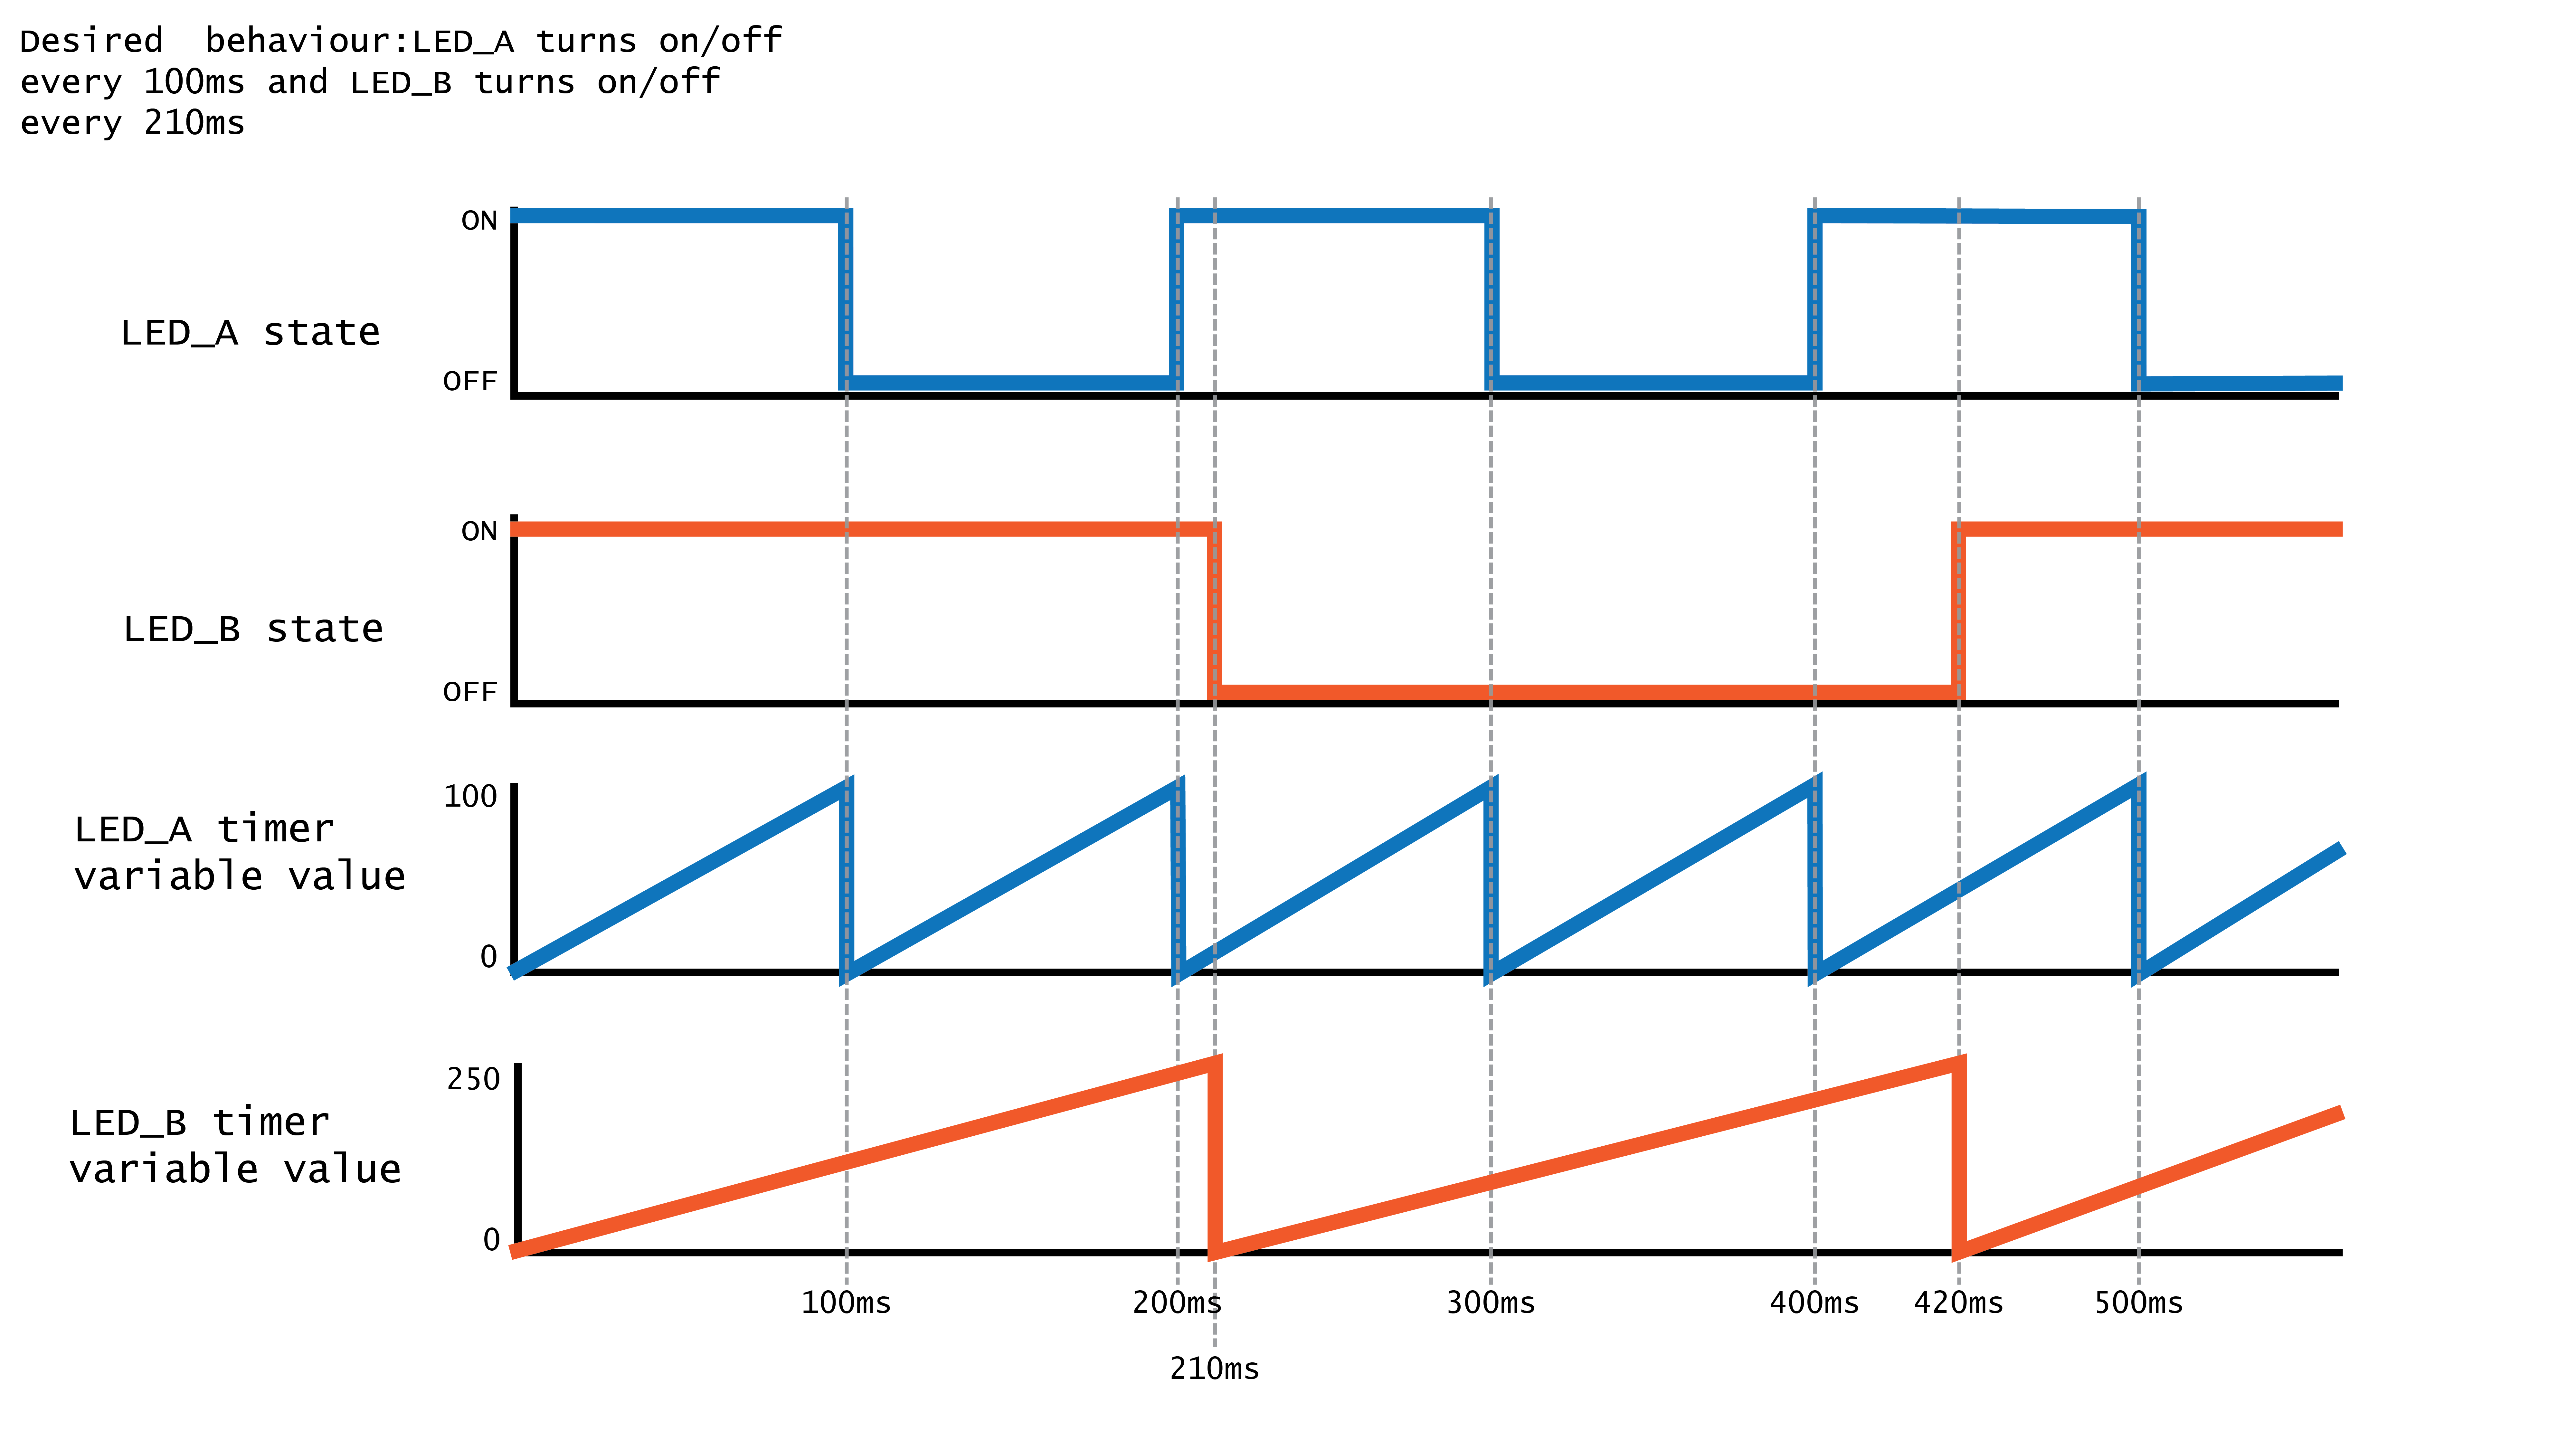
As the program runs, and therefore the loop, this sequence unfolds:
- we increment both LED timer variables by delta time (this happens every loop)
- LED_A timer reaches its target (100ms) quicker than LED_B timer. We catch that with an
ifstatement, turn LED_A on and reset timer to 0. LED_B timer has not been reset so it continues increasing. - Next, LED_A timer once again reaches its target (100ms) so we catch that again, reset the timer and turn the LED off instead. Meanwhile, LED_B timer still hasn't reached its target so we keep going.
- LED_B timer reaches its target, so we catch it with an
ifstatement, turn on LED_B and reset timer to 0. LED_A hasn't reached its target so it continues increasing.
Hopefully, you can see that no matter what the desired intervals of our LED switching, we can easily change the target of LED_A timer or LED_B timer without them interfering with each other! Nice!
The delta time code pattern
Okay, so here's how to actually calculate delta time in an Arduino program. Read the comments carefully to understand what is going on.
// declare 2 variables, one to store delta time (dt)
// and one to store what the program run-time was the last time we checked
unsigned long dt;
unsigned long timeLastTimeWeChecked; // this is uneccesarily verbose, you will usually see the variable called something like lastMs

// no delta time stuff happens in setup
void setup() {
// do setup stuff for whatever our program should be doing
}

void loop() {
// check how long the program has been running (millis() returns this value)
unsigned long timeRightNow = millis();

// now we can get the delta (AKA the time it took to process the last loop) by subtracting the run-time from the last time we checked from the current run-time
dt = timeRightNow - timeLastTimeWeChecked;

// now we have calculated delta time, we can store timeRightNow in timeLastTimeWeChecked ready to be used by the next run through the loop
timeLastTimeWeChecked = timeRightNow;

// now we do a bunch of stuff in our loop and time passes...

// when we get to the next run through the loop, millis() will have increased but timeLastTimeWeChecked will still be the same. We'll once again calculate the difference between those two numbers and get delta time again! And the cycle continues...!
}
As you can hopefully see, this gives us a powerful variable called dt which we can use to increment various timers and have all kinds of different things happening all at once!
A delta time example
Let's look at how we can implement our nightmare situation from the start of this post with delta time and see how much easier it will be. As a reminder we want the following things to happen:
- the first LED should blink at a constant rate of 500ms
- the second LED should blink at a different rate
- the speed of the second LED should be varied by the input from a sensor
- we will just use a potentiometer as our 'sensor' for simplicity
So then our schematic would look like this:
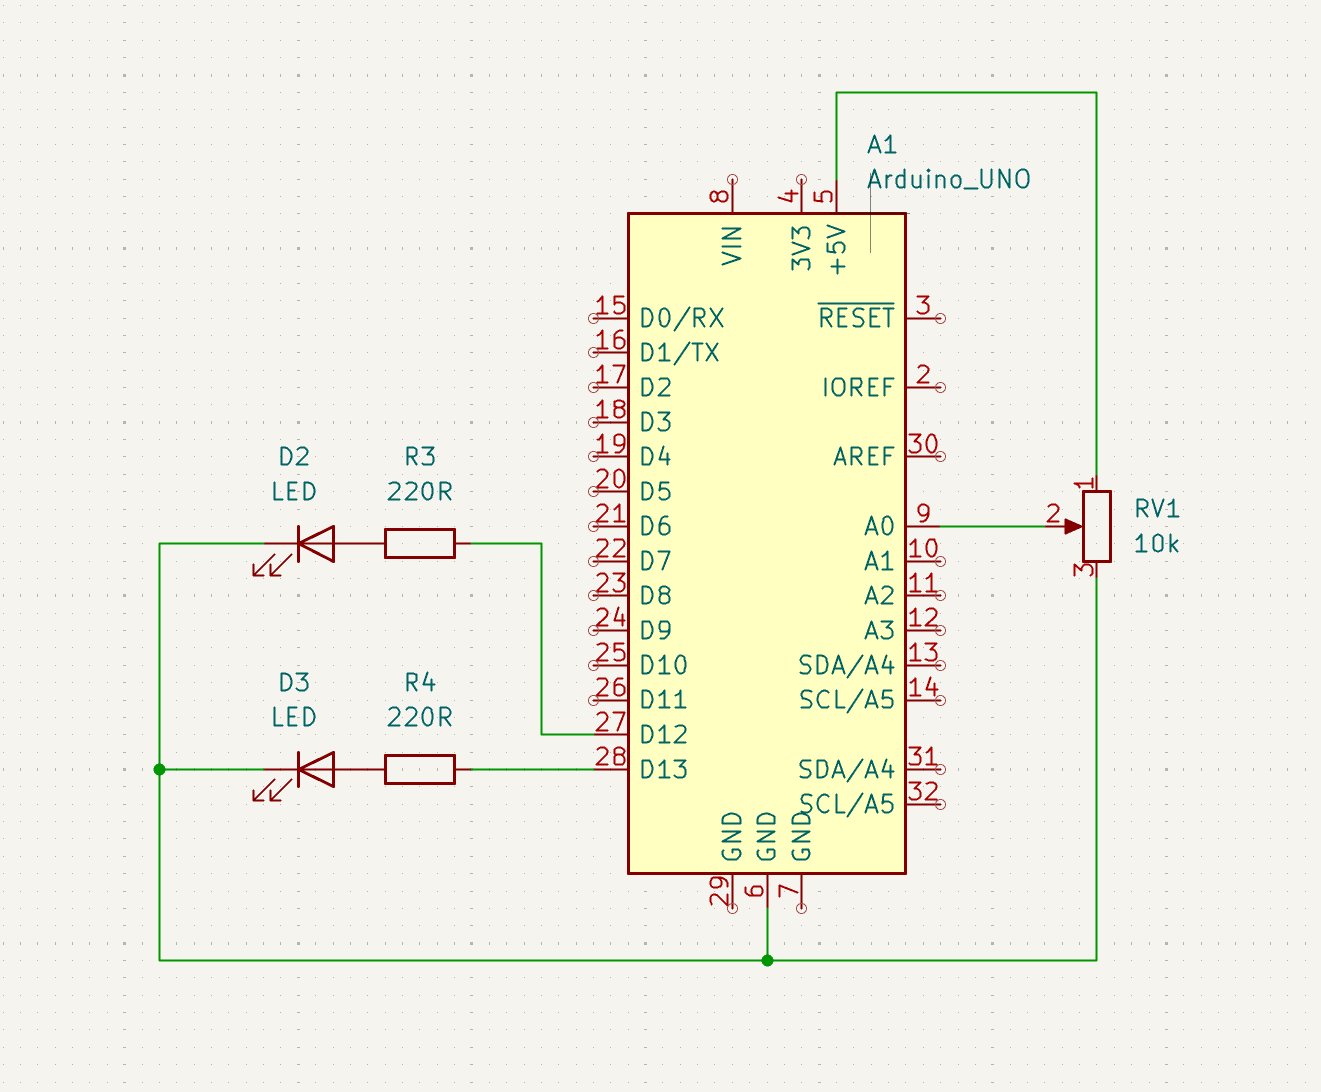
Great, let's write some code. Again, read the comments carefully to see what is going on.
int LED_A = 13; // define pin for our first LED
int LED_B = 12; // define pin for our second LED
int POT = A0; // define pin for potentiometer

// declare 2 variables, one to store delta time (dt)
// and one to store what the program run-time was the last time we checked
unsigned long dt;
unsigned long lastMs;

// declare 2 timer variables, one for each LED
unsigned long ledTimerA;
unsigned long ledTimerB;

// declare 2 bools to track our states
bool ledStateA;
bool ledStateB;

void setup() {
  // set LEDs as outputs
  pinMode(LED_A, OUTPUT);
  pinMode(LED_B, OUTPUT);
}

void loop() {
  // calculate delta time
  unsigned long now = millis();
  dt = now - lastMs;
  lastMs = now;

  // increment any timers we have running
  ledTimerA += dt;
  ledTimerB += dt;

  // read our potentiometer
  int reading = analogRead(POT);
  // map reading to a reasonable range for our blink interval
  int interval = map(reading, 0, 1023, 20, 800);

  // check if timer A has reached 500ms yet
  if(ledTimerA > 500) {
    // if it has, set our led
    digitalWrite(LED_A, ledStateA);
    // flip state for next time
    ledStateA = !ledStateA;
    // reset our timer variable
    ledTimerA = 0;
  }

  // check if timer B has reached the desired interval, as set by our pot reading
  if(ledTimerB > interval) {
    // if it has, set our led
    digitalWrite(LED_B, ledStateB);
    // flip state for next time
    ledStateB = !ledStateB;
    // reset our timer variable
    ledTimerB = 0;
  }
}
And that is it! As you can hopefully see, we have code that is now:
- easier to write
- no dividing up
delay()calls - no doing mental gymnastics to figure out where to put them and how long they should be
- no dividing up
- easier to read
- when we are reading and debugging our code, we can easily isolate what
LED_Ais doing from whatLED_BandPOTare doing
- when we are reading and debugging our code, we can easily isolate what
- easily scalable (this is a huge benefit of using delta time and timers)
- we can easily keep adding timers and behaviours without having to worry too much about it interfering with what is already happening in our program
- we only have to calculate delta time once, but we can use it everywhere in our program
That's about all there is to say. Delta time is a hugely powerful code pattern which is used in all kinds of programs where things are happening over time. Now you know about it, you will likely see it popping up everywhere!